Koshin KV-EX50TH85 User manual


1 2
‒CAUTION FOR SAFETY
‒NAME OF EACH PART AND SPECIFICATION
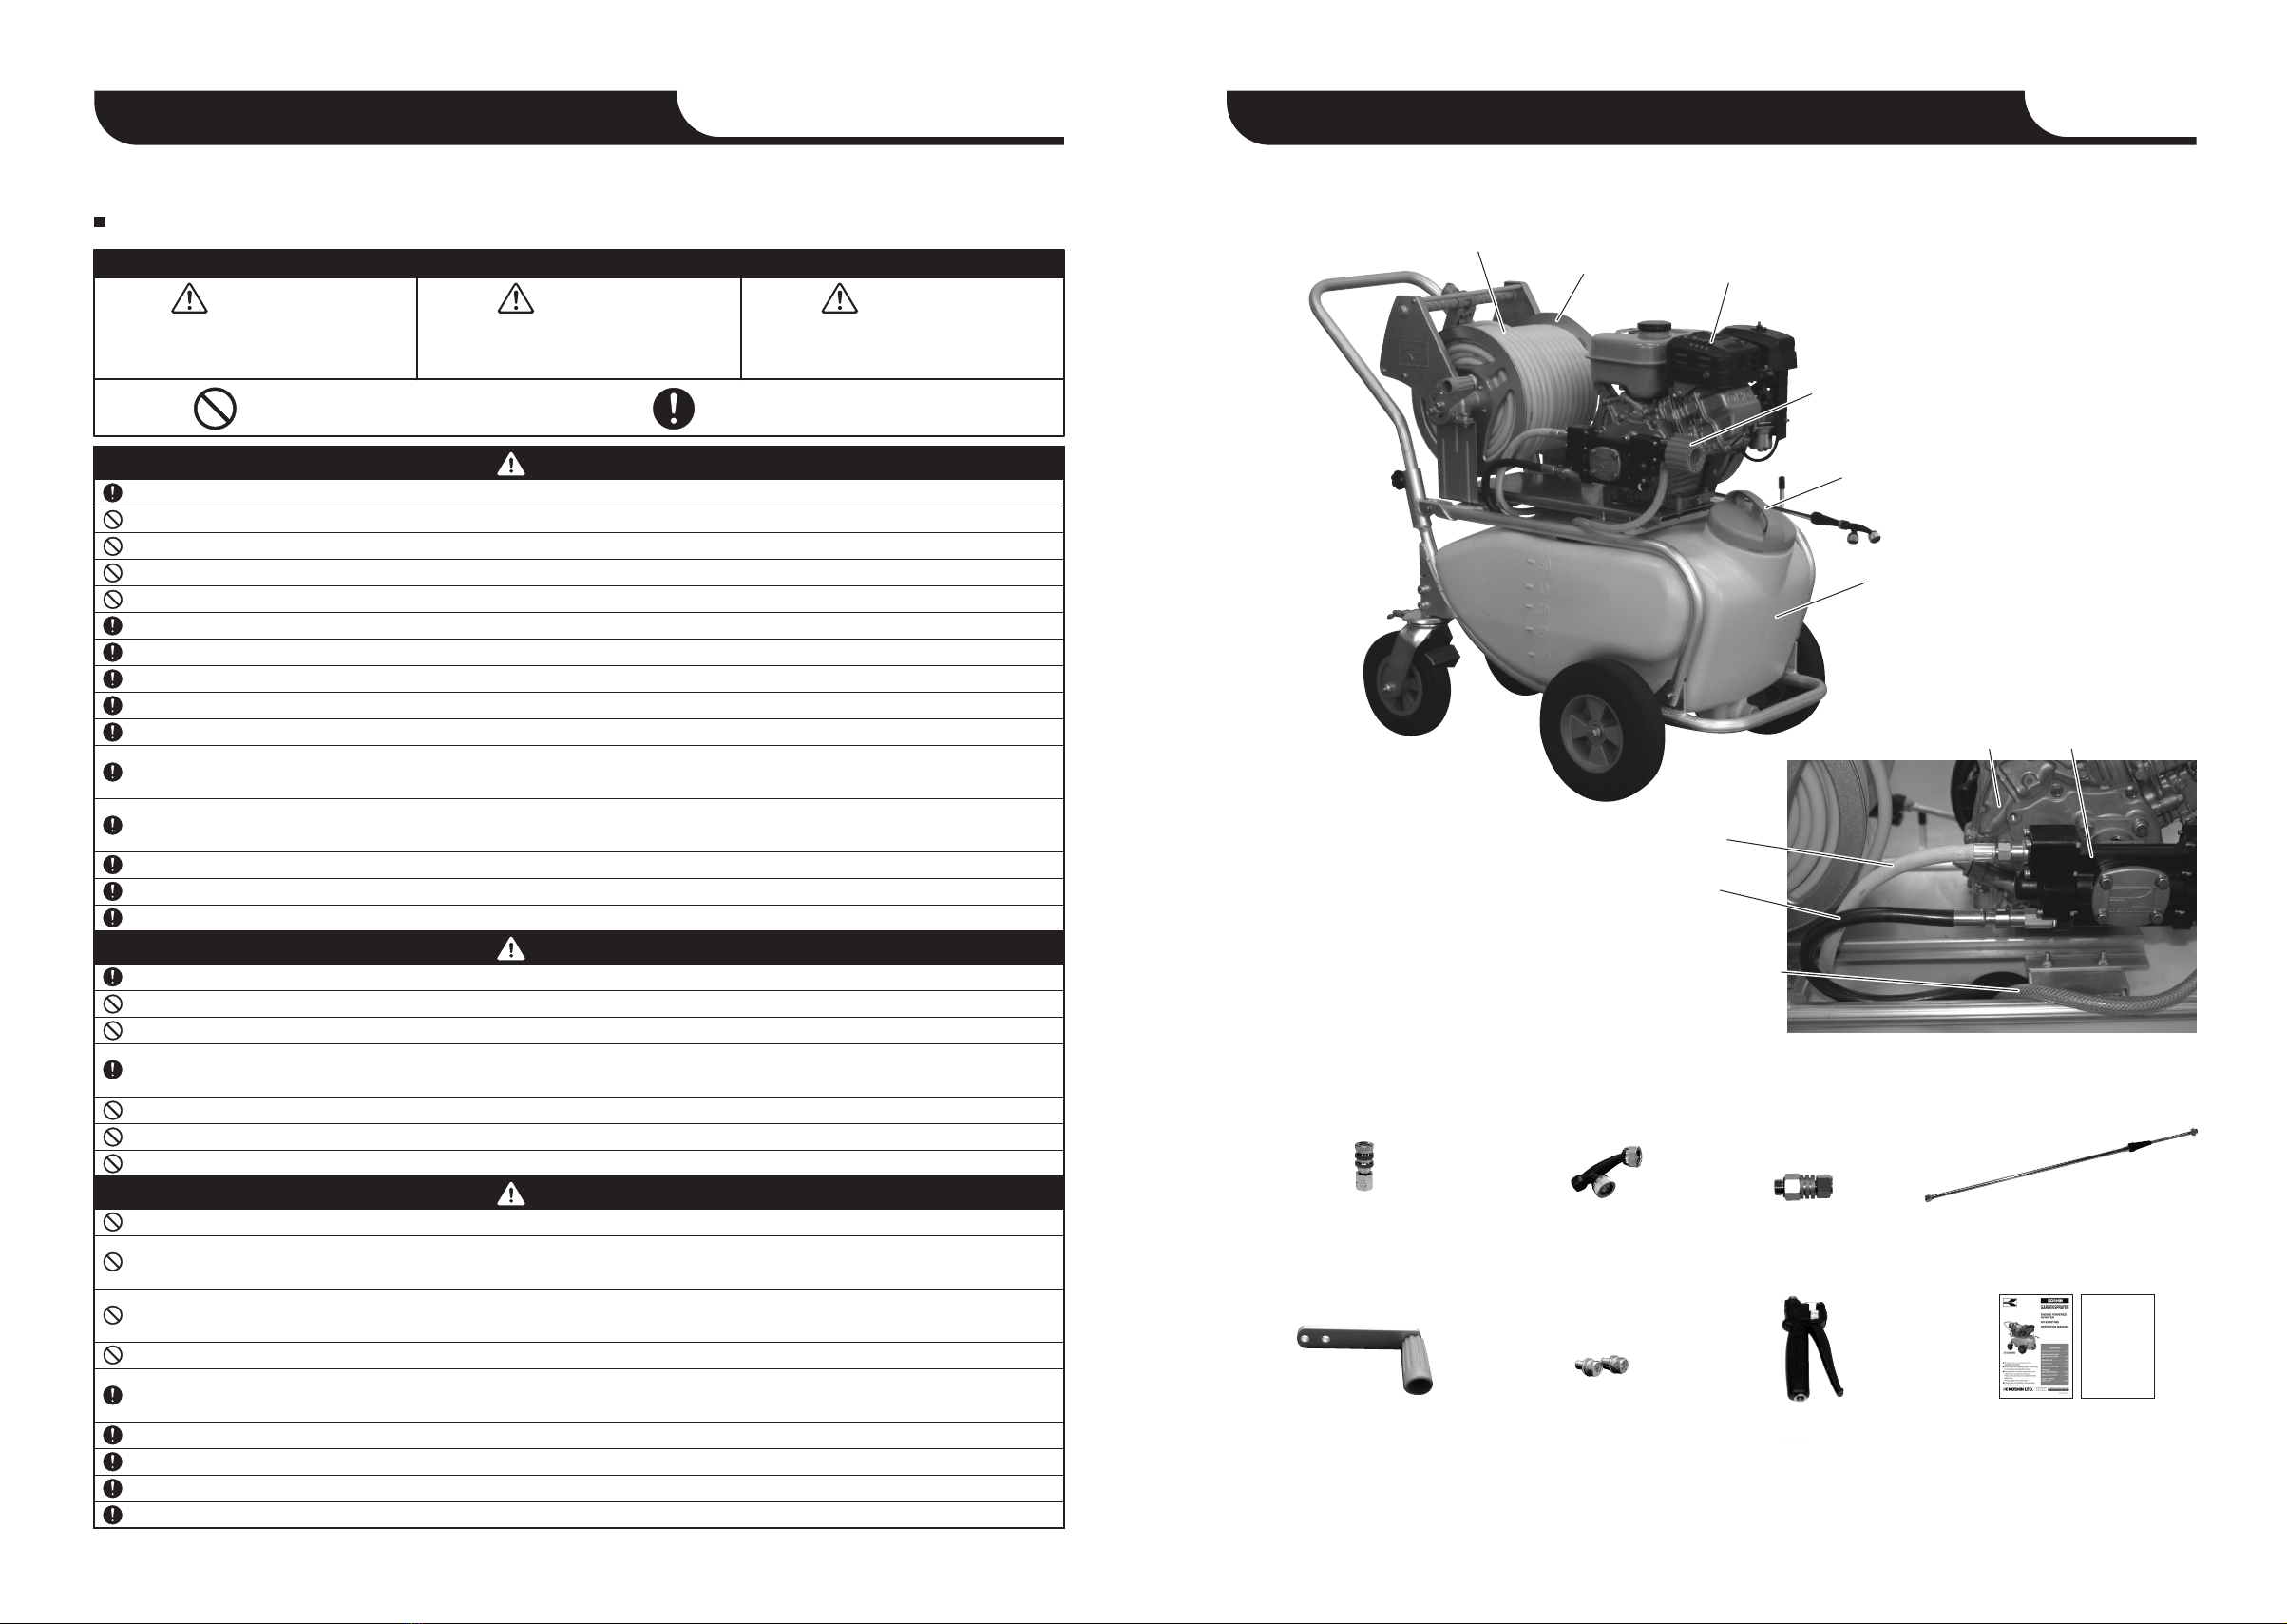
[ NAME OF EACH PART ]
Tank (50L)
Vertical 2-Head
Spray Mouth
2-Step Extensible
Nozzle Pipe Assy
Handle Grip
Swivel
Reel Handle Reel Handle Bolt
Universal 1-Head
Spray Mouth
Each article explains important contents. Make sure to follow the articles.
Indicates a imminent hazardous
situation which, if not avoided,
will result in death or serious injury.
Indicates a potentially hazardous
situation which, if not avoided,
could result in death or serious injury.
Indicates a potentially hazardous situation
which, if not avoided, may result in minor or
moderate injury, or damage to property.
Indicates "PROHIBITION" Indicates "EXECUTION"
DANGER WARNING CAUTION
*Read the "CAUTION AND SAFETY INSTRUCTION" carefully before use. The following cautions are shown for the proper use of this product
to protect you and others from danger or harm.
The following contents explains the possible danger or damage which may occur through inappropriate use.
The marks "DANGER", "WARNING" and "CAUTION" are important.
DANGER
WARNING
CAUTION
Do not use this products if you do not understand the operation manual.
Work in a safe isolated area to prevent children from touching.
Do not water this product. It would cause trouble.
Do not overhaul, repair, or remodel which is not mention in the operation manual except by a technician.
It may lead to abnormal movement and cause injury.
Do not cover the machine with anything and keep combustible items away from the machine during use. It may cause fire and trouble.
Do not use or leave any combustible substance such as gasoline, spray can, or any flammable materials during use. It may cause fire.
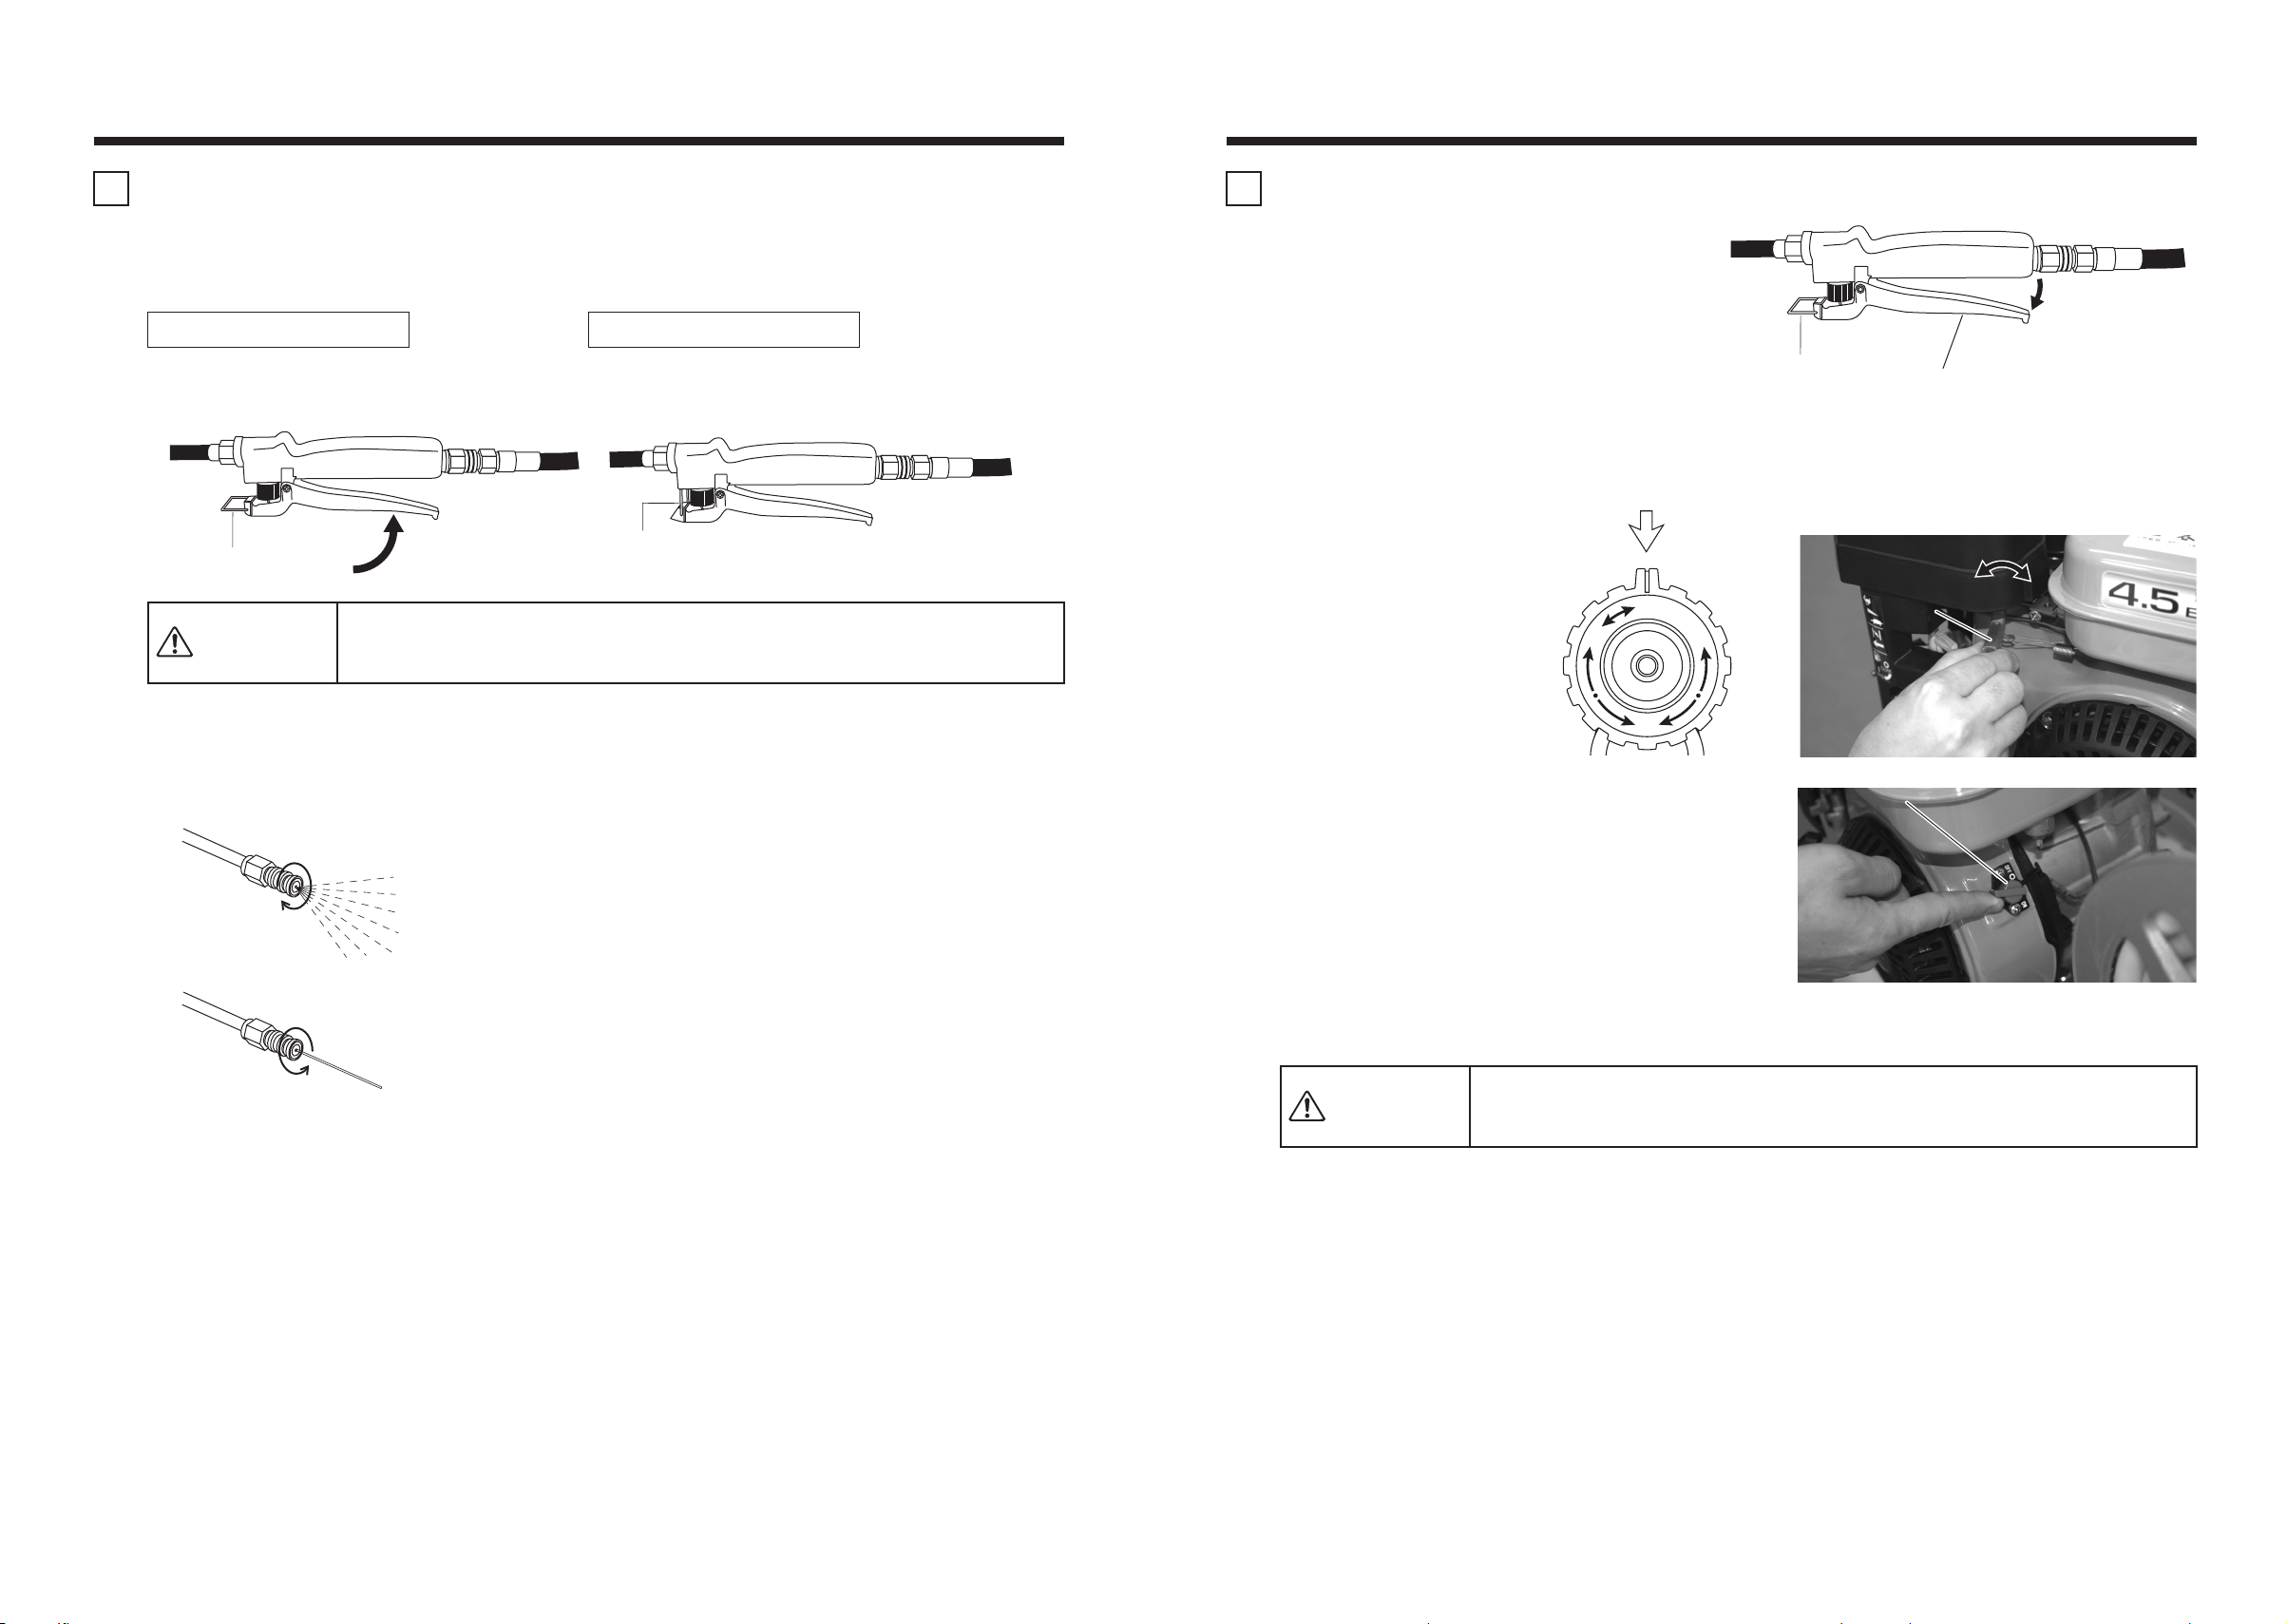
Do not point nozzle at people or animals. It may cause injury.
Do not touch muffler, engine or pump parts when hot. It may cause burn.
Make sure to check Recommend which is in the operation manual before using any chemical.
Do not use combustible liquids, solvents, such as strong acidity and alkalinity, benzene, gasoline, etc. It may cause explosion.
Do not use insecticide and prevention of epidemic chemicals for insects, antiseptic for sewage, toilet, etc and chemicals for stockbreeding.
It may cause trouble.
Do not run the machine without water more than 1 minute. It may break pump part.
If the machine stops running or you find any trouble, stop using the machine and ask for an inspection at a repair shop
for your safety. It may cause injury if continue to use.
Do not use the machine except for spraying gardening and agricultural chemicals and normal spray use.
Store the machine in a place where children cannot get to it.
Hose should not touch muffler or engine exhaust. Heat may damage hose.
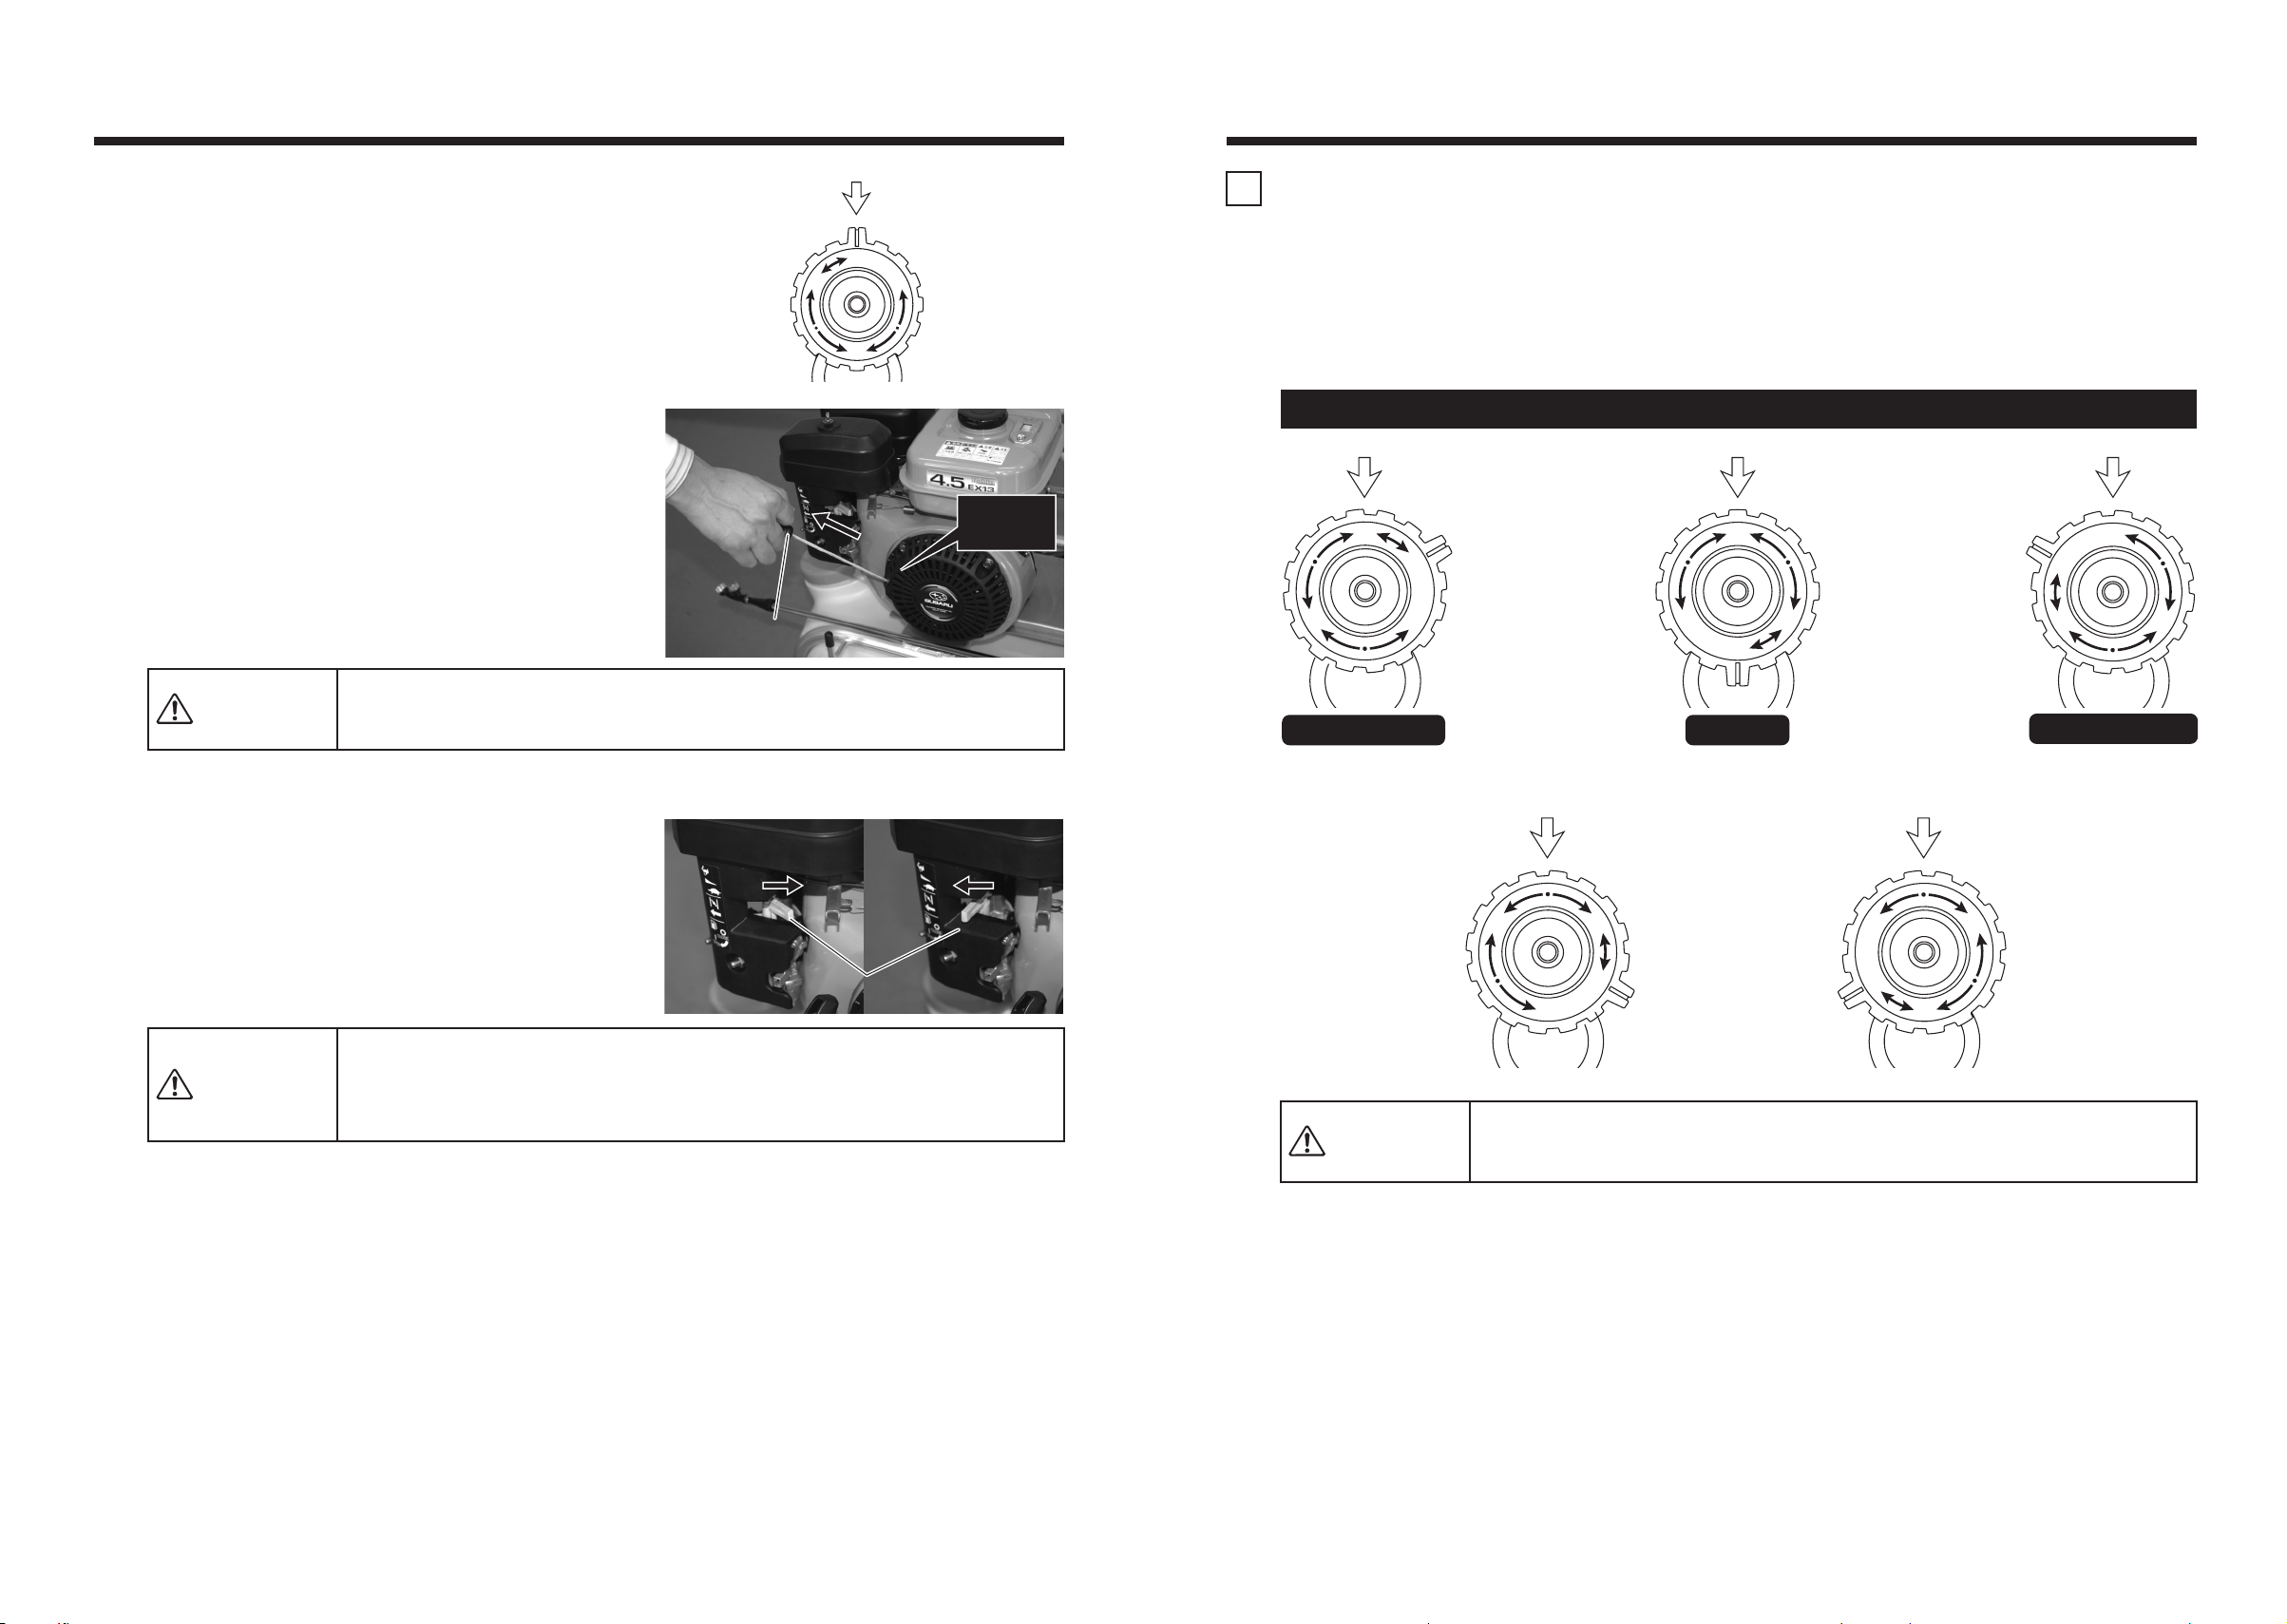
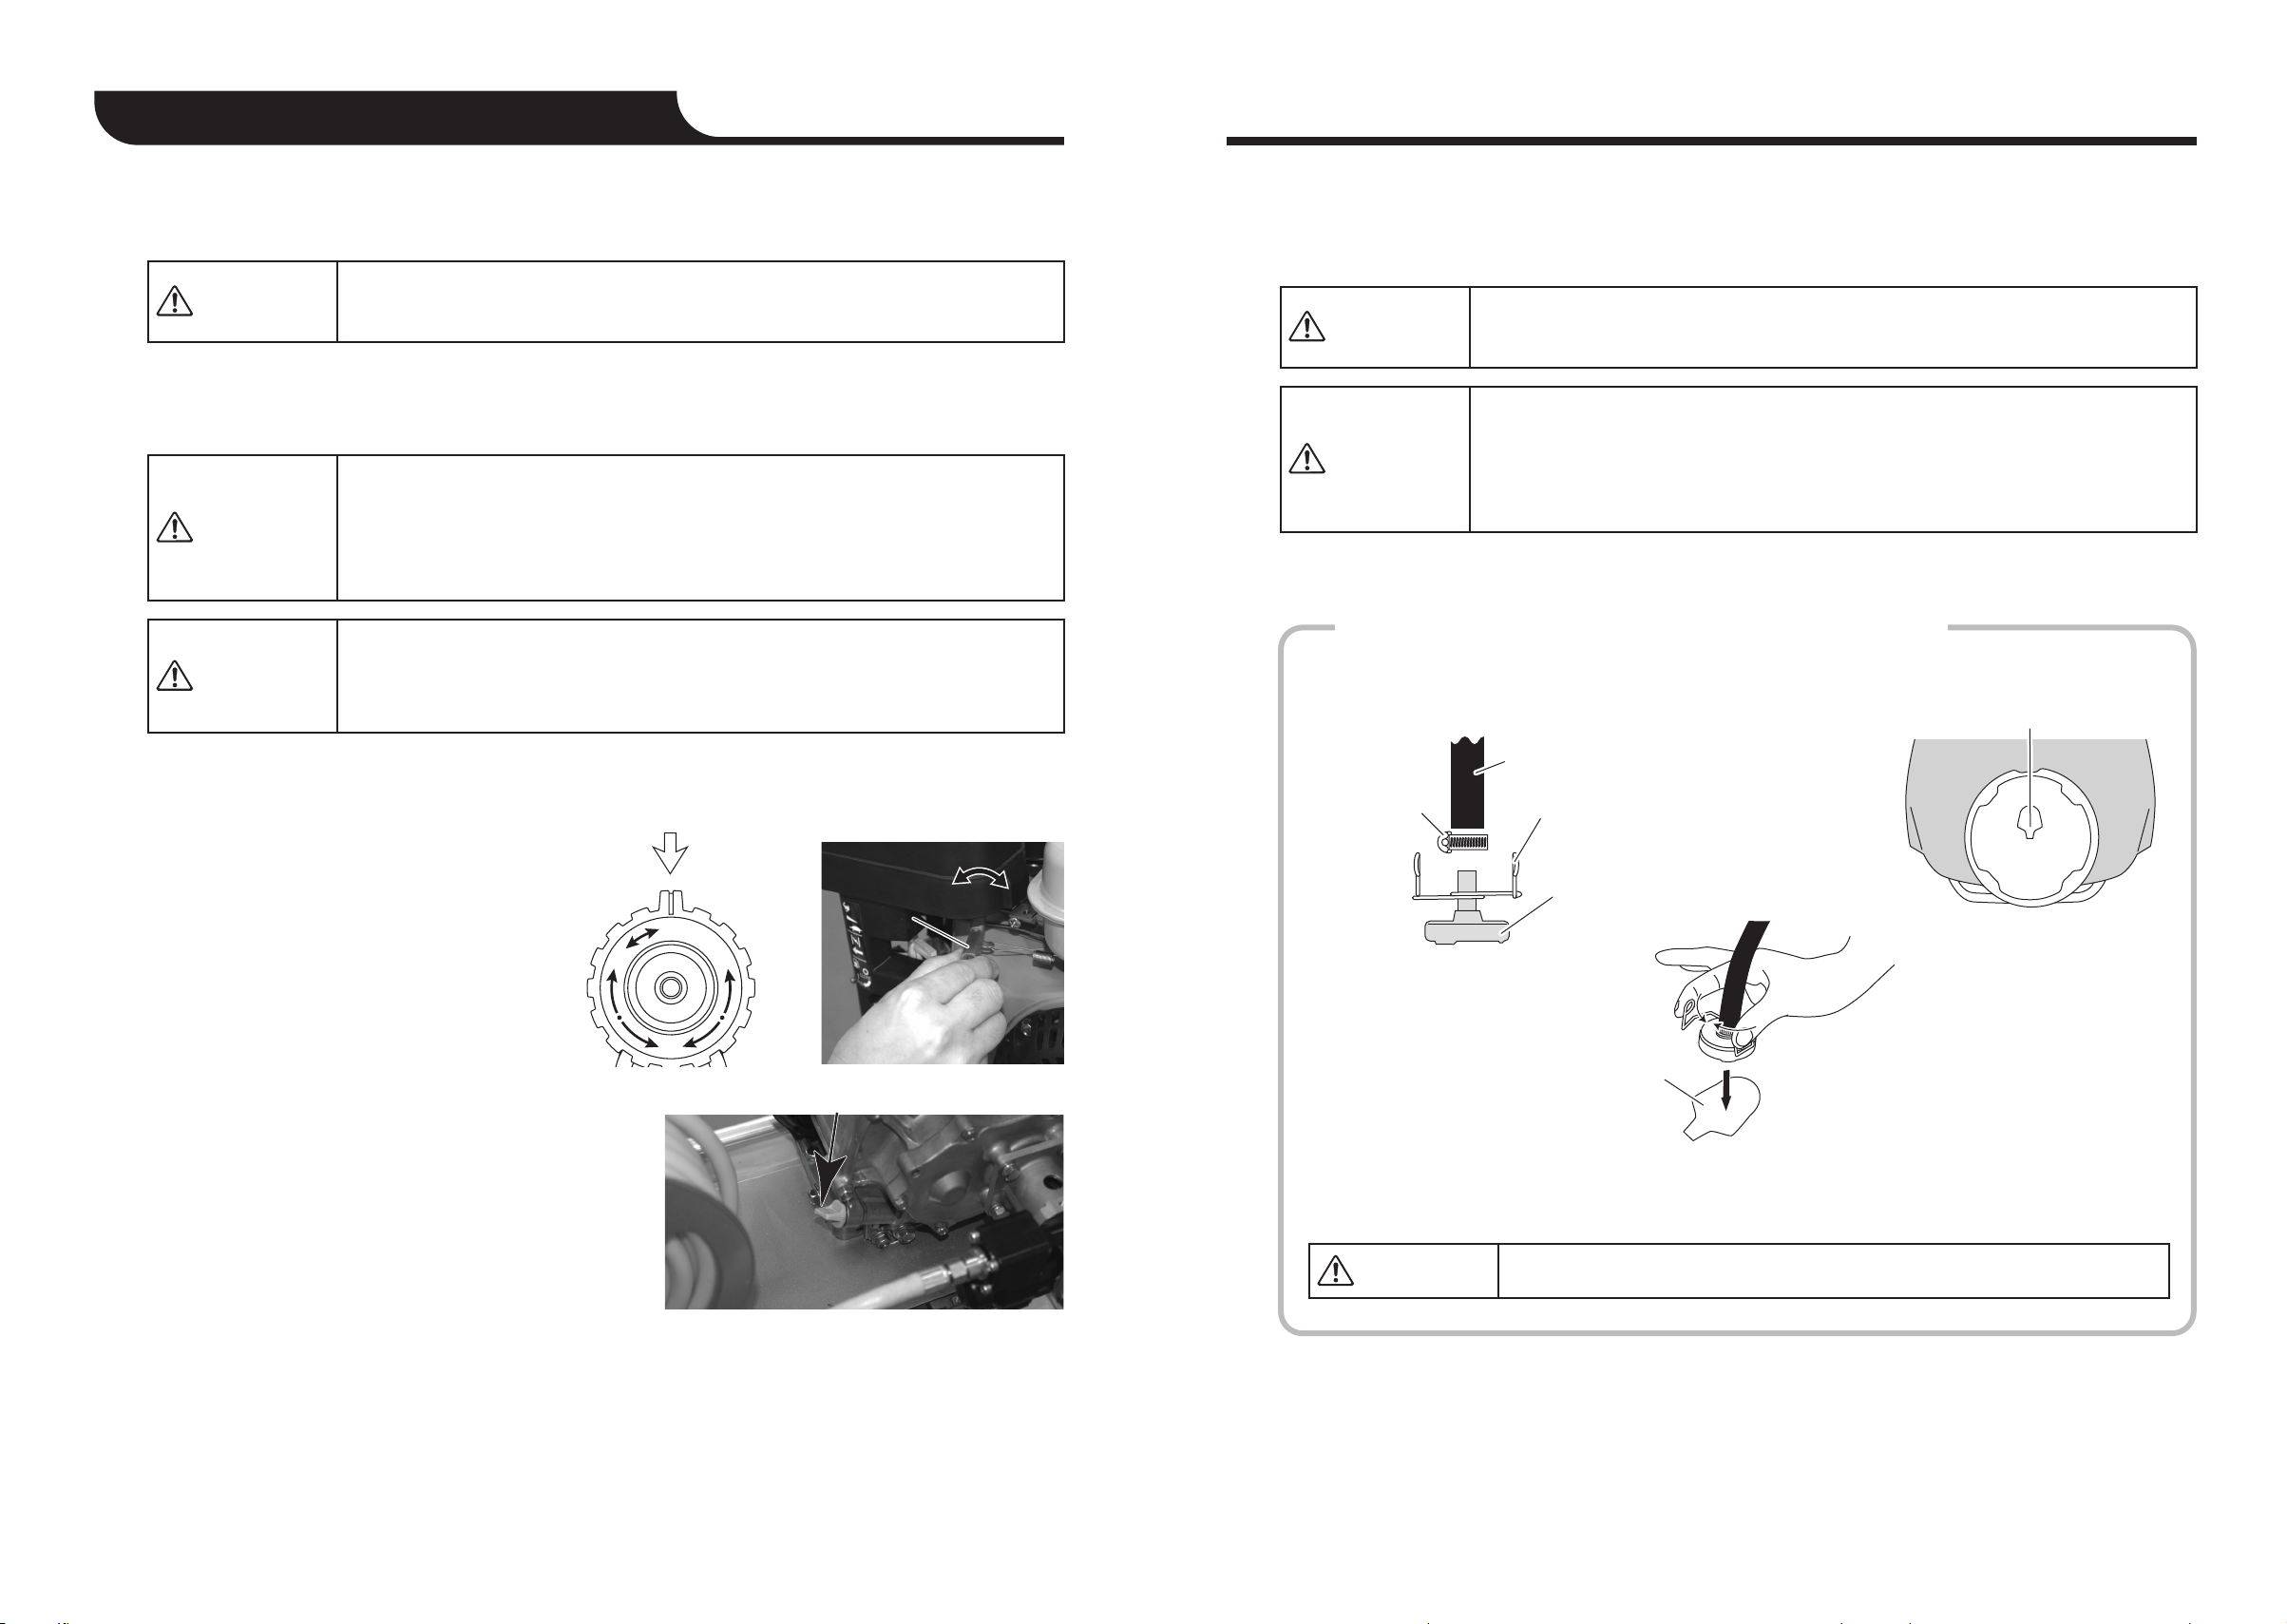
Make sure to stop the engine when putting chemicals into the tank. Otherwise, you may inhale the exhaust gas, which will cause gas poisoning.
Do not use fire while supplying or changing fuel.It will cause fire.
Do not run the machine in poorly ventilated place such as inside a building, green houses, etc. Engine exhaust includes poisonous gas.
Do not enter a hole while using this machine beside the hole. Engine exhaust entering into the hole will cause gas poisoning.
Do not use this machine on an incline. Fuel would spill from fuel tank cap and carburetor and this will cause a fire.
Do not put any objects near muffler part. It would cause fire.
Read carefully direction for each chemical and use them correctly.
Chemicals are hazardous. Keep chemicals away from children. Also, follow direction of chemicals about proper storage.
Check carefully the wind direction and surroundings to avoid spraying people, and domestic animals, or polluting river, pond, etc when using.
For your safety, wear protect mask, protect glasses, protect clothes, working cap, protect gloves, and working shoes while spraying.
Wash tools and clothing completely. Users should take a shower or wash hands, feet, face etc well with soap.
Incorrectly prepared chemicals could not only damage crops, but also harm human body. Read direction and caution
for each chemical when prepare chemicals and understand all properly before use. It would cause product trouble.
Before changing chemicals, make sure to remove current chemical completely, then put in new chemical.
It is dangerous to mix chemicals. It will cause chemical change.
If you accidently drink or touch the chemical, follow directions on the chemical container and take appropriate action.
Nobody is allowed to operate this Sprayer except people who are healthy and not under influences.
Do not dump water from washing spray tools and container into river, sewage, etc. Dispose of the water in a safe way.
" According to the EN 55011 norms this is a CLASS A device and it may cause electromagnetic type diseases inside domestic environments".
Engine Pump
Suction Hose
Surplus Water Hose
Hose Reel
Pressure Adjusting
Handle
Engine
Tank Cap
Delivery Hose
Delivery Hose (50m)
Please check all parts are included.
Operation Manual for
Sprayer and Engine


56
BEFORE USE
BEFORE USE
Knob Bolts
Height Adjustment
Holes
Carriage Handle
Carriage
Knob Bolts
4. Adjust the length of the 2-step extensible nozzle pipe. (Max. 109 cm, Min. 62 cm)
Rotate the tightening part to loosen the pipe. Adjust the length and rotate again to fix the
pipe.
5. Attach the handle.
Loosen the knob bolts on the carriage and insert the handle.
The heights of the carriage handle can be adjusted with 2 holes.
Adjust the height for your preference to attach.
Tightening part
Loosen
Tighten
Hose Guide
The hose guide will be in "Fixed state" or "Free state".
Switch the state according to the application.
This product employs the traverse mechanism for the hose reel so the hose can easily be
reeled.
Traverse mechanism
When you rotate the handle, the traverse axis rotates
in conjunction with the belt. The hose is reeled with the
hose guide moving to right and left.
Fixed state
(The knob faces lengthways as or )
Free state
(The knob faces sideways as )
KnobKnob
Rotate the knob
sideways while
pulling it to front.
Rotate the knob
lengthways
KnobKnob
The mark
faces
upward.
The mark can face either side.
1. How to use the hose guide
The moving direction of the
knob differs depending on
the location of the mark.
When pulling out: moves to the left
When reeling: moves to the right
When pulling out: moves to the right
When reeling: moves to the left
MarkMark
MarkMark
How to Use the Hose Reel
2
Place the product on a flat location for use.
Caution
Knob
Knob
Mark Mark

78
BEFORE USE
BEFORE USE
When pulling out the hose for
the first time after purchase, set
it to the free state.
Caution
Pull out the hose as straight as
possible.
(Permissible range of angle is
60 degrees both to the right and
left. Pulling out the hose forcibly
to the side may result in the
damage of the hose and the
hose guide.)
Caution
Make sure the knob is in the
fixed state when reeling the
hose.
Caution
Move the hose guide to the
handle side when starting to
reel the hose. The hose guide
moves in the free state.
(See "How to use the hose
guide" (page 6).)
Caution
Check the traveling direction of
the knob matches the reeling
direction of the hose before
starting to reel the hose.
(If the traveling direction of the
hose is opposite)
Pull the knob to the front and
reversely rotate it. Then the
traveling direction of the hose
will change.
Caution
When pulling out the hose guide in the
fixed state, adjust the position of the
hose guide so the hose on the hose
reel side can be inserted straight
against the hose guide.
The hose guide can be moved in the
free state.
Set it to the fixed state after adjustment.
(See "How to use the hose guide"
(page 6).)
Caution
RollerRollerRoller
Hose
2. How to pull out the hose
Straight
HoseHose
120120º120º
There are 2 methods for pulling out the hose.
• Set the hose guide to the free state to pull out.
• Set the hose guide to the fixed state to pull out.
3. How to reel the hose
Rotate the handle clockwise when seeing the handle in front. Then, reel the hose.
Hose Guide
Pull out the hose slowly as the same speed as possible.
Pulling out with force or stop suddenly may cause the hose to sag
inside the reel and pulling may be impossible.
Caution
The hose guide moves.
Rotating direction of the handle
Time for reeling the hose:
approx. 1.5 min.
KnobKnobKnob
Hose GuideHose GuideHose Guide
Reeling direction
of the hose
Reeling direction
of the hose
Traveling direction
of the hose
Hose GuideHose GuideHose Guide
The hose guide moves.
Traveling direction
of the hose
Hose

910
BEFORE USE
BEFORE USE
Free state Fixed state
Free state Braked state
The hose is reeled clockwise when
the handle is seen from front.
Do not rotate counterclockwise.
Doing so will cause the hose to
sag inside the reel and not to move.
Caution
Guide the hose to the hose guide
so the hose does not become
tangled while reeling.
Caution
4. How to clean the hose guide
When the hose guide does not operate smoothly due to dust or mud, remove the guide
and clean with water.
If the hose guide and hose become misaligned while reeling, Set the
hose guide to the free state and align the position.
(See "How to use the hose guide" (page 6).)
Caution
Hydration and Lime sulfur might make life-time of this machine
shorter. Dissolve them completely in container such as bucket, before
use. Also, stir the chemical in powder completely to avoid preeipitation.
Caution
When the hose-reeling comes close to an end, reel it slowly.
(Reeling fast may cause the wire at the hose end to spring and result
in injury.)
Caution
You can set the hose guide to the free state when wishing to reel the hose without using
the traverse mechanism.
Rotating direction of the handle
Do not tangle
the hose.
ScrewScrewScrew
Wash with waterWash with waterWash with water
(1) Removing 2 screws at the hose guide
can disengage the hose guide.
(2) Remove the dust, wash with water and
reassemble to the original condition.
How to Use the Tire Stopper and Brake
3
About chemicals
4
Tire StopperTire Stopper
BrakeBrake
The tire direction can be fixed when the tire
stopper pin is pulled as shown below.
This will be safe when moving this product on a
light truck on a bridge or moving straight on a
ridge.
Press the brake with your foot and put on the
brake as shown below.
To cancel, reversely press the brake.
1.
Follow exactly the direction for dilution from chemical manufacturer when use each chemical.
2.Wash hands immediately after use. (Do not keep chemical in tank) Put enough clear
water into tank to clean inside of tank and also spray to clean hose and pump. Make
sure to clean all completely. Repeat this step 2-3 times.
Main Recommend Chemical List
Emulsion
[Use before thinning down chemical with water]
Insecticide Disinfectant Weed-killer
Hydration
[Use before dissolving chemical in power with water]
Insecticide Disinfectant Weed-killer
Press the brake firmly. Otherwise malfunction may occur.
Caution
Make sure to read carefully operation manual for each chemical and
follow direction when thin down the chemical.
Caution
Chemicals are poisonous. Make sure to follow instruction from each
chemical manufacturer and pay attention when using.
Caution
Inproper use may cause damage to hose and parts. Make sure to use properly.
Caution

11 12
BEFORE USE HOW TO USE
1. Make stop-switch "ON".
2. Adjusting choke
• Move choke lever to "Close" when it is cold
weather or engine gets cold.
• Need no adjusting when engine is warm.
3. Set throttle lever at middle-low.
Check if engine has engine oil or has appropriate amount of engine
oil before starting.
Engine without engine oil or engine with either more or less
appropriate amount of engine oil may cause trouble.
Caution
Inspect engine oil before use this machine. Also change engine oil
regularly. Read engine operation manual for details.
Caution
When suction start, chemical is sprayed from spray head. Be care not
to spray people, objects, etc.
Caution
Make sure to stop engine before lubricating, adding, or exchanging
engine oil.
Be careful of high temperature of engine oil just after stopping.
Caution
Make sure to put water or chemical in tank before starting engine.
Check working condition of this machine with clear water before using
chemical when starting this machine for the first time.
Caution
Turn volume adjusting handle to left all the way to make straight spray.
If don not make spray condition, air will not go out from hose and
water does not come up.
Caution
Read carefully the engine operation manual before putting in engine oil.
Caution
Mistreatment may cause fire.
Caution
Clean up fuel/ engine oil completely if it spilled.
Caution
Fuel / Engine oil
5Starting Engine
1
Store fuel properly. Keep this machine away from Fuel supply tank
more than 3m when start engine.
Warning
Exhaust is poisonous to human body.
Do not run this machine in a place with poor ventilation.
Warning
No fuel and engine oil inside of engine tank. Make sure to put engine oil in before use.
Engine without oil will burn and it will be difficult to repair. (A burned engine is out of
guarantee.)
Make sure to use
(Do not use mixed gas and oil)
4 stroke engines need both fuel and engine oil.4 stroke engines need both fuel and engine oil.
4 stroke engines need both fuel and engine oil.4 stroke engines need both fuel and engine oil.4 stroke engines need both fuel and engine oil.4 stroke engines need both fuel and engine oil.
Automotive Unleaded Gasoline.
Stop SwitchStop SwitchStop Switch
Choke leverChoke leverChoke lever
Close
CloseClose OpenOpenOpen
HighHighHigh
LowLowLow
Throttle LeverThrottle LeverThrottle Lever

13 14
HOW TO USE
HOW TO USE
ڼѣ
1
֩ᩤ
/
᭗ן
*
ᨊᒬ
.
ڼѣ
1
֩ᩤ
/
᭗ן
*
ᨊᒬ
.
ڼѣ
1
֩ᩤ
/
᭗ן
*
ᨊᒬ
.
ڼѣ
1
֩ᩤ
/
᭗ן
*
ᨊᒬ
.
ڼѣ
1
֩ᩤ
/
᭗ן
*
ᨊᒬ
.
ڼѣ
1
֩ᩤ
/
᭗ן
*
ᨊᒬ
.
4. Set pressure adjusting handle at Start "O".
6. Move choke back to "Open" side little by little.
• When choke is at "CLOSE", move choke
down gradually while checking engine
rotation is stable.
5. Start engine
1. Start engine and adjust throttle lever to accelerate revolution until high speed.
2. Check if liquid is spraying from spray head.
3. After checking the machines condition, turn pressure adjusting handle and set "L", "M", or
"H" depending on working condition.
Hold this machine and pull recoil starter grip
to start.
If engine does not start after pulling recoil starter several times, move
choke to "OPEN" then pull it again.
Caution
Do not run without water except when removing water. Running
without water more than 1 minute may cause trouble.
Caution
Make sure to remove fuel after use, especially when not using the
engine for more than 30days. Change in quality of fuel may cause
trouble when start or while running.
Caution
Recoil starter gripRecoil starter gripRecoil starter grip
Pull
*If engine still does not start, see P.20 "Trouble and Maintenance".
Choke leverChoke leverChoke lever
Run
2
Position of pressure adjusting handlePosition of pressure adjusting handle
"L" ="L" =
Normal SprayNormal Spray
"M" = Mist"M" = Mist
"H" = High Pressure"H" = High Pressure
Between "L" and "M"
= between weeding and normal spray
Between "M" and "H"
= between mist and high pressure

15 16
HOW TO USE
HOW TO USE
Loosen
Tighten
ڼѣ
1
֩ᩤ
/
᭗ן
*
ᨊᒬ
.
1. By operating the handle grip, you can select either the consecutive spraying or the
intermittent spraying.
2.
Adjustment for spray head
[ When spraying a wide area ]
• Tighten the spray head to the right to switch from direct
spraying to mist spraying.
[ When spraying in the distance ]
• Loosen the spray head to the left to switch from mist
spraying to direct spraying.
Do not overloosen the head since it may come off.
Universal 1-head spray mouth ... Rotating the spray head can adjust the spraying condition.
If you do not hold the handle grip, the air may not come out easily at
first and water suction may not work smoothly.
Caution
To prevent burn, do not touch the high-temperature part of the engine
during operation and immediately after stopped.
Caution
Spraying
3How to Stop
4
Intermittent spraying Consecutive spraying
With the lever lock canceled, use
only when spraying.
Lever lock
The consecutive spraying is possible using
the lever lock.
Lever lock
1. Disengage the handle grip lever to stop
spraying.
*When using the lever lock, cancel the lock.
2. Set the pressure adjusting handle to the "0" position and restore the throttle lever to the
low speed.
4. Hold the handle grip and confirm the pressure in the hose is released.
Release
Handle grip lever
Lever lock
High
HighHigh
LowLowLow
Throttle LeverThrottle LeverThrottle Lever
3. Set the stop switch to "OFF" to stop the
engine.
Stop SwitchStop SwitchStop Switch

17 18
‒CAUTION AFTER USE CAUTION AFTER USE
ڼѣ
1
֩ᩤ
/
᭗ן
*
ᨊᒬ
.
1. Spray clean water for 2-3 minutes to wash out chemicals from inside of pump, hose and
nozzle after use.
2. After you finish washing, make sure tank is empty and move pressure adjusting handle
back to "O" position before switching "OFF".
3. Remove fuel (gasoline) inside of tank and run engine until engine stops automatically at
idling.
4. Remove dirt from engine, pump, nozzle, etc. If moisture is left, engine gets rusty and it may
cause trouble. Keep this machine in a place out of direct sunlight after drying pump and
nozzle.
Remaining chemical inside of pump or nozzle will harden or cause
deterioration to packing and damage pump.
Caution Long exposure to direct sunlight may make hose deteriorate and it
may cause burst when spraying.
Caution
Make sure the stop-switch is "OFF" immediately when liquid is gone
and no more spray from nozzle.
Running without liquid may damage pump.
Caution
In case of possibility of freezing, use antifreeze and run through pump,
hose and nozzle after wash with water.
Do not leave antifreeze liquid inside of pump and nozzle. (Read
carefully antifreeze operation manual before use)
Caution
Always keep inside of tank and strainer clean and make sure to use
attached strainer whenever using the machine. If sand and dust get
into pump, it will affect performance, for example delivery volume and
pressure decline.
Caution
[ How to use up fuel ]
1. Adjust pressure adjusting handle to "O"
position and start engine.
2. Move throttle to "LOW".
3. Run until engine stops automatically.
4.ᲢFor long storageᲣ
Remove engine oil completely
HighHighHigh
LowLowLow
Throttle LeverThrottle LeverThrottle Lever
Oil Drain Plug
[ How to attach / remove strainer ]
Strainer
Strainer Clip
Suction Hose
Hose Band
View of inside of tank
from chemical supply hole
Strainer Hole
Push strainer clip inward
and attach / remove strainer.
Strainer Hole
[ How to attach ]
Improper strainer attachment causes poor suction.
Caution

19 20
‒TROUBLE AND MAINTENANCE
CAUTION AFTER USE
Check before ask service station.
Vertical 2-head spray mouth
Spraying Head Unit
Spraying Board
Match the shape.
źWashing Spray HeadŻ
Remove the cap
Remove the cap.
Match the concavo-convex shape of the spraying board and
spraying head unit.
Caution
Be careful not to lose each component.
Caution
Cannot pullCannot pull
recoil starterrecoil starter
or recoil isor recoil is
hard to pullhard to pull
Engine doesEngine does
not startnot start
No waterNo water
suctionsuction
Suction is OKSuction is OK
but cannot spraybut cannot spray
Liquid comes out fromLiquid comes out from
surplus water hosesurplus water hose
Symptom Possible Cause Maintenance
Engine trouble due to use of oil fuel
Rust inside of engine
Burned engine
Clogged carburetor
Plug is wet
Dirty air cleaner
Too much engine oil
Clogged delivery hose
Remaining pressure inside of
delivery hose
Clogged strainer
Clogged hole of spray head
Loss of packing from suction hose
connection
Loose screw of suction hose connection.
Clogged delivery valve and suction
valve. Wear or breakage of consumption
parts. (cylinder pipe, Piston rod,
packing, pressure adjusting spring, etc)
Air is coming into suction side.
Bad engine revolution
Running engine at low speed
Air is coming into delivery hose
Position of pressure adjusting
handle is not "O" when start
Handle grip is not "spray" condition
Just after start engine
Clogged hole of spray head
Clogged delivery hose
Change fuel. If it is still in bad
condition, ask service station.
Ask service station
Ask service station
Ask service station
Check or exchange plug * See maintenance 3
Wash air cleaner (* See engine
operation manual)
Adjust amount of engine oil
Remove dust from delivery hose
Loose volume adjusting handle
and remove pressure.
Remove dust
Wash spray head with water
* See "Caution after use" P.17
If packing is lost or broken,
change to new packing.
* See "Maintenance 2"
Tighten connection screw
Ask service station
Check suction pipe * See "Maintenance 2"
See engine operation manual
Shift to high speed
Take off reel connection hose
and start * See "Maintenance 1"
Set pressure adjusting handle at
"O" position before start
* See "How to Use" P.13
Make handle grip spray condition
* See "How to Use" P.15
Run engine for 1 to 1 and half min
Wash spray head with water
* See "Caution after Use" P.19
Remove dust from delivery hose
Universal 1-head spray mouth

21 22
TROUBLE AND MAINTENANCE TROUBLE AND MAINTENANCE
Low sprayLow spray
volume Badvolume Bad
condition ofcondition of
sprayspray
Cannot increaseCannot increase
pressurepressure
Oil leakageOil leakage
from mufflerfrom muffler
or air cleaneror air cleaner
Symptom Possible Cause Maintenance
Air is coming into suction side
Decline of engine output
Water leak from hose and connection
Clogged hole of spray head
Wear of spray head hole
Pressure adjusting handle is set at
"O"
Wear of consumption parts
Oil leakage due to engine fall
Burned engine
Too much engine oil
Check suction pipe
* See "Maintenance 2"
Check and repair
Stop water leak
Wash spray head with water
* See "Caution after Use" P.19
Exchange spray head
Adjust pressure adjusting
handle to "L", "M" or "H"
Ask service station.
Adjust to proper engine oil amount
Piston seal, Oil seal, Packings, O-rings, Piston, Piston rod, Springs and Delivery hose are
consumption parts. Repair for those parts are out of guarantee even within guarantee
period. Recommend to exchange those parts every 100 hours; however lifetime of those
parts may become shorter depending on chemicals.
Do not do overhaul and repair by yourself except those which are
mentioned in the operation manuals. Ask service station.
Caution
Be careful with chemicals
coming from delivery mouth.
Caution
Reel Connection HoseReel Connection HoseReel Connection Hose
Delivery MouthDelivery MouthDelivery Mouth
Take off reel hose and run the machine.
If spray does not start, the major possible cause is that air is coming into delivery hose.
In this case, follow these steps to check.
1. Take off reel connection hose with spanner etc.
2. Start engine
3.
Make sure to check liquid is coming from delivery mouth.
1. Take off suction hose
3.
Touch suction mouth with your hand while
running engine.
If you feel that your hand is sticking to suction
mouth, pump has not problem and the main
cause is that air is coming into suction hose.
2. Start engine
4. Check again that the
connection has packing and
suction hose does not have
a hole.
4. Attach reel connection hose.
MAINTENANCE 1MAINTENANCE 1
Remove water (liquid) from inside of delivery hose as much as
possible. If water (liquid) is left inside of delivery hose, it would
be difficult to let air out.
Caution
Each engine has different plug. Read engine operation
manual.
Caution
Check suction side pipe
If suction does not start or spray volume is less, the major possible cause is that
air is coming into suction hose.
If this is the case, follow these steps to check.
Check if plug is wet
or dirty.
If plug is wet or dirty,
clean it with cloth.
Check if gap of spark
plug is proper.
Proper gap is 0.6 - 0.7 mm.
If not, adjust the gap.
Whether feeling suctionWhether feeling suctionWhether feeling suction
Packing
Suction Hose
RecoilRecoilRecoil
MAINTENANCE 2MAINTENANCE 2
MAINTENANCE 3MAINTENANCE 3
• Exchange to new plug if engine does not start after cleaning plug or adjusting the
gap.

23 24
‒MAIN AFTER PARTS ‒HOW TO CHECK PARTS LIST
Order parts from the shop where you bought the machine. Check parts code and parts
name before ordering.
For other parts, go to KOSHIN website to see full parts list.
Parts Parts Code
0458331
0451448
0451450
0451598
0452536
0451508
0451837
0450949
0450950
0458075
0451168
0450950
0451213
0458202
0451839
Vertical 2-Head Spray Mouth Assy
Universal 1-Head Spray Mouth ( 1.5)
Suction Hose Assy
( 10 g0.9 M)(with Nipple packing C)
Nipple Packing C
Strainer
Hose Band
Surplus Water Hose ( 9 g0.8 M)
Clip
Delivery Hose Assy
( 8.5 g50 M)(with Nipple Packing A & B)
Nipple Packing A (small)
Nipple Packing B (big)
2-Step Extensible Nozzle Pipe Assy
Handle Grip (with Nipple Packing B)
Nipple Packing B
Swivel
Parts Name
Nipple Packing B
2-Step Extensible
Nozzle Pipe Assy
Handle Grip
Swivel
Suction Hose Assy
Nipple Packing
Hose Band Strainer
Surplus Water Hose
Clip
Nipple Packing A
Small
Big
Nipple Packing B
Delivery Hose
Assy
Suction Hose
Surplus Water Hose
Delivery Hose Nozzle Pipe Nozzle
Check parts list for Koshin products from Koshin website.
Please check carefully correct parts code and parts name.
When order parts.
Click banner "Parts List" on
top page.
Type model name and
click "SEARCH" or
click banner "PARTS LIST".
Find your model
and click file name
Check parts code
and parts name.
Click your products.
1
4
5
2
3
http://www.koshin-ltd.jp/english/
PARTS LIST
ENGINE PUMP HIDELS HONDA
ENGINE PUMP HIDELS MITSUBIS
ENGINE PUMP HIDELS ROBIN
ENGINE PUMP SEMI-TRASH HON
Adobe Reader software is
required to see parts list.
If your PC does not have it,
please download it.
Click!Click!Click!
Click!Click!Click!
Click!Click!Click!
PARTS LIST Click!Click!Click!

25 26
This manual suits for next models
1
Table of contents
Other Koshin Paint Sprayer manuals