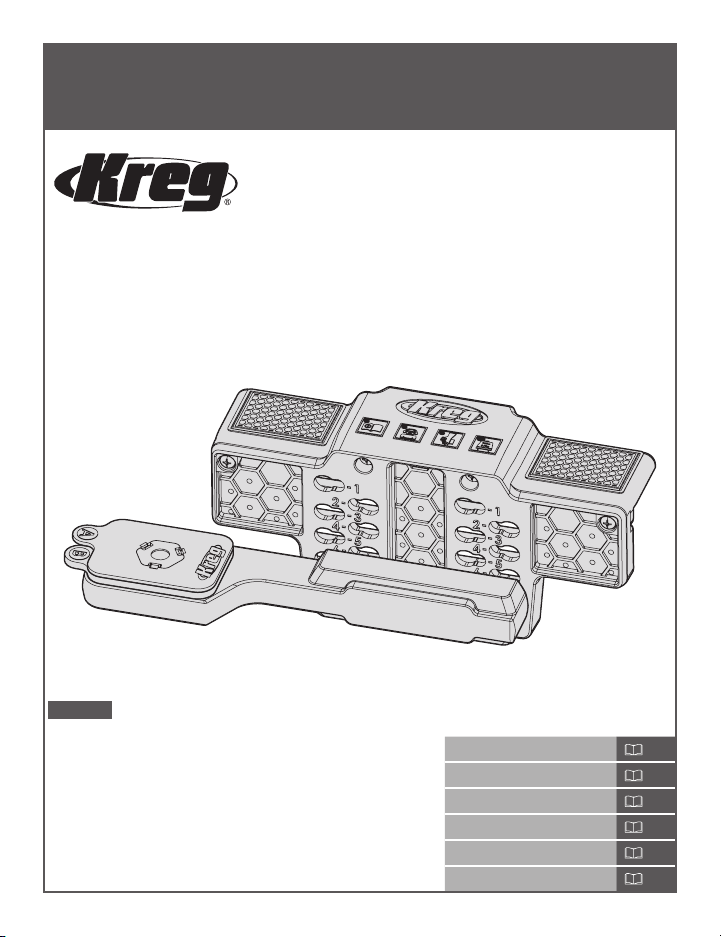
Kreg KHI-CDIJ User manual

English 2
French (N. America) 13
Spanish (N. America) 25
French 37
Spanish 49
German 61
OWNER’S MANUAL
We’re here to help.
We want you to have an exceptional project building experience.
If you have questions or need support, please get in touch.
Tell us about your experience.
Your opinion counts. And we’re always looking for ways to improve.
Share your feedback so we can keep growing and innovating for you.
www.kregtool.com/feedback
WARNING Every user must read and follow instructions and safety precautions in this manual.
Failure to do so could result in serious injury. Save manual for future reference.
Cabinet Door Mounting Jig
Manual applies to Item # KHI-CDIJ and KHI-CDIJ-INT

2
Safety Precautions
WARNING Before using a power tool with this product, read and follow the tool manufacturer’s
instructions and safety precautions in addition to the safety precautions below to reduce the risk
of serious injury from hazards such as re, electric shock, or rotating drill bit.
■Always follow the written safety instructions for using your jig.
■Follow your drill manufacturer’s safety guidelines.
■Always wear personal protective equipment certied as such, including safety glasses,
hearing and respiratory protection. When using a power tool, always follow the manufacturer’s
personal protective equipment requirements.
■Do not allow familiarity gained from frequent use of your tools to replace safe work practices.
A moment of carelessness is sufcient to cause severe injury.
WARNING Follow your clamp manufacturer’s safety guidelines. Ensure that the jig is clamped
securely prior to hanging the cabinet door.
WARNING Do not exceed the rated weight limit capacity of the jig. Exceeding the weight limit
with doors over 25 lbs. may cause the product to fail which can result in serious injury.
WARNING When mounting doors, take special care to avoid injury. Ensure the cabinet door is
properly placed on the jig and supported with one hand.
WARNING Avoid awkward hand positions where a sudden slip could cause contact with the
rotating bit.
WARNING Do not operate this tool or any machinery while under the inuence of drugs, alcohol,
or medications.
WARNING This product can expose you to chemicals including Carbon 1333-86-4 and other
chemicals, which are known to the State of California to cause cancer and reproductive harm.
Formore information go to www.P65Warnings.ca.gov.
Table of Contents
Safety Precautions . . . . . . . . . . . . . 2
Pre-Assembly . . . . . . . . . . . . . . . . 3
Recommended Tools/Materials . . . . . 3
Product Description . . . . . . . . . . . 3
Assembly . . . . . . . . . . . . . . . . . . 4
Before you Begin. . . . . . . . . . . . . 4
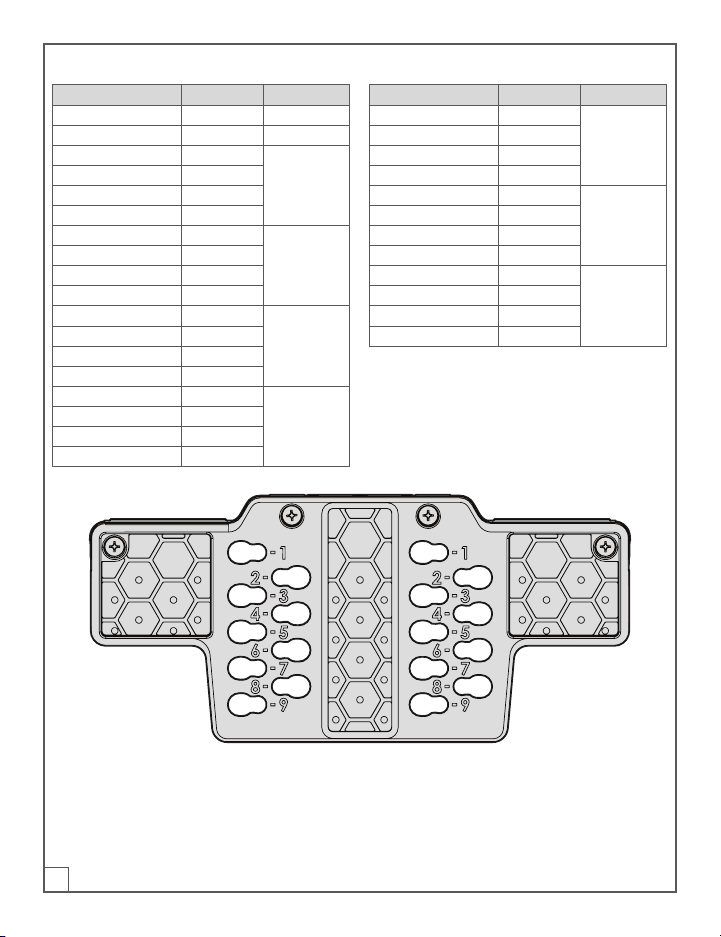
Jig Setting and Shim Use Chart . . . . . 6
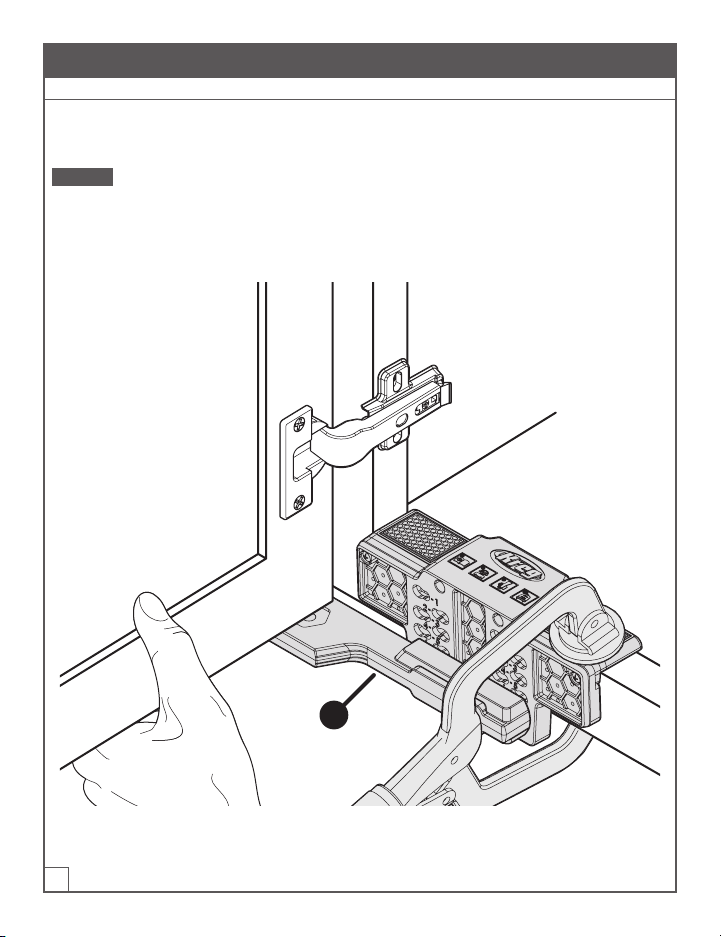
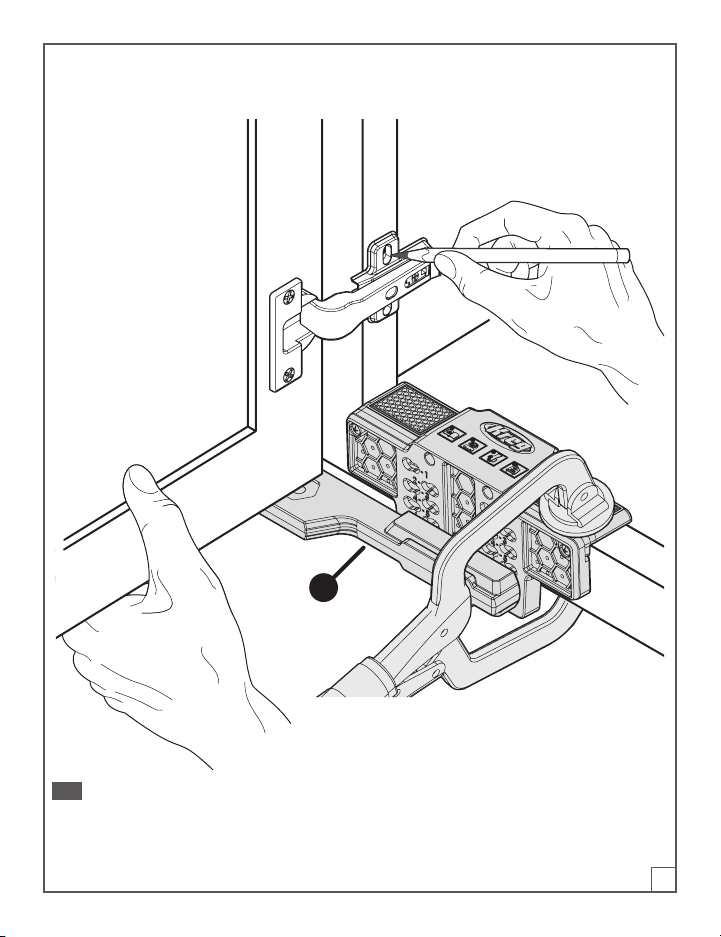
Operation . . . . . . . . . . . . . . . . . . 8
Using the Jig . . . . . . . . . . . . . . . 8
Maintenance . . . . . . . . . . . . . . . . 10
Care and Cleaning . . . . . . . . . . . . . 10
Troubleshooting. . . . . . . . . . . . . . . 10
Adjusting for Cabinet Door Weight. . . . 10
Recommended Accessories (Not Included)10

3
Pre-Assembly
Review this section before you begin. Ensure you have all tools/materials on hand and compare
the package with the items listed in the Product Description section. If any item appears missing
or lost, do not use this product. Contact Technical Support or return product to place of purchase.
Recommended Tools/Materials
Clamp Pencil
Product Description
C
A
B
D
Part Description Part Description
A Shim A C Cabinet Door Mounting Jig
B Shim B D Support Arm

4
Assembly
Before you Begin
Note This jig can be used to mount doors for both wall cabinets and base cabinets.
a. Mount your hinges on your doors.
b. Use the chart on page 6 to identify the correct jig setting and shims to use for your desired
overlay (how much your door will overlap your cabinet frame or faceframe).
1 Attach the Support Arm to the Jig
a. Determine the correct orientation of the support arm (D) to the jig (C) for your application.
C
D
D
For right cabinet door mounting,
the support arm should extend to
the right of the jig.
For left cabinet door mounting, the
support arm should extend to the
left of the jig.

5
b. Insert the pegs (1) of the support arm (D) into the correct jig setting (see chart on page 6).
c. Slide the support arm (D) horizontally to secure in place.
D
C
1
Note To remove the support arm, slide horizontally and pull away from the jig. Flip the support
arm and reattach to the same jig setting for the opposite door.
2 Optional: Add Shims to the Support Arm
Depending on how far you want to the door to overlay the opening, you can use the support arm
alone, or add one or both shims. Use the chart on page 6 to determine which shims to use.
a. Apply the shim (A or B) to the end of the support arm.
Note To remove, pull the shim(s) off the end of the support arm.
A B A
B

6
Jig Setting and Shim Use Chart
Overlay Shim Jig Setting
Inset — 1
1/4" (6.5 mm) — 2
5/16" (8 mm) A + B
3
3/8" (9.5 mm) A
7/16" (11 mm) B
1/2" (13 mm) —
9/16" (14 mm) A + B
4
5/8" (16 mm) A
11/16" (17.5 mm) B
3/4" (19 mm) —
13/6" (20.5 mm) A + B
5
7/8" (22 mm) A
15/16" (24 mm) B
1" (26 mm) —
1-1/16" (27 mm) A + B
6
1-1/8" (28.5 mm) A
1-3/16" (30 mm) B
1-1/4" (31.5 mm) —
Overlay Shim Jig Setting
1-5/16" (33 mm) A + B
7
1-3/8" (35 mm) A
1-7/16" (36.5 mm) B
1-1/2" (37.5 mm) —
1-9/16" (40 mm) A + B
8
1-5/8" (41 mm) A
1-11/16" (43 mm) B
1-3/4" (45 mm) —
1-13/16" (46 mm) A + B
9
1-7/8" (47.5 mm) A
1-15/16" (49 mm) B
2" (50 mm) —

7
3 Position the Jig
a. Align the jig (C) on the bottom edge of the cabinet as close as possible to the door opening.
C
4 Clamp the Jig
Warning Follow your clamp manufacturer’s safety guidelines. Ensure that the jig is clamped
securely prior to hanging the cabinet door.
a. Clamp the jig (C) in place.
C

8
Operation
Using the Jig
This jig is recommended for use with cabinet doors weighing 25 lbs. or less.
Warning When mounting doors, take special care to avoid injury. Ensure the cabinet door is
properly placed on the jig and supported with one hand.
a. Align the cabinet door at a 90-degree angle to the front of the cabinet.
b. Rest the bottom corner of the door on the support arm (D) and hold the door in place with
one hand.
D

9
c. Use your other hand to mark, drill, or screw the hinge plate in the correct location.
d. Repeat with top hinge.
D
TIP For concealed hinges, make sure to mount the screw in the center of the mounting slot of the
plate to allow for additional adjustment.

10
Maintenance
Keep all parts clean of dust and debris.
Care and Cleaning
To clean, wipe with a clean rag or blow compressed air on the jig.
Troubleshooting
Problem Possible Cause Solution
The cabinet door is not aligned to
the correct overlay.
The support arm is not in the
correct jig setting.
Check the jig setting placement and
realign the cabinet door.
The cabinet door is too heavy for
the jig setting.
Move the support arm up one
setting or add shims.
The support arm is bent or
damaged. Call Technical Support.
Adjusting for Cabinet Door Weight
While mounting doors that weigh more than 15 lbs., additional adjustment or shims may be
required for proper placement. Do not use with doors that exceed 25 lbs.
Recommended Accessories (Not Included)
Clamp

11

EXPLORE. BUILD. SHARE.
We’re makers just like you.
That’s why we love to see what you’re working on.
Share with the community and get inspired!
#madewithKreg
Get free plans, project resources, and more.
kregtool.com and buildsomething.com
12/2020 105823

GUIDE D’UTILISATEUR
Nous sommes là pour vous aider.
Nous voulons que votre projet de construction se déroule de manière optimale.
Si vous avez des questions ou si vous avez besoin d’aide, n’hésitez pas à nous contacter.
Parlez-nous de votre expérience.
Votre opinion compte. Et nous sommes toujours à la recherche de moyens de nous améliorer.
Partagez vos commentaires an que nous puissions continuer à croître et à innover, pour vous.
www.kregtool.com/feedback
AVERTISSEMENT Chaque utilisateur doit lire et suivre les instructions et les précautions de
sécurité de ce manuel. Respectez cette consigne an d’éviter tout risque de blessures graves.
Conservez le manuel pour une utilisation ultérieure.
Gabarit de montage pour
les portes d’armoires
Le guide s’applique aux articles n°KHI-CDIJ
et KHI-CDIJ-INT

14
Précautions de sécurité
AVERTISSEMENT Avant d’utiliser un outil électrique avec ce produit, veuillez lire et suivre les
instructions et les précautions de sécurité du fabricant de l’outil, en plus des précautions de
sécurité ci-dessous, an de réduire le risque de blessures graves dues à des risques comme le
feu, les chocs électriques ou les mèches de forage rotatives.
■Suivez toujours les consignes de sécurité qui se rapportent à l’utilisation de votre gabarit.
■Suivez les consignes de sécurité du fabricant de votre perceuse.
■Portez toujours un équipement de protection individuelle certié, notamment des lunettes
de sécurité ainsi qu’une protection auditive et respiratoire. Lorsque vous utilisez un outil
électrique, respectez toujours les exigences du fabricant en matière d’équipement de
protection individuelle.
■Faites attention lorsque vous devenez familier avec l’outil en raison d’une utilisation fréquente.
Employez systématiquement des pratiques de travail sécuritaires. Un moment d’inattention
est sufsant pour causer des blessures graves.
AVERTISSEMENT Suivez les consignes de sécurité du fabricant de votre serre-joint. Assurez-
vous que le gabarit est bien serré avant de suspendre la porte d’armoire.
AVERTISSEMENT Ne pas dépasser la capacité limite de poids nominal du gabarit.
Le dépassement de plus de 25lb (11,3kg) de la limite de poids peut provoquer la défaillance
du produit, ce qui peut entraîner des blessures graves.
AVERTISSEMENT Lorsque vous installez les portes, faites particulièrement attention à ne
pas vous blesser. Veillez à ce que la porte d’armoire soit correctement placée sur le gabarit et
soutenue d’une main.
AVERTISSEMENT Évitez de positionner vos mains de la mauvaise façon, car un glissement
soudain pourrait causer un contact avec la mèche en rotation.
AVERTISSEMENT N’utilisez pas cet outil ou toute autre machine lorsque vous êtes sous
l’inuence de drogues, d’alcool ou de médicaments.
AVERTISSEMENT Ce produit peut vous exposer à des produits chimiques, notamment le
carbone 1333-86-4 ou d’autres types de produits chimiques dont l’État de Californie reconnaît être
cancérigènes et nocifs pour la reproduction. Pour en savoir plus, visitez www.P65Warnings.ca.gov.
Table des matières
Précautions de sécurité . . . . . . . . . . 14
Avant l’assemblage. . . . . . . . . . . . . 15
Outils/Matériel recommandés . . . . . .15
Description du produit . . . . . . . . . .15
Assemblage. . . . . . . . . . . . . . . . . 16
Avant de commencer . . . . . . . . . . 16
Tableau de réglage des gabarits et
d’utilisation des cales . . . . . . . . . . 18
Mode d’emploi . . . . . . . . . . . . . . .20
Utilisation du gabarit . . . . . . . . . . .20
Maintenance . . . . . . . . . . . . . . . . 22
Entretien et nettoyage . . . . . . . . . . . 22
Dépannage . . . . . . . . . . . . . . . . .22
Ajustement en fonction du poids de la porte
d’armoire . . . . . . . . . . . . . . . . .22
Accessoires recommandés (non inclus) . . 22

15
Avant l’assemblage
Consultez cette section avant de commencer. Assurez-vous d’avoir tous les outils et les matériaux
à portée de main et comparez ce qui se trouve dans l’emballage avec les articles énumérés
dans la section Description du produit. Si un article semble manquant ou perdu, n’utilisez pas ce
produit. Contactez le soutien technique ou retournez le produit où vous l’avez acheté.
Outils/Matériel recommandés
Serre-joint Crayon
Description du produit
C
A
B
D
Pièce Description Pièce Description
A Cale A C Gabarit de montage pour les portes d’armoires
B Cale B D Bras de support

16
Assemblage
Avant de commencer
Remarque Ce gabarit peut être utilisé pour installer des portes d’armoires murales et d’armoires
sur plancher.
a. Installez vos charnières sur vos portes.
b. Utilisez le tableau de la page18 pour déterminer le réglage correct du gabarit et les cales à
utiliser pour le recouvrement souhaité (la largeur dont votre porte chevauchera le cadre de
votre armoire ou le cadre frontal).
1 Fixez le bras de support au gabarit
a. Déterminez l’orientation correcte du bras de support (D) par rapport au gabarit (C) pour la
conguration que vous utilisez.
C
D
D
Pour un montage sur une porte
d’armoire droite, le bras de support
doit s’étendre à droite du gabarit.
Pour un montage sur une porte
d’armoire gauche, le bras de
support doit s’étendre à gauche
du gabarit.

17
b. Insérez les chevilles (1) du bras de support (D) dans le bon réglage du gabarit (voir tableau page18).
c. Faites glisser le bras de support (D) horizontalement pour le xer en place.
D
C
1
Remarque Pour retirer le bras de support, faites-le glisser horizontalement et éloignez-le du
gabarit. Retournez le bras de support et xez-le à nouveau au même réglage de gabarit pour la
porte opposée.
2 Facultatif: Ajoutez des cales au bras de support
Selon la distance à laquelle vous souhaitez que la porte recouvre l’ouverture, vous pouvez utiliser
le bras de support seul ou ajouter une ou deux cales. Utilisez le tableau de la page18 pour
déterminer les cales à utiliser.
a. Appliquez la cale (A ouB) à l’extrémité du bras de support.
Remarque Pour démonter, retirez la ou les cales de l’extrémité du bras de support.
A B A
B

18
Tableau de réglage des gabarits et d’utilisation des cales
Recouvrement Cale Mise en place
du gabarit
Alaise — 1
1/4 po (6,5 mm) — 2
5/16po (8 mm) A + B
3
3/8 po (9,5 mm) A
7/16 po (11 mm) B
1/2po (13mm) —
9/16 po (14 mm) A + B
4
5/8 po (16 mm) A
11/16 po (17,5 mm) B
3/4 po (19 mm) —
13/6 po (20,5 mm) A + B
5
7/8 po (22 mm) A
15/16 po (24 mm) B
1po (26mm) —
1 1/16 po (27 mm) A + B
6
1 1/8po (28,5mm) A
1 3/16 po (30 mm) B
1 1/4po (31,5mm) —
Recouvrement Cale Mise en place
du gabarit
1 5/16 po (33 mm) A + B
7
1 3/8 po (35 mm) A
1 7/16 po (36,5 mm) B
1 1/2po (37,5mm) —
1 9/16 po (40 mm) A + B
8
1 5/8 po (41 mm) A
1 11/16 po (43 mm) B
1 3/4po (45mm) —
1 13/16 po (46 mm) A + B
9
1 7/8 po (47,5 mm) A
1 15/16 po (49 mm) B
2po (50mm) —

19
3 Positionnez le gabarit
a. Alignez le gabarit (C) sur le bord inférieur de l’armoire aussi près que possible de l’ouverture
de la porte.
C
4 Serrez solidement le gabarit
Avertissement Suivez les consignes de sécurité du fabricant de votre serre-joint. Assurez-vous
que le gabarit est bien serré avant de suspendre la porte d’armoire.
a. Fixez le gabarit (C) en place.
C

20
Mode d’emploi
Utilisation du gabarit
Ce gabarit est recommandé pour les portes d’armoires de 25lb (11,3kg) ou moins.
Avertissement Lorsque vous installez les portes, faites particulièrement attention à ne pas vous
blesser. Veillez à ce que la porte d’armoire soit correctement placée sur le gabarit et soutenue
d’une main.
a. Alignez la porte d’armoire à un angle de 90degrés par rapport à l’avant de l’armoire.
b. Posez le coin inférieur de la porte sur le bras de support (D) et maintenez la porte en place
avec une main.
D
This manual suits for next models
1
Table of contents
Languages:
Other Kreg Tools manuals

Kreg
Kreg KMA4000 User manual

Kreg
Kreg K4 User manual

Kreg
Kreg Jig HD User manual

Kreg
Kreg Rip-Cut KMA2675 User manual

Kreg
Kreg FOREMAN DB210 User manual

Kreg
Kreg R3-INT User manual

Kreg
Kreg 700 Series User manual

Kreg
Kreg r3 Operating and maintenance manual

Kreg
Kreg KPHJ310 User manual

Kreg
Kreg K3 Operating and maintenance manual

Kreg
Kreg Track Clamp User manual

Kreg
Kreg KHI-SLIDE-INT User manual

Kreg
Kreg KPHJ230 User manual

Kreg
Kreg Jig K5 User manual

Kreg
Kreg DB110 Operating and maintenance manual

Kreg
Kreg 520PRO User manual

Kreg
Kreg 500 Series User manual

Kreg
Kreg 720PRO User manual

Kreg
Kreg Rip-Cut KMA2685 User manual

Kreg
Kreg MINI KREG JIG User manual