manuals.online logo
Brands
  1. Home
  2. •
  3. Brands
  4. •
  5. Kruger
  6. •
  7. Ventilation Hood
  8. •
  9. Kruger Ecowatt K320 Series Installation guide

Kruger Ecowatt K320 Series Installation guide

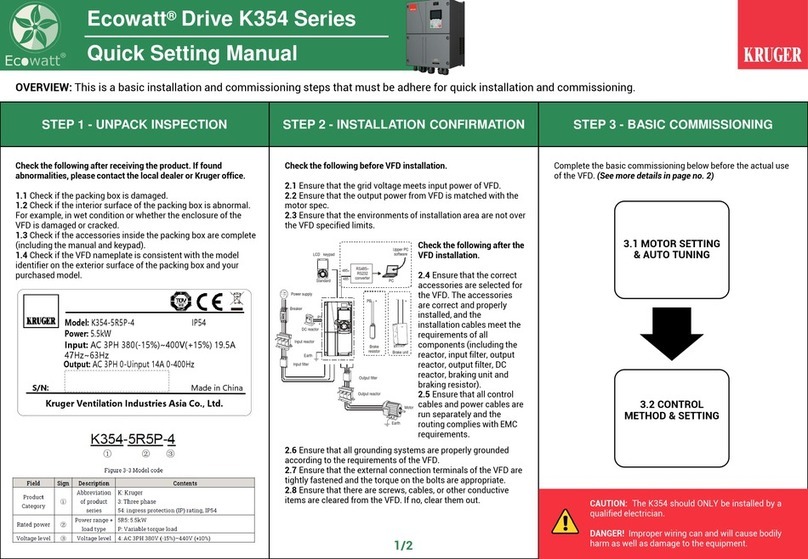
STEP 1 - UNPACK INSPECTION STEP 2 - INSTALLATION CONFIRMATION STEP 3 - BASIC COMMISSIONING
Ecowatt®Drive K320 Series
Quick Setting Manual
3.1 MOTOR SETTING
& AUTO TUNING
3.2 CONTROL
METHOD & SETTING
1/2
Power supply
Breaker
Input filter
Input reactor
Earth
DC reactor
LCD keypad
P1
+
+-
PB
Brake
resistor Brake unit
PC
RS485–
RS232
converter
Output filter
Output reactor
Motor
Earth
+
Upper PC
software
485+
485-
Standard
OVERVIEW: This is a basic installation and commissioning steps that must be adhere for quick installation and commissioning.
Check the following after receiving the product. If found
abnormalities, please contact the local dealer or Kruger office.
1.1 Check if the packing box is damaged.
1.2 Check if the interior surface of the packing box is abnormal.
For example, in wet condition or whether the enclosure of the
VFD is damaged or cracked.
1.3 Check if the accessories inside the packing box are complete
(including the manual and keypad).
1.4 Check if the VFD nameplate is consistent with the model
identifier on the exterior surface of the packing box and your
purchased model.
Check the following before VFD installation.
2.1 Ensure that the grid voltage meets input power of VFD.
2.2 Ensure that the output power from VFD is matched with the
motor spec.
2.3 Ensure that the environments of installation area are not over
the VFD specified limits.
2.6 Ensure that all grounding systems are properly grounded
according to the requirements of the VFD.
2.7 Ensure that the external connection terminals of the VFD are
tightly fastened and the torque on the bolts are appropriate.
2.8 Ensure that there are screws, cables, or other conductive
items are cleared from the VFD. If no, clear them out.
Check the following after the
VFD installation.
2.4 Ensure that the correct
accessories are selected for
the VFD. The accessories
are correct and properly
installed, and the
installation cables meet the
requirements of all
components (including the
reactor, input filter, output
reactor, output filter, DC
reactor, braking unit and
braking resistor).
2.5 Ensure that all control
cables and power cables are
run separately and the
routing complies with EMC
requirements.
Complete the basic commissioning below before the actual use
of the VFD. (See more details in page no. 2)
CAUTION: The K320 should ONLY be installed by a
qualified electrician.
DANGER! Improper wiring can and will cause bodily
harm as well as damage to the equipment.
Kruger Ventilation Industries Asia Co., Ltd.
Model: K320-004P-4 IP20
Power: 4.0kW
Input: AC 3PH 380(-15%)~400V(+15%) 13.5A
47Hz~63Hz
Output: AC 3PH 0-Uinput 9.5A 0-400Hz
S/N: Made in China
3.1 MOTOR SETTING & AUTO TUNING 3.2 CONTROL METHOD SETTING
1. Select the motor type
Push Manu => Parameter setting => Motor and Encoders
parameter setting => Motor1 param => P02.00 motor type
(0: Asynchronous motor, 1: Synchronous motor)
2. Set motor parameters follow Motor’s nameplate
- Asynchronous motor_P02.01 to P02.05
Example of setting
- Synchronous motor _P02.15 to P02.19
Example of setting
3. Auto tuning
De-couple the load from motor before start autotuning.
Push Manu => Motor parameters auto tuning =>
1: Rotary auto tuning => Push RUN to start auto tuning
=> Waiting until tuning completed
Note: If cannot be de-coupled motor from the load,
please select to perform 2: Static autotuning.
4. Check rotating direction
Push Jogging for 5sec to run motor and check whether
the motor rotational direction is correct. If not, change the
rotation direction by swapping UW wires of the motor.
or change P00.13 from 0 to 1: Run in reverse direction.
P02.01: Rated Power (3.0 kW)
P02.02: Rated Frequency (50 Hz)
P02.03: Rated Speed (2880 rpm)
P02.04: Rated Voltage (400 V)
P02.05: Rated Current (5.7 A)
1. Select Start/Stop command method
Push Manu => User defined parameter setting => P00.01: Run CMD channel
(0: Keypad, 1: Terminal, 2: Communication)
P00.01 = 0 : Start/Stop via Keypad
- You can Push or on Keypad directly.
P00.01 = 1 : Start/Stop via Terminal
- Connect 3 switch to terminal S1, S2, S3, COM, PE below.
P00.01 = 2 : Start/Stop via Communication (Modbus)
- Connect control cable to 485+, 485-, 485G below.
485+
RS485 connect to
Controller
485- 485G
Shieled cable
2. Select Speed command method
Push Manu => User defined parameter setting
=> P00.06: A Freq CMD
(0: Set via Keypad, 1: Set via AI1 )
P00.06 = 0 : Set via Keypad
- You can adjust motor speed / frequency from the
Digital Operator on Keypad directly.
P00.06 = 1 : Set via AI1
- Speed reference from external terminals
(Potentiometer or Analog Signal)
Connect cable to 10V, AI1, GND, PE below.
2/2
Ecowatt®Drive K320 Series
Quick Setting Manual
01: K354
16:02:35 Forward Local Ready
Set frequency
Return Homepage
0.00 630.00
01: K354
16:02:35 Forward Local Ready
Set frequency
P17.00 Hz 50.00
DC bus voltage
P17.11 V 540.0
0x0000
AboutMonitoring Menu
Digital input terminal state
P17.12
50.00
Hz
P02.15: Rated Power (4.77 kW)
P02.16: Rated Frequency (50 Hz)
P02.17: Number of pole pair (1)*
P02.18: Rated Voltage (400 V)
P02.19: Rated Current (12.5 A)
* 2 pole = 1 pole pair
3. BASIC COMMISSIONING (CONTINUE)
You can perform various operations on the VFD by using the
keypad, including entering/exiting menus, parameter selection,
list modification and parameter addition.


Other manuals for Ecowatt K320 Series

1

This manual suits for next models

1

Other Kruger Ventilation Hood manuals

Kruger Ecowatt Drive K354 Series Installation guide

Kruger

Kruger Ecowatt Drive K354 Series Installation guide

Kruger Alto S User manual

Kruger

Kruger Alto S User manual

Kruger KCE 100PA User manual

Kruger

Kruger KCE 100PA User manual

Kruger KM300 User manual

Kruger

Kruger KM300 User manual

Kruger KM300 User manual

Kruger

Kruger KM300 User manual

Kruger KR-300 Alto-R User manual

Kruger

Kruger KR-300 Alto-R User manual

Kruger ALTO-H User manual

Kruger

Kruger ALTO-H User manual

Kruger KA300 User manual

Kruger

Kruger KA300 User manual

Kruger KCE 140PA User manual

Kruger

Kruger KCE 140PA User manual

Kruger KA300 User manual

Kruger

Kruger KA300 User manual

Kruger ALTO-T User manual

Kruger

Kruger ALTO-T User manual

Kruger KH 300 User manual

Kruger

Kruger KH 300 User manual

Popular Ventilation Hood manuals by other brands

AEG PERFEKT GLIDE 24-1 manual

AEG

AEG PERFEKT GLIDE 24-1 manual

Venduro RA 90 LP manual

Venduro

Venduro RA 90 LP manual

Gorenje E016E II 1K37A 2B S B Instruction on mounting and use

Gorenje

Gorenje E016E II 1K37A 2B S B Instruction on mounting and use

Franke FCMY 120 C WHG A AH installation manual

Franke

Franke FCMY 120 C WHG A AH installation manual

AVG TEXAS AVT-309CS2 INSTALLATION GUIDE / USE AND CARE MANUAL

AVG

AVG TEXAS AVT-309CS2 INSTALLATION GUIDE / USE AND CARE MANUAL

Cata GL-75X Manual for installation

Cata

Cata GL-75X Manual for installation

Pkm BS47-60ABTH instruction manual

Pkm

Pkm BS47-60ABTH instruction manual

Diamond KCGD1/AS manual

Diamond

Diamond KCGD1/AS manual

Teka GFG2 instruction manual

Teka

Teka GFG2 instruction manual

Best IEX170SS manual

Best

Best IEX170SS manual

Vallox 280 SE manual

Vallox

Vallox 280 SE manual

Kuppersberg LORA 90/60 Technical Passport

Kuppersberg

Kuppersberg LORA 90/60 Technical Passport

bora PL 540 Mounting and installation instructions

bora

bora PL 540 Mounting and installation instructions

Caple SL903-P manual

Caple

Caple SL903-P manual

Grundig GDSP2464BBSC user manual

Grundig

Grundig GDSP2464BBSC user manual

FläktGroup CPDB Technical manual

FläktGroup

FläktGroup CPDB Technical manual

Electrolux EFF55550DX user manual

Electrolux

Electrolux EFF55550DX user manual

Whirlpool GZ5730XRB0 Installation Instructions and Use & Care Guide

Whirlpool

Whirlpool GZ5730XRB0 Installation Instructions and Use & Care Guide

manuals.online logo
manuals.online logoBrands
  • About & Mission
  • Contact us
  • Privacy Policy
  • Terms and Conditions

Copyright 2025 Manuals.Online. All Rights Reserved.