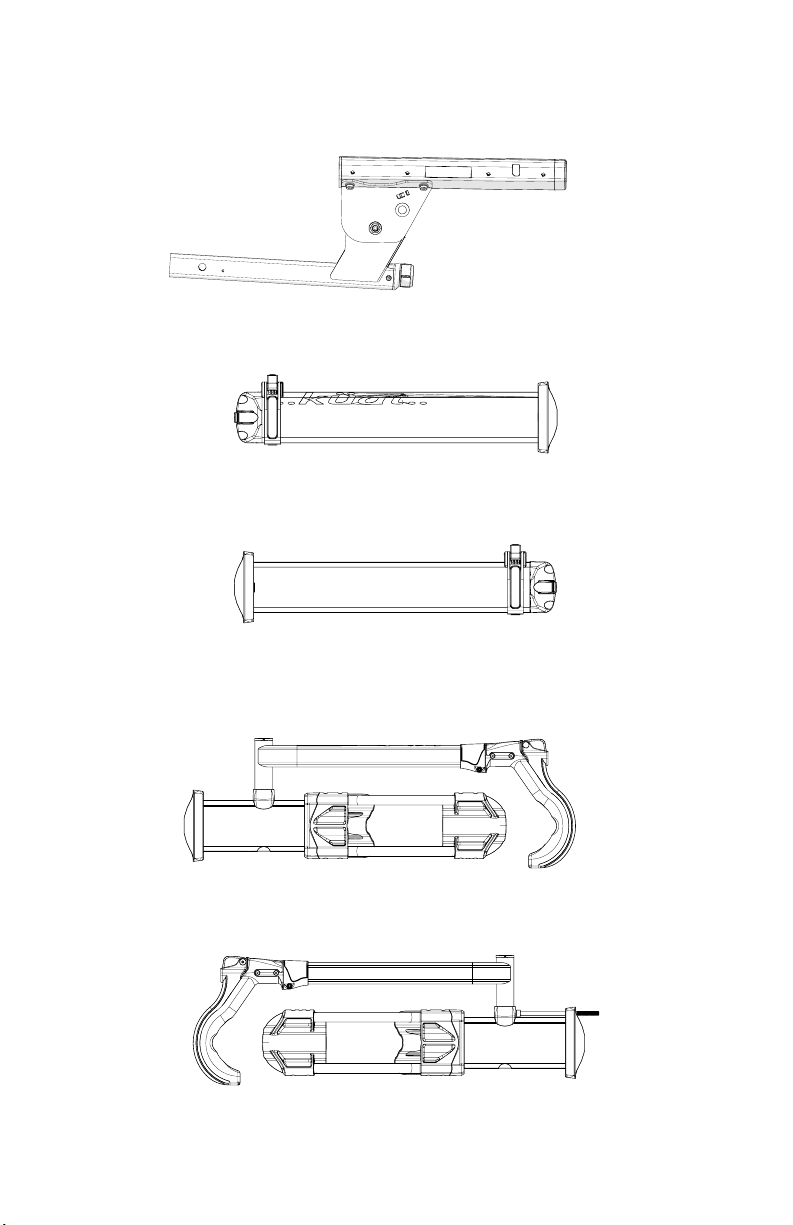
Kuat NV BASE 2.0 User manual

NV BASE™2.0
USER GUIDE
NV BASETM 2.0

2
Parts:
Inner Front Tire Tray
Outer Front Tire Tray
Outer Rear Tire Tray
Inner Rear Tire Tray
Pivot Assembly

3
Included in the parts box:
6mm Allen Wrench
8mm Allen Wrench 4x M8 Nut
3x M8x160 Bolts
M8 Lock Washer
3x Keys
Bottle Opener
Key-chain
Rear End Cap
Pivot Lever Hitch Pin and Lock
M8x45 Bolt
Rear End Cap
STEP 1. Insert rear end cap.
Part Needed:
2x Keys
Bottle Opener
Keychain
Hitch Pin and Lock

4
STEP 2. Align the trays with the holes on the cen-
ter-beam by matching the coordinating labels. Then
alternate between bolts to tighten.
3x M8x160 Bolts
4x M8 Nut
Parts Needed:
A
A
NOTE: The trays with the “..Küat..” Logo will be
farthest from the hitch. Performing this step with the
rack upside down will ease assembly.
NOTE: This tray has the M8x160
bolt pre-installed.
STEP 1. Align the trays with the holes on the center
beam by matching the coordinating labels.
Alternate between bolts to tighten.

5
STEP 3. Press the pivot lever onto the
corresponding keyed shaft. Then tighten the bolt
with the lock washer to secure the pivot lever.
Parts Needed:
Pivot Lever
NOTE: When positioning the
pivot lever there should be about
1in(25.4mm) of space between
the lever and the tray.
M8 Lock Washer M8x45 Bolt
NOTE. When positioning the
pivot lever there should be about
1in (25.4mm) of space between
the lever and the tray.

Using the Rear Entry NV Base 2.0 Hitch LockSection 2
1Insert NV 2.0 into hitch aligning hitch pin holes.
2Slide hitch pin through hitch, NV Base 2.0, and into new hitch lock.
Remove dust cover to
access lock key core
and lock hitch pin.
Tighten NV Base 2.0 Hitch Cam

7
Loading bicycles:
STEP 1. Rotate the tire hook outward. Press the
button and extend the hook.
NOTE: When not in use keep the tire hook rotated
inward to avoid damage.
STEP 2. Set the bicycle on the rack and place the
hook as close to the bicycle’s front fork as possible,
then ratchet the hook down onto the tire.
NOTE: Proper placement of the
tire hook is critical to securing
the bicycle to the rack.

8
NOTE: 7RDGMXVWIRUELF\FOHðWLVVXHVORRVHQWKH
front cradle bolt with an 8mm allen wrench (Do not
fully remove the bolt). Once loose, move the cradle to
one of three positions; up, center, or down. Tighten
the bolt to secure the cradle in position.
Failure to re-tighten bolt can lead to loss of bike.
STEP 3. Feed the rear tire strap through the
rear tire and behind the tire retention tab, then pull
through the ratchet pawl until the rear tire is secure.
NOTE: Failure to properly feed and tighten the
strap can lead to loss of bike.
NOTE. To adjust for bicycle fit issues, loosen the
front cradle bolt with an 8mm Allen wrench (Do not
fully remove the bolt). Once loose, move the cradle
to one of three positions; up, center, or down.
Tighten the bolt to secure the cradle in position.
Tire scoop will need to be adjusted into the down position to
accommodate 50” wheelbases.

11
Additional Notes:
NOTE: When loading bicycles with 20”-24” front
tires an adapter must be used. Please contact Kuat
Racks directly by calling toll free 1(877)822-5828, or
adapter kit will be provided.
20”-24” Adapter Kit
Tips and Tricks.
•Periodicallycheckallnutsandboltsforpropertightness,
not doing so can lead to premature wear or rack failure.
•Lubricate the lock mechanisms using a light oil. Keep
the cover on the hitch pin lock at all times.
•The 8mm allen wrench can be stored in the rear end
cap for easy access.
•The 8mm allen wrench can be used to tighten and
loosen the cam system.
•Keeping your rack clean will help prevent corrosion
and keep the rack working correctly for years.
•The pivot handle is also designed to be used as foot
pedal when lowering the trays.
•0DNH VXUH WKH ELF\FOHVâ WLUHV DUH SURSHUO\ LQñDWHG
and free of leaks. Bicycles can become loose if a tire
GHñDWHVZKLOHLQWKHUDFN
NOTE. When loading bicycles with 20”-24” front
tires an adapter must be used. Please contact Küat
Racks directly by calling toll free 1(877) 822-5828, or
adapter kit will be provided.
Tips and Tricks
• Periodically check all nuts and bolts for propert tightness.
Not doing so can lead to premature wear or rack failure.
• Lubricate the lock mechanisms using a light oil.. Keep
the cover on the hitch pin lock at all times.
• The 8mm Allen wrench can be stored in the rear end cap
for easy access.
• The 8mm Allen wrench can be used to tighten and loosen
the cam system.
• Keeping your rack clean will help prevent corrosion and
keep the rack working correctly for years.
• The pivot handle is also designed to be used as a foot
pedal when lowering the trays.
• Make sure the bicycles’ tires are properly inflated and
free of leaks. Bicycles can become loose if a tire deflates
while in the rack.

Küat Rack Warnings
NV BASE
™2.0
Number Of Bikes Weight Per Bike Max Wheelbase Max Tire Width
2
-
60 lb
27.2 kg
50 in
1270 mm
5 in
127 mm
50lbs with
1 Bike Add On
40lbs with
2 Bike Add On
3 with
1 Bike Add On
4 with
2 Bike Add On
WARNINGS
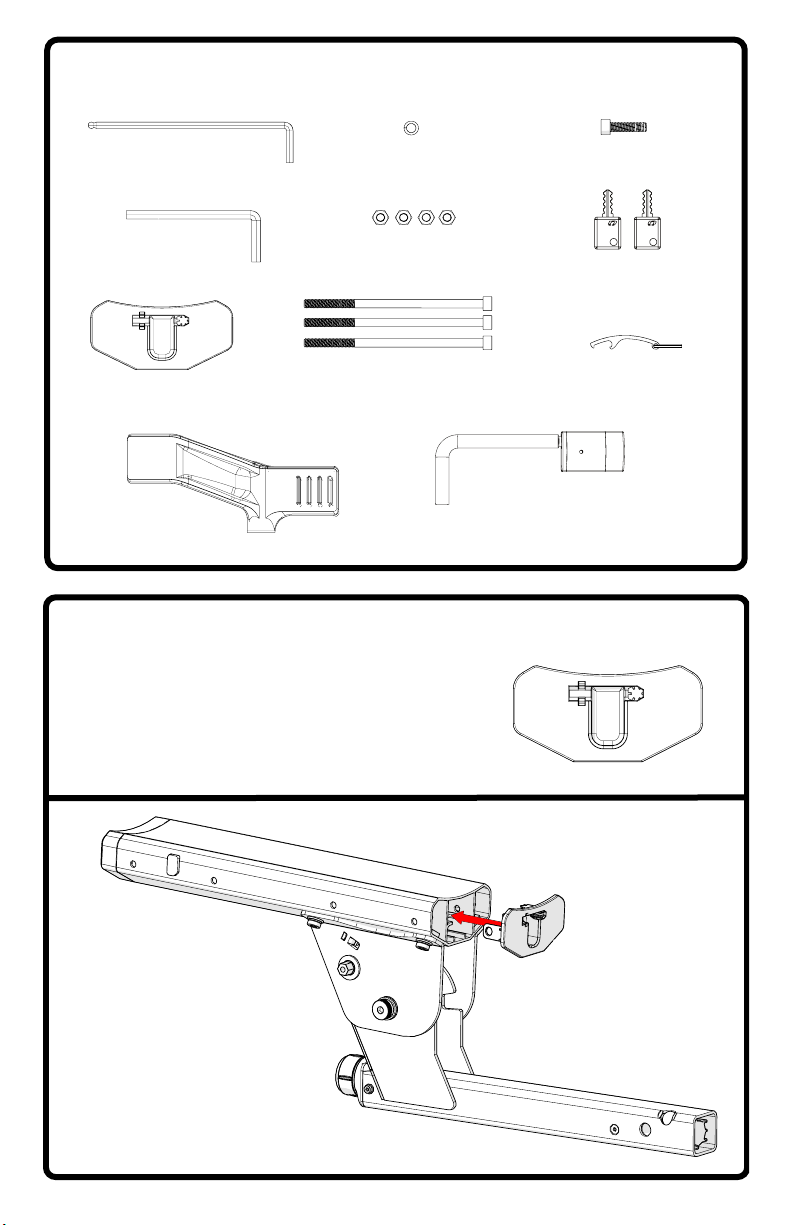
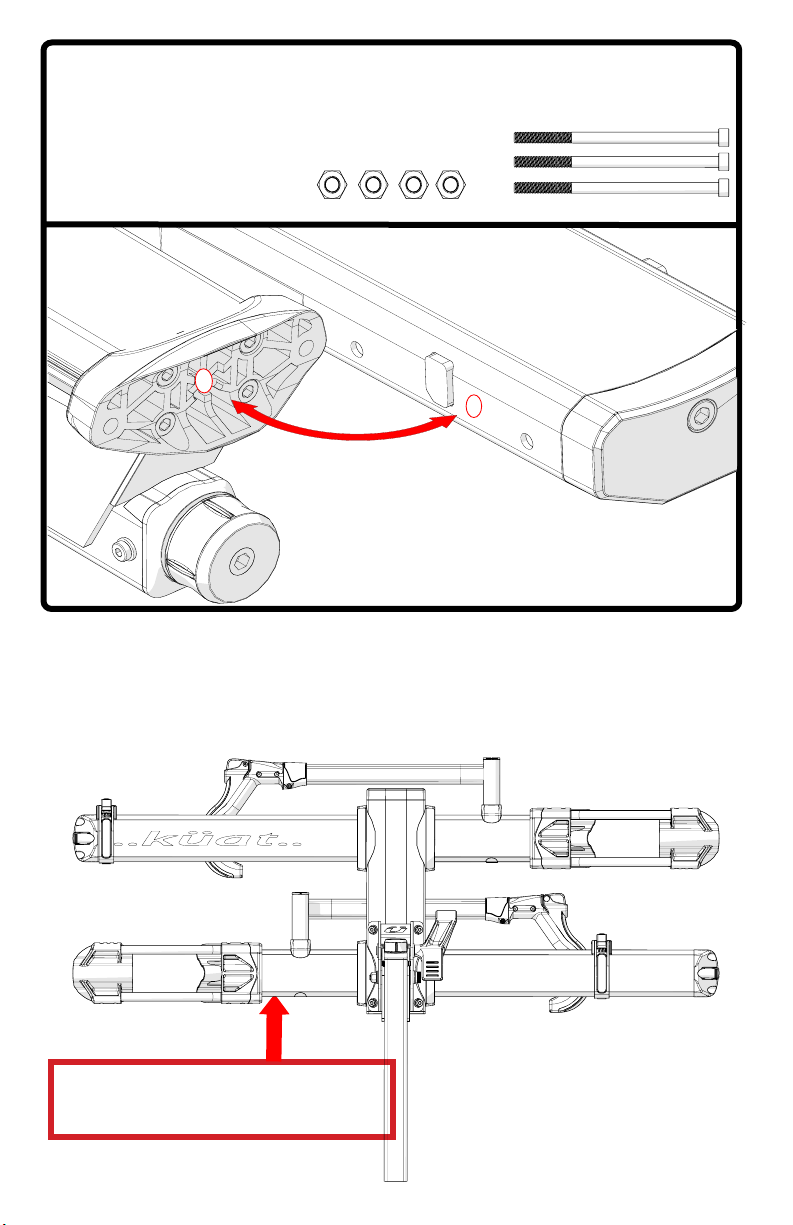
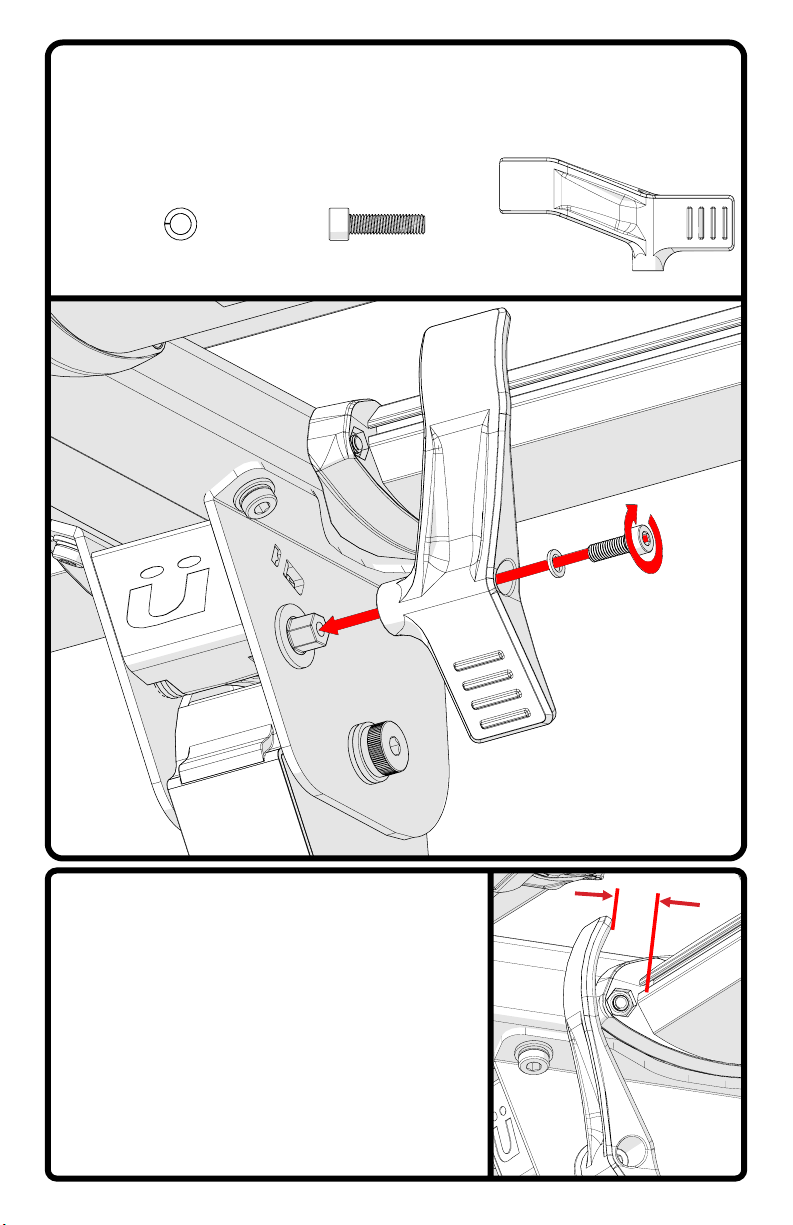
• Follow instructions for proper assembly, installation, and use.
• Check tightness of all bolts and screws periodically.
• Make sure rack and vehicle receiver are in working condition before each use.
• Only use Küat hitch extenders witih this product.
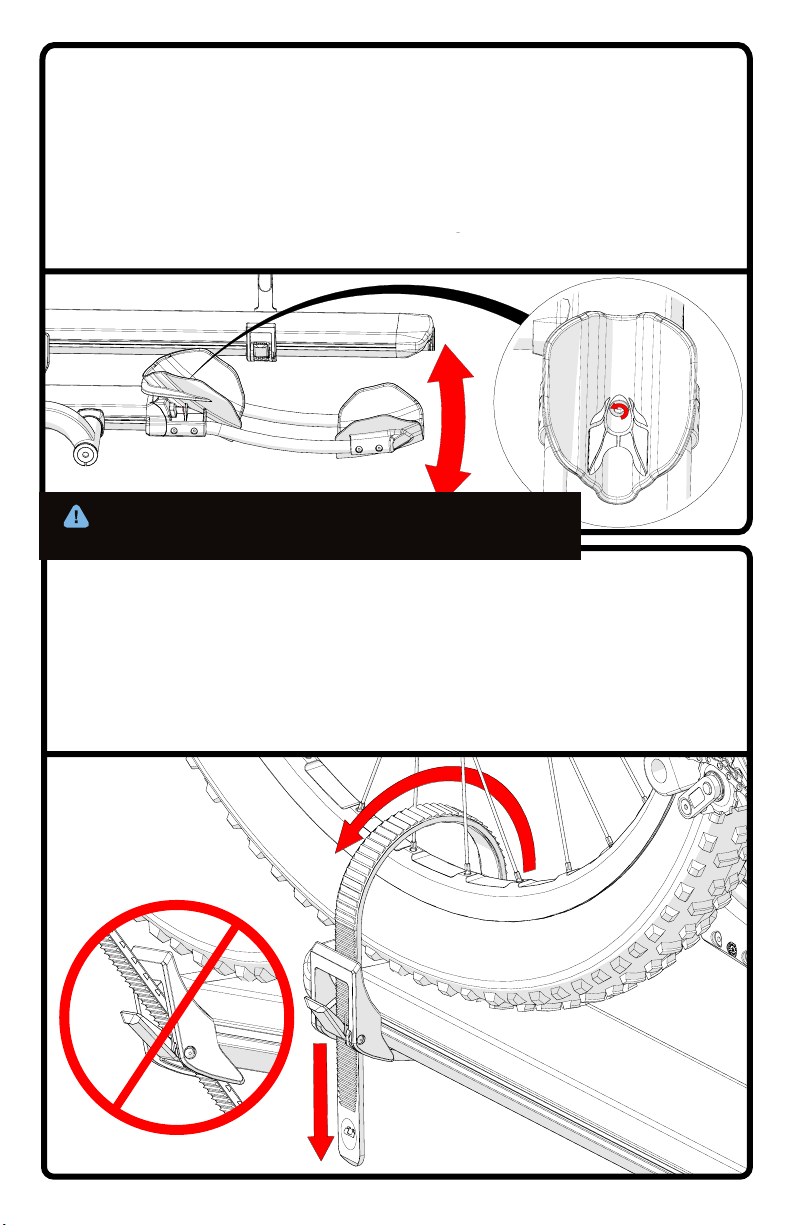
• Place front tire ratchet arm as close to front fork as possible.
• Do not use front tire bicycle fenders with this product.
• Do not exceed the bicycle or weight limits intended for this rack.
• Do not use rack Off-Road*. (*Rough, washed out, boulder-and-rut-strewn backroads)
-Smooth gravel roads are not considered off-road.
• Do not use tarps, rain covers, or wind covers with this product.
• Do not install this product on campers, recreational vehicles or trailers.
• Do not take through automatic car wash.
• Drive responsibly.
If you have questions or problems, please contact Küat Racks directly by calling toll free
ADVERTENCIAS
• Siga las instrucciones para un montaje, instalación y uso adecuados.
• Compruebe periódicamente la estanqueidad de todos los pernos y tornillos.
• Asegúrese de que el estante y el receptor del vehículo estén funcionando antes de cada uso.
• Utilice únicamente extensores de enganche Küat con este producto.
• Coloque el brazo de trinquete del neumático delantero lo más cerca posible de la horquilla delantera.
• No utilice guardabarros delanteros para bicicletas con este producto.
• No exceda los límites de bicicleta o peso destinados a esta parrilla.
• No utilice el bastidor Off-Road *. (* Caminos en bruto, deslavados, llenos de rocas y surcos)
-Los caminos de grava lisa no se consideran fuera de carretera.
• No use lonas, cubiertas para la lluvia o cubiertas para el viento con este producto.
• No instale este producto en autocaravanas, vehículos recreativos o remolques.
• No realice el lavado automático de automóviles.
• Conduzca responsablemente.
AVERTISSEMENTS
• Suivez les instructions pour un assemblage, une installation et une utilisation appropriés.
• Vérifiez régulièrement le serrage de tous les boulons et vis.
• Assurez-vous que le support et le récepteur du véhicule sont en état de marche avant chaque utilisation.
• Utilisez uniquement des rallonges d'attelage Küat avec ce produit.
• Placer le bras de cliquet du pneu avant le plus près possible de la fourche avant.
• N'utilisez pas d'ailes de vélo avant avec ce produit.
• Ne dépassez pas les limites de vélo ou de poids prévues pour ce support.
• N'utilisez pas le rack Off-Road *. (* Routes rugueuses, délavées, parsemées de rochers et d'ornières)
-Les routes de gravier lisses ne sont pas considérées comme hors route.
• N'utilisez pas de bâches, de housses de pluie ou de vent avec ce produit.
• N'installez pas ce produit sur des camping-cars, des véhicules récréatifs ou des remorques.
• Ne passez pas au lave-auto automatique.
• Conduisez de manière responsable.

13
Küat Racks Limited Lifetime Warranty
Küat honors the warranty on all Küat brand products for original owners of the product. Warranty is not
transferable.
If a Küat rack that is covered by the terms of this warranty and is determined by Küat, to be defective, Küat will
repair or replace the defective parts. Küat may choose in some cases to offer the owner a refund of up to the
original purchase price of the product in lieu of repairing or replacing the product.
The Küat warranty does not cover any conditions that are beyond Küat’s control. This includes, but is not
limited to, the following: excessive loading, improper assembly, improper installation, theft, or any use that is
not consistent with the user guide that is included with the product.
The Küat Warranty does not cover normal wear and tear, scratches, cosmetic oxidation, accidents, or damage
GXHWRXQDXWKRUL]HGUHSDLUVRUPRGLðFDWLRQV
If you are the original owner of a defective Küat product, please contact Küat at 1(877)822-5828. A Küat
representative will work to quickly resolve the problem. If repairs are necessary, the owner will be responsible
for the cost of returning the product to Küat for repair. No product should be returned to Küat without prior
authorization from Küat staff.
LIMIT OF LIABILITY
THIS WARRANTY ONLY COVERS REPAIR, REPLACEMENT OR REFUND FOR THE COVERED KÜAT PRODUCT.
ANY DAMAGE TO VEHICLE OR PROPERTY IS NOT COVERED BY THIS WARRANTY. PERSONAL INJURY IS
NOT COVERED BY THIS WARRANTY.
LIMITATION OR EXCLUSION OF INCIDENTAL DAMAGE IS NOT ALLOWED IN ALL STATES SO THE ABOVE
LIMITATIONS MAY NOT APPLY.
Küat respeta la garantía de todos los portabicicletas Küat mientras el comprador original sea el propietario de
dicho producto. Si el comprador original vende o de alguna otra manera cede el producto a otra persona, la
garantía será revocada.
Si un portabicicletas Küat que esté cubierto por los términos de esta garantía está defectuoso, Küat reparará
o remplazará las partes defectuosas a su propio criterio. Küat puede optar en algunos casos por ofrecer el
reembolso del precio de compra del product en lugar de repararlo o de reemplazar las piezas defectuosas.
La garantía Küat no cubre ninguna condición que esté más allá del control de Küat. Esto incluye, más no
limita, carga excesiva, ensamblaje impropio, montaje impropio, robo o cualquier uso que no sea consistente
con las instrucciones que están incluidas con el producto o que están disponibles para el usuario.
La garantía Küat no cubre el uso y desgaste natural, raspaduras, oxidación cosmética, accidentes, operación
LOHJDOGHOYHKķFXORRPRGLðFDFLRQHVRUHSDUDFLRQHVQRDXWRUL]DGDV
Si usted es el propietario original de un producto Küat defectuoso, por favor contacte a Küat al 1(877) 822-
5828. . Un representante de Küat le atenderá para resolver su problema. Si son necesarias reparaciones, el
propietario será responsable por el costo del envío del producto a Küat para su reparación. Ningún producto
deberá ser enviado a Küat sin previa autorización de un agente de Küat.
LIMITE DE RESPONSABILIDAD
ESTA GARANTIA SOLO CUBRE REPARACIONES, REEMPLAZOS O REEMBOLSOS PARA EL PRODUCTO DE
KÜAT CUBIERTO. CULAQUIER DAÑO AL VEHICULO O PROPIEDAD O LESION NO ESTA CUBIERTA POR ESTA
GARANTIA.
LIMITANTES O EXCLUSIONES DE DAÑO ACCIDENTAL NO ESTAN PERMITIDAS EN TODOS LOS ESTADOS,
POR LO TANTO ESTAS LIMITANTES PODRIAN NO APLICAR.
Küat honore la garantie de toute sa gamme du support de la marque Küat tant qu’il demeure la propriété du
SURSULÒWDLUHRULJLQDO/DJDUDQWLHSUHQGðQORUVTXHOHSURSULÒWDLUHRULJLQDOVHGÒSDUWLWGXSURGXLWHQOHYHQGDQW
ou en le transférant à une autre personne.
Si un article Küat fait défaut alors qu’il est sous garantie, Küat réparera ou remplacera, à sa discrétion, la ou les
pièces défectueuses. Küat pourrait choisir dans certains cas d’offrir un remboursement du prix à l’achat au lieu
de réparer ou de remplacer la pièce défectueuse.
La garantie Küat ne couvre pas les conditions hors du control de Küat. Celles-ci incluent mais ne sont pas
limitées à un chargement excessive, un assemblage erroné, un mauvais montage, le vol ou tout usage qui n’est
pas conforme aux instructions (incluses avec le produit) accessibles à l’utilisateur.
La garantie Küat ne couvre pas l’usure normale, les égratignures, l’oxydation, les accidents, l’usage illégal d’un
YÒKLFXOHRXOHVUÒSDUDWLRQVRXPRGLðFDWLRQVQRQDXWRULVÒHV
Si vous êtes le propriétaire original d’un produit Küat défectueux, prière de contacter Küat au 1-877-822-5828.
Un représentant Küat travaillera à la résolution du problème. Si des réparations sont nécessaires, l’acheteur
doit assumer les frais d’envoie pour faire parvenir le produit Küat à l’entreprise. Ne retourner pas un produit
Küat tant que vous n’obtenez pas l’autorisation d’un représentant de Küat.
LIMITE DE RESPONSABILITÉS
LA GARANTIE COUVRE SEULEMENT LA RÉPARATION , LE REMPLACEMENT OU LE REMBOURSEMENT
D’UN PRODUIT KÜAT SOUS GARANTIE. LA GARANTIE NE COUVRE PAS LES DOMMAGES AU VÉHICULE,
LES DOMMAGES À LA PROPRIÉTÉ NI LES BLESSURES.
L ES RESTRICTIONS OU LES EXCLUSIONS CONCERNANT LES DOMMAGES ACCIDENTELLES NE SONT PAS
ADMISES DANS TOUS LES ÉTATS OU CES RESTRICTIONS PEUVENT NE PAS S’APPLIQUER.

1Slide lock assembly out of tray until cable is fully extended.
When near full extension
cable will catch.
Pull again to fully seat
cable into lock.
2Slide dust cover forward to
access lock key core.
3Feed cable through
rear triangle of the bike
and secure cable tip
into the lock port.

10
STEP 6. When adjusting the pivot position always
support the end of the rack before engaging the pivot
lever. This will assist with the release of the pivot
lever and prevent the rack from falling.
NOTE: The rack can tilt down for access to the rear
hatch of the vehicle. Use caution when opening the
rear hatch as this may not clear all hatches.
Other manuals for NV BASE 2.0
1
Table of contents
Other Kuat Automobile Accessories manuals
Popular Automobile Accessories manuals by other brands

Diamondback
Diamondback 270 installation guide

Malmbergs
Malmbergs C0051 instruction manual

KAP
KAP AUDI R PAS D instruction manual

Westfalia Automotive
Westfalia Automotive 306 235 Installation and operation instructions

Westfalia
Westfalia 321 452 300 107 installation instructions

Ranger design
Ranger design 5047 installation guide