Kuhling&Kuhling RepRap User manual

Quick Start Guide
Congratulation, you probably just received your RepRap Industrial 3D Printer. Follow these short
instructions and you are up and running in no time!
You will always find the latest version of the manual, additional documentation and new software
releases at
http://docs.kuehlingkuehling.de
Please visit our site regularly so that you do not miss important developments and new features.
Safety precautions
In order to ensure your own safety and the proper functioning of your RepRap Industrial read and
observe the following information.
Electrical safety
Only connect the 3D Printer to the specified supply voltage.
Do not operate the 3D Printer with defective cable connections.
Work on the electrical connections and the electrical equipment of the 3D Printer must only be
carried out by trained personnel.
Health hazards
Due to the production process and depending on the material used for printing, components in
the build chamber may reach temperatures up to 300 °C (572 °F). Wear adequate protective
gloves, when handling freshly printed objects if you do not wish to cool down the machine
between two print jobs.
The weight of the RepRap Industrial exceeds 50 kg. Always carry it two by two.
Use only mild detergents for cleaning. When using solvents to remove filament residues, always
regard the safety data sheet of the manufacturer. Wear adequate protective equipment if
required.
Damage risks
Never switch off the machine by flipping the main switch while the system is still running.
Always shut down the 3D Printer properly as described in Shutdown / Wake up.
Be careful not to damage the print bed. Scratched, broken or buckled print beds can no longer
be used for production and must be replaced.

Do not use solvents inside the build chamber. Solvent fumes may damage printer components
or dissolve printed objects.
Additional information
Your network must provide DHCP IP address management and should be connected to the
internet to enable the 3D Printer to fetch current time signal via Network Time Protocol (ntp).
When printing large objects with high demands concerning dimensional accuracy and close
tolerances, it is advisable to let the 3D Printer cool down for at least 30 minutes after finishing
the print job to minimize warpage and to ensure the best possible results.
Small gas bubbles appearing in the water cooling system after the initial commissioning are not
unusual. Due to the heating process the coolant may degas. This should disappear within the
first few operating hours. Otherwise, it is necessary to fill up the cooling system. You will find
further information in the complete manual at our website.
Overview
touchscreen and power-on button at the front
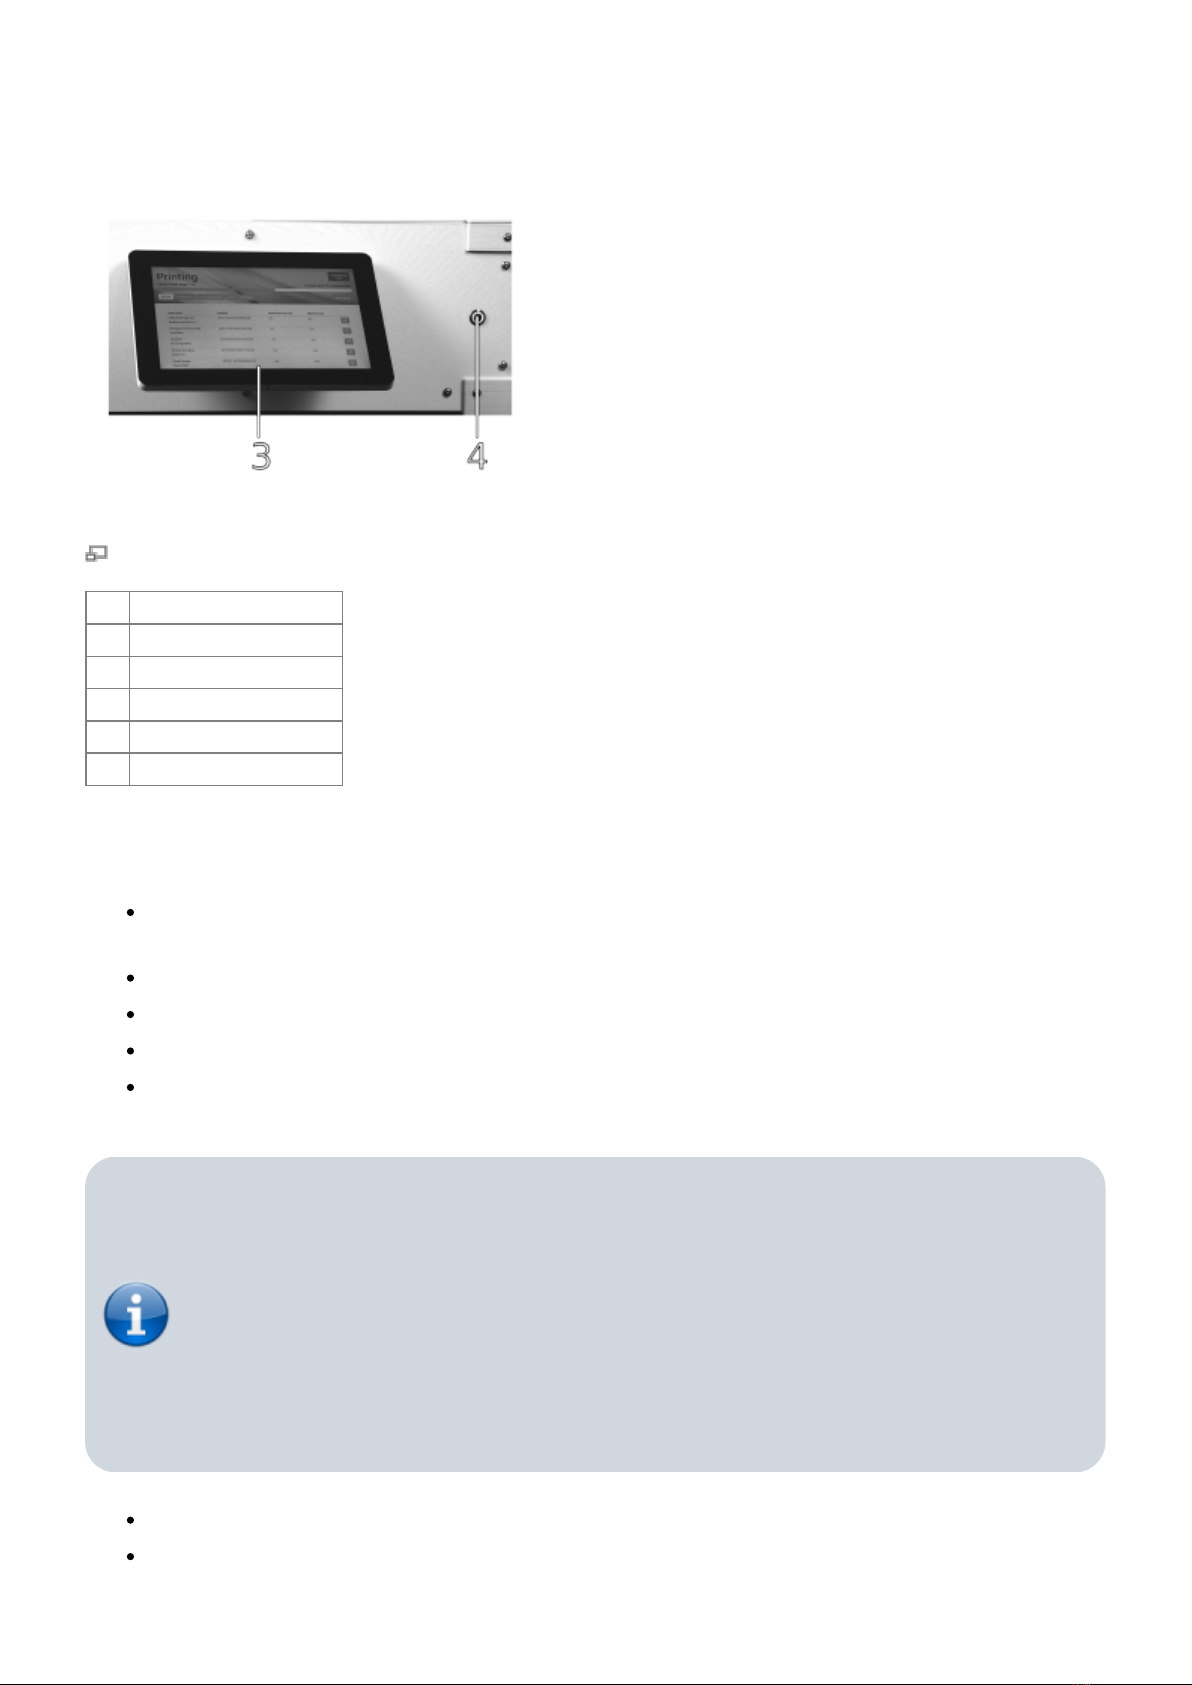
connections and main switch at the back
No. Description
1 touchscreen
2 power-on button
3 main switch
4 mains socket
5 RJ45 ethernet socket
Unpacking / Setting up
After opening the wooden transport box lid, lift the plywood side frame off the pallet in one
piece.
Cut and remove the packing straps.
Remove wooden panel and foam wrap on top of the machine.
Take out the accessory kit box.
Lift the 3D Printer with two persons onto a sturdy table with a flat surface. Always hold the
machine from beneath the bottom edges.
Installation requirements
The apparatus must not be set up in a surrounding with high formation of dust (e.g.
near woodworks etc.). Ingress of particles into the filament feed system can lead to
intense cleaning efforts due to clogging of the nozzle tips and thus immense non-
productive time.
Make sure that no tablecloth is placed underneath the apparatus to avoid blocking
the ventilation openings in the bottom. Loss of air flow can lead to severe damage by
overheating of the drives.
Pull the blue tape off the front doors (2x top edges, 2x bottom edges)
Pull the blue tape off the print bed cardboard support and carefully remove the cardboard from

underneath the print bed by tearing it into pieces.
Remove all remaining cardboard and blue tape used as transport protection from inside the
build chamber.
Gently move the print head into the center of the build chamber by hand.
Check the entire device carefully for any transportation damage.
Initial commissioning
The first few steps will prepare your RepRap Industrial for its day-to-day duty:
Close the build chamber.
Set the main switch at the rear of the 3D Printer to <0> (OFF).
Select the power cord from the accessory kit and connect the RepRap Industrial to the mains
socket.
Connect printer to wired ethernet via the RJ45 socket at the rear of the 3D Printer.
Make sure that no foreign objects are left in the build chamber (transport locks, tools or the
like).
Toggle the main switch to <I> (ON). When the power supply is initially switched on after
connection, the 3D Printer will boot up automatically. Please wait patiently until the full
controller interface is loaded on the touchscreen. The screen will show the Queue menu and
the top-left status message should read IDLE.
The next step is preheating the build chamber and the print bed in order to enable calibration at
operating temperature:
Tap the [Manual Control] button to enter the respective menu.
Activate the build chamber by tapping [Build Chamber ON] and then start the heating by
tapping [Preheat Chamber/Bed ON]. The current temperatures are indicated on the right side
of the screen. You can always check the temperature by tapping the [Refresh temperatures]
button.
Let the build chamber heat for approximately 45 minutes.
After the preheating, it is necessary to calibrate the print bed.
Important
Run the calibration in the given order:
Tap the [Setup] button to change to the setup menu.1.
Tap the [Print Bed Leveling] button to start the Wizard that will guide you2.
through the leveling process.
Follow the on-screen instructions step by step.3.
When the calibration has been successfully finished, all that is left to do is to load your RepRap
Industrial:

Tap the [Load Filament] button to start the Wizard that will guide you through the material
feed process.
Follow the on-screen instructions step by step.
Adjusting the filament spools.
Depending on the diameter of the filament spool you install, you may have to adjust the
spool guides in order to avoid poor conveyance of the filament.
The spool guides are preinstalled for fitting the 750 g spools provided for test reasons.
To adjust the spool guides:
Use an Allen wrench size 2.5 to loosen the two fixing screws of each spool guide.
Load a new filament spool onto the guide. Observe the direction of rotation.
Push the guide as close to the feed assembly as possible. Make sure that the spool
does not scrape at the filament feed.
Carefully fasten the fixing screws. Ensure that the hammerhead nuts are aligned
correctly.
At the end of the Load Filament Wizard, follow the suggestion to run the Prime Extruders
Wizard by tapping the respective button.
That's it - your RepRap Industrial 3D Printer is ready for the first print.
Preparing the first print
In the Setup menu at the touchscreen controller you see the network address (Backend-URL) by
which the RepRap Industrial is accessible from any computer that is connected to the same network.
Open a browser window on your computer and enter this URL in the address line.
You will be greeted with a “First Steps” welcome page to guide you through the installation of the
necessary slicing-software and uploading your print-job to the printer.
Shutdown / Wake up
To shut down the RepRap Industrial tap the [Manual Control] button at the touch screen and press
[Shutdown]. The system will then perform a clean shutdown after performing the cool-down
sequence for safety reasons. When the screen turns black and the illuminated ring of the power-on
button dims, the 3D Printer is in standby mode.
To wake the machine from standby, just push the power-on button once and the system will reboot.
Please wait patiently until the controller interface is entirely loaded on the touch screen at the
machine front. On the screen, the top-left status message should read IDLE.
During the boot sequence the screen stays black for a while. The boot-up may take
several minutes. Do not push any button during boot-up.
For day-to-day use, the power supply should stay connected to mains power (main switch in position
<I> (ON).
Important Information on handling the print bed
The black sheets used as print beds are made of polyetherimide (PEI) glass fabric composite material.
This material composition is highly resistant to a lot of solvents. It is particular compatible with
acetone and isopropylalcohol.
If you experience insufficient adhesion of the printed objects to the print surface during the first
prints, it is advisable to thoroughly clean the print bed once with an acetone-soaked lint-free cloth.
For further use, regular cleaning is usually not necessary. However, it should be ensured that the
surface is always free of grease (i.e. fingerprints). Should grease residues on the surface lead to poor
adhesion, the print bed can be degreased with isopropylalcohol.
After completion of a print proceed as follows:
Danger of burning!
Immediately after a print the print bed may still hold temperatures up to 115 °C (239
°F). Wear appropriate protective gloves when handling the print bed.
The print heads may hold temperatures of up to 300 °C (572 °F). To avoid severe
burns do not touch the print heads.
Remove the two frontal bulldog clamps.1.
Remove the print bed from from the print bed table.2.
Let the print bed cool down to room temperature with the workpiece still attached. Large3.
printed objects are likely to separate themselves from the surface. Smaller objects may be
released by gently bending the print bed from different angles and can easily pulled off
afterwards.
If residues of the print material remain on the print bed, use a very sharp, flat mounted blade to4.
scrape the surface clean. Be careful not to scratch the print bed.
Alternatively, ABS residues can be removed with a lint-free towel soaked in acetone.
Make sure to thoroughly wash off any ABS residues. Remaining ABS smear may lead to
increased adhesion, which can render it impossible to release printed objects without
damage.
Emergency stop
You will find a red Emergency stop button in the top-right corner of the touchscreen. In case of any
unexpected performance of the 3D Printer, press this button to immediately stop any mechanical
movement in the build chamber and to shut down all heater elements.

The emergency stop function does not provide a cool down sequence. Do not use
the emergency stop button to abort current print jobs, as this may lead to damage
of the 3D Printer due to uncontrolled heat accumulation.
Do not use the main switch as an emergency stop button. You risk loosing or
corrupting data.
When the Emergency Stop is triggered, the microcontroller board responsible for the stepper motors,
heaters and sensors is reset immediately and returns to idle state afterwards. Now it is safe to resolve
any problems or defects in the build chamber. The build chamber can then be reactivated via the
Manual Control screen or by starting a print job as usual.
Table of contents
Other Kuhling&Kuhling 3D Printer manuals


