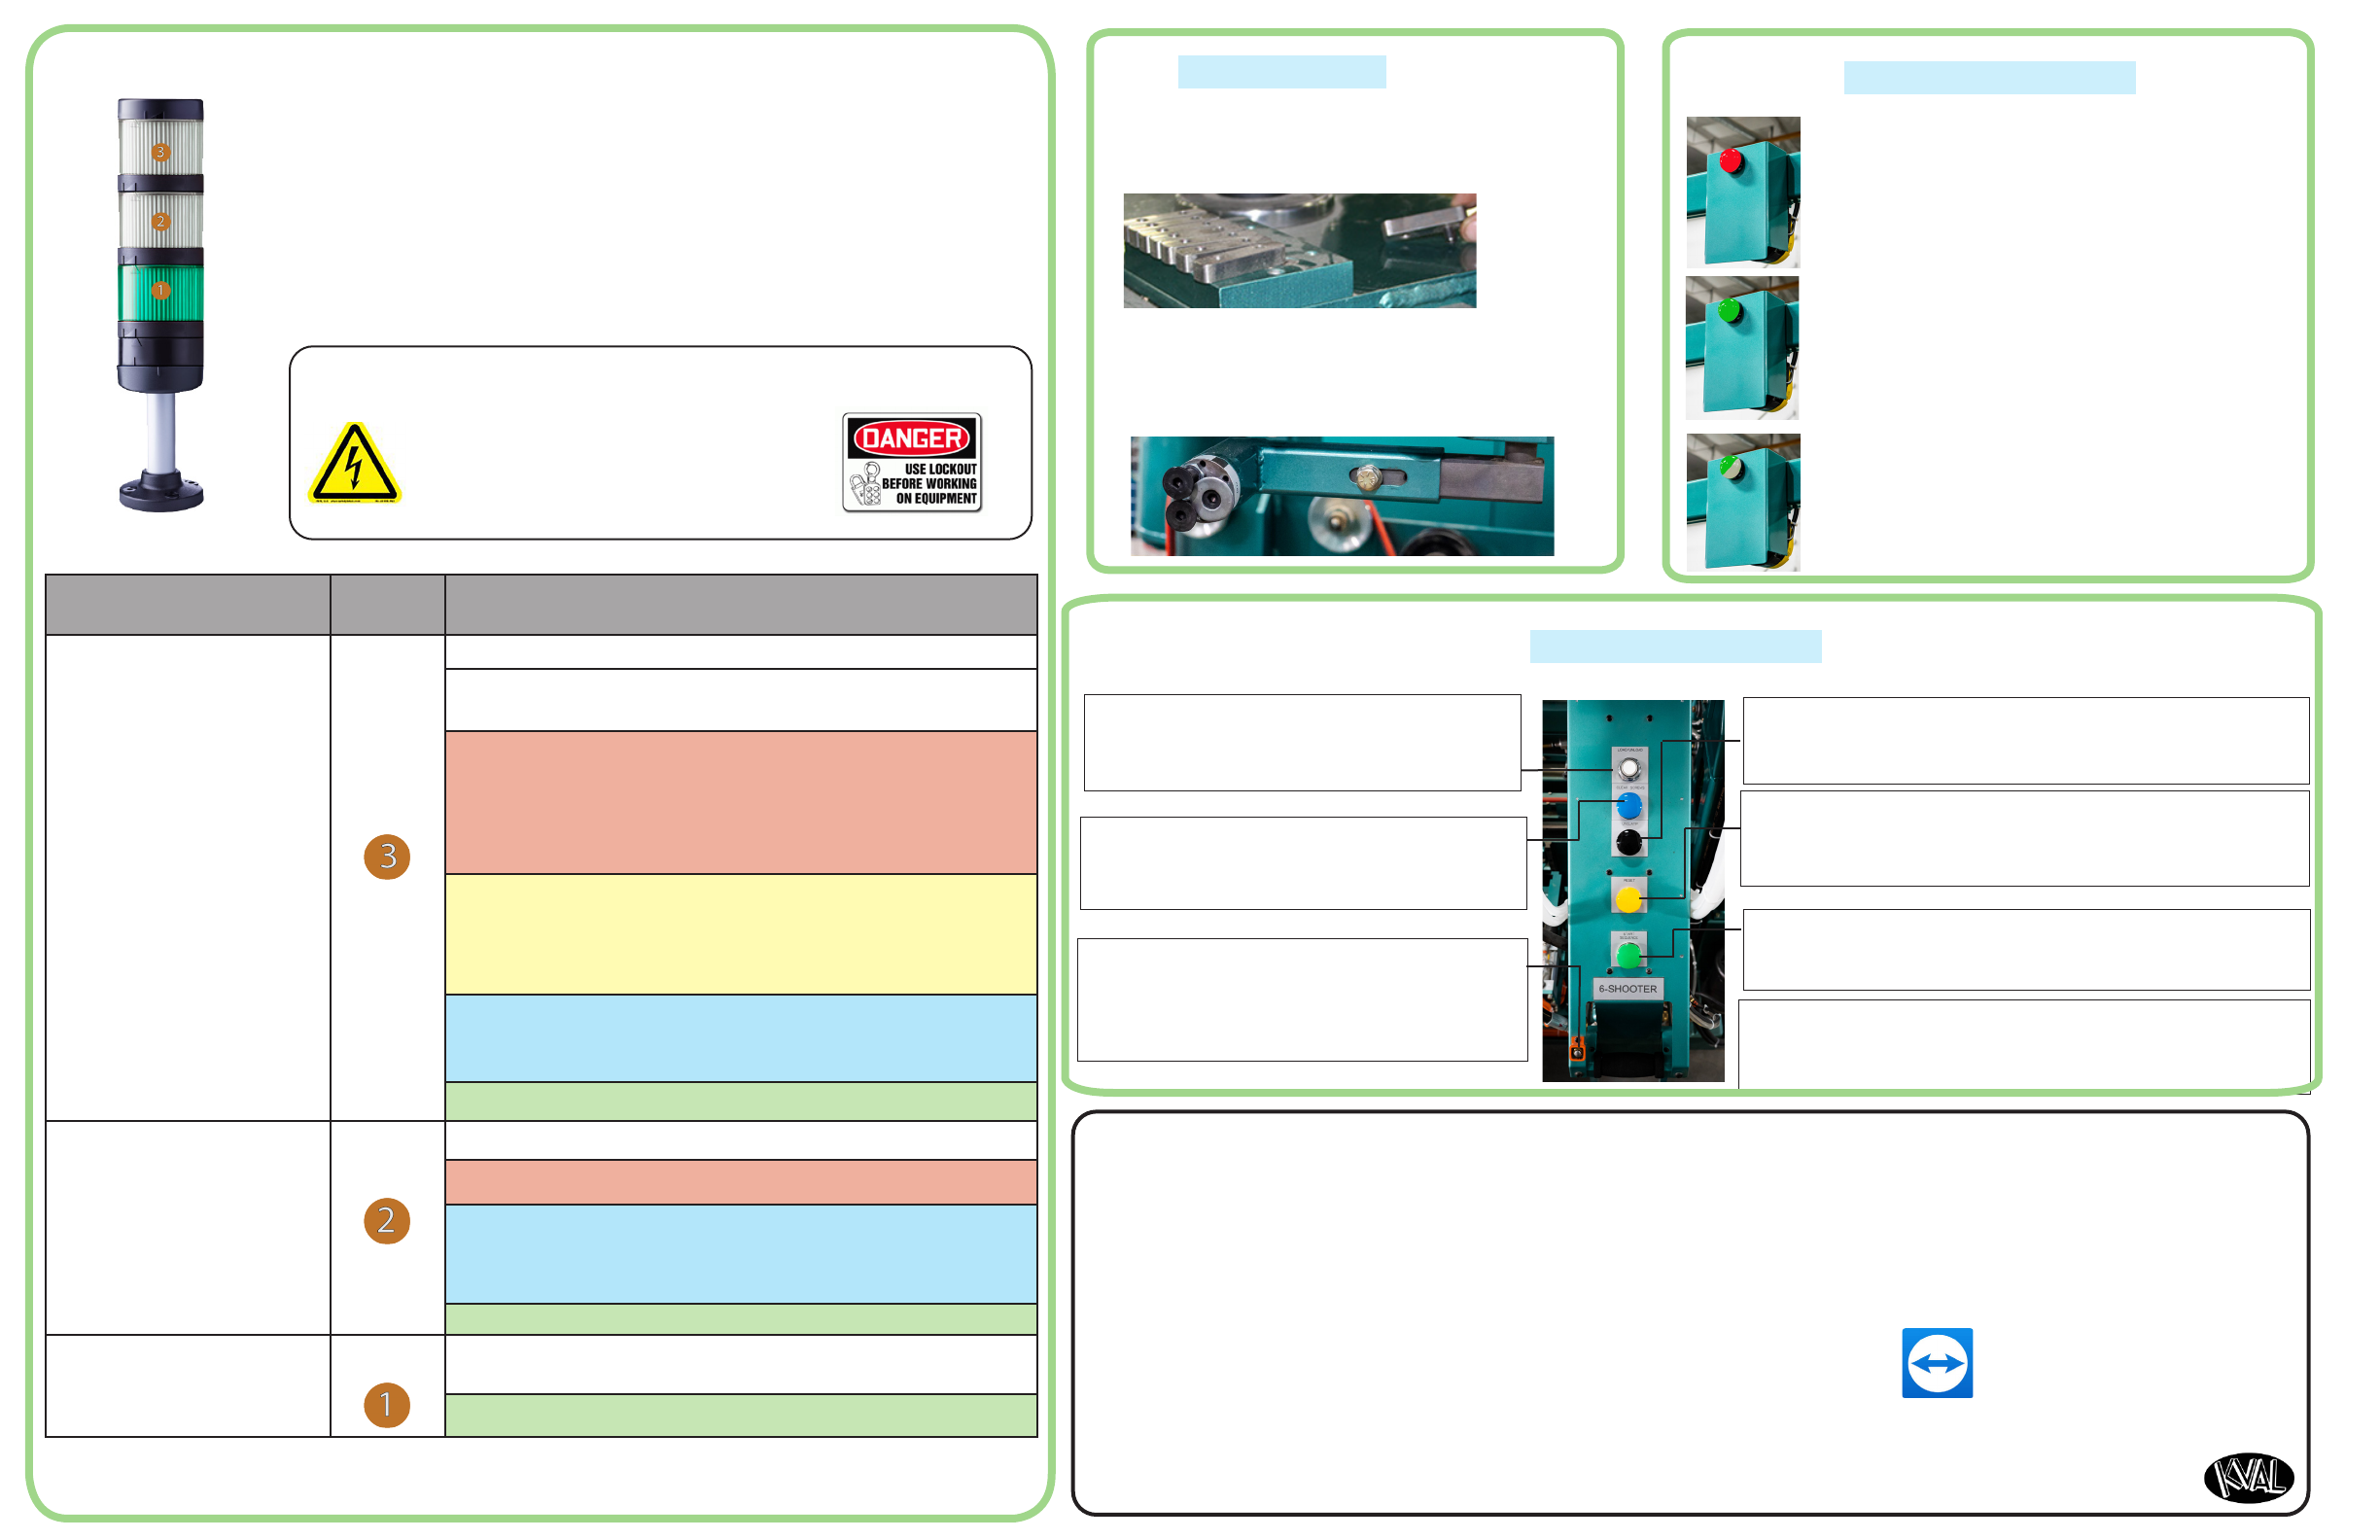
manuals.online logo
Brands
  1. Home
  2. •
  3. Brands
  4. •
  5. Kval
  6. •
  7. Industrial Equipment
  8. •
  9. Kval 990-APEX User manual

Kval 990-APEX User manual

990-APEX QUICK START990-APEX QUICK START
5. Process the Door and Jamb: Step out of the Cut-
ting Area out of range of the Safey Scanner.
→If Auto Stat is enabled, the cuting will stat automatically. The Ma-
chine Safey Indicator turns red. Cuting Stats.
→If Auto Stat is disabled, press the Stat Sequence buton. The Machine
Safey Indicator turns red. Cuting Stats.
When the Machine Safey Indicator turns Green or
Flashing Green,it is safe to enter the Hinge Cuting
area.
A. Load the hinge onto the magnetic
indexing ixture with the hinge pin
towards the top of the door and the
counter sinks facing into the index
ixture.
B. Align and move the Shooter tight
into the H-Block.
C. Press the
Stat Sequence
buton to
activate the hook and latch to lock
the index ixture into the door and
jamb.
D. When fully seated and locked, press the Inset Screw buton to
apply the screws.
E. Press the Reset buton to raise the Shooter out of the hinge
pocket.
F. Repeat steps A-E for each Hinge until all Hinges are completed.
G. When inished with Hinges, press the Shooter Unclamp
buton to feed out the door.
H. Park the Shooter at the end of the machine.
Press the Shooter Unclamp Buton or the Door Clamp Foot
Switch to Feed out the Door. Doors will feed in until the
Door Queue is emptied.
1. Open the 990-APEX Screens: Select the 990-APEX
Tab to open the Main Control screen.
2. Door Fed in and Clamped: If Auto Feed is enabled, the
door is clamped automatically. If Auto Feed is disabled, use
the Door Clamp Foot Switch.
3.Load the Jamb:1Place the jamb securely on the Jamb
Shelf located behind the H-Blocks and against the Jamb
Stop (LH or RH.)
4. Clamp the Jamb: Hold the jamb in place and press the
Jamb Clamp Pedal.
1 Verify that the Jamb Shelf Pins and the Jamb Stops are set. See Reverse for more infor-
mation.
990-APEX Quick Rev 1
Process the Door and Jamb
Load Door Job from the Library
1. Select the Libraries Tab at the upper let side of
the KvalCAM® screen .
2. Select the Door Job Libray Tab at the upper
center screen.
3. At the Door Job table, double click the desired
selection to open that job in the Door Job
screen.
Auto Feed Disabled:
Select Door Clamp
Power-Down
Power-UP
Before Power up, ensure the work area is safe and the Main Air is ON.
1. At the Electrical Panel, pull up the Power Lever to
ON.
2. Turn the Control Circuit Switch to ON. (3 min Boot-up)
3. Push the Stat buton.
4. At the Main Control screen, Home the machine.
1. Click the Windows® Stat buton at the botom
let corner of the screen.
2. Click the Power icon .
3. Select Shut Down. Wait for the machine to power
OFF.
4. Turn the Control Circuit Switch to OFF.
5. At the Electrical Panel, pull down the Power Lever
to the OFF position.
1. At the Door Job screen, conirm the parameters of the job.
2. In the Door Qy Box at the botom of the screen, enter the
number of doors to be processed.
3. Select the Add to Queue Buton.
Add Door Job to the Queue
Note: All lights on the
Light Tower will be Green.
See the reverse page for
information about the Light
Tower
Auto Feed Enabled:
Door is Auto-Clamped
Step Out of
Cuting Area
Step Out of
Cuting Area
Door Machining
Stats
Attach the Hinges
Door Machining
Stats
Feed the Door Out
Categoy Desig. Descriptions
Machine Status
OFF (Clear): Machine not in operation.
White: Initializing
1 Flash: Waiting for all systems to initialize
Red: Machine Error
Solid: General Error
• 1 Flash: EtheCat Device not Ready to Run
• 2 Flashes: VFD, Sevo, or Motor Error
• 3 Flashes: 24 VDC Power Error
Yellow: External Error
Solid: General Error
• 1 Flash: 3 Phase Voltage Error
• 2 Flashes: Low Air Error
Blue: Operator Status
Solid: Waiting for Operator
• 1 Flash: Reposition Door
Green: Machine is Operational
Safey
OFF (Clear): Safey Project not Running
Red: Safey PLC Error
Blue: Waiting for Safey Re-Set
• Solid: General Error
• Flashing: Not Ready to Re-Stat (E-Stop Switch is Active)
Green: Machine is Operational
Control Power
O: No Control Power
ON (Green): 24 VDC Control Power ON
About the Light Tower
High Voltage may cause injury or death.
Troubleshooting checks must be performed
by a Qualied Electrical Technician.
The Light Tower indicates the working status of the system. The
Light Tower is mounted on top of the Electrical Boxes. Each light dis-
plays dierent colors and lashing codes to show the machine status.
The table below describes the dierent states of the Light Tower.
Be Smat! Follow all Safey Precautions.
Remote Troubleshooting
Kval’s Suppot Team is able to work remotely with your maintenance sta or contractor to diagnose and troubleshoot machiney
issues. Call (800)- 553-5825 or stat a suppot ticket Online htps://www.kvalinc.com/suppot.
Tools Needed for machine hardware troubleshooting:
• Access to a broadband internet connection
•An iPhone or Android smat-phone with Google Duo® for video.
• A Digital Multi-meter
• A standard tool set
For machine soware troubleshooting:
• Access to a broadband internet connection
• A computer running Windows
• Our remote suppot client
Allow Kval to Logon to the Machine
• Exit the KvalCAM® program. On the
Windows Screen, select the KVAL
Sevice Icon
Add Shelf Pins to the Jamb Shelf to adjust to your
backset. Spacers are stored at Operator’s Station. The
insetion points are behind each H-Block.
Rotate the Jamb Stop turrets to adjust to your Dado.
The turrets are located at A-side and B-Side of the
machine.
Jamb Setup
Stat Sequence Buton–After the Shooter is aligned with the
H-Block, press the Start Sequence button to drop the indexing
assembly into the pocket, drop the screws down.
* Screw Drop Switch–is located on the side of the Shooter. In the OFF posi-
tion, screw delivery system is shut off. If the switch is in the ON position,
normal screw delivery is active. One of the uses for this function is to
troubleshoot with out the screw delivery active.
Inset Screw Buton–After the Hinge and the Screw
Shooter has been locked in into the pocket, push
the Insert Screw button to attach the screws to the
jamb and door hinge
SOLID GREEN Light–No Processing is occurring, OK
to enter the Hinge Cutting Area.
Clear Screws Buton–Pull the Screw Shooter away
from the machine and press the button to cause
a last of air to clear the line of a stuck screw.
Unclamp Buton–After all the hinges have been applied, press this
button to unclamp the jamb and the door. If the machine is set to
Auto-Feed the door will feed-out to the next machine.
Reset Buton–Press the Reset button to raise the 6/8 Shooter
back into the Start position.
Be aware, if the tilt cylinder is set to retract too fast, it can cause
the 6/8 Shooter to jump out of the pocket and bounce
RED Light–Do not enter the Hinge cutting area the
cutting process will stop.
BLINKING GREEN Light–Lock section is busy pro-
cessing, It is OK to enter the Hinge Cutting Area.
Load/Unload Buton–Press to add new screws.
The Hopper will dump the existing screws into a
container. After the Hopper is empty, pour in the
new type/color screws.
Safety Indicators
Shooter Controls

Other manuals for 990-APEX

2

Other Kval Industrial Equipment manuals

Kval MDA-66 Operation manual

Kval

Kval MDA-66 Operation manual

Kval Edge-SS Installation and operating instructions

Kval

Kval Edge-SS Installation and operating instructions

Kval DL-NCD User manual

Kval

Kval DL-NCD User manual

Kval 700-DC Operation manual

Kval

Kval 700-DC Operation manual

Kval ON-3V User manual

Kval

Kval ON-3V User manual

Kval 558 User manual

Kval

Kval 558 User manual

Kval MDA-6 Installation and operating instructions

Kval

Kval MDA-6 Installation and operating instructions

Kval 994-X User manual

Kval

Kval 994-X User manual

Kval 700-C User manual

Kval

Kval 700-C User manual

Kval Commander 3 User manual

Kval

Kval Commander 3 User manual

Kval 990-H User manual

Kval

Kval 990-H User manual

Kval 995-H Operation manual

Kval

Kval 995-H Operation manual

Kval RT-2 Operation manual

Kval

Kval RT-2 Operation manual

Kval Commander III User manual

Kval

Kval Commander III User manual

Kval 990-H User manual

Kval

Kval 990-H User manual

Kval 960-3 Operation manual

Kval

Kval 960-3 Operation manual

Kval 990-HQ User manual

Kval

Kval 990-HQ User manual

Kval 990FX User manual

Kval

Kval 990FX User manual

Kval 700-C User guide

Kval

Kval 700-C User guide

Kval 990-APEX User manual

Kval

Kval 990-APEX User manual

Kval 990FX User manual

Kval

Kval 990FX User manual

Kval 700-C User manual

Kval

Kval 700-C User manual

Kval DL-2 User manual

Kval

Kval DL-2 User manual

Kval 990FX User manual

Kval

Kval 990FX User manual

Popular Industrial Equipment manuals by other brands

Condair HP Series Installation and operation manual

Condair

Condair HP Series Installation and operation manual

ABB HT563058 Operation manual

ABB

ABB HT563058 Operation manual

GDS SHARK Assembly Instructions Instruction Manual

GDS

GDS SHARK Assembly Instructions Instruction Manual

ABB HT613159 Operation manual

ABB

ABB HT613159 Operation manual

Reich Kupplungen ARCUSAFLEX AC F2 Series English translation of the original German Operating Manual

Reich Kupplungen

Reich Kupplungen ARCUSAFLEX AC F2 Series English translation of the original German Operating Manual

ABB HT613266 Operation manual

ABB

ABB HT613266 Operation manual

Miki Pulley COUPLINGS manual

Miki Pulley

Miki Pulley COUPLINGS manual

Acoustic Signature TA-9000 Neo instruction manual

Acoustic Signature

Acoustic Signature TA-9000 Neo instruction manual

Genesis GXT 115 reference guide

Genesis

Genesis GXT 115 reference guide

BIG BBT40-SSL -135 Series Operation manual

BIG

BIG BBT40-SSL -135 Series Operation manual

Jäger Z100-M636.03 S5V manual

Jäger

Jäger Z100-M636.03 S5V manual

TriangleTube TTP Series installation guide

TriangleTube

TriangleTube TTP Series installation guide

Schwing CPC III manual

Schwing

Schwing CPC III manual

Raytools BM110 Series user manual

Raytools

Raytools BM110 Series user manual

ABB HT847137 Operation manual

ABB

ABB HT847137 Operation manual

Fireye SureFire II SP-48-NG-FD instruction manual

Fireye

Fireye SureFire II SP-48-NG-FD instruction manual

Pearson CE35-T Case Operation manual

Pearson

Pearson CE35-T Case Operation manual

Ecosoft MO22XLWE instruction manual

Ecosoft

Ecosoft MO22XLWE instruction manual

manuals.online logo
manuals.online logoBrands
  • About & Mission
  • Contact us
  • Privacy Policy
  • Terms and Conditions

Copyright 2025 Manuals.Online. All Rights Reserved.