KYORITSU KEW 1052 User manual

INSTRUCTION MANUAL
DIGITAL MULTIMETER
KEW 1051
/
1052

1
Thank you for purchasing our Model KEW1051, KEW1052 Digital Multimeter.
This instruction manual describes the specications and handling precaution for this Digital
Multimeter.
Before using this Digital Multimeter, thoroughly read this manual to get a clear understanding
on proper use.
Always observe the following instructions.
Failure to do so may impair the protection provided by the instrument and probes, and may
result in electrical shock or other dangers that may lead to serious injury or the loss of life.
KYORITSU is in no way liable for any damage resulting from the user’s mishandling of the
product.
For safe use of this product, the following safety symbols are used on the product:
nAbout This Manual
• Every effort has been made to ensure accuracy in the preparation of this manual.
However, should any errors or omissions come to the attention of the user, please contact
KYORITSU.
• The contents of this manual are subject to change without prior notice because of
improvement in performance or function.
• All rights reserved. No part of this manual may be reproduced in any from without
KYORITSU's written permission.

2
Regarding Safe Use of This Product
For safe use of this product, the following safety symbols are used on the product and manual:
WARNING
This indicates that the operator must refer to an explanation in the
instruction manual in order to avoid the risk of serious injury or
the loss of life.
CAUTION
This indicates that the operator must refer to an explanation in the
instruction manual in order to avoid the risk of injury or damage to
the product.
Note This indicates information that is essential for handling the instrument
or should be noted in order to familiarize yourself with the
instrument’s operating procedures and/or functions.
Danger! Handle with Care
This symbol indicates that the operator must refer to an
explanation in the instruction manual in order to avoid risk of
injury or death of personnel or damage to the instrument.
Double Insulation
This symbol indicates double insulation or reinforced insulation.
Direct Current
This symbol indicates DC voltage/current.
Alternating Current
This symbol indicates AC voltage/current.
DC/AC
This symbol indicates AC and DC.
Fuse
This symbol indicates a fuse.
Battery
This symbol indicates a battery.
Ground
This symbol indicates ground (earth).

3
WARNING
nAlways observe the following instructions. Failure to do so may result in
electrical shock or other dangers that may lead to serious injury or the loss of
life.
Test leads / Test leads with crocodile clip (optional accessory)
• Use the probes supplied by KYORITSU with this instrument.
• Do not use test leads/test leads with crocodile clip that have deteriorated or are defective.
Check test leads/test leads with crocodile clip continuity.
• Disconnect test leads/test leads with crocodile clip from the circuit under test before opening
the casing to replace the batteries or for any other reason.
• Disconnect test leads/test leads with crocodile clip from the circuit under test before
attaching/detaching the test leads/test leads with crocodile clip to/from the instrument.
• Disconnect test leads/test leads with crocodile clip from the instrument before opening the
casing to replace the batteries or for any other reason.
• A cap is provided on the tip of a test lead.
Use a test lead with the cap on for safety (safety standards: IEC 61010-031).
• Do not use the crocodile clip of test leads being loosen or removed conditions.
Casing
• Do not use the instrument if there is any damage to the casing or when the casing is
removed.
Fuses
• Use fuses of the specied rating when the fuse is replaced.
Operating Environment
• Do not operate the instrument in an atmosphere where any ammable or explosive gas is
present.
• Avoid using the instrument if it has been exposed to rain or moisture or if your hands are
wet.
Disassembly
• No person, except personnel from KYORITSU, is authorized to disassemble this instrument.

4
Contents
1. Overview.............................................................................................................5
2. Measurement Category.......................................................................................6
3. Specications ......................................................................................................7
3.1 General Specications ..............................................................................7
3.2 Accuracy...................................................................................................9
4. Operation ..........................................................................................................12
4.1 Precautions Before Measurement...........................................................12
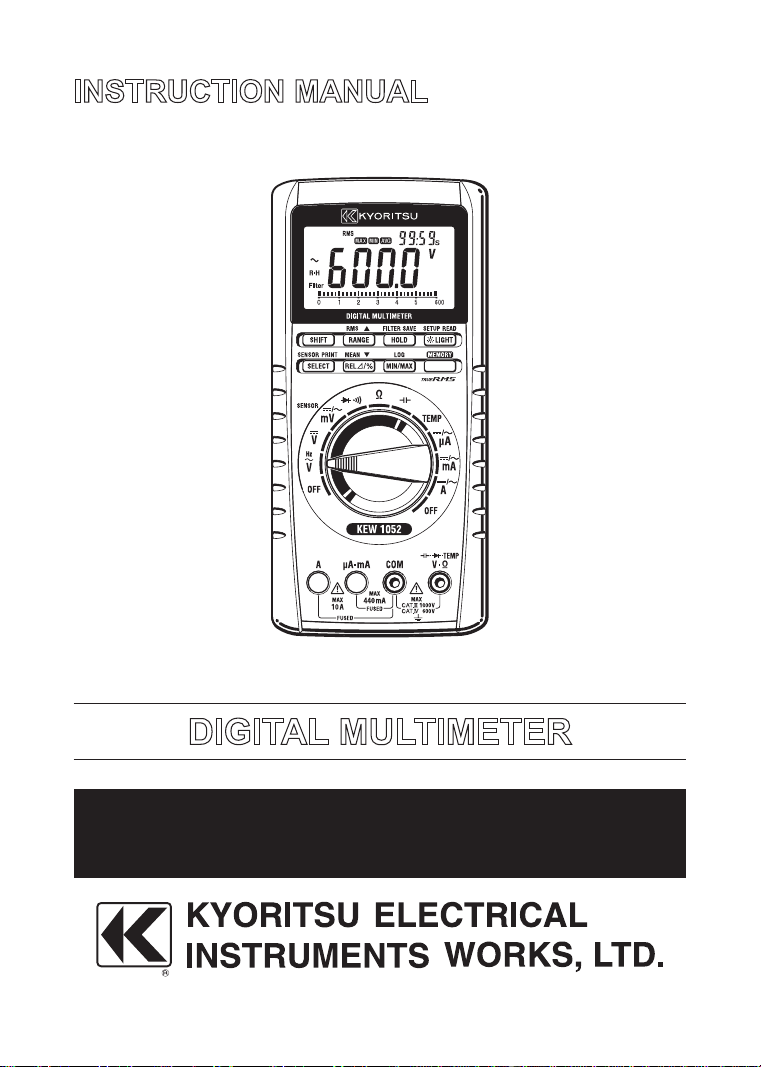
4.2 Components ............................................................................................ 13
4.3 Measuring Instructions............................................................................17
4.3.1 AC Voltage Measurement................................................................ 17
4.3.2 DC Voltage Measurement................................................................ 17
4.3.3 Measurements with SENSOR..........................................................18
4.3.4 Resistance Measurement..................................................................18
4.3.5 Continuity Check............................................................................. 19
4.3.6 Diode Test........................................................................................19
4.3.7 Temperature Measurement...............................................................20
4.3.8 Current Measurement ...................................................................... 21
4.3.9 Capacitor Measurement................................................................... 22
4.3.10 Frequency Measurement.................................................................22
4.3.11
Function to change RMS detection to/from MEAN detection
mode (KEW1052 only).........................................................................23
4.3.12 Function to turn the lter on/off...................................................... 23
4.3.13 AUTO HOLD Function...................................................................24
4.3.14 Relative and percentage calculation................................................24
4.3.15 MIN/MAX/AVG Function (KEW1052 only) .................................25
4.4 Memory Function (KEW1052 only)....................................................... 26
4.5 AUTO POWER OFF Function...............................................................27
4.6 Set-up Function.......................................................................................28
4.7 Additional functions simply set when POWER ON...............................32
4.8 LCD Check ............................................................................................. 32
5. User Calibration Function.................................................................................33
6. Battery and Fuse Replacement .........................................................................35
6.1 Battery Replacement...............................................................................35
6.2 Fuse Replacement...................................................................................36
7. Calibration and Maintenance............................................................................37
8 Disposing the Product....................................................................................... 37

5
1. Overview
lDisplay
4-digit (LCD)
Maximum Reading: 6000
Bar graph indicator
lSupports a variety of measurement function
Measurement function
DC Voltage, AC Voltage, DC Current, AC Current, Resistance, Frequency, Temperature,
Capacitor, Continuity Check, Diode Test
Other functions
Data Hold (D•H), Auto Hold (A•H), Range Hold (R•H),
Maximum value* (MAX), Minimum value* (MIN), Average value* (AVG),
Zero Adjustment (Capacitor, Resistance), Relative values, Save to Memory*,
LCD backlight.
*: For model KEW1052 only
lSwitching detection modes
Effective value (root mean square value) detection (RMS) and mean value detection (MEAN)
can be switched during AC voltage measurement (KEW1052 only).
l Low-passlter
The low-pass lter can be switched on/off during AC voltage or AC current measurement.
lCommunication: optional communication set is required (KEW1052 only).
• Measurement data can be transferred to a PC using an optional USB communication
package.
The data can be read by certain applications to make trend graphs or can be converted
into Excel les.
• The data can also be output from an optional printer via an optional printer communication
set.
lSafety design
Complied standards: CE standards
Uses a current-input terminal shutter for preventing wrong input.
Uses high-performance UL-standard fuses.

6
2. Measurement Category
WARNING
nMeasurement Category (CAT.)
The restrictions on the maximum voltage level for which the KEW1051, KEW1052 can
be used, depend on the measurement categories specied by the safety standards.
Do not apply any input level higher than maximum allowable input.
AC/DC 1000V CAT.III
AC/DC 600V CAT.IV
Measurement
category Description Remarks
ⅠCAT. I For measurements performed on circuits not
directly connected to MAINS.
ⅡCAT. II For measurements performed on circuits directly
connected to the low voltage installation. Appliances, portable
equipment, ect.
ⅢCAT.III For measurements performed in the building
installation. Distribution board,
circuit breaker, ect.
ⅣCAT. ⅣFor measurements performed all the source of the
low-voltage installation. Overhead wire,
cable systems, ect.
Internal Wiring
Outlet
Entrance
Cable
Fixed Equipment,
etc.
Distribution
Board
CAT.II
Equipment
CAT.I
CAT.IV
CAT.III
Note
Radiation immunity affects the accuracy of the KEW1051, KEW1052 under the
conditions specied in IEC61326-1.
Use of this instrument is limited to domestic, commercial, and light industry
applications. If equipment generating strong electromagnetic interference is located
nearly, the instrument may malfunction.

7
3. Specications
3.1 GeneralSpecications
Measurement function:
DC Voltage, AC Voltage, DC Current, AC Current, Resistance,
Frequency, Temperature, Capacitor, Continuity Check, Diode Test
Other functions: Data Hold (D•H), Auto Hold (A•H), Range Hold (R•H), Maximum
value* (MAX), Minimum value* (MIN), Average value* (AVG),
Zero Adjustment (Capacitor, Resistance), Relative values, Save to
Memory*, LCD backlight.
*: For model KEW1052 only
Measuring method: Σ modulation
Display: 4-digit (LCD)/7-segment
Maximum Reading: 6000
Polarity Indicator: “–” Appears automatically when the polarity is
negative
Overrange Indicator: “ OL ”
Low-battery Indicator: “ ” Appears when the batteries become
low
Measurement cycle: 5 times per second
(except frequency measurement : one time per second, Resistance
measurement (6MΩ/60MΩ) : 2.5 times per second, capacitor
measurement (1000μF) : max.0.14 time per second)
Bar graph display approx 25 times per second (at AC, Ω)
Operating temperature and humidity ranges:
-10 to 55ºC, 80%RH or less (no condensation)
70%RH or less at 40 to 55ºC.
Storage temperature and humidity ranges:
-30 to 70ºC, 70%RH or less (no condensation)
Temperature coefcient:
(Accuracy at 23±5ºC× 0.1)/ºC should be added.
(Temperature ranges: -10 to 18ºC and 28 to 55ºC)
Power supply: AA-size (R6/LR6) 1.5V batteries: 4
Battery life: Approximately 300 hours
(Operating hours of alkaline batteries when in DC voltage-mode.)
Note: The battery life varies depending on the operating conditions.
Insulation resistance : 1000V DC, 100MΩ or more

8
Withstand voltage: 6.88kVrms AC for ve seconds
(across input terminals and casing)
External dimensions: Approximately 192(L)×90(W)×49(D)mm
Weight: Approximately 560g (including batteries)
Complied standards: Safety standards
IEC61010-1, IEC61010-031
CAT.III (Max. input voltage: AC/DC1000V)
CAT.IV (Max. input voltage:AC/DC600V)
Pollution degree 2, indoor use,
2000m max. above sea level
EMC standards
IEC61326-1 Class B
Effect of radiation immunity:
In the radio-frequency electromagnetic eld of 3 V/m, accuracy is
within ve times the rated accuracy.
Standard accessories: Batteries : 4
Test leads: 1set (M-7220)
Fuse (included): 440mA/1000V (M-8926), 10A/1000V (M-8927)
Instruction manual: 1
Blank cover: 1
Optional accessories: Carrying case M-9150
(for the main unit with test leads and
communication cable)
Test leads (1set) M-7220
Test leads with crocodile clip (1 set)
M-7234
Fuse
440mA/1000V M-8926
10A/1000V M-8927
Temperature probes M-8405, 8406, 8407, 8408
Followings are for KEW1052 only.
USB Communication set M-8241 (Software, USB adapter and
cable)
Printer communication set M-8243 (Printer Adapter and Cable)
Printer M-8246
AC adapter (for printer, Europe)
M-8248
Thermal paper for printer (10 rolls)
M-8247

9
3.2 Accuracy
Test conditions:
Temperature and humidity: 23±5ºC at 80%RH or less
Accuracy: ±(% of reading + digits)
Note: Each response time is a value to rated accuracy within selected range.
DC Voltage Measurement V
Range Resolution Accuracy Input Resistance Maximum
Input Voltage
600mV 0.1mV
0.09+2
10MΩ 1000V
DC
1000V
rms AC
6V 0.001V 11MΩ
60V 0.01V
10MΩ600V 0.1V
1000V 1V 0.15+2
NMRR: 60dB or more 50/60Hz±0.1%
CMRR: 120dB or more 50/60Hz (Rs=1kΩ)
Response time:1 sec max.
AC Voltage Measurement V
AC Coupling: RMS value detection, sine wave
MEAN value detection and RMS value calibration (KEW1052 only)
Range
Resolution
Accuracy Input
Impedance
Maximum
Input
Voltage
50/60Hz 40Hz to 500Hz 500Hz to 1kHz
600mV 0.1mV
0.5+5 1+5 1.5+5
10MΩ, <200pF 1000V
rms AC
1000V
DC
6V 0.001V 11MΩ, <50pF
60V 0.01V
10MΩ, <50pF600V 0.1V
1000V 1V -
Accuracy: At 5 to 100% of range and 1000V range is 200 to 1000V.
less than 1500V peak
For non-sinusoidal waveforms, add ±(2% + 2% of full scale), for Crest factor<3.
CMRR: 60dB or more DC to 60Hz (Rs=1kΩ)
4 counts or less is corrected to 0, Response time: 2 sec max.
DC Current Measurement A
Range Resolution Accuracy Voltage Drop Maximum
Input Current
600μA 0.1μA 0.2+2 < 0.12mV/μA 440mA Protected by
a 440mA/1000V fuse.
6000μA 1μA
60mA 0.01mA < 3.3mV/mA
440mA 0.1mA 0.5+56A 0.001A < 0.1V/A 10A Protected by
a 10A/1000V fuse.
10A 0.01A
Response time: 1 sec max.

10
AC Current Measurement [RMS] A RMS value detection, sine wave
Range Resolution Accuracy Voltage
Drop Maximum
Input Current
50/60Hz 40Hz to 1kHz
600μA 0.1μA
0.75+5 1.5+5
< 0.12mV/μA 440mA Protected by a
440mA/1000V fuse.
6000μA 1μA
60mA 0.01mA < 3.3mV/mA
440mA 0.1mA
6A 0.001A < 0.1V/A 10A Protected by a
10A/1000V fuse.
10A 0.01A
Accuracy: At 5 to 100% of range, 10A range is 2 to 10A and 440mA range is 30 to 440mA.
For non-sinusoidal waveforms, add ±(2% + 2% of full scale), for Crest factor<3.
4 counts or less is corrected to 0, Response time: 3 sec max.
ResistanceMeasurementΩ
Range Resolution Accuracy Maximum
Measuring
Current
Open-loop
Voltage
Input
Protective
Voltage
600Ω 0.1Ω
0.4+1
< 1.2mA < 3.5V
1000V
rms
6kΩ 0.001kΩ <110μA
< 1.3V
60kΩ 0.01kΩ <13μA
600kΩ 0.1kΩ <1.3μA
6MΩ 0.001MΩ 0.5+1
<130nA
60MΩ 0.01MΩ 1+2 (~40MΩ)
2+2 (40~60MΩ)
Accuracy is specied after zero adjustment at 600Ω to 6kΩ (Resistance)
Response time: 2 sec max. at 600Ω to 600kΩ, 10 sec max. at 6M to 60MΩ
Continuity Check
Range Resolution Range of Operation Measuring
Current Open-loop
Voltage Input Protective
Voltage
600Ω 0.1Ω
The buzzer turns on
for resistances lower
than 50±30Ω.
Approx.
<1.2mA <3.5V 1000V rms
Diode Test
Range Resolution Accuracy Measuring Current
(Vf=0.6V) Open-loop
Voltage Input Protective
Voltage
2V 0.001V 1+2 Approx. 0.5mA <3.5V 1000V rms

11
Temperature Measurement TEMP
Range Resolution Accuracy Input Protective
Voltage
-50 ~ 600°C 0.1°C 2+2°C 1000V rms
-58~ 999.9°F
-58~ 1112°F 0.1°F
1°F 2+3.6°F
2+3°F
Use optional Temperature Probe: Thermocouple Type K
Capacitor Measurement
Range Resolution Accuracy Input Protective
Voltage
10nF 0.01nF 2+10
1000V rms
100nF 0.1nF 2+51μF 0.001μF
10μF 0.01μF
100μF 0.1μF 3+5
1000μF 1μF
Accuracy is specied after zero adjustment at 10n to 1μF (Capacitance).
Frequency Measurement Hz AC Coupling, Maximum Reading 9999
Range Resolution Accuracy Input Voltage
10.00 to 99.99Hz 0.01Hz
0.02+1 0.2 to 600Vrms
90.0 to 999.9Hz 0.1Hz
0.900 to 9.999kHz 0.001kHz 0.4 to 600Vrms
9.00 to 99.99kHz 0.01kHz 0.8 to 100Vrms

12
4. Operation
4.1 Precautions Before Measurement
n
Examining Items Contained in the Package
After opening the package, be sure to examine the product as instructed below before use.
Should the delivered product be the wrong model, lack any item, or show any aw in its
appearance, contact the vendor from which you purchased the product.
n
Precautions of Operation and Storage
CAUTION
• Insert the batteries in the instrument by referring to “6.1 Battery Replacement.”
• A Blank cover is provided on the upper part of back casing.
Don’t remove the Blank cover except when the USB adapter or Printer adapter is
connected (KEW1052 only).
• Do not use the instrument near noise-emitting equipment or
where there may be a sudden change of temperature. Otherwise, the instrument may
give an unstable reading or errors.
Removal of Dirt
Do not wipe the instrument using any solvent (chemicals) such as benzine or paint
thinner, as this may damage or discolor the front panel.
Use a dry cloth to clean the instrument.
Storage Conditions
• Do not leave the instrument exposed to direct sunlight or in a hot and humid location
such as the inside of a vehicle, for any prolonged length of time.
• If the instrument will not be used for a prolonged period, remove the batteries.

13
4.2 Components
nPanel Description n
Test leads
Display (LCD)
Function switch
Input terminal block
SHIFT key
RANGE key
HOLD (SAVE) key
LIGHT (READ) key
RE
SELECT (PRINT) key
L /% key
MIN/MAX(LOG) Key
(KEW1052 only)
MEMORY Key
(KEW1052 only)
BlackRed
Caps of Test leads
Actions indicated in parenthesis are available at Memory Function (KEW1052 only).
nTest leads with crocodile clip(optional accessory)
Black
Red
Cable Crocodile clip

14
1) Function switch
Turns off the power or select the measurement mode (function).
OFF Turns off the power ΩResistance measurement
V AC voltage (V) measurement Capacitor measurement
V DC voltage (V) measurement TEMP Temperature measurement
/mV DC/AC voltage (mV) measurement
(SENSOR mode) μA
mA
ADC/AC current measurement
Continuity Check
Diode Test
2) SELECT key
Pressing this key in each measurement modes (function) described above selects other
measurement modes (function).
V Frequency measurement
/ mV AC voltage (mV) measurement
(AC SENSOR measurement in the SENSOR mode)
Diode Test
μA/mA/A AC current measurement
3) RANGE key
Allows the operator to select the measuring range.
Fixed ranges : The display shows the “ R•H ” symbol.
The range increases every time this key is pressed.
AUTO range : The display shows the “ AUTO ” symbol.
To return to the auto-ranging mode, hold down RANGE key for
more than one second.
4) HOLD key
Selects between the DATA HOLD andAUTO HOLD functions.
To cancel functions, press this key once again.
DATA HOLD: Holds the display readings.
The display shows the “ D•H ” symbol.
AUTO HOLD: Holds the measured value when the test leads are handled.
The display shows the “ A•H ” symbol.

15
5) LIGHT key
Press this key once to turn on the LCD backlight for approximately one minute.
The LCD backlight is lit for approximately one minute.
(To postpone turned on time, press this key once again.)
To cancel the function, hold down this key for more than one second.
6)REL∆/%key
The instrument can calculate relative values or differences, and percentage values from the
reference measurement values.
1 : Relative Calculation
The display shows the “ ” symbol.
The sub-display shows the reference value.
2 : Percentage Calculation
The display shows the “ ”, “ % ” symbol.
The sub-display shows the reference value.
7) MIN/MAX key (KEW1052 only)
Displays the minimum value (MIN), maximum value (MAX) and average value (AVG)
during measurement.
Pressing this key starts recording and at the same time the display shows MIN/MAX/AVG to
release AUTO POWER OFF.
8) MEMORY key (KEW1052 only)
Data can be stored in internal memory using this key.
Used when outputting to printer with the optional adapter and cable.
9) SHIFT key
While this key is pressed, “Shift” appears on the display.
Then pressing the following keys enables the following settings.
SHIFT +
LIGHT key Set-up function
RANGE key Change to [RMS] mode (KEW1052 only)
REL key Change to [MEAN] mode (KEW1052 only)
HOLD key Turn lter on/off
SELECT key Switch to the SENSOR mode at the mV function

16
■ Display (LCD) Description
Symbol and Unit Description
Appears when in DC-mode measurement
Appears when in AC-mode measurement
-Appears when the polarity is negative
Appears when in diode test
Appears when in continuity check
⊿Relative calculation indicator
R・H Fixed ranges indicator
AUTO AUTO range indicator
DATA HOLD indicator
AUTO HOLD indicator
Lit when in MIN/MAX/AVG-mode (KEW1052 only)
AUTO OFF Auto power off indicator
RMS Appears in RMS mode
Filter Appears while lter is on
Shift Appears when the SHIFT key is pressed
nF、μF Unit for capasitance measurement
mV, V Unit for voltage measurement
μA, mA, A Unit for current measurement
Ω, kΩ, MΩ Unit for resistance measurement
℃Unit for temperature measurement
Hz, kHz Unit for frequency measurement
% Unit for percentage calculation
mV (Sub-display) Unit for SENSOR-mode measurement (Input voltage)
s (Sub-display) Unit for recording time when in MIN/MAX/AVG-mode (KEW1052
only)
Appears in Memory mode (KEW1052 only)
SENSOR Appears when in SENSOR mode measurement.
lx Unit can be selected at the SENSOR mode only.
(sub-display)
Recording time indicator when in MIN/MAX/AVG-mode.
(KEW1052 only)
number of saved data indicator. (KEW1052 only)
Reference value indicator when relative calculation.
Input voltage value indicator from SENSOR in SENSOR-mode
measurement.
(sub-display) Appears when in DC SENSOR mode measurement
(sub-display) Appears when in AC SENSOR mode measurement
OL Overrange indicator
Appears when the batteries become low
6
Bar graph indicator, Range indicator

17
4.3 Measuring Instructions
WARNING
To avoid damage to instrument or equipment
• Before starting measurement, make sure that the position of function switch and the input
terminals for connecting the test leads are appropriate for the desired mode of measurement.
• Temporarily remove the test leads from the device under test before operating the function
switch.
• Verify proper operation on a known source before use or taking action as a result of the
indication of the instrument.
Test leads here include a test leads with crocodile clip (optional accessory).
4.3.1 AC Voltage Measurement ( V, mV)
1) Turn the function switch to the “ V ” or “mV ” position.
2) Press the SELECT Key when selecting the "mV".
( “ ” is displayed.)
3) Plug the test leads into the input terminals.
4) Connect the test leads to the circuit under test and then read the value
when it stabilizes.
Test leads
RedBlack
4.3.2 DC Voltage Measurement ( V, mV)
1) Turn the function switch to the “ V ”or “mV” position.
2) Plug the test leads into the input terminals.
3) Connect the test leads to the circuit under test and then read the value
when it stabilizes.
Test leads
RedBlack
Note
If “ mV ”range is selected and the test leads are left open-circuited, the instrument may
give a certain reading. This dose not affect your measurement.

18
4.3.3 Measurements with SENSOR (SENSOR)
1) Turn the function switch to the “ mV ” position.
2) Get the instrument in the DC SENSOR mode with the SHIFT + SELECT
Keys. Press of the SELECT Key again to use AC SENSOR.
Input voltage will be displayed on the sub-display, and values and units
set according to “input, display and unit settings of SENSOR mode”
mentioned at clause 4.6 will be displayed on the main display.
SENSOR
DC SENSOR Range AC SENSOR Range
3) Connect the SENSOR to the input terminal.
4) Read the value when it stabilizes.
Press the SHIFT + SELECT Keys to return to normal mV measurement.
4.3.4 ResistanceMeasurement(Ω)
CAUTION
To avoid damage to instrument
Turn off the power to the circuit under test before starting measurement in order to prevent any
excessive voltage from being applied to the instrument.
1) Turn the function switch to the “Ω” position.
2) Plug the test leads into the input terminals.
3) Connect the test leads to the circuit under test and then read the value
when it stabilizes.
Test leads
RedBlack
Note
Zero adjustment
Zero adjustment is recommended for correct measurement. After executing 1), 2) above,
short the two test leads. Press the REL key for adjust. (The display shows the “0.0Ω”
value.) The value (zero adjustment) stores till turn off.

19
4.3.5 Continuity Check ( )
CAUTION
To avoid damage to instrument
Turn off the power to the circuit under test before starting measurement in order to prevent any
excessive voltage from being applied to the instrument.
1) Turn the function switch to the “ ” position.
2) Plug the test leads into the input terminals.
3) Connect the test leads to the circuit under test. If the circuit is continuous
(no more than approximately 50Ω), the buzzer sounds.
Test leads
RedBlack
4.3.6 Diode Test ( )
CAUTION
To avoid damage to instrument
Turn off the power to the circuit under test before starting measurement in order to prevent any
excessive voltage from being applied to the instrument.
1) Turn the function switch to the “ • ” position.
Press the SELECT key to select Diode test.
(The display shows the symbol.)
2) Plug the test leads into the input terminals.
3) Connect the test leads to the diode and then read the value when it
stabilizes.
Test leads
RedBlack
<Forward-bias Diode Test>
Connect the black test lead to the cathode and the red test lead to the anode.
Silicon diodes should give a reading of approximately 0.5V and light-emitting diodes a reading
between approximately 1.5V and 2.0V.
Table of contents
Other KYORITSU Multimeter manuals

KYORITSU
KYORITSU 1110 User manual

KYORITSU
KYORITSU KEW1020R User manual

KYORITSU
KYORITSU New SNAP 7 User manual

KYORITSU
KYORITSU KEW1011 User manual

KYORITSU
KYORITSU 1009 User manual

KYORITSU
KYORITSU KEW MATE 2012R User manual

KYORITSU
KYORITSU KEW1021R User manual

KYORITSU
KYORITSU KEW 1018 User manual

KYORITSU
KYORITSU KEW 4106 User manual

KYORITSU
KYORITSU KEW 1109 User manual