Lafayette ERMES User manual

ERMES
Manuale operativo
User’s Manual
RICETRASMETTITORE CB
CB TRANSCEIVER

Dichiarazione
di Conformità
Declaration
of Conformity
Si fa presente che l’impiego dell’apparato è soggetto ad autorizzazione per gli scopi di cui al punto 8
dell’art. 334 del codice PT.
0648
Questo simbolo, aggiunto al numero di serie, indica che l’apparato risponde pienamente ai requisiti della Direttiva Europea delle Radio e Teleco-
municazioni 1999/05/EC, per quanto concerne i terminali radio.
This symbol, on the serial number seal, means that the equipment complies with the essential requirements on the European Radio and Telecom-
munication Terminal Directive 1999/05/EC.
Questo simbolo avverte l’operatore che l’apparato opera in una banda di frequenze che, in base al paese di destinazione e di utilizzo, può essere soggetta
a restrizioni oppure al rilascio di una licenza d’esercizio. Assicurarsi che pertanto la versione di apparato acquistata operi in una banda di frequenze
autorizzata e regolamentata dalle vigenti normative locali.
This warning symbol indicates that this equipment operates in non-harmonized frequency bands and/or may be subject to licensing conditions
in the country of use. Be sure to check that you have the correct version of this radio or the correct programming of this radio, to comply with
national licensing requirements.
Con la presente, la Marcucci SpA
dichiara che questo ricetrasmettitore
CB di marca Lafayette mod. Ermes,
è conforme ai requisiti essenziali ed
alle altre disposizioni pertinenti stabi-
lite dalla Direttiva 1999/5/CE.
Hereby Marcucci SpA, declares that this
CB transceiver brand Lafayette, mod. Er-
mes is in compliance with the essential
requirements and other relevant provi-
sions of Directive 1999/5/CE.

ITALIANO
Grazie per avere preferito un prodotto Lafayette.
Per potere utilizzare al meglio il nostro prodotto vi consigliamo di leggere con attenzione il
presente manuale d’uso.
Attenzione
Non tentare di trasmettere senza l’antenna collegata in quanto il ricetrasmettitore potrebbe
danneggiarsi seriamente.
Il presente apparato è stato tarato e testato in fabbrica. Non aprirlo o manomettere le parti
interne per nessun motivo. Eventuali interventi tecnici devono essere effettuati solo da perso-
nale autorizzato.
Collegamento dell’antenna
Il cavetto di discesa dell’antenna deve essere terminato con un connettore PL-259. Utilizzare
solo antenne accordate sulla gamma dei 27MHz ed effettuare la discesa utilizzando del ca-
vetto schermato tipo RG-58/U con impedenza tipica 50 Ohm.
Aggancio del microfono
Installare il supporto del microfono in una posizione agevole della vostra autovettura, facendo
bene attenzione che il cavetto o il microfono stesso non vadano ad interferire con le normali
operazioni guida.
Disturbi causati dal circuito di distribuzione dell’auto
Normalmente le automobili moderne non presentano più problemi di schermatura dei cavetti
di distribuzione e del circuito di accensione, quindi il ricetrasmettitore non dovrebbe risultare
affetto da disturbi durante il funzionamento del motore.
•
•
Funzioni
Noise blanker integrato e circuito di limi-
tazione automatica del rumore
Microfono dinamico con pulsante per il
controllo ASC
Ampio display LCD multifunzione e di fa-
cile lettura
Pulsanti che consentono l’eventuale sele-
zione della doppia funzione abbinata
Display frequenza o numero canale
Segnale acustico (funzione beep) escludibile
Richiamo immediato ultimo canale utilizzato
Controllo squelch manuale e automatico
Funzione di scan e 4 canali di memoria
Funzione di dual watch
Canale 9 di emergenza
1
2
3
4
5
6
7
8
9
10
11
Selettori
Selettore volume e on/off
Selettore squelch
Selettore canale su/giù
Display LCD
Canale / frequenza
TX/ BP/ DW/ SC
Memoria canale 1 - 4
AM/FM/AQ
Level meter a 12 tacche
Jack per speaker esterno da 3.5 mm
Connettore antenna SO-239
Microfono dinamico & jack a 8 pin
1
2
3
1
2
3
4
5
Le caratteristiche standard comprendono:

ITALIANO
Indicatori e selettori
Selettore funzione
Selettore frequenza/beep
Pulsante LCR (richiamo ultimo canale)
On/off & regolazione volume
Display LCD
Selezione canali
1
2
3
4
5
6
Controllo squelch
Selettore AM/FM
Scansione e memoria canale 1
DW (Dual Watch) & memoria canale 2
Canale 9 di emergenza & memoria canale 3
ASQ (squelch automatico) & memoria canale 4
7
8
9
10
11
12
Display

ITALIANO
ISTRUZIONI PER L’USO
Dopo aver correttamente installato e collegato il vostro ricetrasmettitore CB, collegato l’antenna
e l’alimentazione, procedete con i seguenti sei passi per un uso corretto dell’apparecchio:
Passo 1: collegare il microfono alla presa microfono sulla parte frontale dell’apparecchio e
verificare che sia fissato in modo stabile.
Passo 2: assicurarsi che il connettore dell’antenna sia saldamente collegato all’apposito presa.
Passo 3: assicurarsi che la manopola di controllo squelch sia in posizione ore 9.
Passo 4: accendere l’apparecchio e regolare il volume fino ad ottenere un livello ottimale.
Passo 5: selezionare il canale desiderato agendo sull’apposito selettore.
Passo 6: per trasmettere premere il pulsante PTT sul microfono; per ricevere rilasciare il pulsante PTT.
CONTROLLI E CONNETTORI: FUNZIONI E USI
1 - Pulsante FUN (Funzione)
La vostra radio CB ERMES è dotata di pulsanti a doppia funzione. Premendo un pulsante si acce-
de alla prima funzione, per accedere alla seconda funzione è invece necessario premere prima
il pulsante FUN. Per disabilitare questa funzione premere nuovamente il pulsante FUN.
2 - Pulsante FR/BP (Frequenza/Beep)
Premendo questo pulsante si visualizza alternativamente la frequenza del canale o il numero
corrispondente. Premendo prima il pulsante FUN, questo pulsante funziona invece come se-
lettore On/Off per il segnale di Beep. Premendo prima il pulsante FUN e quindi questo, sul
display si visualizza BP ed è possibile utilizzare la funzione di Beep.
3 - Pulsante LCR (Richiamo ultimo canale)
Questo pulsante vi riporta all’ultimo canale utilizzato.
4 - ON/OFF e Volume
Ruotare in senso orario per accendere l’apparecchio ed alzare il livello del volume.
Ruotare in senso antiorario per ridurre il volume e spegnere l’apparecchio.
5 - Display LCD
Il display LCD visualizza lo stato operativo dell’apparecchio CB.
6 - Selettore canale
Consente di selezionare il canale desiderato. Ruotare in senso orario per passare ad un cana-
le superiore, ruotare in senso antiorario per passare ad un canale inferiore.
Un pulsante di canale su/giù si trova anche sul microfono.
7 - Regolazione SQUELCH
Ruotare in senso orario per eliminare il rumore quando non vi è segnale in ricezione per con-
sentire una condizione di standby silenziosa.
8 - Pulsante AM/FM
Questo pulsante funziona come selettore di AM/FM. Premendo questo pulsante sul display
LCD viene visualizzato AM o FM.
9 - Pulsante SCAN/M1
La prima funzione di questo pulsante è quella della scansione dei canali. Premendo il pulsante

ITALIANO
si attiva la scansione di tutti i 40 canali.
Lo scansione si arresta su ogni canale occupato e si ferma sul canale per 10 secondi dopo la
conclusione della conversazione, quindi la scansione riprende.
Per attivare questa funzione premere il pulsante scansione, sul display viene visualizzato SCAN.
Per arrestare la funzione premere nuovamente il pulsante scansione o il pulsante PTT sul microfono.
Questo pulsante può inoltre, se viene premuto dopo il pulsante FUN, essere utilizzato per
memorizzare o richiamare un canale in memoria.
Come utilizzare la funzione di memoria
Per memorizzare un canale:
Selezionare il canale da memorizzare utilizzando il selettore canale.
Premere il pulsante FUN.
Premere a lungo il pulsante M1~M4 corrispondente alla memoria da utilizzare.
Un segnale acustico (beep) indica che il canale è stato memorizzato ed il pulsante FUN
viene rilasciato.
Per richiamare un canale memorizzato:
Premere il pulsante FUN.
Premere il pulsante M1~M4 corrispondente alla memoria da richiamare.
Il canale desiderato verrà chiamato ed il numero della memoria sarà visualizzato sul display.
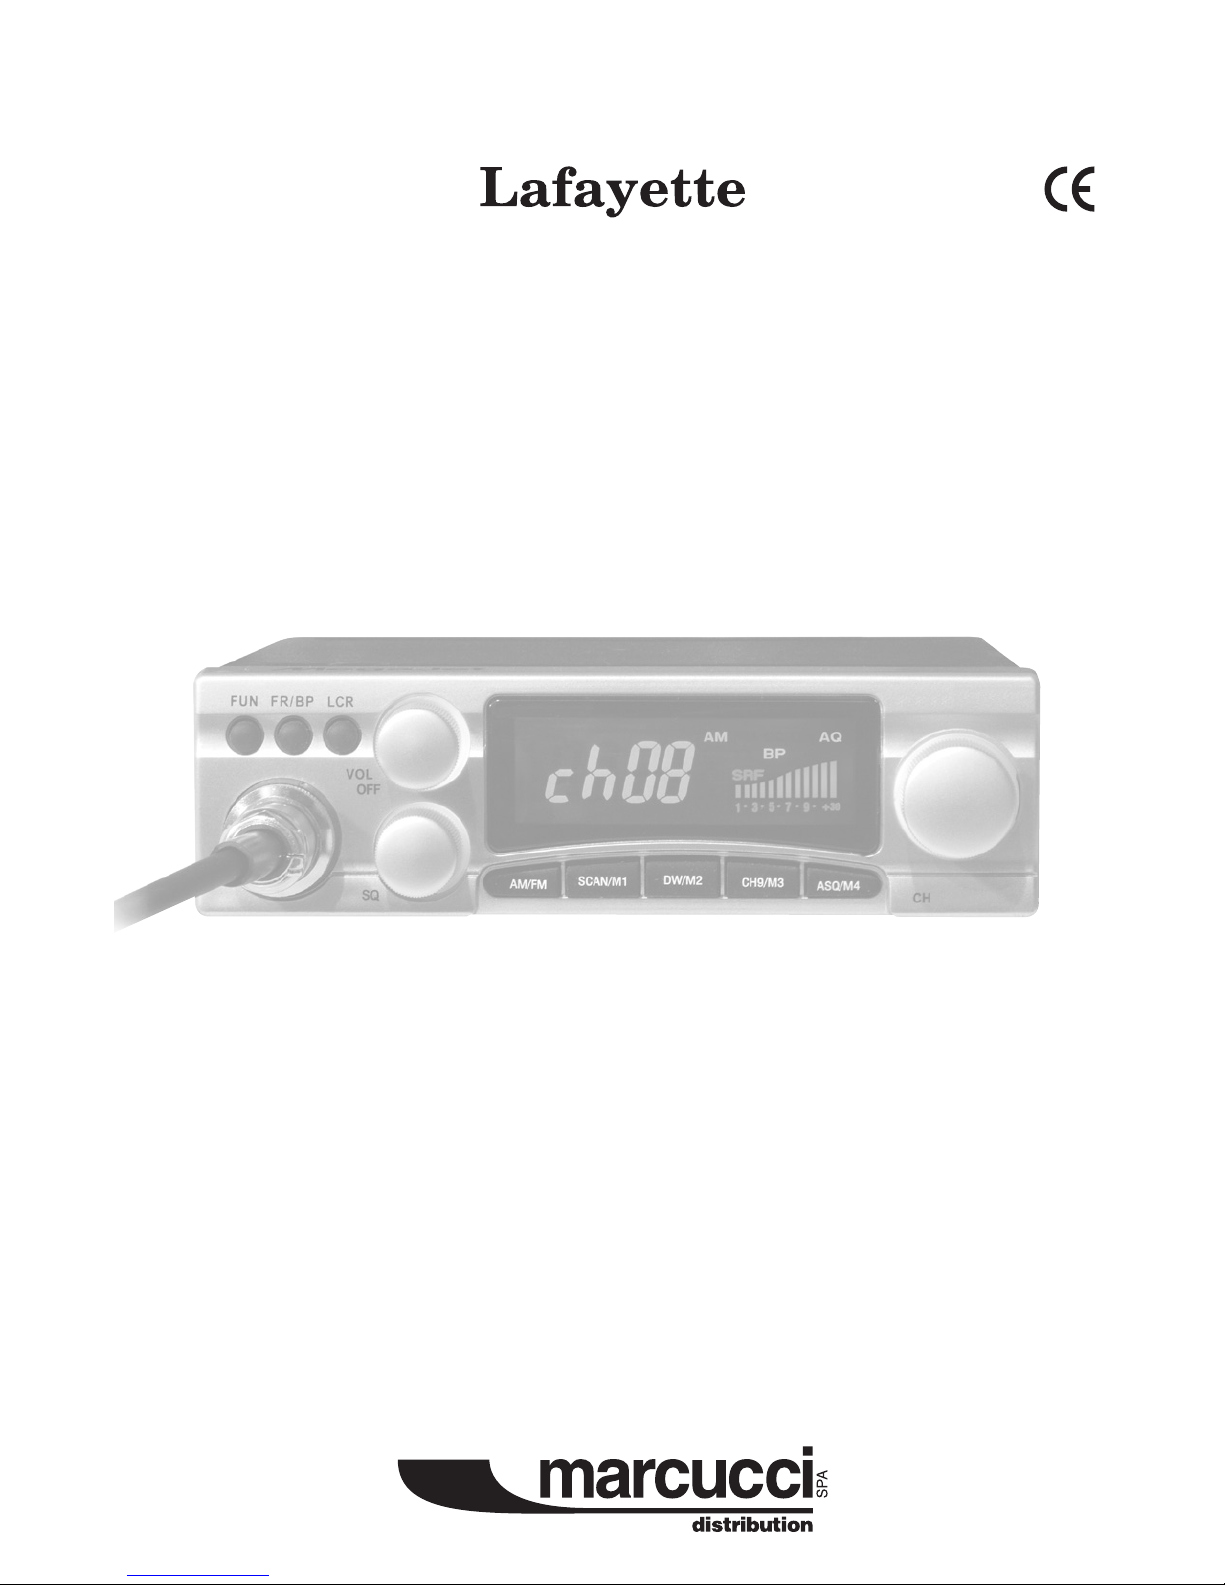
10 - Pulsante DW/M2 (Dual Watch/Memoria 2)
La funzione di Dual Watch offre la possibilità di monitorare allo stesso tempo due canali diversi.
Premendo il pulsante DW sul display viene visualizzato DW ed è possibile selezionare i due
canali da monitorare utilizzando il selettore canale.
I due canali verranno quindi monitorati ogni 0.5 secondi e visualizzati sul display in alternanza.
Se si rileva un segnale su uno dei due canali, la funzione di DW si arresta ed attende per 5
secondi. Se non si agisce, la funzione riprende dopo 5 secondi; premendo il pulsante PTT
l’apparecchio si sposta sull’ultimo canale ricevuto.
La funzione di Dual Watch riprende 5 secondi dopo la chiusura della trasmissione.
Per interrompere la funzione di Dual Watch premere nuovamente il pulsante DW.
11 - Pulsante CH9/M3 (Emergenza/Memoria 3)
Questa funzione viene utilizzata per l’accesso rapido al canale 9 (emergenza).
Premere questo pulsante per effettuare le chiamate di emergenza; sul display lampeggia
l’indicazione CH 9.
12 - Pulsante ASQ/M4(Squelch automatico/Memoria 4)
Il pulsante ASQ corrisponde alla funzione di controllo automatico dello squelch; premendo questo
pulsante sul display si visualizza l’indicazione AQ e si abilita la funzione di Squelch automatico.
Utilizzare la funzione di ASQ in presenza di molti rumori irregolari.
Quando la funzione di ASQ è attiva, la funzione di controllo manuale dello Squelch non funziona.
NB: Un pulsante per il controllo della funzione ASQ si trova anche sul microfono.
1
2
3
4
1
2
3

ITALIANO
Specifiche Generali
Generali
Trasmettitore Sintetizzatore PLL
Ricevitore Sistema a doppia conversione super-etherodina
Tensione operativa DC 13.8 V
Temperatura Da -10°C a +50°C
Passi Canale 10 kHz
Dimensioni Prof.138 mm - largh.159 mm - alt. 48 mm
Peso 870g senza accessori
(Totale: 1400g - accessori e imballaggio compresi)
Trasmettitore
Potenza in uscita: FM/AM 4 watt
Gamma di frequenza: 40Ch 26.965 ~ 27.405 MHz
Tolleranza di frequenza ±300 Hz
Sensibilita’ di modulazione 3mV (1.25 kHz input)
Capacita’ di modulazione AM: 90 %
FM: 2 kHz
Ricevitore
Frequenze 40ch 26.965 ~ 27.405 MHz
Sensibilita’ AM: 0.5 µV (s/n 10db)
FM: 0.5 µV (sinad 12db)
Squelch 1000 µV
Squelch automatico 0.5 µV
Rapporto S/N 40 dB
Distorsione 3 %
Massima potenza 4 Watt
S/meter (S-9) 1000 µV
Condizioni di test
Alimentazione DC 13.8 Volt
Impedenza d’antenna 50 Ohm non-inductive
Impedenza audio 8 Ohm non-inductive


Thank you for purchasing a Lafayette product.
In order to make the best of our product, please read carefully the following instruction manual.
Warning
Do not try to transmit if the antenna has not been connected, this could seriously damage
the transceiver.
This equipment has been calibrated and tested at factory; do not open it and try to tamper
with its internal components.
Connecting the antenna
The lead-in antenna cable must be terminated with a PL-259 connector. Only use antennas
tuned on 27MHz and use a RG-58/U shielded cable with a typical impedance of 50 Ohm.
Microphone bracket
Install the microphone bracket in a conformable position inside the vehicle, making sure that
the cable or the microphone itself do not interfere with driving operations.
Interference caused by the distribution system of your vehicle
Modern cars no longer cause problems for the shielding of distribution cables and ignition sy-
stem, therefore the transceiver should not suffer any interference caused by engine operation.
•
•
Standard features include:
Function
Built-in noise blank and automatic noise
limit circuit
Strong dynamic microphone with ASQ
control button
Large scale, easy reading multifunction
LCD display
Dual function selection button design
Frequency or channel number display
Beep sound ON or OFF
Instant recall for the last used channel
Manual squelch control and automatic
squelch control system
Scanning and 4 channel memory
Dual watch function
Emergency channel 9
1
2
3
4
5
6
7
8
9
10
11
Please note that the use of the equipment is subject to authorization for the purposes indicated
in article 334 of P.T. code (Italy only).
Controls
AF volume control W/ On/Off SW
Squelch control
Channel up/down control
Lcd display
Channel / frequency
TX/BP/DW/SC
Memory Channel 1 - 4
AM/FM/AQ
12 bar level meter
3.5 mm external speaker jack
SO-239 antenna connector
Dynamic microphone & 8 pin jack
1
2
3
1
2
3
4
5
ENGLISH

Control Locations and Indicators
Function selector
Frequency/beep selector
LCR (last channel recall) button
Power on/off & volume control button
LCD display
Channel selector
Squelch control
1
2
3
4
5
6
7
AM/FM selector
Scanning & memory channel 1
DW (dual watch) & memory channel 2
Emergency channel 9 & memory channel 3
ASQ (automatic squelch) control & memory
channel 4
8
9
10
11
12
Display Panel Information Command
Center
ENGLISH

ERMES OPERATING INSTRUCTIONS
Having properly intalled and wired your CB and antenna and power supply, you are now
ready for the six steps designed to get you into effective and satisfactory operation.
Step 1: Screw the plug from the microphone into the microphone jack on the face panel and
check for secure fit.
Step 2: Make sure your antenna is securely connected to the antenna connector.
Step 3: Make sure the Squelch control is in the 9 o’clock position.
Step 4: Turn the power on and adjust the “volume” control for a satisfactory sound level.
Step 5: Select your desired channel by the channel selector up or down.
Step 6: To transmit, press the push-to-talk bar (PTT) on the microphone.
To receive, release the PTT bar.
OPERATING CONTROLS, CONNECTORS: FUNCTIONS AND USES.
1 - FUN (FUNCTION) button
Your CB radio ERMES is equipped with dual function buttons. Press each button to access the
first function, to access the second function press the FUN button. To disable this function ,
press FUN button again.
2 - FR/BP (Frequency/Beep) button
When this button is pressed, the channel frequency or number are displayed alternately. After
FUN button is pressed, this button is used as Beep sound On/Off selector. When you press the
FUN button and then this button, BP appears on LCD and you can use the Beep function.
3 - LCR(Last Channel Recall) button
This button returns you to the last-used channel.
4 - Power/ AF Volume
Turn this control clockwise to switch on the CB radio and to increase the volume level.
Turn it counter-clockwise, to decrease volume and switch off the radio.
5 - LCD
The LCD displays all operating status of your CB radio.
6 - Channel Selector
It is used to select the desired channel. Turn it clockwise to change the channel up and turn it
counter clockwise to change the channel down.
A channel up/down button is also located on the microphone.
7 - SQUELCH Control
When turned clockwise, it quiets the receiver when there is no receiving signal and allows a
quiet standby operation.
8 - AM/FM button
This button is an AM or FM selector. When this button is pressed, AM or FM is displayed on the LCD.
9 - SC/M1 (Scan /Memory1) button.
The first function of this button is scanning. When you press this button scanning starts through
all 40 channels.
The scanning stops at any BUSY channel and stays on that channel for ten seconds after the
conversation ends, then it resumes scanning.
ENGLISH

To activate this feature, press the Scan button, SCAN is displayed on the LCD.
To stop scanning, press the Scan button again or the PTT bar in the microphone.
This button is also used as channel memory input or recall when pressed after the FUN but-
ton.
How to use Memory Channel function
When you want store a channel into a memory:
Select the channel that you want to store using the channel selector.
Press the Fun button.
Press continuously the M1~M4 button you want to use as memory.
When the channel is stored you hear a beep sound and the FUN button is released.
When you want to call the channel stored into the memory
Press the Fun button.
Press the M1~M4 button corresponding to the channel you want to call.
The channel will be called and the memory number s shown on the LCD.
10 - DW/M2 (Dual Watch / Memory1) button
Dual Watch allows you to work as if you had two receivers in your CB radio. It gives you the
ability to monitor two different channels at a time
When you press the DW button, DW will appears on the LCD and you can select the two
channels you want to monitor using the Channel selector.
The two channels will then be monitored every 0.5 seconds and displayed on the LCD alternately.
If there is any signal in any of the two channels, the Dual Watch function stops and waits for
5 seconds. If you do not respond, the DW function resumes after 5 seconds, if you press the
PTT button then your CB radio moves to the last received channel.
Dual Watch function resumes 5 seconds after the transmission is closed.
To stop the DW function, press the DW button again.
11 - CH9/M3 (Emergency / Memory 3)
In case of an Emergency such as crime, fire, crash, etc, press this button for emergency calls,
CH 9 will blink on the LCD.
12 - ASQ/M4(Auto Squelch / Memory 4)
ASQ is the Automatic Squelch Control function; when you press this button AQ is displayed
on the LCD and the Squelch control function is automatically enabled.
You can use this ASQ function when there are many and irregular noises.
When ASQ is on, the manual SQ function will not work.
NB : An ASQ control button is also located on the microphone.
1
2
3
4
1
2
3
ENGLISH

ENGLISH
General specifications
General
Transmitter cristal controlled PLL synthesizer
Receiver double conversion, superheterodyne system
Voltage operation DC 13.8V
Temperature -10 °C +50 °C
Channel step 10 kHz
Dimension depth 138 mm - width 159 mm - height 48 mm.
Weight 870g w/o accessories.
( total: 1400g including accessories & packing)
Transmitter
Output power: FM/AM: 4 Watt
Frequency range: 26.965 ~ 27.405 MHz
Frequency tolerance ±300 Hz
Modulation sens 3 mV (1.25kHz input)
Modulation capablity AM: 90 %
FM: 2 kHz
Receiver
Frequency range 40ch 26.965 ~ 27.405 MHz
Sensitivity AM: 0.5 µV (s/n 10dB)
FM: 0.5 µV (sinad 20dB)
Squelch 1000 µV
Auto squelch 0.5 µV
S/nratio 40 dB
Distortion 3 %
Max power 4 Watt
S/meter(s-9) 100 µV
Test condition
Power source DC 13.8 Volt
Ant load impedance 50 Ohm non-inductive
Audio load impedance 8 Ohm


INFORMAZIONE AGLI UTENTI
Ai sensi dell’art. 13 del decreto legislativo 25 luglio 2005, n. 15”Attuazione delle Direttive 2002/95/CE, 2002/96/CE e 2003/108/CE,
relative alla riduzione dell’uso di sostanze pericolose nelle apparecchiature elettriche ed elettroniche, nonché allo smaltimento dei
rifiuti”
Il simbolo del cassonetto barrato riportato sull’apparecchiatura indica che il prodotto alla fine della propria vita utile deve
essere raccolto separatamente dagli altri rifiuti.
L’utente dovrà, pertanto, conferire l’apparecchiatura giunta a fine vita agli idonei centri di raccolta differenziata dei rifiuti
elettronici ed elettrotecnici, oppure riconsegnarla al rivenditore al momento dell’acquisto di una nuova apparecchiatura di
tipo equivalente, in ragione di uno a uno.
L’adeguata raccolta differenziata per l’avvio successivo dell’apparecchiatura dismessa al riciclaggio, al trattamento e allo smaltimento
ambientalmente compatibile contribuisce ad evitare possibili effetti negativi sull’ambiente e sulla salute e favorisce il riciclo dei
materiali di cui è composta l’apparecchiatura.
Lo smaltimento abusivo del prodotto da parte dell’utente comporta l’applicazione delle sanzioni amministrative di cui al dlgs. n.
22/1997” (articolo 50 e seguenti del dlgs. n. 22/1997).
USER INFORMATION
in accordance with art. 13 of the Legislative Decree of 25th July 2005, no. 15 ”Implementation of Directives 2002/95/EC, 2002/96/EC
and 2003/108/EC, relative to reduction of the use of hazardous substances in electrical and electronic equipment, in addition to waste
disposal”
The crossed bin symbol shown on the equipment indicates that at the end of its working life the product must be collected
separately from other waste.
The user must therefore take the above equipment to the appropriate differentiated collection centres for electronic and electro
technical waste, or return it to the dealer when purchasing a new appliance of equivalent type, in a ratio of one to one.
Appropriate differentiated waste collection for subsequent recycling, treatment and environment-friendly disposal of the
discarded equipment helps to prevent possible negative environmental and health effects and encourages recycling of the component
materials of the equipment.
Illegal disposal of the product by the user will be punished by application of the administrative fines provided for by the legislative decree
no. 22/1997 (article 50 and following of the legislative decree no. 22/1997).
AVVISO AGLI UTENTI/USER INFORMATION

Importato e distribuito da
Strada Provinciale Rivoltana 4 - km 8,5 • 20060 Vignate (MI)
www.marcucci.it
Table of contents
Languages:
Other Lafayette Transceiver manuals

Lafayette
Lafayette Petrusse User manual

Lafayette
Lafayette Petrusse User manual

Lafayette
Lafayette Atena User manual

Lafayette
Lafayette Petrusse User manual

Lafayette
Lafayette ZEUS User manual

Lafayette
Lafayette HA-410 User manual

Lafayette
Lafayette COMSTAT 35 User manual

Lafayette
Lafayette Ares User manual

Lafayette
Lafayette HE-20 D User manual

Lafayette
Lafayette VENUS User manual