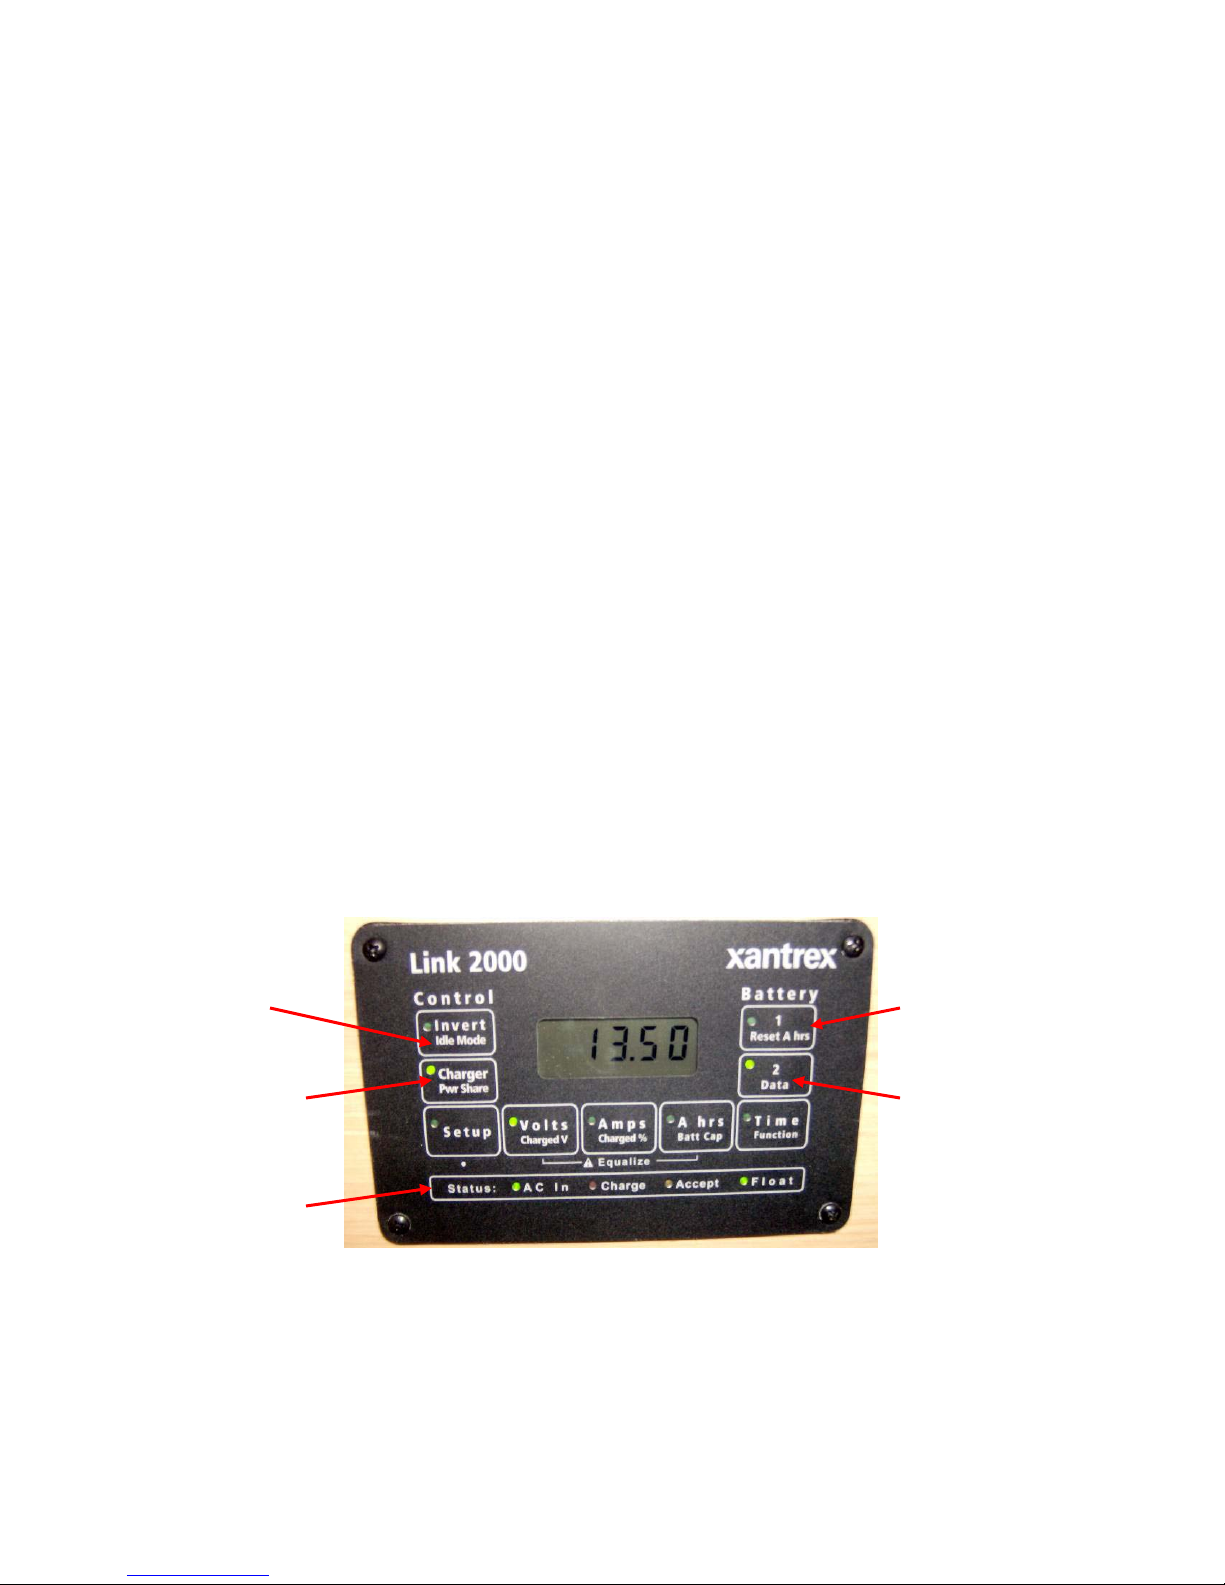
Lagoon 440 User manual

Information & operations manual for
Lagoon 440 Catamaran 2008
‘Larimar’

Welcome
Welcome to Horizon Yacht Charters and your Lagoon 440 “Larimar”. We hope
you had a pleasant journey and are looking forward to a fantastic holiday and
some of the finest sailing in the world here.
This manual is here to guide you through the operation of your yacht. Please
take the time to read this manual and don’t hesitate to ask any of our
professional, friendly staff if you have any questions.
All of the yachts in the Horizon fleet are maintained to the highest standards
so that you may enjoy a trouble free vacation, on a beautiful yacht. Please
remember that these yachts are all privately owned and we ask that you care
for it like it was your own.
Best wishes for a great vacation,
Sylvia and Andrew
Directors
Office Hours:
Monday – Sunday 08:30 – 17:30
Telephone: (284) 494 8787
Duty Manager: (284) 542 8788 (Emergency Only)

Contents
1. Yacht specifications
2. Electrical panels, breakers and fuses
3. The inverter panel
4. Engine start procedures
5. Daily engine checks
6. The generator
7. Air conditioning
8. Instruments
9. VHF radio
10. Batteries
11. Anchoring and using the windlass
12. Picking up a mooring buoy
13. Bilge pumps
14. Fresh water systems
15. Heads
16. Showers
17. Refrigeration
18. Using the stove and propane
19. The BBQ
20. Fire safety
21. The dinghy and outboard

1. Yacht Specifications
Length 44’ 8”
Beam 25' 3"
Draft 4' 3"
Fuel 170 gallons
Water 240 gallons
Engines 2-53hp
Location of:
Engines (starboard and port aft cockpit lockers)
Generator (beneath cockpit seating)
Manual bilge pump (in cockpit)
Propane tank (beneath cockpit seating)
Water tank refill (port side of the bow seating area)
Electric winch breakers (in saloon next to the 12v panel)
Windlass breaker (forward locker opposite water tanks)
Diesel refills (port and starboard transom)
Fuel shut off valves (below the port and starboard aft berths)
Air conditioning bleed valves (2 in starboard hull, 1 in port hull)

2. Electrical panels
12 volt panel and 110v panel B:
12 volt panel, first column:
•Navigation lights
•Mooring light
•Steaming lights
•Deck light
•Cabin lights
•Saloon lights
•Instrument lights
•12v DC outlets
12v panel, second column:
•Fresh water pump
•Starboard bilge pump
•Fridge
•Confort (switches on the shower drains)
•Navigation instruments
•VHF
•Port bilge pump
•Not used
The water gauge checks the amount of water in your tanks. There are 3
tanks on board but they are all interconnected. Toggle the switch to check
the level of tank 1; this will give you the overall level of water in the tanks.
Toggling the other tanks will not give you a reading.
ECL tab – this illuminated the 12v and 110v panels
Battery gauge
Water gauge
12v panel
110v panel B
ECL tab
12v outlet

110v panel B:
•Water Heater
•Inverter/Battery charger (the inverter must be on to operate the 110v
outlets)
•110v outlets
•110v outlets
These switches will operate when the vessel is connected to shore power or
when the generator is running.
110v panel A and AC source selection panel:
110v panel A:
•Port air conditioning pump
•Port air conditioning unit
•Saloon air conditioning unit
•Stateroom air conditioning
The 110 panels will operate when
the vessel is connected to shore
power or when the generator is
running.
There are 2 selector panels; one
each for 110v panel A and 110v
panel B.
Make sure you have selected the
option for the power source you
are using
Selection for Panel A Selection for Panel B

Battery switches are located beneath the berth in the starboard aft cabin
Emergency fuel shut off valves are located below both the
starboard and port aft berths.
The electric winch breakers are located in the saloon beneath the generator
start up. To reset the breakers simply flick the yellow lever to it’s down
position.
The windlass breaker looks like the above breakers and is located in the bow
locker, opposite to the water tanks.
Breakers are on Breakers have tripped.

3. Inverter
The inverter panel does three things: it charges the batteries, gives you the
volt levels of the battery banks and it can be used to provide 110v power
without the need to connect to shore power or run the generator.
To charge the batteries:
When plugged into shore–power, the “charge” button needs to be switched
on; the green light will be illuminated. The “AC in” and one of the three
inverter status lights should be illuminated in the status bar. If these are not
illuminated check your shore power connection.
Before un-plugging from the dock power, press the charge button on the
panel and switch off all the breakers on the 110V panel, (see previous
pages), as well as the breaker on the dock power outlet. Do this process in
reverse when plugging into dock power.
To use the inverter:
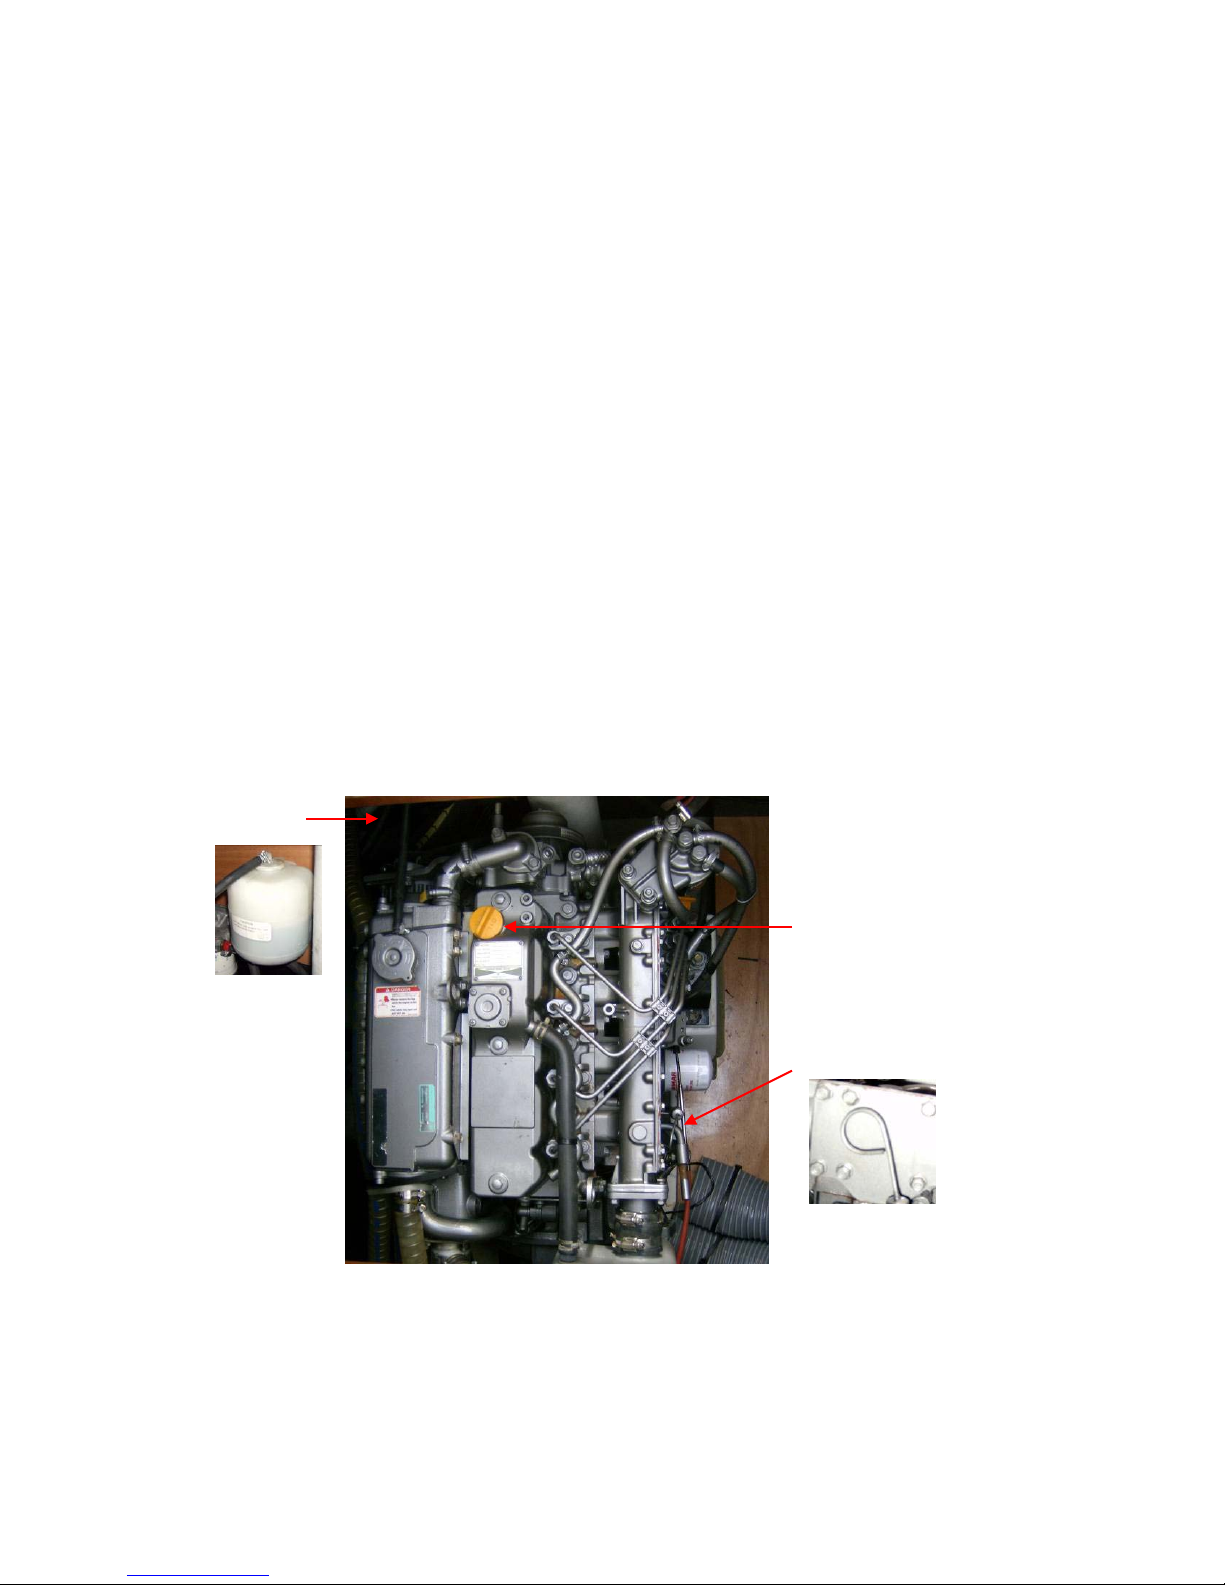
1. Start the engines; bring the rpm up to 1400.
2. Press the “invert” button under the control section of the panel. The green
light on the switch will then illuminate.
3. All of the 110V outlets are now live.
4. Reverse steps 1, 2 & 3 to switch off the inverter, but run the engines for
ten minutes before switching it off.
Always ensure that you have switched the inverter off by checking that the
switch on the panel is no longer illuminated. Leaving the inverter on will
cause your batteries to rapidly lose their charge.
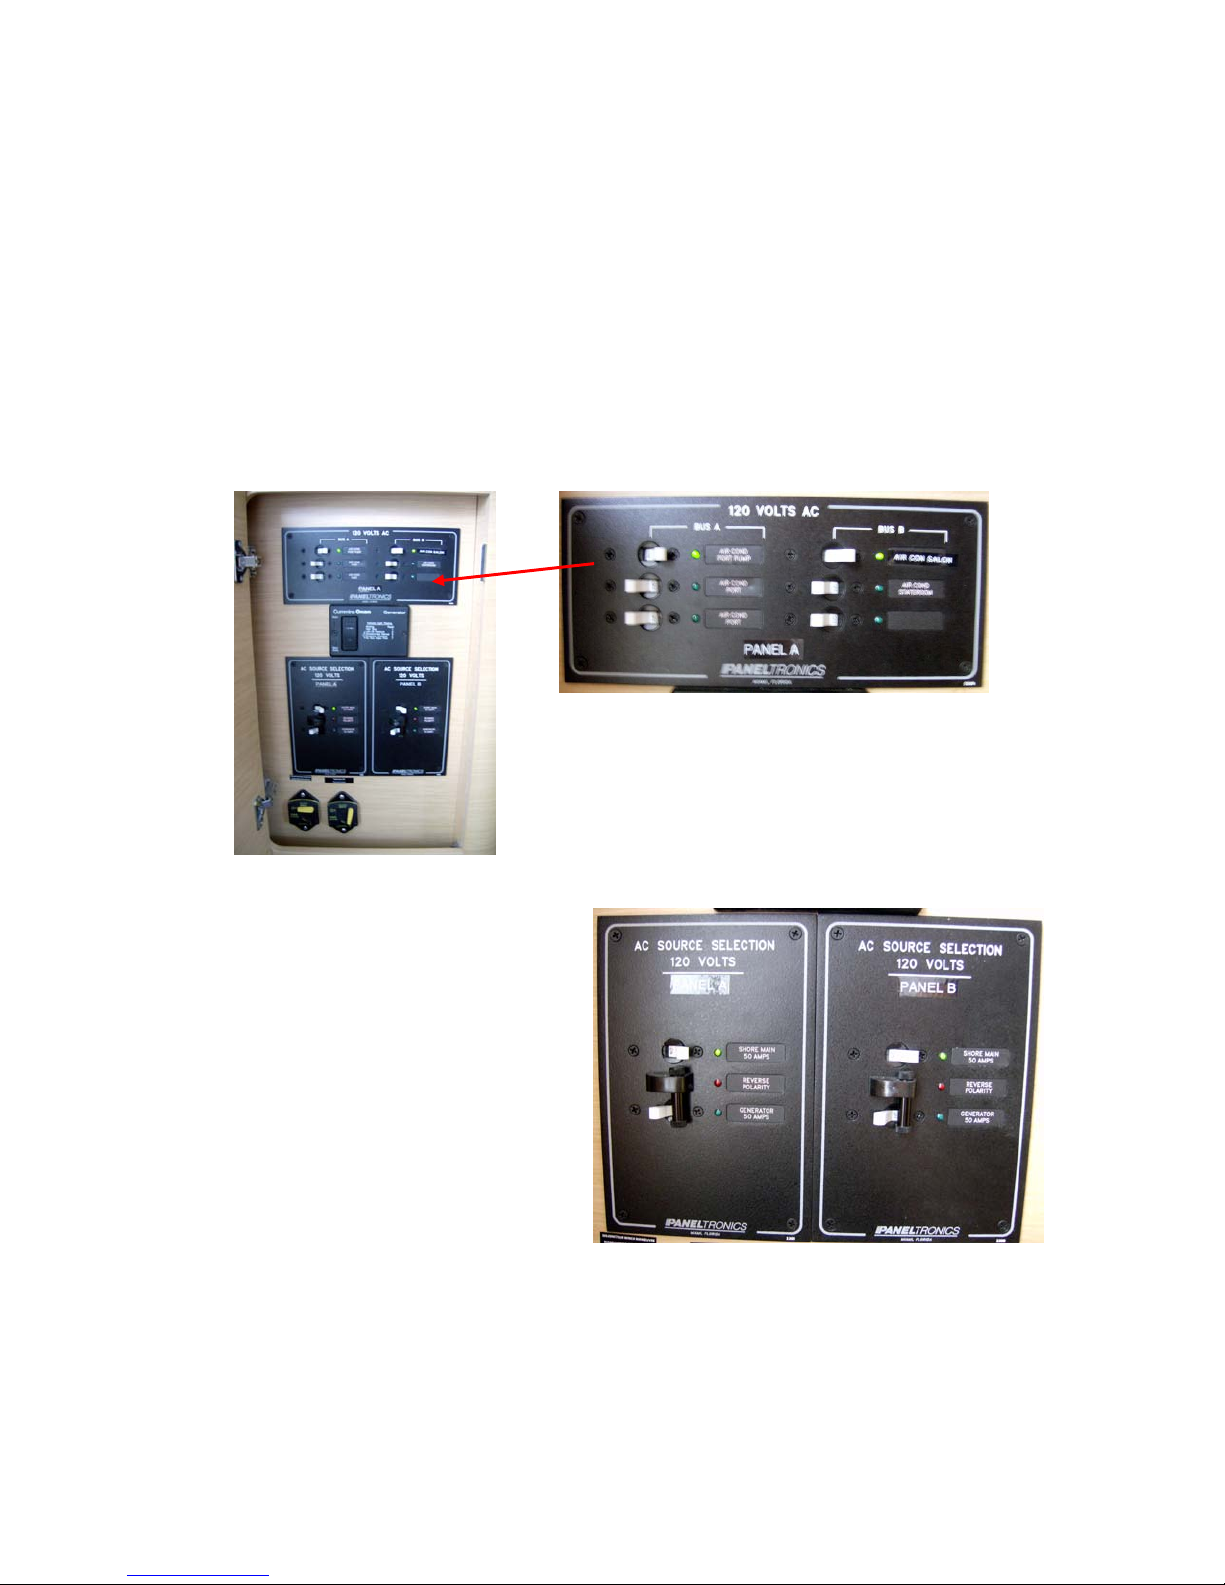
NB: The inverter panel will not operate the air conditioning unit; this is only
available under generator power or shore power.
Invert
button
Charger
button
(leave on at
all times)
Status bar
Battery 1:
engine
batteries
Battery 2:
domestic
batteries

4. Engine start procedures
You have two engines on your vessel, one to operate the starboard prop and
one for port. You must switch on both engines to manoeuvre the vessel.
Start one engine and then start the other.
•Make sure engines are in neutral.
•Turn on the engine ignition switches (an audible alarm should come on)
and then turn the key further to the right to switch the engine on.
•Once the engines are running check you have water coming out of the
exhausts.
•To stop the engines press the stop buttons until the engines stop.
Should you hear an engine alarm during operation, check which light
is on and immediately shut down the engine-CALL HORIZON
All our yacht engines run with diesel fuel. There is a diesel filler cap
on the transom which is clearly marked “DIESEL” DO NOT PUT
WATER IN HERE.

5. Daily Engine Checks
The engines are located at the transom, one in each hull. It is important that
you complete the following checks on both engines.
•Check the oil level using the dip stick located on the right of the engine.
The level should be at least halfway between the empty and full marks.
To add oil open the yellow oil filler cap on the top of the engine.
•To the back left of the engine is the engine coolant reservoir (hidden from
view on the picture). The coolant level should be between the maximum
and minimum lines.
•Check for any engine leaks or bilge water below engine.
•Check the belt for any damage and correct tension.
KEEP HANDS CLEAR OF ALL MOVING PARTS.
ANY PROBLEMS CALL HORIZON
Oil dip stick
Oil refill
Coolant
reservoir

6. Generator
Larimar is fitted with its own generator which will run the 110v outlets, the
air conditioning and will also charge the batteries in place of the engine. The
generator is located behind the seating in the cockpit and the starter is inside
the saloon on the port side.
The reset breaker for the generator
is located to the left of the
generator, towards the back.
•Make sure the battery charger switch is on so that the batteries are
charging.
•To use the 110v sockets you must switch on the converter and also the
110v outlet switches.
•The water heater will work when the generator is running; make sure this
is switched off as soon as you have enough hot water.
Main breakers for the generator
Inside the front panel of the generator
Oil dip stick

To start the generator:
•Make sure all the 110v systems have been switched off prior to starting
the generator.
•Make sure the shore power/generator breakers have been switched over
to generator mode.
•Press the top of the “GenSet” switch and hold.
•After a slight delay the light on the switch will flash and go green, you will
hear the generator start.
•Allow the generator to warm up for 5 minutes and then gradually load up
the system, adding one load every 5 minutes.
Stopping the generator
•Press the bottom of the switch and release. The generator will close
down.
You must not run the generator when underway.
Generator start and stop button. Press the top
and
hold until generator starts. Press bottom
and hold for generator to stop.
Shore power/generator breakers.
Make sure generator mode is selected
prior to starting the generator.

7. Air conditioning
The air conditioning unit will operate when the vessel is plugged in to shore
power and when the generator is running. Each cabin has its own individual
air con unit and there is a 4th unit located in the saloon.
Operate the air conditioning as
follows:
•Make sure the units are switched
on at the 110v panel A. The air
conditioning pump should be
switched on first.
•Switch on the unit using the
mode button
•Select “cool” via the mode
button
•Select your base temperature
using the + - temperature controls
•Select fan strength using the fan speed control
•To switch the units off press the mode button repeatedly (4 times to run
through all the modes) until “off” is selected.
Load up the generator with one air conditioning unit every two minutes so
that the generator does not overload.
Bleed valves for the air conditioning units.
There are bleed valves fitted to each unit in case the
system becomes air locked. If this occurs simply open
up the bleed valve until the air is dispelled and water
starts to come out of the valve. Close the valve and
start up the unit.
The valves are situated beneath the floorboards in the following locations:
Stateroom: before the shower room and central cabin floor Port hull: beneath steps

8. Instruments
Located at the helm are the following Raymarine instruments:
Also located at the helm is a Standard Horizon GPS chart plotter CP120
At the chart table is a Raymarine ST60+ Multi Graphic Display
ST6002 Smart Pilot ST60+ Depth Gauge ST70+ Multifunction

9. VHF Procedures
Using the VHF radio:
Familiarise yourself with the method for switching channels, and with the
squelch and volume controls on your radio. Most radios have a button to
instantly select Channel 16 – ensure you understand how this operates or
you could end up speaking on Ch. 16 when you think you are on some other
channel.
1. Make sure the radio is switched on, volume quite high, power to high
unless the station you are calling is very close.
2. Squelch up until loud hissing, and then back a little until the noise just
stops.
3. Select the channel for calling (Channel 16, unless specified otherwise).
4. Press switch on microphone when speaking. Release immediately.
If no response then wait two minutes and repeat the call. If still no
response, wait a further two minutes before trying again. If calling on
Channel 16, it is very important to switch to a working channel after the
contact is established. Do no use Channel 16 for your conversations – this
channel is for hailing and distress only.
Channels to use:
16 Hailing and Distress
74 Contact Horizon Yacht Charters (when in range)
12 Yacht Charter Companies working channel – assigned for yacht
breakdown servicing and emergency only
68 Marinas and Yacht Clubs – for lunch/dinner reservations etc
06 Ship to Ship – along with Channel 68 and 77 can be used for contact
between boats
In the event that your vessel is involved in a non-life threatening incident
with an object or with another vessel, it is important that you contact the
Horizon Office immediately at 494 8787 or 542 8788. Please remember to
get as much information as possible about your location, the other vessel’s
description and what damage has been done to your vessel so that we can
best assist you.
Failure to report any accidents or incidents in a timely manner may
result in nullification of your hull damage insurance.

Types of emergency:
In the unlikely event that you are involved in an emergency stay calm and
follow these steps. You will also have an Emergency Procedure card next to
your VHF.
Distress: “MAYDAY, MAYDAY, MAYDAY.” This is an International Distress
signal and an imperative call for assistance. It is used only when a life or
vessel is considered to be in grave and imminent danger.
Mayday Relay: used to summon help for a vessel which is either too far
offshore to contact the coastguard directly, without radio capabilities or
whose radio has been damaged or destroyed.
Urgency: “PAN-PAN, PAN-PAN, PAN-PAN” This is the International Urgency
Signal and is used when a vessel or person is in some jeopardy but is not
considered to be in grave and imminent danger.
Medical emergency: “PAN-PAN MEDICO, PAN-PAN MEDICO, PAN-PAN
MEDICO” (Pronounced med-ick-oh). This is an International Urgency Signal
that should be used when medical advice is needed.
Safety: “SECURITE, SECURITE, SECURITE” (Pronounced Say-cure-it-tay).
This is an International Safety Signal and is a message about some aspect of
navigational safety or a weather warning.
How to issue an emergency message
Select Channel 16 and press transmit button on handset
Say slowly and clearly ‘MAYDAY, MAYDAY, MAYDAY, CALLING ALL STATIONS
This is…. (vessel name)….’ and repeat vessel name 3 times
Give position – vessel’s position in degrees of latitude and longitude or
nautical miles from, and bearing to, a navigational landmark
Describe emergency –list the problem, the type of assistance needed;
number of passengers aboard (boat length, hull colour and type is also
useful)
Wait 1 minute for a response, repeat message
ALTERNATIVELY: Dial either 767 or 999 from any BVI cell phone or
call 494- HELP (4357)
.

10. Batteries
There are 3 ways to recharge your batteries.
Engines:
The batteries will need to be recharged as often as you deplete them.
Conserving power will result in less time needed for charging, so turn off
systems that you are not using. Your batteries will charge when the engines
are running at 1400rpms or more, whether sitting at a mooring or motoring
to a destination.
•Check the battery levels and make note of them before charging.
•Run the engines at 1400rpms or more for 1-1 1/2hrs.
•Shut the motor off.
•Wait 5 minutes before checking the battery levels, (directly after turning
off the motor they will remain in an excited state for about 10 minutes).
Shore power:
Ensure the battery charger button on the link 2000 panel is illuminated and
that the 110v battery breaker is also on. The AC selector panels should be
switched to shore power.
Generator:
Ensure the battery charger switch on the 110v panel is on. The AC selector
panels should be switched to generator.
In all instances ensure that the charge button on the link inverter
panel is on as this starts the battery charger.
The link inverter panel
Charge button

11. Anchoring & the windlass
Setting your anchor:
Preparation:
•Establish a non verbal communication system from bow to stern, as with
the noise of the engine and wind, verbal communication proves difficult.
•Tie the dinghy painter close to the boat at the bow or amidships to avoid
wrapping it around the prop.
Location:
•Choose a clear area to anchor in, normally in 12 to 25 feet. A white
bottom is sand and perfect for anchoring. A brown or green bottom will be
grass, rock or coral. Only anchor in sand.
•Make sure that you are not on a lee shore; i.e. that the land mass is
protecting you from the elements and that you are not being pushed onto
the shore. A lee shore is the most dangerous place to anchor your
yacht.
Action:
•Manually lift the anchor over the bow roller and feed the chain so the
anchor is just above the water surface.
•Use the elements; approach from down wind or current, whichever
prevails.
•Once the yacht is stationary use the electric windlass to drop the anchor.
The elements will push you back and away from the anchor.
•Minimum scope is 5:1. In heavy weather you may want to increase that,
always ensuring your swing area is clear of any obstacles.
•Engage reverse, slowly building up to 1500 rpm to really drive your hook
into the sand.
•Once set, put the engine in neutral and allow the yacht to settle, take
transits around the bay to ensure you are not dragging, it is always
advisable to snorkel the anchor and ensure it is bedded in correctly and
not just lying on its side.
Attaching the snubbing line:
•Once you are happy that the anchor is set you must attach the snubbing
line. The snubbing line protects the windlass and it is important that you
attach the snubber every time you set the anchor.
•Attach the hook around the chain link (the hook is too big to go though
the link) and cleat off the bitter end of the line to a bow cleat. Pay out
enough chain so that the snubbing line becomes taut.
•If the hook falls of the chain it means that there is not enough tension on
the line. In this case re-attach the hook and pay out more chain until the
line is once again taut.
Setting a secondary anchor:
•If a second anchor is required, e.g. you are anchoring in a mooring field
and need to control your swing room, deploy the primary as above and
attach the secondary at the bow. Drive the boat forward at a 45 degree
angle to the primary. Once in line with the primary deploy the secondary
and allow the elements to push you back. Increase astern to 1500 rpm to
drive in the secondary. Snorkel over the anchor to ensure a good hold.

Manual operation of the windlass
If you lose power to your windlass, start the engine and give it some revs, to
make sure you have not just got a low battery voltage. If you still have no
power, you can operate the windlass manually.
To drop the anchor, insert the windlass
handle into the inner hole on the top of
the windlass.
Turn the handle to loosen the gypsy,
which in turn loosens its grip on the
anchor chain.
Your anchor is now ready to drop.
Remove the safety line or safety pin, and
push the anchor over the bow roller,
keeping hands and feet clear. Control the rate the chain pays out by
tightening or loosening the gypsy with the windlass handle.
When you have paid out sufficient chain, between 5 to 8 times the water
depth, tighten the windlass back up. Increase revs to 1500 rpm to set the
anchor. If you drag, pay out more chain, and re-try 1500 rpm in reverse.
When the anchor is set, fit the snubbing line then release more chain on the
gypsy so that the load is taken up on the snubbing line.
To raise the anchor, put the handle in the outer hole on the windlass and
turn. It can often be quicker if you pull the anchor up by hand as the
helmsperson motors forward a little at a time, to give you slack on the chain.
If you are fit and strong, it is possible to heave an anchor aboard, even on a
55 footer!

12. Picking up a mooring buoy
•Ensure dinghy painter tied off short on the bow or amidships and clear of
the prop.
•Approach mooring buoy, keeping the bow into the wind or current,
whichever prevails.
•Have a crew member on the bow to pick up the mooring pennant with the
boat hook.
•The bowman will direct the helmsman to the mooring, using the already
established non verbal communication system. Once at the mooring,
inspect the buoy and pennant for any signs of wear and tear - generally
the overnight moorings are well maintained, the day balls to a lesser
degree. If you are ever unsure about a mooring buoy’s integrity, choose
another location to moor up.
•Attach the bridle to the pennant using the attached clip
•Once set you will have a bridle around the bow of the boat holding the
yacht head to wind, remember to centralize wheel and lock in place to
avoid the yacht sailing around the buoy.
•Now set up a second back up line. Go directly to the mooring buoy if
possible. It is always easier to do this from the dinghy.
•To depart, slowly motor the yacht forward to create slack, release the clip
from the pennant and allow the pennant to drop into the water. Fall back
with the wind or current, and be careful not to foul your prop on the
pennant.
•Remember to tie your dinghy away from the stern whenever you
are manoeuvering in close quarters
Other manuals for 440
2
This manual suits for next models
1
Table of contents
Other Lagoon Boat manuals
Popular Boat manuals by other brands

Sea Eagle Boats
Sea Eagle Boats SE-8 Instructions and owner's manual

Highfield
Highfield PA540 installation guide

Sea Dragon
Sea Dragon ALUBAT CIGALE 16 Operation guide

Classic Accessories
Classic Accessories Colorado owner's manual

Bayliner
Bayliner 2150 Ciera Sunbridge owner's manual

BRP
BRP Sea-Doo GTX PRO 130 Operator's guide