Lalizas 71107 User manual

DO NOT REMOVE PRIOR TO SALE!
OWNER’S MANUAL
LALIZAS Inatable Lifejackets Lamda, SOLAS/MED
LALIZAS Inatable Lifejacket Lamda, Auto, 150N, SOLAS/MED (code: 71107)
LALIZAS Inatable Lifejacket Lamda, Auto, 150N, with Zipper, SOLAS/MED (code: 711071)
LALIZAS Inatable Lifejacket Lamda, Auto, 275N, SOLAS/MED (code: 71216)
LALIZAS Inatable Lifejacket Lamda, Auto, 275N, with Zipper, SOLAS/MED (code: 712162)
LALIZAS Inatable Lifejacket Advanced Lamda, Auto, 330N, with Crotch Strap, SOLAS/MED (code: 72114)
LALIZAS Inatable Lifejacket Advanced Lamda, Auto, 330N, with Sprayhood & Crotch Strap, SOLAS/MED (code: 72115)
LALIZAS

2
IMPORTANT MESSAGE
When used and serviced according to this Owner’s Manual, this device can greatly increase your chances of survival in the water. The lifejacket has integrated polyvinyl
chloride material cover which is easy to clean.
The lifejacket cover closure system is a simple hook and loop fastener or zipper (depending on product code). The cover will pop open quickly upon discharge of 1 or 2
cylinders of 33gr or 60 gr CO2 automatically upon water entry, or manually by pulling the manual lever. When lled, its chamber capacity is capable of providing buoyancy
to keep the wearer’s head above water. Actual buoyancy will vary with ambient conditions and CO2 production tolerances.
A double oral & relief ination tube with automatic seal valve is provided for buoyancy adjustment and deating. Oral ination may only be used as a back- up if for any
reason the automatic and/or manual ination has not operated.
LALIZAS Lamda lifejackets can be easily adjusted to users with chest size up to 150cm.
When fully donned and inated, this device is designed to turn most wearers face up within 5 seconds.
Its inner high visibility yellow chamber, with double chamber interlocking system and SOLAS grade retro-reective material, its SOLAS lifejacket light and whistle, which is
rmly secured by lanyard, enhance the chances for rapid rescue. The lifejacket has also integrated a yellow lifeline, also known as buddy line, which is reusable and can
be secured to a lifejacket worn by another person in the water.
It is also provided with lifting loop so as to lift the wearer from the water into the rescue boat or survival craft.
The LALIZAS JSI inator mechanism was selected for its low prole, simplicity, and eld proven technology. Its water-soluble water activation device technology meets
the highest ination mechanism requirements for resistance to inadvertent ination from high temperature and high humidity. Caution: Since water soaking trips the ring
pin, premature ination is always a possibility with all inators. Rain, splash, and fog are very unlikely to cause ring. Full immersion as would be experienced with a large
wave or fall overboard will cause ination.
Attention: The inator mechanism does not have cylinder seal indication, so the cylinder must be removed to check and conrm that it has not been red. Once the
lifejacket is used, then it should be immediately serviced and immediately cylinder CO2 to be replaced with a brand new cylinder CO2.
CAUTION
DEVICE IS ARMED
READ INSTRUCTIONS IN YOUR OWNER’S MANUAL PRIOR TO USE
SEE PARTS LIST BELOW
GENERAL SPECIFICATIONS
Chest Size: 70 - 150 cm
Weight Range: more than 40 kg
Buoyancy: 150, 275 & 330 Newtons according to each model predened category, when fully inated
Ination System:
2 pcs of Manual/Automatic Ination Mechanism
2 pc Oral & Relief Tube (Double)
The Manual levers are used to manually activate the ination mechanism and inate the lifejacket.
2 pcs of CO2 Cylinder 33 or 60 gram in accordance with the relevant model, 1/2-inch thread
Available in one adult size, which can be easily adjusted to passengers with chest size up to 175cm or more, with the use of the LALIZAS Waist Belt Extender (71161)
PRE-DONNING INSTRUCTIONS
CHECK THE FOLLOWING INSTRUCTIONS BEFORE EACH USE OR OUTING:
1. INSPECT THE LIFEJACKET FOR DAMAGE
2. INSPECT THE INFLATOR MECHANISM/S
3. EXAMINE CO2 CYLINDER CAP FOR PUNCTURE HOLE. IF PUNCTURED OR DEFORMED, REPLACE THE CYLINDER.
4. CHECK THAT THE STATUS OF THE INFLATOR IS IN AUTOMATIC OR MANUAL MODE FOR THE APPLICATION NEEDED.
DONNING INSTRUCTIONS
In an emergency situation there is not enough time to learn the proper operation of lifesaving equipment. Therefore, it is advised that the user has practiced beforehand,
in order to become familiar with the use and features of the lifejacket. It is vital that the lifejacket is correctly adjusted in order to t the user.
Donning instructions are printed on the outer cover of each lifejacket.
LALIZAS

3
In order to don your lifejacket, follow the below steps:
1. Remove the lifejacket from the storage bag. Unfasten the stainless steel interlocking buckle/buckles.
2. Wear the lifejacket as you would wear a jacket.
3. Fasten the buckle/buckles.
4. Tighten the waist belt. Adjust the strap.
5. Fix and fasten the crotch strap for 330N model.
How to wear your lifejacket (150Ν & 275Ν):
How to wear your lifejacket (330N):
To prevent the lifejacket from riding up on the wearer when in the water, it is vital that the straps are properly adjusted. This may prevent the wearer from being able to
maintain their nose or mouth face up above the water surface.
In an emergency situation, if needed, enter into the water with your feet rst while holding the lifejacket (see below).
After donning, locate the Manual lever for the mechanism; it should protrude from the lifejacket! Make sure that you are comfortable locating it with either hand.
Be prepared to use it in case of emergency! Always wear your lifejacket over clothing, not under clothing.
Caution: Clothing and equipment may affect the ability of this lifejacket to turn the wearer to a face-up position in the water. Due to mission specic congurations, we
recommend self-testing under controlled conditions to conrm adequate performance. Make sure you practice on closing the hardware and on adjusting the straps before
use or prior to in-water testing.
LALIZAS

4
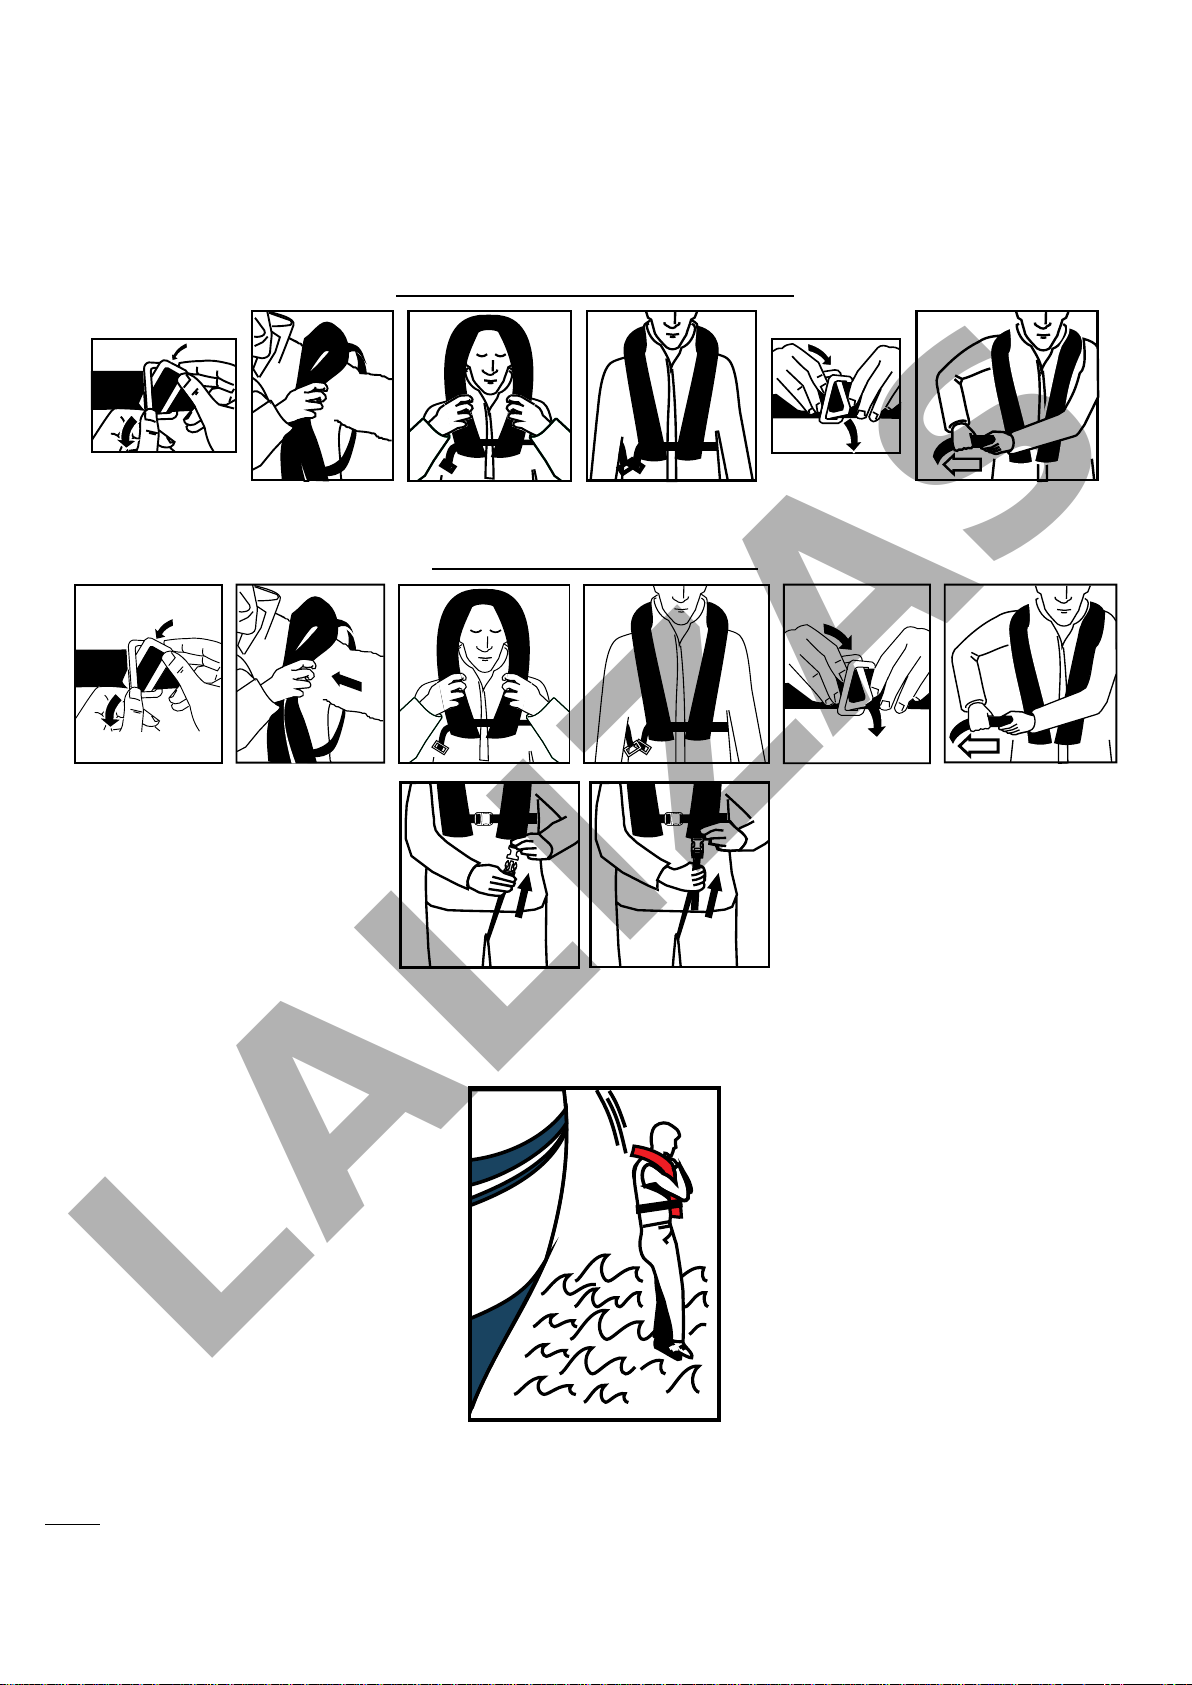
INFLATED DONNING INSTRUCTIONS
Inatable lifejackets can be very difcult to don when fully inated. Deate through the Oral Tube until enough gas has escaped to don. See DEFLATION
INSTRUCTIONS. Don as described above and re-inate orally as described below.
INFLATION INSTRUCTIONS
1. Manual Ination - To inate, grasp the 2Manuallevers and pull sharply downwards. This will open the mechanism cover ap and activate the manual ination lever.
2. Automatic Ination - When armed, the 2 automatic Ination Mechanisms will be activated when the device is totally immersed in the water. Depending upon
temperature, the device will obtain full buoyancy within 5 to 10 seconds. It is recommended that the user regard the automatic system as a backup and always be
prepared to pull the Manual levers upon immersion.
3. Oral Ination - The Oral & Relief Tube (Double) is located on both ination chambers. Each tube has one ination valve and one relief valve preinstalled. Before
inating, without CO2, you MUST rst open the oral ination cap. Grasp the Oral Tube and bring to mouth. Blow air through the Oral Tube until the Inatable Chamber
is rm. The oral tube valve will automatically re-seal. The relief valve will automatically remove the excess air so as to maintain the chamber with the needed buoyancy.
4. Cold Ination - Oral Ination may be required in addition to manual or automatic ination if chamber/s is not rm due to cold temperatures at or below 4 oC. Ination
time using CO2 gas will be longer at these temperatures. Activation of automatic system may also be slower. Always be prepared to use the manual ination system!
See FREEZING TEMPERATURES on page 9.
3. Other Ination Precautions
Caution: Never inate this lifejacket with a pump or air-compressor.
If the chamber/s becomes soft due to CO2 permeance, Oral Ination will be necessary to maintain full buoyancy. Permeation loss is greater when the device is inated with
CO2 than with air, and earlier replenishment by means of the oral ination system will therefore be necessary.
INSPECTING YOUR LIFEJACKET FOR DAMAGE
Make sure that the lifejacket is free from rips, tears or punctures. This type of damage on the outside covering indicates that the Inatable Chamber/s may have been
exposed to potentially damaging elements. If these defects expose the yellow inatable chamber/s material, discontinue use of the lifejacket until you have the lifejacket
inspected by an authorized repair facility. If these defects are noticed but the yellow inatable chamber/s material is not exposed, the Inatable Chamber/s should be
checked for leaks.
IMPORTANT NOTICE - WARNINGS
Caution - Do not use as a cushion. This is not a lifejacket until it is fully inated. Train yourself in the use of this lifejacket. Full performance may not been achieved using
waterproof clothing or in other circumstances.
Trapped air and carried load impair the performance of the 33gr or 60gr CO2 gas cylinder.
Once lifejacket is used, then it should be immediately serviced and immediately the 2 cylinder CO2 to be replaced with a brand new cylinder CO2.
Gas Cylinders are dangerous goods and they shall be kept away from children and not misused.
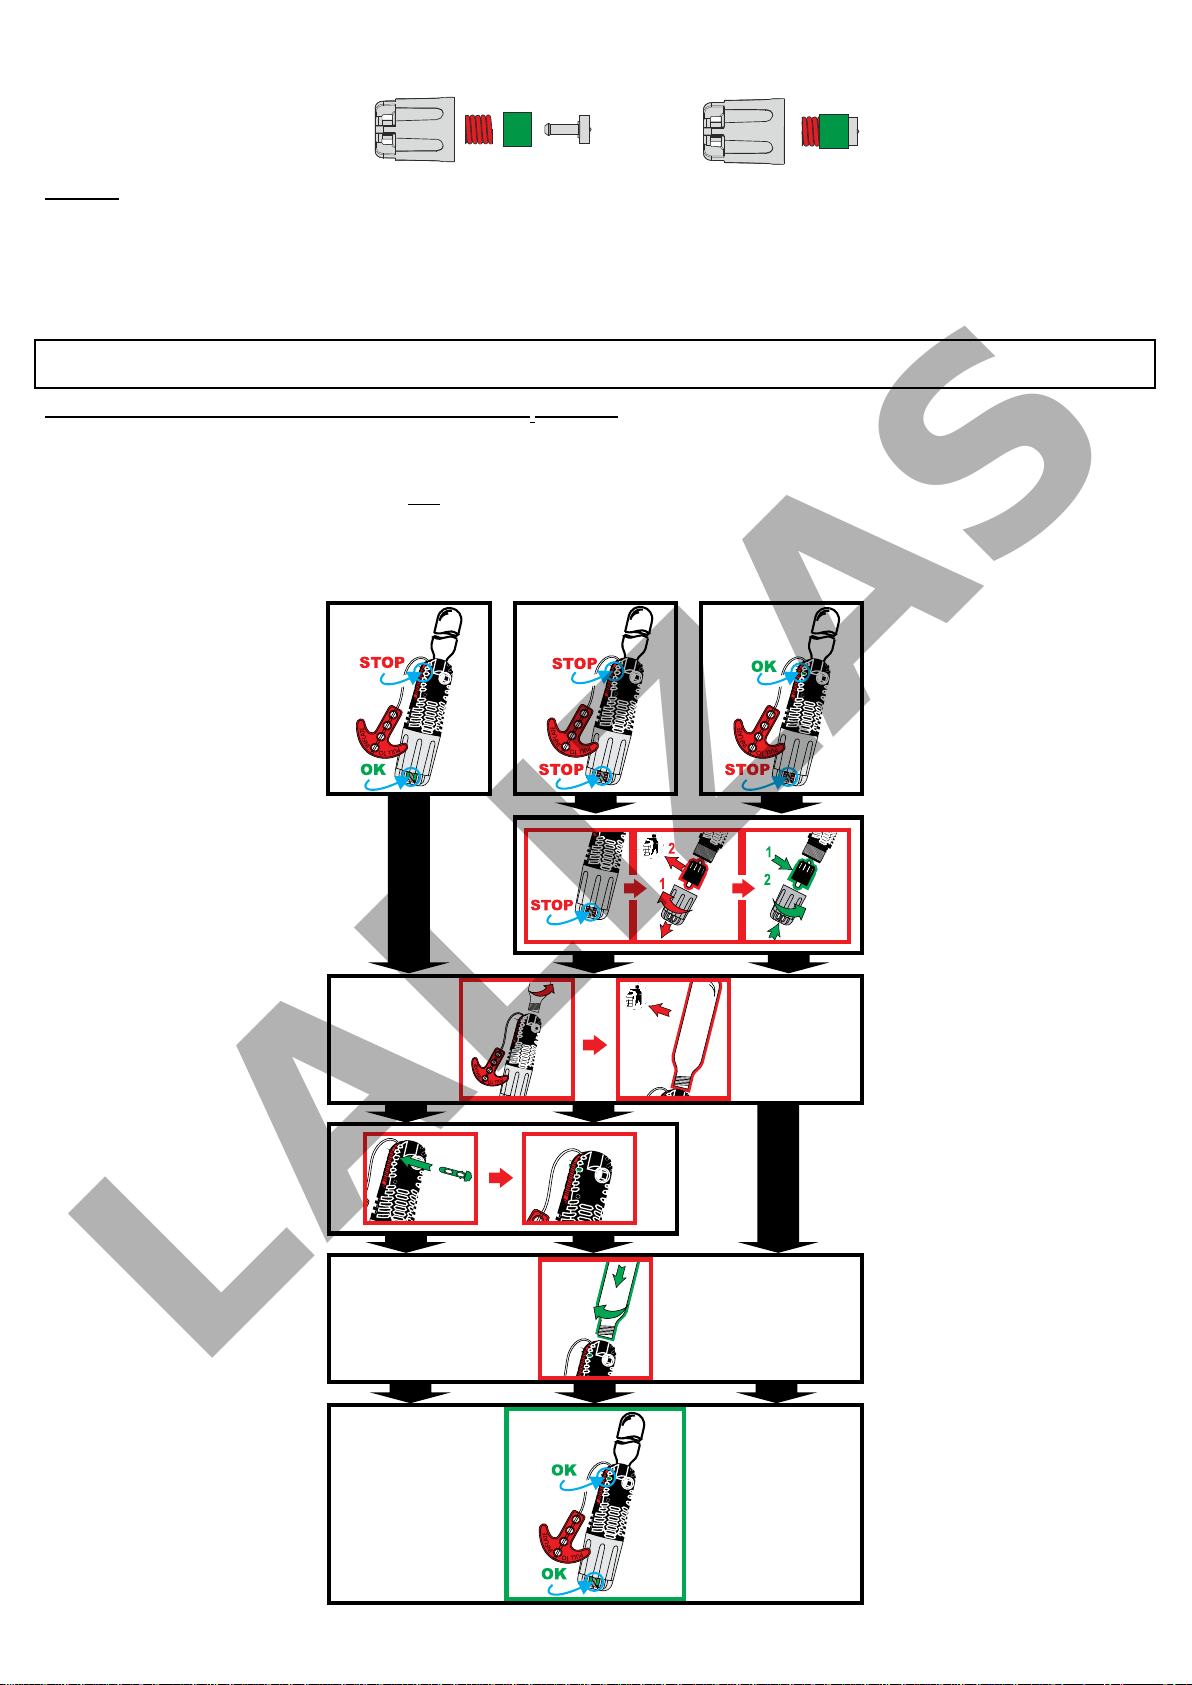
Regarding the cylinders attached to the inator mechanism, please perform visual periodic inspection. In case there is any of the below:
• dent
• scratches
• corrosion on the cylinder
• or even used and not replaced,
then contact a LALIZAS authorized Service Station, in order to perform service of the lifejacket.
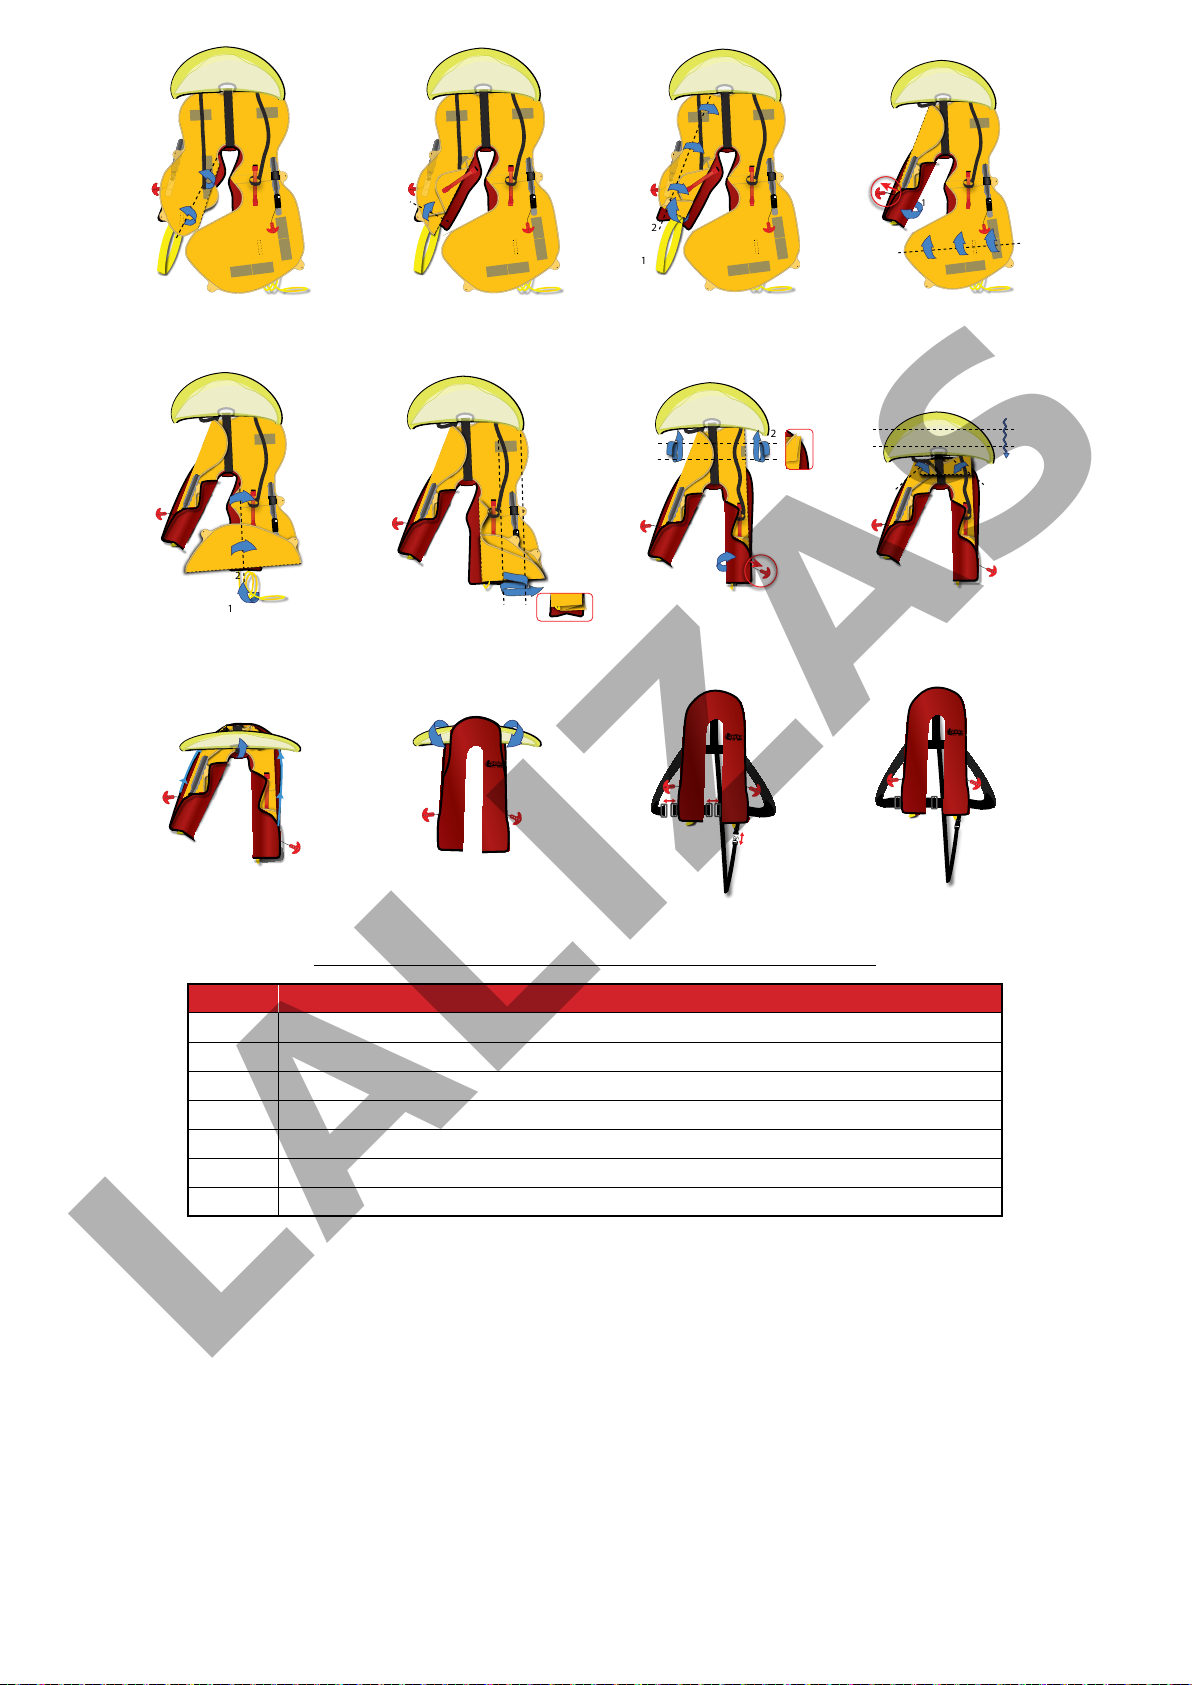
For the LALIZAS SOLAS models with zipper closure, please perform visual periodic inspection:
Preparing zip for repacking:
- Ensure that the zip teeth are separated all around the lifejacket.
- Slide the zip around to the right end as worn.
- Zip carefully, helping with your other hand, till the left edge.
The zipper has precut teeth to different determined location by manufacturer and these areas are protected /hidden by a black hook and loop patch. It is forbidden to cut
or damage additional zipper teeth.If that happens then the lifejacket should be discarded.
In case the zipper has dents, cracks, missed teeth, damaged zipper slider or the zipper slider is stuck then contact a LALIZAS authorized Service Station, in order to
perform service of the lifejacket
Make sure that LALIZAS lifejacket light SOLAS and LALIZAS whistle are attached and that retroreective tapes SOLAS have no signs of deterioration.
All damage to the materials, such as tears, abrasion, cuts on the cloth or webbing, color change or damage to the buckles, that would affect the buoyancy by overheating,
UV sun damage, incorrect storage or use,etc can lead to a life threatening reduction in safety offered by the product. All such products should be removed from use. If in
doubt, contact a LALIZAS certied Service Station.
LALIZAS

5
STORAGE
The lifejackets must be stored in a dark, clean, and dry area, which can be accessed immediately in case of emergency. Do not compress the lifejackets in storage. Avoid
any contact with sharp objects that can damage the lifejacket. Avoid storage in extreme temperature conditions.
Avoid contact with high corrosive oil / petrol or other liquid.
CLEANING
Rinse the lifejacket with fresh water after use in salty water. Always remove the auto-ring head before washing automatic inated lifejackets. Use only warm water and mild
detergents and a gentle hand wash. Use of stain removers is not recommended. Let it dry naturally before storing. Check that the lifejacket is completely dry and repack it.
Never use a washing machine or any other drying method to clean your lifejacket.
SERVICE INTERVALS
As per SOLAS/MED requirements the SOLAS/MED inatable lifejackets should be serviced annually, by a LALIZAS authorized Service Station, or less than an annually
basis, in case of use.
A list worldwide with LALIZAS Authorizes Service Station is available in LALIZAS Ofcial Website.
INSPECT THE INFLATOR MECHANISM & RE-ARMING INSTRUCTIONS
Examine the ination mechanism status indicators. The Ination Mechanism Status Indicators will tell you if the ination mechanism is properly ARMED/REARMED and
ready for activation.
See below for a description of the inator status indicators: includes the indications to when a LALIZAS automatic inator is ready for use (OK) and to when it should be
serviced (STOP).
INFLATOR’S PARTS
INFLATOR’S INSPECTION
Automatic JS1 inators can also operate manually, by using their lever.
Attention: Once lifejacket is used then it should be immediately serviced and immediately the 2 cylinders CO2 to be replaced with 2 brand new cylinders CO2.
To check the automatic inator, rst inspect the inator cap(F) making sure the green “ready for action” indicator is visible in the base of the unit.
Next step is to remove and inspect the seal of the CO2 cylinder. If the cylinder seal has been pierced or the “red red” indicator is visible in the inator cap (F) , the water
activated device (D) and the gas Cylinder (A) will need to be replaced.
To replace the water activated device (D), unscrew the inator cap (F) in a counter-clockwise direction and discard the used water activated device.
Clean the inator cap (F) if any presence of water is found.
LALIZAS

6
Then install a new water-activated device in the inator body (B) and screw the inator cap (F) in a clockwise direction until no thread is visible, see photos below. Then
check that the green “ready for action” indicator (C) is visible in the base.
Attention: In automatic inators, the ring pin returns inside the inator body (B) when the water activated device(D) is removed. If not, then:
1.Remove the green tag (C), then remove the inator cap (F), along with the water activated device (D). Check the manual operation, by pulling the manual lever (Ea or
Eb) and observe if the pin moves inside the cylinder aperture of inator body and by leaving the lever the pin resets to its original position.
Check the condition of the gas Cylinder (A). Replace with a new green tag (C) and gas Cylinder (A) if necessary.
2. If any defects are found, they should be recorded and a new inator should be tted if it is needed. If the pin doesn’t reset inside the inator core body should be
lubricated with silicone spray. Then repeat 3.10 to check its function.
Note: LALIZAS recommends that in every annual inspection of the lifejacket, the water-activated device (code 00340) should be checked for its good condition
and if necessary you replace it.
At last, check the manual system “green tag C” is in place and ret the CO2 cylinder (A).
If the ring pin does not reset inside the automatic inator’s core body, then immediately declare the lifejacket as ‘’needs to be serviced’’, discontinue use of this
lifejacket and take it to a LALIZAS authorized Service Station.
Attention, the inator inspection should be done to both ination mechanisms that LALIZAS lifejackets SOLAS have.
In short, user may also follow the steps as it is shown in the below diagram:
REARMING
LALIZAS

7
EXAMINE YOUR CO2CYLINDER
The CO2 cylinder contains the gas charge that will inate your lifejacket when the ination mechanism is red either automatically or manually.
You must verify that the 2 CO2 cylinders installed are of the correct size and have not been previously red. To examine the cylinder, you must unscrew it and visually
examine the cap (the at surface on the threaded end).
There are no indicators to show that the CO2 cylinder is full. The cylinder needs to be replaced if there is any visible damage on the at surface. See the product
specications section on page 1 of this manual to determine the proper size cylinder.
If the cylinder is OK, you must properly screw it back into the inator mechanism. If the cylinder is damaged, discard and install a new, undamaged cylinder into the
mechanism, as explained in detail in 2. Inspect the inator mechanism.
Additional Notes on CO2 Cylinders:
• FAILURE to properly rearm the ination mechanism prior to installing the CO2 Cylinders will result in premature activation of the cylinder.
• CO2 Cylinder is only good for one ination and cannot be recharged.
• CO2 Cylinders are made with a protective coating that may wear off after a period of use or exposure to the environment. When this coating is worn off, the CO2
Cylinders may start to show some signs of rusting. If this occurs, replace the CO2 Cylinder.
ORAL TUBE (Double) DEFLATION INSTRUCTIONS
To deate the lifejacket, remove the cap on the oral ination tube side and either insert the nipple from the cap or your hand into the valve head, as following sketch. Then,
apply gentle pressure to the lifejacket and deate it. Gently squeeze the lifejacket to expel the remaining air or CO2. When fully deated, place again the cap on the oral &
relief tube (double). Please apply this procedure to both oral & relief tube (double) which are located to the 2 chambers of the lifejacket.
DO NOT TWIST OR WRING INFLATABLE CHAMBER/s TO DEFLATE.
If for any reason the oral valve remains open, depress it several times. If it does not release, discontinue use of this lifejacket and take it to a LALIZAS authorised Service
Station.
CARE & STORAGE: As lifejacket, the double tube should be clean and kept away from petrol, oil and hazardous substances.
REPACKING INSTRUCTIONS
- Always deate the lifejacket and rearm the ination mechanism. - Follow REARMING instructions, given to this manual.
- Lay the lifejacket on a at surface so that the retro-reective tape is visible.
- Follow the details of repacking inatable lifejacket as provided by the images in accordance with the lifejacket in your possession.
- Check that the manual lever/s are visible at the 2 sides of the lifejacket and free of any obstacles.
For models 150N (code 71107) & 275N (code 71216) with hook and loop fastener:
LALIZAS

8
For models 150N (code 711071) & 275N (code 712162) with zipper:
For models 330N (code 71214) & 330N (code 71215) with hook and loop fastener:
1234
5
1
2
6
1
2
71
2
8
9
1
2
1
10 11 12
Assembly and packing instructions of the LALIZAS Sprayhood for SOLAS Inatable Lifejackets (code 72113):
12
1
2
3
34
LALIZAS

9
56
1
2
7
1
2
8
1
2
910
1
2
1
11
1
2
1
2
12
13 14 15 16
Suitable for LALIZAS Lamda & Delta inatable lifejackets as per the table below:
Code Description
71107 LALIZAS Inatable Lifejacket Lamda, Auto, 150N, SOLAS/MED
711071 LALIZAS Inatable Lifejacket Lamda, Auto, 150N, w/ Zipper, SOLAS/MED
71216 LALIZAS Inatable Lifejacket Lamda, Auto, 275N, SOLAS/MED
712162 LALIZAS Inatable Lifejacket Lamda, Auto, 275N, w/ Zipper, SOLAS/MED
72114 LALIZAS Inatable Lifejacket Advanced Lamda, Auto, 330N, w/ Crotch Strap, SOLAS/MED
72115 LALIZAS Inatable Lifejacket Advanced Lamda, Auto, 330N, w/ Sprayhood & Crotch Strap, SOLAS/MED
71108 LALIZAS Inatable Lifejacket Belt-Pack Delta, Auto, 150N, SOLAS/MED
FREEZING TEMPERATURES
Around 4°C automatic activation and ination time with CO2 gas will be longer. Wearing a partially inated lifejacket in these conditions will provide some initial buoyancy
while the lifejacket fully inates.
OTHER USE GUIDELINES
1. Always wear your lifejacket to avoid emergency donning.
2. If you need to jump from any height always fold arms over your chest to keep the lifejacket in place when entering the water.
3. Avoid all unnecessary activities that will be abrasive to the device.
4. Use extreme caution around sharp objects.
LALIZAS

10
5. Avoid unnecessary exposure to the sunlight. See GENERAL PRODUCT LIFE EXPECTANCY below.
6. CO2 gas from the cylinder will permeate through the chamber fabric over time. If you are in the water for a long time, it may be necessary to top off the inatable orally,
by blowing air in through the oral & relief tube (double).
7. Inatable lifejackets are not designed for activities in which the wearer expects to encounter impact with the water at a high speed such as water skiing, riding personal
water craft, etc.
8. Inatable lifejackets are not designed for white water activities.
9. For Inatable lifejackets that have a manual-auto inator, dropping the lifejacket into the water or exposing the ination system to unnecessary water spray, will result
in an inadvertent ination.
IS YOUR LIFEJACKET IN GOODAND SERVICEABLE CONDITION?
Check your lifejacket between outings to be sure that it is properly armed: that it is free of rips, tears or holes, that all seams are securely sewn, and that the fabric, straps
and hardware are still strong. Inspect the inatable portion of the lifejacket in accordance with Care and Maintenance Instructions.
GENERAL PRODUCT LIFE EXPECTANCY
The reliability and service life of this lifejacket depends greatly upon how it is used and cared for. Avoid storing lifejacket in direct sunlight. Sunlight contains ultraviolet
radiation that weakens synthetic materials. Prolonged exposures to high temperatures and high humidity may shorten service life of this lifejacket. While it is known that
these elements degrade the materials, every environment of use is unique so there is no sure way to estimate how long the lifejacket will last. It is for this reason that you
must follow the care and cleaning instructions and perform the maintenance and service checks. This will assure that the lifejacket remains functional and will maximize
the useful life of this lifejacket. Failure to follow these instructions rigorously could result in a non-functioning lifejacket causing injury or death.
Estimated lifetime of the lifejacket: 10 years from the date of manufacture.
INSPECTION & MAINTENANCE INSTRUCTIONS
User’s Inspection - The user should perform the following checks before each season, or before a long journey, or before each outing, as recommended below:
1. Physical Inspection of Cover, Straps and Chambers - Examine outer shell fabric, seams, webbing attachments, buckles, slides, etc. Fabric fading can indicate a loss
of strength. Check for strength by pulling seams and attachments snugly. If device shows any signs of damage, return to a LALIZAS authorised Service Station or replace
the entire lifejacket. This inspection should be performed each outing.
2. Repeat pre donning instructions
3. Function Test of Oral & Relief Tube (Double) - Remove the dust protection cap. With the lifejacket inated, test the valve as explained in this manual. The valve should
depress easily, and when released it should automatically return to the closed position and reseal.
CAREAND CLEANING INSTRUCTIONS
Drying - If the device is wet, place on a coat hanger to allow thorough drying.
Do not place in direct sunlight to dry. Do not use any heat source or place on radiator.
Cleaning - Rinse the lifejacket with fresh water after use in salty water.
Use only warm water or mild detergents or / and a gentle hand wash. Use of stain removers is not recommended.
Remove grease and oil immediately. Always remove the auto-ring head before washing automatic inated lifejackets. Read instructions provided on the device.
Let it dry naturally before storing.
• DO NOT MACHINE WASH
• DO NOT MACHINE DRY
• DO NOT DRY CLEAN
• DO NOT USE SOLVENT BASED CLEANERS
• DO NOT BLEACH
Check that the lifejacket is completely dry and repack.
STORAGE
• STORE your water-activated devices (D) in a ventilated package, DO NOT store in a sealed container.
• STORE in clean, cool, dry area.
• DO NOT store water-activated devices (D) in high humidity or high temperatures (over 38°C) for an extended time.
• DO NOT store water-activated devices (D) for more than 36 months before use.
LALIZAS

11
REARMING COMPONENTS
Unused components for the ination mechanism should be inspected and/or replaced annually. To reduce the possibility of inadvertent ination, water-activated devices
(D) should be replaced more often if exposed to long term high temperature and high humidity. The rearming kit for this device is available upon request.
Lifejackets Code Re-Arm Kit
150N AUTO & MANUAL >04kg
Automatic
Manual
71323 33gr + 2 x
20190 33gr + + 2 x
71324 4 x + 10 x
00348 33gr
275N AUTO & MANUAL
>04kg
Automatic
Manual
71324 4 x + 10 x
02197
60gr
73676
60gr
+ + 2 x
WHYARE LIFEJACKETS REQUIRED AS SAFETYEQUIPMENT?
Drownings are the leading cause of fatalities in water related missions. A lifejacket provides otation to help keep your head above water, help you to stay face up in the
water, and increase your chances for survival and rescue. Most adults only need an extra 30N of otation to keep their heads above water. The proper size lifejacket will
properly support the weight of the wearer.
Since this inatable lifejacket does not have inherent buoyancy, it provides otation only when inated.
Familiarize yourself with the use of this lifejacket so that you will know what to do in an emergency.
HOWAND WHY TO TEST YOUR LIFEJACKET?
Inate your lifejacket and try it out in the water to:
• Make sure it oats you:
Comfortably (When worn properly)
Adequately for expected wave conditions (Body shapes/densities affect performance)
• Make sure it works:
A continuous ow of bubbles should not appear (for details see leak tests)
It should inate quickly and easily
• Learn how it works by:
Activating the 2 CO2 ination system
Rearming the 2 CO2 ination system
Using the 2 oral & relief tube (double)
LALIZAS recommends that you purchase automatic rearming kits. The rearming kit for this device is available upon request.
By doing this, you demonstrate that the automatic ination system is still working properly and reduce the likelihood of premature ination and its associated dangers. The
only check of the 2 manual ination system (with CO2 cylinder and green indicator tab removed) would be to determine that the lever and piercing pin move freely when
moving the lever (attached to the manual lever) several times down and up, as explained previously in this manual.
WEAR YOUR LIFEJACKET
In approximately 80 percent of all boating fatalities, the victims were not wearing a lifejacket. Most fatal accidents happen on calm sunny days. This inatable lifejacket
is much more comfortable to wear than other lifejacket types. Get into the habit of wearing this Lifejacket. Non-swimmers especially should wear a lifejacket at all times
when on or near the water.
CO2PERMEATION LOSS
CO2 gas will permeate the chamber fabric over time. Oral Ination will be necessary to maintain full buoyancy.
LALIZAS Lifejacket Light, SOLAS:
General:
• Water-activated LED ashlight technology
• Extra powerful LED light: Offers lower consumption, longer life and operates automatically when it comes in contact with water
LALIZAS

• ON-OFF button operation: To turn it ON-OFF when out of water
• Durable plastic body: 100% Waterproof via ultrasound welding & epoxy resin for extra safety
• Universal size clamp: Fits & locks easily in two moves with every 20 - 40 mm lifejacket belt, providing security & stability against sudden moves of panic
• Easy-to-read marking for instant inspection
• Lithium battery: Ensures 5 year lifetime and more than 8 hours of continuous operation. Smoother and easier waste batteries management
Assembly Instructions:
Step 1:
Put the black clip
underneath the fabric
which holds the whistle.
Step 2:
Place the light at an angle
and press it down so that
the two pieces lock together.
Step 3:
Check that the light has
been placed as in the above
picture and that it cannot be
removed from the fabric by
pulling it.
Code 72349
LALIZAS Lifejacket LED ashing light “Safelite IV”
ON-OFF water activated, USCG/SOLAS/MED
Code 72348
LALIZAS Lifejacket LED ashing light “Alkalite II”
ON-OFF water activated, USCG/SOLAS/MED
www.lalizas.com
1.23.12.1
NOTES
LALIZAS
This manual suits for next models
5
Table of contents
Other Lalizas Safety Equipment manuals