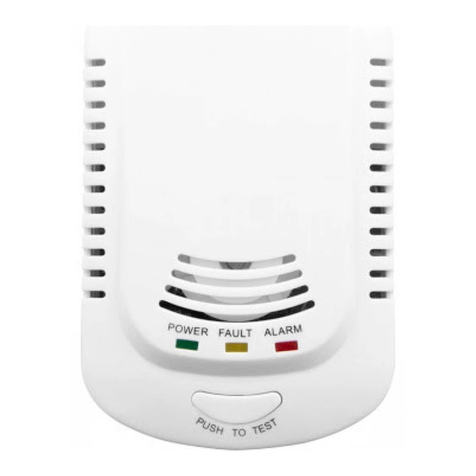
Lanberg SR-1007 User manual

UWAGA: Jeżeli na urządzeniu cały czas zapalona jest żółta dioda oznacza
to, że sensor czujnika uległ uszkodzeniu i nie pełni już swoich funkcji –
ŻYWOTNOŚĆ SENSORA TO OKOŁO 5 LAT.
4. Montaż urządzenia
A) Jeżeli produkt zostanie zastosowany do wykrywania gazu ziemnego, należy go
zamontować w miejscu oddalonym od sufitu co najmniej o 50 centymetrów. Co więcej
produkt musi się również znajdować w odległości ok. 1,5 m od źródła gazu ziemnego.
Głównym składnikiem gazu ziemnego jest metan, który jest lżejszy od powietrza,
dlatego elektrochemiczny czujnik gazu powinien być zamontowany na ścianie i nie
powinien się znajdować poniżej górnej framugi okna lub drzwi, znajdujących się
w danym pomieszczeniu testowym.
C) W przypadku, gdy alarm gazowy zostanie wykorzystany do wykrywania sprężonego
gazu ziemnego lub gazu węglowego, których głównymi składnikami są propan lub
butan, czyli gaz cięższy od powietrza, urządzenie powinno być zamontowane niżej,
w odległości ok. 30 cm (lub mniej) od ziemi i w odległości 1,5 m od źródła gazu typu
LPG. Należy pamiętać o tym, aby pomiędzy umieszczonym alarmem gazowym,
a miejscem wycieku gazu nie znajdowały się drzwi lub okno –dokładne i precyzyjne
wykrywanie gazu nie będzie wtedy możliwe.
Nie wolno montować urządzenia w miejscach:
A) Nad kuchenką gazową – dym, tłuszcz oraz brud mogą zakłócić prawidłową pracę
urządzenia.
B) Nad zlewami – rozbryzgi wody (również wilgoć) oraz kurz mogą wpłynąć negatywnie
na pomiary czujnika.
C) Z blisko ulokowanymi otworami wentylacyjnymi lub wentylatorami – może to
uniemożliwić właściwe przedostanie się gazu do elektrochemicznego czujnika gazu
podczas testu. Dokładny i precyzyjny pomiar gazu może nie być możliwy.
D) Mocno zabudowanych lub zakrytych miejscach - może to opóźnić wykrycie wycieku
gazu.
E) Na zewnątrz lub w lokalizacjach o wilgotności mniejszej niż 10% lub większej niż 95%.
5. UWAGA!
A) Aby uniknąć poważniejszych uszkodzeń urządzenia nie należy dokonywać napraw
samodzielnie.
B) Naprawę urządzenia należy zlecić profesjonalistom i/lub autoryzowanym serwisom.
C) Umieść elektrochemiczny czujnik gazu oraz elementy opakowania w miejscach
niedostępnych dla dzieci.
D) Jakiekolwiek niewłaściwe użycie produktu lub uszkodzenia spowodowane z winy
użytkownika, lub osób trzecich nie są objęte gwarancją.
6. Gwarancja
Produkt objęty jest 24-miesięczną gwarancją producenta.
SR-1007
ELECTROCHEMICAL GAS ALARM
ELEKTROCHEMICZNY CZUJNIK GAZU
USER MANUAL
INSTRUKCJA OBSŁUGI
PLPL

Instrukcja obsługi SR-1007
Zaleca się uważne przeczytanie instrukcji przed obsługą urządzenia oraz przechowanie
tego dokumentu po przeczytaniu jego zawartości.
1. Opis
Elektrochemiczny czujnik gazu został opracowany przy użyciu zaawansowanych technik
elektrotechnicznych służących wykrywaniu gazów palnych. Urządzenie ma wysoką
czułość i znajduje zastosowanie do wykrywania wycieków gazów domowych, gazów
płynnych i gazu ziemnego. Gdy wykryta gęstość gazu w powietrzu osiągnie ustaloną
wartość, alarm wyśle sygnał dźwiękowy, aby przypomnieć użytkownikom o podjęciu
kroków zapobiegawczych.
Alarm gazowy SR-1007 ma nowoczesną i dyskretną konstrukcję, pasującą do wystroju
pomieszczeń w domu lub wewnątrz biur. Ponadto urządzenie jest bardzo przyjazne
i wygodne w obsłudze.
2. Parametry techniczne
• Napięcie znamionowe: AC230 V / 50 ~ 60 HZ
• Pobór mocy: <2,5 W
• Dopuszczalna temperatura pracy: 0°C ~ + 50°C
• Dopuszczalna wilgotność: 10% ~ 95% RH
• Alarmujący poziom gazu: 2500 PPM (+/- 1500 PPM)
• Głośność / zasięg sygnału alarmowego: ≥ 85 dB @ 1 m
• Wymiary produktu: 105 x 72 x 28 mm
3. Test urządzenia przed montażem
A) Podłącz elektrochemiczny czujnik gazu do zasilania, w celu nagrzania urządzania (ok.
3 min.). Zostanie wydany pojedynczy sygnał dźwiękowy i czerwona lampka (oznaczona
ALARM) będzie mrugać, wskazując działanie czujnika w trybie uruchamiania. Przez ten
okres czasu czujnik nie będzie w stanie wykryć gazu. Po nagrzaniu, czerwona lampka na
urządzeniu zgaśnie, w jej miejsce zapali się lampka zielona (oznaczona POWER),
sygnalizując, iż czujnik działa w trybie normalnym.
B) Stan testowy urządzenia: Wciśnij przycisk testowy na kilka sekund, czerwona
kontrolka powinna się zaświecić, a samo urządzenie wyemituje krótki sygnał alarmowy.
Oznacza to, że czujnik gazowy funkcjonuje poprawnie. Po przeprowadzeniu tego testu
zamontuj produkt w odpowiednim miejscu i podłącz go do zasilania.
C) Gdy elektrochemiczny czujnik gazu wykryje, że gęstość gazu w pomieszczeniu
przekroczyła bezpieczny próg czerwona dioda zacznie migać i uruchomi się alarm
dźwiękowy. Należy wtedy niezwłocznie przedsięwziąć kroki bezpieczeństwa. Alarm
będzie pozostawał włączony tak długo, aż gęstość gazu nie spadnie poniżej zadanego
poziomu.
D) W celu weryfikacji funkcjonowania urządzenia testuj je co najmniej raz na miesiąc.
Upewnij się, że testowane pomieszczenie jest utrzymane w czystości, a pomiar
urządzenia nie zostanie zakłócony.
UWAGA: Jeżeli na urządzeniu cały czas zapalona jest żółta dioda oznacza
to, że sensor czujnika uległ uszkodzeniu i nie pełni już swoich funkcji –
ŻYWOTNOŚĆ SENSORA TO OKOŁO 5 LAT.
4. Montaż urządzenia
A) Jeżeli produkt zostanie zastosowany do wykrywania gazu ziemnego, należy go
zamontować w miejscu oddalonym od sufitu co najmniej o 50 centymetrów. Co więcej
produkt musi się również znajdować w odległości ok. 1,5 m od źródła gazu ziemnego.
Głównym składnikiem gazu ziemnego jest metan, który jest lżejszy od powietrza,
dlatego elektrochemiczny czujnik gazu powinien być zamontowany na ścianie i nie
powinien się znajdować poniżej górnej framugi okna lub drzwi, znajdujących się
w danym pomieszczeniu testowym.
C) W przypadku, gdy alarm gazowy zostanie wykorzystany do wykrywania sprężonego
gazu ziemnego lub gazu węglowego, których głównymi składnikami są propan lub
butan, czyli gaz cięższy od powietrza, urządzenie powinno być zamontowane niżej,
w odległości ok. 30 cm (lub mniej) od ziemi i w odległości 1,5 m od źródła gazu typu
LPG. Należy pamiętać o tym, aby pomiędzy umieszczonym alarmem gazowym,
a miejscem wycieku gazu nie znajdowały się drzwi lub okno –dokładne i precyzyjne
wykrywanie gazu nie będzie wtedy możliwe.
Nie wolno montować urządzenia w miejscach:
A) Nad kuchenką gazową – dym, tłuszcz oraz brud mogą zakłócić prawidłową pracę
urządzenia.
B) Nad zlewami – rozbryzgi wody (również wilgoć) oraz kurz mogą wpłynąć negatywnie
na pomiary czujnika.
C) Z blisko ulokowanymi otworami wentylacyjnymi lub wentylatorami – może to
uniemożliwić właściwe przedostanie się gazu do elektrochemicznego czujnika gazu
podczas testu. Dokładny i precyzyjny pomiar gazu może nie być możliwy.
D) Mocno zabudowanych lub zakrytych miejscach - może to opóźnić wykrycie wycieku
gazu.
E) Na zewnątrz lub w lokalizacjach o wilgotności mniejszej niż 10% lub większej niż 95%.
5. UWAGA!
A) Aby uniknąć poważniejszych uszkodzeń urządzenia nie należy dokonywać napraw
samodzielnie.
B) Naprawę urządzenia należy zlecić profesjonalistom i/lub autoryzowanym serwisom.
C) Umieść elektrochemiczny czujnik gazu oraz elementy opakowania w miejscach
niedostępnych dla dzieci.
D) Jakiekolwiek niewłaściwe użycie produktu lub uszkodzenia spowodowane z winy
użytkownika, lub osób trzecich nie są objęte gwarancją.
6. Gwarancja
Produkt objęty jest 24-miesięczną gwarancją producenta.
EN PL

Instrukcja obsługi SR-1007
Zaleca się uważne przeczytanie instrukcji przed obsługą urządzenia oraz przechowanie
tego dokumentu po przeczytaniu jego zawartości.
1. Opis
Elektrochemiczny czujnik gazu został opracowany przy użyciu zaawansowanych technik
elektrotechnicznych służących wykrywaniu gazów palnych. Urządzenie ma wysoką
czułość i znajduje zastosowanie do wykrywania wycieków gazów domowych, gazów
płynnych i gazu ziemnego. Gdy wykryta gęstość gazu w powietrzu osiągnie ustaloną
wartość, alarm wyśle sygnał dźwiękowy, aby przypomnieć użytkownikom o podjęciu
kroków zapobiegawczych.
Alarm gazowy SR-1007 ma nowoczesną i dyskretną konstrukcję, pasującą do wystroju
pomieszczeń w domu lub wewnątrz biur. Ponadto urządzenie jest bardzo przyjazne
i wygodne w obsłudze.
2. Parametry techniczne
• Napięcie znamionowe: AC230 V / 50 ~ 60 HZ
• Pobór mocy: <2,5 W
• Dopuszczalna temperatura pracy: 0°C ~ + 50°C
• Dopuszczalna wilgotność: 10% ~ 95% RH
• Alarmujący poziom gazu: 2500 PPM (+/- 1500 PPM)
• Głośność / zasięg sygnału alarmowego: ≥ 85 dB @ 1 m
• Wymiary produktu: 105 x 72 x 28 mm
3. Test urządzenia przed montażem
A) Podłącz elektrochemiczny czujnik gazu do zasilania, w celu nagrzania urządzania (ok.
3 min.). Zostanie wydany pojedynczy sygnał dźwiękowy i czerwona lampka (oznaczona
ALARM) będzie mrugać, wskazując działanie czujnika w trybie uruchamiania. Przez ten
okres czasu czujnik nie będzie w stanie wykryć gazu. Po nagrzaniu, czerwona lampka na
urządzeniu zgaśnie, w jej miejsce zapali się lampka zielona (oznaczona POWER),
sygnalizując, iż czujnik działa w trybie normalnym.
B) Stan testowy urządzenia: Wciśnij przycisk testowy na kilka sekund, czerwona
kontrolka powinna się zaświecić, a samo urządzenie wyemituje krótki sygnał alarmowy.
Oznacza to, że czujnik gazowy funkcjonuje poprawnie. Po przeprowadzeniu tego testu
zamontuj produkt w odpowiednim miejscu i podłącz go do zasilania.
C) Gdy elektrochemiczny czujnik gazu wykryje, że gęstość gazu w pomieszczeniu
przekroczyła bezpieczny próg czerwona dioda zacznie migać i uruchomi się alarm
dźwiękowy. Należy wtedy niezwłocznie przedsięwziąć kroki bezpieczeństwa. Alarm
będzie pozostawał włączony tak długo, aż gęstość gazu nie spadnie poniżej zadanego
poziomu.
D) W celu weryfikacji funkcjonowania urządzenia testuj je co najmniej raz na miesiąc.
Upewnij się, że testowane pomieszczenie jest utrzymane w czystości, a pomiar
urządzenia nie zostanie zakłócony.
UWAGA: Jeżeli na urządzeniu cały czas zapalona jest żółta dioda oznacza
to, że sensor czujnika uległ uszkodzeniu i nie pełni już swoich funkcji –
ŻYWOTNOŚĆ SENSORA TO OKOŁO 5 LAT.
4. Montaż urządzenia
A) Jeżeli produkt zostanie zastosowany do wykrywania gazu ziemnego, należy go
zamontować w miejscu oddalonym od sufitu co najmniej o 50 centymetrów. Co więcej
produkt musi się również znajdować w odległości ok. 1,5 m od źródła gazu ziemnego.
Głównym składnikiem gazu ziemnego jest metan, który jest lżejszy od powietrza,
dlatego elektrochemiczny czujnik gazu powinien być zamontowany na ścianie i nie
powinien się znajdować poniżej górnej framugi okna lub drzwi, znajdujących się
w danym pomieszczeniu testowym.
C) W przypadku, gdy alarm gazowy zostanie wykorzystany do wykrywania sprężonego
gazu ziemnego lub gazu węglowego, których głównymi składnikami są propan lub
butan, czyli gaz cięższy od powietrza, urządzenie powinno być zamontowane niżej,
w odległości ok. 30 cm (lub mniej) od ziemi i w odległości 1,5 m od źródła gazu typu
LPG. Należy pamiętać o tym, aby pomiędzy umieszczonym alarmem gazowym,
a miejscem wycieku gazu nie znajdowały się drzwi lub okno –dokładne i precyzyjne
wykrywanie gazu nie będzie wtedy możliwe.
Nie wolno montować urządzenia w miejscach:
A) Nad kuchenką gazową – dym, tłuszcz oraz brud mogą zakłócić prawidłową pracę
urządzenia.
B) Nad zlewami – rozbryzgi wody (również wilgoć) oraz kurz mogą wpłynąć negatywnie
na pomiary czujnika.
C) Z blisko ulokowanymi otworami wentylacyjnymi lub wentylatorami – może to
uniemożliwić właściwe przedostanie się gazu do elektrochemicznego czujnika gazu
podczas testu. Dokładny i precyzyjny pomiar gazu może nie być możliwy.
D) Mocno zabudowanych lub zakrytych miejscach - może to opóźnić wykrycie wycieku
gazu.
E) Na zewnątrz lub w lokalizacjach o wilgotności mniejszej niż 10% lub większej niż 95%.
5. UWAGA!
A) Aby uniknąć poważniejszych uszkodzeń urządzenia nie należy dokonywać napraw
samodzielnie.
B) Naprawę urządzenia należy zlecić profesjonalistom i/lub autoryzowanym serwisom.
C) Umieść elektrochemiczny czujnik gazu oraz elementy opakowania w miejscach
niedostępnych dla dzieci.
D) Jakiekolwiek niewłaściwe użycie produktu lub uszkodzenia spowodowane z winy
użytkownika, lub osób trzecich nie są objęte gwarancją.
6. Gwarancja
Produkt objęty jest 24-miesięczną gwarancją producenta.
ELECTROCHEMICAL GAS ALARM
ELEKTROCHEMICZNY CZUJNIK GAZU
EN PLPL EN PL

User manual for SR-1007
Your purchase and use of SR-1007 gas alarm is much appreciated. Please read these
instrucons BEFORE using the device, and make sure to keep this manual aer carefully
reading it, for the future reference.
1. Summary
The household gas alarm has been developed by adopng advanced electronic and gas
detecng techniques. It is highly sensive and is applicable to detect the leakage of
household gasses, liquid gasses and natural gas. The sensor reacts with the diffused
gases in the air directly and generates a linear voltage signal. When the detected gas
density reaches a specific value, the alarm emits an acousto-opc alarm signal to remind
its users to take appropriate measures in me. SR-1007 gas alarm has a modern, smart
design, and is convenient to use.
2. Technical Parameter
• Rated voltage: AC230 V / 50~60 HZ
• Power dissipaon: <2,5 W
• Operang temperature: 0°C ~ + 50°C
• Operang humidity: 10%~95% RH
• Alarming level of gas density: 2500 PPM (+/- 1500 PPM)
• Alarm loudness / effecve range: ≥85 dB @ 1 m
• Dimensions: 105 * 72 * 28 mm
3. Operaon
A) Plug in the gas alarm to mains, so that it can preheat (for about 2 minutes), with red
indicator light being turned on. During this me, the gas alarm does not detect gas.
Aer the device finishes preheang, the red indicator light will turn off. That is a sign
that shows the detector is in a tesng mode. (it may emit alarms when being plugged
into mains, and will switch to normal operang mode aer preheang, a few minutes
later.)
B) Tesng mode: Press the test buon for a few seconds, the red indicator light will
start to flash, and the gas alarm will emit sounds. That means the detector is working
well. Install the gas alarm in the desired place (aer tesng it) and plug it into the
power supply accordingly.
C) In case of events, the alarm has tested the corresponding density of the gas, the
red indicator light will flash and emit sound alarms. That reminds the users to take
appropriate measures in me.
D) Press the test buon with regular intervals, to make sure the alarm is in normal
operang mode and make sure to keep the surrounding area clean.
WARNING: If the yellow LED on the device is connuously lit, it means that the
detector's sensor has been damaged, and it no longer performs its funcons - THE
SENSOR'S LIFECYCLE LASTS ABOUT 5 YEARS.
4. Installaon
A) If this parcular device is used to detect natural gas, please install the alarm in place
at least 50 cenmeters away from the ceiling, as well as, within 1,5m distance from the
natural gas source. The main component of natural gas is methane, which is lighter than
air. Therefore, the gas alarm should be mounted on the walls should not be placed
below the top frame of doors or windows.
B) If this parcular device is used to detect compressed petroleum gasses or city coal
gasses, their main components are propane or butane, which are heavier than air.
Therefore, the alarm should be mounted in lower places, generally installed at a distance
of less than 30 cm from the ground and within a distance of 1.5m away from the LPG
source. On top of that, there should be no doors or windows located, between the
alarm and LPG source. That prevents the leakage of the gas, from reaching the detector
for the first me.
Gas alarm CANNOT be installed in the following places:
A) Do NOT install the alarm at the top of the cooker (similar kitchen appliances), as
smoke, fat and /or dirt may negavely affect alarm’s funconality.
B) Do NOT install the alarm above the sinks (or any water containers), as water splashes
(humidity) and /or dust may negavely affect alarm’s funconality.
C) Do NOT install the alarm in places, where there are air / vent holes, fans or any other
venlated places nearby. This may prevent the leakage of gas from reaching the alarm
for first me.
D) Do NOT install the alarm in ghtly-covered concealed places. This may delay the
proper detecon of gas leakage.
E) Do NOT install the alarm outdoors or in places with humidity being lower than 10%
or higher than 95%.
5. Warning
A) Do use special fings for any possible repairs, to avoid damaging the product.
B) Do not repair the gas alarm by yourself. Let the professionals handle the
maintenance.
C) Make sure to keep the household gas alarm and its packaging materials, out of reach
of the children.
D) The product warranty does not cover any improper use or human-made damage.
6. Warranty
The product is covered by 24-month warranty.
EN PL

User manual for SR-1007
Your purchase and use of SR-1007 gas alarm is much appreciated. Please read these
instrucons BEFORE using the device, and make sure to keep this manual aer carefully
reading it, for the future reference.
1. Summary
The household gas alarm has been developed by adopng advanced electronic and gas
detecng techniques. It is highly sensive and is applicable to detect the leakage of
household gasses, liquid gasses and natural gas. The sensor reacts with the diffused
gases in the air directly and generates a linear voltage signal. When the detected gas
density reaches a specific value, the alarm emits an acousto-opc alarm signal to remind
its users to take appropriate measures in me. SR-1007 gas alarm has a modern, smart
design, and is convenient to use.
2. Technical Parameter
• Rated voltage: AC230 V / 50~60 HZ
• Power dissipaon: <2,5 W
• Operang temperature: 0°C ~ + 50°C
• Operang humidity: 10%~95% RH
• Alarming level of gas density: 2500 PPM (+/- 1500 PPM)
• Alarm loudness / effecve range: ≥85 dB @ 1 m
• Dimensions: 105 * 72 * 28 mm
3. Operaon
A) Plug in the gas alarm to mains, so that it can preheat (for about 2 minutes), with red
indicator light being turned on. During this me, the gas alarm does not detect gas.
Aer the device finishes preheang, the red indicator light will turn off. That is a sign
that shows the detector is in a tesng mode. (it may emit alarms when being plugged
into mains, and will switch to normal operang mode aer preheang, a few minutes
later.)
B) Tesng mode: Press the test buon for a few seconds, the red indicator light will
start to flash, and the gas alarm will emit sounds. That means the detector is working
well. Install the gas alarm in the desired place (aer tesng it) and plug it into the
power supply accordingly.
C) In case of events, the alarm has tested the corresponding density of the gas, the
red indicator light will flash and emit sound alarms. That reminds the users to take
appropriate measures in me.
D) Press the test buon with regular intervals, to make sure the alarm is in normal
operang mode and make sure to keep the surrounding area clean.
WARNING: If the yellow LED on the device is connuously lit, it means that the
detector's sensor has been damaged, and it no longer performs its funcons - THE
SENSOR'S LIFECYCLE LASTS ABOUT 5 YEARS.
4. Installaon
A) If this parcular device is used to detect natural gas, please install the alarm in place
at least 50 cenmeters away from the ceiling, as well as, within 1,5m distance from the
natural gas source. The main component of natural gas is methane, which is lighter than
air. Therefore, the gas alarm should be mounted on the walls should not be placed
below the top frame of doors or windows.
B) If this parcular device is used to detect compressed petroleum gasses or city coal
gasses, their main components are propane or butane, which are heavier than air.
Therefore, the alarm should be mounted in lower places, generally installed at a distance
of less than 30 cm from the ground and within a distance of 1.5m away from the LPG
source. On top of that, there should be no doors or windows located, between the
alarm and LPG source. That prevents the leakage of the gas, from reaching the detector
for the first me.
Gas alarm CANNOT be installed in the following places:
A) Do NOT install the alarm at the top of the cooker (similar kitchen appliances), as
smoke, fat and /or dirt may negavely affect alarm’s funconality.
B) Do NOT install the alarm above the sinks (or any water containers), as water splashes
(humidity) and /or dust may negavely affect alarm’s funconality.
C) Do NOT install the alarm in places, where there are air / vent holes, fans or any other
venlated places nearby. This may prevent the leakage of gas from reaching the alarm
for first me.
D) Do NOT install the alarm in ghtly-covered concealed places. This may delay the
proper detecon of gas leakage.
E) Do NOT install the alarm outdoors or in places with humidity being lower than 10%
or higher than 95%.
5. Warning
A) Do use special fings for any possible repairs, to avoid damaging the product.
B) Do not repair the gas alarm by yourself. Let the professionals handle the
maintenance.
C) Make sure to keep the household gas alarm and its packaging materials, out of reach
of the children.
D) The product warranty does not cover any improper use or human-made damage.
6. Warranty
The product is covered by 24-month warranty.
EN PLPL
The WEEE symbol (the crossed-out wheeled bin) usage indicates that this product is
not a household waste. Appropriate waste management aids in avoiding consequences,
which are harmful for people and environment and result from dangerous materials
used in the device, as well as, improper storage and processing of such equipment.
Segregated household waste collecon allows recycling of materials and components of
which the device was made of. In order to get detailed informaon about recycling of
this parcular product, please contact your retailer or a local authority.
Użycie symbolu WEEE (przekreślony kosz) oznacza, że niniejszy produkt nie może być
traktowany jako odpad domowy. Prawidłowa utylizacja zużytego sprzętu pozwala
uniknąć zagrożeń dla zdrowia ludzi i środowiska naturalnego, wynikających z możliwej
obecności w sprzęcie niebezpiecznych substancji, mieszanin oraz części składowych,
a także niewłaściwego składowania i przetwarzania takiego sprzętu. Zbiórka selektywna
pozwala także na odzyskiwanie materiałów i komponentów, z których wyprodukowane
było urządzenie. W celu uzyskania szczegółowych informacji dotyczących recyklingu
niniejszego produktu należy skontaktować się z punktem sprzedaży detalicznej,
w którym dokonano zakupu, lub organem władzy lokalnej.

User manual for SR-1007
Your purchase and use of SR-1007 gas alarm is much appreciated. Please read these
instrucons BEFORE using the device, and make sure to keep this manual aer carefully
reading it, for the future reference.
1. Summary
The household gas alarm has been developed by adopng advanced electronic and gas
detecng techniques. It is highly sensive and is applicable to detect the leakage of
household gasses, liquid gasses and natural gas. The sensor reacts with the diffused
gases in the air directly and generates a linear voltage signal. When the detected gas
density reaches a specific value, the alarm emits an acousto-opc alarm signal to remind
its users to take appropriate measures in me. SR-1007 gas alarm has a modern, smart
design, and is convenient to use.
2. Technical Parameter
• Rated voltage: AC230 V / 50~60 HZ
• Power dissipaon: <2,5 W
• Operang temperature: 0°C ~ + 50°C
• Operang humidity: 10%~95% RH
• Alarming level of gas density: 2500 PPM (+/- 1500 PPM)
• Alarm loudness / effecve range: ≥85 dB @ 1 m
• Dimensions: 105 * 72 * 28 mm
3. Operaon
A) Plug in the gas alarm to mains, so that it can preheat (for about 2 minutes), with red
indicator light being turned on. During this me, the gas alarm does not detect gas.
Aer the device finishes preheang, the red indicator light will turn off. That is a sign
that shows the detector is in a tesng mode. (it may emit alarms when being plugged
into mains, and will switch to normal operang mode aer preheang, a few minutes
later.)
B) Tesng mode: Press the test buon for a few seconds, the red indicator light will
start to flash, and the gas alarm will emit sounds. That means the detector is working
well. Install the gas alarm in the desired place (aer tesng it) and plug it into the
power supply accordingly.
C) In case of events, the alarm has tested the corresponding density of the gas, the
red indicator light will flash and emit sound alarms. That reminds the users to take
appropriate measures in me.
D) Press the test buon with regular intervals, to make sure the alarm is in normal
operang mode and make sure to keep the surrounding area clean.
WARNING: If the yellow LED on the device is connuously lit, it means that the
detector's sensor has been damaged, and it no longer performs its funcons - THE
SENSOR'S LIFECYCLE LASTS ABOUT 5 YEARS.
4. Installaon
A) If this parcular device is used to detect natural gas, please install the alarm in place
at least 50 cenmeters away from the ceiling, as well as, within 1,5m distance from the
natural gas source. The main component of natural gas is methane, which is lighter than
air. Therefore, the gas alarm should be mounted on the walls should not be placed
below the top frame of doors or windows.
B) If this parcular device is used to detect compressed petroleum gasses or city coal
gasses, their main components are propane or butane, which are heavier than air.
Therefore, the alarm should be mounted in lower places, generally installed at a distance
of less than 30 cm from the ground and within a distance of 1.5m away from the LPG
source. On top of that, there should be no doors or windows located, between the
alarm and LPG source. That prevents the leakage of the gas, from reaching the detector
for the first me.
Gas alarm CANNOT be installed in the following places:
A) Do NOT install the alarm at the top of the cooker (similar kitchen appliances), as
smoke, fat and /or dirt may negavely affect alarm’s funconality.
B) Do NOT install the alarm above the sinks (or any water containers), as water splashes
(humidity) and /or dust may negavely affect alarm’s funconality.
C) Do NOT install the alarm in places, where there are air / vent holes, fans or any other
venlated places nearby. This may prevent the leakage of gas from reaching the alarm
for first me.
D) Do NOT install the alarm in ghtly-covered concealed places. This may delay the
proper detecon of gas leakage.
E) Do NOT install the alarm outdoors or in places with humidity being lower than 10%
or higher than 95%.
5. Warning
A) Do use special fings for any possible repairs, to avoid damaging the product.
B) Do not repair the gas alarm by yourself. Let the professionals handle the
maintenance.
C) Make sure to keep the household gas alarm and its packaging materials, out of reach
of the children.
D) The product warranty does not cover any improper use or human-made damage.
6. Warranty
The product is covered by 24-month warranty.
PL
www.lanberg.eu
The WEEE symbol (the crossed-out wheeled bin) usage indicates that this product is
not a household waste. Appropriate waste management aids in avoiding consequences,
which are harmful for people and environment and result from dangerous materials
used in the device, as well as, improper storage and processing of such equipment.
Segregated household waste collecon allows recycling of materials and components of
which the device was made of. In order to get detailed informaon about recycling of
this parcular product, please contact your retailer or a local authority.
Użycie symbolu WEEE (przekreślony kosz) oznacza, że niniejszy produkt nie może być
traktowany jako odpad domowy. Prawidłowa utylizacja zużytego sprzętu pozwala
uniknąć zagrożeń dla zdrowia ludzi i środowiska naturalnego, wynikających z możliwej
obecności w sprzęcie niebezpiecznych substancji, mieszanin oraz części składowych,
a także niewłaściwego składowania i przetwarzania takiego sprzętu. Zbiórka selektywna
pozwala także na odzyskiwanie materiałów i komponentów, z których wyprodukowane
było urządzenie. W celu uzyskania szczegółowych informacji dotyczących recyklingu
niniejszego produktu należy skontaktować się z punktem sprzedaży detalicznej,
w którym dokonano zakupu, lub organem władzy lokalnej.
Table of contents
Languages:
Other Lanberg Gas Detector manuals
Popular Gas Detector manuals by other brands

Dräger
Dräger Ethylene glycol 10 Instructions for use

Teledyne
Teledyne 700 IR Series instruction manual

Dräger
Dräger X-AM 5000 Instructions for use

Siemens
Siemens INTELLIGAS LYA14 Series quick start guide

Riken Keiki
Riken Keiki PT0E-1380 operating manual

RKI Instruments
RKI Instruments AirLink 7032 Operator's manual