Landa PGHW5-5000 User manual

OPERATOR’S MANUAL
For technical assistance or the dealer nearest you,
consult our web page at www.landa.com
8.913-928.0
■ PGHW5-5000 1.110-512.0
PGHW
L
I
S
T
E
D
®
PRECAUCION/AVERTISSEMENT
WARNING
CAUTION
NeverUse
:
• Bleach, chlorine products and other corrosive chemicals
• Liquids containing solvents (i.e. paint thinner,gasoline,oil)
• Tri-sodium phosphate products
• Ammonia products
• Acid-based products
These chemicals will harm the unit and will damage the
surface being cleaned.
Use manufacturer's detergents as recommended in manual
O
WARNING
High pressure hot wate r discharge—Risk of injection or
severe injury to persons. Keep clear of nozzle. Do not touch
or direct discharge stream at persons. Before disconnecting
pressure hose, turn machine off and open gun to reli eve
pressure.
Risk of electrocution—Connect only to properly grounded
outlet. Keep all connections dry and off the ground. Keep
spray away from electrical wiri ng and components.
Disconnectfrom electrical supply before servicing.
Hot surfaces—Use only insulated gripping areas of gun and
wand.
Riskof asphyxiation—Use only in well ventilated area.
Risk of explosion—Operate only where open flame or torch
ispermitted. Do not spray flammable liquids.
GunKicks Back—Hold with both hands.
To prevent damage from occuring tothe generator, do not
turnburner on until the engine has reached ful RPM.
Turnburner off before stopping engine.
Eyeprotection must be worn when operating this equipment.
Thismachine is to be used only by qualified operators.
ReadOperator's Manual carefully before using.
Descarga de agua caliente a presión—Riesgo de penetración o
lesiones severas a personas. Manténgase fuera del alcance de la
boquilla. Notoque nidirija el flujo del agua a otras personas. Antes de
desconectar la manguera de presión, apague la y releve la
presióncon el gatillo.
Riesgo de electrocución—Conecte el enchufe a un adecuado enchufe
hembra con conexion a tierra. Mantenga todas las conecciones secas
y arriba del suelo. No rocie componentes eléctricos. Desconecte la
corrienteeléctrica antes de dar servicio.
Supericies calientes—Use solamente las aisladas del gatillo y la
lanza.
Riesgo de explosión—Use elproducto en donde elfuego o
llamasean permitidos. No rocie liquidos inflamables.
Riesgode aspixia—Use el producto en un área de ventilación adecuada.
Lapistola se mueve con la presión—Sostenga con las dos manos.
Para prevenir daños enel generador, no encienda elquemador hasta
queel motor haya alcanzado las maximas RPM
Apagueel quemador antes de parar el motor.
Protéjaselos ojos cuando se opere este equipo.
Esteequipo debe ser usado solamente por operadores califcados.
Leael Manual de Operación antes de usarse.
PRECAUCION
AVER TISSEMENT
15°
10° 25° 40°
Eau chaude sous pression la sortie—Risque deblessures. Se tenir
loin des buses. Ne pas diriger le jet d'eauvers des personnes. Avant
de le boyau pression, fermer l'appareil et ouvrir le
pistoletà gachette pour relacher la pression.
Risque d'électrocution—Relier des prises avec mise la terr e
seulement. Tous lesfils doivent maintenus secs et suspendus.
Ne jamais projeter de l'eau sur les composantes et fils
Couperl'alimentation électrique avant de faire une réparation.
Surface s chaude s—Touche r seul ement le s parties isolées des
poignéespistolets et lances.
Risqued'asphyxie—Utiliser dans un endroit bien aéré.
Risque d'explosion—Utiliser aux endroits une flamme nue est
permise.Ne pas vaporiser de liquides inflammables.
Lapoignée pistolet repousse—Tenir à deux mains.
Afin d'eviter d'endommager la n'allumez le bruleur que
lorsquele moteur a atteint sa pleine vélocite.
Assurezvous que bruleur est eteint avant d'arreter le moteur.
appareil.
Cetappareil doit ëtre utilisé par des opérateurs qualifiés.
Lirele manuel de l'opérateur avant utilisation.
alta
DETERGENTVALVE
CHOKE
SOUPAPEDE DETERGENT
SOUPAPEDE DETERGENT
STEAMV ALVE
VALVULADEVAPOR
SOUPAPEDE VAPEUR
WATER PRESSURE
PRESIÓNDE AGUA
PRESSIOND'EAU
+
+
1.Apague el equipo.
2.Abra la válvula de vapor.
3.Coloque el termostato en la posición
devapor.
4.Siga con las instrucciones normales
deoperación.
5.
Paracambiar de vapor a agua caliente,
cierrela válvula de vapor y ponga el
termostatoen su posición original.
INSTRUCTIONS D’OPÉRATION
COMBINAISON
VAPEUR
INSTRUCCIONES DE OPERACION
OPERACION
CONVAPOR
1.Fermer tous les interrupteurs.
2.Ouvrir la soupape de vapeur.
3.Mettre le thermostat en position
maximum.
4.Suivre les instructions d’opération
normales.
5.Pour retourner à l’eau chaude, fermer
lasoupape de vapeur et remettre le
thermostaten position normale.
1.Shut down unit.
2.Open steam valve.
3.Turn thermostat to maximum
position.
4.Follow normal operating
instructions.
5.Toswitch from steam to hot
water,close steam valve and turn
thermostatto original position.
OPERATING INSTRUCTIONS
STEAM
COMBINATION
1.Read Engine and Operator’s Manual
carefullybefore using.
2.Connect standard garden hose to
unitand turn water on.
3.Secure high pressure hose to
machine.
4.Secure spray nozzle to end of wand.
5.Check oil levels.
6.Start engine and trigger shut-off gun.
7.To heat water, turn burner on.
8.To apply chemical see Operator’s
Manual.
9.To shut down unit, turn burner off
andallow pump to run until water is
cool.Flush chemical lines with clean
waterbefore turning engine off.
Triggershut-off gun to relieve
pressure.
1.Lea el Manual de Operación antes de
usarse.
2.Conecte la manguera de jardín y abra
lallave de agua.
3.Conecte la manguera de alta presión.
4.Coloque la boquilla a la lanza.
5.Revise los niveles de aceite.
6.Encienda el motor, abra el gatillo y
logrepresión.
7.Para calentar agua, encienda el
quemador.
8.Para aplicar el químico, consulte el
Manualde Operación.
9.Al terminar, apague el quemador,
purguecon agua la manguera del
químico,y haga circular el agua fría
antesde apagar el motor. Abra el
gatillopara relevar la presión.
1.Lire attentivement le manuel de
2.Relier à une prise d’eau et ouvrir l’eau.
3.Relier le boyau haute pression à
4.
5.Insérer la buse au bout de la lance.
6.Partir le moteur et presser la gachette
dela poignée pistolet.
7.Pour chauffer l’eau, allumer le brûleur.
8.Pour appliquer du chimique, voir le
manuelde l’opérateur.
9.Pour arrêter l’appareil, fermer le
brûleuret laisser refroidir l’eau. Rincer
laligne de chimique à l’eau propre
avantd’arrêter le moteur.Presser la
poignéepistolet pour relacher la
pression.
PGHW
5-5000
HOUR METER
HOROMETRO
COMPTEURD'HEURES
BURNER
QUEMADOR
BRULEUR
ON
PRENDER
OFF
APAGAR/ETTEINT
I
O
V
VOLTMETER
VOLTMÉTRE
OLTMÉTRE
TURE CONTROL
TEMPERA
CONTROLDE TEMPERATURA
CONTROLEDE TEMPERATURE
START
89139280-1

CONTENTS
2
LANDA PGHW 5-5000 • 8.913-928.0 • REV. 3/13
Introduction & Important Safety Information 4-6
Pre-Operation Check 6
Component Identification 7
Assembly Instructions 8
Operation Instructions 9
Detergents & General Washing Techniques 10
Shutdown Instructions 11
Storage 11
Maintenance & Service 12-15
Preventative Maintenance 12
Unloader Valves 12
Winterizing Procedures 12
High Limit Hot Water Thermostat 12
Pumps 12
Cleaning of Coil 12
Deliming Coils 12
Removal of Soot & Heating Coil 13
Pressure Relief Valve 13
Rupture Disk 13
Fuel 13
Fuel Control System 13
Fuel Pressure Adjustment 13
Electrode Setting 13
Burner Nozzle 13
Air Adjustment 14

3
CONTENTS
LANDA PGHW 5-5000 • 8.913-928.0 • REV. 3/13
Model Number ______________________________
Serial Number ______________________________
Date of Purchase ____________________________
The model and serial numbers will be found on a decal attached
to the pressure washer. You should record both serial number and
date of purchase and keep in a safe place for future reference.
Coil Reinstallation & Installation 14-15
Troubleshooting 16-18
Preventative Maintenance Charts 19
Left & Right Side Exploded View & Parts List 20-23
Control Panel Exploded View & Parts List 24-25
Hose Spray Gun & Wand Exploded View & Parts List 26
Pump & Unloader Exploded View & Parts List 27
Float Tank Exploded View & Parts List 28-29
Surefire Burner and Replacement Parts List 30-31
Burner Specifications 32
VB Unloader Exploded View & Parts List 33
LH Series Pump Exploded View & Parts List 34-35
Warranty

4
OPERATOR’S MANUAL PRESSURE WASHER
LANDA PGHW 5-5000 • 8.913-928.0 • REV. 3/13
INTRODUCTION & IMPORTANT SAFETY INFORMATION
Thank you for purchasing this Pressure Washer.
We reserve the right to make changes at any time
without incurring any obligation.
Owner/User Responsibility:
The owner and/or user must have an understanding of
the manufacturer’s operating instructions and warnings
before using this pressure washer.Warning information
should be emphasized and understood. If the operator
is not fluent in English, the manufacturer’s instructions
and warnings shall be read to and discussed with
the operator in the operator’s native language by the
purchaser/owner, making sure that the operator com-
prehends its contents.
Owner and/or user must study and maintain for future
reference the manufacturers’ instructions.
The operator must know how to stop the machine
quickly and understand the operation of all controls.
Never permit anyone to operate the engine without
proper instructions.
SAVE THESE INSTRUCTIONS
This manual should be considered a permanent
part of the machine and should remain with it if
machine is resold.
When ordering parts, please specify model and
serial number. Use only identical replacement
parts.
This machine is to be used only by trained operators.
IMPORTANT SAFETY
INFORMATION
READ OPERATOR’S
MANUAL THOROUGHLY
PRIOR TO USE.
WARNING:To reduce the risk of
injury, read operating instruc-
tions carefully before using.
1. Read the owner's manual
thoroughly. Failure to fol-
low instructions could cause
malfunction of the machine
and result in death, serious
bodily injury and/or property
damage.
2. Know how to stop the machine and bleed pressure
quickly. Be thoroughly familiar with the controls.
3. Stay alert — watch what you are doing.
WARNING
KEEP WATER
SPRAY AWAY FROM
ELECTRICAL WIRING.
WARNING: Keep wand, hose, and
water spray away from electric
wiring or fatal electric shock
may result.
4. All installations must comply with
local codes. Contact your electri-
cian, plumber, utility company or
the selling distributor for specific
details.
WARNING
EAR PROTECTION MUST
BE WORN
WARNING:This machine exceeds
85 db appropriate ear protection
must be worn.
WARNING
USE PROTECTIVE
EYE WEAR
AND CLOTHING
WHEN OPERATING
THIS EQUIPMENT.
WARNING: High pressure spray
can cause paint chips or other
particles to become airborne
and fly at high speeds. To avoid
personal injury, eye, hand and
foot safety devices must be
worn.
5. Eye, hand, and foot protection
must be worn when using this
equipment.
6. Keep operating area clear of all persons.
RISK OF EXPLOSION:
OPERATE ONLY WHERE
OPEN FLAME OR TORCH
IS PERMITTED
WARNING
WARNING: Flammable liquids
can create fumes which can ig-
nite, causing property damage
or severe injury.
WARNING: Risk of explosion —
Operate only where open flame
or torch is permitted.
RISK OF FIRE.
DO NOT ADD FUEL
WHEN OPERATING
MACHINE.
WARNING
WARNING: Risk of fire — Do not
add fuel when the product is
operating or still hot.
WARNING: Do not use gasoline
crankcase draining or oil con-
taining gasoline, solvents or
alcohol. Doing so will result in
fire and/or explosion.
WARNING: Risk of fire — Do not
Spray flammable liquids.
7. Allow engine to cool for 1-2 minutes before refu-
eling. If any fuel is spilled, make sure the area is
dry before testing the spark plug or starting the
engine. (Fire and/or explosion may occur if this is
not done.)
Gasoline engines on mobile or portable equipment
shall be refueled:
a. outdoors;
b. with the engine on the equipment stopped;
c. with no source of ignition within 10 feet of
the dispensing point; and
d. with an allowance made for expansion of the
fuel should the equipment be exposed to a
higher ambient temperature.

LANDA PGHW 5-5000 • 8.913-928.0 • REV. 3/13
5
PRESSURE WASHER OPERATOR’S MANUAL
15. Be certain all quick coupler fittings are secured
before using pressure washer.
RISK OF INJECTION
OR SEVERE INJURY TO
PERSONS. KEEP CLEAR
OF NOZZLE.
WARNING
WARNING: High pressure devel-
oped by these machines will
cause personal injury or equip-
ment damage. Keep clear of
nozzle. Use caution when oper-
ating. Do not direct discharge
stream at people, or severe in-
jury or death will result.
WARNING
PROTECT FROM
FREEZING
WARNING: Protect machine from
freezing.
16. To keep machine in best
operating conditions, it is
important you protect machine
from freezing.Failure to protect
machine from freezing
could cause malfunction of the
machine and result in death,
serious bodily injury, and/or property damage. Fol-
low storage instructions specified in this manual.
17. Inlet water must be clean fresh water and no hotter
then 90°F.
WARNING
RISK OF
ASPHYXIATION. USE
THIS PRODUCT
ONLY IN A WELL
VENTILATED AREA.
WARNING: Risk of asphyxiation.
Use this product only in a well
ventilated area.
18. Avoid installing machines in
small areas or near exhaust
fans. Adequate oxygen is
needed for combustion or
dangerous carbon monoxide
will result.
19. Manufacturer will not be liable for any changes
made to our standard machines or any components
not purchased from us.
20. The best insurance against an accident is precau-
tion and knowledge of the machine.
WARNING
RISK OF INJURY FROM
FALLS WHEN USING
LADDER.
WARNING: Be extremely careful
when using a ladder, scaffolding
or any other relatively unstable
location. The cleaning area
should have adequate slopes
and drainage to reduce the pos-
sibility of a fall due to slippery
surfaces.
IMPORTANT SAFETY INFORMATION
In an overfilling situation, additional precautions are
necessary to ensure that the situation is handled
in a safe manner.
WARNING: Risk of injury. Disconnect battery
ground terminal before servicing.
8. When in use , do not place machine near flammable
objects as the engine is hot.
9. Oil burning appliances shall be installed only in
locations where combustible dusts and flammable
gases or vapors are not present. Do not store or
use gasoline near this machine.
10. Use No. 1 or No. 2 heating oil (ASTM D306) only.
NEVER use gasoline in your fuel oil tank. Gasoline
is more combustible than fuel oil and could result
in a serious explosion. NEVER use crankcase or
waste oil in your burner. Fuel unit malfunction could
result from contamination.
11. Do not confuse gasoline and fuel oil tanks. Keep
proper fuel in proper tank.
WARNING
Risk Of Injury.
Hot Surfaces
Can Cause Burns
WARNING: Risk of injury. Hot
surfaces can cause burns. Use
only designated gripping areas
of spray gun and wand. Do not
place hands or feet on non-insu-
lated areas of the pressure
washer.
12. Transport/Repair with fuel tank EMPTY or with fuel
shut-off valve OFF.
HOT DISCHARGE FLUID:
DO NOTTOUCH OR
DIRECT DISCHARGE
STREAM AT PERSONS.
CAUTION: Hot discharge fluid.
Do not touch or direct discharge
stream at persons.
WARNING: This machine pro-
duces hot water and must have
insulated components attached
to protect the operator.
13. To reduce the risk of injury, close supervision is
necessary when a machine is used near children.
Do not allow children to operate the pressure
washer. This machine must be attended during
operation.
TRIGGER GUN KICKS
BACK - HOLD WITH
BOTH HANDS
WARNING
WARNING: Grip cleaning wand
securely with both hands before
starting. Failure to do this could
result in injury from a whipping
wand.
14. Never make adjustments on
machine while in operation.

6
OPERATOR’S MANUAL PRESSURE WASHER
LANDA PGHW 5-5000 • 8.913-928.0 • REV. 3/13
IMPORTANT SAFETY INFORMATION
21. Do not allow acids, caustic or abrasive fluids to pass
through the pump.
22. Never run pump dry or leave spray gun closed
longer than 1-2 minutes.
23. Machines with shut-off spray gun should not be
operated with the spray gun in the off position for
extensive periods of time as this may cause dam-
age to the pump.
24. Protect discharge hose from vehicle traffic and
sharp objects. Inspect condition of high pressure
hose before using or bodily injury may result.
25. Before disconnecting discharge hose from water
outlet, turn burner off and open spray gun to al-
low water to cool below 100° before stopping the
machine. Then open the spray gun to relieve pres-
sure. Failure to properly cool down or maintain the
heating coil may result in a steam explosion.
26. Do not overreach or stand on unstable support.
Keep good footing and balance at all times.
27. Do not operate this machine when fatigued or under
the influence of alcohol, prescription medications,
or drugs.
28. In oil burning models, use only kerosene, No. 1
home heating fuel, or diesel. If diesel is used, add
a soot remover to every tankful.
Follow the maintenance instructions speci-
fied in the manual.

LANDA PGHW 5-5000 • 8.913-928.0 • REV. 3/13
7
PRESSURE WASHER OPERATOR’S MANUAL
COMPONENT IDENTIFICATION
PRECAUCION/AVERTISSEMENT
WARNING
CAUTION
NeverUse
:
• Bleach, chlorine products and other corrosive chemicals
• Liquids containing solvents (i.e. paint thinner,gasoline,oil)
• Tri-sodium phosphate products
• Ammonia products
• Acid-based products
These chemicals will harm the unit and will damage the
surface being cleaned.
Use manufacturer's detergents as recommended in manual
O
WARNING
High pressure hot water discharge—Risk of injection or
severe injury to persons. Keep clear of nozzle. Do not touch
ordirect discharge stream at persons. Before disconnecting
pressure hose, turn machine off and open gun to relieve
pressure.
Risk of electrocution—Connect only to properly grounded
outlet. Keep all connections dry and off the ground. Keep
spray away from electrical wiring and components.
Disconnectfrom electrical supply before servicing.
Hot surfaces—Use only insulated gripping areasof gun and
wand.
Riskof asphyxiation—Use only in well ventilated area.
Risk of explosion—Operate only where open flame or torch
ispermitted. Do not spray flammable liquids.
GunKicks Back—Hold with both hands.
To prevent damagefrom occuring to the generator, do not
turnburner on until the engine has reached ful RPM.
Turnburner off before stopping engine.
Eyeprotection must be worn when operating this equipment.
Thismachine is to be used only by qualified operators.
ReadOperator's Manual carefully before using.
Descarga de agua caliente a presión—Riesgo depenetración o
lesiones severas a personas. Manténgase fuera del alcance de la
boquilla. Notoque ni dirija el flujo del agua a otras personas. Antes de
desconectar la manguera de presión, apague la y releve la
presióncon el gatillo.
Riesgo deelectrocución—Conecte el enchufe aun adecuado enchufe
hembra con conexion atierra. Mantenga todas las conecciones secas
y arriba del suelo. No rocie componentes eléctricos. Desconecte la
corrienteeléctrica antes de dar servicio.
Supericies calientes—Use solamente las aisladas del gatillo y la
lanza.
Riesgo de explosión—Use elproducto en donde el fuego o
llamasean permitidos. No rocie liquidos inflamables.
Riesgode aspixia—Use el producto en un área de ventilación adecuada.
Lapistola se mueve con la presión—Sostenga con las dos manos.
Paraprevenir daños enel generador, no encienda el quemador hasta
queel motor haya alcanzado las maximas RPM
Apagueel quemador antes de parar el motor.
Protéjaselos ojos cuando se opere este equipo.
Esteequipo debe ser usado solamente por operadores califcados.
Leael Manual de Operación antes de usarse.
PRECAUCION
AVER TISSEMENT
15°
10° 25° 40°
Eau chaude sous pression la sortie—Risque de blessures. Setenir
loin des buses. Nepas diriger le jet d'eauvers des personnes. Avant
de le boyau pression, fermer l'appareil et ouvrir le
pistoletà gachette pour relacher la pression.
Risque d'électrocution—Relier des prises avec mise laterre
seulement. Tous lesfils doivent maintenus secs et suspendus.
Ne jamais projeter de l'eau sur les composantes et fils
Couperl'alimentation électrique avant de faire une réparation.
Surfaces chaudes—Toucher seulement lesparties isolées des
poignéespistolets et lances.
Risqued'asphyxie—Utiliser dans un endroit bien aéré.
Risque d'explosion—Utiliser aux endroits une flamme nue est
permise.Ne pas vaporiser de liquides inflammables.
Lapoignée pistolet repousse—Tenir à deux mains.
Afin d'eviter d'endommager la n'allumez le bruleur que
lorsquele moteur a atteint sa pleine vélocite.
Assurezvous que bruleur est eteint avant d'arreter le moteur.
appareil.
Cetappareil doit ëtre utilisé par des opérateurs qualifiés.
Lirele manuel de l'opérateur avant utilisation.
alta
DETERGENTVALVE
SOUPAPEDE DETERGENT
SOUPAPEDE DETERGENT
STEAMVALVE
VALVULADEVAPOR
SOUPAPEDE VAPEUR
WATER PRESSURE
PRESIÓNDE AGUA
PRESSIOND'EAU
+
+
1.Apague el equipo.
2.Abra la válvula de vapor.
3.Coloque el termostato en la posición
devapor.
4.Siga con las instrucciones normales
deoperación.
5.
Paracambiar de vapor a agua caliente,
cierrela válvula de vapor y ponga el
termostatoen su posición original.
INSTRUCTIONS D’OPÉRATION
COMBINAISON
VAPEUR
INSTRUCCIONES DE OPERACION
OPERACION
CONVAPOR
1.Fermer tous les interrupteurs.
2.Ouvrir la soupape de vapeur.
3.Mettre le thermostat en position
maximum.
4.Suivre les instructions d’opération
normales.
5.Pour retourner à l’eau chaude, fermer
lasoupape de vapeur et remettre le
thermostaten position normale.
1.Shut down unit.
2.Open steam valve.
3.Turn thermostat to maximum
position.
4.Follow normal operating
instructions.
5.Toswitch from steam to hot
water,close steam valveand turn
thermostatto original position.
OPERATING INSTRUCTIONS
STEAM
COMBINATION
1.Read Engine and Operator’s Manual
carefullybefore using.
2.Connect standard garden hose to
unitand turn water on.
3.Secure high pressure hose to
machine.
4.Secure spray nozzle to end of wand.
5.Check oil levels.
6.Start engine and trigger shut-off gun.
7.To heat water,turn burner on.
8.To apply chemical see Operator’s
Manual.
9.To shut down unit, turn burner off
andallow pump to run until water is
cool.Flush chemical lines with clean
waterbefore turning engine off.
Triggershut-offgun to relieve
pressure.
1.Lea el Manual de Operación antes de
usarse.
2.Conecte la manguera de jardín y abra
lallave de agua.
3.Conecte la manguera de alta presión.
4.Coloque la boquilla a la lanza.
5.Revise los niveles de aceite.
6.Encienda el motor, abra el gatillo y
logrepresión.
7.Para calentar agua, encienda el
quemador.
8.Para aplicar el químico, consulte el
Manualde Operación.
9.Al terminar, apague el quemador,
purguecon agua la manguera del
químico,y haga circular el agua fría
antesde apagar el motor.Abra el
gatillopara relevar la presión.
1.Lire attentivement le manuel de
2.Relier à une prise d’eau et ouvrir l’eau.
3.Relier le boyau haute pression à
4.
5.Insérer la buse au bout de la lance.
6.Partir le moteur et presser la gachette
dela poignée pistolet.
7.Pour chauffer l’eau, allumer le brûleur.
8.Pour appliquer du chimique, voir le
manuelde l’opérateur.
9.Pour arrêter l’appareil, fermer le
brûleuret laisser refroidir l’eau. Rincer
laligne de chimique à l’eau propre
avantd’arrêter le moteur.Presser la
poignéepistolet pour relacher la
pression.
PGHW
5-5000
HOUR METER
HOROMETRO
COMPTEURD'HEURES
BURNER
QUEMADOR
BRULEUR
ON
PRENDER
OFF
APAGAR/ETTEINT
I
O
V
VOLTMETER
VOLTMÉTRE
OLTMÉTRE
TURE CONTROL
TEMPERA
CONTROLDE TEMPERATURA
CONTROLEDE TEMPERATURE
89139280-2
Fuel Oil
Tank
Spray
Gun
Discharge
Nipple
Quick
Coupler
High Pressure
Hose
Pressure
Nozzles
Detergent Bucket
(not included)
Battery Box
(battery not
included)
Trigger
Gasoline
Tank
Water Supply Hose
(not included)
Float Tank
Burner Switch
Volt Meter
Detergent
Valve
Steam
Valve
Detergent
Pick-up Tube
Pump — Delivers a specific gpm to the high pressure
nozzle which develops pressure (Not Shown).
Spray Gun — Controls the application of water and
detergent onto cleaning surface with trigger device.
Includes safety latch.
Detergent Valve — Allows you to siphon and mix
detergents.
Wand — Must be connected to the spray gun.
High Pressure Hose — Connect one end to water
pump high pressure discharge nipple and the other
end to spray gun.
Rupture Disk — Secondary pressure release in the
unlikely event the unloader valve fails.
Unloader Valve — Safety device which, when the
spray gun closes, prevents over pressurization (Not
Shown).
NOTE:If trigger on spray gun is released for more than
2 minutes, water will leak from the pump protector.
Warm water will discharge from pump protector onto
floor. This system prevents internal pump damage.
High
Pressure
Wand
High
Pressure
Nozzle
Water Supply
Connection

LANDA PGHW 5-5000 • 8.913-928.0 • REV. 3/13
OPERATOR’S MANUAL PRESSURE WASHER
8
ASSEMBLY INSTRUCTIONS
STEP 1: Attach a 5/8" water supply
hose to inlet connector. Minimum
flow should be 6 or 10 gpm depend-
ing on model of machine.
STEP 3: Attach variable pressure
control wand to spray gun using
teflon tape on threads to prevent
leakage.
Attach swivel connector on dis-
charge hose to spray gun using
teflon tape on threads.
STEP 2: Attach high pressure hose
to discharge nipple using quick
coupler. Lock coupler securely into
place by pulling back coupler col-
lar and inserting it onto discharge
nipple, then pushing collar forward
to lock in place.
STEP 4: Check oil level on sight
glass on side of pump. Oil should be
visible one half way up sight glass
(SAE 30W non-detergent). If sight
glass is not visible, use the oil dip
stick on top of the pump.
STEP 5: Fill gasoline tank and check engine oil.
Fill fuel tank. Do not confuse gasoline and fuel oil
(diesel) tanks. Keep proper fuel in proper tank. (The red
tank is for gasoline, and the green tank is for fuel oil.)
STEP 6: Install proper battery
making sure that the red cable is
attached to the positive terminal.
Use a U1, 30 amp, 12 volt garden
tractor style battery.
89139280-3
HIGHPRESSUREPUMPS
®
WARNING
Highpressurehot water discharge—Riskofinjection or
severeinjurytopersons. Keepclear ofnozzle. Do not touch
ordirect discharge streamat persons.Before disconnecting
pressurehose,turnmachineoff and opengunto relieve
pressure.
Riskofelectrocution—Connect onlytoproperlygrounded
outlet.Keep allconnectionsdry and offtheground. Keep
sprayawayfromelec trical wirin g andcomponents.
Disconnectfrom electrical supplybeforeservicing.
Hotsurfaces—Useonly insulated gripping areas ofgun and
wand.
Riskofasphyxiation—Use onlyinwellventilatedarea.
Riskofexplosion—Operate only where openflameor torch
ispermitted.Do not spray flammableliquids.
GunKicksBack—Holdwith both hands.
Topreventdamagefromoccuringto thegenerator,do not
turnburneron untilthe engine has reached fulRPM.
Turnburneroffbeforestoppingengine.
Eyeprotectionmustbewornwhen operatingthisequipment.
Thismachineis tobe used only by qualified operators.
ReadOperator'sManualcarefully beforeusing.
Descarga deaguacalienteapresión—Riesgode penetración o
lesionesseverasapersonas. Manténgase fueradelalcancedela
boquilla.Notoquenidirijael flujodelaguaaotraspersonas.Antes de
desconectarlamanguera depresión,apague la yreleve la
presiónconel gatillo.
Riesgo deelectrocución—Conecteel enchufe a un adecuado enchufe
hembra conconexiona tierra.Mantenga todaslas conecciones secas
yarriba del suelo.Norociecomponentes eléctricos.Desconectela
corrienteeléctrica antesde dar servicio.
Supericiescalientes—Usesolamente lasaisladasdelgatilloy la
lanza.
Riesgodeexplosión—Useel productoe
llamaseanpermitidos. Norocieliquidos inflamables.
Riesgode aspixia—Use el productoen un área de ventilación
Lapistolasemueve con lapresión—Sostengaconlas dosmanos.
Paraprevenirdaños enel generador,no encienda elquemador has
queelmotorhayaalcanzado lasmaximas RPM
Apagueelquemadorantes depararelmotor.
Protéjaselosojos cuando se opere esteequipo.
Esteequipo debeser usadosolamenteporoperadorescalifcados.
LeaelManual deOperación antesde usarse.
PRECAUCION
alta
HOURMETER
HOROMETRO
COMPTEURD'HEURES
BURNER
QUEMADOR
BRULEUR
ON
PRENDER
OFF
APAGAR/ETTEINT
I
O
TURECONTROL
TEMPERA
CONTROLDETEMPERATURA
CONTROLEDE TEMPERATURE
Gasoline
Tank
Burner
Fuel Tank

LANDA PGHW 5-5000 • 8.913-928.0 • REV. 3/13
9
PRESSURE WASHER OPERATOR’S MANUAL
OPERATION INSTRUCTIONS
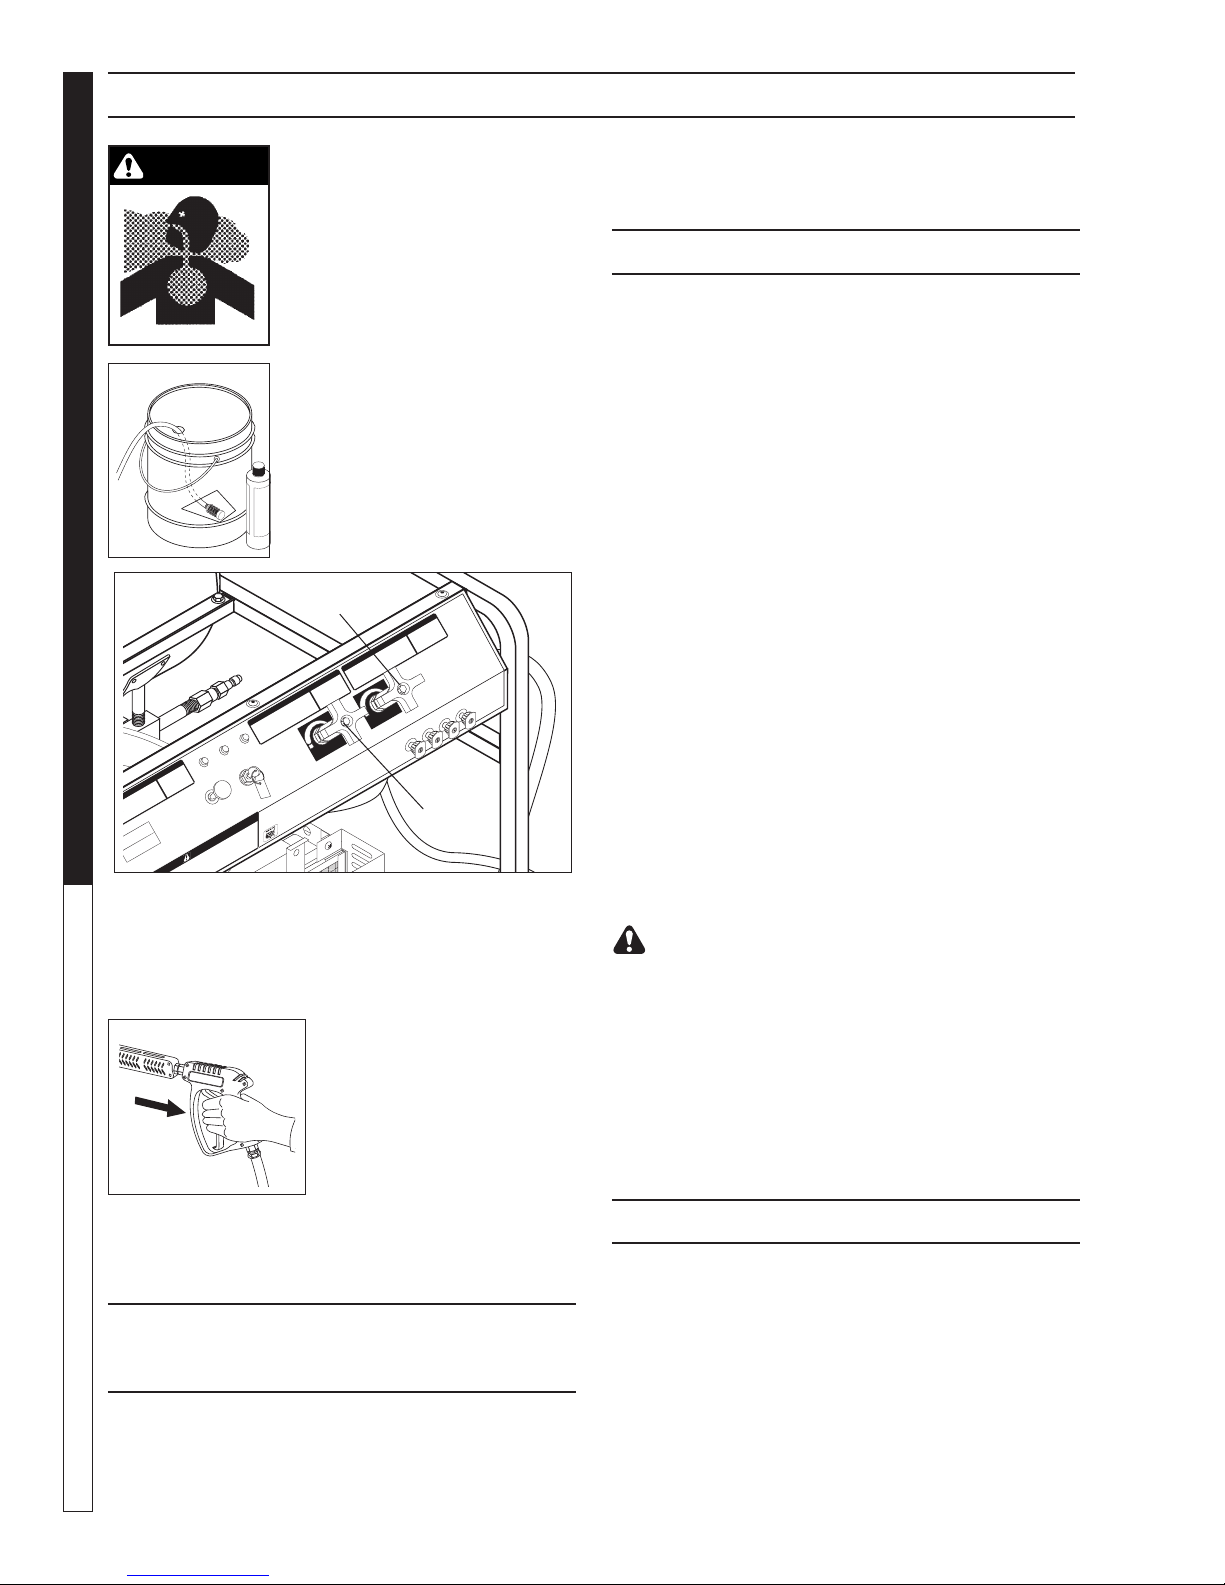
STEP 4: With spray nozzle pointed away from you or
anybody else, press trigger on spray gun to obtain
pressurized cold water spray.
Selection of high or low pressure is accompanied by
turning the handle. NOTE: High pressure nozzle must
be inserted at end of wand to obtain high pressure.
To apply soap read operator’s manual.
Trigger
High Pressure
Wand (HP)
High
Pressure
Nozzle
STEP 5: With the spray nozzle
pointed away from you or anybody
else, press the trigger on the spray
gun to obtain pressurized cold water
spray.
STEP 6: For hot water, turn the
burner switch to ON when a steady
stream of water flows out of the
spray gun. Burner will now light
automatically.
NOTE: Do not start machine with
burner switch on.
STEP 7: To apply detergent, place
detergent pick-up tube into a con-
tainer of detergent and turn the
detergent valve counterclockwise.
For steam, open the steam valve
counterclockwise. This lowers
the pressure and raises the
temperature.
STEP 1: Read safety, installation and
preventative maintenance instructions before
starting machine.
Connect the water supply hose to the
float tank inlet swivel connector and turn
on water supply. NOTE: Before installing
pressure nozzle in wand coupler run machine
allowing water to flush through the system
until clear.
STEP 3: Pull wand coupler collar back and
insert desired pressure nozzle into wand
coupler. Then secure by pushing coupler
collar forward. CAUTION: Never replace
nozzles without engaging the safety latch
on the spray gun trigger.
RN
I
O
WARNING
High pressure hot water di scharge—Ri skof injection or
severe injuryto persons. Keep clear of nozzle. Do not touch
ordirect discharge stream at persons. Before disconnecting
pressure hose, turn machine off and ope n gun to relieve
pressure.
Risk of electrocution—Connectonly to properly grounded
outlet. Keep all connections dry andoff the ground. Keep
spray awa y fromel ectrical w iri ngand c ompon ent s.
Disconnectfrom electrical supply before servicing.
Hot surfaces—Use onlyinsulated gripping areas of gun and
wand.
Riskof asphyxiation—Use only in well ventilated area.
Risk of explosion—Operate only where open flame or torch
ispermitted. Do not spray flammable liquids.
GunKicks Back—Holdwith both hands.
To prevent damage from occuring to the generator, do not
turnburner on until the engine has reached ful RPM.
Turnburner off before stopping engine.
Eyeprotection must be worn when operating thisequipment.
Thismachine isto be used only byqualified operators.
ReadOperator'sManual carefully before using.
Descarga de agua caliente a presión—Riesgo de penetración o
lesiones severas a personas. Mant éngase fuera de l alcance de la
boquilla. No toque ni dirija el flujo del agua aotras personas. Antes de
desconectar la manguera de presión, apague la y releve la
presiónconel gatillo.
Riesgo de electrocución—Conecte el enchufe a un adecuado enchufe
hembra con conexion atierra. Mantenga todas las conecciones secas
yarriba del suelo. No rocie componentes eléctricos. Desconec te la
corrienteeléctrica antes de dar servicio.
Supericies calientes—Use solamente las aisladas del gatillo y la
lanza.
Riesgo de e xplosión—Us e el producto en dond e el fuego o
llamasean permitidos.No rocie liquidos inflamables.
Riesgodeaspixia—Use el producto en un área deventilación adecuada.
Lapistola se mueve con la presión—Sostenga con las dos manos.
Para prevenir daños en el generador, no enciendael quemador hasta
queel motor haya alcanzado las maximas RPM
Apagueel quemador antes de parar el motor.
Protéjaselos ojos cuando se opere este equipo.
Esteequipo debe ser usado solamente por operadorescalifcados.
Leael Manual de Operación antes de usarse.
PRECAUCION
A
Eau chaude sous pression la sortie—Risque de ble
s
loin des buses. Ne pas diriger le jet d'eau vers des p
e
de le boyau pression, ferme r l'appa
r
pistoletà gachette pour relacher la pression.
Risque d'élec trocu tion—R elier des prises a vec
seulement. Tous lesfils doivent maintenus secs et
Ne jamais projeter de l' eau sur les composanteset
Couperl'alimentation électrique avant de faire une réparati
o
Surfa ces cha udes—Toucher seulement l es parti
e
poignéespistolets et lances.
Risqued'asphyxie—Utiliser dans un endroit bienaéré.
alta
5-
500
HOUR METER
HOROMETRO
COMPTEURD'HEURES
BURNER
QUEMADOR
BRULEUR
ON
PRENDER
OFF
APAGAR/ETTEINT
I
O
V
VOLTMETER
VOLTMÉTRE
OLTMÉTRE
TURE CONTROL
TEMPERA
CONTROLDE TEMPERATURA
CONTROLE DE TEMPERATURE
Burner
Switch
CAUTION
NeverUse
:
•Bleach,chlorineproductsandothercorrosivechemicals
•Liquidscontainingsolvents(i.e.paintthinner,gasoline,oil)
•Tri-sodiumphosphateproducts
•Ammoniaproducts
•Acid-basedproducts
Thesechemicalswillharm theunitand will damagethe
surfacebeingcleaned.
E
MENT
15°
10° 25°40°
u
e d'explosion—Utiliser aux endroits une flamme nue est
s
e.Ne pas vaporiser de liquides inflammables.
ignéepistolet repousse—Tenir à deux mains.
d
'eviter d'endommager la n'allumez le bruleur que
u
ele moteur a atteint sa pleine vélocite.
r
ezvous que bruleur est eteint avant d'arreter le moteur.
r
eil.
p
pareildoit ëtre utilisé par des opérateurs qualifiés.
e
manuel de l'opérateur avant utilisation.
DETERGENT VALVE
SOUPAPEDEDETERGENT
SOUPAPEDEDETERGENT
STEAM VALVE
VALVULADEVAPOR
SOUPAPEDEVAPEUR
WATER PRESSURE
PRESIÓNDEAGUA
PRESSIOND'EAU
+
+
1.Apagueelequipo.
2.Abrala válvula devapor.
3.Coloqueeltermostato enla posición
devapor.
4.Sigaconlasinstruccionesnormales
deoperación.
5.
Paracambiar de vapor a agua caliente,
cierrela válvula devapor ypongael
termostatoensuposiciónoriginal.
INSTRUCTIONS D’OPÉRATIONINSTRUCCIONES DE OPERACION
OPERACION
CONVAPOR
1.Fermer tous
les
2.Ouvrirla soupape
de
3.Mettrele thermostat en
po
maximum.
4.Suivrelesinstructionsd’opératio
n
normales.
5.Pourretourneràl’eauchaude,fermer
lasoupapedevapeur et remettre le
thermostatenpositionnormale.
1.Leael Manual deOperaciónantes de
usarse.
2.Conecte la manguera dejardín y abra
lallavedeagua.
3.Conectela manguera dealta presión.
4.Coloquelaboquilla a lalanza.
5.Reviselosnivelesdeaceite.
6.Enciendaelmotor, abrael gatillo y
logrepresión.
7.Paracalentar agua, enciendael
quemador.
8.Paraaplicar el químico, consulte el
ManualdeOperación.
9.Alterminar, apagueel quemador,
purgueconagualamanguera del
químico,yhagacircularelaguafría
antesdeapagarel motor.Abra el
gatillopara relevar la presión.
1.Lireattentivement le manuel de
2.Relieràuneprised’eauetouvrir l’eau.
3.Relierle boyauhaute pressionà
4.
5.Insérer la buse aubout dela lance.
6.Partirle moteur et presser la gachette
delapoignéepistolet.
7.Pourchauffer l’eau, allumer le brûleur.
8.Pourappliquer duchimique, voir le
manueldel’opérateur.
9.Pourarrêter l’appareil, fermer le
brûleuret laisser refroidir l’eau. Rincer
lalignedechimiqueà l’eaupropre
avantd’arrêter le moteur. Presser la
poignéepistoletpour relacher la
pression.
Steam
Valve
Detergent
Bucket
Detergent
Valve
STEP 2: Read engine manual provided and pull choke.
Pull spray gun trigger to relieve pressure.Then turn the
engine switch to the START position and hold it there
until the engine starts. NOTE: Do not engage the elec-
tric starter for more than five (5) seconds at a time. If the
engine fails to start, release the switch, pull spray gun
trigger and wait ten seconds before operating the starter
again. When the engine starts, allow the engine switch
to return to the ON position. Push the choke in.
CAUTION
NeverUse
:
•Bleach,chlorineproductsandother corrosive chemicals
•Liquidscontainingsolvents (i.e. paint thinner,gasoline,oil)
•Tri-sodiumphosphateproducts
•Ammoniaproducts
•Acid-basedproducts
Thesechemicalswill harmthe unitand will damage the
surfacebeingcleaned.
AVER TISSEMENT
15°
10° 25° 40°
Risque d'explosion—Utiliser aux en droits uneflamme nue est
ermise.Nepas vaporiser de liquidesinflammables.
néepistoletrepousse—Tenir à deux mains.
d'endommager lan'allumezle bruleur que
tteintsa pleine vélocite.
steteint avant d'arreter le moteur.
qualifiés.
DETERGENT VALVE
SOUPAPEDEDETERGENT
SOUPAPEDE DETERGENT
STEAM VALVE
VALVULADEVAPOR
SOUPAPEDE VAPEUR
WATER PRESSURE
PRESIÓNDEAGUA
PRESSIOND'EAU
+
+
1.Apague el equipo.
2.Abrala válvula de vapor.
3.Coloqueeltermostato en la posición
devapor.
4.Sigacon las instrucciones normales
deoperación.
5.
Paracambiar de vapor aagua caliente,
cierrela válvula de vapor yponga el
termostatoen su posición original.
INSTRUCTIONS D’OPÉRATION
COMBINAISON
VAPEUR
INSTRUCCIONES DE OPERACION
OPERACION
CONVAPOR
1.Fermer tous les interrupteurs.
2.Ouvrirla soupapedevapeur.
3.Mettrelethermostatenposition
maximum.
4.Suivre lesinstructionsd’opération
normales.
5.Pourretourner à l’eau chaude, fermer
lasoupape de vapeur et remettre le
thermostaten positionnormale.
1.Shut down unit.
2.Opensteamvalve.
3.Turnthermostat to maximum
position.
4.Follow normal operating
instructions.
5.Toswitchfrom steamto hot
water,close steam valve and turn
thermostatto originalposition.
OPERATING INSTRUCTIONS
STEAM
COMBINATION
1.ReadEngine and Operator’s Manual
carefullybeforeusing.
2.Connect standard garden hoseto
unitand turnwater on.
3.Securehighpressure hose to
machine.
4.Securespraynozzle to endof wand.
5.Check oillevels.
6.Start engine and trigger shut-off gun.
7.Toheatwater, turn burneron.
8.To apply chemicalsee Operator’s
Manual.
9.Toshutdownunit, turn burner off
andallow pumpto run until wateris
cool.Flushchemicallineswith clean
waterbeforeturningengine off.
Triggershut-off gun to relieve
pressure.
1.Lea el Manual de Operación antesde
usarse.
2.Conectela mangueradejardín y abra
lallavede agua.
3.Conecte la manguera de alta presión.
4.Coloquelaboquilla a lalanza.
5.Reviselosniveles de aceite.
6.Encienda el motor, abra el gatillo y
logrepresión.
7.Para calentar agua,enciendael
quemador.
8.Para aplicar el químico, consulte el
Manualde Operación.
9.Al terminar, apague el quemador,
purguecon agua la mangueradel
químico,y haga circularel agua fría
antesde apagar el motor.Abra el
gatillopara relevar la presión.
1.Lire attentivement le manuelde
2.Relier à une prise d’eau et ouvrirl’eau.
3.Relierle boyau haute pressionà
4.
5.Insérerlabuse au boutde la lance.
6.Partirlemoteuret presser la gachette
dela poignée pistolet.
7.Pour chauffer l’eau, allumer le brûleur.
8.Pour appliquer du chimique, voir le
manueldel’opérateur.
9.Pourarrêter l’appareil, fermer le
brûleuret laisser refroidirl’eau. Rincer
lalignede chimique à l’eau propre
avantd’arrêter lemoteur. Presser la
poignéepistoletpour relacher la
pression.
PGHW
5-5000
Choke

10
OPERATOR’S MANUAL PRESSURE WASHER
LANDA PGHW 5-5000 • 8.913-928.0 • REV. 3/13
WARNING: Some detergents
may be harmful if inhaled or in-
gested, causing severe nausea,
fainting or poisoning.The harm-
ful elements may cause prop-
erty damage or severe injury.
STEP 1: Use detergent designed
specifically for pressure wash-
ers. Household detergents could
damage the pump. Prepare deter-
gent solution as required by the
manufacturer. Fill a container with
pressure washer detergent. Place
the filter end of detergent suction
tube into the detergent container.
STEP 2: Apply safety latch to spray gun trigger.
Secure black detergent nozzle into quick coupler.
NOTE: Detergent cannot be applied using the Yellow
nozzle.
STEP 3: With the motor running, pull trigger to oper-
ate machine. Liquid detergent
is drawn into the machine
and mixed with water. Apply
detergent to work area. Do
not allow detergent to dry on
surface.
IMPORTANT: You must
flush the detergent injec-
tion system after each use by placing the suction
tube into a bucket of clean water, then run the
pressure washer in low pressure for 1-2 minutes.
THERMAL PUMP
PROTECTION
If you run your pressure washer for 2-3 minutes without
pressing the trigger on the spray gun, circulating water
in the pump can reach high temperatures. When the
water reaches this temperature, the pump protector
engages and cools the pump by discharging the warm
water onto the ground. This thermal device prevents
internal damage to the pump.
CLEANING TIPS
Pre-rinse cleaning surface with fresh water. Place de-
tergent suction tube directly into cleaning solution and
apply to surface at low pressure (for best results, limit
your work area to sections approximately 6 feet square
and always apply detergent from bottom to top). Allow
detergent to remain on surface 1-3 minutes. Do not
allow detergent to dry on surface. If surface appears
to be drying, simply wet down surface with fresh water.
If needed, use brush to remove stubborn dirt. Rinse at
high pressure from top to bottom in an even sweeping
motion keeping the spray nozzle approximately 1 foot
from cleaning surface. Use overlapping strokes as you
clean and rinse any surface. For best surface cleaning
action spray at a slight angle.
Recommendations:
• Before cleaning any surface, an inconspicuous
area should be cleaned to test spray pattern and
distance for maximum cleaning results.
• If painted surfaces are peeling or chipping,
use extreme caution as pressure washer may
remove the loose paint from the surface.
• Keepthespraynozzleasafedistancefromthe
surface you plan to clean. High pressure wash
a small area, then check the surface for dam-
age. If no damage is found, continue to pressure
washing.
CAUTION - Never use:
• Bleach, chlorine products and other corrosive
chemicals
• Liquidscontaining solvents(i.e.,paint thinner,
gasoline, oils)
• Tri-sodiumphosphateproducts
• Ammoniaproducts
• Acid-basedproducts
These chemicals will harm the machine and will dam-
age the surface being cleaned.
RINSING
It will take a few seconds for the detergent to clear.
Apply safety latch to spray gun. Remove black soap
nozzle from the quick coupler. Select and install the
desired high pressure nozzle. NOTE: You can also stop
detergent from flowing by simply removing detergent
siphon tube from bottle.
WARNING
DETERGENTS & GENERAL CLEANING TECHNIQUES
CAUTION
NeverUse
:
•Bleach,chlorine products and other corrosive chemicals
•Liquidscontainingsolvents(i.e.paint thinner,gasoline,oil)
•Tri-sodiumphosphate products
•Ammoniaproducts
•Acid-basedproducts
Thesechemicalswill harmtheunitand will damagethe
surfacebeing cleaned.
d
ucto en donde el fu ego o
o
s inflamables.
un área de ventilación adecuada.
ostenga conlas dosmanos.
r,no encienda el quemador hasta
m
as RPM
motor.
t
e equipo.
e
por operadorescalifcados.
u
sarse.
AVER TISSEMENT
15°
10° 25° 40°
Eauchaude souspression la sortie—Risque deblessures.Se tenir
loin des buses. Nepas diriger le jet d'eau vers des personnes. Avant
de le boyau pression, fermer l' appareil et ouvri r le
pistoletà gachette pour relacher lapression.
Risque d' élec trocu tion —Reli er des prises avec mise l a terre
seulement. Tous les fils doivent maintenus secs et suspendus.
Ne jamais projeter de l 'eau sur les com posantes et fi ls
Couper l'alimentation électrique avant de faire une réparation.
Surfaces ch audes—Touche rseule ment les p arti es isol ées des
poignéespistolets et lances.
Risque d'asphyxie—Utiliser dans un endroit bien aéré.
Risqued'exp losion—Utiliser au x endroits uneflammenue est
permise. Nepasvaporiser de liquides inflammables.
La poignée pistolet repousse—Tenirà deux mains.
Afin d'eviter d'endommager la n'allumez le bruleur que
lorsque le moteur aatteint sapleinevélocite.
Assurezvous quebruleur esteteintavantd'arreter le moteur.
appareil.
Cet appareil doitëtre utilisé par desopérateurs qualifiés.
Lirele manuel del'opérateur avantutilisation.
DETERGENT VALVE
SOUPAPEDEDETERGENT
SOUPAPEDE DETERGENT
STEAM VALVE
VALVULADEVAPOR
SOUPAPEDE VAPEUR
WATERPRESSURE
PRESIÓN DE AGUA
PRESSIOND'EAU
+
+
1. Apagueel equipo.
2. Abrala válvula de vapor.
3. Coloqueeltermostatoen la posición
devapor.
4. Sigacon las instrucciones normales
deoperación.
5.
Paracambiar de vapor a agua caliente,
cierrela válvula de vapor yponga el
termostatoen su posición original.
INSTRUCTIONS D’OPÉRATION
COMBINAISON
VAPEUR
INSTRUCCIONES DE OPERACION
OPERACION
CONVAPOR
1. Fermertous les interrupteurs.
2. Ouvrirla soupape de vap eur.
3. Mettrele thermostat en position
maximum.
4. Suivreles instructions d’opération
normales.
5. Pourretourner à l’eau chaude, fermer
lasoupape de vapeur etremettre le
thermostaten position normale.
1. Shutdown unit.
2. Opensteam valve.
3. Turnthermostat to maximum
position.
4. Follownormal operating
instructions.
5.To switch from steam to hot
water,close steam valve and turn
thermostatto original position.
I
NSTRUCTIONS
STEAM
COMBINATION
ua
l
t
o
to
n
dof wand.
ge
rshut-offgun.
7. Toheat water, turn burner on.
8. Toapply chemical see Operator’s
Manual.
9. Toshut down unit, turn burner off
andallow pump to run until water is
cool.Flush chemical lines with clean
waterbefore turning engine off.
Triggershut-off gun to relieve
pressure.
1. Leael Manual deOpera ciónantes de
usarse.
2. Conectelamanguera de jardín yabra
lallave de agua.
3. Conectela manguera de alta presión.
4. Coloquela boquilla a la lanza.
5.Reviselos niveles de aceite.
6. Enciendael motor, abra el gatillo y
logrepresión.
7. Paracalentar agua, encienda el
quemador.
8. Paraaplicar el químico, consulte el
Manualde Operación.
9. Al terminar,apagueel quemador,
purguecon agua la manguer adel
químico,yhaga c ircularel agua fría
antesde apagar el motor.Abra el
gatillopara relevar la presión.
1. Lireattentivement le manuelde
2. Relierà une prise d’eau et ouvri r l’eau.
3. Relierle boyau haute pression à
4.
5. Insérerla buse au boutdela lance.
6. Partirle moteur et presser lagachet te
dela poignée pistolet.
7. Pourchauffer l’eau,allumer le brûleur.
8. Pourappliquer du chimique, voirle
manuelde l’opérateu r.
9. Pourarrêter l’appareil, fermerle
brûleuret laisser refroidir l’eau. Rincer
laligne de chimique à l’eau propre
avantd’arrê ter le moteur.Presserla
poignéepistolet pour relacher l a
pression.
P
GHW
5-5000
Detergent
Valve
Steam
Valve

LANDA PGHW 5-5000 • 8.913-928.0 • REV. 3/13
11
PRESSURE WASHER OPERATOR’S MANUAL
5. Do not allow high pressure hose to become
kinked.
6. Store the machine and accessories in a room which
does not reach freezing temperatures.
After Extended Storage
CAUTION: Prior to restarting, thaw out any
possible ice from pressure washer hoses,
spray gun or wand.
SHUTDOWN INSTRUCTIONS
STEP 1: Rinse all detergent lines
with clean water, to remove any
soap residue.
Turn burner switch off and continue
spraying, allowing the water to cool
to below 100°.
STEP 2: Turn engine key switch off
before turning off water supply.
STEP 3: Squeeze trigger on spray
gun to relieve remaining pressure.
CAUTION: Always store your pressure washer in a
location where the temperature will not fall below
32°F (0°C).The pump in this machine is susceptible
to permanent damage if frozen. FREEZE DAMAGE
IS NOT COVERED BY WARRANTY.
1. Stop the pressure washer, squeeze spray gun
trigger to release pressure.
2. Detach water supply hose and high pressure
hose.
3. Turn on the machine for a few seconds, until
remaining water exits.Turn engine off immediately.
4. Drain the gas and oil from the engine.
STORAGE
STEP 4: Remove water supply hose.
RN
I
O
WARNING
High pressure hot wat er discharge—Riskof injecti on or
severe injuryto persons. Keep clear of nozzle. Do not touch
ordirect discharge stream at persons. Before disconnecting
pressure hose, turn machine off and open g un toreli eve
pressure.
Risk of electrocution—Connectonly to properly grounded
outlet. Keep all connections dry andoff the ground. Keep
spray awa y fromelectrical w irin gand co mpone nts.
Disconnectfrom electrical supply before servicing.
Hot surfaces—Use onlyinsulated gripping areas of gun and
wand.
Riskof asphyxiation—Use only in well ventilated area.
Risk of explosion—Operate only where open flame or torch
ispermitted. Do not spray flammable liquids.
GunKicks Back—Hold with both hands.
To prevent damage from occuring to the generator, do not
turnburner on until the engine has reached ful RPM.
Turnburner off before stopping engine.
Eyeprotectionmust be worn when operating this equipment.
Thismachine isto be used only byqualified operators.
ReadOperator'sManual carefully before using.
Descarga de agua caliente a presión—Riesgo de penetración o
lesiones severas a personas. Manténg ase fuera del alcance de la
boquilla. No toque ni dirija el flujo del agua aotras personas. Antes de
desconectar la manguera de presión, apague la y releve la
presiónconel gatillo.
Riesgo de electrocución—Conecte el enchufe a un adecuadoenchufe
hembra con conexion atierra. Mantenga todas las conecciones secas
yarriba del suelo. No rocie componentes eléctricos. Desconecte l a
corrienteeléctrica antes de dar servicio.
Supericies calientes—Use solamente las aisladasdel gatillo y la
lanza.
Riesgo d e explosión—Use el product o en donde el fuego o
llamasean permitidos. No rocie liquidos inflamables.
Riesgodeaspixia—Use el producto en un área deventilación adecuada.
Lapistola se mueve con la presión—Sostenga con las dos manos.
Para prevenir daños en el generador, no enciendael quemador hasta
queel motor haya alcanzado las maximas RPM
Apagueel quemador antes de parar el motor.
Protéjaselos ojos cuando se opere este equipo.
Esteequipo debe ser usado solamente por operadores califcados.
Leael Manual de Operación antes de usarse.
PRECAUCION
A
Eau chaude sous pression la sortie—Risque de ble
s
loin des buses. Ne pas diriger le jet d'eau vers des p
e
de le boyau pression, ferme r l'appa
r
pistoletà gachette pour relacher la pression.
Risque d'élec trocut ion—Re lier de s prises avec
seulement. Tous lesfils doivent maintenus secs et
Ne jamais projeter de l'e au sur les composanteset
Couperl'alimentation électrique avant de faire une réparati
o
Surfac es chau des—Toucher seulement les p arti
e
poignéespistolets et lances.
Risqued'asphyxie—Utiliser dans un endroit bienaéré.
alta
5-
500
HOUR METER
HOROMETRO
COMPTEURD'HEURES
BURNER
QUEMADOR
BRULEUR
ON
PRENDER
OFF
APAGAR/ETTEINT
I
O
V
VOLTMETER
VOLTMÉTRE
OLTMÉTRE
TURE CONTROLTEMPERA
CONTROLDE TEMPERATURA
CONTROLEDE TEMPERATURE
Burner
Switch
Water Hose

12
OPERATOR’S MANUAL PRESSURE WASHER
LANDA PGHW 5-5000 • 8.913-928.0 • REV. 3/13
MAINTENANCE
PREVENTATIVE MAINTENANCE
❑Check to see that water pump is properly lubri-
cated.
❑Follow winterizing instructions to prevent freeze
damage to pump and coils.
❑Always neutralize and flush detergent from system
after use.
❑If water is known to be high in mineral content, use
a water softener on your water system, or de-scale
as needed.
❑Do not allow acidic, caustic or abrasive fluids to be
pumped through system.
❑Always use high grade quality cleaning products.
❑Never run pump dry for extended periods of
time.
❑Use clean fuel-kerosene, No. 1 fuel oil, or diesel.
❑ Clean or replace fuel filter every 100 hours of
operation.
❑ Avoid water contaminated fuel as it will damage
the fuel pump.
❑If machine is operated with smoky or eye burning
exhaust, coils soot up and prevent water from
reaching maximum operating temperature.
❑Never allow water to be sprayed on or near the
engine or burner assembly or any electrical com-
ponent.
❑ Periodically delime coils per instructions.
❑Check to see that engine is properly lubricated.
It is advisable, periodically, to visually inspect the
burner. Check air inlet to make sure it is not clogged
or blocked. Wipe off any oil spills and keep this equip-
ment clean and dry.
The flow of combustion and ventilating air to the burner
must not be blocked or obstructed in any manner.
The area around the Landa washer should be kept
clean and free of combustible materials, gasoline and
other flammable vapors and liquids.
MAINTENANCE & SERVICE
Unloader Valves
Unloader valves are preset and tested at the factory
before shipping.Tampering with the factory setting may
cause personal injury and/or property damage, and will
void the manufacturers warranty.
Winterizing Procedure
Damage due to freezing is not covered by warranty.
Adhere to the following cold weather procedures when-
ever the washer must be stored or operated outdoors
under freezing conditions. During winter months, when
temperatures drop below 32°F, protecting your machine
against freezing is necessary. Store the machine in a
heated room. If this is not possible then mix a 50/50
solution of antifreeze and water in the float tank. Turn
the engine on to siphon the antifreeze mixture through
the machine. If compressed air is available, an air fit-
ting can be screwed into the float tank by removing the
float tank strainer and fitting. Inject the compressed air.
Water will be blown out of the machine when the trigger
on the spray gun is opened.
High Limit Hot Water Thermostat
For safety, each machine is equipped with a tempera-
ture sensitive high limit control switch. In the event that
the water should exceed its operating temperature, the
high limit control will turn the burner off until the water
cools then automatically reset itself. The thermostat
sensor is located on the discharge side of the heat-
ing coil. The thermostat control dial is located on the
control panel.
Pumps
Use only SAE 30 weight non-detergent oil. Change
oil after first 50 hours of use. Thereafter, change oil
every three months or at 500 hour intervals. Oil level
should be checked through use of dipstick found on top
of pump, or the red dot visible through the oil gauge
window. Oil should be maintained at that level.
Cleaning of Coils
In alkaline water areas, lime deposits can accumulate
rapidly inside the heating coil.This growth is increased
by the extreme heat build up in the coil. The best
prevention for liming conditions is to use high quality
cleaning chemicals. In areas where alkaline water is
an extreme problem, periodic use of Landa Deliming
Powder (Landa Part #9-028008) will remove lime and
other deposits before coil becomes plugged.
Deliming Coils
Periodic flushing of coils or optional float tank is rec-
ommended.
Step 1 Fill a container with 4 gallons of water, then
add 1 lb. of deliming powder. Mix thoroughly.
Pour mixture into float tank.
Step 2 Remove wand assembly from spray gun and
put spray gun into float tank. Secure the trig-
ger on the spray gun into the open position.
Step 3 Turn engine on, allowing solution to be
pumped through coils back into the float tank.
The solution should be allowed to circulate
2-4 hours or until the color changes.
Step 4 After circulating solution, flush the entire
system with fresh water. Clean out float tank
and then reinstall wand assembly to spray
gun.

LANDA PGHW 5-5000 • 8.913-928.0 • REV. 3/13
13
PRESSURE WASHER OPERATOR’S MANUAL
MAINTENANCE & SERVICE
Removal of Soot and Heating Coil
In the heating process, fuel residue in the form of
soot deposits may develop on the heating coil pipe
and block air flow which will affect burner combustion.
When soot has been detected on visual observation,
the soot on the coil must be washed off after following
the coil removal steps.
Pressure Relief Valve
Each machine is equipped with a relief valve to relieve
pressure in the system when higher than normal op-
erating pressures are encountered or if the unloader
valve should fail. Unusually high pressures come from
an object plugging the spray nozzle. If operating pres-
sure is found to be normal and the relief valve continues
to leak, repair or replace valve.
CAUTION:This valve must be opened each year to
check operation.
Rupture Disk
If pressure from pump or thermal expansion should
exceed safe limits, the rupture disk will burst, allowing
high pressure to be discharged through hose to ground.
The ruptured disk needs to be replaced.
Fuel
Use clean fuel oil that is not contaminated with water
and debris. Replace fuel filter and drain tank every 100
hours of operation.
Use No. 1 or No. 2 heating oil (ASTM D306) only.
NEVER use gasoline in your burner fuel tank. Gasoline
is more combustible than fuel oil and could result in a
serious explosion. NEVER use crankcase or waste oil
in your burner. Fuel unit malfunction could result from
contamination.
Fuel Control System
This machine utilizes a fuel solenoid valve located on
the fuel pump to control the flow of fuel to the combus-
tion chamber. The solenoid, which is normally closed,
is activated by a flow switch when water flows through
it. When the operator releases the trigger on the spray
gun, the flow of water through the flow switch stops,
turning off the electrical current to the fuel solenoid.
The solenoid then closes, shutting off the supply of
fuel to the combustion chamber. Controlling the flow of
fuel in this way gives an instantaneous burn-or-no-burn
situation, thereby eliminating high and low water tem-
peratures, and combustion smoke normally associated
with machines incorporating a spray gun.
CAUTION: Periodic inspection, to insure that the
fuel solenoid valve functions properly, is recom-
mended. This can be done by operating the ma-
chine and checking to see that the burner is not
firing when the spray gun is in the off position.
Fuel Pressure Adjustment
To control water temperature, adjust fuel pressure by
turning the regulating pressure adjusting screw clock-
wise to increase, counterclockwise to decrease. Do
not exceed 200 psi. NOTE: When changing fuel pump,
a bypass plug must be installed in return port or fuel
pump will not prime.
ELECTRODE SETTING:
5/32" Gap
1/16"
Nozzle
Electrode
7/16"
Burner Nozzle
Keep the tip free of surface deposits by wiping it with
a clean, solvent-saturated cloth, being careful not to
plug or enlarge the nozzle. For maximum efficiency,
replace the nozzle each season.
Burner Air Adjustment:
The oil burner on this machine is preset for opera-
tion at altitudes below 1000 feet. If operated at higher
altitudes, it may be necessary to adjust the air band
setting. Adjust air band for a #1 or #2 smoke spot
on the Bacharach scale. If a smoky or eye-burning
exhaust is being emitted from the stack, two things
should be checked. First, check the fuel to be certain
that kerosene or No.1 home heating fuel is being used.
Next, check the air adjustment on the burner. An oily,
smoky fire indicates a lack of air and the air band
should be moved to allow the air to flow through the
burner. Sharp eye-burning fumes indicate too much air
flowing through the combustion chamber.The air band
should be readjusted to allow less air to flow through
the burner.
CAUTION: If white smoke appears from burner
exhaust vent during start-up or operation, discontinue
use and readjust air bands.
NOTE: If a flue is installed, have a professional ser-
viceman adjust your burner for a #1 or #2 smoke spot
on the Bacharach scale.
For additional burner component information, see
Burner Assembly Exploded View page. It is recom-
mended that the oil burner be serviced yearly or as
needed. Contact your local service center.

14
OPERATOR’S MANUAL PRESSURE WASHER
LANDA PGHW 5-5000 • 8.913-928.0 • REV. 3/13
MAINTENANCE & SERVICE
Beckett Burner Air Adjustment:
To adjust, start the machine and turn burner ON.
Loosen two locking screws found in the air shutter
openings (see illustration) and close air shutter until
black smoke appears from burner exhaust vent. Note
air band position. Next, slowly open the air shutter
until white smoke just starts to appear. Turn air shutter
halfway back to the black smoke position previously
noted. Tighten locking screws.
If the desired position cannot be obtained using only
the air shutter, lock the air shutter in as close a position
as can be obtained, then repeat the above procedure
on the air band setting.
LANDA Surefire Burner Air Adjustment
To adjust, start machine and turn burner ON. Loosen
two locking screws found on the air band and close air
band until black smoke appears from burner exhaust
vent. Note air band position. Next, slowly open the air
band until white smoke just starts to appear. Turn air
band halfway back to the previously noted position.
Tighten locking screws.
Air Shutter
Locking Screw
Air Shutter
Locking Screw
Air Band Locking
Screw
Air Shutter
Air Band
Reference Numbers
Air Band Locking Screws
Air Band

LANDA PGHW 5-5000 • 8.913-928.0 • REV. 3/13
15
PRESSURE WASHER OPERATOR’S MANUAL
MAINTENANCE - COIL REMOVAL & REINSTALLATION
89139280-4
Top
Wrap
1/2" Pipe
Nipple
3/8"
Screw
1/2" Pipe
Nipple
Burner
Assembly
Thermostat
Sensor
Insulation
Tabs
Coil
Insulation
Pump
Hose
Blanket
Insulation
Bottom Wrap
Hold Down
Bolt
Capillary
Tube
Insulation
Retainer Plate Rupture
Disk
Coil Removal
Coil removal, because of freeze breakage or to clean
soot from it, can be done quickly and easily.
1. Disconnect hose from pump to inlet side of
the coil.
2. Carefully disconnect the thermostat sensor making
sure you do not crimp the capillary tube.
3. Remove burner assembly from combustion
chamber.
4. Remove the 3-3/8" bolts from each side of coil and
tank assembly (these bolts are used to fasten tank
to chassis).
5. Remove fittings connected to the 1/2" pipe nipples
from inlet and discharge sides of coil.
6. Remove top tank wrap, bend back insulation tabs
and fold back blanket.
7. Remove bolts that hold down coil to bottom wrap.
8. Remove coil.
9. Replace or repair the coil and any insulation found
to be broken or torn.
10. Remove insulation retainer plates.
Coil Reinstallation
Reinstall new or cleaned coil reversing Steps 9
through 1.

LANDA PGHW 5-5000 • 8.913-928.0 • REV. 3/13
PRESSURE WASHER Troubleshooting Guide
16
TROUBLESHOOTING
PROBLEM POSSIBLE CAUSE SOLUTION
LOW
OPERATING
PRESSURE
Faulty pressure gauge Install new gauge.
Insufficient water supply Use larger supply hose; clean filter at water inlet.
Old, worn or incorrect spray nozzle Match nozzle number to machine and/or
replace with new nozzle.
Belt slippage Tighten or replace; use correct belt.
Plumbing or hose leak Check plumbing system for leaks.
Retape leaks with teflon tape.
Faulty or misadjusted unloader
valve
Adjust unloader for proper pressure.
Install repair kit when needed.
Worn packing in pump Install new packing kit.
Fouled or dirty inlet or discharge
valves in pump
Clean inlet and discharge valves.
Worn inlet or discharge valves Replace with valve kit.
Leaking pressure control valve Rebuild or replace as needed.
Slow engine RPM Set engine speed at proper specifications.
Pump sucking air Check water supply and possibility of air
seepage.
Valves sticking Check and clean or replace if necessary.
Unloader valve seat faulty Check and replace if necessary.
BURNER
WILL NOT LIGHT
(Continuedon
nextpage)
Little or no fuel Fill tank with fuel.
Improper fuel or water in fuel Drain fuel tank and fill with proper fuel.
Clogged fuel line Clean or replace.
Plugged fuel filter Replace as needed.
Misadjusted burner air bands Replace air bands for clean burn.
Little or no fuel pressure from fuel
pump
Increase fuel pressure to specifications and/or
replace fuel pump. Test with pressure gauge.
Faulty burner transformer Test transformer for proper arc between con-
tacts. Replace as needed.
Disconnected or short in electrical
wiring
All wire contacts should be clean and tight.
No breaks in wires.
Flex coupling slipping on fuel pump
shaft or burner motor shaft
Replace if needed.
On-Off switch defective Check for electrical current reaching burner
assembly with burner switch on.
Heavy sooting on coil and burner
can cause interruption of air flow
and shorting of electrodes
Clean as required.
Improper electrode setting Check and reset according to diagram in
Operator’s Manual.

LANDA PGHW 5-5000 • 8.913-928.0 • REV. 3/13
17
PRESSURE WASHER Troubleshooting Guide
TROUBLESHOOTING
PROBLEM POSSIBLE CAUSE SOLUTION
BURNER WILL
NOT LIGHT
(Continued from
previous page)
Fuel not reaching
combustion chamber
Check fuel pump for proper flow. Check
solenoid flow switch on machines with spray
gun control, for proper on-off fuel flow control.
Clogged burner nozzle Clean as required.
Thermostat faulty or slow engine
speed
Increase engine RPM to increase voltage.
Flow switch malfunction Remove, test for continuity and replace as
needed.
Flow solenoid malfunction Replace if needed.
FLUCTUATING
PRESSURE
Valves worn Check and replace if necessary.
Blockage in valve Check and replace if necessary.
Pump sucking air Check water supply and air seepage at joints in
suction line.
Worn piston packing Check and replace if necessary.
Gasoline Engine Altitude The gasoline engine is preset for operation at
altitudes below 1000 feet above sea level. If
operated at higher altitudes, it may be neces-
sary to install a high altitude main jet in the
carburetor. Contact your local authorized
engine sales and service center for details.
MACHINE
SMOKES
Improper fuel or water in fuel Drain tank and replace contaminated fuel.
Improper air adjustment Readjust air bands on burner asssembly.
Low fuel pressure Adjust fuel pump pressure to specifications.
Plugged or dirty burner nozzle Replace nozzle.
Faulty burner nozzle spray pattern Replace nozzle.
Heavy accumulation of soot on coils
and burner assembly
Remove coils and burner assembly, clean
thoroughly.
Obstruction in smoke stack Check for insulation blockage or other foreign
objects.
Low engine RPM Increase RPM.
LOW WATER
TEMPERATURE
Improper fuel or water in fuel Replace with clean and proper fuel.
Low fuel pressure Increase fuel pressure.
Weak fuel pump Check fuel pump pressure. Replace pump if
needed.
Fuel filter partially clogged Replace as needed.
Soot build-up on coils not allowing
heat transfer
Clean coils.
Improper burner nozzle See specifications.
WATER
TEMPERATURE
TOO HIGH
Incoming water to machine warm or
hot
Lower incoming water temperature.
Fuel pump pressure too high See specifications for proper fuel pressure.
Fuel pump defective Replace fuel pump.
Detergent line sucking air Tighten all clamps. Check detergent lines for
holes.
Defective temperature switch Replace.

LANDA PGHW 5-5000 • 8.913-928.0 • REV. 3/13
PRESSURE WASHER Troubleshooting Guide
18
TROUBLESHOOTING
PROBLEM POSSIBLE CAUSE SOLUTION
WATER
TEMPERATURE
TOO HIGH
Incorrect fuel nozzle size See specifications for proper fuel pressure.
Insufficient water supplied Check water GPM to machine
Restrict water flow Check nozzle for obstruction, proper size.
PUMP NOISY Air in suction line Check water supply and connections on suction
line.
Broken or weak inlet or discharge
valve springs
Check and replace if necessary.
Excessive matter in valves Check and clean if necessary.
Worn bearings Check and replace if necessary.
PRESENCE OF
WATER IN OIL
Oil seal worn Check and replace if necessary.
High humidity in air Check and change oil twice as often.
WATER DRIPPING
FROM UNDER
PUMP
Piston packing worn Check and replace if necessary.
O-Ring plunger retainer worn Check and replace if necessary.
Cracked piston Check and replace if necessary.
Pump protector Lower water supply pressure. Do not run with
spray gun closed longer than 5 minutes.
OIL DRIPPING Oil seal worn Check and replace if necessary.
EXCESSIVE
VIBRATION IN
DELIVERY LINE
Irregular functioning of the valves Check and replace if necessary.
DETERGENT
NOT DRAWING
Air leak Tighten all clamps. Check detergent lines for
holes.
Restricter in float tank is missing Replace restrictor. Check for proper orifice in
restrictor.
Filter screen on detergent suction
hose plugged
Clean or replace.
Dried up detergent plugging meter-
ing valve
Disassemble and clean thoroughly.
High viscosity of detergent Dilute detergent to specifications.
Hole in detergent line(s) Repair hole.
Low detergent level Add detergent, if needed.
BURNER MOTOR
WILL NOT RUN
Fuel pump seized Replace fuel pump.
Burner fan loose or misaligned Position correctly, tighten set screw.
Defective control switch Replace switch.
Loose wire Check and replace or tighten wiring.
Defective burner motor Replace motor.
RELIEF VALVE/
RUPTURE DISK
LEAKS WATER
Excessive pressure, thermal
expansion
Replace or repair.

LANDA PGHW 5-5000 • 8.913-928.0 • REV. 3/13
19
PRESSURE WASHER OPERATOR’S MANUAL
PREVENTATIVE MAINTENANCE
PREVENTATIVE MAINTENANCE:
This pressure washer was produced with the best available materials and quality craftsmanship. However, you
as the owner have certain responsibilities for the correct care of the equipment. Attention to regular preventative
maintenance procedures will assist in preserving the performance of your equipment. Contact your Landa dealer
for maintenance. Regular preventative maintenance will add many hours to the life of your pressure washer.
Perform maintenance more often under severe conditions.
DATE OIL CHANGED
MONTH/DAY/YEAR
ESTIMATED OPERATING
HOURS SINCE LAST
OIL CHANGE
DATE OIL CHANGED
MONTH/DAY/YEAR
ESTIMATED OPERATING
HOURS SINCE LAST
OIL CHANGE
MAINTENANCE SCHEDULE
Engine Oil
Inspect Daily
Change Every 25 hours
Filter Every 50 hours
Air Cleaner
Inspect Every 50 hours or monthly
Clean Every 3 months
Battery Level Check monthly
Engine Fuel Filter 500 hours or 6 months
Spark Plug Maintenance 500 hours or 6 months
Clean Fuel Tank(s) Annually
Replace Fuel Lines Annually
Pump Oil
(Non-detergent
10/40W)
Inspect Oil level daily
Change After first 50 hours, then every 500 hours or annually
Clean Burner Filter Monthly (More often if fuel quality is poor)
Remove Burner Soot Annually
Burner Adjustment/Cleaning Annually
Replace Burner Nozzle Annually
Descale Coil Annually (More often if required)
Replace High Pressure Nozzle Every 6 months
Replace Quick Connects Annually
Clean Water Screen/Filter Weekly
Replace HP Hose Annually
OIL CHANGE RECORD

20
OPERATOR’S MANUAL PRESSURE WASHER
LANDA PGHW 5-5000 • 8.913-928.0 • REV. 3/13
EXPLODED VIEW - LEFT SIDE
89139280-5
45
30
44
14
13
1
5
8
44a
47
51
49
20
3
4
6
10
46
48
50 30
9
7
33
34
42
43
32
41
33
35
31
37
38, 39, 40
36 19
16 27
26 17
14
13
115
124
125
253 52
30
30
113
15
12
11
28
34
113
21
24
96
122
123
29
Table of contents
Other Landa Pressure Washer manuals

Landa
Landa MPE5-5000 User manual

Landa
Landa ZE2-11026D User manual

Landa
Landa PG4-15321 User manual

Landa
Landa VNG4-2000 User manual

Landa
Landa PC3-2400 User manual

Landa
Landa SLT6-32624E User manual

Landa
Landa SEA Series User manual

Landa
Landa MHP4-3000 User manual

Landa
Landa MP-373534 User manual

Landa
Landa VHG User manual

Landa
Landa MPE5-50024B User manual

Landa
Landa vhp2-1500 User manual

Landa
Landa SEHW6-3500 User manual

Landa
Landa PGDC Series User manual

Landa
Landa PE3-1100 User manual

Landa
Landa PDHW5-35624E User manual

Landa
Landa ZF2-10021D User manual

Landa
Landa EHW Series User manual

Landa
Landa VNG/VLP3-11021D User manual

Landa
Landa SGP-302214S User manual