Laser 4806 User manual

CV Bootgun
Suitable for stretching flexible CV Boots
Instructions 4806
2
UK UK
3
Introduction
The Bootgun is to be used solely for the stretching of flexible CV boots onto
drive-shaft assemblies of automotive vehicles. The nameplate is on the base of
the main body.
Specifications
Operating air pressure: 4 – 8 bar
Weight: 2 Kg
Dimensions: 465 x 148 x 148mm
Noise level: < 70dB(A)
Maximum joint diameter 115 mm
Bootgun is guaranteed for two years from purchase date. This guarantee is
invalid if the product has been misused or modified. Your statutory rights are
not affected.
Safety First
Read the operating and safety instructions. Follow them carefully.
Maximum safe operating pressure 8 bar 110 (psi). Air lines are dangerous – use
them correctly Keep hands away from moving parts. Never operate the Bootgun
near the face or body. Only use Bootgun to fit CV boots. If air line pressure
exceeds 8 bar, fit a regulator. Disconnect the Bootgun from the air supply
after use.
Putting into service
Before use, check cap-retaining screws are secure. If the Bootgun is dropped,
check for cracked components. Check air line pressure before connecting the
Bootgun. The Bootgun should be used only by people trained in the use of
pneumatically operated tools.
Maintenance
Do not attempt to clean or repair the Bootgun whilst air line is connected. There
is no routine maintenance on Bootgun. Only use genuine spare parts obtainable
from your supplier.
Assembly / dismantling
No assembly or dismantling is required. The air adaptor may be exchanged if
necessary. The body is threaded to accept 1/4 inch BSP connector.
Operation
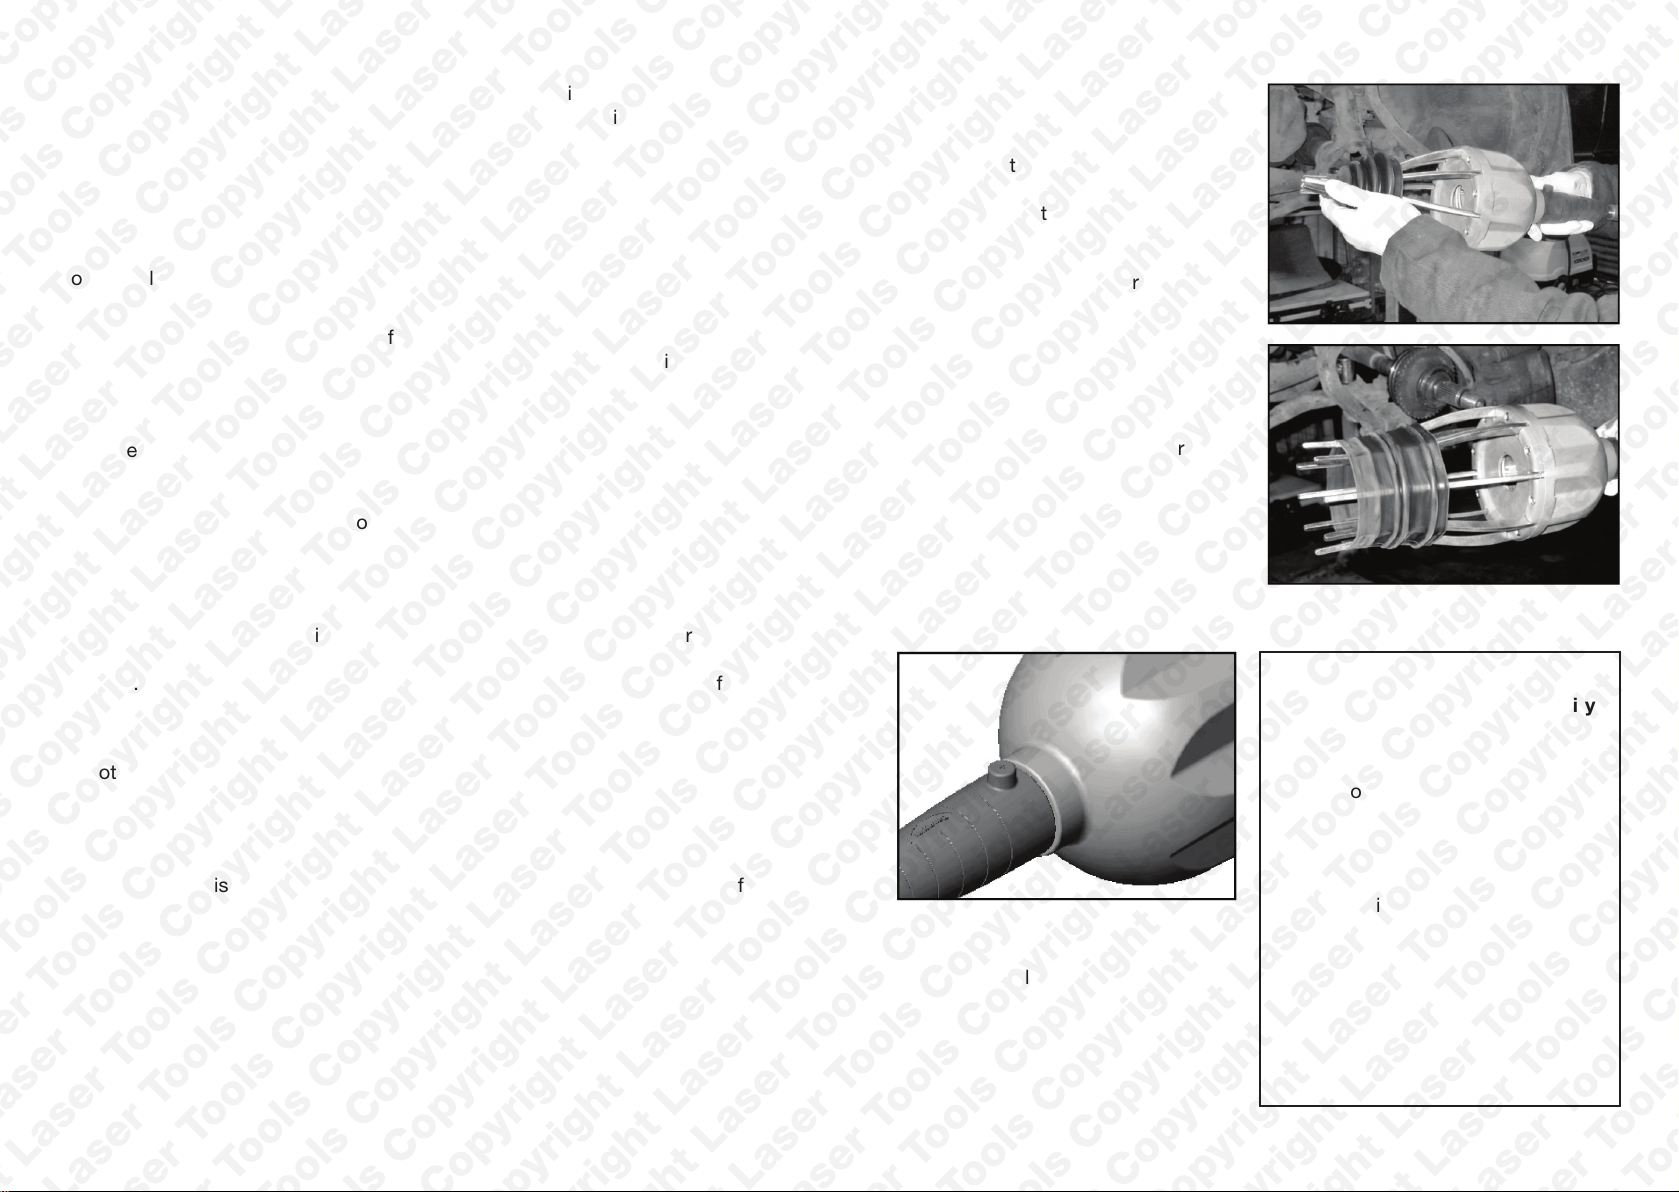
1. Slide boot onto arms, large end
first. The arms should just protrude
from the small end of the boot. To
fit a boot to an inner joint, turn the
boot inside out before sliding it
onto the Bootgun’s arms.
2. Press “+” button until arms open
enough to pass over the joint. Keep
hands clear of moving parts.
3. The air line can now be
disconnected. The arms will remain
open until the “-” button is pressed.
4. Place Bootgun over CV joint and
press release button (“-”). Keep
hands away from moving parts.
5. Slide the boot from the Bootgun
onto the axle and withdraw the
Bootgun over the joint, leaving
the boot in position. Complete the
installation in the normal way.
Bootgun Parts List
Item Description Quantity
1 Main Body 1
2 Piston 1
3 Top 1
4 Arms 8
5 U-Seal 1
6 Dowel Pins 8
7 Conical Spring 1
8 Bolt 8
9 Air control switch 1
10 Nut 8
11 Rubber Handle 1
12 Air Adaptor 1
13 Nameplate 1

4
F
5
F
Introduction
Le Bootgun ne doit être utilisé que pour le montage des soufflets extensibles sur
les joints homocinétiques automobiles. La plaque du fabricant se trouve au bout
de la poignée.
Spécifications
Pression d’air de fonction: 4 – 8
Poids: 2 Kg
Dimensions: 465mm x 148 x 148mm
Niveau de bruit: <70dB (A)
Diamètre maximum du joint: 115 mm
Bootgun est garanti deux ans dès l’achat. Cette garantie n’est pas valable si le
produit a été modifié ou employé abusivement. Vos droits statuaires ne sont
pas affectés.
Sécurité
Lire et suivre attentivement les instructions d’opération et de sécurité.
Pression maximum d’opération 8 BAR (115 psi). Les voies d’air sont
dangereuses – traitezles avec respect. Garder les mains hors de contact des
pièces mobiles. Ne pas utiliser le Bootgun près de la figure ou du corps. Ne pas
utiliser sauf pour le montage des soufflets homocinétiques. Si la pression de la
voie d’air excède 8 bar, monter un régulateur. Démonter le Bootgun de l’air.
Mise en service
Avant l’utilisation, vérifier que les écrous de soutènement sont fermes. Si on
laisse tomber le Bootgun, vérifier la pression de la voie d’air avant de connecter
le Bootgun. Le Bootgun ne doit être utilisé QUE par les personnes ayant des
connaissances des outils pneumatiques.
Entretien
Ne pas essayer de nettoyer ou réparer le Bootgun pendant que la voie d’air est
connectée. L’entretien routine n’est pas nécessaire pour le Bootgun. N’utiliser
que de pièces de rechange obtenues de votre fournisseur.
Montage / Démontage
Aucun montage ou démontage n’est nécessaire. Le raccord d’air peut être
changé si nécessaire. Le corps est enfilé pour accepter un raccord d’air de 1/4
d’un pouce en diamètre.
Opération
1. Faire glisser le soufflet sur les bras,
grande extrémité du soufflet. S’il
s’agit d’un montage à côté boîte,
il faut tourner le soufflet à l’envers
avant de le faire glisser sur les bras
de l’outil.
2. Presser le bouton “+” jusqu’à ce
que les bras s’ouvrent assez pour
poserle soufflet sur le joint. Tenir
les mains loin des pièces mobiles.
3. La voie d’air peut être débranchée
si nécessaire. Les bras restent
ouverts jusqu’à ce que le bouton
“-” soit pressé.
4. Mettre le Bootgun sur le joint
homocinétique et presser le bouton
(“_”). Tenir les mains loin des
pièces mobiles.
5. Retirer le Bootgun, en laissant le
soufflet en position correcte. Finir
le montage du soufflet selon la
méthode normale.
Liste de pièces Bootgun
Art. Description Quantité
1 Le corps principal 1
2 Le piston 1
3 Le haut 1
4 Les bras 8
5 Le sceau 1
6 Les chevilles 8
7 Le ressort conique 1
8 Le boulon 8
9 Le bouton de
déclenchement d’air 1
10 L’écrou 8
11 La manche en caoutchouc 1
12 Le raccord d’air 1
13 La plaque 1

6 7
D D
Einführung
Bootgun sollte angewendet werden elastische Achsmanschetten auf Kraftwagen
Gleichlaufgelenke zu setzen.
Technische Daten
Betriebsluftdruck: 4 - 8 bar
Gewicht: 2 Kg
Dimension: 465 x 148 x 148mm
Geräuschpegel: < 70dB(A)
Maximumgleichaufgelenkedurchmesser: 115 mm
Bootgun Garantie 2 Jahre. Diese Garantie wird ungültig wenn das Produkt
mißbraucht oder geändert wird. Ihre gesetzlichen Rechte bleiben unberührt.
Sicherheitsmaßnahmen
Lesen Sie die Gebrauchsanweisung genau, und befolgen Sie die Hinweise
sorgfältig. Maximaler Gebrauchsluftdruck 8 Bar (110 psi). Druckluft
Schläuche sind gefährlich – benutzen Sie diese in der richtigen Art und
Weise. Bevor Sie den Bootgun einsetzen, versichern Sie sich, daß die
Kronebefestigungsschrauben fest sind. Sollte Bootgun herunterfallen, muß das
Werkzeug auf Risse untersucht werden. Kontrollieren Sie, daß genügend
Luftdruck besteht, bevor Sie Bootgun anschließen. Bootgun sollte nur von
Leuten betrieben werden, die für den Gebrauch von pneumatischen Werkzeugen
ausgebildet sind.
Gebrauch
Hände sollten von bewegenden Teilen ferngehalten werden. Bootgun sollte
nie in der Nähe von Gesicht oder Körper angewendet werden . Bootgun darf
nur zur Montage von Achsmanschetten benutzt werden. Ist der Druck auf dem
Luftschlauch höher als 9 Bar , muß ein Luftregler installiert werden. Bootgun muß
nach Benutzung sofort vom Druckluftschlauch getrennt werden.
Instandhaltung
Man soll den Bootgun nicht versuchen zu reinigen oder reparieren, während das
Gerät mit dem Druckluftschlauch verbunden ist. Es gibt keine routinemäßige
Instandhaltung für das Bootgun Werkzeug. Sollte eine Reparatur notwendig sein,
dürfen nur authentische Teile benutzt werden, die bei Ihrem Bootgun Händler
verfügbar sind.
Zusammenbau/Auseinanderbau
Kein Zusammen- oder Auseinanderbau ist nötig. Der Luftanschlußstück kann
ersetzt werden, falls nötig. Der Hauptstück hat ein 1/4 zoll BSP Gewinde.
Betrieb
1. Schieben Sie die Manschette über die
Arme, große Öffnung zuerst. Die Arme
sollten bei aufgesetzter Manschette
ein wenig vorstehen. Wenn eine
Manschette auf das innere Gelenk
montiert wird, muß die Manschette
umgestülpt werden, bevor sie auf die
Bootgun Arme geschoben wird.
2. „+” Knopf drücken, bis die Arme
genügend öffnen, um über das Gelenk
zu passen. Halten Sie Ihre Hände von
bewegenden Teilen entfernt.
3. Der Druckluftschlauch kann jetzt
entfernt werden. Die Arme bleiben
offen, bis der “-” Knopf gedrückt wird.
4. Setzen Sie die gedehnte Manschette
auf Bootgun Armen über das Gelenk,
und drücken Sie den Auslöseknopf (“-”)
. Halten Sie Hände von bewegenden
Teilen entfernt.
5. Schiebe die Manschette von den
Armen herunter auf die Welle.
Entfernen Sie den Bootgun
von dem Gelenk, und lassen
Sie die Manschette auf die
Welle gleiten. Beenden Sie die
Manschettenmontage auf die
übliche Weise.
Bootgun Bestandteilliste
Nr. Beschreibung Anzahl
1 Hauptstück 1
2 Kolben 1
3 Krone 1
4 Arme 8
5 U-Dichtung 1
6 Dübel 8
7 Kegelförmige Feder 1
8 Bolzen 8
9 Bedienungsknopf 1
10 Mutter 8
11 Gummi Griff 1
12 Luft Anschlußstück 1
13 Namensschild 1

8 9
E E
Introducción
Bootgun se utiliza solamente para dar de sí al guardapolvos sobre la transmisión
del vehículo. La placa de identificación está colocada en la base del cuerpo
del Bootgun.
Especificaciones
Presión de aire de funcionamiento: 4 – 8 bares
Peso: 2 Kg
Dimensiones (medidas): 465 x 148 x 148mm
Nivel de ruido: <70dB (A)
Diámetro máxima de la junta: 115 mm
Bootgun está garantizado dos año desde la fecha de compra. Esta garantía
será inválida si el producto ha sido utilizado de forma incorrecta o si ha sido
modificado de algún modo.
Ante todo la seguridad
Leer las instrucciones de manejo y de seguridad antes de nada. Seguir las
instrucciones cuidadosamente. La presión máxima de funcionamiento es de 8
bares 110 (psi). Las conducciones de aire comprimido son peligrosas por lo que
hay que usarlas correctamente. Mantener las manos alejadas de las piezas en
movimiento. Nunca manejar el Bootgun cerca de la cara o del cuerpo. Utilizar
el Bootgun solamente para el montaje del guardapolvos. Si la presión del aire
comprimido excede de 8 bares, instalar un regulador. Desconectar el Bootgun
del aire comprimido después de usar.
Puesta en funcionamiento
Antes de usar, cerciorarse de que los tornillos que van en la tapa están
apretados correctamente. Si el Bootgun se cae y recibe algún golpe, revisar que
no se haya roto nada. Revisar la presión del aire antes de conectar el Bootgun.
El Bootgun debe ser utilizado sólo por personas que han sido formadas en el
uso de herramientas neumáticas. Usar ropa de protección adecuada.
Mantenimiento
No intentar limpiar o reparar el Bootgun mientras esté conectado al aire
comprimido. El Bootgun no requiere ningún tipo de mantenimiento rutinario.
Utilizar solamente recambios originales del proveedor.
Montaje y desmontaje:
No es necesario montar ni desmontar parte alguna. El adaptador de aire se
puede cambiar si es necesario. El cuerpo lleva rosca para conector de BSP de
1/4 de pulgada.
Funcionamiento
1. El extremo de los brazos debe
sobresalir ligeramente por la parte
estrecha del guardapolvos. Para
montar el guardapolvos en el lado caja
darle la vuelta antes de colocarlo sobre
los brazos del Bootgun.
2. Apretar el botón de “+” hasta que
los brazos hayan abierto lo suficiente
para que el guardapolvos pase sobre
la junta homocinética. Mantener las
manos alejadas de las piezas en
movimiento.
3. Ahora puede desconectarse el aire
comprimido. Los brazos continuarán
abiertos hasta que se aprete el botón
que pone “-”.
4. Colocar el Bootgun sobre la junta
homocinética y apretar el botón “-”
para soltar. Mantener las manos
alejadas de las piezas en movimiento.
5. Retirar el Bootgun manteniendo
el guardapolvos en posición.
Completar la instalación de la
forma acostumbrada.
Lista de piezas del Bootgun
Pieza Descripción Cantidad
1 Cuerpo 1
2 Émbolo 1
3 Tapa 1
4 Brazos 8
5 Retén 1
6 Pasadores 8
7 Muelle cónico 1
8 Tornillo 8
9 Botón para la salida de aire 1
10 Tuerca
11 Mando de goma 1
12 Adaptador de aire 1
13 Placa de identificación 1

10 11
Gebruik
1. Plaats de ashoes zoals getoond in
afb. 1 op de Bootgun. De einden
vande armen steken dan juist door
de kleine opening van de hoes.
Voor plaatsing van een hoes aan de
versnellingsbakzijde, eerst de hoes
binnenstebuiten keren voor u deze
op de armen plaatst.
2. Druk op de knop “+” totdat de
armen zich voldoende gespreid
hebben en schuif de hoes dan
over de koppeling. Raak geen
bewegende delen van de Bootgun.
3. De luchtslang kan nu losgekoppeld
worden, de armen blijven gespreid
totdat u op de knop “-” drukt.
4. Als de hoes over de koppeling
geplaatst is drukt u op de knop
“-” , de armen komen weer in de
beginstand.
5. Schuif de ashoes van de armen af
en trek de Bootgun terug over de
koppeling, de hoes is nu geplaatst.
Bootgun onderdelenlijst
Art. Omschrijving Aantal
1 Huis 1
2 Zuiger 1
3 Deksel 1
4 Armen 8
5 Zuigerring 1
6 Pin 1
7 Conische veer 1
8 Schroef 8
9 Ventiel 1
10 Moer 8
11 Rubbergreep 1
12 Aansluitnippel 1
13 Naamplaatje 1
NLNL
Introductie
De Bootgun is ontwikkeld voor het plaatsen van flexibele ashoezen op
homokinetische koppelingen. Niet flexibele ashoezen kunnen mogelijk de
Bootgun beschadigen.
Specificaties
Werkdruk 4-8 bar
Gewicht 2.2 kg.
Afmetingen 465 x 148 x 148 mm
Geluid niveau < 70dB(A)
Max. as diameter 115 mm
Bootgun heeft een garantie van twee jaar op materiaal en montagefouten. De
garantie vervalt bij verkeerd gebruik en indien aan de Bootgun iets is veranderd.
Veiligheid
Lees voor gebruik eerst de veiligheid en gebruiksinstructies en neem deze in
acht. De maximale veilige werkdruk is 8 bar (110 psi). Luchtslangen kunnen
gevaarlijk zijn, gebruik deze met de nodige zorg. Vermijd contact met bewegende
delen van de Bootgun. Houd de Bootgun tijdens gebruik nooit dicht bij uw
gezicht of lichaam. Gebruik de Bootgun alleen voor het plaatsen van flexibele
ashoezen. Indien de luchtdruk hoger is dan 8 bar moet u een reduceerventiel
voor de Bootgun plaatsen. Na gebruik de Bootgun altijd van de luchtslang
ontkoppelen.
In gebruikneming
Inspecteer voor gebruik de Bootgun en overtuig u ervan dat alle schroeven in
het deksel aanwezig zijn en vast zitten. Indien de Bootgun is gevallen, controleer
deze op beschadiging. Controleer de luchtdruk voor u de Bootgun aansluit op de
luchtslang. De Bootgun mag alleen gebruikt worden door personen die opgeleid
zijn te werken met pneumatisch gereedschap.
Onderhoud
Nooit de Bootgun schoonmaken of repareren als de luchtslang aangekoppeld
is. De Bootgun is onderhoudvrij. Gebruik voor vervanging alleen originele
onderdelen van uw Bootgun leverancier.
Montage / Demontage
De Bootgun wordt geheel gebruiksklaar geleverd. Mogelijk heeft u een
alternatieve aansluitnippel nodig. De schroefdraad op het huis is standaard
1/4” BSP.

Construction of the Bootgun
Construction du Bootgun
Bau des Bootguns
Construcción del Bootgun
Constructie van de Bootgun
Table of contents
Languages:
Other Laser Tools manuals


