manuals.online logo
Brands
  1. Home
  2. •
  3. Brands
  4. •
  5. Lawmate
  6. •
  7. DVR
  8. •
  9. Lawmate PV-500W User manual

Lawmate PV-500W User manual

1 32 4
6 75
LawMate, innovation never stops
®
V1.0
PV-500W Bundle
BU-18HD + PV-500HDW Package
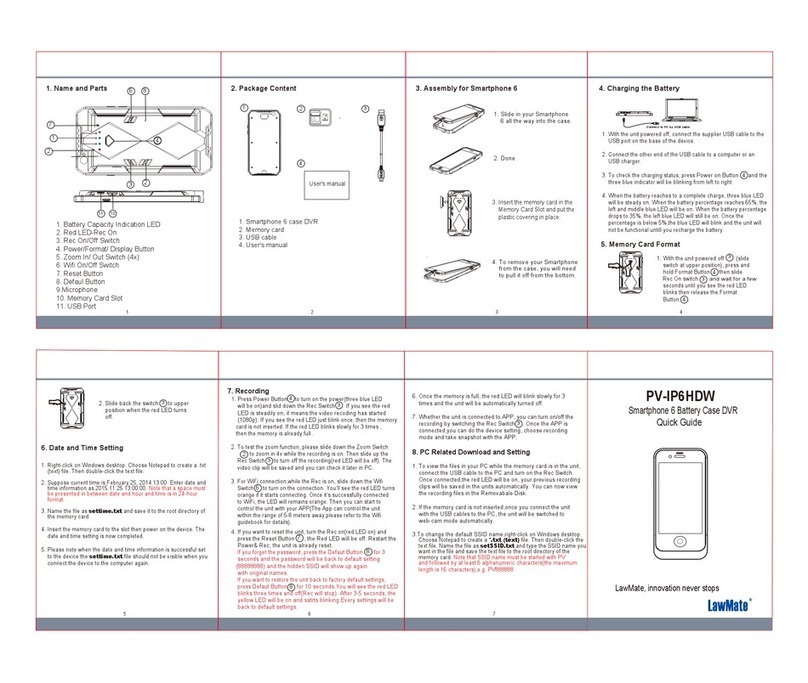
1. BU-18HD Names and Parts
3
1. Camera Lens
2. Microphone
3. Micro USB
a. BU-18HD 2MP Camera
b. Button & Screw Kit
c. 3M Double Coated Tape
d. DIY Lens Cover Button
e. User’s Manual
3. PV-500HDW Names and Parts
2
1
910 11
4
5
6
7
812
13
14
315
1.Battery Pack
2.Battery Lock Switch
3.Controller Port
4. Green LED - Charge
5. Red LED - Rec
6. Orange LED - Wi-Fi
7. Blue LED - Power
8. Camera In Port
9. Power / Wi-Fi on &
off Button
10. Rec on/stop Button
11. Memory Card Slot
12. DC 5V in Jack
13. Reset Key
14. USB Port
15. Default Key
4. Package Content of PV-500HDW
5. Install and Remove Battery
To remove the battery, gently unlock
by switching LOCK switch to the right side
and push battery in red arrow pointed
direction.
To install the battery, attach the
battery to the DVR, gently push
the battery in red arrow pointed
direction. Lastly, don’t forget to slide
LOCK swith to the left to ensure it is
locked properly.
4GB
6. Battery Charging
1. Connect the charger plug to the DC In Jack .
2. Plug the power cord of the charger to an AC wall outlet.
The charging starts automatically. The device can record
while charging.
● Solid green LED - the device is charging.
● Green LED goes off - the deviced is fully charged.
7. Connecting camera to DVR
8
To connect the camera,
plug the camera’s micro
USB end into Camera in
port on the DVR.
※ Only to connect the camera
to DVR when system is turned off.
※Both camera and memory card
need to be inserted to DVR
to turn the system on.
Battery Pack
DC 5V 2A Charger
Memory Card
USB Cable
Controller Cable
European Adapter
Head
Pouch
1.
LOCK
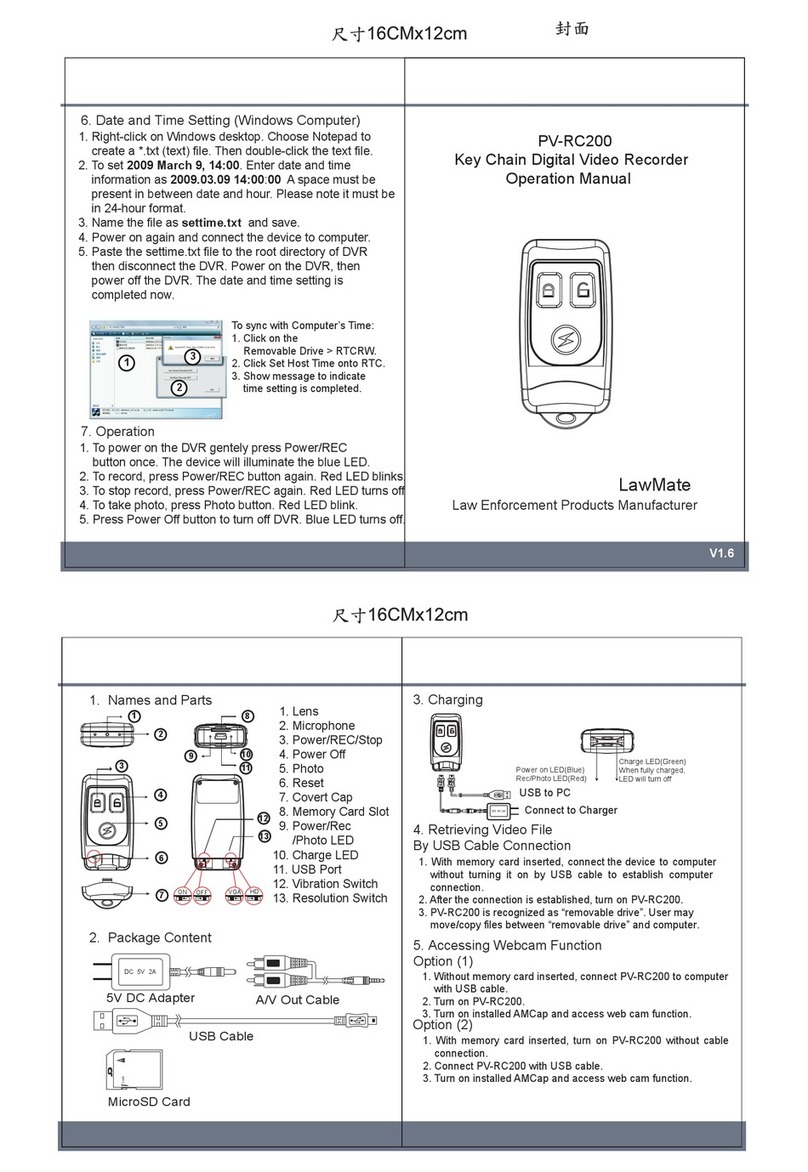
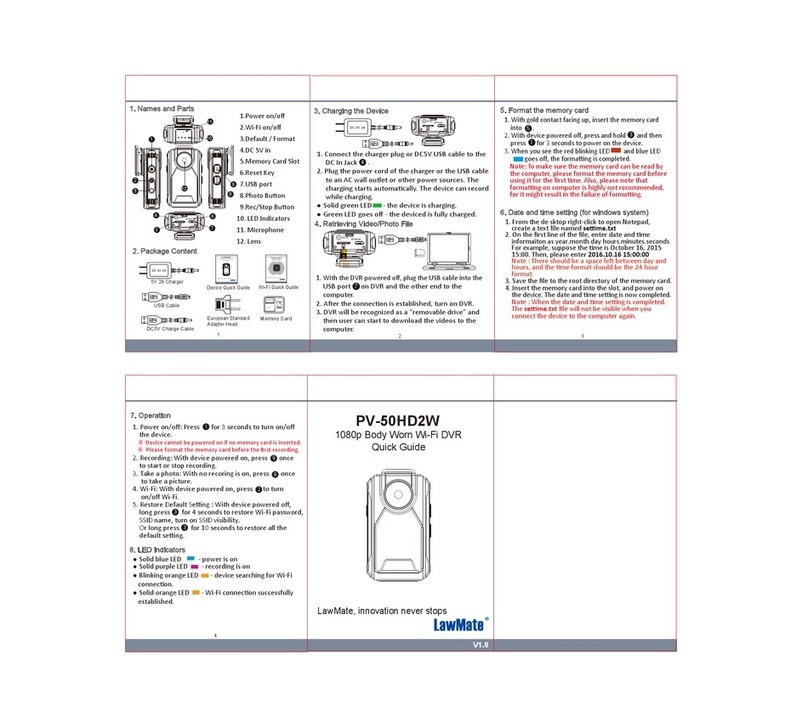
1. From the desktop right-click to open Notepad, create a text
file named settime.txt
2. On the first line of the file, enter date and time information as
year.month.day hours.minutes.seconds
For example, suppose the time is October 16, 2015 15:00.
Then enter 2015.10.16 15:00:00
※
There should be a space left between day and hours,
and the time format should be the 24-hour format.
3. Save the file to the root directory of the memory card.
4.
Insert the memory card into the slot, and power on the device.
The date and time setting is now completed.
※
When the date and time setting is completed. The settime.txt
file should not be visible when you connect the device to
the computer again.
11. Date and time setting (for Windows system)
Knowing that all video files are stored in the memory card.
You can do the following to download videos.
1. Use a memory card reader to transfer files from the card to
the computer.
2. Or, connect the device to the computer with memory card
inserted. Turn on the device and it will work as a flash drive.
13. Download videos and photos from DVR
10. Formate the memory card
3
9. Connect the DVR to the computer
14
14. Put on DIY lens cover button
Stick the tape on the button and screw it on the camera.
8. Connect the wired controller to the DVR
User's Manual
ab
cde
8
12
2.
LOCK
● Solid green LED on Controller - the controller is connected.
● Solid red LED on Controller - the device is recording.
1. Plug in the Controller able into the Control port .
2. Turn on the Controller, the device starts recording instantly;
When turned off, the recording stops and device powered off.
3. To turn on the device, slide the controller toggle downward
and hold for 3 seconds.
4. To turn off the device, slide the controller toggle downward
again and hold for 3 seconds.
3
With the DVR powered off, plug the USB Cable
into the USB port on DVR and the
other end to the computer.
14
1. The camera must be connectd to the DVR first.
2.
With gold contact facing down, insert the memory card into .
3. With device powered off, press and hold Rec button .
4. And then press Power button for 3 seconds until you
see the blinking red LED.
5. Lastly, release both buttons at the same time.
● Blinking Red LED + Solid Blue LED - the memory
card is being formatted.
● All lights go off - the formatting is completed.
10
11
9
Caution: To make the memory card recognizable, please be
sure to format the memory card before using it for the first time.
Please note that formatting on computer is not recommended,
for it might result in the failure for the computer to recognize
the card.
12. Operation
1. Power on: Press for 3 seconds.
2. Recording: With device powered on, press to start or
stop recording.
3. Wi-Fi: With device powered on, press to turn on/off Wi-Fi.
4. Power off: With no ongoing recording, press for 3 seconds.
5. Reset: When the device functions abnormally, press .
6. Restore default Wi-Fi password: long press for 4 seconds.
7. Restore default setting : press for 10 seconds.
● Solid blue LED - power on
● Solid red LED - recording on
● Blinking orange LED - device searching for Wi-Fi connection
● Solid orange LED - device is connected to Wi-Fi
※
The device powers off itself when memory card is full.
9
10
9
9
15
13
15
5.Download Video Files
In order to back up the recording files to your smart phone,
please go to Main Menu> Video Files > Recording and find the
video clipsyou want to back up. Or go to Main Menu > Video
Files > Photographs to download photos.
Swipe leon the video clip you want to back up and you will
see two opons, “Backup files” or “Delete”. Click on “Backup
files”, the files will be backed up to your smart phone. Click
“Delete”, the video file will be deleted fromthe device and phone.
To check whether the file issuccessfully backed up on your phone,
go to “Backup files” in “Video Files” to make sure it’sin the list.
If you want to delete the backed-up file, just slide it to the leand
click Delete.
Note: The video filescan only be viewed when theyare backed up
to your smart phone.
Program Setting
6.Hide the device Wi-Fi SSID
If you don’t want other people to see the Wi-Fi SSID of your
device while they are searching for Wi-Fi network,go to
“Program Seng” on the main menu of the app, turn off
the “SSID Visible” byswiping it to the le.
7.Modify Wi-Fi Password & SSID name
The default WI-Fi password is“88888888”. To change password,
go to “Program Seng” then tap on “Modify equipment Wi-Fi
password” to enter the new password. If you lose or forget
your WI-Fi password, please long press the default key on
the device for 4 seconds.
To change the default SSID name, right-click on Windowsdesktop.
Choose Notepad to create a *.txt (text) file. Then double-click the
text file. Name the file as setSSID.txt and type the SSID name you
want in the file and save the text file to the root directory of the
memorycard.
Note: SSID name must be started with PV and followed by
at least 6 alphanumeric characters (the maximumlength is16
characters),e.g. PV888888
4GB
Lock
Adapter
Take the product PV-IP6HDW for example.
You could enter PV123abc at the first line
of the *.txt(text) file. Save the*.txt(text) file
to the memorycard and insert back to the device.
8.Lock up your video files
If you want to keep the files
from being overwrien or
deleted, go to “Video Files”
and tap on the greylock icon
on the file you want to
lock up. When the lock icon
turns blue,the file is
successfully locked up.
9.Troubleshoong
If you see error message “Current device isoff-line”,please
make sure your Wi-Fi connecon isfunconal. Or,trydouble
clicking home buon on your smart phone,terminate the
PV Cam Viewer App and enter it again.
If you can’t see the live view image, tryto double click and
terminate the App, and then re-enter the App.
If you want to restore the device to the default seng
( i.e. the Wi-Fi password,SSID visibility, SSID name and so forth),
please long press Default key for 10 secondsand then release it.
5 6 7
V1.2
LawMate, innovation never stops
®
PV-Cam Viewer
for Wi-Fi Cam
App Store & Play Store
Installation Quick Guide
Get it on
Google play
Available on
App Store
1.Install the App “PV Cam Viewer”
We provide 2 methodsto install PV Cam Viewer app.
1. Scan the QR code on thispage with the QR code reader on
your smart phone. The app will be downloaded automacally.
2. To manually install PV CamViewer on your smart phone,
go to App Store (iOS) or PlayStore (Android) on your phone.
Enter
“PV Cam Viewer” to search and download the App.
“PV CamViewer”. Once “PV CamViewer” icon shows on your
phone, the app is successfully installed.
2.Configure the Wi-Fi Sengs
1. To enable Wi-Fi, turn on the Wi-Fi funcon on your device and
on your phone. With Wi-Fi funcon on device turned on, go to
Sengs>Wi-Fi on your phone to search for the network named
“PV-xxxxxxx...” (same asthe name of your device) and enter the
password “88888888”.
3.Date & Time Sengs
Go to “Program Seng” on the main menu of the app,then tap
on “Synchronize the me” to sync the me and date of your
device with your smart phone.
4.Recording Sengs
On top of the live view image you can select “NormalMode”
or “Moon Mode”. To change the recording mode,you need
to click “Stop” first to pause the on-going recording,then tap
on the mode you want.
To overwrite recording,tap on“SETUP", which isat the top
right corner of the live view screen,to enable or disable
Overwrite recording.
Note: Once the DVR isturned off, it will always return to the
NormalMode the next me it’sturned back on.
21 3 4
21 3 4
4. When “Current Device is off-line, please check your Wi-Fi
network” pops up, go to Sengs > Wi-Fi on your phone to check
if the Wi-Fi connecon is successfully established. If “Please select
device to operate” pops up, go to Device Management and select
the device by tapping on it.
2. If you have opened the PV Cam Viwer app before configuring
Wi-Fi sengs, please terminate the app and re-open it.
Note: Do this again if you do not see the device show up in
Device Management.
3. Go to Device Management, refresh the page, and you can see
the device get online. Next, enter Recorder Seng to stream live
view.
This manual suits for next models

2

Other Lawmate DVR manuals

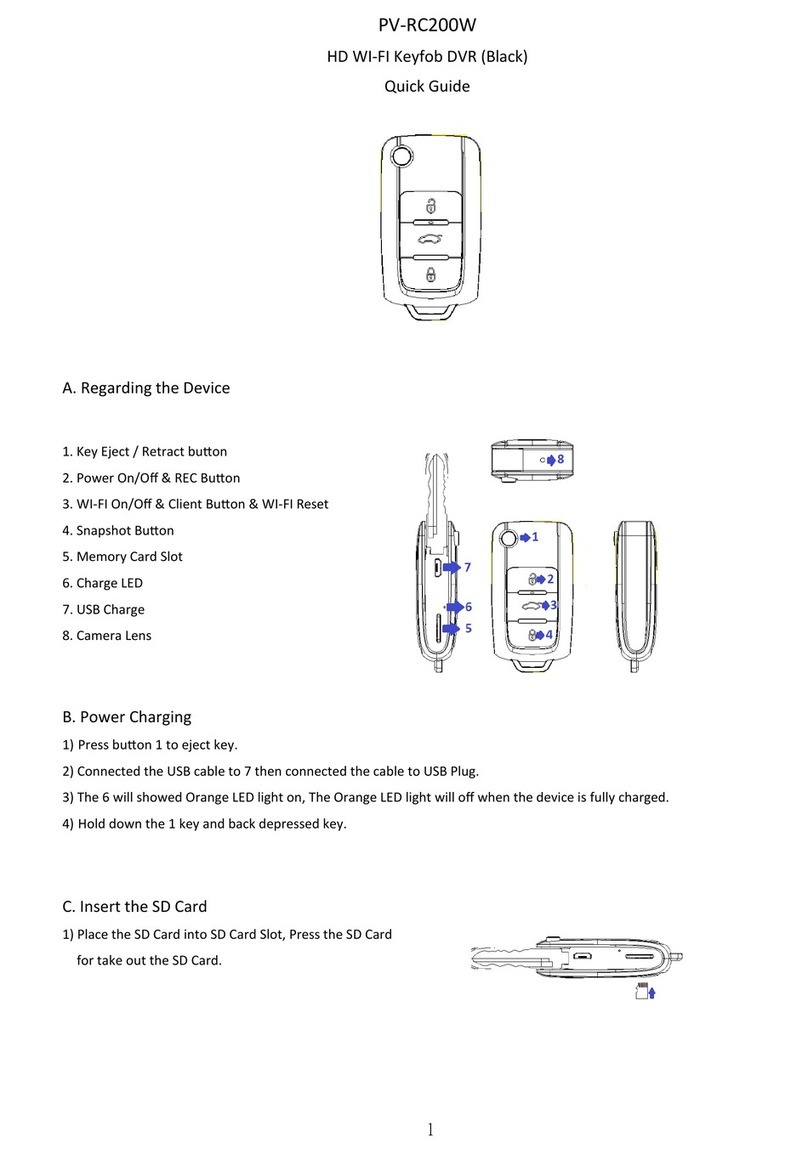
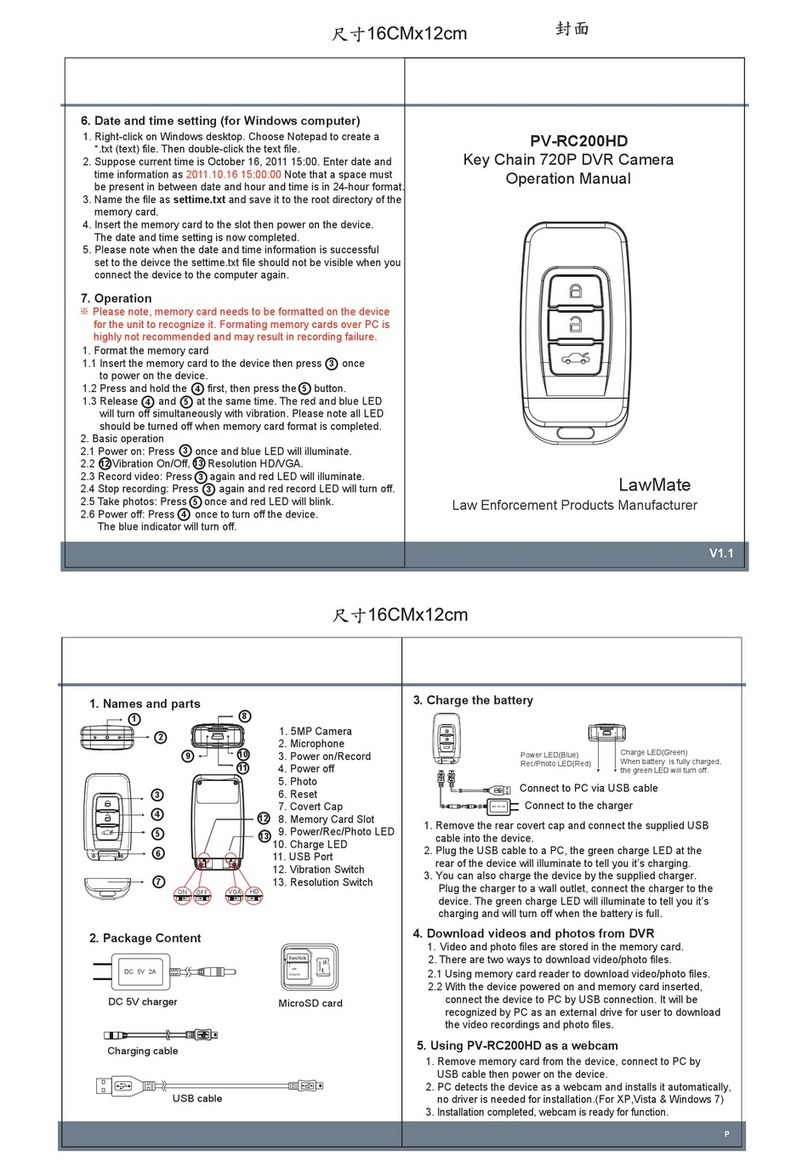
Lawmate PV-RC200 User manual

Lawmate

Lawmate PV-RC200 User manual

Lawmate PV-50U User manual

Lawmate

Lawmate PV-50U User manual

Lawmate PV-900HD User manual

Lawmate

Lawmate PV-900HD User manual

Lawmate PV-1000 Touch User manual

Lawmate

Lawmate PV-1000 Touch User manual

Lawmate PV-AC20 User manual

Lawmate

Lawmate PV-AC20 User manual

Lawmate PV-RC300 User manual

Lawmate

Lawmate PV-RC300 User manual

Lawmate PV-500 EVO User manual

Lawmate

Lawmate PV-500 EVO User manual

Lawmate PV-1000 Touch User manual

Lawmate

Lawmate PV-1000 Touch User manual

Lawmate PV-50HD2W User manual

Lawmate

Lawmate PV-50HD2W User manual

Lawmate PV-RC200HDW User manual

Lawmate

Lawmate PV-RC200HDW User manual

Lawmate PV-RC300 Mini Camstick DVR User manual

Lawmate

Lawmate PV-RC300 Mini Camstick DVR User manual

Lawmate PV-500EVO User manual

Lawmate

Lawmate PV-500EVO User manual

Lawmate PV-500 LITE User manual

Lawmate

Lawmate PV-500 LITE User manual

Lawmate PV-1000 Touch User manual

Lawmate

Lawmate PV-1000 Touch User manual

Lawmate PV-AC30 User manual

Lawmate

Lawmate PV-AC30 User manual

Lawmate PV-RC200 User manual

Lawmate

Lawmate PV-RC200 User manual

Lawmate PV-500EVO User manual

Lawmate

Lawmate PV-500EVO User manual

Lawmate PV-RC200W User manual

Lawmate

Lawmate PV-RC200W User manual

Lawmate PV-AC20 User manual

Lawmate

Lawmate PV-AC20 User manual

Lawmate PV-800 User manual

Lawmate

Lawmate PV-800 User manual

Lawmate PV-900HD User manual

Lawmate

Lawmate PV-900HD User manual

Lawmate PV-400W User manual

Lawmate

Lawmate PV-400W User manual

Lawmate PV-500EVO2 User manual

Lawmate

Lawmate PV-500EVO2 User manual

Lawmate PV-AC30 User manual

Lawmate

Lawmate PV-AC30 User manual

Popular DVR manuals by other brands

Toshiba Surveillix XVR16-60-X user manual

Toshiba

Toshiba Surveillix XVR16-60-X user manual

Grundig VIVANCE GV 3242 NIC/2 user manual

Grundig

Grundig VIVANCE GV 3242 NIC/2 user manual

Dahua DVR0404LBH-S user manual

Dahua

Dahua DVR0404LBH-S user manual

Interlogix TruVision DVR 11 quick start guide

Interlogix

Interlogix TruVision DVR 11 quick start guide

Nuvico EV-4000 instruction manual

Nuvico

Nuvico EV-4000 instruction manual

INSIGHT CCTV EDVR user manual

INSIGHT CCTV

INSIGHT CCTV EDVR user manual

Kprokorea GDS-400H user manual

Kprokorea

Kprokorea GDS-400H user manual

Kendo VR 2544 operating instructions

Kendo

Kendo VR 2544 operating instructions

ESP HDV16RX user manual

ESP

ESP HDV16RX user manual

Dahua Technology XVR5232AN-I3 user manual

Dahua Technology

Dahua Technology XVR5232AN-I3 user manual

Archos AV400 Series specification

Archos

Archos AV400 Series specification

JB Systems Light USB 1.1 REC Operation manual

JB Systems Light

JB Systems Light USB 1.1 REC Operation manual

Q-See QSC26404 user manual

Q-See

Q-See QSC26404 user manual

Hi Sharp 16 CH DVR user manual

Hi Sharp

Hi Sharp 16 CH DVR user manual

foc.us Firestore FS-M user manual

foc.us

foc.us Firestore FS-M user manual

Black BLK-DH200400D user manual

Black

Black BLK-DH200400D user manual

Omni UVS-4**D1 Series installation manual

Omni

Omni UVS-4**D1 Series installation manual

Q-See QC444 user manual

Q-See

Q-See QC444 user manual

manuals.online logo
manuals.online logoBrands
  • About & Mission
  • Contact us
  • Privacy Policy
  • Terms and Conditions

Copyright 2025 Manuals.Online. All Rights Reserved.