LCG MINI RADIUS 1W RGB User manual

MINI RADIUS 1W RGB
RGB Animation Laser
User Manual
LCG-256 1W RGB
Please read this manual carefully before use!

Animation Laser User Manual
--1 - -
Contents
Introduction--------------------------------------------------------------------------------------------------P2
Silkscreen on product------------------------------------------------------------------------------------P3
Safety instruction/Installation/Technical specification----------------------------------------P4
SD control system/Menu--------------------------------------------------------------------------------P5
DMX512 Channel------------------------------------------------------------------------------------------P6
DMX Address setting/DMX512 connection---------------------------------------------------------P7
Product size-------------------------------------------------------------------------------------------------P8
Ringing--------------------------------------------------------------------------------------------------------P9
Cleaning and maintenance/Warning/Warranty card-------------------------------------------P10

Animation Laser User Manual
--2 - -
Introduction
Thank you for purchasing this product. To optimize the performance of this product,prior to
use,please read these operating instructions carefully to familiarize yourself with the basic operation
of this unit.Please keep the manual in safe price for future reference.
This unit has been tested at our factory before being shipped to you, there is no assembly required.
Once after received this product , please take and put carefully. And check cautiously that whether
the product was damaged or not during the transportation.
Checking Parts
Please check if the following parts are included:
1 x Laser light
1 x User manual
1 x Power cable
Caution
CAUTION!
Keep this device away from rain and moisture!
Unplug mains lead before opening the housing!
Warning!
Damages caused by the disregard of this user manual are not subject to
warranty. The dealer will not accept liability for any resulting defects or

Animation Laser User Manual
--3 - -
Symbol Instruction On The Device
-------------------------------------------------------------------------------CE Certificate
---------------------------------------------------------------------Only indoor use
------------------------------------------------------------------------Environmental protection
----------------------------------------The minimum distance from lighted objects(meter)
------------------------------------------------------------Max. Ambient Temp
----------------------------------------------------Max. Housing Temp
------------------------------------------------------------------------- Safety caution
-------------------------------------------------------------------------Careful burns
------------------------------------------------------------------------Careful electric shock
-----Not suitable for directly installed on the surface of ordinary combustible
materials

Animation Laser User Manual
--4 - -
Safety Instructions
Please open and check whether break or not for transport once receive this fixture, if yes, not use it
and contact dealer or manufacture as soon as possible.
The Max applicable temperature for the light is 40°C. Do not use the light under or above the
temperature. ta=40℃
The fixture is applicable for many occasions, it should keep clean, and avoid long use in
overheating or dusty environment. To prevent the fixture from the chemical liquid .
User must be careful of fire, heat, electric and fall-off that make heavy or fatal injury. Please read
this user manual carefully before power on and installation, following safety and operation
instruction in it. If still have any questions, please contact dealer or manufacture.
User must following this user manual, do not open fixture by yourself, if any problems, please
contact professional technician, maintenance should by technician.
Do not power on or start the fixture before installation, please stop after working more than 8 hours,
which will longer use life.
Fixed installation, do not by strong shocks.
The minimum distance between light and the illuminated surface must be more than 1 meter.
Never look directly into the light source to avoid hurt to eyes (especially epileptics)!
When dustproof glass at light output breaks, cracks or other visible damage, user should replace
with new glass to continue to use.
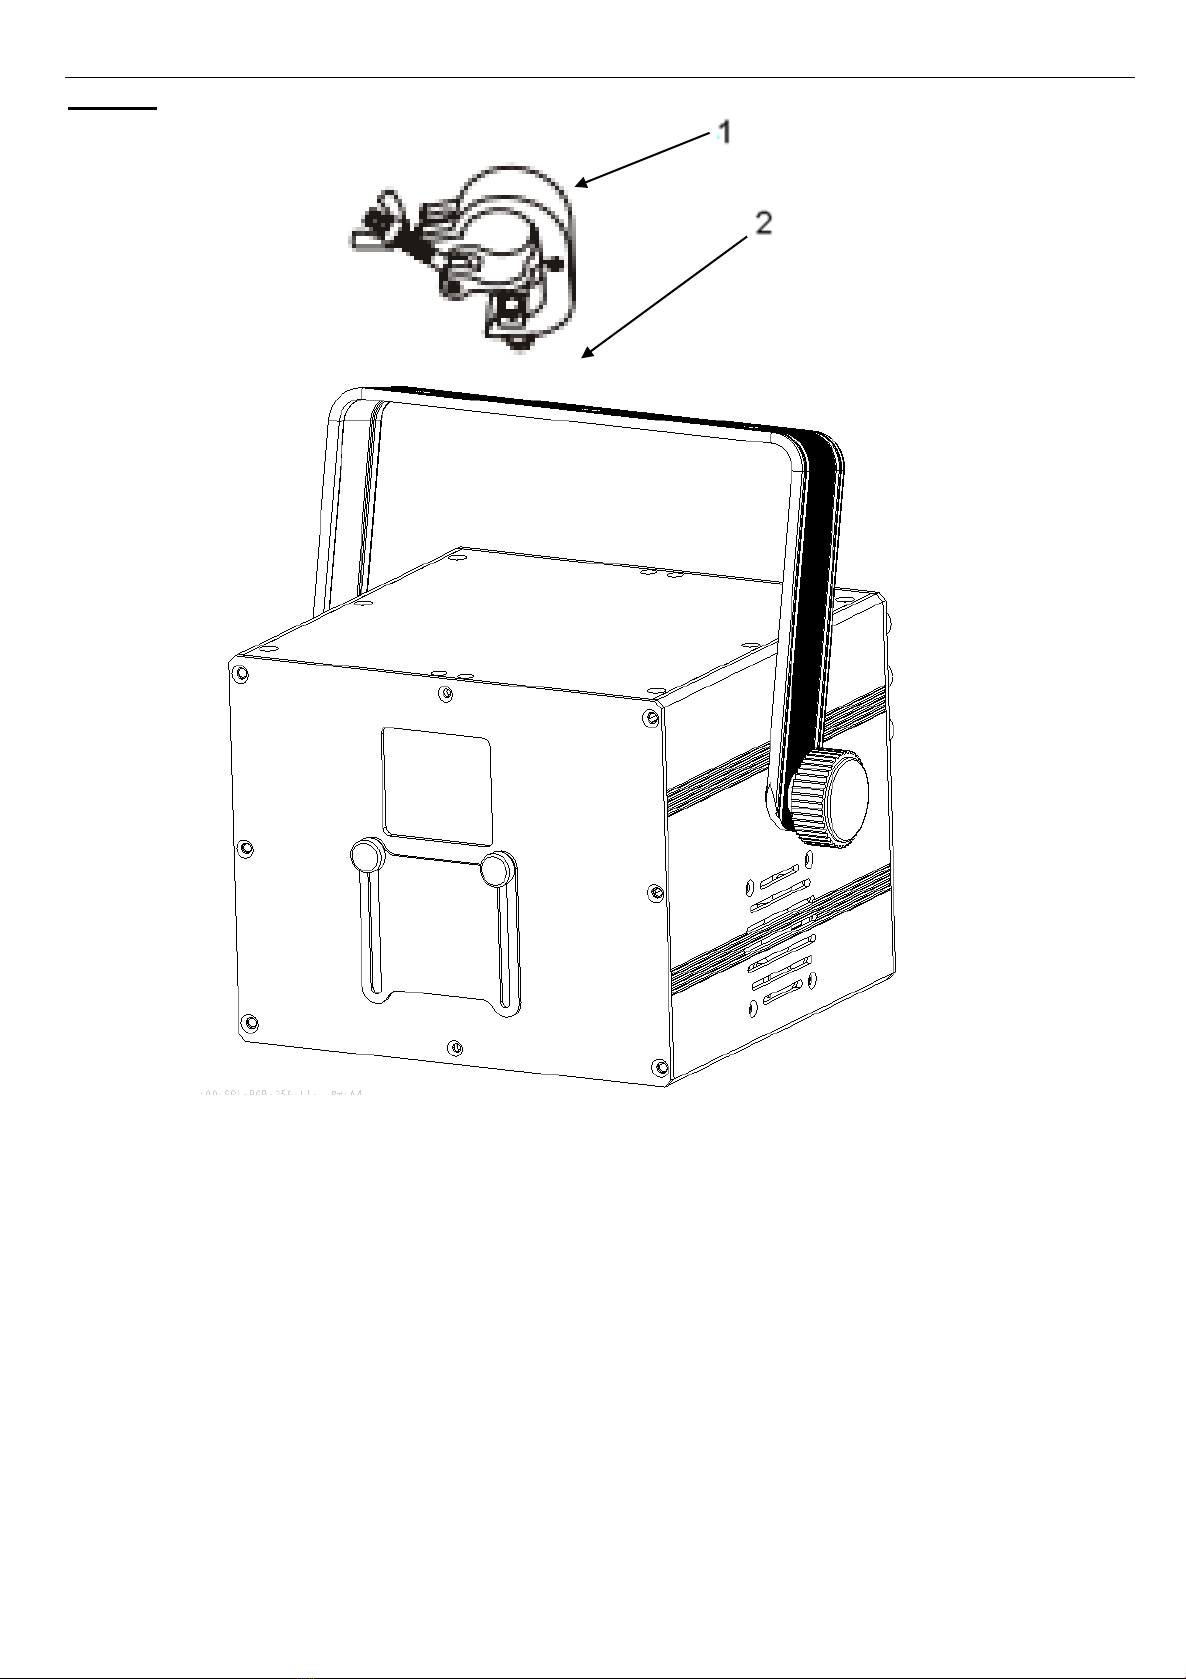
Installation
When install this equipment please make sure there's no flammable surfaces (decorated things,
etc) and minimum distance of 0.5M from the equipment to the flammable.
The installation of the effect has to be built and constructed in a way that it can hold 10 times the
weight and without any harming deformation.
The installation must always be secured with a secondary safety attachment, e.g. an appropriate
safety rope.Never stand directly below the device when mounting, removing or servicing the
fixture.
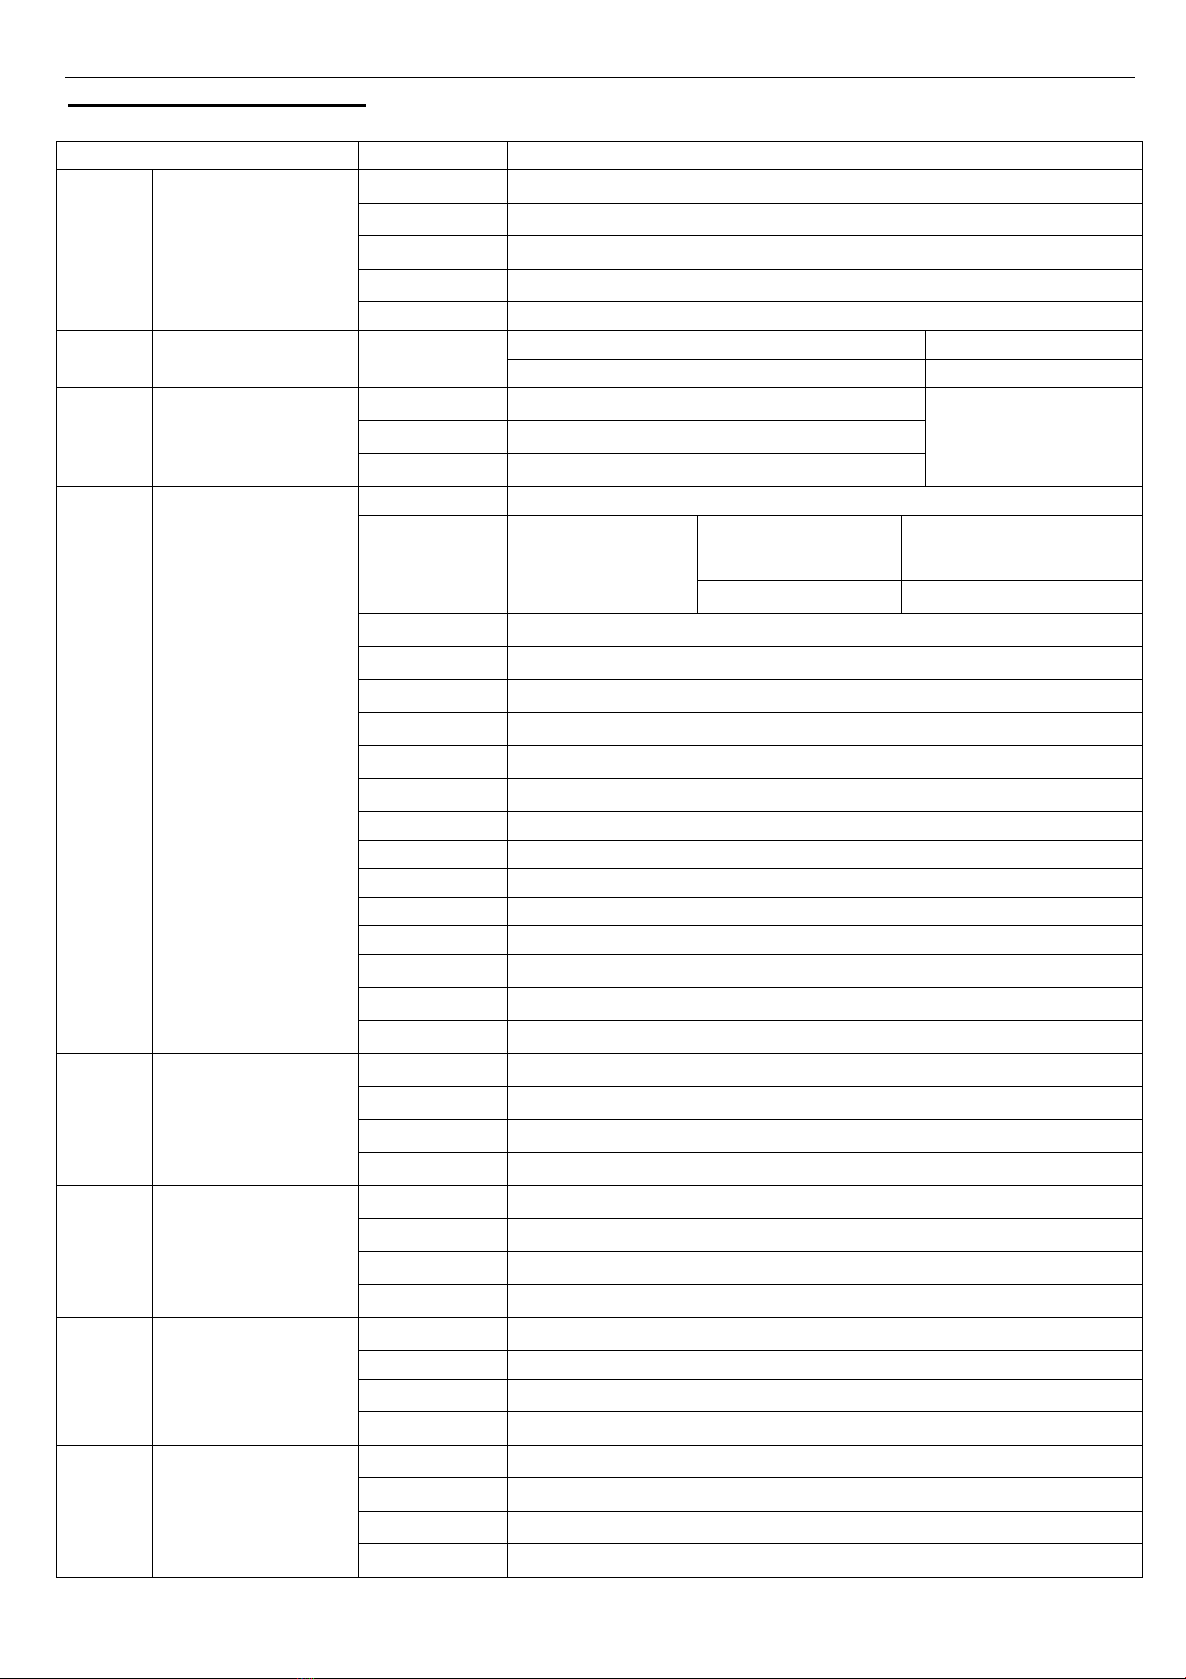
Technical Specifications
Input voltage: AC100-240V, 50/60Hz
Fuse: BGDP ¢5x20mm 250VAC F2A
Light source: 1W RGB (200mW/638nm+150mW/532nm+650mW/445nm)
Control mode: Auto/Sound/DMX512/ILDA/Master-slave/SD
Channels:17CH
Scanning system: 20Kpps Scanner, ±30º
Surface temp: Tb=45ºC ( this data testing when the environment temp is 30ºC)
Working temp: 10ºC--65ºC
Modulation: Analog modulation
N.W: 4.1Kg
G.W: 5Kg

Animation Laser User Manual
--5 - -
Carton packing size: 30*25*26cm
SD laser control system
1. MENU operation
Rotate the knob at display’s right side to operate the menu, press knob to enter sub-menu or exit
menu, after operation, Non-stop double-click the knob to save the option and exit the menu.(Eg:
when setting DMX address should Non-stop Double click the knob and exit MENU, then DMX
address can successed save)
The potentionmeter at display’s left side can adjust the power of laser: Red Current( adjust red
laser power), Green Current(adjust green laser power),Blue Current (adjust blue laser power).
Anti-clockwise rotation the potentionmeter is down the power, and clockwise rotation is up the
power.Below the display, safety key location, is closed the laser when the key at OFF, and is open
when the key at ON.
2. MENU display
MENU Display Function
DmxAddress 1-512 DMX address setting
Show mode
Prg Mode Display list mode:display PRG file, the 2rd line
displays the current file name
ILDA Mode
ILDA mode
,
display shows in ILDA file circularly
(
file’s expanded-name is ILD
)
Sound Sound activate mode
Auto Mode Auto mode
Sound sense 0-100 Sound sensitivity setting
SD File choose SD card file
SIZE 0-100 Set pattern size
Phasic set X Y
Speed set
Set show speed
,
set the speed according to the
scanner speed, too high speed will hurt the
scanner
DMX STATE
Show mode When no DMX,the working mode is show mode
Black out When no DMX,light stands by
HOLD When no DMX,light holds the last scene
Slave Master/ slave Master/slave mode
Fixture Hours Fixture total working hours
Version Software version

Animation Laser User Manual
--6 - -
DMX Channel Instructions
Channel
Value
Function
CH1 control mode
0-49
auto mode
50-99
sound activated mode
100-149
PRG file display orderly
150-199
ILD file display circularly
200-255
DMX Mode
CH2
choose
pattern/file
0-255
DMX Mode
PRG/ILD mode
choose pattern, 1 pattern for 3 digits
choose file
CH3 strobe and
display file
0-10
no strobe
choose display file
11-199
strobe automatically from slow to fast
200-255
strobe via sound activated
CH4 choose color
0-5
laser off
6-16 white 6-10
ILD file's original
color
11-16
white
17-33
red
34-50
green
51-67
blue
68-84
yellow
85-101
purple
102-118
cyan
119-135
white,red, green, blue subsection
136-152
blue, yellow, purple, cyan subsection
153-169
white, red, green, blue, yellow, purple, cyan subsection
170-186
white, red, green, blue color flowing
187-203
blue, yellow, purple, cyan color flowing
204-220
white, red, green, blue, yellow, purple, cyan color flowing
221-237
color subsection by pattern break-point
238-255
color change by sound
CH5 display
0-63
normal display
64-127
bright dot display
128-191
subsection display
192-255
dot display
CH6 Horizontal Move
0-125
move with manual adjust
126-225
auto move from left to right circularly
226-245
auto jump randomly
246-255
random jump by sound control
CH7 Vertical
0-125
move with manual adjust
126-225
auto move top-down circularly
226-245
auto jump randomly
246-255
random jump by sound control
CH8 Zoom
0-10
no zoom
11-87
zoom by manual adjust
88-150
zoom out
151-200
zoom in

Animation Laser User Manual
--7 - -
201-255
zoom circularly
CH9 Horizontal
rotation
0
no rotation
1-128
manual adjust
129-255
auto rotation
CH10 Vertical
rotation
0
no rotation
1-128
manual adjust
129-255
auto rotation
CH11 center rotation
0
no rotation
1-128
manual adjust
129-192
auto rotation clockwise
193-255
auto rotation anti-clockwise
CH12 gradual drawing
0-10
no drawing
11-74
gradual drawing by manual adjust
75-104
auto gradual drawing
(
increasing
)
105-144
auto gradual drawing
(
decreasing
)
145-184
auto gradual drawing circularly
185-224
end to end gradual drawing circularly
(
increasing
)
225-255
end to end gradual drawing circularly (decreasing
)
CH13 Horizontal wave
0-9
no wave
10-69
small wave
70-129
middle wave
130-189
big wave
190-255
biggest wave
CH14 Vertical wave
0-9
no wave
10-69
small wave
70-129
middle wave
130-189
big wave
190-255
biggest wave
CH15
red dimming
0-255
red dimming from 100%-0%
CH16
green dimming
0-255
green dimming from 100%-0%
CH17
blue dimming
0-255
blue dimming from 100%-0%
DMX-512 connection

Animation Laser User Manual
--8 - -
DMX In To the fourth
First light (Address 001)Second light (Address 018)Third light(Address 035)
DMX Address setting
Each fixture must set a specific starting address. When receiving signal transmission, fixture will
receive channel control signals which from the starting address.
According to different requirements or easy to use, the user can set many value fixtures to the
same address, also can set up a separate address for every device.
If you set the same address,all the devices will receive from DMX channels signal. All
connecting fixtures are jointly controlled, controller can't separate control a device.
If you set a different address, each device will be separate from its particular set the starting
address and begin accepting DMX512 control signal, so that more convenient separate control one
device. Using this method must be based on channel quantity of device to determine a starting
address.
This laser light has 17 channels.you should set the starting address of the first unit to 1, the
second unit to 18(1 + 17), the third unit to 35 (17*2+ 1), and so on.
Product Size

Animation Laser User Manual
--9 - -
Ringing
1 Mounting bracket
2 Handle
A).The ambient temperature range is 1°C--45°C, must never be exceeded.
B).The installation of the projector has to be built and constructed in a way that it can hold 10 times
the weight for 1 hour without any harming deformation.
C)).When rigging or servicing the fixture staying in the area below the installation place, on
bridges,under high working places and other endangered areas is forbidden.
D).The operator has to make sure that safety-relating and machine-technical installations are
approved by an expert before taking into operation for the first time and after changes before taking
into operation another time.
E).The operator has to make sure that safety-relating and machine-technical installations are
approved by a skilled person once a year.
F). Sure M8 screws on mounting bracket fixed middle hole ¢12.5mm of handle

Animation Laser User Manual
--10 - -
Cleaning and maintenance
Maintenance should be performed every 15-day period, by using a sponge which is dipped with
alcohol, rather than wet cloth or other chemical liquid, to clean the mirror.
Always disconnect from the mains when the device is not in use or before cleaning it.
Warning
Warranty Card
This product is made of high-
brightness transistor. We will provide 1 year warranty under
the condition that user has operated the light normally and lifetime service. We won't
provide warranty if the damage is caused by artificial or force majeure event. Cost of fittings
should be charged by user if product need maintenance after 1 year .Please cut this
warranty card and shipped it along with the product to our factory when applying for
warranty.
Product
:
Purchasing date:
Code of invoice
:
Warranty date: From To
User’s name
:
Add
:
Company
:
Tel
:
Make sure power off before cleaning and maintenance!
Caution
Warning!
Never look directly into the light source,as sensitive persons may suffer an epileptic
shock(especially meant for epileptics)!
Warning!
Any power connected must by professional person
Table of contents
Other LCG Dj Equipment manuals

LCG
LCG LCG-301B User manual

LCG
LCG LCG-072 User manual

LCG
LCG LCG-2501WB User manual

LCG
LCG LCG-301C User manual

LCG
LCG LCG-UV18 User manual

LCG
LCG BEAMER 6 User manual

LCG
LCG Mini Party Mix LCG-305A User manual

LCG
LCG DICE6 User manual

LCG
LCG ULTRA WASH ZOOM LCG-MHW730Z User manual

LCG
LCG Mini Rubik LED LCG-623A User manual
Popular Dj Equipment manuals by other brands

Creative Lighting Solutions
Creative Lighting Solutions REVO Compact Basic manual

TECshow
TECshow DUALTEC 3-IN-1 user manual

Chauvet DJ
Chauvet DJ Intimidator Scan 360 Quick reference guide

Kandolite
Kandolite KSL1W9 user manual

Beamz
Beamz IGNITE180 Beam LED instruction manual

ProLights
ProLights SUNBLAST3000FC user manual