LEGRAND tynetec Aidcall User manual

Doc No. FM0614 issue D Page 1
169MHz Telecare Devices
Enuresis Sensor & Cotton Bed Sheet
__________________________________________________________________________________________________________
•Compatible with Reach at-home alarms, Advent xt warden call,
Altec Response and Touchsafe Pro Nursecall systems
•Interface unit complete with cotton bed sheet & lead
•Cotton bed sheet dimensions: 1.2m x 0.9m
•Connecting lead with press stud fixings: 2m long
•Interface unit with user replaceable 9V battery
•Low battery warning
•Interface dimensions: 90 x 65 x 28 mm (HxWxD)
•Interface weight: 170 grams
•Product Code: ZXT476
•Replacement cotton sheet: Part No. W00860
•Replacement lead: Part No. W00861
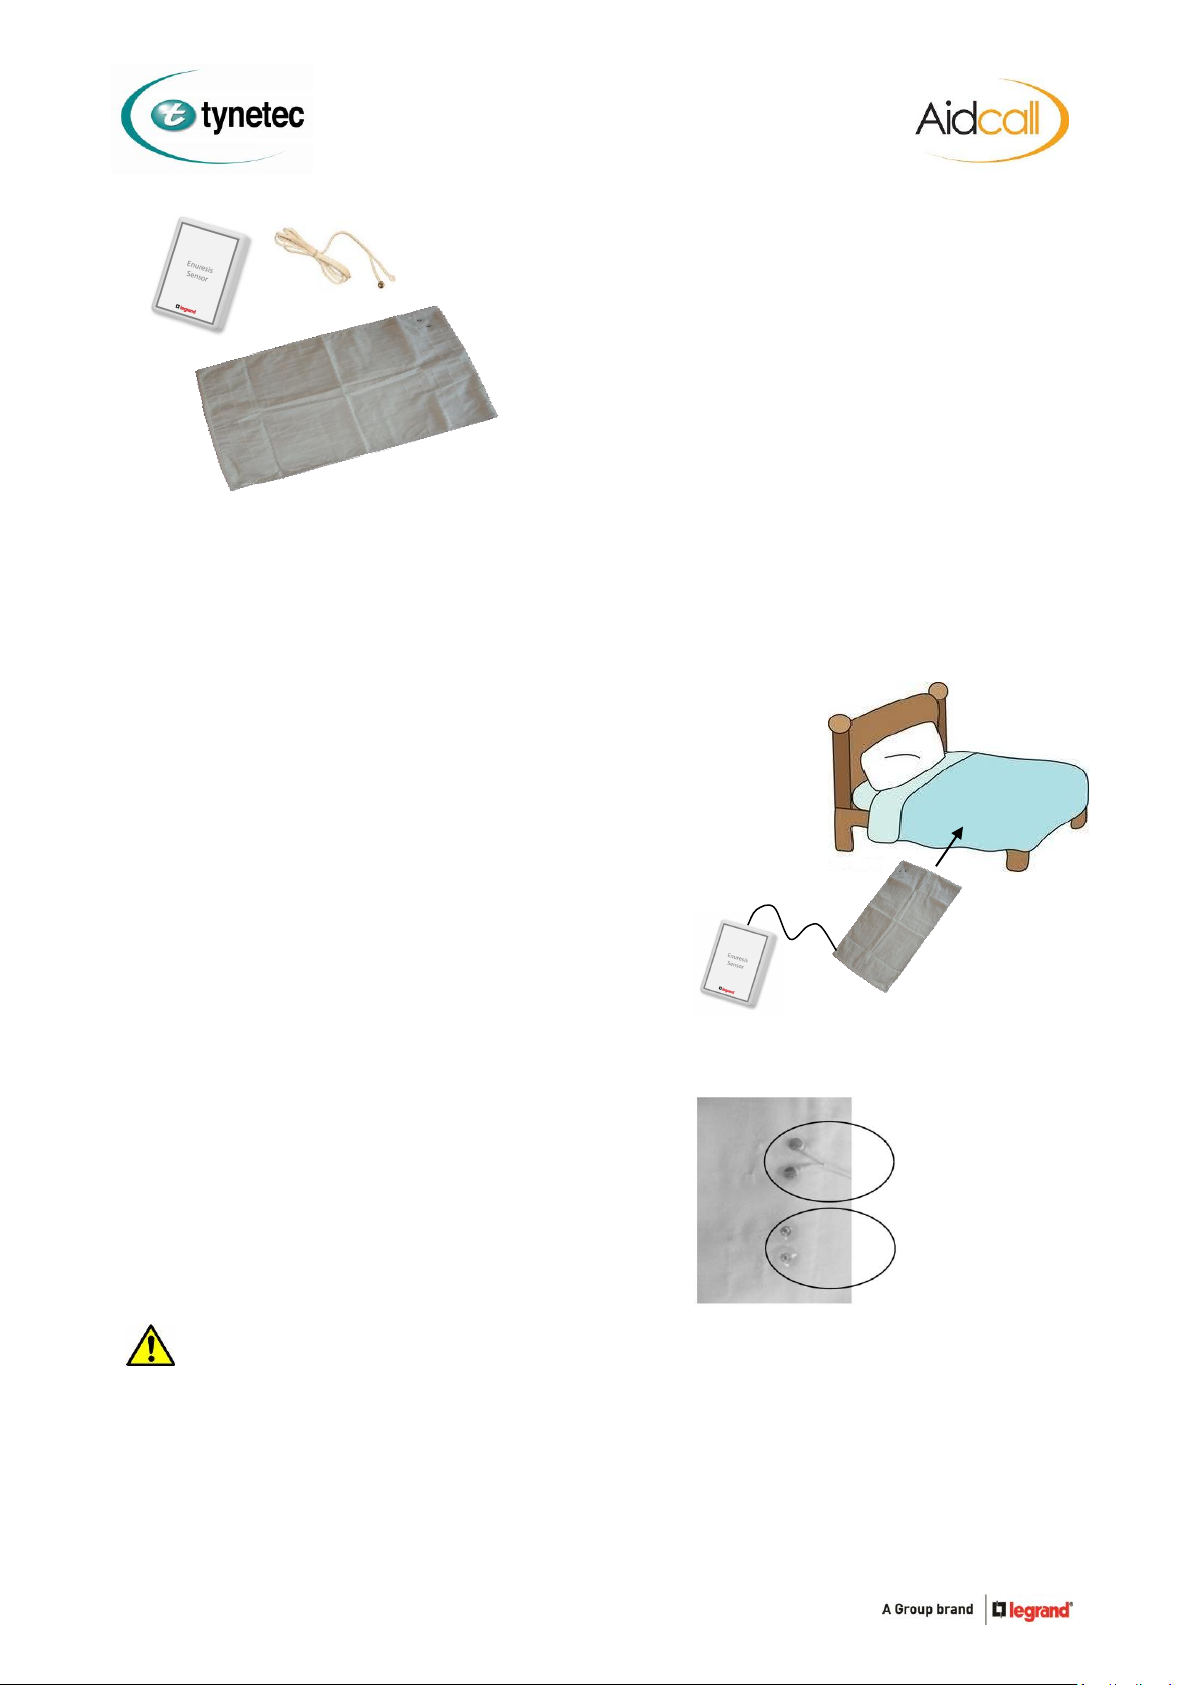
Where should Enuresis Sensors be located?
The cotton sheet should be placed between the bottom sheet and the mattress to detect instances of enuresis.
An alarm will be raised immediately moisture is detected thereby alleviating carers from making regular checks which can be
intrusive and unwelcome.
Installation
It is easier to register the Enuresis sensor before installation –see below.
1. Remove the bottom sheet from the bed.
2. Place the cotton sheet across the width of the bed at a point where
the pelvic area of the person will be when lying down.
The side with the visible pattern of electrodes should be placed uppermost
with the press stud connections accessible.
If necessary a towel can be placed over the sheet to make it less sensitive.
3. Connect the lead to the cotton sheet using one of the pairs of press studs
(it doesn’t matter which), see image below;
4. Ensure the wire exits safely without causing a hazard.
5. Refit the bottom bed sheet.
6. Remove the battery cover from the interface unit and connect the battery.
7. Plug the lead into the interface unit and make sure it is placed safely
out of the way under the bed.
Testing and Registering the Enuresis Sensor
Place a metal object across the 2 un-used press studs
on the cotton bed sheet to activate an Enuresis alarm.
The Enuresis sensor must be activated when learning
onto the warden call, at-home alarm or Nursecall system.
See the following pages for how to put each of these
products into registration mode.
The range of all radio devices can be affected by the working environment - always take care during installation and
perform several test calls.
CONNECT LEAD
TO ONE PAIR OF
PRESS STUDS
SHORT-OUT THE
OTHER PAIR OF
PRESS STUDS
TO TEST
Tynetec and Aidcall are business units of Legrand Electric Ltd
Unit 10 Cowley Road, Blyth Riverside Business Park, Blyth
Northumberland, NE24 5TF. Tel: 01670 352 371
Email: sales@tynetec.co.uk Web: www.tynetec.co.uk

Doc No. FM0614 issue D Page 2
PP3 BATTERY
We declare this product complies with the relevant UK
legislation on condition that it is used in the manner
intended, and in accordance with the current installation
standards and/or the manufacturer's recommendations.
A copy of the full UKCA Declaration of Conformity is
available on request.
Mask Time & Battery Test
The Enuresis sensor transmitter has a 15 minute mask time to prevent the same alarm
call re-reporting several times. There is a facility for Engineers to override this mask
time and test the battery at the same time.
When the sensor is activated the alarm call will be transmitted once, no further
transmissions will occur for 15 minutes giving time for the cause to be cleared.
To override the mask time; open the case, press and hold BUTTON 1 on the transmitter
for 2 seconds until the RED light flashes once. After a short delay the RED light will flash once more
to indicate the mask time is reset and the battery power is OK. If the RED light flashes several times the battery power is low.
Disconnect after an Alarm
It is advisable to disconnect the cotton sheet as soon as possible after an alarm is detected.
Prolonged connection while damp can result in some cosmetic staining.
Cleaning the Cotton Sheet
Unplug the connecting lead before laundering.
For maximum life (50 washes) wash at 60oC and hang to dry in a warm room (i.e. do not tumble dry).
Alternatively, wash at 85oC with a medium heat tumble dry but expect a reduced life of 30 washes.
Do not use a fabric conditioner –this will make the sheet waterproof.
If the sheet develops brown staining around the electrodes consult the manufacturer for cleaning instructions.
Maintenance
The Enuresis sensor should be activated periodically to check the electrodes in the cotton sheet have not
been damaged in the wash –see Testing and Registering on page 1.
Replacement Cotton Sheets
Due to the nature of the product cotton sheets are non-returnable.
Replacement sheets are available separate –order Tynetec Part No. W00860.
Battery Life
The battery is checked once a day, if the voltage falls and stays below a pre-set level for 7 consecutive days a low battery alert is
automatically transmitted. Once a low battery call is received the battery should be replaced within 7 days.
Detailed information on battery management for all Tynetec/Aidcall products is available - request Doc No. FM0630.
Battery Replacement
Slide the battery compartment cover off the rear
of the interface unit.
Disconnect the old battery and replace with an
identical type; 9V Duracell Plus MN1604.
Refit the battery compartment cover.
Perform a test call to check the new battery is
fitted and working correctly.
Declaration of Conformity
SLIDE THE COVER OFF
TO REVEAL THE BATTERY
9 Volt
Battery
PRESS AND HOLD
BUTTON 1 TO RESET
THE MASK TIME
THE RED LIGHT
WILL FLASH
We declare this product complies with the relevant
European legislation on condition that it is used in the
manner intended, and in accordance with the current
installation standards and/or the manufacturer's
recommendations. A copy of the full CE Declaration of
Conformity is available on request.

Doc No. FM0614 issue D Page 3
Registering an Enuresis Sensor onto a Reach at-home alarm unit
1. Put the Reach unit into radio device learn mode…
2. Activate the Enuresis sensor…
3. Exit radio device learn mode…
4. Check with the Control Centre that it is convenient to perform a test call, activate the Enuresis sensor and confirm they receive
an Enuresis alarm call.
Deleting an Enuresis Sensor from a Reach at-home alarm unit
Enter 1 6 7 0 using the keypad on the rear of the Reach unit –the front light will FLASH FAST GREEN and the unit will announce
“Program Mode - Ready”.
Enter # 0 4 1 and the Reach will announce “Delete Radio Device” followed by a “Beep”.
Enter the 8 digit Enuresis sensor IDto be deleted; after the “Beep” press #to exit.
Press the key to exit Program Mode; the unit will sound a “Double-Beep” and the front light will return to STEADY GREEN.
The 8 digit ID can be found on a label on the back of the Enuresis interface unit –it will always start with 32xxxxxx
The instructions given above for the standard Reach product also applies to the Reach Plus, Reach Plus GSM
and Reach Ultra models. Refer to the instruction booklets provided with these products for more information
on programming and testing radio devices.
“Trigger
Radio
Device”
Press and HOLD the GREEN button on the Reach unit.
When the front light FLASHES FAST GREEN release the
button and the Reach will announce “Trigger Radio Device”.
You now have 1 minute to activate the Enuresis sensor.
Press the GREEN button on the Reach unit.
The front light will return to STEADY GREEN and the Reach
is back in normal operating mode.
⚫
Short-out the 2 un-used metal press studs on the cotton bed
sheet and the Reach will announce “Enuresis”.
*Note: if the Enuresis sensor has been activated in the last 15
minutes you’ll have to reset the MASK TIME –see page 2.
Cotton Sheet

Doc No. FM0614 issue D Page 4
Registering an Enuresis Sensor onto an Advent xt warden call system
1. Put the Advent xt system into radio device learn mode…
2. Activate the Enuresis sensor…
3. Exit the Advent xt system radio device learn mode…
4. Activate the Enuresis sensor and check an Enuresis alarm call is reported on the warden call system.
Deleting an Enuresis Sensor from an Advent xt warden call system
Press the LINE key and wait for the “Ready” prompt.
Enter 5 0 0 1 followed by the key.
Enter the flat number the Enuresis sensor is being deleted from followed by the key.
Activate the Enuresis sensor to be deleted.
Wait for the “Pendant Disabled –Enter Flat” prompt.
Press the #key and wait for the “Ready” prompt, then press the LINE key to clear the connection.
Refer to the Advent xt operator’s manual (Doc No. FM0420) provided with the warden call system for more
information on programming and testing radio devices.
Using the Manager’s DECT telephone;
Press the LINE key and wait for the “Ready” prompt.
Enter 5 0 0 0 followed by the key.
Enter the flat number the Enuresis sensor is being installed in
followed by the key.
You now have 1 minute to activate the Enuresis sensor.
“Ready”
Using the Manager’s DECT telephone;
Press the #key and wait for the “Ready” prompt.
Press the LINE key to clear the connection and the warden call system is
now back in normal operating mode.
“Ready”
Short-out the 2 un-used metal press studs on the cotton bed
sheet.
Wait for the “Enter Location Code” prompt then press 0(no
location) followed by the key.
Wait for the “Pendant Enabled –Enter Flat” prompt.
*Note: if the Enuresis sensor has been activated in the last 15
minutes you’ll have to reset the MASK TIME –see page 2.

Doc No. FM0614 issue D Page 5
Registering an Enuresis Sensor onto anAltec Response local carer alarm unit
1. Put the Altec Response unit into radio device learn mode…
2. Activate the Enuresis sensor…
3. Exit the Altec Response radio device learn mode…
4. Activate the Enuresis sensor and check an Enuresis alarm call is displayed on the Altec Response unit.
Deleting an Enuresis Sensor from an Altec Response local carer alarm unit
Press ENTER to activate the wake-up display then ENTER again to display the main menu
Press ENTER to select Radio Devices
Press the key to select Delete Device then press ENTER
The display will prompt you to “Trigger the Sensor”
Activate the Enuresis sensor to be deleted - the display will show the device type and its 8 digit ID number
If this is the device you activated press the key to select Delete then press ENTER
If it’s NOT the device you activated press the ENTER key to select Reject then try again
To exit the mode select Exit then press the ENTER key.
Refer to the Altec Response installation guide (Doc No. FM0548) provided with the portable alarm unit for
more information on programming and testing radio devices.
Short-out the 2 un-used metal press studs on the cotton bed sheet.
The display will show Enuresis and the enuresis sensor 8 digit ID number.
Check the ID is correct, press the key to select Accept then
press ENTER. Note: if another device has been picked-up press ENTER
to Reject and try again.
The display will show Flat , use the & keys to choose the
dwelling type.
Press the key to select No: 000000 then press the ENTER key.
Use the & keys to select each digit of the flat number and
the & keys to move between digits then press the ENTER key.
Press key several times to select Exit then press the ENTER key.
The display will prompt you to “Trigger the Sensor” again.
*Note: if the enuresis sensor has been activated in the last 15 minutes you’ll
have to reset the MASK TIME –see page 2.
Press ENTER to activate the wake-up display then ENTER again to display
the main menu.
Press ENTER to select Radio Devices
Press ENTER to select Learn Device
The display will prompt you to “Trigger the Sensor”.
You now have 20 seconds to activate the Enuresis sensor.
tynetec
tynetec
From the Learn Device menu select Exit then press ENTER.
From the Radio Devices menu select Exit then press ENTER.
The display will return to the wake-up screen and go blank after 10 seconds.
The Altec Response is now back in normal operating mode.
This manual suits for next models
1
Table of contents
Other LEGRAND Medical Equipment manuals
Popular Medical Equipment manuals by other brands

Getinge
Getinge Arjohuntleigh Nimbus 3 Professional Instructions for use

Mettler Electronics
Mettler Electronics Sonicator 730 Maintenance manual

Pressalit Care
Pressalit Care R1100 Mounting instruction

Denas MS
Denas MS DENAS-T operating manual

bort medical
bort medical ActiveColor quick guide

AccuVein
AccuVein AV400 user manual