manuals.online logo
Brands
  1. Home
  2. •
  3. Brands
  4. •
  5. LEGRAND
  6. •
  7. Personal Care Product
  8. •
  9. LEGRAND tynetec Touch 2 User manual

LEGRAND tynetec Touch 2 User manual

Tynetec, a business unit of Legrand Electric Ltd
Cowley Road, Blyth Riverside Business Park, Blyth, Northumberland, NE24 5TF.
Tel: +44 (0) 1670 352371 www.tynetec.co.uk
Trusted Technology
Caring for People
869MHz
Touch 2 Pendant
_________________________________________________________________________
________________________________________________________________
Doc No. FM0828 V1.04 Page 1
•Portable alarm trigger device
•Compatible with Reach IP, Advent XT2 & Carer Response
•Complies with BS EN 50134-2:2017
•IP68: fully sealed against immersion in water
•Red alarm transmit reassurance LED
•Green alarm received reassurance LED
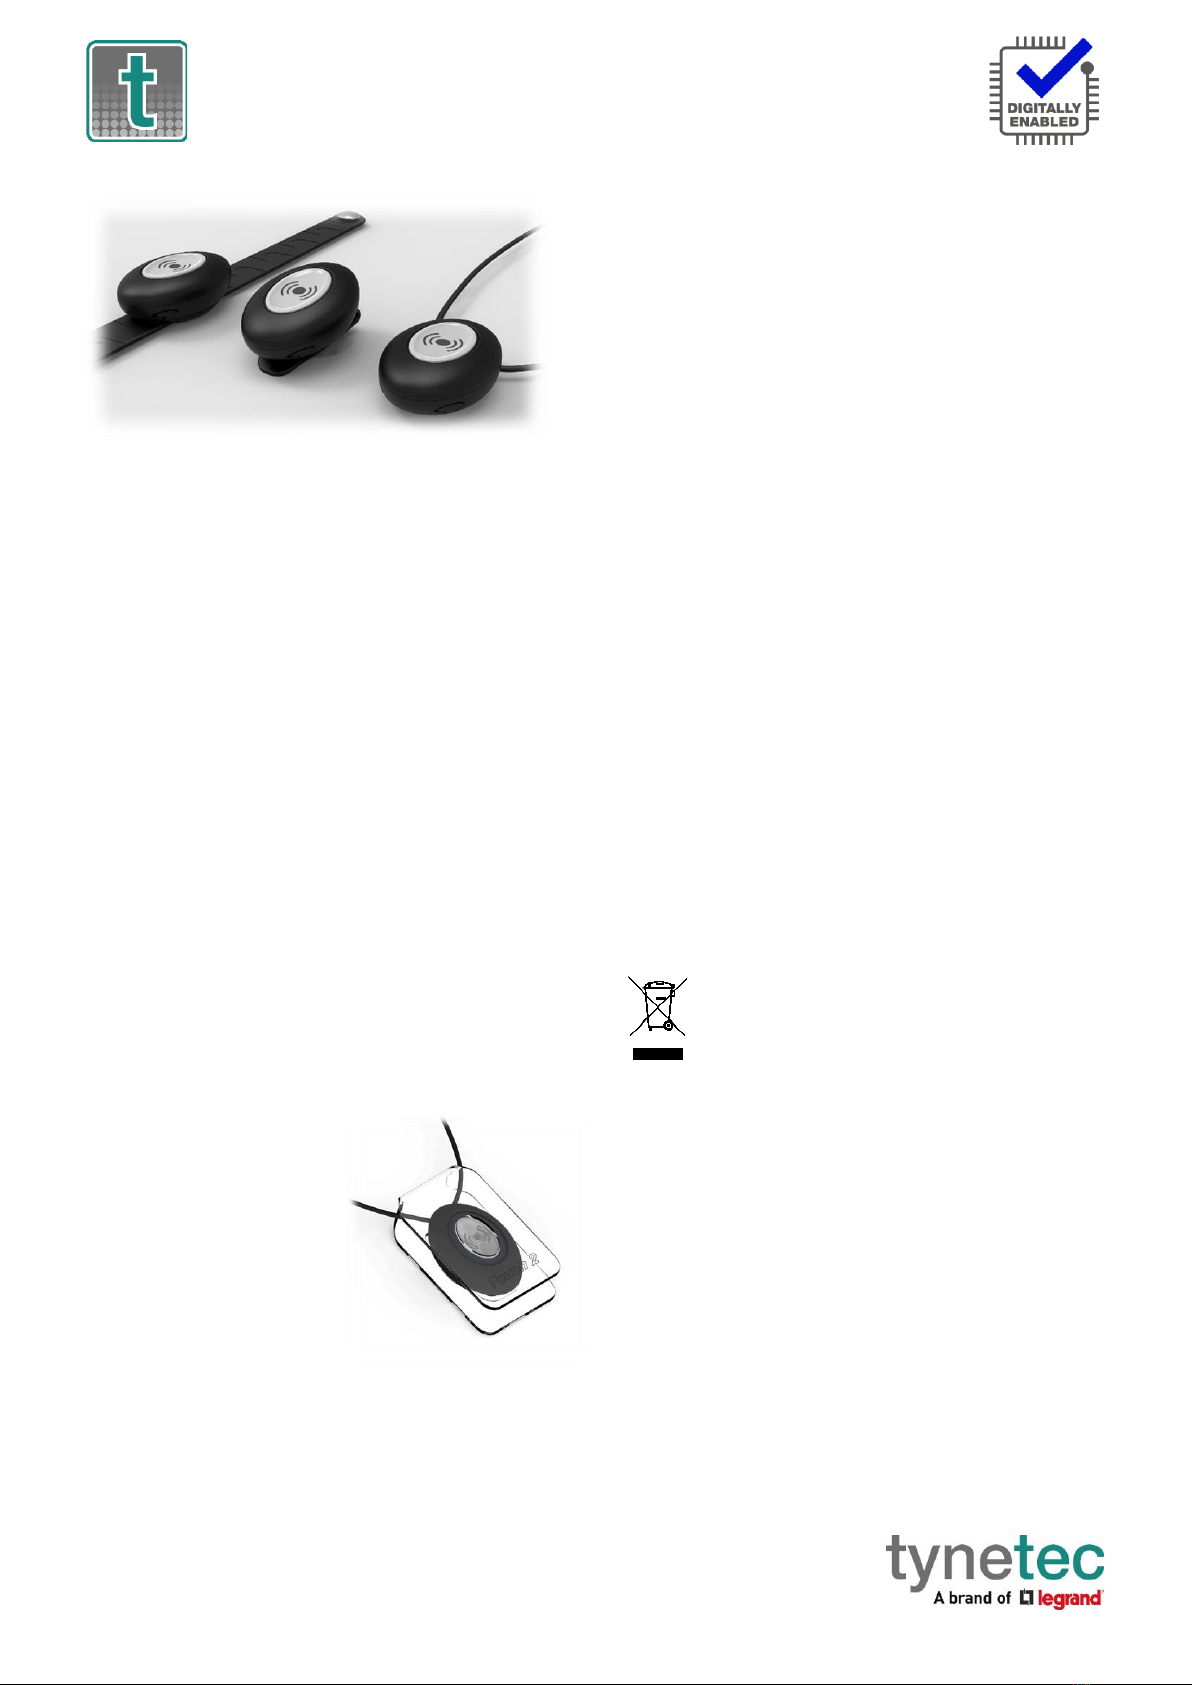
•TPU neck cord with anti-ligature safety break
•TPU wrist strap with aluminium stud
•ABS belt clip
•Suction cup for fixing to a hard surface
•5 year Lithium battery (typical)
•Low battery warning
•Telecare Transceiver: 869.2125MHz Class 1.5
•Digital Heartbeat
•Operating Temperature: -10oC to +55oC
•Weight: 12 grams (exc. wearing option)
•Dimensions: 45mm x 30mm x 14mm (HxWxD)
•Product Code: ZXT800
The Touch 2 Personal Pendant can be worn by the user
either around the neck, on the wrist or on a belt to allow
an emergency alarm call to be made from anywhere in or
around the home. In residential housing, calls can be
made from anywhere on the scheme.
Optional Dexterity Aid
When fitted to a standard
Touch 2 pendant this elegantly
designed adapter provides a
much larger surface area
for button activation.
This enables those with limited
dexterity to easily make a call
should they require assistance.
Adapter Part No. E00520.
Emergency Alarm Call
An alarm call is made by simply pressing the button once,
no further action is required. The button will flash red to
indicate a call has been transmitted, it will then flash green
as reassurance that the call has been received by the
Reach IP or Advent XT2 –it does not flash green when
used with a Carer Response.
Low Battery Condition
A low battery condition will be reported automatically to
the Alarm Receiving Centre (ARC) or the local Manager.
The pendant should be replaced as soon as possible within
30 days.
Out of Range Notification (Reach IP)
The Reach IP can monitor all radio peripheral devices to
determine whether they have been damaged or removed
from an installation. Should the Reach IP be unable to
detect a device’s heartbeat it will automatically generate a
“radio out of range” notification. Firstly, investigate if
there’s a genuine reason for the alert, if not, arrange for
the peripheral device to be replaced immediately.
The “Radio out of range timer” can be set from 30 hours to
99999 hours in Pulse CMP. “Radio supervision” can be
disabled by unchecking the tick box associated with each
peripheral device in Pulse CMP.
Maintenance
Test the pendant once every month.
Clean with a damp cloth, do not use solvents or cleaners
on the pendant or wearing accessories.
Disposal
Waste electrical products should not be disposed
of with normal household waste. The pendant is
ideally suited for disposal within the waste
electronic and electrical equipment (WEEE)
recycling scheme. Please recycle where facilities exist.
Check with your local authority or contact your supplier for
recycling/disposal advice.
Warning
The pendant contains a Lithium battery. If tampered with
the battery may be damaged and create a fire hazard.
No attempt should be made to remove or replace the
battery. Do not incinerate.
Anti-ligature Safety Break
The pendant includes an anti-ligature safety break in the
neck cord. Should excessive force be applied the cord will
part - it can be simply clipped back together.
Tynetec, a business unit of Legrand Electric Ltd
Cowley Road, Blyth Riverside Business Park, Blyth, Northumberland, NE24 5TF.
Tel: +44 (0) 1670 352371 www.tynetec.co.uk
Trusted Technology
Caring for People
869MHz
Touch 2 Pendant
_________________________________________________________________________
________________________________________________________________
Doc No. FM0828 V1.04 Page 2
869MHz
Fitting a Wearing Option
The pendant can be worn around the neck, on the wrist or
clipped to a belt, just fit the desired wearing option as
described below.
⚫Neck Cord: lie the cord through one of the grooves on
the rear on the Pendant then slide the neck cord
attachment into place. Note: smaller cord end of
attachment marked above.
⚫Wrist Strap: feed the wrist strap (pattern side up)
through the 2 slots in the wrist strap attachment. Note:
locate the attachment pip in the centre strap hole marked
above. Push the fixing stud through the hole marked 
at the end of the strap.
⚫Belt Clip: simply clip into place on the rear of the
pendant. Note: the suction cup can be fitted to the belt
clip to stick the pendant to a tiled wall.
Telecare Radio ID
The pendant includes a radio transceiver to communicate
with the Reach IP, Advent XT2 or Carer Response.
The Radio ID is a 10-digit code printed on the label on the
back of the pendant.
Registering the Pendant onto a Reach IP
Login to Pulse CMP (www.tynetecpulse.com) and enter the
Reach IP Serial No. in the ALARM UNIT view. Press the
Accessories button and enter the Radio ID code, Location
and Equipment type. Press Save then Synchronize.
IMPORTANT: when the pendant is delivered to the
customer a test call must be made to check operation and
start the digital heartbeat.
Alternatively, with the Reach IP in normal operating mode
undo the fixing screw and remove the stand or connector
cover to access the ⚫Power button.
Press the ⚫Power button to enter Control Mode,
then press and hold the button until the unit announces
“add radio device” then release.
Press the ⚫button to confirm then press the pendant.
The Reach IP unit will sound a high beep if it’s a new device
and announce “range test mode”.
Press ⚫to confirm, or press to step to the next function,
or press to exit the mode.
Press the pendant to check operation.
Registering the Pendant onto an Advent XT2
Press the Settings button on the Home page of the
Manager’s Panel. Press the Manager (or Engineer) button,
enter the password and press the Programming button.
Select the Program Radio Devices option from the tabs
along the bottom of the screen.
Press Flat ID and enter the flat number of the resident the
pendant is being issued to. Enter 4-digits e.g. 0014.
Press Radio ID and enter the 10-digit code taken from the
label on the back of the pendant.
Press Room Locations and select select “no location” as
the pendant is a portable device.
Press the Send button to update the XT2 system.
Press the pendant to check operation.
⚫Power Button
01922C001D
ZXT800 ISS 1
Ser: 4618A0189
ENV GR II
Radio ID
Neck Cord with
Safety Break
Wrist Strap
Attachment


Fixing
Stud
Neck Cord
Attachment

Wrist Strap
Belt Clip
Attachment
Suction
Cup
Tynetec, a business unit of Legrand Electric Ltd
Cowley Road, Blyth Riverside Business Park, Blyth, Northumberland, NE24 5TF.
Tel: +44 (0) 1670 352371 www.tynetec.co.uk
Trusted Technology
Caring for People
869MHz
Touch 2 Pendant
_________________________________________________________________________
________________________________________________________________
Doc No. FM0828 V1.04 Page 3
Registering the Pendant onto a Carer Response
Refer to the Carer Response
user manual for full details of
the button functions and how
to navigate the menus.
From the Main menu select
Programming.
From the Programming menu select
Add transmitter.
The display will prompt you to Activate the transmitter…
Press the pendant.
The Carer Response will beep and the display will change to
the Add transmitter menu with a box showing No ID.
Press then to select Room, then press 
Press to select the room number box 0000.
Press to select the first digit, press to move between
the digits and press or to change each digit.
Press when the correct room number is displayed.
Press to select the alarm type box None.
Press thento select Trigger then press 
Press the button to select Save then press 
The display will show Radio ID saved to memory…
Return to the Main menu and select Quit.
Press the pendant to check operation.
Declaration of Conformity
We declare this product complies with the
relevant UK legislation on condition that it is
used in the manner intended, and in
accordance with the current installation
standards and/or the manufacturer's recommendations. A
copy of the full UKCA Declaration of Conformity is
available on request.
We declare this product complies with the
relevant European legislation on condition that
it is used in the manner intended, and in
accordance with the current installation standards and/or
the manufacturer's recommendations. A copy of the full
CE Declaration of Conformity is available on request.
Chris Dodd
CEO
Legrand Assisted Living & Healthcare

Other LEGRAND Personal Care Product manuals

LEGRAND NEAT NOVO Release Note

LEGRAND

LEGRAND NEAT NOVO Release Note

LEGRAND TYNETEC ZXT801 User manual

LEGRAND

LEGRAND TYNETEC ZXT801 User manual

LEGRAND Plugmold 2000 Aluminum User manual

LEGRAND

LEGRAND Plugmold 2000 Aluminum User manual

LEGRAND Mosaic 766 60 User manual

LEGRAND

LEGRAND Mosaic 766 60 User manual

LEGRAND neat NOVO IP User manual

LEGRAND

LEGRAND neat NOVO IP User manual

LEGRAND neat SMILE Use and care manual

LEGRAND

LEGRAND neat SMILE Use and care manual

LEGRAND Mosaic Quick start guide

LEGRAND

LEGRAND Mosaic Quick start guide

Popular Personal Care Product manuals by other brands

DiGiQuest BRUSHY user manual

DiGiQuest

DiGiQuest BRUSHY user manual

Balance KH111 Operating and safety instructions

Balance

Balance KH111 Operating and safety instructions

Xiaomi PMA Graphene quick start guide

Xiaomi

Xiaomi PMA Graphene quick start guide

Current Solutions LG SMART TENS instruction manual

Current Solutions

Current Solutions LG SMART TENS instruction manual

Sissel SPINEFITTER Instructions for use

Sissel

Sissel SPINEFITTER Instructions for use

Pulsaderm ReNu user manual

Pulsaderm

Pulsaderm ReNu user manual

ESTELLE ESTNINGSETA quick start guide

ESTELLE

ESTELLE ESTNINGSETA quick start guide

Panasonic EH-2500 operating instructions

Panasonic

Panasonic EH-2500 operating instructions

Kohler Sanijura Triptyque Fitting instructions

Kohler

Kohler Sanijura Triptyque Fitting instructions

mychway SR-MACL263 manual

mychway

mychway SR-MACL263 manual

Life Alert HELP PERS DECT user manual

Life Alert

Life Alert HELP PERS DECT user manual

RECLAR Peeler manual

RECLAR

RECLAR Peeler manual

Somnetics Transcend 3 miniCPAP user manual

Somnetics

Somnetics Transcend 3 miniCPAP user manual

Rolyan Hemi Arm Sling manual

Rolyan

Rolyan Hemi Arm Sling manual

Balance KH 8070 operating instructions

Balance

Balance KH 8070 operating instructions

Panasonic EH2300 operating instructions

Panasonic

Panasonic EH2300 operating instructions

Albrecht MKS LUMBAGO User instructions

Albrecht

Albrecht MKS LUMBAGO User instructions

TechniSat TECHNIMASK MINI quick start guide

TechniSat

TechniSat TECHNIMASK MINI quick start guide

manuals.online logo
manuals.online logoBrands
  • About & Mission
  • Contact us
  • Privacy Policy
  • Terms and Conditions

Copyright 2025 Manuals.Online. All Rights Reserved.