LEGRAND 036 02 User manual

Caractéristiques
Tension 100 - 240 V±
Fréquence 50 - 60 Hz
1,5 mm2
Ecombrement 4 modules
Norme Courant porteur
EN 500 65 - IEC 60669-2-1
+ 5°C à + 45°C
Interface scénario
036 02
N0064ES8/02
2
Branchement
Poussoir Interrupteur
L
N
Configuration d’usine
A la première mise sous tension
l’appui sur les touches 1, 2, 3, 4,
5, 6, 7, ou8 ne commande aucun
produit de l’installation
“In One by Legrand”.

3
Description
Entrées auxiliaires
Média de communication
PLC => Courant porteurTouche LEARN
Voyant LEARN
Touches de
commandes
N° d’identification
Entrées auxiliaires
Touches de
commandes
Fonctionnement
Ce produit peut commander simultanément à partir de ses touches 1, 2, 3, 4, 5, 6, 7 ou8 des ensembles de produits
(Acteurs) qui lui sont associés lors de l’apprentissage(1), il est alors Leader d’un scénario(2).
Le scénario associé à la touche 1 (respectivement 2, 3, 4, 5, 6, 7 ou8) sera lancé automatiquement à l’apparition
de la phase sur l’entrée auxiliaire 1 (respectivement 2, 3, 4, 5, 6, 7, ou8).
Les produits pouvant être connectés aux entrées auxiliaires sont :
- des poussoirs,
- des interrupteurs,
- des horloges,
- etc…
Ce produit peut piloter des produits radio à travers l’interface RF/ PLC réf. 036 06 / 29.
(1) Apprentissage : action d’associer des produits en vue de les commander simultanément à partir d’un point central.
Cette association se réalise en appliquant la procédure d’apprentissage du scénario en page 5.
(2) Scénario : correspondà l’ensemble des produits (acteurs) qui sont associés à une touche de commande.
4

5
Appuyer sur
LEARN
Appuyer sur
LEARN
Appuyer sur
LEARN
Appuyer sur la touche de commande
qui doit piloter le scénario
Apprentissage du scénario
Etape 1 : débuter l'apprentissage (sur le LEADER)
Appuyer sur la touche de commande
qui doit être associée au leader
Etape 2 : ajouter un acteur au scénario (sur l'ACTEUR)
Les voyants de tous les produits s'éteignent
Le scénario est enregistré
Etape 3 : enregistrer le scénario (sur le LEADER)
Pour ajouter plusieurs produits au scénario, répéter pour chaque acteur les opérations et
Légende
Le voyant s'éteint Le voyant clignote
lentement
Le voyant clignote
rapidement
Le voyant flashe
6
Modification díun scénario
Appuyer sur
LEARN
Appuyer sur la touche de
commande qui pilote le scénario
Les voyants de tous les produits
du scénario clignotent
Appuyer sur la touche
de commande que
l'on souhaite associer
Etape 1 : ouvrir le scénario (sur le LEADER)
Appuyer sur
LEARN ou
Appuyer sur
LEARN
Pour supprimer le produit
du scénario passer à l'étape 3
Etape 2 : modifier l'état d'un acteur du scénario (sur l'ACTEUR)
Appuyer sur
LEARN
Les voyants de tous les produits s'éteignent
Le scénario est enregistré
Etape 3 : enregistrer le scénario (sur le LEADER)

7
Effacement d’un scénario
Appuyer sur
LEARN
Le scénario est effacé
Appuyer sur
la touche de commande
et maintenir 10 s
Effacer tous les scénarios liés à la touche de commande (sur le LEADER)
Appuyer sur
LEARN
Retour du produit
en configuration usine
Appuyer sur
LEARN
et maintenir 10 s
Effacer tous les scénarios liés à la touche de commande (sur le LEADER)
5 s
5 s
8

9
Scenario interface
036 02
Characteristics
Voltage 100 - 240 V±
Frequency50 - 60 Hz
1.5 mm2
Dimensions 4 modules
Standard Power Line Carrier
EN 500 65 -IEC 60669-2-1
+ 5°C to + 45°C
Connection
10
Push-button Switch
L
N
Factory settings
On first powering up, pressing the
1,2,3,4,5,6,7 or 8 button does not
control any product of the
“In One by Legrand” installation.

11
Description
Identification No. Auxiliary inputs
Auxiliary inputs
Communication media
PLC => Power Line Carrier LEARN key
LEARN indicator
Control keys
Control keys
12
Operation
This product can simultaneously control groups of products (Actors) linkedto it during the learn phase (1) using keys
1, 2, 3, 4, 5, 6, 7 or 8; it then becomes the scenario Leader (2).
The scenario linkedto key 1 (respectively 2, 3, 4, 5, 6, 7 or 8) will be startedautomatically on the appearance of phase at
the auxiliary input (respectively 2, 3, 4, 5, 6, 7 or 8).
Auxiliary products are:
- push-buttons,
- switches,
- clocks,
- etc.
This product can control radio products through the RF/PLC interface Cat. No. 036 06 /29.
(1) Learn phase: Operation of associating products so that they can be controlledsimultaneously from a central point.
This association is carriedout by applying the scenario learning procedure on page 13.
(2) Scenario: Corresponds to the set of products (actors) that are associatedwith a control key.

13
Press LEARN
Press LEARN
Press LEARN
Press the control keythat is to
control the scenario
Press the control keythat is to be
associated with the leader
Step 2: Add an actor to the scenario (on the ACTOR)
Learn scenario
The indicator lamps of all products go off
The scenario is saved
Step 1: Start the learn phase (on the LEADER)
Step 3: Save the scenario (on the LEADER)
To add a number of products to the scenario, repeat operations and for each actor
Key
The indicator lamp
goes off
The indicator lamp
blinks slowly
The indicator lamp
blinks quickly
The indicator lamp
flashes
14
Modifyinga scenario
Press LEARN
Press LEARN
Press LEARN
Press LEARN
Press the control key
that controls the scenario
The indicator lamps of all the products
in the scenario blink
Press the control key
that is to be associated
Step 1: Open the scenario (on the LEADER)
or
To remove the product from
the scenario, go to step 3
Step 2: Modifythe state of an actor in the scenario (on the ACTOR)
The indicator lamps of all the products go off
The scenario is saved
Step 3: Save the scenario (on the LEADER)

15
Clearinga scenario
Press LEARN
Press LEARN
The scenario is cleared
Press the control key
and hold it down for 10 s
Clear all the scenarios linked with the control key(on the LEADER)
The product returns to
its factorysetting
Press LEARN and hold
down for 10 s
Clear all the scenarios linked to this product (on the LEADER)
5 s
5 s
16

17
Eigenschappen
Spanning 100 - 240 V±
Frequentie 50 - 60 Hz
1,5 mm2
Afmetingen 4 modules
Norm Draaggolf EN 50065
IEC 60669-2-1
+ 5°C tot + 45°C
Scenario-interface
036 02
18
Aansluiting
Drukknop Schakelaar
L
N
Standaardconfiguratie
Bijde eerste inschakeling wordt bij
een druk op de toetsen 1, 2, 3, 4,
5, 6, 7 of 8 geen enkel product van
de installatie “In One by Legrand”
bediend.

19
Beschrijving
Hulpingangen
Communicatiemiddelen
PLC => Draaggolf
Toets LEARN
Controlelampje
LEARN
Bedieningstoetsen
Identificatienummer
Hulpingangen
Bedieningstoetsen
20
Werking
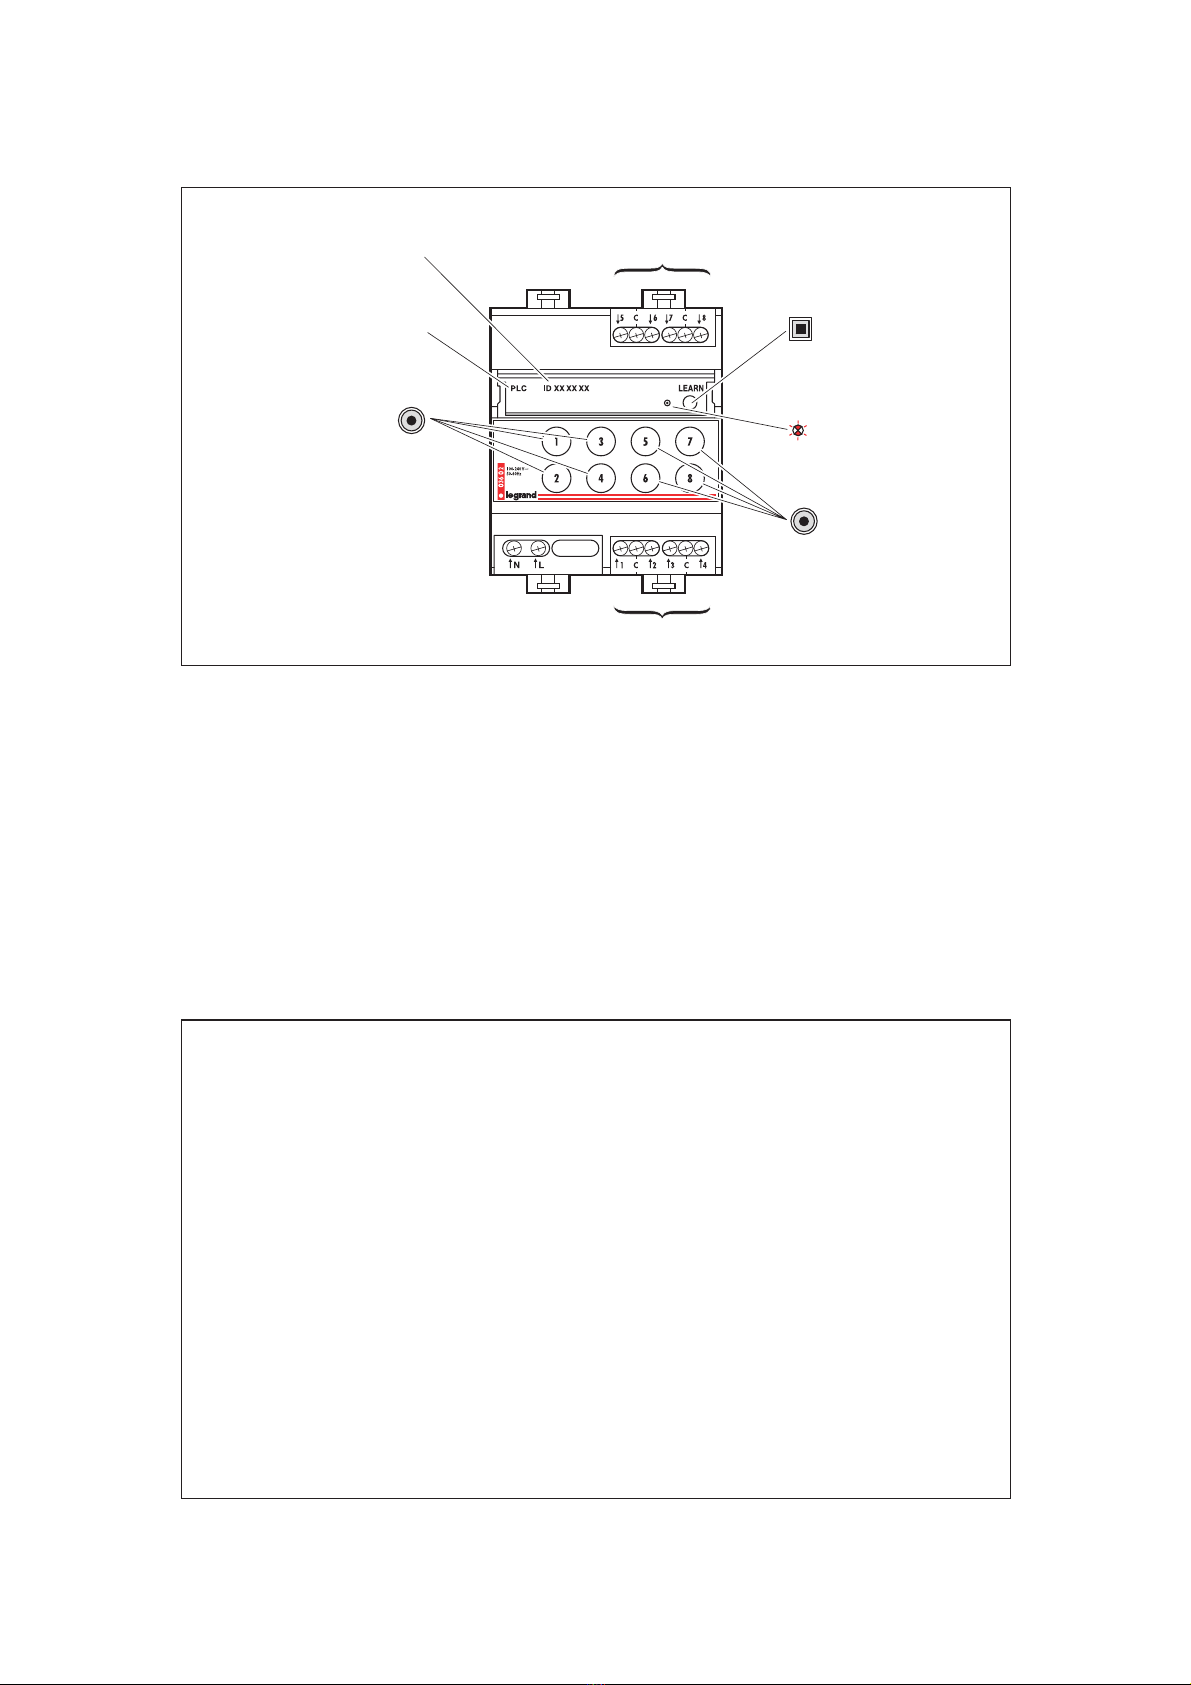
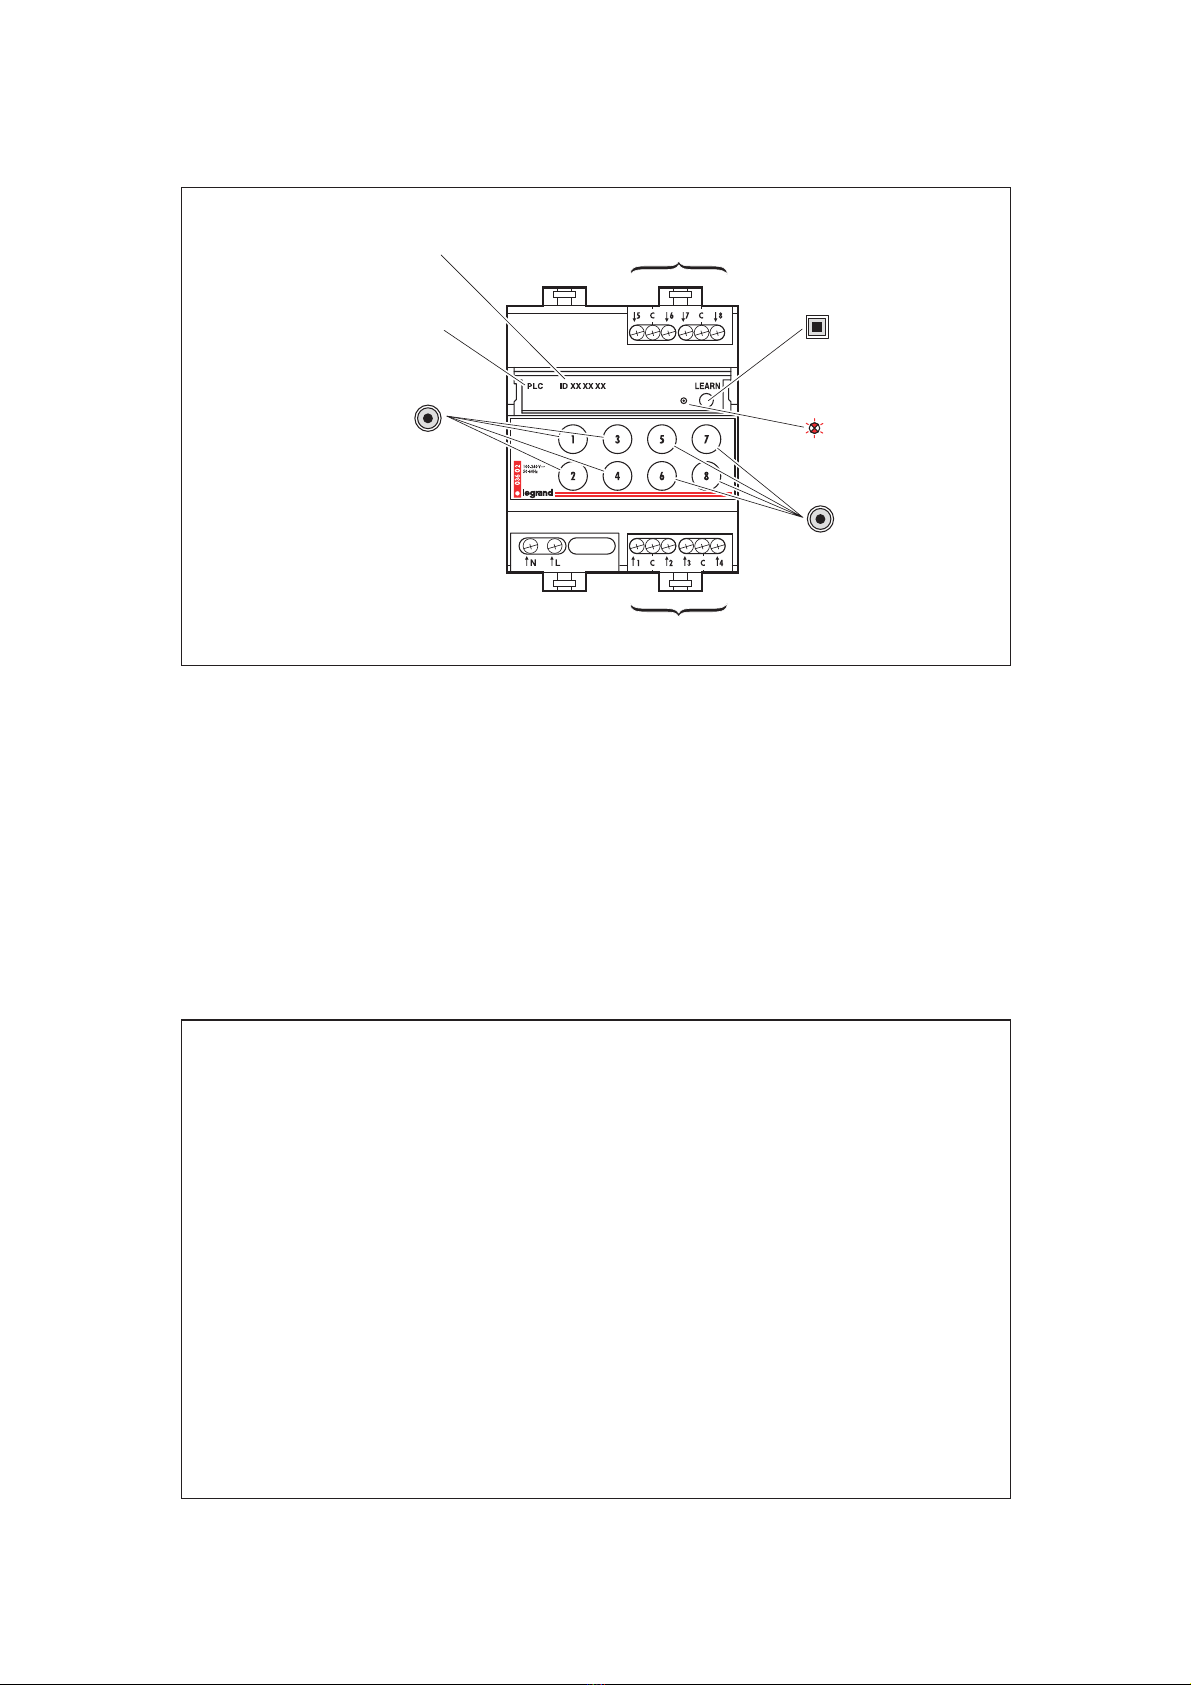
Dit product kan tegelijkertijd met behulp van de toetsen 1, 2, 3, 4, 5, 6, 7 of 8 productverzamelingen (actoren) bedienen
die hier aan toegevoegdzijn tijdens het inlezen(1), het is dan de leider van het scenario(2).
Het bijde toets 1 (respectievelijk 2, 3, 4, 5, 6, 7 of 8) behorende scenario zal automatisch opgestart worden bijhet
verschijnen van de fase op de hulpingang 1 (respectievelijk 2, 3, 4, 5, 6, 7, of 8).
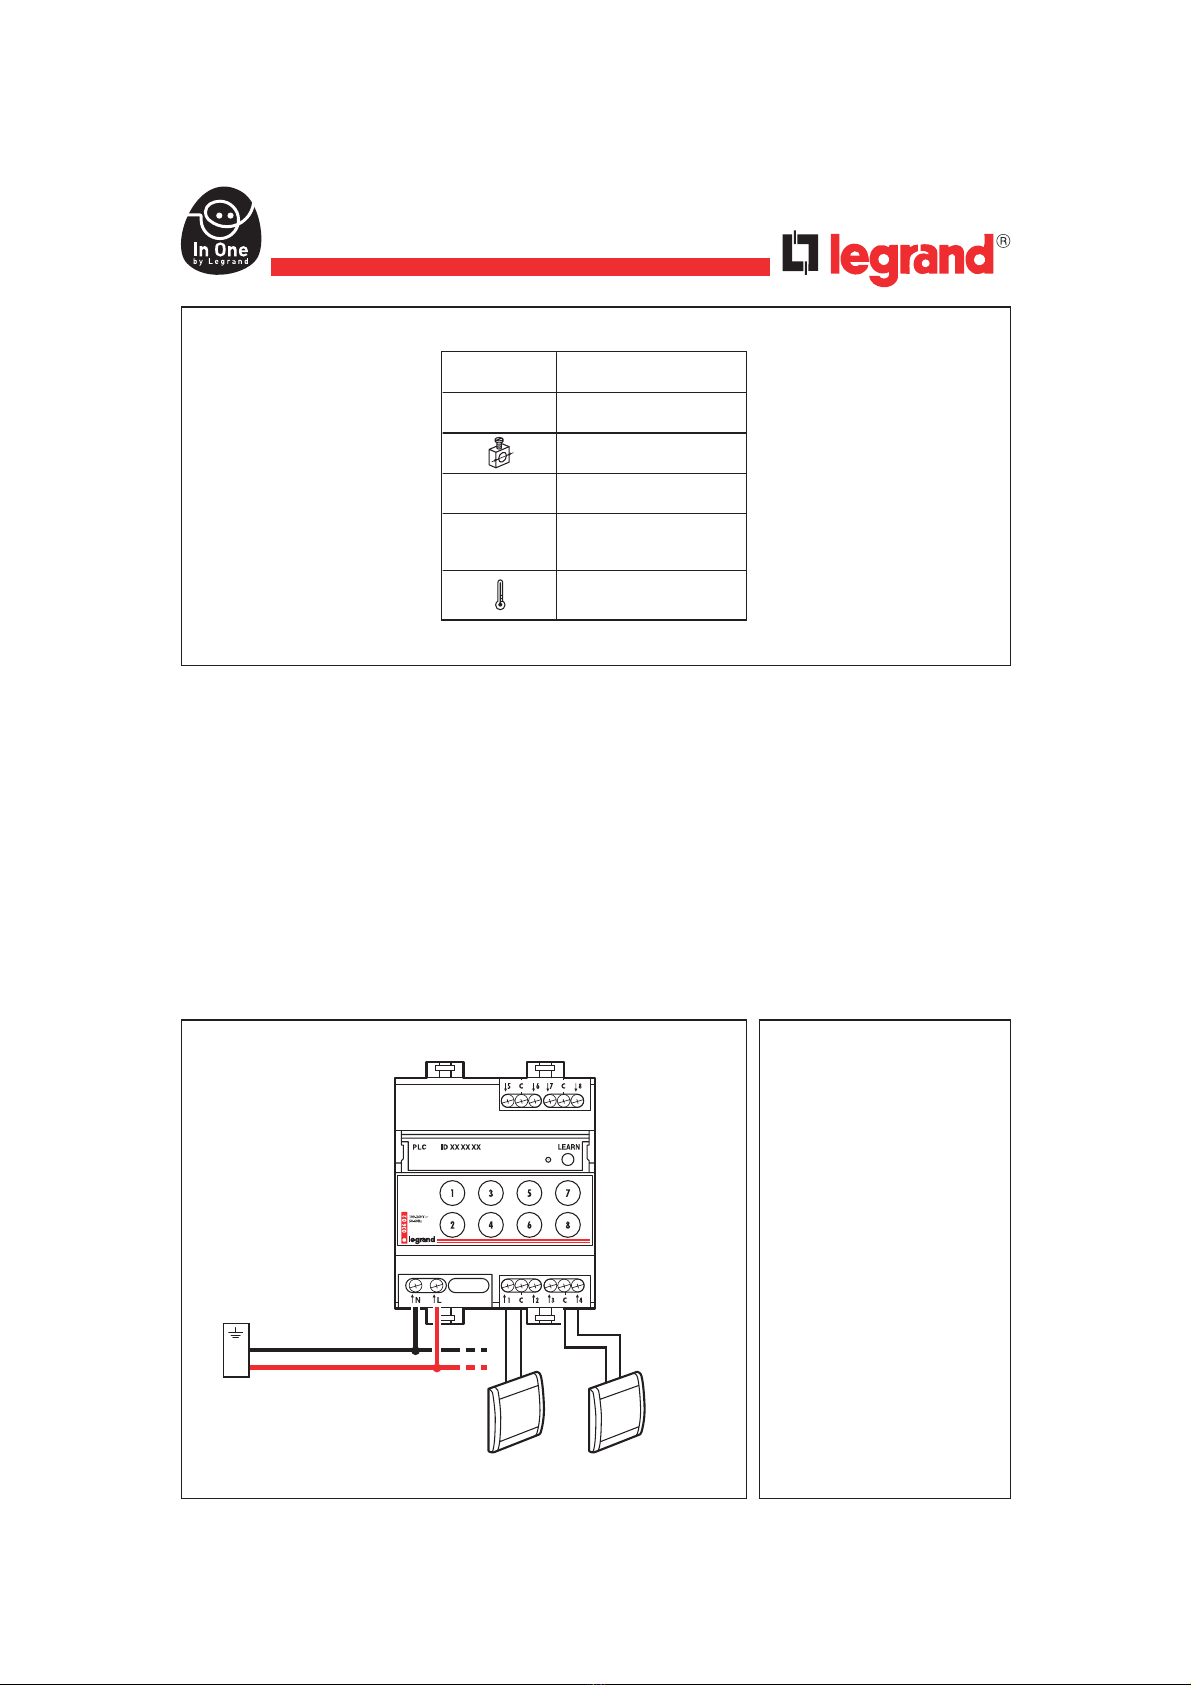
De producten die op de hulpingangen aangesloten kunnen worden zijn :
- drukknoppen,
- schakelaars,
- klokken,
- enz…
Dit product kan radioproducten besturen via de RF/PLC-interface met ref. 036 06 / 29.
(1) Aanleren : actie van het associëren van producten met de bedoeling deze tegelijkertijd vanaf een centraal punt te
bedienen. Dit associëren geschiedt door toepassing van de aanleerprocedure van het scenario op pagina 21.
(2) Scenario : komt overeen met alle producten (actoren) die bijeen bedieningstoets horen.

21
Druk op LEARN
Druk op LEARN
Druk op LEARN Druk nogmaals op LEARN
Druk op de bedieningstoets die aan de leider
moet zijn toegevoegd
Stap 2 : een actor toevoegen aan het scenario (op de ACTOR)
Aanleren van het scenario
De controlelampjes van alle producten gaan uit
Het scenario is geregistreerd
Stap 1 : beginnen met aanleren (op de LEIDER)
Stap 3 : het scenario registreren (op de LEIDER)
Herhaal voor het toevoegen van meerdere producten aan het scenario voor iedere actor de handelingen en
Legenda
Het controlelampje
gaat uit
Het controlelampje
knippert langzaam
Het controlelampje
knippert snel
Het controlelampje
flitst
22
Druk op LEARN
Druk op LEARN
Druk op LEARN
Druk op LEARN
Druk nogmaals op LEARN
Druk op de bedieningstoets
die u toe wilt voegen
Ga voor het wissen van het product uit
het scenario naar stap 3
De controlelampjes van alle producten
van het scenario knipperen
of
Stap 2 : de staat van een actor van het scenario wijzigen (op de ACTOR)
De controlelampjes van alle producten gaan uit
Het scenario is geregistreerd
Stap 3 : het scenario registreren (op de LEIDER)
Wijzigingvan een scenario
Stap 1 : het scenario openen (op de LEIDER)

23
Druk op LEARN
Druk op LEARN
Het scenario is gewist
Druk op de bedieningstoets
en houd deze
10s ingedrukt
Wis alle scenario’s die verbonden zijn met de bedieningstoets (op de LEIDER)
Terugkeer van het product
naar de standaardconfiguratie
Druk op LEARN en houd
deze 10s ingedrukt
Wis alle scenario’s die bij dit product horen (op de LEIDER)
5 s
5 s
Wissen van een scenario
24

25
Szenen Controller
036 02
Technische Daten
Spannung 100 - 240 V±
Frequenz 50 - 60 Hz
1.5 mm2
Teilungseinheiten 4-Module
Norm EN 500 65
IEC 60669-2-1
+ 5°C bis + 45°C
26
Anschluss
Taster Schalter
L
N
Werkseinstellung
Bei Erstinbetriebnahme muss
durch Konfiguration der Kanäle
1,2,3,4,5,6,7 und8 eine Funktion
oder Szene zugeordnet werden.

27
Beschreibung
Geräte- Identifikationsnummer Eingänge für potentialfreie Schalt oder Tastkontakte
Technologie
PLC = Übertragung LEARN taste
LEARN LED
Befehlstaste
Befehlstaste
Eingänge für potentialfreie Schalt oder Tastkontakte
28
Funktionsbeschreibung
Sensor zum Schalten, Dimmen von Aktoren, Steuern von Jalousien/Rollladen- Aktoren.
Über die Befehlstasten 1, 2, 3, 4, 5, 6, 7 und8 oder durch Belegung der Eingänge 1, 2, 3, 4, 5, 6, 7 und8 können
Szenarien manuell am Gerät, Fernschaltfunktion oder Automatisch (Schaltuhr) ausgeführt werden.
Externe Eingänge (potentialfrei)
- Taster
- Schalter
- Zeitschaltuhr
- etc.…
Zusätzliche Ansteuerung von Funk- Aktoren mittels Funkschnittstelle Art.Nr. 036 06 möglich.
Durch Zuordnung einzelner/ mehrere Kanäle (Sensor) können Aktoren - einzeln, in Gruppen oder zentral
geschaltet/gedimmt undgesteuert (Szenarien) werden.

29
Die Lerntaste LEARN drücken
(Lernmodus aktivieren)
Bedientaste drücken,die dem Aktor
zugeordnet werden soll
Einlernen der Teilnehmer
1. Schritt : Einlernmodus aktivieren (aufdem Sensor)
Die Lerntaste
LEARN drücken
Bedientaste drücken, die den Sensor
zugeordnet werden soll
2. Schritt : Einlernmodus aktivieren (aufdem Aktor)
Die Lerntaste LEARN am
Sensor drücken (Lernmodus schließen)
Die Leuchtdiode der LEARN Taste erlischt aufallen eingelernten
Aktoren. Der Einlernprozess ist abgeschlossen
3. Schritt : Einlernmodus beenden
Um mehrere Aktor einen Sensor zuzuordnen, die Arbeitsschritte und bei jedem der betreffenden Aktoren wiederholen
Legende
Die Leuchtdiode
erlischt
Die Leuchtdiode blinkt
langsam ca.1Hz
Die Leuchtdiode blinkt
schnell ca.2Hz
Die Leuchtdiode
blitzt ca.5Hz
30
Änderungeiner Funktionszuordnung(löschen oder zusätzlich einlernen)
Die Lerntaste
LEARN drücken
Bedientaste drücken, welche die
Aktoren ansteueren
Die Leuchtdioden aufallen zugeordneten
Aktoren blinken
Die Bedientaste drücken,
die zugeordnet werden soll
1. Schritt : Auswahl der Funktion am Sensor
Die Lerntaste
LEARN drücken
Die Lerntaste
LEARN drücken
oder
Die Lerntaste
LEARN drücken
Um den Aktor aus der Sensor Konfiguration zu löschen,die Lerntaste LEARN
drücken. Die Leuchtdioden der LEARN Taste erlischt aufallen Aktoren.
Der Prozess ist abgeschlossen
2. Schritt : Aktor am Sensor hinzufügen oder löschen (am AKTOR)
Die Leuchtdioden der LEARN Taste erlischt aufallen Aktoren
Der Prozess ist abgeschlossen
3. Schritt : Die Funktionszuordnung beenden

31
Löschen aller Funktionszuordnungoder Aktoren
Die Lerntaste
LEARN drücken
Die Lerntaste
LEARN drücken
Die Zuordnung ist gelöscht
Die Bedientaste 10 Sekunden
lang gedrückt halten
Alle eingelernte Zuordnungen am Sensor löschen
Das Produkt kehrt zur
Werkseinstellung zurück
Die Lerntaste 10 Sekunden
lang gedrückt halten
Alle Sensoren aufWerkseinstellung zurücksetzten
5 s
5 s
32

33
Interface escenario
036 02
Características
Tensión 100 - 240 V±
Frecuencia 50 - 60 Hz
1,5 mm2
Dimensiones 4 módulos
Estándar Corriente portadora
EN 500 65 -IEC 60669-2-1
+ 5°C a + 45°C
34
Conexión
pulsador interruptor
L
N
Configuración de fábrica
Cuando se conecta por primera
vez, la pulsación de las teclas
1, 2, 3, 4, 5, 6, 7 ó 8 no activa
ningún producto de la instalación
“In One by Legrand”.

35
Descripción
N° de identificación Entradas auxiliares
Entradas auxiliares
Medio de comunicación
PLC => Corrientes portadoras Tecla LEARN
Piloto LEARN
Teclas de mando
Teclas de mando
36
Funcionamiento
El interface escenario puede controlar simultáneamente con las teclas 1, 2, 3, 4, 5, 6, 7 ó 8, conjuntos de actores asociados
en el momento del aprendizaje (1). Es entonces Líder de un escenario (2).
El escenario asociado a la tecla 1 (respectivamente las 2, 3, 4, 5, 6, 7 u8) se ejecutará automáticamente cuando se cierre
la entrada auxiliar 1 (respectivamente las 2, 3, 4, 5, 6, 7, u8).
Los productos que pueden conectarse a las entradas auxiliares son :
- pulsadores,
- interruptores,
- relojes,
- etc…
Este producto puede controlar productos radio a través del interface RF / PLC ref. 036 06 / 29.
(1) Aprendizaje : acción de asociar actores con el fin de controlarlos simultáneamente (Escenario) a partir de un punto
central (Líder). Esta asociación se realiza aplicando el procedimiento de aprendizaje del escenario descrito en la página 37.
(2) Escenario : conjunto de acciones realizadas por los actores a través de una orden enviada por el Líder.

37
Pulsar LEARN
Pulsar LEARN
Pulsar la tecla de mando que va a
controlar el escenario
Pulsar la tecla de mando que va a
estar asociada al líder
Paso 2 : añadir un actor al escenario (en el ACTOR)
Aprendizaje del escenario
Pulsar LEARN
El led en todos los mecanismos se apaga
El escenario ha sido grabado
Paso 1 : crear el escenario, fase LEARN (en el LÍDER)
Paso 3 : grabar el escenario (en el LÍDER)
Para asociar más mecanismos al escenario, repetir en cada actor las operaciones y
Leyenda
Led Off Parpadeo lento FlashParpadeo rápido
38
Pulsar LEARN
Pulsar LEARN
Pulsar LEARN
Pulsar LEARN
Pulsar la tecla de mando que
controla el escenario
Pulsar la tecla de mando
que va a ser asociada
Para eliminar el producto del escenario ir al
punto "Grabar el escenario"
El led de todos los mecanismos del
escenario parpadea
o
Paso 2 : modificar el estado de un actor del escenario (en el ACTOR)
El led de todos los mecanimos se apaga
El escenario ha sido grabado
Paso 3 : grabar el escenario (en el LÍDER)
Modificación de un escenario
Paso 1 : abrir el escenario (en el LÍDER)

39
Pulsar LEARN
Pulsar LEARN
El escenario ha sido borrado
Pulsar la tecla de mando
durante 10 s
Borrar todos los escenarios vinculados a la tecla de mando (en el LÍDER)
Configuracion de fabrica
Pulsar LEARN
durante 10 s
Borrar todos los escenarios vinculados a este producto (en el LÍDER)
5 s
5 s
Borrado de un escenario
40
Table of contents
Languages:
Other LEGRAND Recording Equipment manuals

LEGRAND
LEGRAND 3 109 72 User manual

LEGRAND
LEGRAND 0 883 32 User manual

LEGRAND
LEGRAND 0 626 00 User manual

LEGRAND
LEGRAND 5739 94 User manual

LEGRAND
LEGRAND 036 06 User manual

LEGRAND
LEGRAND 0 488 77 User manual

LEGRAND
LEGRAND Wattstopper LMIO-101 User manual

LEGRAND
LEGRAND VANTAGE MRHC3 User manual

LEGRAND
LEGRAND 0 883 31 User manual

LEGRAND
LEGRAND MRIR1 User manual