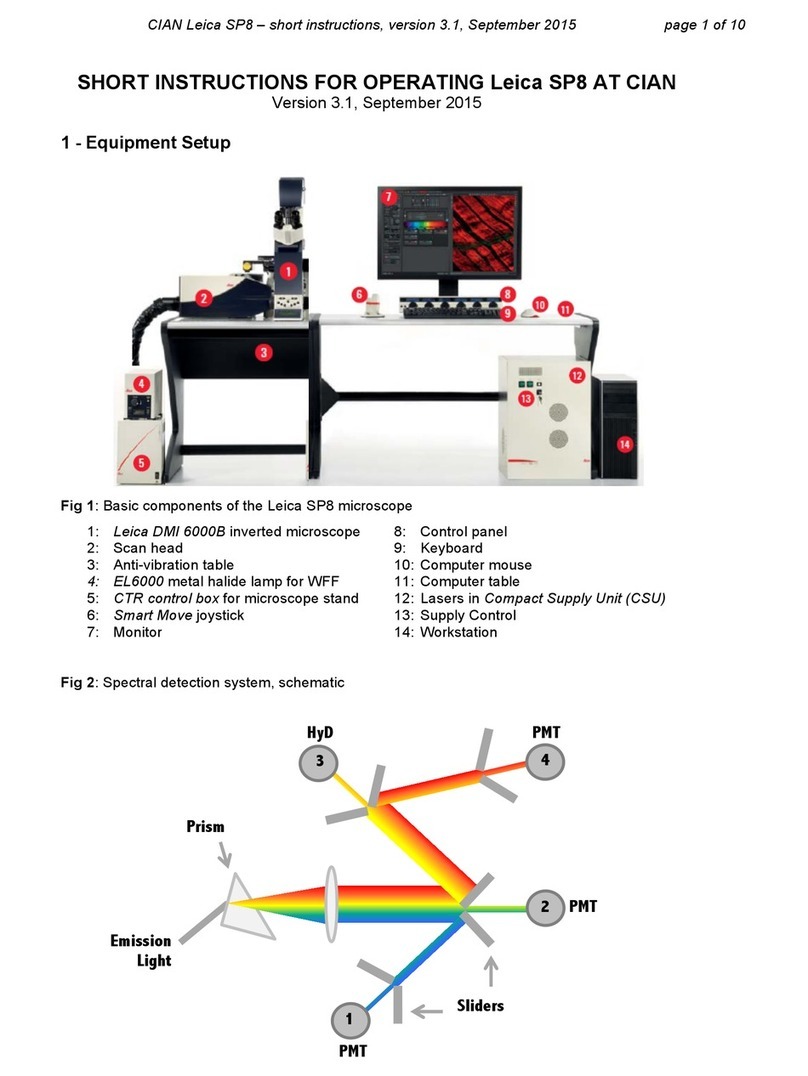
Leica TCS SP8 User guide

Last Updated on Sep 2021
BEGINNERS SAFETY MANUAL FOR LEICA TCS SP8
CONFOCAL SYSTEM
Produced by Graham Wright, Fiona Chia, Cris Barzaghi, Wang Jing Fang, Shaalini, Melvin
1. Safety Guidelines ........................................................................................................................ 2
1.1 Lasers .................................................................................................................................... 3
1.2 Immersion Oil........................................................................................................................ 3
1.3 Metal Halide Lamps (MHL) ................................................................................................... 4
2. Training ....................................................................................................................................... 4
2.1 To arrange a training session:............................................................................................... 4
3. Online Booking and System Access............................................................................................. 5
3.1 Acknowledgements............................................................................................................... 6
4. Operation Procedures................................................................................................................. 6
4.1 Switching ON Protocol .......................................................................................................... 7
4.2 Objective Lens....................................................................................................................... 7
4.3 Software initiation ................................................................................................................ 8
4.4 Turning on the lasers ............................................................................................................ 8
4.5 Using Dye Assistant tab......................................................................................................... 8
4.6 Setting Laser & Detector configuration .............................................................................. 10
4.7 Using the Acquisition tab.................................................................................................... 11
4.8 Image Adjustments –Setting the Gain and Offset properly............................................... 12
4.9 How to do a Z stack for a 3D Image.................................................................................... 13
4.10 Saving images and reusing settings .................................................................................. 14
4.11 Switching OFF Protocol..................................................................................................... 15
5. Troubleshooting........................................................................................................................ 16
5.1 Troubleshooting Appendix.................................................................................................. 18

Last Updated on Sep 2021
THIS PAGE IS INTENTIONALLY LEFT BLANK

Last Updated on Sep 2021
1. Safety Guidelines
Please adhere to the safety guidelines for your own safety and health. When in doubt, always
approach the bioimaging facility for assistance.
1.1 Lasers
Lasers in the confocal facility are class 3B lasers. This means that the lasers are strong enough
to cause serious damage to your eyes, including temporary to permanent blindness. Therefore,
please always follow the safety guidelines below when using the confocal microscopes:
•Before turning on the lasers, make sure the power connections are all connected
properly. If there are any disconnected wires, please reconnect them or inform the facility
staff. If you see any exposed wires, do not attempt to use the equipment and inform
facility staff immediately.
•For all confocal systems, there is a minimum time for lasers to be switched ON/OFF.
Please check the operation procedure for the respective microscopy system that you are
assigned to. This is to ensure the lasers have sufficient time to heat up and cool down
before running again.
•When using the lasers to image, NEVER look directly at the laser while imaging. If a safety
shutter is present, make sure it is in the correct position to better protect your eyes.
1.2 Immersion Oil
Modern immersion oil has no known hazards to human beings so far, yet they can cause
discomfort to a person if the immersion oil has been left on skin for too long or inhaled.
Therefore, please take note of the following safety guidelines for using immersion oil:
•Use the applicator to apply the immersion oil onto the slides for upright system.
•Do not touch the applicator oil directly on the objective lens as this will scratch or break
the lens. Instead, allow the drop of oil to contact the lens surface.
•If the bottle containing immersion oil has oil on the sides, wipe down with kimwipes and
ethanol. Wash hands immediately after with soap and water.
•Wipe immersion oil off objective lenses after use using lens paper and wash hands
immediately after with soap and water.
•Always clean up any spilled oil or residue from oily slides immediately after your session.

Last Updated on Sep 2021
1.3 Metal Halide Lamps (MHL)
Metal halide lamps are fluorescence lamps that gives a visible light range of 300 –650nm,
enabling us to observe fluorescence signals such as GFP, DAPI and RFP. Metal halide lamps
contain mercury vapours that are extremely toxic to the human body. Therefore, please take
note of the following safety guidelines when working with the metal halide lamp:
•Ensure that the metal halide lamp has been off for at least 30 minutes before switching it
on. Once the lamp has been turned on, it must remain on for a minimum of 30 minutes to
allow sufficient time for it to warm up and run properly.
•Check the timer on the power box to ensure the mercury lamp does not run past 2,000
hours.
•Do not look directly at the MHL when it is switched on as it can damage your eyes.
•Do not attempt to remove the light guide from the MHL, especially when it is on. Direct
emission of the MHL may set off fires.
•If there are no users in the next 30 mins, MHL must be turned off.
•Never attempt to change a bulb yourself. Please contact facility staff when you notice
that a bulb has reached between 2,000 –2,500 hours or is not functioning properly.
2. Training
Use of confocal microscopy and the online booking system is authorized by facility staff only. All
users must attend the confocal training session conducted by the Bioimaging facility staff
before they are allowed to access the confocal system.
2.1 To arrange a training session:
•Please email Bioimaging Facility ([email protected]) for a training session.
•Fill in the necessary particulars in the form here:
http://microscopy.tll.org.sg/pages/conf_training_form.html
(E.g. Lab, PI, sample, and a brief description of your project)
•We will help you identify the most appropriate microscope for your imaging needs.
•We will then arrange training session according to your availability within a week.
•Training sessions usually last 1 - 3 hours depending on users’ previous experience.
•Users receiving training are highly encouraged to bring their own samples so that staff
can adjust trainings to your imaging needs, but if not possible, staff have their own
samples that they can work with.
Once you have completed the training session, we will grant you access to both the confocal PC
and the online booking system. Please keep in mind that only bioimaging facility members are

Last Updated on Sep 2021
allowed to conduct the training. None of your lab members are allowed to conduct the training
for you.
If you need a refresher or some specific advice on anything microscopy related, please
approach any member of the Bioimaging Facility for assistance/help.
We also offer training on the various types of image analysis and image processing software
available here at TLL, including ImageJ/Fiji, Huygens and Imaris.
3. Online Booking and System Access
•Booking of all Light microscopes prior to use is COMPULSORY through microscopy
resource booking via TLL intranet (https://intranet.tll.org.sg/App/tll_intranet/booking_searches)
•Users are only allowed to book the confocal system that they have received training on. If
they wish to book other confocal system, they have to receive a separate training.
•Users are entitled to advance bookings of up to 2 weeks. They are advised to plan their
experiments accordingly to avoid any disappointments.
•During Office Hours (Weekdays from 8.30am to 6pm)
➢Each user is entitled to a MAXIMUM of 2 bookings per system per week.
➢Users whom are trained on multiple systems are entitled to a maximum of 3 bookings
per week but it has to be shared across the systems that they have received training
on.
➢Each booking must not exceed 3 hours.
➢If users have utilized all their entitled bookings for the week, “24Hr Rule” can be
applied where they can book the system in less than 24 hours in advance according to
its availability. If extra slots are booked within the 24-hour period, a note of “24Hr
Rule” should be made in the booking description.
•During Non - Office Hours (Weekdays after 6pm, Sat, Sun & Public holidays)
➢If users require more slots in a particular week, they can book on weekdays during
non-peak hours (after 6pm), on weekends (Sat and Sun) and on public holidays.
➢If extra time is required, bookings can be extended out of peak hours (E.g. 3 –7pm).
•Bookings exceeding these limits are subjected to cancellation without prior warning.
•Simultaneous bookings of two or more different systems are not allowed. Multiple
bookings for the same system on the same day during office hours is strictly prohibited.
•If users cannot attend a booked session for any reason, it is COMPULSORY that they
availability. If they are the last users for the day, they need to check if the system has
been switched off completely.
•If users are swapping a session with another user, they must change the booking details
accordingly.
Last Updated on Sep 2021
•Under any circumstances, users are not allowed to make bookings on behalf of other
people. Users who have received training but are yet to gain access to microscopy
resource booking may approach TLL Bioimaging department for booking assistance if they
need to use it urgently.
•If a user fails to show up within the first 30 minutes of their booking, the slot is forfeited
and is free for any user to use it.
•If any users violate any of these Booking rules, users will be subjected to the 3 strikes
policy.
3.1 Acknowledgements
If you use the TLL Microscopy and Imaging facility and/or have been trained or assisted any of
the bioimaging facility members in your research, then this should be acknowledged
appropriately in your publications and presentations.
4. Operation Procedures
Every confocal system in TLL Bioimaging Facility has its specific instructional manual which are
found in every confocal rooms. Strictly adhere to the correct order of operation for all system.
Failure to do so will result in disciplinary action from the facility. Any issues encountered during
the operation of the system are advised to seek help from the Bioimaging facility.
Modification, exchange or removal of components beyond this operational manual is strictly
prohibited and is only carried out by the manufacturer, Bioimaging facility or by experienced
users approved by bioimaging facility. During operation of laser microscopy system, do not look
into the laser beam directly as they are all Class 3b and Class 4 lasers.
1st offence
A warning will be issued along with the reminder of the rules.
2nd offence
A second warning will be issued and your respective PI will be notified.
3rd offence
Banned from using any of the facility’s microscope for 2 weeks.

Last Updated on Sep 2021
4.1 Switching ON Protocol
(a) SIGN IN the Logbook and record your START-TIMING.
(b) Switch on Laser Key (1), Laser Power (2), Scanner power (3) and PC Microscope (4).
(c) Switch on the Metal Halide lamp (5), if you need it.
(d) Switch on STED laser module (6), if you need it.
(e) Wait for PC to start up and log in with your TLL user name.
(f) Load LASx software and switch on the lasers that you are planning to use:
•Diode Laser: “ON” 405nm laser
•White Light laser: “ON” up to 70% power
•Argon laser: “ON” up to 70% power. (Make sure the argon lasers are ON for a
minimum of 2hrs before switching OFF as it requires sufficient time for warming up)
•STED laser: You may switch “ON” up to 100%. (Make sure the STED lasers are ON for
at least 1hr before switching OFF.)
(g) Do not overload the HyD detectors. Keep gain at max 100% as overloading will damage
the performance of HyD detectors over time. For best performance of the HyD detectors,
set gain at 100% and only use the laser power slider to moderate irradiation intensity.
(h) Finally, fill in the logbook.
4.2 Objective Lens
Objective lens
Immersion media
10x/0.4 HC Plan Apochromat
Air
20x/0.75 HC Plan Apochromat
Air
40x/1.3 HCX Plan Apochromat
Air
63x/1.2 HC Plan Apochromat
Water
63x/1.4 HC Plan Apochromat
Oil
100x/1.4 HCX Plan Apochromat
Oil

Last Updated on Sep 2021
4.3 Software initiation
Turn on the machine following the instructions pasted on the wall and inserted in the log book.
Wait for complete initialization of microscope and Windows after logging in with your TLL
username and password.
Double click on:
(A) The LAS X configuration screen will appear:
Configuration: Machine.xlhw must be selected.
Microscope: Check that DMI6000 is selected.
Click on OK and wait for complete initialization. Do not move anything on the microscope
during the initialization process.
4.4 Turning on the lasers
1. Under the Visible panel, click on the button to open the laser panel.
2. Click on the UV (405nm), Visible (Argon) and SuperContVisible2(WLL) bar to observe
405nm, Argon and WLL respectively in the dropdown menu.
3. White light laser (WLL) has excitation wavelengths from 470nm-670nm allowing you to
select specific excitation light source. Argon lasers have much higher power than the WLL
and has excitation wavelengths –458nm, 476nm, 488nm, 496nm and 514nm.
4. Turn on the laser that you need by clicking on the sliders. Make sure that WLL and
SuperContVisible2 are at 70% before carrying on with the next steps.
4.5 Using Dye Assistant tab
•Select the objective lens that you would like to image with your sample.
1
3
4
2

Last Updated on Sep 2021
•Then select, Dye assistant to set up your laser pathway.
1. Click to add the number of channels
you would like to image.
2. Click to select the dyes you are
using for each channel.
3. Then select the type of detector (HyD or
PMT) you would like to image with your
dyes. HyD is more sensitive than PMT.
4. The Dye assistant will give you a list of
laser settings options to select from.
Select the settings which has the least
amount of crosstalk. Sequential Scan is
always preferred as the amount of
crosstalk is lesser. Line sequencing is
much faster than frame/stack imaging.
5. Select your preferred laser setting option
and click apply.
1
..
2
3
5
4

Last Updated on Sep 2021
4.6 Setting Laser & Detector configuration
•Based on the no. of dyes, you have selected, it will give you
the total no. of seq. (E.g., if you have selected 3 dyes in
sequential mode, you will have 3 seqs corresponding to each dye.)
•Select each seq, and increase the laser power to 1% initially. Make sure the laser line is
activated by checking both the red button and the laser line shown at 2 and 3.
•Make sure that the HyD/PMT is activated. (Turn on the slider)
•Then, Select the fluorophore you are using. It will give you the emission spectrum of the
dye you are using.
•Choose an appropriate emission band to detect your fluorophore. (Important: Make sure
that the emission band is at least 8-10nm away from your excitation line.)
•Choose an appropriate detector pseudocolour (also known as a Look Up Table, or LUT).
•For PMT, set the Gain to approx. 700 - 800 and the Offset to 0.
•When using the HyD (2× more senstitive than PMT), default gain is set at 100.(Important:
Do not overload HyD, max is 100.)
•Gating: Removes the first few nanoseconds of the signal as a result of autofluorescence
from the sample or mounting medium.
oOnly usable on pulsed lasers such as the WLL. Constant mode lasers like the Argon lasers
will not work with the Gating function.
oChoose appropriate reference laser line for gating.
oNOTE: start with low laser power to avoid damaging the HyD detectors. HyD detectors
will shut down if an overload condition is detected.
1
2
3
Gating
Ref.line

Last Updated on Sep 2021
•If you want to also acquire a brightfield image activate the
Transmission channel.
oEnsure that there is at least one active laser emission line
when you are using this channel
4.7 Using the Acquisition tab
Select the Acquisition tab, in which you can set the parameters for your imaging:
•Acquisition Mode:
➢Choose the type of scan xyz (z-stack) or xyzt
(time-series) are the most commonly used
➢Seq: select this for multi-channel/colour samples
•XY
➢Format: the number of pixels in your image
(the more pixels the higher the resolution,
to an extent, but slower the acquisition). The max
is 8000x8000.
➢Speed: the slower, the better your image will be
(a higher signal:noise ratio; but it takes longer and
it bleaches your sample more).
➢Bidirectional X: Useful for live imaging
unless you require fast imaging (in which case you
will need to adjust the phase correction.)
➢Zoom: is where you control the zoom parameters,
the arrows allow you to nudge the zoomed area
within the image. Zooming in can increase your
resolution to a point, but can cause more
photobleaching/damage.
➢Average: averages a given number of scans to get
a higher signal to noise ratio. Drawback: slower
scanning time and more bleaching. No averaging
or Line averaging is recommended if you are
doing live-cell imaging. Averaging twice will help
you achieve better quality images.
➢Accumulation: Is the sum of signal of several images together, hence boosting your
signal. Drawback: you also sum the noise and the resulting image may not have
improved signal:noise ratio, also has a slower scan time and more bleaching.
➢Auto Gain: the program will adjust the gain (beware that this happens only for the
active channel if you are in seq mode).

Last Updated on Sep 2021
Click on Live to view a live image. You can now adjust parameters while checking the result
directly on the monitor. Be careful though, if you spend too long doing this you will
photobleach your sample. Start focusing your sample and then center it moving the stage.
Now, based on the image, you can adjust the brightness in the Acquire and Acquisition tabs:
•Excitation laser power: the higher the laser power, the faster your sample photobleaches.
Also, this will alter both the brightness of the fluorescent image and that of the brightfield.
•Gain:
oPhotomultiplier Tube (PMT): Keep below 800V during image acquisition to control
noise.
oHybrid Detector (HyD): Keep at 100% at all times for optimum performance. Change
the brightness of your image by changing the laser power only.
•Offset (adjusts the background/black level)
•Pinhole (the wider the pinhole aperture, the thicker is the optical slice –which means a
blurrier, but brighter image). Make sure you also lower the laser power if you have to
increase the pinhole.
There’s no general rule: these adjustments mainly depend on your sample.
4.8 Image Adjustments –Setting the Gain and Offset properly
Check image saturation
level by clicking QuickLUT
icon . The image will
change color to show
green, orange and blue.
Green indicates that the
signal in a given pixel is
black, with a value of 0.
Blue color in a given pixel
means it is saturated (over-
exposed) with a value of
255. We need to bring our
image back within the
limits of our dynamic range, such that the background is black and the sample is not too bright.
Different sets of experiments may have different fluorescence intensities.
When using the PMT detectors, we have to adjust our image using a combination of the
excitation Laser power, Gain and Offset: Set the Gain at 700 - 800 and reduce it, or the laser

Last Updated on Sep 2021
power, until blue pixels just disappear. Decrease Offset until you have a dusting of green pixels
in the background where there are no cells.
When using the HyD detectors, gain is set at default 100 reduce it or the laser power to prevent
oversaturation. Activate gating when using the WLL to remove laser reflection or auto
fluorescence. Make sure to choose the correct reference line when using gating.
Click on QuickLUT button twice to switch from range indicator mode to normal colour view.
Click Capture Image or Start to capture an image.
4.9 How to do a Z stack for a 3D Image
•Scroll down to the Z-stack option in the Acquisition tab.
•Select Live to see the specimen.
•Use the focus knob on the USB control panel or point the
cursor in the Z-stack box panel and use the mouse scroll
wheel to focus up and down (do not use the
microscope’s focus knob).
•Move all the way to the top of your sample and click on
the Begin, turning it red, to mark the start
position.
•Use the mouse scroll wheel to move to the bottom of your
sample and click on the End, turning it red to mark the end
position.
•With system optimized selected the program will
determine the optimal settings for your Z-stack. You can
override these settings using the Nr. of steps or z-step size
boxes. Beware that changing these will alter the z-
resolution you attain.
•Click the Start button to begin the series.

Last Updated on Sep 2021
4.10 Saving images and reusing settings
Taking snapshots:
•Right click on the image you would like to take a snapshot of.
•Click on Snapshot to get an RGB image of the desired image.
To store an image:
•Select the Projects tab and it will list the images you have
acquired (either with the Capture Image or Start buttons. Live
images are not held in the memory.
•Click on the Save button.
•Your images will be saved in a *.lif proprietary format.
➢If you turned on Auto-save, your images will be saved in
*.xlef format. This functions about the same as *.lif format
in LAS X.
•Please save in your folder. For example:
➢Option 1: D:/E: →Users →Graham →example.lif. Do keep
in mind that we will delete any images which are older
than 3 months. Please make sure to do a backup.
➢Option 2: In TLL research cmn drive folder in your
respective lab folders.
➢Option 3: In your own lab drive.
➢Option 4: In your personal hardisk or thumbdrive. Keep in
mind that the data transfer will be slow.
•You can also change the name of each image, or delete selected images, to your liking by
right-clicking on the name and select Rename.
•You could also export your images in the TIFF format. (right-click on the image file)
Important: please do not save any data on the C: drive and remember to back up your data to
the network!
To reuse previous settings:
•Open previous images.
•Right-click on the image you would like to repeat and select Properties. Here you will see a
detailed record of the settings used to acquire that image, and all its properties.
•Click on Apply Settings to re-establish the confocal to the same setting.

Last Updated on Sep 2021
4.11 Switching OFF Protocol
Check through TLL microscopy resource booking if there is a user immediately after you. If
there is a user immediately after you, leave the system on and log off the PC. Otherwise switch
off the system.
(a) Save your images through TLL common drive folder. Images saved in computer D/E
drives will be deleted within a month without prior warning.
(b) Lower down the objective lens and carefully clean the objective lenses with Whatman
lens paper.
(c) Make sure to switch your lens back to the 10x/0.3 objective lens.
(d) Clean the sample holder with Kim wipes and 100% ethanol to remove any oil residues.
(e) In the event of logging off, you may leave the lasers ON and exit LASX. Otherwise, Switch
off all lasers within the software.
•Diode Laser: “OFF” 405nm
•White Light laser: “OFF”
•Argon laser: Slowly decrease the power to 0% and switch OFF only when it has run
for at least 2hrs. It needs a minimum of 2hrs for cooling before switching it ON.
•STED laser: Switch on the STED module (6). Slowly decrease the power to 0% and
switch off only when it has run for at least an hour.
(f) Exit LAS X software and switch off PC Microscope (4).
(g) Switch off STED laser module (6) if it was used.
(h) Switch off Scanner power (3), Laser Power (2) and the Laser Key (1).
(i) Switch off the Metal Halide lamp if it was used (5).
(j) Fill in the logbook with the objective lens used and mention if ARGON/STED laser is still
ON/OFF.

Last Updated on Sep 2021
5. Troubleshooting
Issue
Explanation & Remedial steps
White Light Laser
does not emit laser
radiation.
Error occurred with the wavelength setting system (AOBS). The
AOBS is part of the laser scanning module (LSM).
Confirm that:
•White Light Laser module interlock is set to ON.
•White Light Laser module emission is on. Emission LED
should be red.
•LAS X shows that the WLL is on, shutter is raised, and
there is laser power set on WLL emission lines.
If previous steps fail to allow laser emission,
1. Close LAS X program. If this issue is a scanner issue, you
will not hear clicking as the program is shutting down and
performing its pre-shutdown WLL checks.
2. Switch off the LSM (switch 3*, marked Scanner)
3. Switch on the LSM
4. Open LAS X program. If this issue has resolved, you will
hear clicking as the program is performing its startup WLL
checks.
5. Confirm laser emission
Argon laser does not
emit laser radiation
Argon laser may be unable to power on.
Confirm that:
•Argon laser switch (switch 2) is ON.
•Argon laser fan is on (you hear a continuous loud whirring
noise)
•LAS X shows that the argon laser is on, and there is laser
power set on argon laser.
•If previous steps fail to allow laser emission,
•Close LAS X program
Switch off the argon laser (switch 2*, marked Laser)

Last Updated on Sep 2021
•Switch on the argon laser
•Open LAS X program
•Confirm laser emission
•Gating function for removing autofluorescence photons
only works for pulsed lasers (WLL). It will not work for
continuous mode argon lasers.
No signal viewed from
the sample
Check that your sample does actually have the signal using the
Wide Field eyepiece.
If there is signal from the Wide Field eyepiece:
1. No laser emission
•Refer to previous items
2. Wrong detector settings
•Check detector settings on LAS X
3. Hybrid Detector overloaded
•Look at the bottom of the LAS X window. If it says the
HyD overloaded, use the following steps:
1) Turn off Live View.
2) Ensure that the detection band is set at least 10nm
away from any laser you are using.
3) Set the HyD gain to 100% always. Brightness should be
set using the laser power only for best sensitivity and
minimal photobleaching risk
4) Drop the laser power to the lowest level, then switch
on Live View.
5) On Live View, carefully increase the laser power using
the mouse wheel until you can see the sample on Live
View.
6) Watch the information ticker in case the overload
message appears again.
4. Out of focus
•Confocal microscopes are very sensitive to focus shifts.
Use the panel knob to carefully shift focus in and out
until you see a signal.
*Refer to Troubleshooting Appendix for location of switches

Last Updated on Sep 2021
5.1 Troubleshooting Appendix
Switches
(under
computer
terminal)
Power schematic diagram of the SP8
Other manuals for TCS SP8
3
Table of contents
Other Leica Microscope manuals

Leica
Leica EZ4 E User manual

Leica
Leica PROVEO 8 User manual

Leica
Leica DM1000 LED User manual

Leica
Leica DM500 User manual

Leica
Leica F12 I User manual

Leica
Leica TCS SP2 Reference guide

Leica
Leica DM LSP User manual

Leica
Leica DMS1000 User manual

Leica
Leica DM6000 M User manual

Leica
Leica M80 B User manual