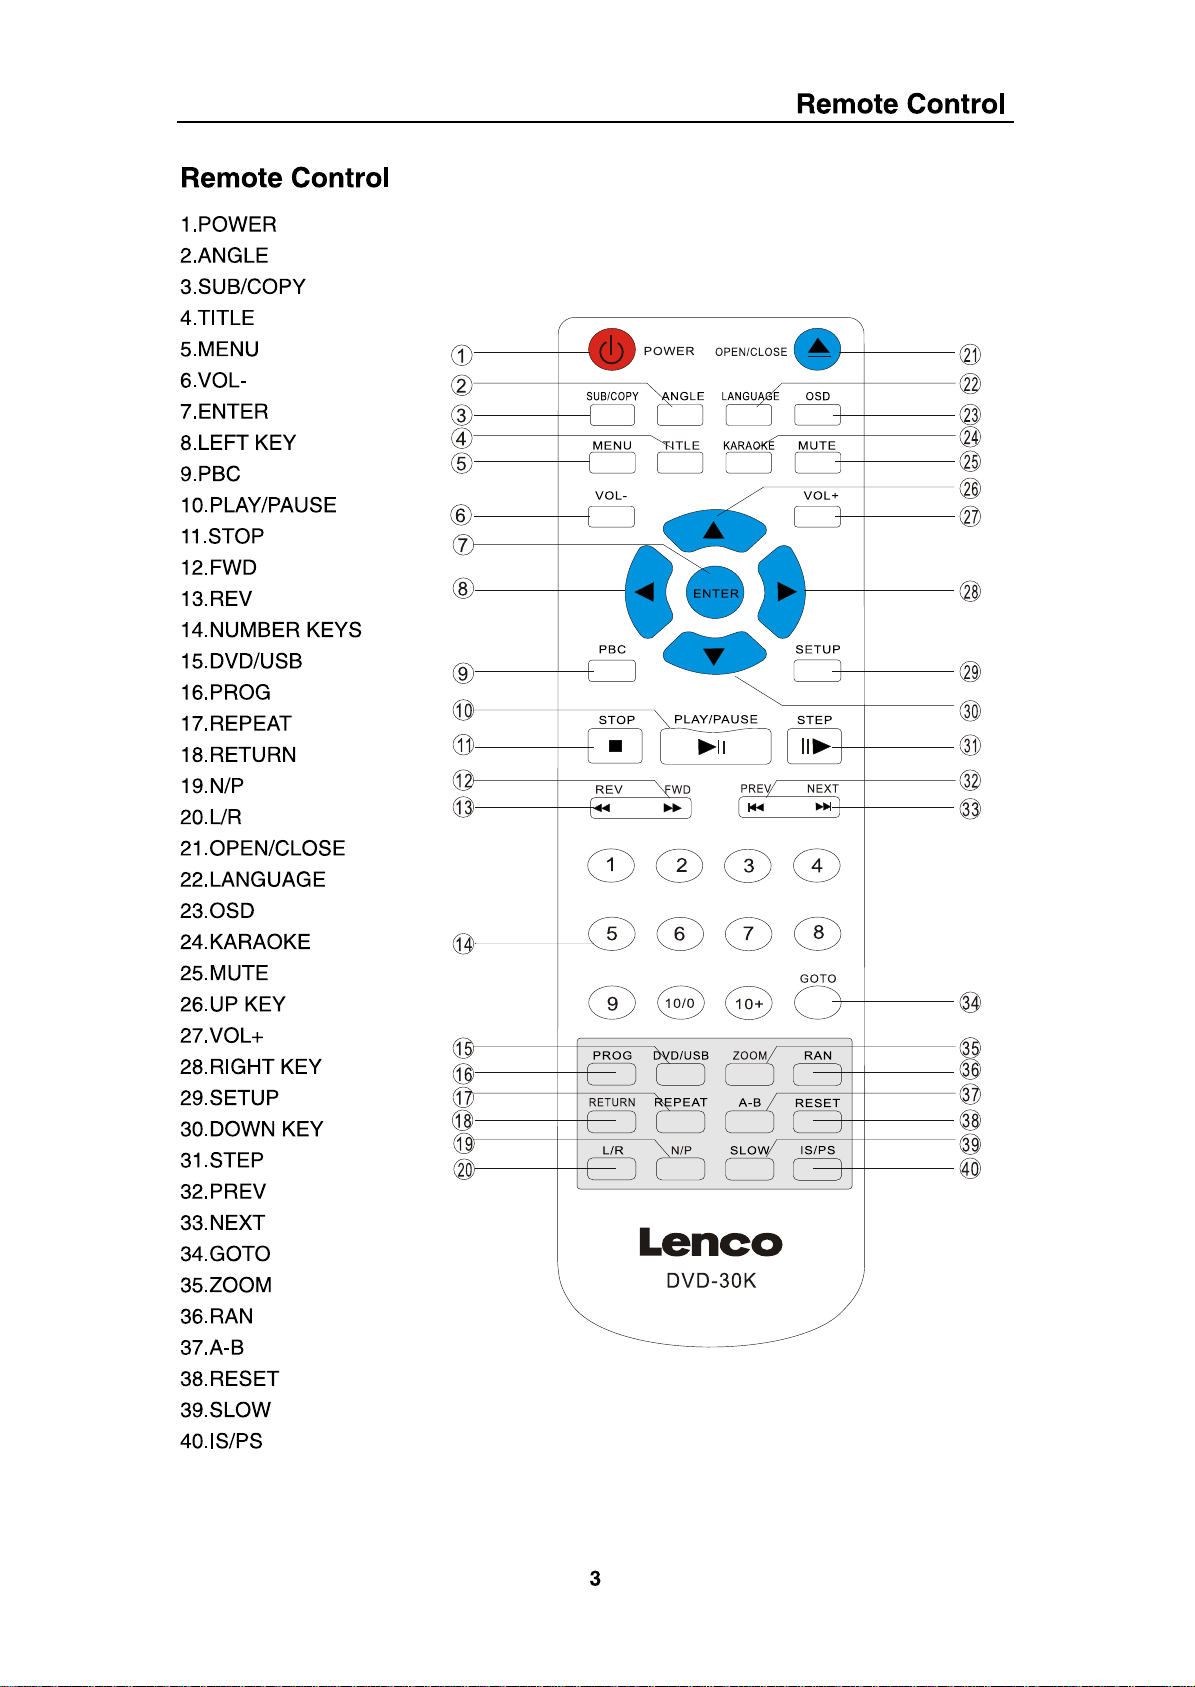
LENCO DVD-30K User manual


Remote Control
1
Table of Contents…………………………...………………………1-2
Remote Control…………………………...…………………………..3
Front And Back Panel…………………….….…….………………...4
Chapter 1 Basic Operation…………………….….…….………...5-6
1. Turn On the TV and MPEG 4 DVD Player…………………….………..……………5
2. Place a disc onto the tray.………………………………………………………………5
3. Play the disc…………………………………………………………………………….5-6
a) Menu Play (compatible with MPEG 4, DVD, SVCD, VCD2.0 discs)…………5-6
b) Title Play (compatible with MPEG 4 and DVD discs only)………………………6
c) Sequence Play (compatible with MPEG 4, DVD, SVCD, VCD, HD-CD, WMA,
MP3/JPEG discs)…………………………………………………………………... 6
d) Program Play (compatible with MPEG 4, DVD, SVCD, VCD, CD, HD-CD,
WMA, MP3 discs)…………………………………………………………..............6
Chapter 2 Additional Operation………………………………...7-12
1. Selecting Tracks (compatible with MPEG 4, DVD, SVCD, VCD, CD, HD-CD, WMA,
MP3/JPEG discs)……………………………………………………………………………7
2. Skipping Tracks (compatible with MPEG 4, DVD, SVCD, VCD, CD, HD-CD, WMA,
MP3/JPEG discs)…………………………………………………………………………...7
3. Multi Speeds Fast Motion Playback (compatible with MPEG 4, DVD, SVCD, VCD,
CD, WMA, MP3 discs)…………………………………………………………..............7-8
4. Multi speed Slow Motion Playback (compatible with MPEG 4, DVD, SVCD, VCD
discs)………………………………………………………………………………………….8
5. USB CD Ripping……………………………………………………………………….....8
6. Decoding function and Encoding from CD/MP3-CD to USB………………………8-9
7. Repeat Feature (compatible with MPEG 4, DVD, SVCD, VCD, CD, HD-CD, WMA,
MP3/JPEG discs)………………………………………………………………………..….9
8. Display Feature (OSD) (compatible with MPEG 4, DVD, SVCD, VCD, CD, WMA,
MP3/JPEG discs)…………………………………………………………………………9-10
9. GOTO Feature (compatible with MPEG 4, DVD, SVCD, VCD, CD, HD-CD
discs)……………………………………………………………….………………………..10
10. Language (compatible with MPEG 4, DVD, SVCD discs)……………………....10
11. Subtitle (Sub-T) (compatible with MPEG 4, DVD, SVCD discs)………………...10
12. Angle function. (compatible with MPEG 4 and DVD discs)………………………..11
13. TV System (compatible with MPEG 4, DVD, SVCD, VCD, CD, HD-CD, WMA,
MP3/JPEG discs)…………………………………………………………………………...11
14.Mute Feature (compatible with MPEG 4, DVD, SVCD, VCD, CD, HD-CD, WMA,
MP3/JPEG discs)…………………………………………………………………………..11

Remote Control
2
15. Zoom In/Out the Video Image (compatible with MPEG 4, DVD, SVCD, VCD,
JPEG discs)…………………………………………………………………………….…..11
16. Repeat a Specific Segment (compatible with MPEG 4, DVD, SVCD, VCD, CD,
HD-CD, WMA, MP3 discs)…………………...……………………………………….11-12
17. Volume control (compatible with MPEG 4, DVD, SVCD, VCD, CD, HD-CD, WMA,
MP3/JPEG discs)…………………………………………………………………….........12
18. Random playing (compatible with DVD, SVCD, VCD, CD, HD-CD, WMA,
MP3/JPEG discs)…………………………………………………………………………..12
Chapter 3 Playing WMA, MP3 and JPEG discs……………..13-14
Chapter 4 Setup Menu System………………………………..15-19
1. General Steps of Setup Menu………………………………………………………....15
2. Setup Items Introduction. …………………………………………………………..15-19
a) System Setup………………………………………………………………...15-17
b) Language Setup…………………………………………………………………17
c) Audio Setup…………………………………………………………..………….17
d) Video Setup…….…………………………………………………………….17-18
e) Speaker Setup…………………………………………………………………...18
f) Digital Setup………………………………………………………………… 18-19
Chapter 5 Specification of the MPEG 4 DVD player……………20
1. Types of disc that the MPEG 4 DVD player can play……………………….20


Basic Operation
5
Chapter 1 Basic Operation
1. Turn On the TV and MPEG 4 DVD Player
Press the Power button on the player or on the remote control, and “READ” appears on the
TV screen. If there is no disc in the MPEG 4 DVD player, “No disc” will be displayed on both
the TV screen and the LED.
2. Place a disc onto the tray.
Press the Open / Close button on the remote control or on the front panel of the MPEG 4 DVD
player, and “OPEN” appears on the screen. Then place a disc gently onto the tray with the
disc’s label facing up (double-sided discs have content on both sides, so you can place either
side up), and press the Open / Close button again to close the disc tray, “CLOSE” appears and
the player starts to read. Then the disc starts playing automatically. (Note: For some certain
discs, the Play or Enter button should be pressed to start playing.)
3. Play the disc.
The contents of each disc menu vary according to how the disc is authorized and what
features are included. The disc menu will be shown for you to select, when the Menu button is
pressed. Also PLAY and PAUSE functions can be switched with the PLAY/PAUSE button on
the remote control. Different playing modes are offered, such as Menu play, Title play,
Sequence play etc.,
a) Menu Play (compatible with MPEG 4, DVD, SVCD, VCD2.0 discs)
I. Press Menu Button
zTV screen displays the DVD Root Menu when an MPEG 4 or DVD disc is
loaded.
zWhen a SVCD or VCD 2.0 disc is loaded, the SVCD or VCD 2.0 menu will be
displayed on the screen (when Menu Play is off).
zThe default setup of Menu Play is on when a SVCD or VCD2.0 disc is loaded.
II. When an MPEG 4 or DVD disc is loaded, you can press the Arrow buttons to
highlight the menu item you want to choose; As a SVCD or VCD2.0, you can press
Numeric buttons to select a track to play.
III. Press the Enter or Play button, the disc will play the highlighted item.
IV. Return when playing: When an MPEG 4 or DVD disc is playing, press the Menu
button, and you will return to Root Menu; As SVCD, VCD2.0, and Menu Play is on,
press the Title button, you will return to the menu.
Notes:
Press the Title button to select the Menu Play on/off.
V. Stop
1) When you press the Stop button for the first time, the player turns into the
quasi stop state. At the same time the OSD shows “Stop”. When you press the
Stop button twice, it will return to the Menu.
2) In quasi stop state, the MPEG 4 DVD player remembers where you stopped,
when you start playing the disc again, the player continues playing from where
you stopped.

Basic Operation
6
3) In stop state, when you press Play, the player enters sequence playback mode.
zFor the protection of the disc, before you press Open / Close button to eject the
disc tray when playing, please press the Stop button at first. After taking out
the disc, press Open / Close again to close the tray.
zIf you’re not going to use the MPEG 4 DVD player for a long time, be sure to
remove the mains plug.
b) Title Play (compatible with MPEG 4 and DVD discs only)
I. During DVD playback, press the Title button to display the disc title contents of the
DVD discs, choose the title you like, press Enter button
II. Then highlight the track you want to play and press Play button
c) Sequence Play (compatible with MPEG 4, DVD, SVCD, VCD, HD-CD, WMA,
MP3/JPEG discs)
I. When a SVCD or VCD disc is loaded and Menu Play is on, the player can play in
sequence playback mode.
II. Except for SVCD or VCD discs, in stop state, when you press Play button, the
player enters sequence playback mode. This feature is effective to all the
compatible discs.
d) Program Play (compatible with MPEG 4, DVD, SVCD, VCD, CD, HD-CD,
WMA, MP3 discs)
The Program Playback option allows you to program chapters or tracks which you want
to play, maximum to 16.
zProgram Menu:
If Menu Play is on, this operation will turn Menu Play off, while the chapters /
tracks play in programmed order.
zUse the Numeric buttons to enter the chapters / tracks in the order you want them to
play. Then press Play or use the Arrow buttons to highlight the “PLAY” item and
press Enter. The chapters / tracks will play in the programmed order.
You can program a maximum of 16 titles / chapters / tracks.
zAccording to the Direction Indicator on the menu, you can press the Arrow buttons
to highlight where you want to enter.
zDuring Program Playback, if the Program button is pressed, the programmed order
and the contents will be displayed on the screen, and Program Playback will be
stopped; You can also press Stop and Play to resume normal playback.

Additional Operation
7
Chapter 2 Additional Operation
1. Selecting Tracks (compatible with MPEG 4, DVD, SVCD, VCD, CD, HD-CD, WMA,
MP3/JPEG discs)
a) When playing DVD disc, press GOTO buttom, press left or right arrow button to choose
title/track, directly press numetric button to selcet the title/track you like to play,then
press enter.
b) When playing MPEG4 in DVD disc or USB you can press numeric button on remote to
choose the desired track..And you can press Return button to directory ,then press left
or right Arrow button on Remote to select the chapter and the track.
c) With a SVCD or VCD disc, during Sequence Playback, press the Numeric buttons to
select tracks. (During Program Playback and Menu Play is on, you can press the Prev /
Next button to select only)
d) As for CD, HD-CD discs, press the Numeric buttons directly to select tracks.
e) When playing WMA, MP3 / JPEG discs, press the Numeric buttons to select different
tracks on from the current track list.
Notes: To select tracks from 1 to 10, press the corresponding Numeric buttons (1-9, 10)
To select tracks above 10, press 10+ button. For example, to select track 15, press
10+ and 5 button.
If the selected track is not available, the input No. will be invalid.
2. Skipping Tracks (compatible with MPEG 4, DVD, SVCD, VCD, CD, HD-CD, WMA,
MP3/JPEG discs)
a) To skip forward from the beginning to the next title / chapter / track on a disc, press
Next on the remote or on the front of the player
b) To skip backward from the beginning to the preceding title / chapter / track on a disc,
press Prev on the remote or the front of the player.
zWhen playing the last chapter / track on a SVCD or VCD disc with Menu Play off,
pressing Next button will stop the playback; When playing the first chapter / track.,
pressing Prev button will stop the playback; During stop, the Next / Prev button will
be invalid
zIf an MPEG 4 or DVD disc is loaded, it varies according to how the disc is
authorized.
3. Multi Speeds Fast Motion Playback (compatible with MPEG 4, DVD, SVCD,
VCD, CD, WMA, MP3 discs)
4 kinds of Forward and Reverse modes during playback.
a) Press the FWD button on the remote control during playback to achieve the Fastward
playback. Press the button again to play at the next speed. Fast Forward Playback has
four speeds: ×2, ×4, ×8, ×20.With each consecutive press of the button, the
playing speed increases. If you press the button five times, Fast Forward Playback
cycles back to normal playback.
During MPEG 4 and DVD playback, when Fast Forward Playback to the beginning of
the next title / chapter, it resumes normal playback; During SVCD or VCD playback

Additional Operation
8
with Menu Play on, when Fast Forward Playback gets to the beginning of the next track,
it resumes normal playback.
zPress the Play button to resume normal playback.
zFor CD, HD-CD, MP3, or WMAplayback, when proceeding the Fastward playback,
the player will have audio output.
b) Press the REV button on the remote control during playback to achieve the Fast Reverse
playback. Press the button again on the remote control to play at the next speed. Fast
Reverse Playback has four speeds: ×2, ×4, ×8, ×20.With each consecutive
press of the button, the play speed increases. If you press the button five times, Fast
Reverse Playback cycles back to normal playback.
During MPEG 4 and DVD playback, when Fast Reverse Playback gets to the beginning
of the playing title / chapter, it resumes normal playback; During SVCD or VCD
playback with Menu Play on, when Fast Reverse Playback gets to the beginning of the
playing track, it resumes normal playback.
zPress Play button to resume normal playback.
zDuring CD, HD-CD, MP3, or WMA playback, when proceeding the Fast Reverse
playback, the player will have audio output.
4. Multi speed Slow Motion Playback (compatible with MPEG 4, DVD, SVCD, VCD
discs)
Press Slow button, you can enter Slow Motion Playback mode.
Press the button again on the remote control to play at the next speed. Slow Motion Playback
has six speeds: 1/2, 1/3, 1/4, 1/5, 1/6, 1/7. With each consecutive press of the button, the play
speed decreases. If you press the button seven times, Slow Motion Playback cycles back to
normal playback.
Press the Play button to resume normal playback.
5. USB CD Ripping
When playing CDDA or CD, insert a USB storage device, press the “COPY” button on the
remote controller, it shows one small frame on TV, according to frame instruction to choose
copy speed and choose favourite songs, press “ENTER” to start copy. It is done when “OK”
is shown on TV.
After that operation,playing USB storage device, all your ripping songs from CDDA or CD
are in “unknown”file.
6. Decoding function and Encoding from CD/MP3-CD to USB
When playing a Mp3, WMA file, press “COPY” on the remote controller, it shows the copy
progress on TV. It is done when progress shows 100%.
Because of the large diversity of products with USB port and the specific manufact urer
specifications we can not guarantee that all devices will be recognized or that all possible
configurations will function properly.
After encoding , " OK" shows on screen. Press" OK" and the interface will return to
"OPTIONS"/"TRACKS"/"START"/"QUIT". Please select "QUIT" and press "OK" key on
remote, then units will return to CD playing.

Additional Operation
9
After that operation,playing USB storage device, all your ripping songs from MP3 and WMA
disc are in “CDROM”file.
7. Repeat Feature (compatible with MPEG 4, DVD, SVCD, VCD, CD, HD-CD, WMA,
MP3/JPEG discs)
When a disc is playing, press the Repeat button once, and the repeat banner appears to show
the current Repeat mode.
a) During SVCD, VCD, CD, HD-CD sequence playback mode, press the Repeat button
again to turn on repeat mode.
Press the button again on the remote control to enter the next repeat mode. There are
three repeat options: Off, Track Repeat, and Disc Repeat. With each consecutive press of
the button, the repeat mode switches. If you press the button four times, repeat mode
cycles back to Off.
b) During DVD playback, press Repeat button again to turn on repeat mode.
There are four repeat options: Off, Chapter Repeat, Title Repeat and REP All .With each
consecutive press of the button, the repeat mode switches. If you press the button five
times, repeat mode cycles back to Off.
c) During MPEG4, WMA, MP3 / JPEG playback, press Repeat button again to turn on
repeat mode.There are four repeat options: Off, REP 1, REP DIR, and REP ALL.With
each consecutive press of the button, the repeat mode switches. If you press the button
five times, repeat mode cycles back to Off.
8. Display Feature (OSD) (compatible with MPEG 4, DVD, SVCD, VCD, CD, WMA,
MP3/JPEG discs)
a) Loading & playing DVD discs (two pages)
zPress the OSD button once to show the first page:
“Disc Type, Title * / * (the playing title / total titles), Chapter * / * (the
playing chapter / total chapters), Elapsed Time of the Disc”.
zPress the button again to show the second page:
“Language * / * (the serial number of playing language / the amount of optional
languages) or Off, Language Type, Audio Type, Subtitle * / * (the serial
number of playing subtitle / the amount of optional subtitles) or Off, Angle * / *
(the serial number of playing angle / the amount of optional angles) or Off”.
zPress the button for the sixth time, the display menu fades out.
b) Loading & playing SVCD discs (two pages)
zPress the OSD button once to show the first page:
“Disc Type, Track * / * (the playing track / total tracks), Mute, Menu Play,
Repeat Mode, Elapsed Time of the Playing Track”.
zPress the button again to show the second page:
“Language * / * (the serial number of playing language / the amount of optional
languages) or Off, Language Type, Audio Type, Subtitle * / * (the serial
number of playing subtitle / the amount of optional subtitles) or Off”.
zPress the button for the sixth time, the display menu fades out.

Additional Operation
10
c) Loading & playing VCD discs.
zPress OSD button once to show the first page:
“Disc Type, Track * / * (the playing track / total tracks), Mute, Menu Play,
Repeat Mode, Elapsed Time of the Playing Track”.
zPress the for the fifth time, the display menu fades out.
d) Loading & playing MPEG4,CD, HD-CD, WMA, MP3 / JPEG discs
zPress OSD button once to show the first page:
“Disc Type, Track * / * (the playing track / total tracks), Mute, Repeat Mode,
Elapsed Time of the Playing Track”.
zPress the button for the third time, the display menu fades out.
9. GOTO Feature (compatible with MPEG 4, DVD, SVCD, VCD, CD, HD-CD discs)
You can use the Search feature to select a title / chapter / track number or to go to a specific
point in a title. First, press the GOTO button on the remote control to enter the search menu
and the edit state; Second, press Arrow buttons to highlight the title / chapter / track number
or the time option; Third, use the Numeric buttons to enter the title / chapter / track you want
to play or the elapsed time you want to go to in that title; At last, press the Enter button to
start playback. For example, entering 01:23:56 will start playback fifty-six second,
twenty-three minute and one hour into the title. If the input number is invalid, the error
information “INVALID KEY ” will be displayed on the screen.
zNotes
I. This feature does not work in Program Play mode.
II. If Menu Play is on, it will turn off automatically when Search Playback starts.
III. When playing WMA, MP3 / JPEG discs, Search Feature does not work.
10. Language (compatible with DVD, SVCD discs)
Support 5 languages: English, German, French, Spanish and Portuguese.
Press Langugae button on the Romote ,one language appears;press Language once
more ,another language out.The language switches from the 5 language only the disc is
made with the above languages.
11. Subtitle-(Sub-T) (compatible with MPEG 4, DVD, SVCD discs)
Press the Subtitle button on the remote control once, and the subtitle info banner appears.
When an MPEG 4, DVD or SVCD disc is recorded with subtitles, you can use the Subtitle
feature to view the subtitles on-screen.As default, subtitles are English.
To display subtitles, press the Subtitle button again. The default language with its
corresponding serial number will be displayed in the info banner and subtitles will be
displayed in that language. For a MPEG 4 disc, it can support English, French, Spanish,
Portuguese, German and Danish. For a DVD or SVCD disc, it can support eight subtitles:
English, Danish, Swedish, French, Spanish, Portuguese, German and Italian. With each
consecutive press of the Subtitle button, the subtitle switches. For example, (The availability
of the subtitles depends on the disc). To turn subtitles off, press the Subtitle button until
Subtitle Off is displayed.

Additional Operation
11
12. Angle function. (compatible with MPEG 4 and DVD discs)
During disc playback, press Angle on the remote control once, and the angel icon appears.
Some MPEG 4 or DVD discs contain multiple angles of a particular scene or sequence, so
you can use the Angle feature to view.
Press the Angle button again to go to the next camera angle. If multiple camera angles are
available, the Angle icon displays the current angle number and the number of angles
available. For example: “Angle Icon: [* / *] or [Off]”; 1 / 4 indicates that one angle is
displayed, and there are a total of four different angles available. (This feature depends on the
disc. If no additional angles are available, the “Invalid Key” will be displayed.)
13. TV System (compatible with MPEG 4, DVD, SVCD, VCD, CD, HD-CD, WMA,
MP3/JPEG discs)
Press N/P button on the remote control to display the current TV system.
Press the N/P button again to change to another TV system. There are two systems: NTSC
and PAL. With each consecutive press of the N/P button, the TV system switches.
Notes:
zIf it isn’t full screen state (note: Wide Screen program would never reach full
screen state) or in black and white, press the N/P button to adapt the TV
System to NTSC or PAL.
zWhen playing in a different TV system, some discs may not have their features
entirely functional
14. Mute Feature (compatible with MPEG 4, DVD, SVCD, VCD, CD, HD-CD, WMA,
MP3/JPEG discs)
Pressing the Mute button allows you to reduce sound to an inaudible level, and “MUTE” will
be displayed on the screen. Press the button again or press the Vol +/- button to return to the
normal state
Notes:
zWhen in the state of Mute, the microphone also has no audio output.
zIf the output has no sound, please try to press the Mute button to resume.
15. Zoom In/Out the Video Image (compatible with MPEG 4, DVD, SVCD, VCD,
JPEG discs)
The Zoom Function allows you to enlarge or zoom out the video image and to pan through
the image. Press Zoom repeatedly to activate the function and choose the required zoom
factor: Zoom 2, Zoom 3, Zoom 4, Zoom 1/2, Zoom 1/3, Zoom 1/4, Zoom Off.
Notes:This feature does not work when the Disc Menu appears.
16. Repeat a Specific Segment (compatible with MPEG 4, DVD, SVCD, VCD, CD,
HD-CD, WMA, MP3 discs)
a) During the normal or fast motion playback, press the A-B RPT button once, and
“REPEAT A-” will appear on the screen. This indicates the start of the loop to be
repeated.
b) Press A-B RPT again, and “REPEAT A-B” will appear on the screen. It indicates the

Additional Operation
12
end of the loop.
zLooping will run from set point A to set point B until you turn off Repeat.
c) Press A-B again to cancelA-B loop mode.
zWhen playing a SVCD, VCD, or CD disc, you can repeat a specific segment only
in one track. When the next track begins, A-B Repeat turns off automatically.
zWhen playing an MPEG 4 or DVD disc, you can repeat a specific segment only in
one title / chapter.
17. Volume control (compatible with MPEG 4, DVD, SVCD, VCD, CD, HD-CD, WMA,
MP3/JPEG discs)
zYou can press the Volume button on the front of the TV set or the amplifier to control the
sound level.
zPressing the Vol+ button on the remote allows you to amplify the sound level; Pressing
Vol- will reduce the sound level.
Notes:
zDuring DVD PCM output playback, this feature does not work.
18. Random playing
zYou can press the RAN button on Remote to play randomly when loading
CD,VCD,SVCD,DVD and MP3 disc.

Playing WMA, MP3 and JPEG discs
13
Chapter 3 Playing WMA, MP3 and JPEG discs
Place an MP3 / JPEG disc into the tray, and the MPEG 4 DVD player will search the directories
automatically saved in the MP3 / JPEG files. After searching, it will go to the first directory with
MP3 files and play the first song in the directory (“01:” is highlighted).The screen displays as the
picture below:
Use the Arrow buttons to enter the Directory Region and highlight the desired directory, then the
first track under it starts to playback; You can also use the Arrow buttons to enter the File Region
and select the file you want to play.
Notes:
I. Press the Left and Right arrow buttons, you can activate the Directory Region, File Region
and File Switch Region separately.
Current directory name Current MP3/JPEG file name. If a
JPEG file is playing, the name
should be *.jpg.
MPEG4 file switch
Game switch
JPEG file switch
The playing file
is MP3 music.

Playing WMA, MP3 and JPEG discs
14
II. The highlight in the Directory Region and File Region is shown in the picture above; While
it appears a transparent rectangle in File Switch Region.
III. In the File Switch Region, you can press the Left and Right arrow buttons to switch the
highlight, then press Enter; the “M”, “P”, and “G” button. For example, if a disc with
MP3 and JPEG files but without any NES files is loaded, the color of the letter “M” and
“P” will appear to white and “G” black. If an MP3 file is playing, “M” turns darker.
IV. To the disc with WMA, MP3 and JPEG files, when playing a JPEG picture, press the
Return button to return to JPEG list.
V. You can press the Numeric buttons to select the file you want to play. For example, if the
desired file is the 15th track in current list, press the “10+” button once, then press “5”,
the 15th starts to playback.
Notes: When playing a disc with MP3 files, video cannot be shown, only digital audio can
be heard.
VI. When playing JPEG pictures, press the Program button to choose the pictures switch mode.
There are 17 switch modes; Press Program repeatedly to activate the function and choose
the required switch mode: Wipe Top,Wipe bottom,Wipe L,Wipe R,,Digonal L Top,Digonal R
Top,Digonal L Bottom,Digonal R Bottom,Extend Central H,Extend Central V,Compress
Central H,Compress Central V,Window H,Window V,EDGE to Center,Random,None.
VII. When a picture is playing or pausing, press the Arrow buttons to change the display angle:
Up: flip vertical
Down: flip horizontal
Left: rotate 90 degree counter-clockwise
Right: rotate 90 degree clockwise
VIII.When a picture is playing or pausing, press the Menu button, the screen displays small
pictures. Up to 12 small pictures are displayed per screen. To view the next 12 pictures,
press the Next button to go forward and the Prev button to go to the previous page. You can
also select and play a picture in full screen by press that number on the remote.

Setup Menu System
15
Chapter 4 Setup Menu System
1. General Steps of The Setup Menu
a) Press the Setup button, the main setup menu appears.
zWhen the main menu is displayed, the MPEG 4 DVD system will pause automatically.
b) Press the Left and Right arrow buttons to highlight the icon of the desired page, then
press the Down or Right arrow button to activate that page; For example, if you want to
setup the video page, press Right to highlight the video icon, the video page will be
displayed on the screen.
c) Press the Down arrow button to highlight the desired option. Press Enter or press Right
to select, the choices of that option appear on the right; For example, press the Down
arrow button to highlight the BRIGHTNESS option, then press Enter to select, the
brightness choices appear on the right.
d) Press the Arrow buttons to highlight the Exit Setup option, then press Enter or Setup
again to exit Setup Menu.
Notes:
zWhen setup, the following buttons will turn off the setup menu: P / N, Sub-T, REV, FWD,
Vol +/-, Title, Play, Stop, Resume, Pause, Next, Prev, Zoom, Preview, Program, Repeat,
A-B RPT, Angle, language, OSD, Mute.
2. Setup Items Introduction
a) SYSTEM SETUP
SOURCE
zChoose this setting shift disc to usb device or usb device to disc.
TV SYSTEM
zNTSC: Choose this settings if your DVD player is connected to a NTSC TV.
zPAL: Choose this settings if your DVD player is connected to a PAL TV.
The default setting is PAL.
VIDEO
zInterlace-YUV: Choose this setting if your DVD player is connected to a TV with Y,
Cb, Cr video cables.
zTV-RGB: Choose this setting if your DVD player is connected to a TV with an
composite video cables,or Scart cable.
zS-VIDEO: Choose this setting if your DVD player is connected to a TV with an
S-Video cable.
zP-SCAN: Choose this setting if your DVD player is connected to a progressive
scan TV with Y, Cb, Cr video cables.
Notes:
zWhen the MPEG 4 DVD player output is composite video, you can choose the
setting randomly.

Setup Menu System
16
zChoose TV-RGB / P-SCAN if the MPEG 4 DVD player is connected to a
progressive scan TV.
zYou can Press IS/PS button on Remote to choose the relevant video model with the
DVD-player connected TV video.
The default setting is S-VIDEO.
TV TYPE
z16 : 9 (Wide Screen): Choose this setting if the MPEG 4 DVD player is connected
to a wide screen TV. If you choose this setting and you don’t have a wide screen TV,
the images on the screen may appear distorted due to vertical compression.
z4 : 3 LB (Letter Box): Choose this setting if the MPEG 4 DVD player is connected
to a normal ratio TV. Connector. You’ll see the movies in their original aspect ratio
(height-to-width ratio). You’ll see the entire frame of the movie, but it will take up
a smaller portion of the screen vertically. The movie might appear with black bars
at the top and bottom of the screen.
z4 : 3 PS (Pan & Scan): Choosing this setting if the MPEG 4 DVD player is
connected to a normal ratio TV. You can fill the movie to the entire screen of your
TV. It means that parts of the picture (the left and right edges) won’t be seen.
Notes:
zThe image display ratio is related to the recorded disc format. Some discs can not
display images in the aspect ratio you choose.
zIf you play a disc recorded in 4:3 format on a wide screen TV, black bars will
appear on the top and bottom side of the screen.
zYou must adjust the screen setting depending on the type of the television you have.
PASSWORD
The password option is initialized locked, and you cannot set the ratings limit or change
the password. In order for the Ratings feature work, the password mode must be turned
on. If you want to set the ratings limit, you will need to enter the default password,
which is 0000, then press Enter to confirm. To change the password, you will be
prompted for the old password, then be prompted for a new. Enter a 4-digit number (this
is your password).
RATING
The Rating feature is a rating limit system, like movie ratings. It works with MPEG 4
and DVD discs that have been assigned a rating. This helps you control the types of
MPEG 4 and DVD disc that your family watches.
zThere are eight rating options.
zSelect the eighth option to cancel the rating limit.
The default setting is eight.
Notes:
zIf the password option is locked, you cannot set the ratings limit; the rating limit
does not work when the password option unlocked.

Setup Menu System
17
DEFAULT
Choose this option to resume all the setup options to default settings.
b) LANGUAGE SETUP
Highlight the OSD LANGUAGE option, and press the Arrow buttons to choose the
OSD language you prefer. Press Enter to confirm, and it will display the OSD in that
language.
Highlight the AUDIO LANG option, and press the Arrow buttons to choose the audio
language you prefer. Press Enter to confirm. If the disc you are playing has that
language available, it will output audio in that language.
Highlight the SUBTITLE LANG option, and press the Arrow buttons to choose the
subtitle language you prefer. Press Enter to confirm. If the disc you are playing has that
language available, it will display subtitles in that language.
Highlight the MENU LANG option, and press the Arrow buttons to choose the menu
language you prefer. Press Enter to confirm. If the disc you are playing has that
language available, it will display the menu in that language.
Notes:
zIf your preferred language isn’t available, the disc’s default language will be
played.
c) AUDIO SETUP
Highlight the AUDIO OUT option, and press the Arrow buttons to choose the audio
output mode you prefer to. Press Enter to confirm; There are 3 optional audio output
modes: SPDIF / OFF, SPDIF / RAW, and SPDIF/ PCM.
zSPDIF / OFF: From the Coaxial Output jack and the Optical Output jack, no signal
is output.
zSPDIF/ RAW: Choose this setting if your DVD player is connected to a power
amplifier with a coaxial cable or an optical cable; When playing a disc recorded
with Dolby Digital and MPEG audio formats, the corresponding digital signals will
be output from the Coaxial Output jack or Optical Output jack. This player’s digital
output jacks are designed for a connection to a Dolby Digital or MPEG receiver or
decoder.
zSPDIF / PCM: Choose this setting if your MPEG 4 DVD player is connected to a
2-channel digital stereo amplifier; When playing a disc recorded with Dolby
Digital and MPEG audio formats, audio signals will be modulated into a 2-channel
PCM signal, and it will be output from the Coaxial Output jack or Optical Output
jack.
zMIC SETUP:Selecting Auto ,Mic function opens; when selecting off,Mic closes.
d) VIDEO SETUP
BRIGHTNESS

Setup Menu System
18
Use the Up and Down arrow button to move the scroll and adjust the brightness.
CONTRAST
Use the Up and Down arrow button to move the scroll and adjust the contrast.
HUE
Use the Up and Down arrow button to move the scroll and adjust the hue.
SATURATION
Use the Up and Down arrow button to move the scroll and adjust the saturation.
SHARPNESS
Use the Up and Down arrow button to move the scroll and adjust the saturation.
e) SPEAKER SETUP
DOWNMIX
Use the Up and Down arrow button to move the scroll and adjust the saturation.
zLT / RT: Choose this setting, it will sound like in a movie theatre if the original
movie the disc was recorded from was encoded in the Pro Logic Dolby Digital
format.
STEREO: Choose this setting, two channels of signals will be output from the left and
right soundtrack.
zVSS: Fake 5.1CH output
f) DIGITAL SETUP
The video setup options are illustrated below:
OP MODE
zLINE OUT: Choose this setting to line out the input signal. It will be more suitable
for playing in the night, for the output volume is low.
zRF REMOD: It will be more suitable to choose this setting for playing in the day
time, for the output volume is high.
DYNAMIC RANGE:
When “LINE OUT” is selected, choose this setting to adjust the line out ratio and get a
different effect. If adjusting to FULL, the audio signal peak value will be the minimum;
while adjusting to OFF, maximum.
NOTE:
This option will be valid when DOWNMIX is set to OFF.
DUAL MONO (LEFT + RIGHT)
Choose this option to setup the L and R mono output mode; There are four modes in this
option: STEREO, MONO L, MONO R, and MIX MONO; It is mainly used in karaoke mode.
REFERENCE:
zPlayer will not be used for a longer period of time, please pull out the mains plug from

Setup Menu System
19
the 230VAC.WALL outlet.
zThe player should be operated only on condition that the type of power supply
corresponds to the marking label. Otherwise, it doesn’t work or even be damaged.
zSome copy protection schemes used by movie companies may result in playback
failure,in this case the DVD player may mot be able to playback the media
zIf the player stops playback by accident, please power it on again.
Other manuals for DVD-30K
2
Table of contents
Languages:
Other LENCO DVD Player manuals

LENCO
LENCO DVD-41 MPEG4 User manual

LENCO
LENCO Diverso-700GY User manual

LENCO
LENCO DVD-120 User manual

LENCO
LENCO DVD-51 User manual

LENCO
LENCO DVD-517 H User manual

LENCO
LENCO DVP-710 User manual

LENCO
LENCO DVD-28 K - User manual

LENCO
LENCO DVD-225 User manual

LENCO
LENCO DVP-854 User manual

LENCO
LENCO DVP-723 User manual