LENCO DVD-517 H User manual

Instruction Manual
DVD-517H

AVIS RISQUE CHOC ELECTRIQUE NE
PAS OUVRIR

3

4

5
TABLE OF CONTENTS
General Steps In The Setup Menu 21
1 System Setup 22
1.1 System Setup 22
1.1.1 Source 22
1.1.2 Tv System 22
1.1.3 Video 22
1.1.4 Tv Type 22
1.1.5 Password 22
1.1.6 Rating 22
1.1.7 Default 23
1.2 Language Setup 23
1.2.1 Osd Language 23
1.2.2 Audio Lang 23
1.2.3 Subtitle Lang 23
1.2.4 Menu Language 23
1.3 AudioSetup 24
1.3.1 Audio Out 24
1.3.2 Lpcm Output 24
1.3.3 Prologic 24
1.4 Video Setup 24
1.4.1 Screen saver 24
1.4.2 Brightness 24
1.4.3 Contrast 24
1.4.4 Hue 24
1.4.5 Saturation 25
1.5 Speaker Setup 25
1.5.1 Downmix 25
1.5.2 Center Delay 25
1.5.3 Rear Delay 25
1.6 Digital Setup 25
1.6.1 Dynamic Range 25
1.6.2 Dual Mono(left + Right) 25
Mp3 & Mpeg Function 27
Jpeg Files 28
Usb Input and cardreader 29
Troubleshooting 30
Specifications 31
Precaution 3
Safety Information 4
Table of Contents 5
About Your DVD Player 6
Best Location 6
To Obtain a Clear Picture 6
Playable Discs 6
Digital Audio Output 6
Laser-Head Over-Current Protection System 6
Use of Disc 7
Handling 7
Cleaning 7
Storing 7
Front and Back panels 8
Back Panel 8
Front Panel 8
Remote Control 9
Operating the remote control 10
Connecting Devices 11
Speakers 12
Arrangement of speakers 12
Connecting speakers 13
Connecting antenna 14
Connecting power supply 15
Playing the radio 16
Basic DVD operation 17
Functions 18

6
The following will help you get the most enjoyment from your DVD receiver system.
BEST LOCATION
The unit should be placed on a firm, flat surface, away from VCRs, stereos, radios, or large
speakers, as the magnetic flux from these devices may cause distortion in the sound and a poor
picture. If placed in a cabinet, be sure there is at least 1 of free space completely around the unit
for proper ventilation.
TO OBTAIN A CLEAR PICTURE
ADVD receiver is a precision device. If the optical pick-up lens and disc drive parts become dirty
or worn down, picture quality will become poor. To obtain a clear picture, regular inspection and
maintenance are recommended every 1,000 hours of use, depending on the operating environment.
Contact dealer for details.
PLAYABLE DISCS
This DVD receiver system will play the following types of discs: DVD, MP3, CD, CD-R,
and CD-RW with super-error correction ability. It is also capable of displaying picture CDs and digital
photo albums. It supports eight languages, up to 32 subtitles, and multi-angle viewing. It features
easy setup and operation with on-screen menus. It has full function CPU up grade able capability.
DIGITALAUDIO OUTPUT
The unit's coaxial output capability enables you to connect an external six-channel AV amplifier
and processor with built-in Dolby Digital code and MPEG modulating capacity with just one
cord. This enables you to conveniently enjoy different DVD, CD, and Mp3 discs.
ANALOG AUDIOOUTPUT
Speaker system plug-and-play convenience through the built-in six-channel power amplifier
eliminates the use of an external power amplifier.
LASER-HEAD OVER-CURRENT
PROTECTION SYSTEM
To extend the service life of the laser head, the unit includes a unique laser-head over-current
protection system, ensuring a constant laser current.
"
ABOUT YOUR
DVD PLAYER

7
USE OF DISCS
This page contains valuable information regarding the handling, cleaning, and storage of discs
played in this unit.
Handling
Do not touch the playback side of the disc.
Do not attach paper or tape to discs.
Do not stick or write anything on the surface. Protect against fingerprints.
Always hold a disc by the center and edge portions.
Cleaning
Fingerprints and dirt on the disc may cause picture and/or sound deterioration. Wipe the disc from
the center outward with a soft cloth. Always keep the disc clean.
If you cannot wipe the dirt off, lightly use a slightly moistened soft cloth and finish with a dry cloth.
Do not use any type of solvent such as: Paint thinner, benzene, commercially available cleaners or
anti-static spray for vinyl LPs.
Storing
Do not store discs in places subject to direct sunlight or near heat sources.
Do not store discs in places subject to moisture and dust.
Store discs vertically in a case. Stacking or placing objects on discs outside of their case may
cause warping.

8
FRONT AND
BACK PANELS
Front Panel Functions
Back Panel Functions
5. NEXT
While in the DVD status, you may press this
button for next track. .
8. VOLUME
Use this button to control the unit's volume. It
controls all six channels simultaneously.
2. OPEN/CLOSE
Use this button to open and close the disc tray
while in DVD mode.
4. PREV
While in the DVD status, you may press this
button for previous track.
outlet, check to make sure all of the connections
have been properly completed. When they have
to power the unit.
of electricity may cause interference with other
1. POWER
Before plugging the power cord into the AC
been, carefully plug power cord into outlet.
Press the POWER button on the front panel
When the unit is initially powered, a brief surge
electronic equipment on the same circuit. If this
occurs, connect the unit to an outlet on a
different circuit.
3. PLAY/
Use this button to begin play function while in
DVD mode.
Use this button to pause play function while in
DVD mode.
PAUSE
6. INPUT SIGNAL SOURCE
Use this button to select the proper input signal
source. (Note: The selected input will correspond to
the selected input terminal on the rear panel.)
7. USB CONNECT
Readonly USB input.
9. CARDREADER
AUDIO
AUX IN LINE OUT
SW
COAXIAL
AUX
VIDEO IN VIDEO OUTPUT
Pr/Cr
VIDEO
S-VIDEO
Y
Pb/Cb SCART TV IN/OUT
AM ANTENNA FM
100-240V
50~60Hz
SPEAKER OUTPUT
SWSW
CENCEN
FLFL
FRFR
SLSLSRSR
4 4 4 4 4 8
2. ANTENNA
Use to connect the provided indoor FM and
AM loop antennas.
3. REAR
Use to connect the four terminals of the left
and right surround sound speakers.
4. FRONT/MAIN
Use to connect the four terminals of the left
and right front or main speakers.
5. CENTER/SUBWOOFER
Use to connect the four terminals of the center
and subwoofer speakers.
1. 100-240V~ 50/60HZ
This unit comes with an AC power cord. Be
sure its prongs are dry before plugging it into an
electrical outlet. Take caution not to overextend
the cord or walk on it. 6. AUX AUDIO INPUT
7 LINE OUTPUT
8. SUBWOOFER LINE OUT
9. COAXIAL OUTPUT
10. AUX VIDEO IN
11. COMPONENT VIDEO OUTPUT
12. VIDEO OUTPUT
13. S-VIDEO OUTPUT
14. SCART TV IN/OUT
21
34514
678
9
12
1310 11

REMOTE
CONTROLLER
9
0
1 2 3
4 5 6
7 8 9
TUNER SCART AUX
SETUP
FM MODE PRE/TUN
MEMO
ENTER
AUTO
STOP
+10
PAUSE/STEP PLAY
+
CH
ZOOM PROG SLOW
REPEAT
GOTO TITLE MENU DISPLAY
N/P
SUBTITLE AUDIO ANGLE
RESUME
A-B
CH.SET
MUTE
RETURN
+
R/L
DVD
PROLOGIC
VOL
23
2
4
5
6
22
7
13
19
14
15
12
10
11
9
21
20
8
1
17
18
16
3
38
37
36
24
27
25
26
28
29
32
31
30
33
35
34
39
42
40
41
43
44
1. Open/Close
2. Tuner
3. DVD
4. Scroll Up
5. FM Mode
6. Scroll Left
7. Scroll Down
8. Memo
9. Play
10. Pause/Step
11. Volume Up and Down
12. Next
13. Previous
14. Zoom
15. Program
16. Title
17. Goto
18. N/P
19. Subtitle
20. Resume
21. Return
22. Repeat
23. Mute
24. Scart input
25. AUX
26. 0-10+ Digits
27. Setup
28. Preset/Tuning
29. Scroll Right
30. Enter
31. Auto tuning
32. Stop
33. Channel Up and Down
34. Fast Reverse
35. Fast Forward
36. A - B Repeat
37. Slow
38. Menu
39. Diplay
40. AUDIO
41. Angle
42. CH.SET
43. Pro Logic
44. R/L

10
Notes:
Do not direct the remote sensor toward
any light source, such as direct sunlight or
a strong fluorescent light, as it may cause
the unit to not operate correctly.
When other remote controls are used
nearby or when the remote is used near
equipment using infrared rays, interference
may occur.
Placing an object on the remote control
may cause it to inadvertently depress a
button, changing a function and shortening
battery life.
Do not glaze the front of the DVD receiver
with colored glass, as it may cause
interference with normal operation of the
controller.
Make sure there is no barrier between the
remote control and remote sensor, as it
could prevent the unit from receiving the
signal.
Do not spill water or put wet items on the
remote control.
Never disassemble the remote control.
BATTERIES
INCORRECT USE OF BATTERIES MAY
CAUSE THEM TO LEAK, CORRODE OR EX-
PLODE.
Battery Installation
1. Push down and out on the battery Compart-
ment cover to remove it.
2. Insert the two AAA batteries into the battery
compartment of the remote control, making
sure the + and - signs on the batteries and
inside the battery compartment match up.
3. Replace the battery compartment cover.
Notes:
Do not mix batteries from different manu-
facturers, nor old ones with new.
If the remote control will not be used for an
extended period of time, remove the
batteries to prevent damage-causing
corrosion.
Remove dead batteries immediately to
prevent damage-causing corrosion.
If battery leakage occurs, wipe the battery
liquid from the battery compartment, then
replace both batteries.
Always replace both batteries at the same
time, using new, fully charged batteries.
Life expectancy of batteries may vary
depending on amount of use.
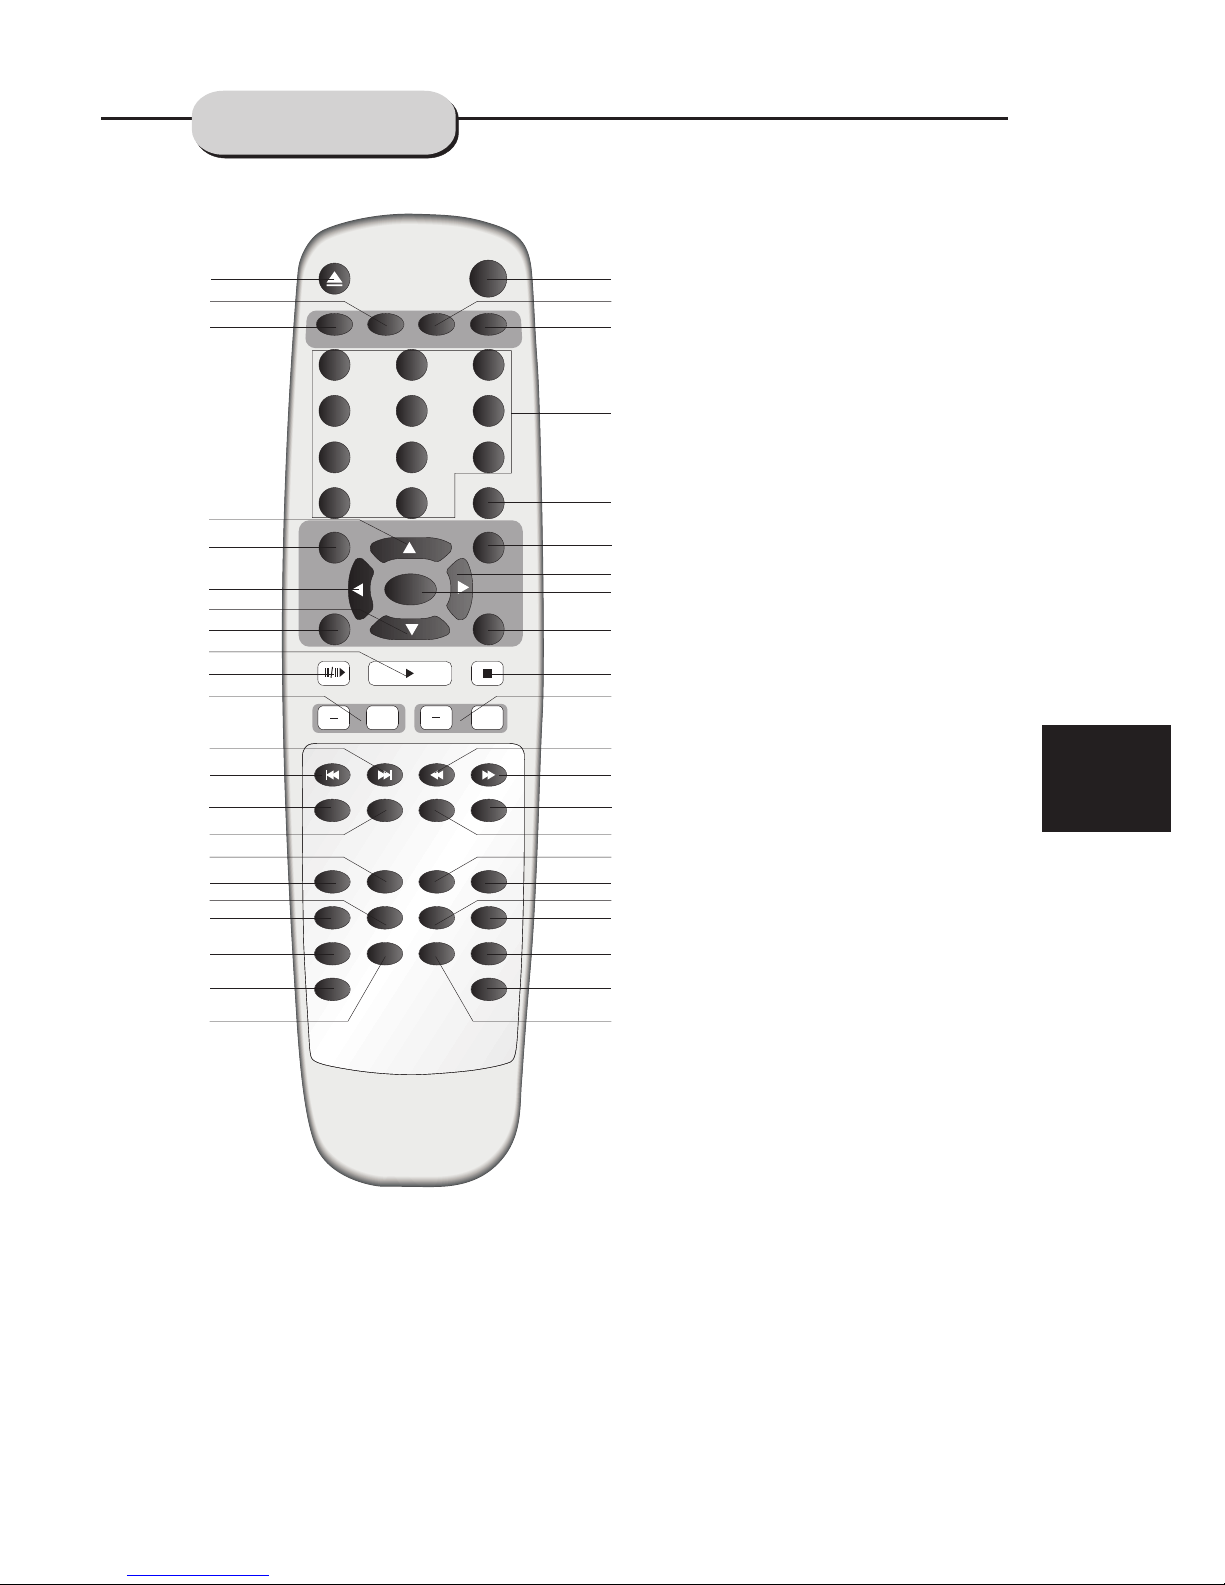
Using the Remote Control
Point the remote control at the remote sensor
on the DVD receiver. When the signal is
received from the remote, the unit will function
accordingly. The remote will operate to
approximately 16' from the remote sensor at an
angle of around 30 each direction.
""
OPERATING THE
REMOTE CONTROL

AUDIO
AUX IN LINE OUT
SW
COAXIAL
AUX
VIDEO IN VIDEO OUTPUT
Pr/Cr
VIDEO
S-VIDEO
Y
Pb/Cb SCART IN/OUT
AM ANTENNA FM
100-240V
50~60Hz
SPEAKER OUTPUT
SWSWCENCEN
FLFL
FRFR
SLSLSRSR
4 4 4 4 4 8
RECORDER
CD/DVD AUX PLAYER 1
ACTIVE
SUBWOOFER (OPTIONAL)
Connection terminals for this DVD receiver
are found on the rear panel. Read carefully
and follow the manufacturers' instructions
of any video and audio device being
connected to this unit.
Do not connect the power until all connections
have been properly completed.
Red terminal (marked R) is for connecting the
right channel. The white terminal (marked L)
is for connecting the left channel. The yellow
terminal is for video connection. Make sure
all connections are securely made. Improper
connections may cause noise, poor perfor-
mance, or cause damage to the equipment.
Do not tie the AV cord with any other cords,
such as the power cord or speaker wires, as
it may result in poor picture and/or sound
quality.
CONNECTING
DEVICES
11

12
1
2
34
5
67
The configuration and arrangement of a
surround sound system's speakers is critical.
For maximum listening enjoyment, refer to the
Arrangement of Speakers section in this manual
prior to connecting speakers.
Surround Sound Speakers
Front or main right and left speakers;
center speaker
These three speakers provide extensive
sound imaging and augment the dynamic effect
of the audio. A movie's principal dialogue comes
through these speakers.
Rear or surround sound speakers
These two speakers provide 3-D dynamic
sound effects, and create an enveloping
atmosphere, as they add background sounds.
.
Subwoofer speaker
Provides rich and powerful bass, adding a
powerful dimension of realism.
Note: Audio recorded for the center speaker and
subwoofer will be assigned to the front and 3-D
rear speakers to obtain the optimum 3-D
surround sound effect.
The ideal surround sound speaker configur-
ation may vary according to room size and wall
material. The figure below illustrates a typical
arrangement.
Hints:
Front or main speakers and central speaker
should be placed at the same level and in a way
that sound is oriented toward the listener's ears.
3D surround sound or rear speakers should
be placed 3' higher than the height of listener's
ears.
Subwoofer speaker may be placed anywhere
within the room, as its location produces little
effect on a listener's sensation to sound. To
obtain the optimum bass effect, a subwoofer is
recommended in home theater systems.
1.TV set or screen
2. Front or main left speaker
3.Subwoofer
4.Center speaker
5.Front or main right speaker
6.3-D surround sound left speaker
7.3-D surround sound right speaker
8.Viewer's location
SPEAKERS ARRANGEMENT
OF SPEAKERS

AUDIO
AUX IN LINE OUT
SW
COAXIAL
AUX
VIDEO IN VIDEO OUTPUT
Pr/Cr
VIDEO
S-VIDEO
Y
Pb/Cb SCART IN/OUT
AM ANTENNA FM
100-240V
50~60Hz
SPEAKER OUTPUT
SWSW
CENCEN
FLFL
FRFR
SLSLSRSR
4 4 4 4 4 8
Subwoofer speaker
Surround speaker
Surround speaker
Center speaker
Main speaker Main speaker
This well-designed DVD receiver provides
optimum sound quality when the speakers used
are within the range of their rated impedance.
Important
The minimum impedance of the five speaker
terminals is 4 ohm; for the subwoofer, it is
8 ohm.
If you want to use only one speaker or listen
to monophonic music, do not parallel connect
individual speakers to the left and right
channel terminals. See the figure on the left
below.
Connecting Speaker Cables
1.Peel off approximately 1/ 2 of cable
insulation
2.Tighten the wire end (#2 below)
3.Open cable terminal by pressing back on
tab
4.Insert wire end into terminal
5.Release tab; make sure wire is in terminal
securely
Note: To prevent damage to the circuit, care
should be taken to prevent short circuiting from
occurring at the positive and negative poles of
the speaker cord.
"
CONNECTING
SPEAKERS
12
13
3 4
5

14 AM
FM
FM
Outdoor AM antenna
Coaxial cable(75 ohm)
Coaxial cable (75 ohm)
Outdoor FM antenna
Radio signals may be difficult to receive in
some buildings and under certain conditions.
The provided antennas will help in their reception.
They are intended for indoor use only.
AM Loop Antenna
The placement of the AM loop antenna should be
in a direction that provides the clearest
reception. Keep as far as possible from DVD
receiver, TV set, and speaker and power cords.
If reception remains poor, an outdoor antenna
may be necessary.
To connect the AM loop antenna:
1.Hold down the handle
2.Insert the wire end into the hole
3.Release the handle
Position for best reception
FM Indoor Antenna
The FM antenna should be fully extended and
in a direction that provides the clearest
signal. Secure the antenna ends in a location
Where distortion is at a minimum. If reception
remains poor, an outdoor antenna may be
necessary.
2
3
1
CONNECTING
ANTENNA

15
BASIC OPERATION
Before plugging the power cord into the AC outlet, check to make sure all of the connections
have been properly completed. When they have been, carefully plug the power cord into the outlet.
Press the POWER button on the front panel to power the unit. The display panel will light up.
When the unit is initially powered, a brief surge of electricity may cause interference with the other
electronic equipment on the same circuit. If this occurs, connect the unit to an outlet on a different
circuit.
Selecting Sound Source
1. Press any function button (DVD, TUNER,
TV, AUX) to select the desired sound source.
The appropriate symbol will appear in the display.
2. When the TUNER button is pressed,
the last station listened to will be played.
Note: The desired program source will not play
unless it and the selected signal button coincide
with the active program source signal input.
Volume Control
The volume may be adjusted by either turning
the large volume knob on the front panel or
using the appropriate volume button on the
remote control.
Mute
Pressing the MUTE button temporarily mutes
every speaker. To resume audio, press the MUTE
button again.
CONNECTING
POWER SUPPLY

16
Memory number
Wave band Station frequency
To Play Preset Stations
1.Press the TUNER button to select the
desired wave band.
2.Press the PRE/TUN button.
3.Press any of the numbered buttons to
select the desired station's memory number.
For example, to play the station at memory
#5, simply press the 5 button; for memory
#17, press the 1 button followed by the 7
button.
4.Stations in the memory function may also
be accessed by pressing the UP or DOWN
button.
PLAYING THE RADIO
Automatic Tuning
This unit will store up to 40 individual AM or
50 individual FM/AM radio stations in its
1.Press the AUTO button. The word AUTO
will appear in the display and the automatic
2.Stations will be stored in ascending order
until 50 stations of that particular wave band
have been saved. When a station is stored,
the memory storage number, as well as the
station's frequency.
3.When the total number of stations reaches
50, in a particular wave's (AM or FM)
memory, no further station in that wave band will
be saved.
Positioning
1.Press the TUNER button to select the desired
wave band (AM or FM).
2.Press CH+ or CH- button to find a station.
The frequency will change with each press.
When a station's signal is received, it will
appear in the display.
3.To lock onto a station quickly, hold the UP
or DOWN button for two seconds. The unit
will start automatic tuning. When a station
is found, automatic tuning stops.
4. To reduce noise when an FM-stereo program
has been received, press the MONO button.
The word STEREO will disappear from the
display. The program is now heard in
monographic form, reducing the noise. To
resume stereo play, press the MONO button
again.
Tuner button
Number button
0
1 2 3
4 5 6
7 8 9
TUNER SCART AUX
SETUP
FM MODE PRE/TUN
MEMO
ENTER
AUTO
STOP
+10
PAUSE/STEP PLAY
+
CH
ZOOM PROG SLOW
REPEAT
GOTO TITLE MENU DISPLAY
N/P
SUBTITLE LANGUAGE ANGLE
RESUME
A-B
CH.SET
MUTE
RETURN
+
R/L
DVD
PROLOGIC
VOL
tuning mode is activated.

17
BASIC DVD
OPERATION
NO DISC
LOADING
POWER
If there is no disc, NO DISC will be shown on screen:
OPEN
OPEN/CLOSE
Once the unit is connected to a television
set and any other accessory equipment, you
are ready to enjoy the excitement of DVD videos
or your favorite CDs and MP3 files.
To play a DVD video disc:
Turn on the TV and select the A/V mode. If
the set features an SCART connection, be sure
the SCART mode is selected from the TV menu.
Turn on the amplifier, if connected. Select AC-3
or DVD mode.
To play an audio disc:
Turn on the audio system and choose the
input source that is connected to the DVD player.
Set the SPDIF OUTPUT to SPDIF OFF from the
SETUP MENU display if you don't have the
proper equipment for Dolby Digital surround
sound.
1. Press the POWER key on the front panel.
DISC LOADING appears on screen.
2. Press the OPEN/CLOSE key. The disc
tray will open.
3. Place the disc on the disc tray. Be sure
label side is facing up wards on the tray.
4. Press the OPEN/CLOSE key to close tray.
The disc tray will close. The disc type will
appear in the upper-left-hand corner of the
screen.
Once ithas read the disc, the unit automati-
cally will begin playback. When playing a DVD,
the DVD title or menu will appear. CD tracks are
played in sequence.
Note:
It is possible to damage a disc if it is not
placed correctly on the guides in the disc tray.
This may also cause the DVD player to
malfunction. Do not force or place anything
other than a 5 DVD or CD onto the disc tray.
Never move the DVD player during playback,
as this may cause damage to the disc as well as
the player. To open and close the disc tray, only
use the OPEN/CLOSE key found on both the
remote control and on the unit's front panel.
"
6.Fast Forward/Reverse Playback
The unit features both fast forward and fast
reverse playback. Either mode will speed up:
2x,4x,8x,20x.
Press PAUSE key:
Press PREV key:
Press NEXT key:
FRONT PANEL
PLAY
FRONT PANEL
REMOTE CONTROL
REMOTE CONTROL
FRONT PANEL
REMOTE CONTROL
REMOTE CONTROL
5. PREV/NEXT playback
Press key or key , play previous or next
track. To resume normal playback, press PLAY key.
REMOTE CONTROL
PAUSE
OPEN/CLOSE
PAUSE
PLAY

18
BASIC DVD
OPERATION FUNCTIONS
Memory Playback
This unit allows the viewer to stop playback,
And continue playback from that exact discLocation
Later onPress the STOP key to halt playback.
The unit then will memorize the location where
playback was stopped. To resume watching,
press the PLAY key and the unit will
resume playback from the exact location where
playback was stopped. (Exclude Mp3 DISC)
When you play DVD discs, press the MENU or
TITLE key to return to the menu and title,the unit then
will memorize the location, To resume watching
press the PLAY key and the unit will resume
playback from the exact location.
Slow Motion
This DVD receiver has the ability to play
discs in slow motion
Each time the SLOW key is
pressed, the speed will slow
speed1/ 2,1/ 3, 1/4,
1/ 5,1/6,1/7,to normal playback resume normal
playback,press the PLAY key.
PLAY
SLOW
Screen Display
While adisc is playing, the status of various
functions may be checked, such as the tile, track
number, and several time categories.
1. Press the DISPLAY key once and the title
appears along with the chapter and how much
playing time has passed.
2. Press the DISPLAY key again and the
remaining time for that particular title appears.
3. Press the DISPLAY key again and the total
elapsed time for that particular chapter appears.
4. Press the DISPLAY key again and the
total remaining time for that particular chapter
appears.
5. Press the DISPLAY key again and the
display turns off.
TT 01/02 CH 02/ 28
00:21:05
TITLE REMAIN
01£º44£º34
CHAPTER ELAPSED
00£º05£º29
CHAPTER REMAIN
00£º07£º36
2X
2X
Toactivate either function, simply press the
key or key on the remote control. The
speed changes each time the key is pressed.
To resume normal playback, press the PLAY key.
DISP
.

19
N/P
This DVD receiver supports video output of
various systems, including auto, NTSC, and PAL.
The picture will blink and become colourless
when the wrong system is selected. (NTSC for
North America, PAL for Europe). For more
information on the output format, refer to the TV
set's manufacturer's instructions.
Subtitles
The unit has the capability to display subtitles
in any of 32 different languages.
1. Press the SUBTITLE key. The subtitle
menu will appear. Select the desired language
by pressing the SUBTITLE key.
2. To remove the subtitles from view, press
the SUBTITLE key until they disappear.
Note: The disc being played must be multi-
subtitle encoded.
SUBTITLE OFF
SUBTITLE 02/08 ENGLISH
Camera Angle
The ability to change the camera angle allows
the viewer to play director and watch a movie from
different perspectives.
1. Press the ANGLE key on the remote control.
With each press, the camera angle changes.
2. The key may be pressed only when the
flashing angle icon appears in the unit's display
panel.
Note: Camera angle may be changed only in
discs with multi-angle capability encoded
into them.
Language
The unit has the capability to show movies in
one of eight languages.
1. Press the AUDIO key. The language
menu will appear. Select the desired language
by pressing the AUDIO key.
Note: The disc being played must be multi-lan-
guage encoded.
1/4
AUDIO 1/8 AC-3 2CH ENGLISH
LOCATING A TITLE
DVD discs are normally divided into titles,
which are then sub-divided into chapters. A
specific title can be easily found with this unit.
Specific titles can be found using either the title
menu function, if the DVD disc contains a title
menu, or through its unique title number.
Title Menu Function
1. Press the TITLE key. The title menu will
appear on the TV screen.
2. Press the appropriate scroll key to select
the desired title. A title may also be located by
pressing its assigned number with the number
buttons.
3. Press the ENTER key . This will start
playback from chapter 1 of the selected title.
Note:
Some discs do not respond to this function. If
different instructions appear on the TV screen,
follow those instructions. The Instructions given
here describe the basic procedure. Procedures
may vary depending on the content of the DVD
disc. When playing a VCD2.0 disc, the TITLE
key can be used to return to menu.
FUNCTIONS
SUBTITLE
AUDIO
ANGLE

20
Time
This DVD receiver can display various data
regarding the disc being played. Press the
DISP button for the following.
1. Press once, the number of titles and
chapters in each title appears
.
2. Press again, the time of a selected title
appears.
TITLE 01/02 CHAPTER 06/28
TITLE 01/02 TIME£-£-:£-£-:£-£-
MENU: MENU/PBC
With the PBC function on, choosing a song
on a CD can only be done when you are in
the main menu. With the PBC function off, song
selections can be made by entering the relevant
number keys. The menu content of the disc will
appear when the MENU button is pressed while
a DVD disc is playing.
AUDIO
SUBTITLES
PLAY
Repeat Play
This DVD receiver allows repeated playback
of specific titles, chapters/tracks, or segment.
It even allows switching between two items that
are being repeated.
1. Select the item to repeat.
2. Press the REPEAT key.
CHAPTER
TITLE
FUNCTIONS
DISP
DISP
REPEAT
MENU
REPEAT
ALL
REPEAT
VOL_L +00db
MONO/
CH.SEL
AMP Volume up/down Adjustment
Press the CH.SEL button on the remote control, TV
OSD appears:
VOL_L +00db
Press CH.SEL twice, OSD Appears:
VOL_R +00db
Press CH.SET three to seven times the OSD
converts into SUR_L,SUR_R,Center And Woofer
VOL_SUR_L +00db
VOL_SUR_R +00db
VOL_Center +00db
VOL_Woofer +00db
Press CH.SET continually And it will Repeat the
cycle.
Press the VOL+ or VOL- button on the remote
control to change the Volume value of L,R,SUR_L ,
SUR_R,Cente or Woofer
separately.
The repeat mode changes each time the
REPEAT key is pressed (i.e., from title repeat
to chapter repeat, all repeat , to repeat off.)
Other manuals for DVD-517 H
3
Table of contents
Other LENCO DVD Player manuals

LENCO
LENCO DVD-120BK User manual

LENCO
LENCO DVD-431 User manual

LENCO
LENCO DVP-713 User manual

LENCO
LENCO DVD-120 User manual

LENCO
LENCO DVP-938X2 User manual

LENCO
LENCO DVD-07 User manual

LENCO
LENCO DVD-432 User manual

LENCO
LENCO DVP-933 User manual

LENCO
LENCO EASY CENTER 1000 User manual

LENCO
LENCO DVP-710 User manual

LENCO
LENCO DVD-28 K - User manual

LENCO
LENCO KDV-309 User manual

LENCO
LENCO DVD-431 User manual

LENCO
LENCO DVD-320 User manual

LENCO
LENCO DVD-30K User manual

LENCO
LENCO DVD-28 K - User manual

LENCO
LENCO DVD-321 User manual

LENCO
LENCO DVD-29 User manual

LENCO
LENCO DVP-854 User manual

LENCO
LENCO DVD-225 User manual