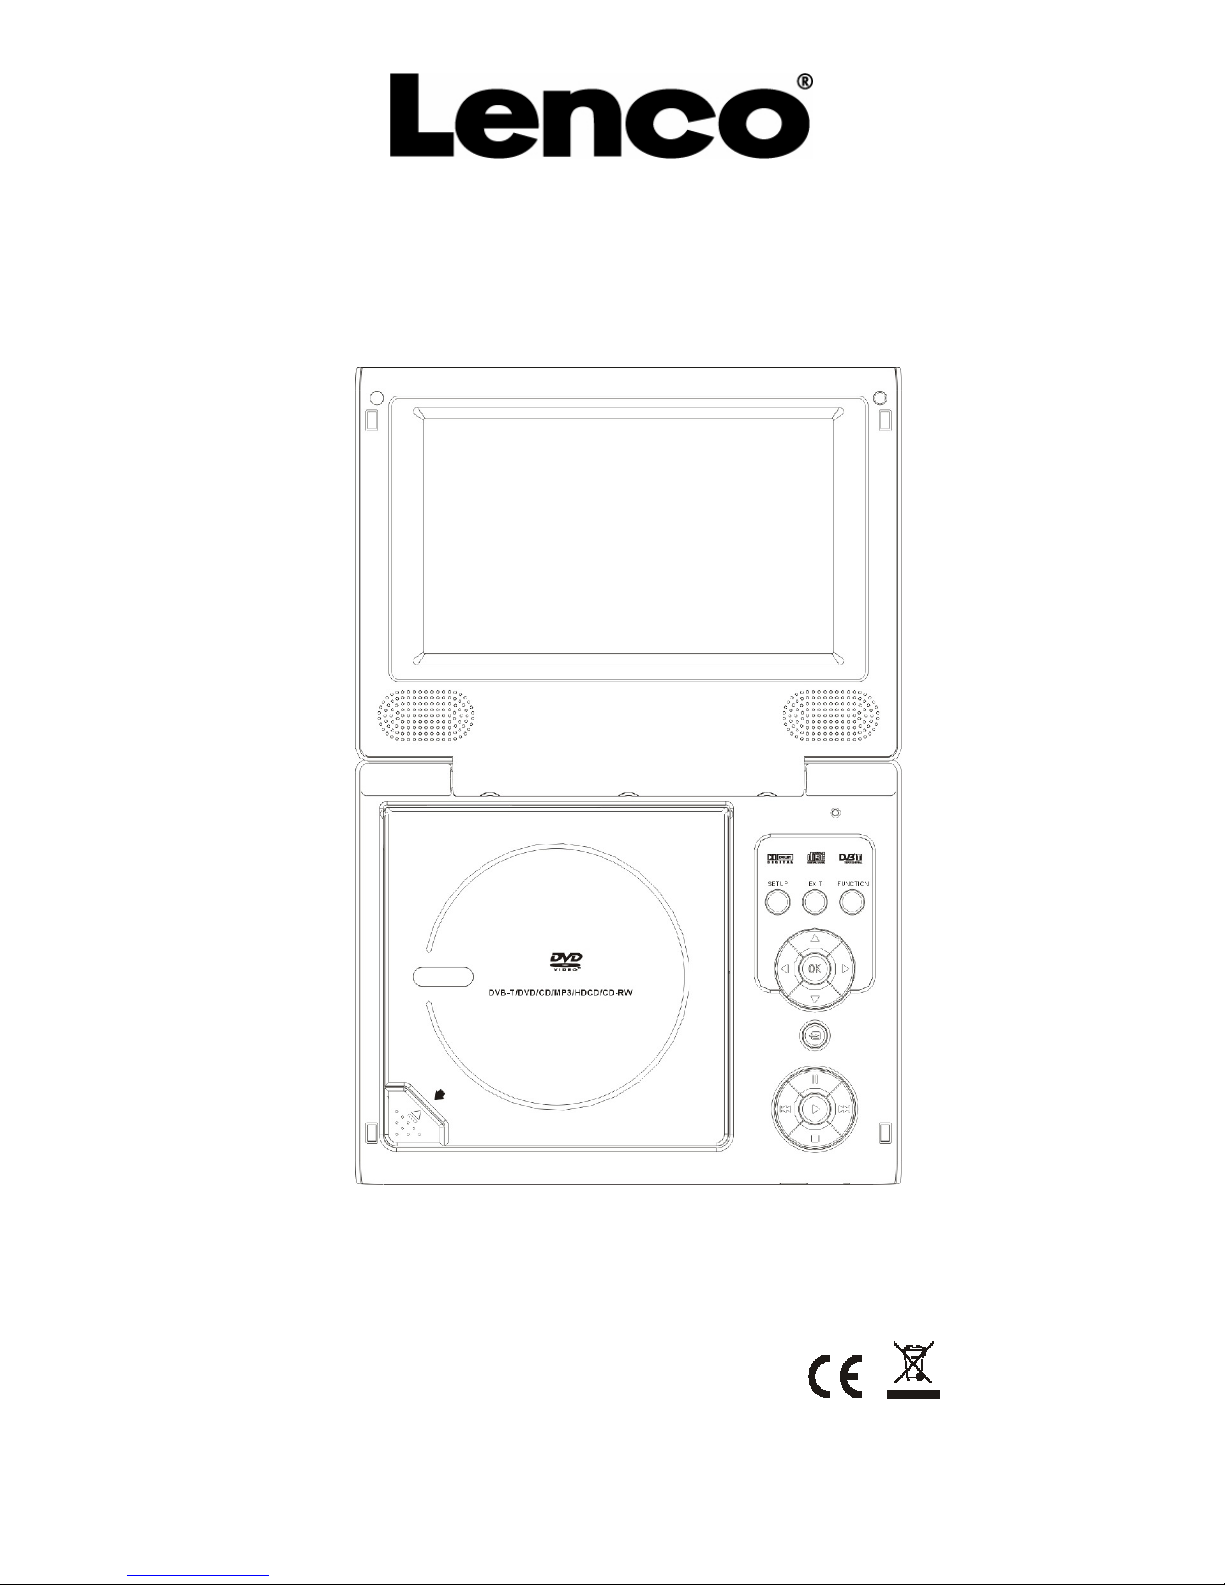
LENCO DVP-753 User manual

DVP-753
USER
MANUAL
DVD/CD/MP3/CD-RW PLAYER ATV/DVB-T tuner
Please read this User Manual carefully to ensure proper use of this
product and keep this manual for future reference.

DVD UserManual Content
INTRODUCTION
Safety
Precautions
2
Important Safety Instructions
3
Precautions
4
Accessories
6
Panel Illustration
7
CONNECTIONS
Connecting to a TV set
8
Connecting to an AV Amplifier with Digital Audio Input
9
Connecting to the USB
10
BASIC
PLAYBACK
Basic Operation
11
REMOTE
CONTROL
OPERATION
Remote Control
12
Remote Control Operation
13
DVD
PART
The Setup Menu System
18
MPEG4/MP3 PLAYBACK
28
Playing a JPEG file
29
KODAK Picture CD playback
30
DVB
PART
The Setup Menu System
31
ATV
PART
The Setup Menu System
40
SCREEN
SET
PART
The Setup Menu System
43
OTHERS
Troubleshooting
44
Specifications
46

Safety Precautions
Introduction
THE
LIGHTNING
FLASH
WITH
ARRO-
WHEAD
SYMBOL
WITHIN
AN
EQUIL-
ATERAL
TRIANGLE
IS
INTENDED
TO
ALERT
THE
USER
TO
THE
PRESEN- CE
OF
UNINSULATED
"DANGEROUS
VOLTAGE"
WITHIN
THE
UNIT'S
CABI-
NET
THAT
MAY
BE
OF
SUFFICIENT
MAGNITUDE
TO
CONSTITUTE
A
RISK OF
ELECTRIC
SHOCK
TO
PERSONS.
THE
EXCLAMATION
POINT
WITHIN
AN
E
Q
U
IL
A
T
E
R
A
L
T
R
IA
N
G
L
E
IS
INTENDED
TO
ALERT
THE
USER
TO THE
PRESENCE
OF
IMPORTANT OPERATING
AND
MAINTENANCE
(SERVICING)
INSTRUCTIONS
IN
THE MANUAL
ACCOMPANYING
THE
UNIT.
WARNING:
TO
PREVENT
FIRE
OR
ELECTRIC
SHOCK,
DO NOT
EXPOSE
THE
UNIT
TO
RAIN
OR
MOISTURE. NEVER
ATTEMPT
TO
OPEN
THE
CABINET, DANGEROUS
HIGH
VOLTAGES
ARE
PRESENTED IN
THE
UNIT.
REFER
SERVICING
TO
QUALIFIED SERVICE
PERSONNEL.
CAUTION:
TO
PREVENT
ELECTRIC
SHOCK,
MATCH
WIDE-
BLADE
PLUG
WITH
WIDE
SLOT
AND
FULLY
INSERT.
THE
APPARATUS
SHALL
NOT
BE
EXPOSED TO
WATER
AND
NO
OBJECTS
FILLED
WITH
LIQUID
SUCH
AS
VASES
SHALL
BE
PLAC- ED
ON
THE
APPARATUS.
CAUTION:
THE
UNIT
EMPLOYS
A
LASER
SYSTEM.
TO
EN-
SURE
THE
PROPER
USE
OF
THE
UNIT,
READ
THIS
MANUAL
CAREFULLY
AND
KEEP
IT
FOR
FUTURE
REFERENCE.
IF
THE
UNIT
REQUIRES
SERVICING,
CONTACT
THE
SELLER
OR
SEE
"TROUBLESHOOTING".
TO
PREVENT
DIRECT
EXPOSURE
TO
THE
LASER
RADIATION,
DO
NOT
OPEN
THE
CABINET.
VISIBLE
LASER
MAY
RADIATE
WHEN
THE
CABINET
IS
OPENED
OR
THE
INTERLOCKS
ARE
DEFEATED.
DO
NOT
STARE
INTO
THE
LASER
BEAMS.
CAUTION:
THE
DVD
VIDEO
PLAYER
IS
A
CLASS
1
LASER
PRODUCT.
USE
OF
CONTROLS
OR
ADJUST-
MENTS
OR
PERFORMANCE
OF
PROCEDURES
OTHER
THAN
THOSE
SPECIFIED
HEREIN
MAY
RESULT
IN
HAZARDOUS
RADIATION
EXPOSURE.
AS
THE
LASER
BEAM
USED
IN
THIS
DVD
VIDEO
PLAYER
IS
HARMFUL
TO
THE
EYES,
DO
NOT
ATTEMPT
TO
DISASSEMBLE
THE
CABINET.
REFER
SERVICING
TO
QUALIFIED
PERSONNEL
ONLY.
WARNING:
FCC
REGULATIONS
STATE
THAT
ANY
CHANGE OR
MODIFICATION
TO
THE
EQUIPMENT,
NOT EXPRESSLY
APPROVED
BY
MAKER
OR
ITS AUTHORIZED
PARTIES,
COULD
VOID
USER'S AUTHORITY
TO
OPERATE
THIS
EQUIPMENT.
WARNING:
The
mains
plug/appliance
coupler
is
used
as
the
disconnect
device,
the
disconnect
device
shall remain
readily
operable.
Always
remember
to
remove
the
plug
from
the
mains
socket
before
disconnecting
the
power leas
from
the
unit.
The
apparatus
shall
not
be
exposed
to
dripping
or
splashing
and
that
no
objects
filled
with
liquids, such
as
vases,
shall
be
placed
the
apparatus
No
naked
flame
sources
such
as
lighted
candles
should
be
placed
on
the
apparatus
The
use
of
apparatus
in
moderate
climates
WARNING:
Attention
should
be
drawn
to
the
environmental
aspects
of
battery
disposal.
Danger
of
explosion
if
battery
is
incorrectly
replaced.
Replace
only
with
the
same
or
equivalent
type.
-1-

Important Safety Instructions
Introduction
1.
Read
Instructions
All
the
safety
and
operating
instructions
should
be
read
before
the
product
is
operated.
2.
Retain
Instructions
The
safety
and
operating
instructions
should
be
retained
for
future
reference.
3.
Heed
Warnings
All
warnings
on
the
product
and
in
the
operating
instructions
should
be
adhered
to.
4.
Follow
Instructions
All
operating
instructions
should
be
followed.
5.
Cleaning
Unplug
this
product
from
the
wall
outlet
before
cleaning.
Do
not
use
liquid
cleaners
or
aerosol
cleaners.
Use
a
damp
cloth
for
cleaning.
6.
Attachments
Do
not
use
attachments
not
recommended
by
the
product
manufacturer
as
they
may
cause
hazards.
7.
Water
and
Moisture
Do
not
use
this
product
near
water
for
example,
near a
bathtub,
wash
bowl,
kitchen
sink,
or
laundry
tub;
in
a
wet
basement;
or
near
a
swimming
pool;
and
the
like.
8.
Accessories
Do
not
place
this
product
on
an
unstable
cart,
stand,
tripod,
bracket,
or
table.
The
product
may
fall,
causing
serious
injury
to
a
child
or
adult,
and
serious
damage to
the
product.
Use
only
with
a
cart,
stand,
tripod,
bracket,
or
table
recommended
by
the
manufacturer,
or
sold
with
the
product.
Any
mounting
of
the
product
should
follow
the
manufacturer's
instructions,
and
should
use
a
mounting
accessory
recommended
by
the
manufacturer.
9.
Portable
Cart
Warning
A
product
and
cart
combination
should
be
moved
with
care.
Quick
stop,
excessive
force,
and
uneven
surface
may
cause
the
product
and
cart
combination
to
overturn.
(Symbol provided by RETAC)
10.
Ventilation
Slots
and
openings
in
the
cabinet
are
provided
for
ventilation
and
to
ensure
reliable
operation
of
the
product
and
to
protect
it
from
overheating,
and
these
openings
must
not
be
blocked
or
covered.
The
openings
should
never
be
blocked
by
placing
the
product
on
a
bed,
sofa,
rug,
or
other
similar
surface.
This
product
should
not
be
placed
in
a
built-in
installation
such
as
a
bookcase
or
rack
unless
proper
ventilation
is
provided
or
the
manufacturer's
instructions
have
been
adhered
to.
11.
Power
Sources
This
product
should
be
operated
only
from
the
type
of
power
source
indicated
on
the
marking
label.
If
you
are
not
sure
of
the
type
of
power
supply
to
your
home,
consult
your
product
dealer
or
local
power
company.
For
products
intended
to
operate
from
battery
power
or
other
sources,
refer
to
the
operating
instructions.
12.
Grounding
or
Polarization
This
product
may
be
equipped
with
a
polarized
alternating
current
line
plug
(a
plug
having
one
blade
wider
than
the
other).
This
plug
will
fit
into
the
power
outlet
only
one
way.
This
is
a
safety
feature.
If
you
are
unable
to
insert
the
plug
fully
into
the
outlet,
try
reversing
the
plug.
If
the
plug
should
still
fail
to
fit,
contact
your
electrician
to
replace
your
obsolete
outlet.
Do
not
defeat
the
safety
purpose
of
the
polarized
plug.
13.
Power
Cord
Protection
Power
supply
cords
should
be
routed
so
that
they
are
not
likely
to
be
walked
on
or
pinched
by
items
placed
upon
or
against
them,
paying
particular
attention
to
cords
at
plugs,
convenience
receptacles,
and
the
point
where
they
exit
from
the
product.
-2-

Important Safety Instructions
Introduction
14.
Outdoor
Antenna
Grounding
If
an
outside
antenna
or
cable
system
is
connected
to
the
product,
be
sure
the
antenna
or
cable
system
is
grounded
so
as
to
provide
some
protection
against
voltage
surges
and
built-up
static
charges.
Article
810
of
the
National
Electrical
Code,
ANSI/NFPA
70,
provides
information
with
regard
to
proper
grounding
of
the
mast
and
supporting
structure,
grounding
of
the
lead-in
wire
to
an
antenna
discharge
unit,
size
of
grounding
conductors,
location
of
antennadischarge
unit,
connection
to
grounding
electrodes,
and
requirements
for
the
grounding
electrode.
See
figure
below.
15.
Lightning
For
added
protection
for
this
product
during
a
lightning
storm,
or
when
it
is
left
unattended
and
unused
for
long
periods
of
time,
unplug
it
from
the
wall
outlet
and
disconnect
the
antenna
or
cable
system.
This
will prevent
damage
to
the
product
due
to
lightning
and power
lines
surges.
16.
Power
Lines
An
outside
antenna
system
should
not
be
located
in
the
vicinity
of
overhead
power
lines
or
other
electric
light
or
power
circuits,
or
where
it
can
fall
into
such
power
lines
or
circuits.
When
installing
an
outside
antenna
system,
extreme
care
should
be
taken
to
keep
from
touching
such
power
lines
or
circuits
as
contact with
them
might
be
fatal.
17.
Overloading
Do
not
overload
wall
outlets,
extension
cords,
or
integral
convenience
receptacles,
as
this
can
result
in
a
risk
of
fire
or
electric
shock.
18.
Object
and
Liquid
Entry
Never
push
objects
of
any
kind
into
this
product
through
openings
as
they
may
touch
dangerous
voltage
points
or
short-out
parts
that
could
result
in
a
fire
or
electric
shock.
Never
spill
liquid
of
any
kind
on
the
product.
19.
Servicing
Do
not
attempt
to
service
this
product
yourself
as
opening
or
removing
covers
may
expose
you
to
dangerous
voltage
or
other
hazards.
Refer
all
servicing
to
qualified
service
personnel.
20.
Damage
Requiring
Service
Unplug
this
product
from
the
wall
outlet
and
refer
servicing
to
qualified
service
personnel
under
the
following
conditions:
A)When
the
power-supply
cord
or
plug
is
damaged,
B)If
liquid
has
been
spilled,
or
objects
have
fallen into
the
product,
C)If
the
product
has
been
exposed
to
rain
or
water,
D)If
the
product
does
not
operate
normally
by
following
the
operating
instructions.
Adjust
only
those
controls
that
are
covered
by
the
operating
instructions
as
an
improper
adjustment
of
other
controls
may
result
in
damage
and
will
often
require
extensive
work
by
a
qualified
technician
to
restore
the
product
to
its
normal
operation,
E)If
the
product
has
been
dropped
or
damaged
in
any
way.
F)When
the
product
exhibits
a
distinct
change
in
performance
this
indicates
a
need
for
service.
21.
Replacement
Parts
When
replacement
parts
are
required,
be
sure
the
service
technician
has
used
replacement
parts
specified
by
the
manufacturer
or
have
the
same
characteristics
as
the
original
part.
Unauthorized
substitutions
may
result
in
fire,
electric
shock,
or
other
hazards.
22.
Safety
Check
Upon
completion
of
any
service
or
repairs
to
this
product,
ask
the
service
technician
to
perform
safety
checks
to
determine
that
the
product
is
in
proper
operating
condition.
23.
Wall
or
Ceiling
Mounting
The
product
should
be
mounted
to
a
wall
or
ceiling
only
as
recommended
by
the
manufacturer.
24.
Heat
The
product
should
be
situated
away
from
heat
sources
such
as
radiators,
heat
registers,
stoves,
or
other
products
(including
amplifiers)
that
produce
heat.
-3-

Precautions
Storage and Keeping
Introduction
Keep this device
away from too hot or
too cold places. The
storage temperature
of this machine is-
20~
60C,the application
temperature ofthis
machine is 5~35C.
Never use this
machine near a
bathtub,
washbasin,and
kitchen, etc places
with water or at a
damp basement,
swimming pool or
similar places..
Never expose the
device to moisture,
dust or oil smoke etc.
Environment.
Avoid this
machine from
dropping or
impacting.
Do not place the
device in a case
together with your
mobile phone
because of
electrostatic
discharge.
Never
extrude
or
shave
this
machine
with
sharp
objects.
Maintenance
Please plug off all connection wires before you start cleaning this machine.
Please wipe the
machine cover,
display screen
and buttons with a
soft cloth
dipped in a mild
solution of washing
–up liquid.
Do not use any
typ of solvent
such as: paint
thinner, benze,
commercially
available
cleaners or anti-
static spray for
vinyl LP’s
-4-

Precautions
Operation Precautions
Introduction
1. Only the attached AC adapter and the automobile adapter(12V) are suitable.
2. For the sake of safety, when you do not intend to use the display, Please unplug the AC adapter or automobile
adapter.
Earphone Operation Precautions
1. Please don,t tune your headphone / earphone at too high volume, otherwise, it may lead inconvenience and
danger to yourself and other people.
2. For open-designed earphone, to avoid influencing your periphery, please turn down the volume.
3. In case of any tinnitus, please tune down the volume or stop using this machine.
4. It is recommended by the aurists that the earphone should not be continuously used for a prolong period.
Warning!
1. For the sake of safety for yourself and others, please do not watch or turn on the TV set while driving.
2. It is very dangerous to watch or operate TV white driving.
Special
notice
Never try to repair this machine by yourself. In case of any faults. Please turn off the display at once, and
notify our Company or the corresponding dealer. The display is made up of many precision electronic
components. Any disassembly or modification may lead to further damage.
-5-

Accessories
AC/DC adapter Remote control
AV line LI type batteries
Car adapter Digital DTV antenna
USB line
BAG & STRAPS!
-6-

Panel Illustration
ILLUSTRATION DIFFERENT FROM SAMPLE!
1
LCD
DISPLAY
2
SPEAKER
RIGHT
3
SPEAKER
LEFT
4
DISC
TOP
5
OPEN
DISC
TOP
6
SETUP
7
EXIT
8
FUNCTION
9
MOVE(
,
,
,
)
10
SOURCE
11
PAUSE
12
PREV
13
NEXT
14
PLAY
15
STOP
16
LIGHT
17
SENSOR
18
POWER
(
ON/OF)
19
DC
12V
INPUT
JACK
20
VIDEO
21
AUDIO
22
COAXIAL
23
PHONE
24
VOLUME
25
USB
26
BATTERY
INSERT/REMOVE
BUTTON
27
DC
12V
INPUT
JACK
(CHARGE
SOCKET)
28
ANT
IN
29
LED
light
(RED:
batteries
charge
indicator
GREEN:
batteries
charge
full
indicator)
Note:
Don’t
supply
charge
when
working
on
-7-

Connecting to a TV Set
Connections
-8-

Connecting to an AV Amplifier with Digital Audio Input
Notes:
1. Select the coaxial digital audio output.
2. Set the player's audio out to
Raw
or
PCM
mode .
3. Set the Digital Amplifier to the AV input connected to the DVD player.
-9-

CONNECT TO THE USB
Press
the
SOURCE
key
on
the
remote
control
until the device switches
into
USB
work
mode
USB interface
This unit has a USB jack, when you want to play the USB DISC, you can
insert a USB DISC or an MP3 Player with USB Interface to play the MP3 music or
and JPEG files or other files. Press the <SOURCE> button to choose USB mode.
All the functions are the same as disc playback.
-10-

Basic Operation
Preparation
before
playing:
STEP
1
-
Press
ON
to
start
the
player.
The
DVD logo
appears
on
the
TFT screen.
STEP
2
-
Push
OPEN
on
the
front
panel
.
When
the
tray
is
opened,
place the
disc
on
the
tray
with
the
label
side up.
STEP
3-
Press
the
PLAY
button
on
the
front
panel
or
remote
con- trol.
The
player
will
automatical-
ly
read
and
identify
the
disc,
and start
playback.
-11-

Remote Control
Remote
Control
1
MUTE
2
4:3/16:9
3
VOL
+
4
VOL
-
5
SCAN
6
FAVORITE
7
SETUP
8
MOVE
(
)
9
OK (Enter)
10
EXIT
11
INFO
12
AUDIO
13
PLAY/PAUSE
14
STOP
15
REV
16
FWD
17
REPEAT
18
A-B
19
TFT
on/off
20
SPEAKER
21
NUMBER
KEY
SELECT
22
GOTO
23
TV/RADIO
24
FUNCTION
25
SOURCE
26
EPG/PROG
27
TITLE/TTX
28
ZOOM
29
SUBTITLE
30
MENU
31
PBC
32
NEXT
33
PREV
34
SLOW
35
ANGLE
Note:
1.
Please
note
that
reference
numbers
for
the
remote
are
described
beginning
on
page
15
to
20
of
this
manual.
2.
In
this
manual,
will
be
used
to
represent
different
NAVIGATION
ARROWS
on
the
remote
respectively.
3.
In
order
to
operate
any
of
the
remote
functions,
you
must
first
press
the
Power
button
on
the
DVD
player.
4.
Some
of
the
keys
have multiple functions.
Function
before
/
can
be
used
in
DVD
mode,
after
/
can
be
used
in
DVB
mode.
HOW
TO
REPLACE
THE
BATTERY
STEP
1:
PUSH
THE
BUTTON
TOWARD
LEFT;
STEP
2:
PULL
THE
BATTERY
LOADER
OUT.
BATTERIES
INCORRECT
USE
OF
BATTERIES
MAY
CAUSE
THEM
TO
LEAK,
CORRODE
OR
EXPLODE.
Be
sure
to
place
the
batteries
in
the
correct
direction.
It
is
dangerous
to
charge/heat/open
or
short-circuit
the
batteries.
Do
not
leave
dead
or
expired
batteries
or
mix
old/new
batteries.
When
not
using
the
remote
control
for
a
long
duration
of
time,
remove
the
batteries.
When
the operating
range
becomes
reduced,
replace
all
batteries
with
new,
fresh
ones.
If
leakage
from
the
battery
occurs,
wipe
the
battery
liquid
from
the
battery
compartment,
then
replace.
-12-

Remote Control Operation
Advanced
Features
1.
MUTE
Pressing the
<MUTE>
button
will
mute
the
audio,
and
display
on
the
screen.
Pressing the
<
MUTE>
button
again
will
cancel
mute
audio.
2.
4:3/16:9
Switch
the
display
mode
of
TFT
4:3 or 16:9
format.
3.
In
DVD
mode
and
DVB
mode,
Pressing
<VOL+>
button
increases
the
volume,
4
.
In
DVD
mode
and
DVB
mode,
Pressing
<VOL->
button
decreases
the
volume.
5.
SCAN
During
the
DVB-T
state
Press the
SCAN
button
to
open
the
DVB-T
channels
tuning
menu.
6.
FAVORITE
In
DVB
mode,
Press the
<FAVORITE>
button
to
turn
on
the
favorite
Channel
Groups, NOTE:
The
<FAVORITE>
button
has
no
effect
in
DVD
mode.
7.
SETUP
In
DVD
mode,
Pressing
the
<SETUP>
button
will
enter
the
DVD
setup
menu.
In
DVB mode,
press
the
<SETUP>
button
to
display
the
DVB
main
menu.
Press the
<SETUP> button
again
to
exit
the
setup
menu.
8.
UP/DOWN/LEFT/RIGHT
Used
to
navigate
menus.
When
not
in
a
menu,
there
are
also
DVB
specific
uses
for
each
button.
In
the
DVB
mode,
Pressing
the
<UP>/<DOWN>
button
will
go
the
next/
previous
channel,
in
the
list
of
all
channels.
9
.
OK (ENTER)
Pressing
<ENTER>
will
enter
the
selected
item
in
a
menu.
10.EXIT
Press the
<Exit>
button
to
exit
the
setup
menu
or
other
choose another
menu
-13-

Remote Control Operation
Advanced
Features
11.
INFO
In
DVD
mode,
pressing
<INFO>
will
bring
up
an
information
menu,
and
the
direction
and
number
buttons
can
be
used
to
select
Track,
Title,
Chapter,
and
Time.
As
below:
In
the
DVB
mode,
Press the
<INFO>
button
to
display
the
Program
information
options, Press
the
<RETURN>
to
exit
the
INFO
option.
As
below:
12.
AUDIO
Press
<L/R>
to
select
between
Left,
Right
audio
channels.
In
DVB
mode,
Press
the
<L/R>
button
to
display
the
Audio
channel.
In
the
Audio
channel
options,
you
can
press
the
NAVIGATION
ARROWS
to
choose
the
RR,
LR,
LL
mode.
As
below:
13.
PLAY/PAUSE
Press
<PLAY>
from
stop
mode
to
start
play,
In
the
DVB
mode,
Press
the
<PLAY>
button
to
display
the
TV
program
list.
In
DVD
mode,
press
<PAUSE>
to
pause
playback.
From
this
state,
press
<PAUSE>
to
advance
one
video
frame.
For
audio-only
media,
pressing
<PAUSE>
the
second
time
will
resume
playback.
For
DVB,
press
<PAUSE>
to
pause
and
again
press
<PAUSE> again
to
resume
playback.
14.
STOP
Press
the
<STOP>
button
to
hold
playback
during
playback.
Press
<PLAY
>to
reseume
playback
from
the
point
you
pressed
STOP.
Press
<STOP>
twice
to
stop
playback
completely.
NOTE:
The
<STOP>
button
has
no
effect
in
DVB
mode.
15.
REV
In
DVD
mode,
press
<REV>
to
enter
Fast-Reverse
playback.
Press
the
same
button
again
to
increase
speed,
from
X2
to
X4
to
X8
to
X16
to
X32.
NOTE:
The
<REV>
button
has
no
effect
in
DVB
mode.
-14-

Remote Control Operation
Advanced
Features
16. FWD
In DVD mode,press<FWD>to enter fast forward playback.
Press this key again to increase speed from X2 to X4 to X8 to X16 to X32.
NOTE: The <FWD> button has no effect in DVB mode.
17. REPEAT
In DVD mode, press <REPEAT> to select repeat mode. Press multiple
times to cycle between Title Repeat, Chapter Repeat, and Repeat Off.
18. A-B
Repeat aSegment In DVD mode, press <A-B> once to set the starting point for the
repeat segment. Press it again to set an end point, and the player will repeat the
segment from the start to end point. Press it once more to turn off this feature.
NOTE: The <A-B> button has no effect in DVB mode.
19. TFT on/off
Press TFT on/off Key to turn on the TFT-LCD display
Press it again to turn off the TFT-LCD.
20. SPEAKER
During playback
Press the speaker to mute the speaker or earphones output.
21.Number
In DVD mode, press a number key to a select a title or track. The number keys are
also used for entering a password. To select a track from 0 to 9, directly press a key
from
<0> to <9>. In order to select a track 10 or higher, first press <10+>. For DVB mode,
use <0> to <9> to directly input a two digit channel number. The <10+> key has no
effect in this mode.
22.GOTO
In DVD mode, pressing the <GOTO> button will bring up a Goto menu, and the
direction and number buttons can be used to select Track, Title, Chapter, and Time.
Use the number keys to input the desired Time, Title or Chapter, then press ENTER to
confirm.
In DVB mode, pressing <GOTO> will enter the Auto Scan menu. as below:
-15-

Remote Control Operation
Advanced
Features
23. TV/RADIO
In DVB mode, press <TV/RADIO> to switch between television and radio mode.
NOTE: This button has no effect in DVD mode.
24
.
FUNCTION
In DVD/DVB mode, press the < FUNCTION> button to display the picture setup menu, you can
setup the LCD BRIGHT, CONTRAST, COLOR, HUE, ZOOM, S-COLOR, LANG, DEFAULT
options.
25.SOURCE
Press the< SOURCE> button to switch between DVD, DVB and USB ATV options.
As below:
26.EPG/PROG
In the DVB mode, Press the <EPG> button to display the electronic program guide, again
press the <RIGHT> button once more to display more detail. As below:
NOTE: The <EPG> button has no effect in DVD mode.
In DVD mode , Press the <PROGRAM> button to display the PROGRAM options. As
below:
NOTE: The <
PROGRAM
> button has no effect in DVB mode.
-16-

Remote Control Operation
Advanced
Features
27.
TITLE/TTX
In
DVD
mode,
this button let’s you return
to
the
disc's
title.
In
DVB
mode,
this
displays
teletext information.
28.ZOOM
Press <ZOOM> multiple times to enlarge (X1, X2, 4X) the display, in that order.
The OSD will display the current zoom mode. In ZOOM mode, you can press the <UP>,
<DOWN>and <LEFT>, <RIGHT> button to move the pictures station.
29.
SUBTITLE
In
DVD
mode,
press the
<SUBTITLE>
button
to
display
subtitle.
NOTE:
In
the
DVD
mode
,This
<SUBTITLE>
button
only
has
effect
on
special
DVD
discs.
In
the
DVB
mode,
Press
the
<SUBTITLE>
button
to
display
the
language
options. As
below:
30. MENU
In DVD mode, this button displays the MENU function
31. PBC
In DVD mode, this button displays the PBC function.
NOTE: The <PBC> button has no effect in DVB mode.
32.NEXT
In DVD mode, Press <NEXT> to skip to the next chapter or track, In DVB mode, the
<NEXT> button has the same function as the <CH+> button.
33.PREV
In DVD mode ,Press <PREV> to skip to the previous chapter or track, In DVB
mode, the <PREV> button function same the <CH-> button.
34.SLOW
In DVD mode, press the <SLOW > button to enter slow playback, and cycle between
different speeds. The possible speeds are ,1/2, 1/4, 1/8, 1/16, 1/32, and normal. NOTE:
The <SLOW> button has no effect in DVB mode.
35.ANGLE
In DVD mode, pressing <ANGLE> will change the view angle, on DVD discs that support
this feature. NOTE: In the DVD mode ,This <ANGLE> button only has effect on special
DVD discs. NOTE: The <ANGLE> button has no effect in DVB mode.
-17-

The setup menu system---DVD PART
Advanced Features
NOTE:
In the DVD setup and System setting options. If you press <SETUP> into the
DVD setup and System setting option when playing disc, the some options have no effect.
1. General Steps of setup menu
In the DVD mode, Press the <STOP> button or open mode, Then press the <setup>
button, the DVD main setup menu appears.
A. DVD Setup-language Setup
Press the Up and Down buttons to highlight “DVD setup”, press “confirm”,
the DVD Setup-language Setup option will appear on the screen.
In the DVD Setup-language Setup, you can setup the Menu, Audio, Subtitle and External
subtitle. Press the <UP>, <DOWN> and <LEFT>, <RIGHT> arrow buttons to highlight the
icon of the desired page, then press the <DOWN >or <RIGHT> arrow button to activate that
page. For example, if you want to setup the audio setup, press the <DOWN> button to
highlight the Audio Option, the Audio setup page will be displayed on the screen.
1). MENU
Highlight the MENU option, and press the Arrow buttons to choose the menu language you
prefer. Press <ENTER> to confirm. If the disc you are playing has that Language available, It
will display the menu in that language.
Notes:
If your preferred language is not available, the discs default language will be
played.
-18-
Table of contents
Other LENCO Portable DVD Player manuals

LENCO
LENCO DVP-734 User manual

LENCO
LENCO MES-405 User manual

LENCO
LENCO DVP-754 User manual

LENCO
LENCO MES-404 User manual

LENCO
LENCO DVP-705 User manual

LENCO
LENCO BRP-1150 User manual

LENCO
LENCO MES-202 User manual

LENCO
LENCO MES-229 User manual

LENCO
LENCO DTVR-700 User manual

LENCO
LENCO DVP-1027 User manual

LENCO
LENCO DVP-1023 CR - User manual

LENCO
LENCO DVP-732 User manual

LENCO
LENCO DVP-1273 User manual

LENCO
LENCO DVD-2051 User manual

LENCO
LENCO MES-221 User manual

LENCO
LENCO MES-4031 User manual

LENCO
LENCO DVP-9413 User manual

LENCO
LENCO DVP-9412 User manual

LENCO
LENCO MES-202 User manual

LENCO
LENCO DVP-1010BK User manual