LENCO DVP-945 User manual

User Manual
9” DVB-T / DTV Television With DVD Player
DVP-945
Please read this UserManual carefully to ensureproper use of thisproduct and keep
this manual for futurereference.
For information and support,www.lenco.eu

Content
1
Important Safety Instructions
This marking indicates thatthis product should notbe disposed with other
household wastes throughout theEU. Toprevent possible harm tothe
environment or human healthfrom uncontrolled waste disposal,recycle it
responsibly to promote thesustainable reuse of materialresources.
To returnyour used device, pleaseuse the return andcollection systems
or contact the retailerwhere the product waspurchased.
They can take thisproduct for environmental saferecycling.
Important Safety Instructions ............................................................1
Panel Illustration....................................................................................2
Connecting to the USB.............................................................................2
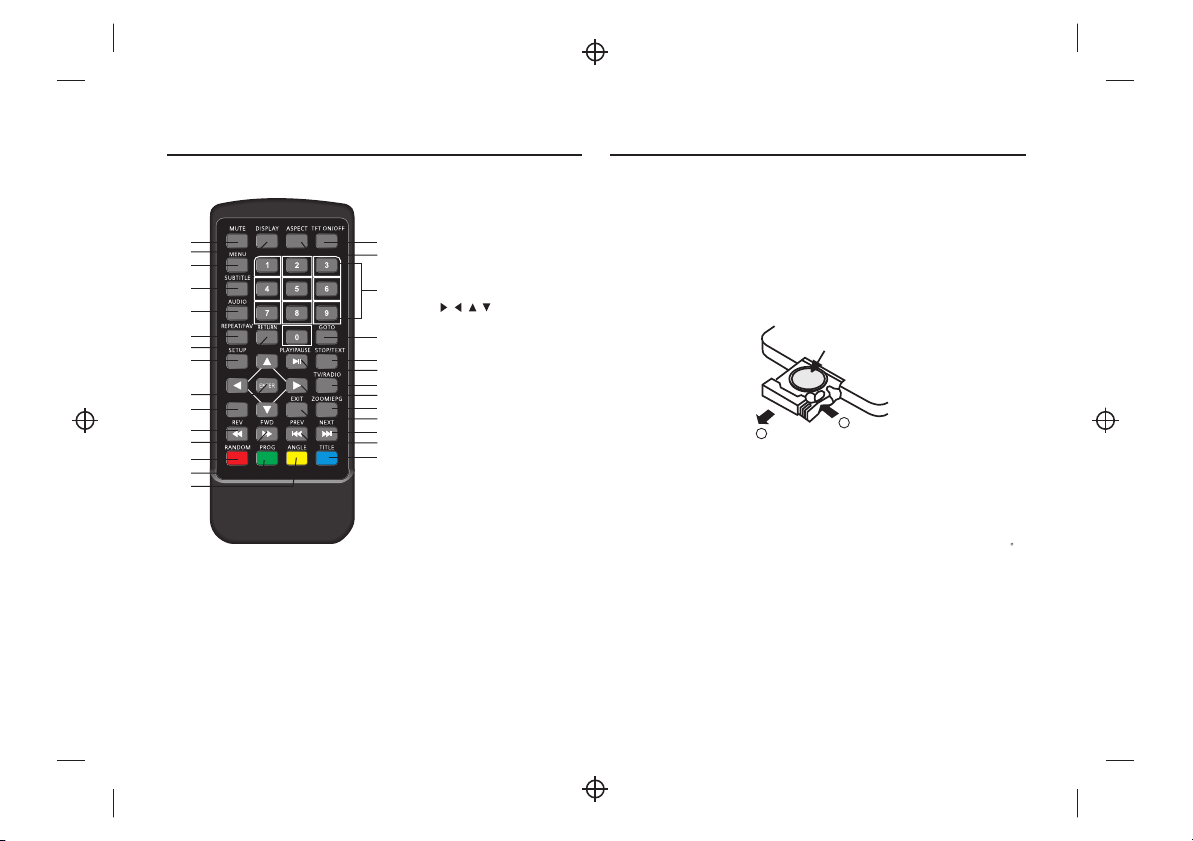
Remote Control..................................................................................... 3
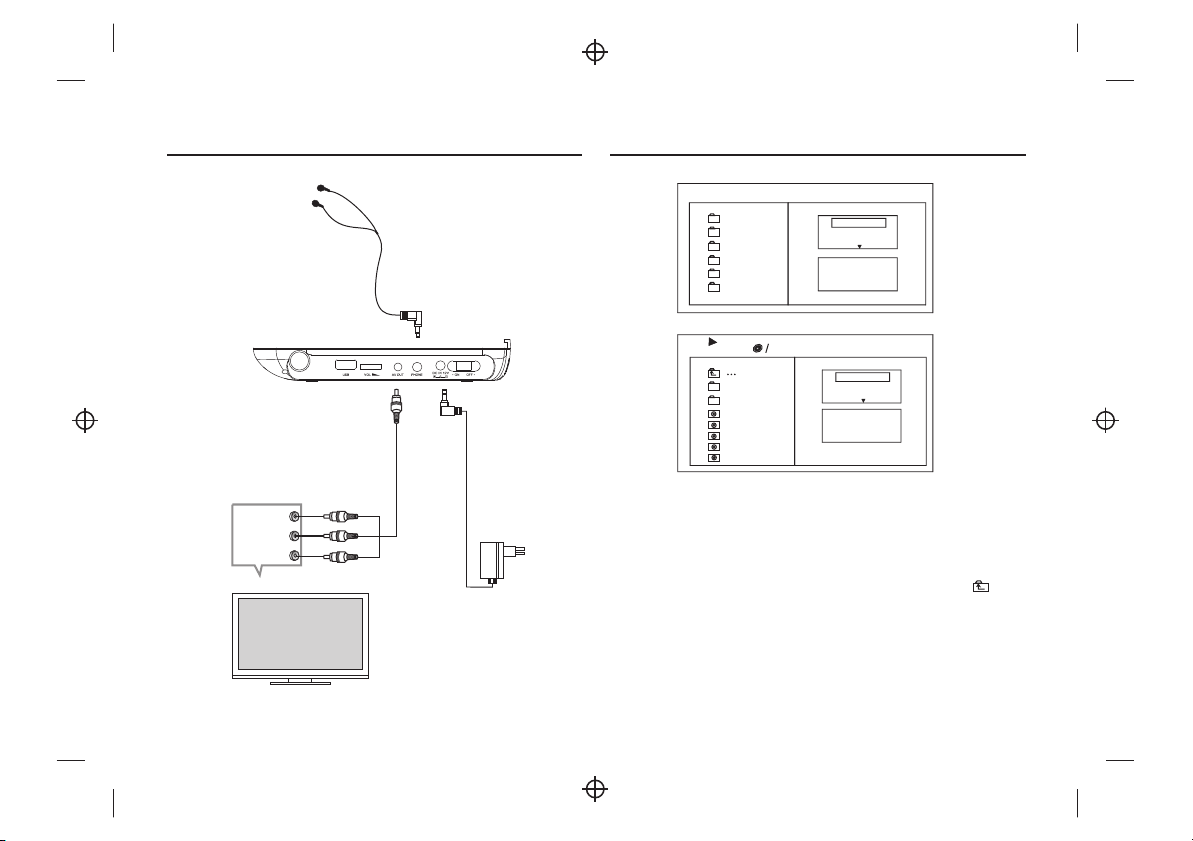
Connecting to a TV set.............................................................................4
MP3/WMA/MPEG4 playing. .....................................................................4
PICTURE CD PLAYBACK ..........................................................................5
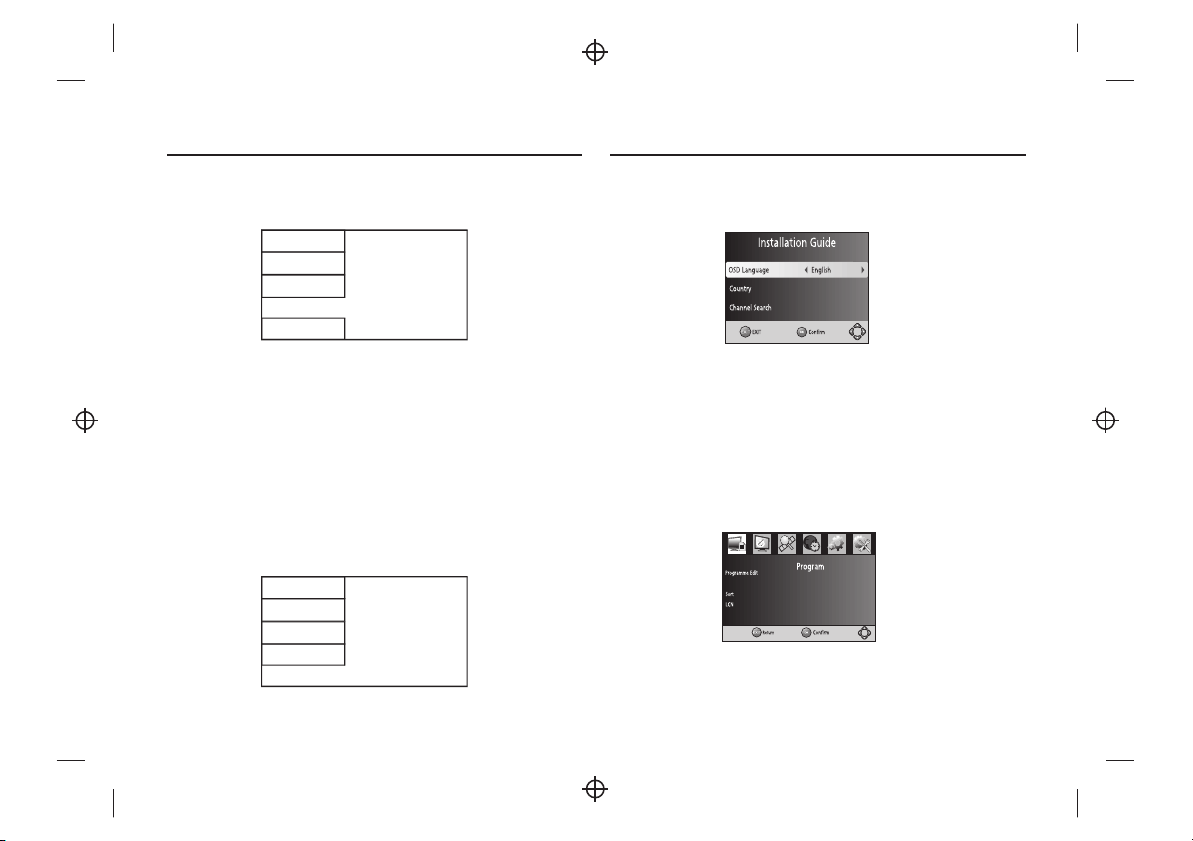
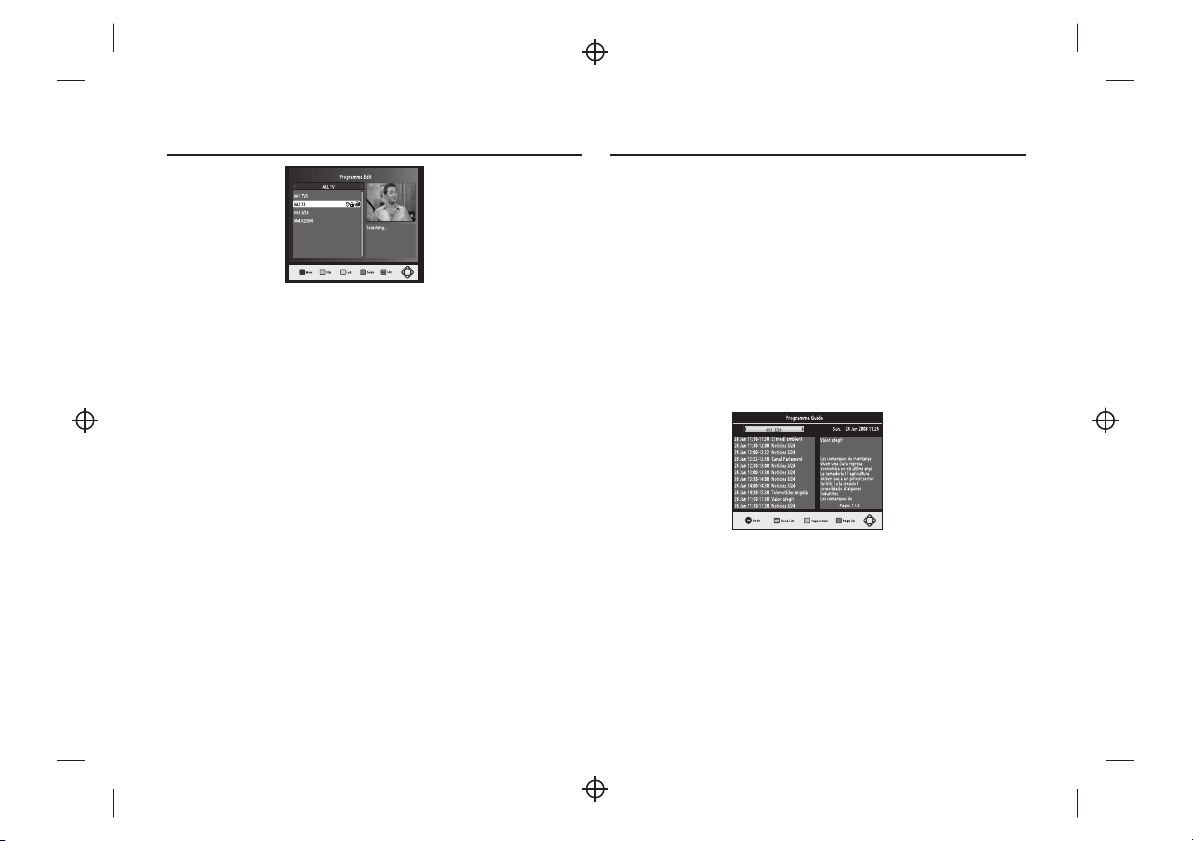
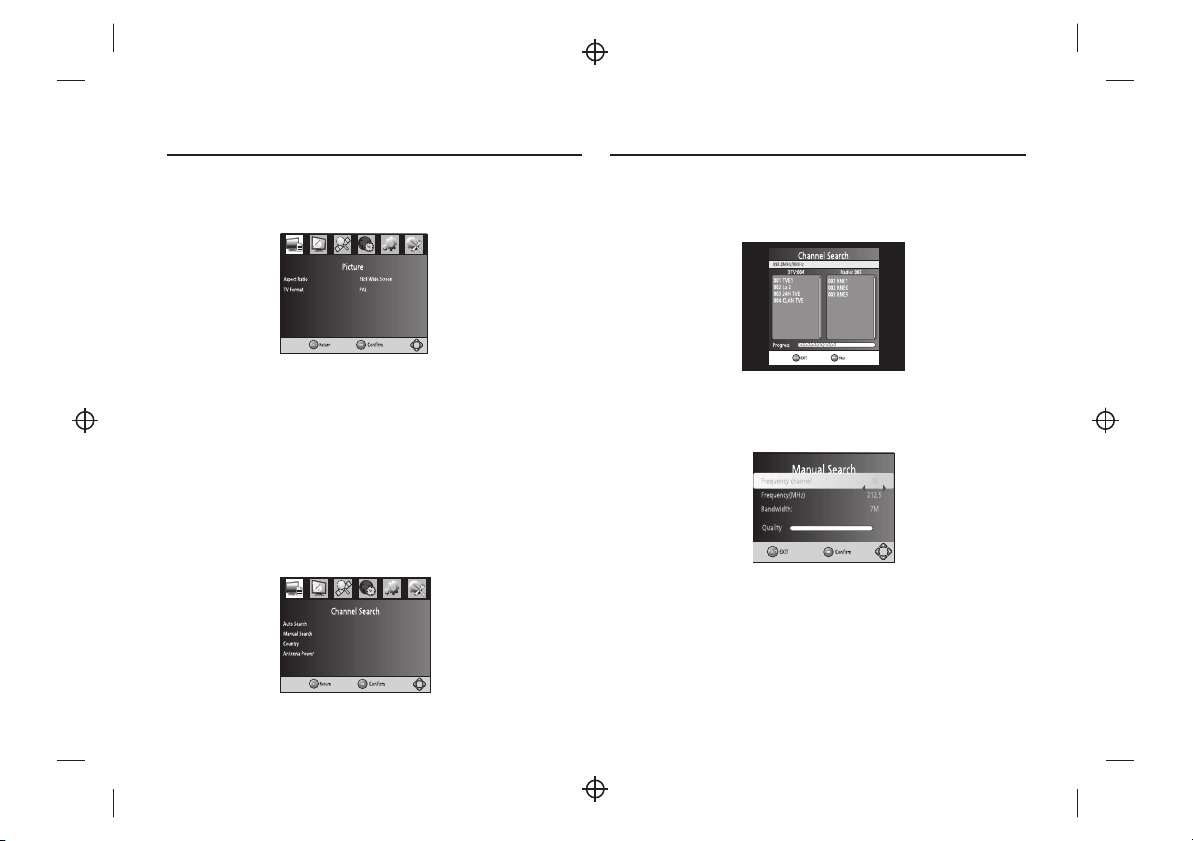
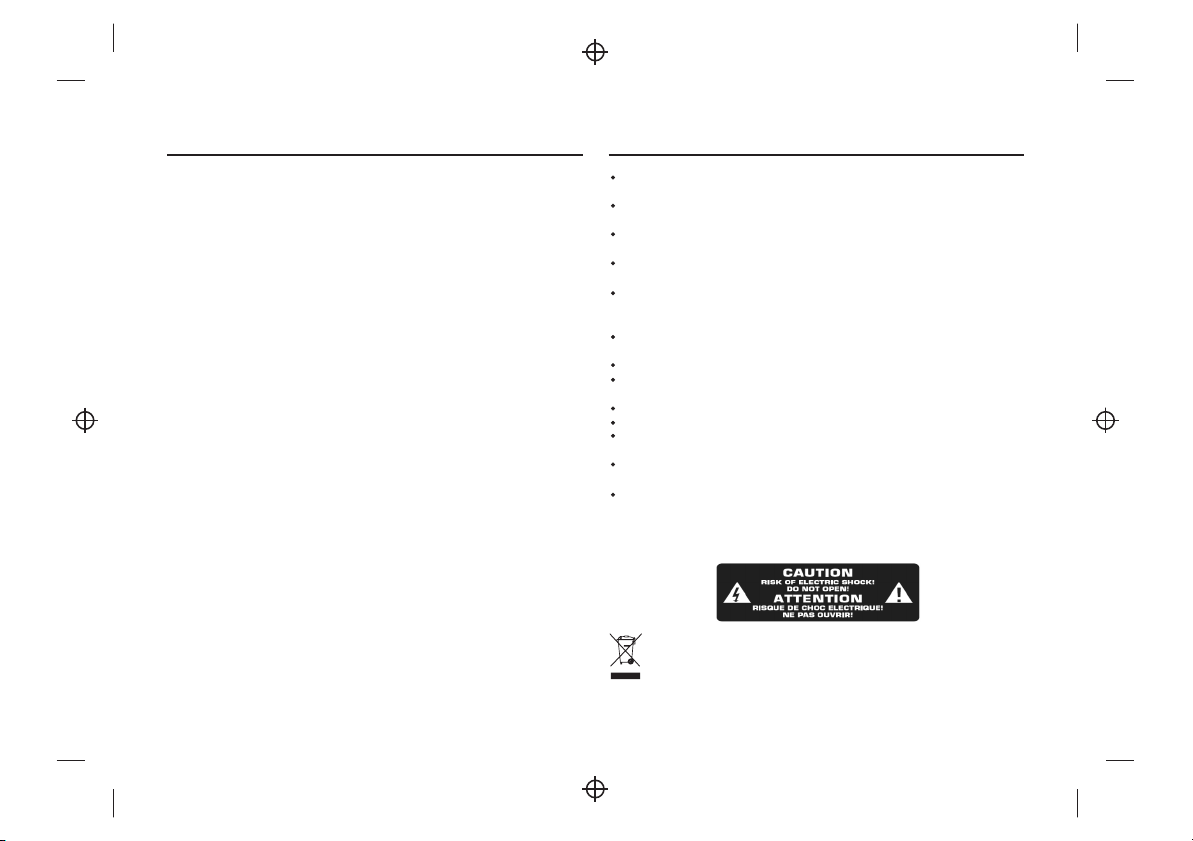
SYSTEM SETUP....... ...............................................................................6
Trouble-shooting ...................................................................................11
Specifications........................................................................................11
Other....................................................................................................12
Warning: To reducethe risk of electricshock, do not removethe cover or back.
There are no user-serviceable parts inside. Refer servicing to qualifiedpersonnel.
Warning: To preventfire or electric shockhazard, do not exposethe unit to rainor
moisture.
Do not expose theAdaptor and product towater (dripping or splashing)and no
objects filled with liquids,such as vases, shouldbe placed on theunit.
Keep the product awayfrom direct sunlight andheat source such asradiators or
stoves.
Do not block theventilation openings. Slots andopenings on the unitare provided
for ventilation. The openingsshould never be blockedby placing your producton
a cushion, sofa orother similar surface.
Do not place theproduct on unstable cart, stand,tripod, bracket or table.
The unit may fall,resulting in possible damageor injury.
Never place heavy orsharp objects on theLCD panel or frame.
Only use the ACadapter included with product.Using any other adapterwill void
your warranty.
Unplug the power fromthe outlet when theunit is not inuse.
Attention should be drawnto the environmental aspectsof battery disposal.
WARNNING: The battery (battery orbatteries or battery pack) shallnot be
exposed to excessive heatsuch as sunshine, fireor the like.
WARNNING: Excessive sound pressurefrom earphones or headphonescan cause
hearing loss.
WARNNING: Only useattachments/accessories specified provided bythe
manufacturer, theproduct is supplied byAC adapter,the AC adapter isused as
disconnect device, the disconnectdevice shall remain readilyoperable.

Panel Illustration
2
Connect to theUSB
Press the SOURCEkey on the remotecontrol until you switchedinto USB work
mode.
USB interface
This unit have a USBIN jack to play the MP3music or and JPEG files orother files.
Press the <SOURCE> buttonto choose USB IN mode.All the function is thesame
to play a disc.
Note: the USB IN port is compatiblewith flash memories, it isnot warranted the
compatibility with MP3 players usingowner software.
NOTE:
When using USB function. Pleasedo not insert in the wrong direction,or it will be
corrupted.
DVB-T
This unit have DVB-Tfunction press the <SOURCE>button tochoose DVB-T mode.
USB
ANT IN 75 ohm
ANT IN
POWER ( ON/OFF)
DC 12V INPUT JACK(power supply)
LCD DISPLAY
SPEAKER
DISC TOP
OPEN DISC TOP
SETUP
SOURCE
PLAY/PAUSE
STOP
MOVE( , , , )
PHONE JACK(Maximum output voltage 150mV)
AV OUT
VOLUME
USB
OK
IR.CHG
EXIT
MENU
NEXT
PREV
SOURCE
CARD SLOT

RemoteControl
1
2
CR2025
Preparation of the RemoteControl
Place the remote controlon an even surface andinsert the supplied button cell
into the remote controlas follows.
Cell data
Battery type: 1x CR2025 , 3 V
Service life: approximately 1 year(for normal use and roomtemperature).
Using Of Remote Control
Point the remotecontrol towards the mainunit when operating.
The remote control worksbest at a distanceless than 5 mand at an angleof up to 30
to the front ofthe unit. No obstaclesmay stand in theway between remote controland
infrared sensor and donot place the remotecontrol in direct sunlight.If the remote
control unit fails towork even when itis operated near theplayer, replacethe battery.
Notes on batteries
If the remote controlis not used fora long period oftime, please remove thebattery from the
compartment.
Do not heat batteriesor dispose of themin fires.
Do not dismantle, deform ormodify batteries.
3
1. Push the buttontowards left.
2. Pull the battery loader out.
3. Insert the battery into thereceptacle make sure thepolarity matches the marks
inside the component.
4. Insert the receptacle intothe remote control.
1. TFT on/off
2. ASPECT
3. NUMBER KEYS
4. GOTO
5. STOP/TEXT
6. PLAY/PAUSE
7. TV/RADIO
8.
9. ZOOM/EPG
10. EXIT
11. NEXT
12. PREV
13. TITLE
14. MUTE
15. DISPLAY
16. MENU
17. SUBTITLE
18. AUDIO
19. REPEAT/FAV
20. RETURN
21. SETUP
22. ENTER
23. SOURCE
24. REV
25. FWD
26. RANDOM
27. PROG
28. ANGLE
1
2
3
4
5
6
7
8
9
10
11
12
13
14
15
16
17
18
19
20
21
22
23
24
25
26
27
28
SOURCE

4
MP3/WMA/MPEG4 PLAYING
AVI
Mp3
Mp4
Photo
WMA
XVID
Repeatoff
ModeNormal
Filter
JPEGPreview
Audio
1/7
1
2
101
102
103
104
105
00:00:15
Repeatoff
ModeNormal
Filter
MusicPlaying
The MP3/WMA/MPEG4 disc hassuch a directory structure asshown .
Press Direction key to choose the rootdirectory and then pressENTER button to
enter into the subdirectory.
Press Direction key to choose the desiredtrack and then pressENTER or PLAY to
enjoy the music ormovie.
If you want toreturn to the uppermenu, press Direction key to choose
the icon and pressENTER button.
Filter: Allows selecting thecategories of files displayedin the browser list.
This selection is doneamong the 3 categories:Audio, Photo and Video.
Repeat: Toswitch different repeat playingmode.
picture above
Mode: Select different playingmode.
L
R
CVBS
Red
White
Yellow
VIDEO IN
AUDIO IN
TV
EARPHONE
ADAPTOR
Connecting to aTV set

5
Normal: Shuffle mode iscancelled.
Shuffle: Shuffle mode enabled.When playback reaches theend of the current
chapter/track, playback jumps toa random chapter/track. Asthe end of
each chapter/track is reached,another random chapter/track willbe
played until all tracks/chaptershave been played orthe Shuffle mode is
cancelled by toggling toa different Mode Option.
Music Intro: In thismode, the media willplay 10 seconds thenskip to next media
Edit Mode: To enable programmed playbackmode. When you selectthe mode,
press LEFT Direction key to directory and pressENTER to choose the
desired track and pressAdd to programto .
Program view: Display programtrack.
Brower view: Display trackdirectory.
Add to program: Choicethe track pressAdd to programto add the trackof the
program play directory.
Clear program: In thecomplete stop state(press theSTOP button twice),
choose the track pressClear program to delete the trackof the
program play directory.
add in programmed playbac
PICTURE CD PLAYBACK
The PICTURE CD dischas such a directorystructure structure as shown inthe
following picture.
1/7
1
2
100
102
103
104
105
Repeatoff
ModeNormal
Filter
JPEGPreview
Photo
Press Direction key to choose the rootdirectory and then pressENTER button to
enter into the subdirectory.
Press Direction key to choose the desiredpicture and then pressENTER or PLAY
to enjoy the picture.
If you want toreturn to the uppermenu, press Direction key to choose the
icon and pressENTER button.
Image rotation
In picture play state,press Direction key to rotation the picture,press ANGLE
button to change thepicture scan mode.

OSD Language
Use this item to selectthe language of the setupmenu and screen display.
MPEG4 Subtitle
Audio
Follow the operating instructions statedin
Subtitle
This option provides the presetsubtitle language.
Follow the operating instructions statedin DVD MENU SETUP Incombination with
the desired option.
Choice different MPEG4 subtitle encodingoption.
DVD MENU SETUP ombination with
the desired option.
This option provides the built-indisc dubbing language options.
DVD Menu
This option provides the films menu language options.
Follow the operating instructions statedin DVD MENU SETUP
In c
In combination with the desiredoption.
6
VIDEO SETUP
Select Video in the setup menu,and display theVideo submenu:
TV System
Smart Picture
Aspect Ratio
TV System
This product supports output ofvarious system, includingNTSC, PAL.
If your TV sethas only NTSC or PAL system, the screen willblink and become
colorless when a wrongsystem is selected.
Note: For more informationof output format, referto the instructions oryour TV set.
Smart picture
Adjust display effect forvideo output: Standard: defaulteffect.
Bright: internal setting forbright view effect.
Soft: internal setting for soft vieweffect.
Dynamic: user adjust brightness,contrast, color etc.
Aspect Ratio
The image display ratiois related to therecorded disc format. Somedisc can not
display images in theaspect ratio you choose.
If you play adisc recorded in 4:3format on a widescreenTV, blackbars will
appear on the left andright side of thescreen. Youmust adjust the screensetting
depending on the typeof the television youhave.
MENU OPERATION
Press theSETUP button on the remotecontrol, the SETUP MENU(main)willbe displayed.
After accessing the setup menu,press the direction buttonsfor up and downmovement
to select an itemdesired, then press theENTER button to confirm.
Press LEFT direction button return to themenu of upper level.
To exitthe setup, press theSETUP button again. In theSETUP MENU, you maychoose
any of the followingoptions as you like.
LANGUAGE SETUP
Select Language in the setup menu,and display theLanguage submenu:
SYSTEM SETUP
Language
Video
Rating
Misc
OSD Language
Subtitle
MPEG4 Subtitle
Audio
DVD Menu
Audio
Language
Video
Rating
Misc
Audio
Audio Setup
Night Mode: Adjust thenight mode.
Smart Sound: Select the smart sound mode.
Night Mode
Smart Sound
Language
Video
Rating
Misc
Audio

7
UseDefault Settings
Language
Video
Rating
Misc
Parental Control
Set Password
Parental Control
Selecting a Rating allowsthe user to setthe parental control featureof the player
Select Parental Control, and pressENTER to change the differentmode.
Note: Unlock the password beforesetting Parental Control.
Set Password
Use the 0-9 keysto input four digits(password),then press ENTER to confirm.
Note: If you forget yourpassword, please use theuniversal password 6666 to
unlock.
MISC SETUP
Select MISC in the setup menu,and display the submenu:
* Use Default SettingsReset setup data tofactory default and re-load disc.
RATING SETUP
Select Rating in the setup menu,and display the Rating submenu:
Note: Not all DVD support ratings.
Audio
Language
Video
Rating
Misc
Audio
First Time Installation
After all connections havebeen made properly, switch on TVand make sure the
receiver is connected tothe Main Power. Press Powerbutton to switch receiveron.
If you are usingthe receiver for thefirst time or restoredto Factory Default, the
Main Menu will appearon your TV screen.
1) Select [OSD Language]and press RIGHT/LEFT keyto select an language
2) Select [Country] and pressRIGHT/LEFT key to selectyour country of residence
3) Select [Channel Search]and press RIGHT orOK key to begin Automatic channel
search
4) Once channel tuningis complete, you arenow ready to watchTV
.
.
.
.
Basic Operation
1. Program ManageSettings
To accessthe Menu, press theMENU button and select[Program].
The Menu provides optionsto adjust the ProgramManage Settings. Select anoption
and press OK orRIGHT to adjust thatsetting. Press theEXIT button to exitthe Menu.
Greece
EPG
1) Program Edit
To edityour program preferences (lock,skip, favourite, move ordelete), you will
need to enter theProgram Edit Menu. ThisMenu requires a passwordto access.
Enter the default password888888.
By ONID
Off

8
Set Favourite Program
You cancreate a shortlist of favouriteprograms that you caneasily access.
Set Favourite TVor Radio program:
(1). Select the preferred program then pressthe FAVOURITE button.
A heart-shaped symbol will appearand the program ismarked as a favourite.
(2). Repeat the previousstep to select moreFavourite programs.
(3). Toconfirm and exit theMenu, press the EXITkey
Disable favourite TV orRadio Program:
Press the FAVOURITE button on theRemote Control with theheart-shaped symbol.
View Favourite Program
(1). Press the Favourite button and theFavourite Menu willappear.
(2). Press UP/DOWN toselect your FavouritePrograms.
(3). Press OKto select your favouriteprogram.
Delete a TV orRadio Program
(1). Select the Programand then press theBLUE button
A message will appear. Press OK todelete the program
2). Repeat theprevious step to selectmore programs to delete.
.
(
Lock Program
You canlock selected programs forrestricted view. Locka TV or Radio Program:
(1).Select the preferred programthen press the YELLOW button. A lock-shaped
symbol is displayed. Theprogram is now markedas locked
2). Repeat theprevious step to selectmore programs
3). Toconfirm and exit themenu, press the EXITbutton
4). Press the YELLOW button to disablethe locked program
5). Toview the locked program,you will be requireto enter either thedefault
password 888888 or your last set password.
2
.
.
.
.
.
(.
(.
(.
(
) EPG:
3) Sort
Sort your channels from thefollowing options:
[LCN] - Sort the channelsin ascending order
[Name] - Sort the channelsin alphabetical order
[Service ID] - Sort the channelsaccording to the station
4) LCN (Logicalchannel number)
Set LCN on oroff
(Electronic program guide)
The EPG is anon-screen TV guide thatshows scheduled programs sevendays in
advance for every tunedchannel. Press theEPG button on theRemote Control to
access guide.
You canuse the UP/DOWN keyto select the preferredprogram. If there ismore than
one page of information,use the BLUE buttonfor page up andthe YELLOW button
for page down.
(.
(.
(.
2). Press UP/DOWN tomove the program
3). Press OKto confirm
4). Repeat the abovesteps to move morechannels
Skip TV or RadioProgram
(1). Select the programyou would like toskip and press theGREEN button. A skip
symbol is displayed. Theprogram is marked asa skip.
(2). Repeat the previousstep to select moreprograms.
(3). Toconfirm and exit themenu, press EXIT key. Disable a skipTV or Radio
program: Press the GREENbutton on the skipprogram with the skipsymbol.
Move a TV orRadio Program
(1). Select the preferredprogram then press theRED button.
A move symbol willappear.

9
3) Channel Search
and M
SC
s
to exit M
To accessthe menu, press MENU select [Search Channel]. The enu provides
options to adjust the earch hannel settings.
Select an option andpress RIGHT/LEFT to adjustthe setting .
Press EXIT the enu.
(1) . Auto Search
Search and install allchannels automatically.This option overwrites all preset
channels.
a. Select [Auto Search]and press OK orRIGHT to start channel search.
B. Tocancel channel search, pressEXIT.
(2). Manual Search
Install new channels manually. This option addsnew channels without changingthe
current channels list.
A. Select [Manual Search]then press OK orRIGHT.The channel search screenwill
appear.
5) Video Setting
To accessthe Menu, press MENUthen select [Picture]. TheMenu
provides options to adjustthe video settings. PressUP/DOWN to select anoption
and press RIGHT/LEFT toadjust that setting. Press EXIT to exitthe menu.
(1). Aspect Ratio
(2). TV format
You mustset the display formatto either 4:3 Full, 4:3 PanScan,4:3 Letter Box,16:9
Full Screen, 16:9wide Screen, 16:9 PillarBox Auto or Autoto get the maximum
display when watching TV.
If the video doesnot appear correctly,you need to changethe settings.
This should match themost common setting forTVs in your country.
[NTSC]: for NTSC systemTV.
[PAL]: forPAL system TV.
b. Press theRIGHT/LEFT key to selectthe channel frequency
c
Enable Antenna Powerif an external activeantenna is connected.
. Press OK tostart searching channels
If a channel isfound, it is savedand added to thechannels list. If channelscan't be
found, then exit themenu.
(3). Country
Select your country of residence.
(4). Antenna power
Greece
Off

10
(1) Parental Guidance
You canrestrict access to channelsthat are unsuitable
for children. To restrict/lock the channel you will need toenter either the default
password 888888 or yourown password.
(2) Set Password
Set or change thepassword for locked programs. Enter your old passwordor the
default password 888888 .You willthen be asked to
enter your new password.To confirmre-enter your new password.Once it is
confirmed, press EXIT toexit the Menu.
888888
(3) Restore Factory Default
Reset your Set Top Box to theDefault Factory Settings.
In Main Menu select[Restore Factory Default] andpress OK or RIGHTto select.
Enter your password orthe default password ‘ ’ and press OKto confirm.
This option will deleteall preset channels andsettings.
(4) Information
View model, hardware andsoftware information.
(3). Subtitle Language
To accessthe enu, press MENU select [System].The menu providesoptions
to adjust the systemsettings.
elect an option andpress RIGHT/LEFT to adjustthe setting.
Press EXIT toexit the enu .
Select the preferred subtitlelanguage.
6) System Setting
M and
Press the UP/DOWNkey to s
M
(1) Time offset
Select auto or manualfor GMT offset adjustments.
(2) Country Region
Select the Country Regionwhen [Time Offset] isset to Auto.
(3) Time Zone
Select the Time ZoneOffset when [Time Offset]is set to Manual.
5) Option
To accessthe Menu, press MENUand select [Option]. Themenu provides options to
adjust the OSD Language,Subtitle Language and AudioLanguage.
Select an option andpress RIGHT/LEFT to adjustthe setting. PressEXIT to exit the
Menu.
4) Time Setting
M then M
Press UP/DOWN tos s
To accessthe enu, press MENU select [Time]. The enu provides options to
adjust the time settings.
elect an option andpress RIGHT/LEFT to adjustthe setting .
Press EXIT toexit the menu.
(1). OSD Language
.
(2). Audio Language
Select an OSD language
Select the preferred audiolanguage for watching TVchannels.
If the language isnot available, the defaultprogram language will beused.
Off
Greeck

11
Carry out the problem-solving measuresdescribed in the followingsection before
contacting Customer Support.
Turn off theDVD player immediately assoon as you suspecta malfunction.
Unplug the power plugand check whether theDVD player is unusuallywarm or
whether smoke is risingfrom it.
Trouble-shooting
Problem Possible cause Remedy
Disc cover not closed Close disc cover
No disc inserted Insert disc
Disc inserted the wrongway Insert disc with labelfacing up
Disc dirty or deformed Clean disc, or insertother disc
Regional code of the player does not
match the regional code of the DVD
Purchase DVD with corresponding
regional code
The DVD player
does not work
Moisture on lens Remove disc and turnoff
DVD player for at
least two hours
Device not properly connected
Check connexions and
connect device in the correct way
Headphones connected
(loudspeaker off) Pull out the headphones
DVD sound settings incorrect
Check sound settings and set sound
correctly
No audio
Disc dirty or deformed Clean disc, or insertother disc
TV screen is off or in the incorrect
video mode
Turn on LCD screen and/or set correct
video mode
No video
Device not properly connected
Check connexions and connect device in
the correct way
Poor video and/or
audio quality
Disc dirty or deformed Clean disc, or insertother disc
Loop mode is switchedon Exit the loop mode
Repeated
playback of a
section Disc dirty or deformed Clean disc, or insertother disc
Obstacle between remote control
and DVD player
Remove obstacle
Remote control not pointed at DVD
player
Point remote control directly at DVD player
Remote control battery inserted the
wrong way
Check the battery's polarity and, if
necessary, insert battery correctly
Remote control
does not work
Battery too low orcompletely
discharged Insert new battery
Specifications are subject to change without notice.
Playmode
Discmode
VideoS/N ratio
Resolution
Frequencyresponse
Audio S/N ratio
Dynamic range
Distortion
D/A Converter
NTSC/PAL
DVD,VCD, CD, MP3, CD-R, CD-RW, JPEG,
DVD+-R/W, MPEG4,
65dB.
500lines.
fs 96KHz: 20Hz-20KHz:+/-1dBI
90dB
80dB
<0.5%
96KHz/24bit
DisplayDevice
ScreenSize
Videooutput
Audio output
Power Voltage
Power consumption
Color TFT-LCD
9inches
1Vp-p(75W)
2CH
DCIN12V
15W
Parameter
Input Frequency
RF Input level
IF Bandwidth
Modulation
Decoder Format
Decoder Format
170~230MHz
470~860MHz
-25~-78dBm
7MHz and 8MHz
QPSK,16QAM,64QAM
MPEG4 AVC/H.264 HP@L4
MPEG2 [email protected]
MPEG-1 (layer1&2)
VHF: 174MHZ-230MHZ UHF: 470MHZ-862MHZ
Item
Tuner
Video
Audio
Input Frequency
Specifications
Ω

Other
12
Other possible causes forproblems:
Static discharges or otherexternal interferences can cause theDVD player to
malfunction. When this happens,disconnect the power plugfrom the mains socket
and plug it backin.
If the problem persists,disconnect the device fromthe mains again andcontact
Customer Service or a repairshop.
This marking indicatesthat this productshould not bedisposed
with other householdwastes throughout theEU. To prevent
possible harm tothe environment orhuman health from
uncontrolled waste disposal, recycleit responsibly to promote
the sustainable reuse ofmaterial resources.
Toreturn your useddevice, please usethe return andcollection
systems or contactthe retailer wherethe product waspurchased.
They can takethis product forenvironmental safe recycling.
Table of contents
Other LENCO Portable DVD Player manuals

LENCO
LENCO WALKY-BOX User manual

LENCO
LENCO DVP-715 User manual

LENCO
LENCO DVP-1010 User manual

LENCO
LENCO DVP-847 User manual

LENCO
LENCO DTVR-700 User manual

LENCO
LENCO DVP-935 User manual

LENCO
LENCO DVP-1047 User manual

LENCO
LENCO DVP-736 User manual

LENCO
LENCO MES-212 User manual

LENCO
LENCO DVD-2051 User manual

LENCO
LENCO DVP-743 User manual

LENCO
LENCO MES-212 User manual

LENCO
LENCO DVP-75 User manual

LENCO
LENCO MES-219 MPEG4 - User manual

LENCO
LENCO DVP-937 User manual

LENCO
LENCO MES-403 User manual

LENCO
LENCO DVP-1040 User manual

LENCO
LENCO DVP-744 User manual

LENCO
LENCO DVP-722 - User manual

LENCO
LENCO TDV-900 User manual