manuals.online logo
Brands
  1. Home
  2. •
  3. Brands
  4. •
  5. Leuchtie
  6. •
  7. Batteries Charger
  8. •
  9. Leuchtie LEUCHTIE Pro Easy Charge User manual

Leuchtie LEUCHTIE Pro Easy Charge User manual

Stand: 05/2019
Instruction Manual
LEUCHTIE
®
Pro Easy Charge
Easily rechargeable via USB charging station
Please read and observe the following safety instructions to enable you
to get the most out of your new LEUCHTIE as possible. Please keep this
document in a safe place.
Activation process
Before using the LEUCHTIE for the first time please remove the transport protection (insulation cap).
It is the red stopper located at the opposite side of the size sticker.
Opening:
1. Separate the tube from the battery pack by
pulling them apart with a slight angular
movement, taking care not to use excessive
force (1). In doing so, hold the silicone sleeve
onto the battery pack.
2. Remove the red insulation cap (2) and discard.
Fix the attachment loop:
3. In order to secure the LEUCHTIE to a collar/
harness with the enclosed fixation loop, pull the
open end of the tube through both transparent
rubber rings of the loop (3).
Closing:
4. Insert the tube straight into the battery pack.
Make sure that the contact spring at the end of
the LED tubing goes in straight and is not bent
over in any way.
5. Press tube and battery pack firmly together as
far as it can go. There must be no gap between
the battery pack and the tube.
Recharging the batteries
6.
7.
The enclosed batteries are pre-charged – the LEUCHTIE is ready for
immediate use.
We recommend charging the batteries once a week or after approx. 10
– 15 hours burn time overnight.
6. Connect the USB cable of the charging station to a USB power source
(e.g. USB power supply unit or USB socket of a car/ PC, etc.). The
green LED of the charging station indicates that it is ready for use.
7. Place the charging contacts of the LEUCHTE on to the charging station.
The magnetic charging contacts will automatically align. The red LED
shows that the batteries are recharging.
8. The batteries are charged as soon as the green LED starts to light up in
addition to the red LED.
8.
Turning the LEUCHTIE on and off
Simply slip the LEUCHTIE over the dog’s head
and it will turn on automatically thanks to a sen-
sor as soon as the battery pack is facing down-
wards. When the battery pack faces upwards the
LEUCHTIE will turn off after approx. one minute.
Therefore, suspend the LEUCHTIE e.g. on a
hook for storage.
ImpImportant notes for recharging
•Please use only the provided original LEUCHTIE charging station.
•Tip: The robust NiMH batteries have no memory effect. Therefore, charge the batteries as
early as possible (after approx. 10 - 15 h burn time) overnight until the green LED of the
charging station starts to light up.
This offers the following advantages:
- maximum brightness of your LEUCHTIE
- maximum possible burn time due to fully charged batteries, even during long tours and
operations
- shorter loading times
- longer battery life (no deep discharge)
•The charging process can easily be interrupted, e. g. for a walk.
Please place it again on the charging station until the green LED starts to light up.
•If the LEUCHTIE is not used for a longer period of time (e. g. in summer), please fully charge
the batteries before taking it out of operation.
•The charging contacts of the battery pack only conduct electricity during the charging process.
The contacts can thus be short-circuited or held under water without creating any danger for
dogs or humans. The battery pack is 100% waterproof.
Please make sure that the battery pack is clean and dry when placing it on the charging
station.
Replaceable batteries – good for both the environment and your wallet
For the sake of sustainability,
the batteries can be replaced if
necessary.
Suitable replacement batteries
(2 pieces type AAA / NiMH with
low self-discharge), including
detailed replacement instruc-
tions, are available in our online
shop at
www.shop.leuchtie.com.
Alternatively, you can also ob-
tain the complete battery pack
including rechargeable batteries
as well as numerous other
spare parts.
Troubleshooting
(detailed tips at www.leuchtie.de, service section)
If your LEUCHTIE is not working correctly, please check the following:
Malfunction Potential cause Remedy
Loose contact Battery pack and tube are
poorly connected.
Check whether the battery pack and the tube are fully
connected (the transparent plug socket needs to be
completely inserted into the battery pack). Ensure
that the contact springs are straight on the contact
plates in the battery pack and are not bent. Apply
some contact spray (e.g. Contact60) to the battery
poles.
LEUCHTIE is
not working
Battery pack and tube are
not connected correctly
Firmly press both parts together as far as it can go
(
see figure page 1).
Batteries are empty Recharge immediately via USB charging station, until
the green LED lights up in addition to the red one.
Charging
process is not
successful
Charging contacts are
dirty
Check / Clean the magnetic contacts.
Metal parts sticking to the magnets can be removed
easily using adhesive tape.
Battery pack and tube are
not connected correctly
Check whether the battery pack and the tube are fully
connected (the transparent plug socket needs to be
completely inserted into the battery pack).
Batteries are defective Replace the batteries with new ones of the same type
(NiMH batteries, type AAA 1,2 V cell voltage, low
self-discharge). Available at www.shop.leuchtie.com
Spare parts
When required, you can obtain spare parts from your retailer or directly from us.
Warranty
Within the framework of the respective legally applicable warranty we will repair all defects, which
can be proven to have been caused by material or manufacturing defects. Excluded from this
warranty are all defects caused by improper use, non-observance of this manual, leaked batteries
and wear from using the product. Further claims are excluded; there will not be any liability for
consequential damages. Opening the product (except for activating and battery changes) and other
interferences by unauthorized persons will automatically void the warranty. Repairs or the
replacement of parts will not extend the original warranty.
In case of a warranty claim, please contact the retailer from whom you purchased the product.
Manufactured in Germany by:
trends and more GmbH Tel. (+49) (0) 961 470 8 474
Hammerweg 123 E-Mail: [email protected]
D- 92637 Weiden URL: www.leuchtie.de
UST-ID: DE 265028845
WEEE: DE 23706136
Safety information
•Please use the LEUCHTIE only for its designated purpose.
•Do not attach a lead to the LEUCHTIE and avoid holding your dog by the LEUCHTIE. Too much
force on the LEUCHTIE could cause the battery and other parts to fall out and get lost.
•LEUCHTIE is not a dog toy!
The LEUCHTIE can be damaged and might open if it is used too heavily (e.g. throwing or
vigorous biting). In this case, small parts such as batteries, contact springs, etc. can fall out and
be lost or even swallowed by the dog, which may lead to serious injuries. If this happens
please immediately contact a veterinarian, who can take the appropriate measures if necessary.
•If you notice any defects, do not use the LEUCHTIE.
•Make sure that no humidity gets inside the LEUCHTIE – especially when cleaning it or changing
the batteries. When fully closed, the LEUCHTIE is protected against water and humidity very well.
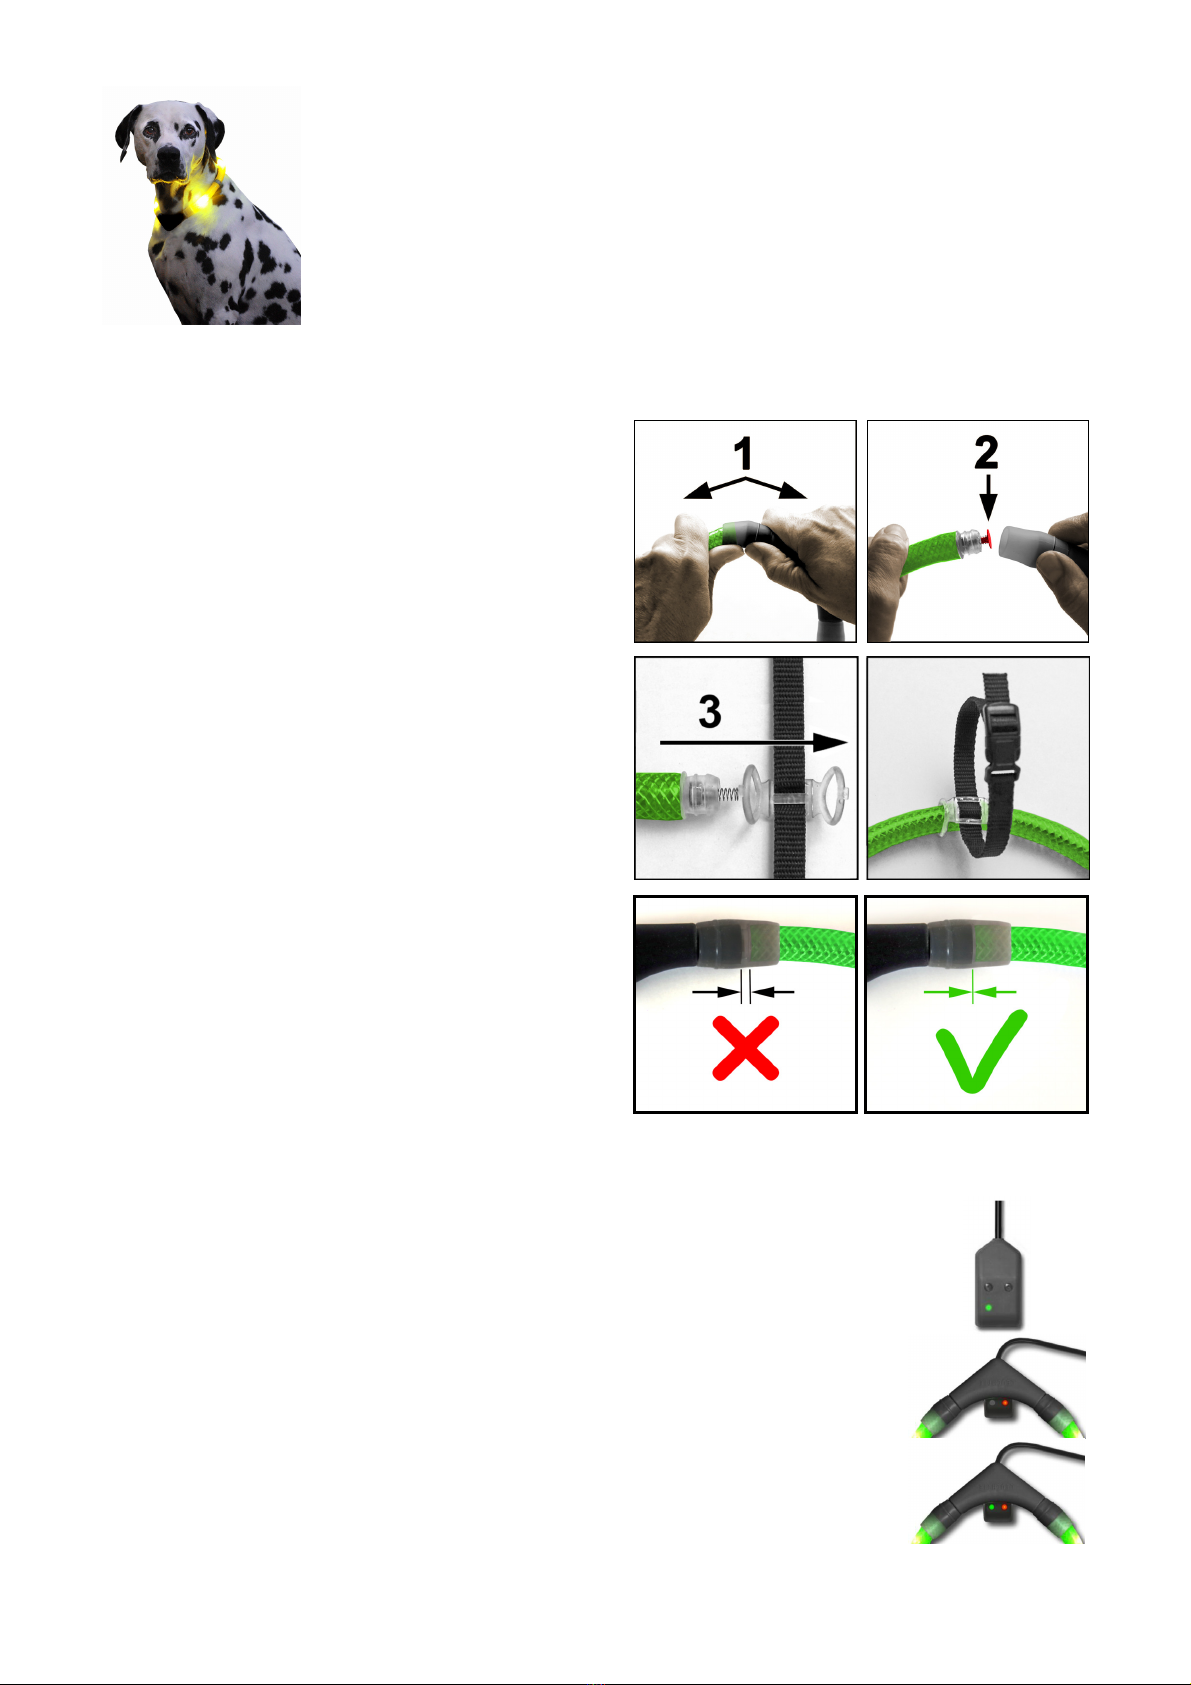
Should you notice humidity inside the LEUCHTIE, pull the tube and the battery pack apart with a
slight angular movement (see figures page 1) and let both parts dry completely. Avoid tempera-
tures above 50°C.
•Do not dry or heat the LEUCHTIE in the microwave under any circumstances - the microwave
radiation would destroy the electronics immediately.
•In order to achieve the best results please recharge at room temperature (5 – 25 °C).
•Do not disassemble, heat or short-circuit the built-in batteries.
•Swallowing the batteries can be fatal! For this reason, please keep both the batteries and the
product out of reach of small children (and your dog). In case a battery is swallowed, please seek
medical/veterinary assistance immediately.
Cleaning
Clean the LEUCHTIE in warm water and soap or mild detergent if required. Do not use aggressive or
solvent-based cleaners! When cleaning the LEUCHTIE, please ensure that the silicone sleeves are
closed properly to prevent humidity from entering.
Disposal / Recycling / Labeling
Please protect the environment and recycle this product. The product is labeled with
the symbol of the crossed out waste bin, which means that it should be dropped off
free of charge at a local collection point for recycling at the end of its useful life.
Disposal in the regular waste is not permitted.
The used batteries cannot be disposed of with the regular household waste! Please
dispose of them via the appropriate commercially available containers or drop them
off at public collection points.
This product meets the requirements of the Directive 2011/65/EU of the European
Parliament and of the Council of 8 June 2011 on the restriction of the use of
hazardous substances in electrical and electronic equipment.

Popular Batteries Charger manuals by other brands

Tactical SN-515 Instructions for use

Tactical

Tactical SN-515 Instructions for use

fireStorm FS140DC instruction manual

fireStorm

fireStorm FS140DC instruction manual

Autel Robotics Dragon Fish quick guide

Autel Robotics

Autel Robotics Dragon Fish quick guide

NOCO Genius GEN5X1 User guide & warranty

NOCO Genius

NOCO Genius GEN5X1 User guide & warranty

Emos N1015 user manual

Emos

Emos N1015 user manual

Guest 2608 owner's manual

Guest

Guest 2608 owner's manual

Gembird DR-BC-001 user manual

Gembird

Gembird DR-BC-001 user manual

Peak Electronics SIRIUS CHARGE 200 user manual

Peak Electronics

Peak Electronics SIRIUS CHARGE 200 user manual

EGO CH2800D Operator's manual

EGO

EGO CH2800D Operator's manual

hager XEV202 installation manual

hager

hager XEV202 installation manual

Arjo NDA8200 Instructions for use

Arjo

Arjo NDA8200 Instructions for use

ProSound N50QR instruction manual

ProSound

ProSound N50QR instruction manual

Olympus PS-BCL1 instructions

Olympus

Olympus PS-BCL1 instructions

Schumacher Electric SSF-1000A owner's manual

Schumacher Electric

Schumacher Electric SSF-1000A owner's manual

MERLIN SOLAR TRAVELPRO 30 user manual

MERLIN SOLAR

MERLIN SOLAR TRAVELPRO 30 user manual

Kärcher BC 36 V manual

Kärcher

Kärcher BC 36 V manual

Wallbox PULSAR installation guide

Wallbox

Wallbox PULSAR installation guide

DigiPower TC-2000 instructions

DigiPower

DigiPower TC-2000 instructions

manuals.online logo
manuals.online logoBrands
  • About & Mission
  • Contact us
  • Privacy Policy
  • Terms and Conditions

Copyright 2025 Manuals.Online. All Rights Reserved.