Levabo Seat All Flexi User manual

The pressure-relieving seat cushion for FlexiSeal:
Prevention and treatment of pressure ulcers.
1
EN
Levabo ApS
Sverigesvej 20
8660 Skanderborg DK
medical
®
Userguide SA Flexi EN 2022.09.06.V1
exi

The cushion is opened and air is lled until the indica-
tor band bursts. See ination and adjustment p.4.
Large patients often need a little less air and light
patients may need a little more air.
The closed part of the cushion (F) is placed as far
back against the backrest of the chair/wheelchair as
possible.
The valve (I) should face upwards for adjustment when
the patient sits on the cushion.
The open part with the two wings (G) points forward
and follows where the patient’s legs will be.
The patient should not wear a diaper, but be placed on
the pillow without any undergarment.
Check that the FlexiSeal hose is down between the
two wings (G) and drains freely.
There is a pressure lock between the two wings of
Quick guide
the pad which can be buttoned when the exi-seal is
lying as it should.
The patient will sit so that the exisole is free from
pressure, reducing both discomfort and leakage.
Use of lift for patient positioning.
When using Seat All Flexi® with other products,
please read the instructions for the other products.
The patient is lifted into the chair without a diaper or
undergarment.
Stand in front of the patient while lifting into the chair.
Check how the patient lands on the Seat All Flexi®
cushion.
Guide the FlexiSeal so that it is aligned and lands in
the opening (H) in the cushion and the tube is correct-
ly positioned between the two wings (G).
2
EN
IMPORTANT:
Seat All Flexi® must NOT be heavily inated. (Figure 5)!
For optimal and comfortable positioning, it must be soft and compliant, NOT hard.
The body part must be free of the ground. If necessary, let air out of the cushion until it feels
comfortable.
Check daily that the lifting height is correct.
If the cushion is inated without a Stop Up band, it is important to follow the above guidelines.
! !
F
F
GG
H
I

Tip before ination Insert the pump into the valve.
Insert the plug
into the hole on the pump handle.
Pump up.
If there is no hole, you can hold
the plug with a nger.
3
EN
Product description
The Seat All Flexi®cushion is designed for the preven-
tion and treatment of pressure injuries.
The design of the pad ensures stability without
impeding the patient’s ability to move. With even
the slightest movements, Seat All Flexi®stimulates
the skin’s microcirculation, which helps to optimise
circulation.
Seat All Flexi®is made of a nonwoven lm, which
makes the cushion skin-friendly, moisture-absorbing,
heat-transporting, soft, comfortable and elastic.
Indications / Purpose
Decubitus prophylaxis and treatment.
Existing pressure ulcers.
Pressure ulcer risk.
Risks of use / Contraindications
Seat All Flexi®can be used in chairs or beds with or
without adjustable surfaces.
When using Seat All Flexi®in chairs or beds with
adjustable surfaces, be sure to follow guidelines to
avoid displacement/shear.
Permitted applications/locations
Seat All Flexi®can be used anywhere on the body.
Seat All Flexi®can be used on the same patient for
extended periods of time.
Seat All Flexi®is designed as a “one-patient” product
and is therefore not reusable on another patient.
One-patient use eliminates the risk of possible bacte-
rial spread between patients.
Seat All®has some important features
which offer a number of advantages.
Derivation
of heat
Lightweight
Derivation
of moisture
The nonwoven felt outer cover
draws moisture and heat away from
the skin very effectively and ensures
that the skin does not stick to the
cushion.
It can be wiped with a damp cloth,
alcohol or other suitable disin-
fectant.

Ination and adjustment
Seat All®cushions are designed to prevent and
treat pressure ulcers.
The pads are for single-patient use.
Ensure that the treated area is examined reg-
ularly and in accordance with current clinical
guidelines.
When using Seat All®with other products,
please read the instructions for the other
products.
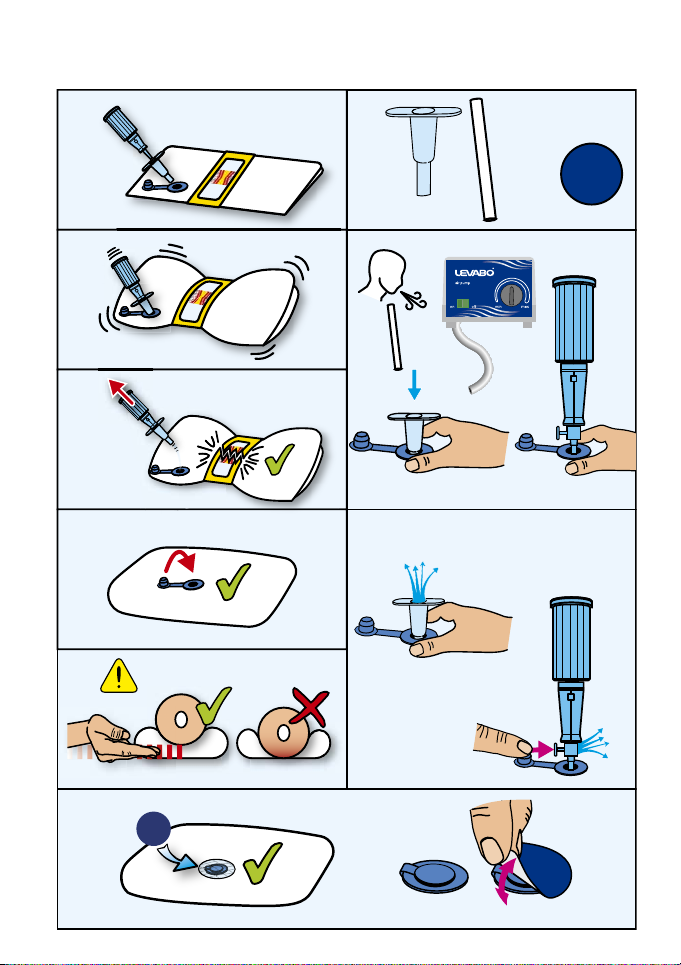
Carefully remove the cushions from the outer
packaging. Leave the wrap-around Stop Up
band in place on the cushion.
Inate:
Holding the valve between nger and thumb
(D), press the small blue pump nozzle (A) into
the valve until it is rmly seated. Insert the
pump or pump tube (supplied with the product)
(B) into the pump nozzle and start pumping
(Figure 1). When using a Levabo manual pump,
the pump nozzle (A) is not necessary as this
pump ts directly into the valve.
See pictograms on the back
Pump up to the recommended level. Please
note that the pad is supplied with a wrapping
paper tape (Stop Up band) that bursts (gure 3)
when the pad is inated to the indicative level.
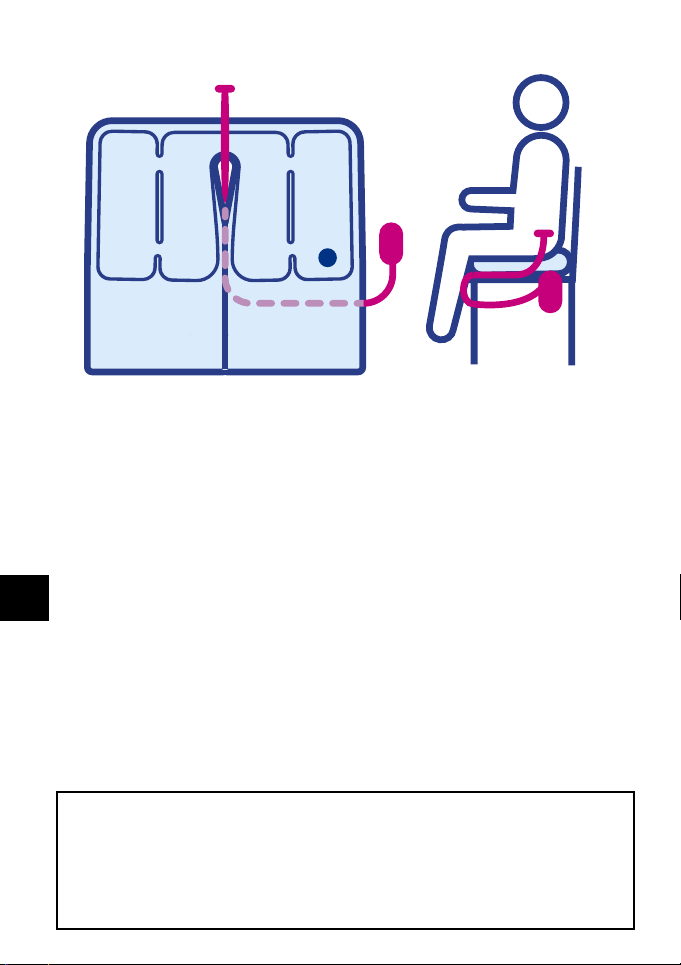
Check the lifting height (g 5) The cushion must
NOT be hard inated it must be soft and
for optimal relief. The body part must be free
of the base.
The cushion should be adjusted to a level that
suits YOUR patient’s needs.
Once you have inated the cushion and
adjusted it to the desired level, close the valve
(Figure 4).
It is important that the plug is pressed all the
way into the valve.
Stick the blue circular valve cover (C) over the
valve (gure 6).
Let air out of the cushion:
Holding the valve between nger and thumb
(E), insert the small blue pump nozzle (A) to let
air out. When using a Levabo-manual pump,
the pump nozzle (A) is not necessary as a vent
button is built into the pump (E).
Warranty
* The warranty is limited and covers manufacturing defects only. Improper use of the product will
void the warranty. Normal wear and tear is excluded from the warranty.
4
Explanation of symbols on the packaging
Read the instructions Expiry date Conformité Européenne
Production number Single-patient product Material of packaging
Manufacturer Date of manufacture Product number
DoC - Declaration of Conformity
The company Levabo ApS, Sverigesvej 20A, 8660 Skanderborg, declares that the products are designed and
manufactured in accordance with the technical documentation and the legal requirements.

5
Seat All®- Product range
Seat All - Accessories
Product name
Size in cm.
Stop Up Bånd
Packing No.
Weight Air Cells Use and Storage Materials
Seat All
®
Seat 42 x 42 x 5 +
Seat All
®
is
stored in an air-
tight bag with
pump nozzle
and ination
device.
70008 115 g 1
0-40° C 100%
PE
Seat All
®
Seat Large 52 x 52 x 5 + 70019 180 g 1
Seat All
®
Seat Max 52 x 62 x 5 + 70020 220 g 1
Seat All
®
Seat Twin 48 x 52 x 5 - 70021 115 g 1
Seat All
®
Seat Tailbone 42 x 42 x 5 + 70022 115 g 2
Seat All
®
Back & Seat 27 x 45 x 5 - 70009 80 g 1
Seat All
®
Donut 45 x 45 x 8 + 70017 115 g 1
Seat All
®
Donut Small 35 x 35 x 8 + 70055 100 g 1
Seat All
®
Bath 50 x 50 x 8 - 70013 115 g 1
Seat All
®
Flexi 42 x 42 x 5 + 70070 125 g 1
Product name
Size in cm. Packing No.
Air Cells Use and Storage Materials
Seat cover 42 x42 5 pcs 76009
N/A 0-40° C 100% PE
Seat cover 52 x 52 5 pcs 76010
Pump nozzle kit 12 x 18 10 pcs 76005
From zero to pressure relief
in less than 60 seconds.
Unfold Seat All® and insert the
pump into the self-closing valve.
Pump up until the Stop Up®
wrapping paper bursts - and
remove the pump. Seat All® is
now ready for use.
Make sure the patient is lifted
about 1½ nger width above the
surface.
Pump up...
Place the cushion under the
patient.
Done...
5
5

6
Visit
www.levabo.dk
for further product information.
Product videos and instruction.
Anti decubitus information on
Home care information at
Download:
Braden Scale Chart,
product datasheets,
anti decubitus poster
academy
Levabo
medical cushions
®
tryksår

7
7
..!
*:
*:
*Gennemsnitspris for behandling, kilde: Dealey Rapport 2012

1 A
B
C
D
E
2
3
4
6
5
Table of contents
Other Levabo Medical Equipment manuals
Popular Medical Equipment manuals by other brands

Synapse
Synapse Accel-Heal General Instructions for Use

AngioDynamics
AngioDynamics VenaCure 1470 Operator's manual

orfit
orfit AIO SOLUTION P-LD-PED Instructions for use

Gima
Gima QDC-8010+P3000A2QB3 user manual

Dräger
Dräger WaterLock 2 quick start guide

Shukla Medical
Shukla Medical Xtract-All Nail Winquist III MSK1017 Surgical Technique Guide