manuals.online logo
Brands
  1. Home
  2. •
  3. Brands
  4. •
  5. Lewitt
  6. •
  7. Microphone
  8. •
  9. Lewitt DGT 260 User manual

Lewitt DGT 260 User manual

QUICKSTART GUIDE
// DGT 260
// How to operate your microphone
Standard mode // Status Indicator (1) is illuminated in white. This is the default state of the device - you can quickly access the
headphone volume by turning the jog dial (9) and check metering on the LED graph (6).
Settings mode // Enter Settings mode by pushing the jog dial (9) - the status indicator’s (1) illumination will turn off.
In Settings mode you can change all the settings on your DGT 260 including: I/O metering, monitoring options (3),
low-cut lter (4), attenuation (5) and gain (7/8).
Rotate the jog dial (9) to change the selected value.
Push the jog dial (9) to jump to the next setting.
After 10 seconds your device automatically switches back to Standard mode.
// User interface
1 Status indicator // White: normal operation. Red: clipping
occurs. Off: in Settings mode.
2 Metering // Select IN for input or OUT for output metering.
3 Monitoring // Mix the playback of your computer with the
input signal of your microphone.
Return // Monitor the output of your PC, e.g. playback signal.
Direct // The signal of the input is sent directly to the output
of the DGT 260. This way you can monitor the signal without
any latency.
4 Low-cut lter // Use to get rid of unwanted low frequencies,
e.g. structure-borne noise.
5 Pre-attenuation // Use for loud input signals to prevent
clipping.
6 LED Graph // Displays values for settings like headphone gain,
input gain and others.
7 Output gain // Set headphone volume.
8 Input gain // Set microphone gain.
9 Jog Dial // Turn and push to change settings.
10 Headphone jack // Connect your 3.5mm headphone plug.
11 Micro-USB port // Use the provided USB cable to
connect your DGT 260 to your computer.
1
2
33
4 5
6
7 8
9
10
11
// Getting started
1 Install Lewitt Control Center software.
2Follow the on screen installation instructions.
3Connect your microphone to your computer’s USB port using the supplied micro-usb cable.
4Open the Control Center software.
5Choose your settings.
6You are ready to go!
// DOWNLOAD THE DGT 260 DRIVER AND FULL MANUAL
www.lewitt-audio.com/dgt260/downloads
Figure 1
QUICKSTART GUIDE
// DGT 260
// Lewitt Control Center Software
The Control Center Software allows you to manage different sound sources and create two independent mixes. One mix for
monitoring and another one to record or stream. It also allows you to set every parameter of your DGT 260 without touching the
microphone, and you can adapt the LED color scheme to your personal taste.
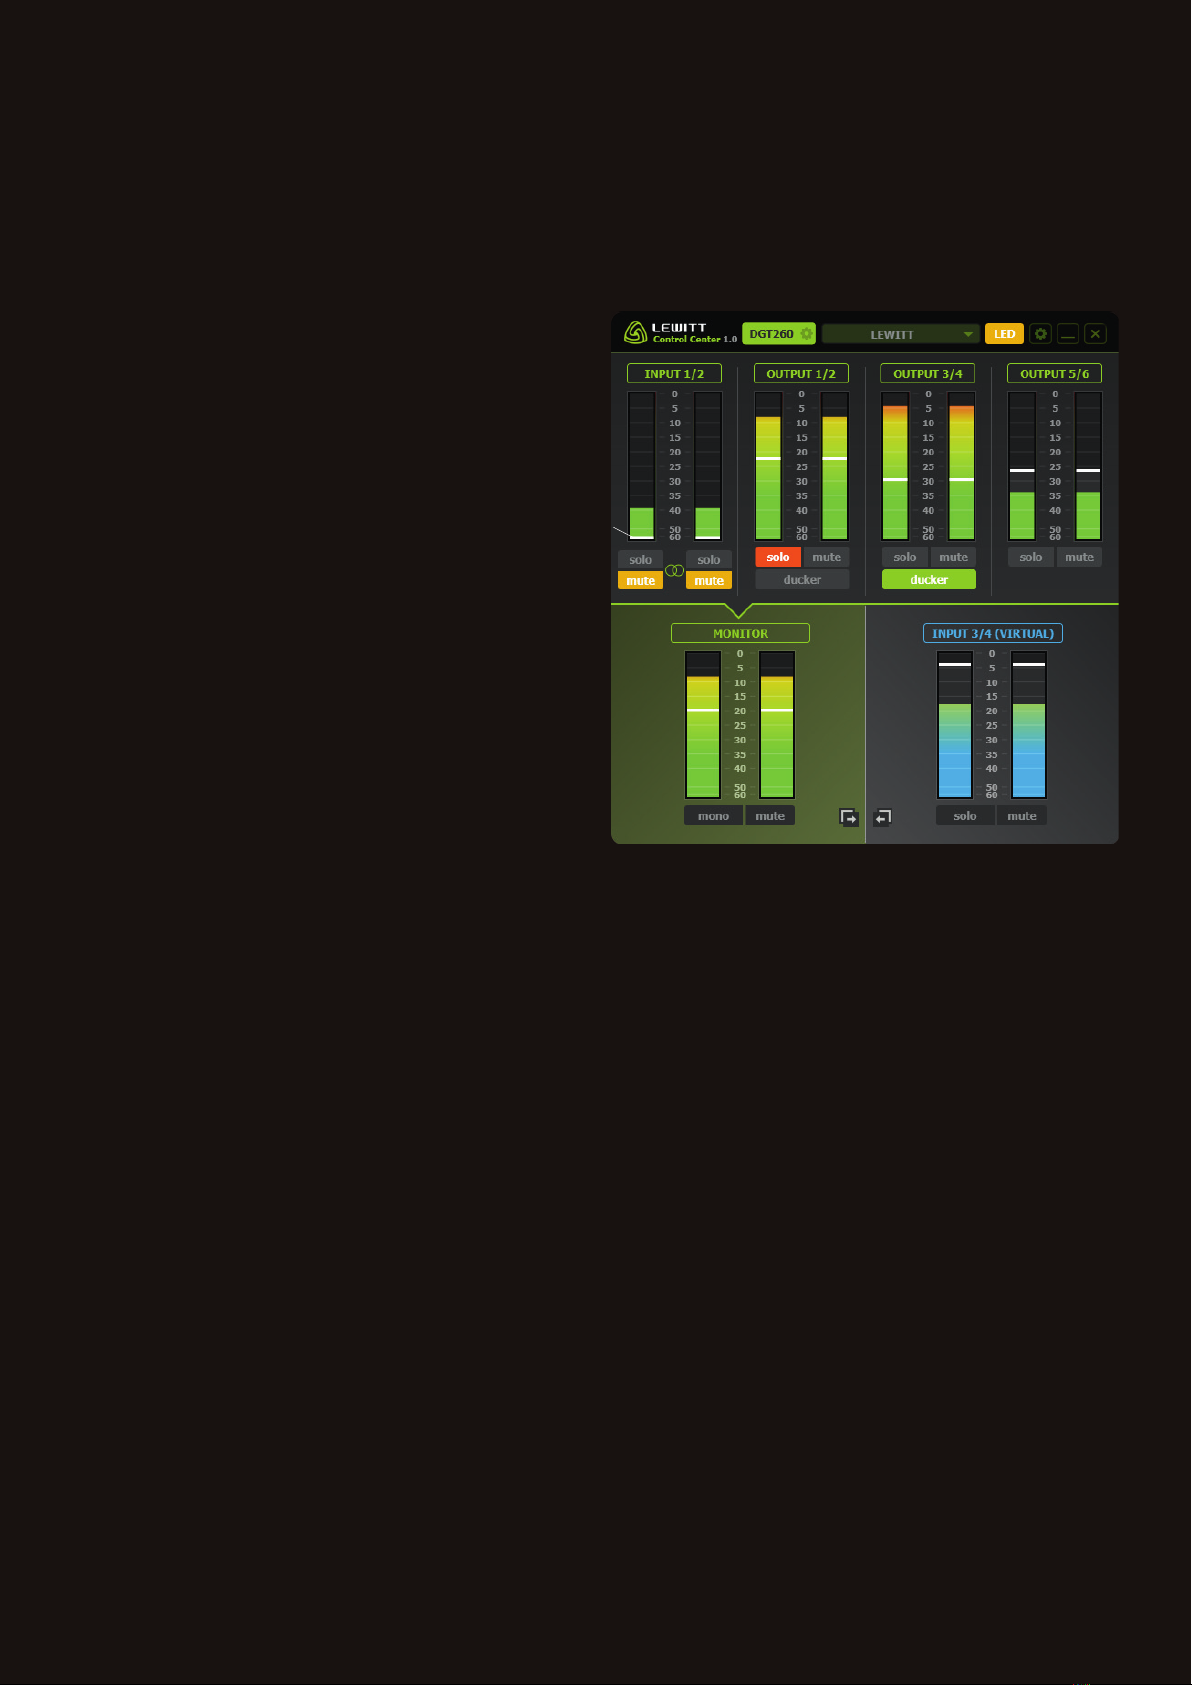
// Control Center’s User Interface
1Microphone settings // Remote control your microphone.
2 Global presets // Load or store presets.
3LED settings // Adapt the LED illumination to your taste.
4Software settings // Activate channel linking and check for
updates.
5Minimize // Hide user interface.
6 Close // Close the window.
7 Channel name // Rename channel names by clicking into the
name  eld.
8FADER // Change volume for this channel.
9SOLO // Listen to this channel only - INPUT 3/4 VIRTUAL mix
will not be affected.
10 MUTE // Mute channel.
11 DUCKER // Use the DUCKER DSP to lower volume of this
channel (for example music playback) when talking into the
microphone.
12 MONO // Signal will be mono-summed.
13 MONITOR MIX // Click in this area (13) to access MONITOR mixer. This is your personal headphone mix!
14 INPUT 3/4 (VIRTUAL) - BROADCAST MIX // Click in this area (14) to access the INPUT 3/4 (VIRTUAL) mixer, it is used to
send the mix to other applications. This mix is recorded or streamed to your audience!
15 COPY // Copy mix settings from MONITOR mix to INPUT 3/4 (15a) or copy INPUT 3/4 to MONITOR mix (15b).
// Analog and Virtual I/O
INPUT 1/2 (ANALOG) // This is the microphone input.
INPUT 3/4 (VIRTUAL) // Use this input to select your mix in other applications like any DAW (Samplitude, Pro Tools, Cubase, ...),
internet stream/broadcast applications and VoIP services like Skype and QQ.
MONITOR // This is the DGT 260 headphone output.
OUTPUT 1/2, OUTPUT 3/4, OUTPUT 5/6 // Use these outputs to route different sources (processed vocals from DAW/VST
rack, audio player, web browser, communication from Skype or QQ,..) to the Control Center. Mix those channels and send them to
MONITOR and/or INPUT 3/4 (VIRTUAL).
// Virtual mixing console with 2 mixes
MONITOR (green color scheme) // This is your personal mix, it will be sent to the headphone output. Click anywhere on the
bottom left area (13) to access your personal mix. All source signals metering color will be green (see Figure 3a).
INPUT 3/4 VIRTUAL (blue color scheme) // This mix is meant to be used by other applications to record or stream to the
internet. Click anywhere on the bottom right area (14) to access your broadcast mix. All source signals metering color will be blue
(see Figure 3b).
Please note that the sources of the two mixes do not differ, both mixes are sharing the same sources. They differ only in the set
levels of the different channels.
9
10 11
12 15a 15b
13 14
Figure 2
1 2 3 4 5 6
7
8
QUICKSTART GUIDE
// DGT 260
// MIC Settings Panel
Input Gain // Sets the input gain of your
microphone.
Attenuation // Activate for loud input signals to
prevent clipping.
Low-cut  lter // Reduces unwanted low
frequencies. Activate when recording vocals!
Monitoring // Sets the ratio between direct and
playback monitoring.
Buffer Size // Low buffer sizes have low latency,
but are more CPU-intense. In case you experience
audio drop-outs try the next bigger buffer size.
Sample Rate // Is  xed at 48.000 Hz.
Find more information about this topics on our
website www.lewitt-audio.com/dgt260.
// LED Settings
Some presets indicate relevant information like
clipping, signal level and if the ducker is currently
active or not. Other presets are only used to create
a nice mood for your vocal performance. Check out all of them!
// Settings
Linking // This allows you to link the fader and the mute button of a selected channel. This channel now
always has the same volume in both mixes - MONITOR and INPUT 3/4 (VIRTUAL) mix. A blue or green
border around the fader and mute button indicates a channel is linked. See Figure 5.
Updates // Always try to be up to date as we are introducing new features on a regular basis.
// Ducker
A channel’s volume can be automatically lowered when the software detects a microphone input signal
above a certain threshold. This way your voice and the playback create a perfect mix.
Ducker is available for OUTPUT 1/2 and OUTPUT 3/4.
Figure 4
Figure 3a Figure 3b
The virtual mixing console:
Click on the MONITOR or
INPUT 3/4 area to select
your mix.
Green color scheme on the
left (Figure 3a) - MONITOR
mix selected.
Blue color scheme on the
right (Figure 3b) - INPUT 3/4
mix selected.
Pro tip: you can link faders
and mute buttons to have
the same mix for MONITOR
and INPUT 3/4.
See Linking below.
Figure 5
QUICKSTART GUIDE
// DGT 260
// Example
In this example a person is singing over a playback and streaming the performance to the internet. The person is using VST vocal
effects and uses a personal communication channel. The user needs to hear the communication channel, but the audience must
not be able to hear it. The user can create two independent mixes: one personal (Figure 6a) and one for the audience (Figure 6b)!
Check how the channels in Figures 6a and 6b were renamed to  t our example.
INPUT 1/2 // This is the microphone input.
Vocal FX // This channel is the microphone with FX added. This channel will be audible to the audience and to the user. The blue
border around the fader indicates that the level is synced to both mixes.
Playback // This channel is used for a playback track. The ducker reduces the volume of the playback whenever the person
starts singing. This way the audience can always hear a crystal clear vocal performance.
Communication // This channel is only audible to the person streaming, but not to the audience.
Internet Stream // Is used as the input signal of the streaming software. From there it is broadcasted to the internet.
Figure 6a Figure 6b
Figure 7 - Flow diagram
Windows
DGT 260 Control Center
Ducker
Virtual Mixer
ASIO WDM
WDM
OUTPUT 3/4
INPUT 3/4
MONITOR
OUTPUT 1/2 OUTPUT 5/6
Internet stream Record
VST FX
Playback
Skype

Other manuals for DGT 260

1

Other Lewitt Microphone manuals

Lewitt DTP 640 REX User manual

Lewitt

Lewitt DTP 640 REX User manual

Lewitt LCT 640 TS User manual

Lewitt

Lewitt LCT 640 TS User manual

Lewitt LCT 840 User manual

Lewitt

Lewitt LCT 840 User manual

Lewitt LCT 240 PRO User manual

Lewitt

Lewitt LCT 240 PRO User manual

Lewitt MTP 340 CMs User manual

Lewitt

Lewitt MTP 340 CMs User manual

Lewitt LTS 240 Diversity C User manual

Lewitt

Lewitt LTS 240 Diversity C User manual

Lewitt LCT 540 Authentica User manual

Lewitt

Lewitt LCT 540 Authentica User manual

Lewitt DGT 650 User manual

Lewitt

Lewitt DGT 650 User manual

Lewitt DGT 260 User manual

Lewitt

Lewitt DGT 260 User manual

Lewitt MTP 940 CM User manual

Lewitt

Lewitt MTP 940 CM User manual

Lewitt STREAM 4x5 User manual

Lewitt

Lewitt STREAM 4x5 User manual

Lewitt MTP 540 DM User manual

Lewitt

Lewitt MTP 540 DM User manual

Lewitt LCT 140 User manual

Lewitt

Lewitt LCT 140 User manual

Lewitt MTP 240 DMs User manual

Lewitt

Lewitt MTP 240 DMs User manual

Lewitt LCT 450 User manual

Lewitt

Lewitt LCT 450 User manual

Lewitt LCT 140 AIR User manual

Lewitt

Lewitt LCT 140 AIR User manual

Lewitt LCT 040 MATCH User manual

Lewitt

Lewitt LCT 040 MATCH User manual

Lewitt LCT 449 PURE User manual

Lewitt

Lewitt LCT 449 PURE User manual

Lewitt DGT 450 User manual

Lewitt

Lewitt DGT 450 User manual

Lewitt LCT 540 User manual

Lewitt

Lewitt LCT 540 User manual

Lewitt IDOL User manual

Lewitt

Lewitt IDOL User manual

Lewitt LCT 550 User manual

Lewitt

Lewitt LCT 550 User manual

Lewitt MTP 340 CMs User manual

Lewitt

Lewitt MTP 340 CMs User manual

Lewitt MTP 840 DM User manual

Lewitt

Lewitt MTP 840 DM User manual

Popular Microphone manuals by other brands

Audio Technica AT4055 Specifications

Audio Technica

Audio Technica AT4055 Specifications

Crown CM-312AHS quick reference

Crown

Crown CM-312AHS quick reference

Axon AX1034 Installation and user manual

Axon

Axon AX1034 Installation and user manual

APART MICPAT-D manual

APART

APART MICPAT-D manual

Sonova PHONAK Roger On user guide

Sonova

Sonova PHONAK Roger On user guide

Electro-Voice C015P Specification sheet

Electro-Voice

Electro-Voice C015P Specification sheet

4EVAC 4E-FMTC Installation and user guide

4EVAC

4EVAC 4E-FMTC Installation and user guide

royer SF-12 Operating instructions manual & user guide

royer

royer SF-12 Operating instructions manual & user guide

Sennheiser ME 34 Product sheet

Sennheiser

Sennheiser ME 34 Product sheet

Cochlear SM-2M Operation manual

Cochlear

Cochlear SM-2M Operation manual

Blue Snowball user guide

Blue

Blue Snowball user guide

Shure 444 datasheet

Shure

Shure 444 datasheet

Beyerdynamic TG V71d manual

Beyerdynamic

Beyerdynamic TG V71d manual

AUSTRALIAN MONITOR DIGIPAGE DP8M Service information

AUSTRALIAN MONITOR

AUSTRALIAN MONITOR DIGIPAGE DP8M Service information

Sennheiser ew G4 Series Safety instructions

Sennheiser

Sennheiser ew G4 Series Safety instructions

Earthworks Audio M23 quick start guide

Earthworks Audio

Earthworks Audio M23 quick start guide

Clarity SBS-400 quick start guide

Clarity

Clarity SBS-400 quick start guide

Shure ROSWELLITE KSM313 Guía del usuario

Shure

Shure ROSWELLITE KSM313 Guía del usuario

manuals.online logo
manuals.online logoBrands
  • About & Mission
  • Contact us
  • Privacy Policy
  • Terms and Conditions

Copyright 2025 Manuals.Online. All Rights Reserved.