manuals.online logo
Brands
  1. Home
  2. •
  3. Brands
  4. •
  5. Lexing
  6. •
  7. Accessories
  8. •
  9. Lexing LX-MV-360S2-A-Z User manual

Lexing LX-MV-360S2-A-Z User manual

Transmission power<0.2mW
mm
mm
LX-MV-360S2-A-Z Microwave Sensor Instruction
Specifications
Utilizing field and introduction
Sensor information
Detection range: 2-10m (radii.) (adjustable)
Time setting: 8sec to 12min (adjustable)
Light-ontrol: 2-2000LUX (adjustable)
Power consumption: approx.0.5W
Installation sit: ceiling mounting
HF system: 5.8GHz CW electric wave,ISM band
Power source: 100-240VAC
Power frequency: 50/60Hz
Rated load:
1200W. any load(220-240VAC)
600W. any load (100-130VAC)
Transmission power: <0.2mW
Working temperature: -15°C~+70°C
Detection angle: 360°
Note: the high-frequency output of this sensor is
<0.2mW- that is just one 5000 of the transmission
power of a mobile phone or the output of a
microwave oven.
th
LX-MV-360S2-A-Z is a motion sensor whose detection range is 360° and working frequency is 5.8G. It adopts
a microwave sensor (HFoutput<0.2mW), so it is of more stable and safer performance than PIR motion sensor,
it can also be used where the ambient temperature is about
-15°C~+70°C.
H
L
L
1
2
3
4
5
6
7
8
9
10
11
12
0 11 22 33 44 55 66 77 88 99 1010 1111 1212 1313 1414
Detection rang: 6M max (Height of installation2M) Detection rang: 7-8M max (Height of installation4M)
Detection rang: 6-8M max (Height of installation8M)
Detection rang: 6-7M max (Height of installation6M)
Detection rang: 6-7M max (Height of installation10M)
Ground
360º
Sensing angle adjustment range
Warning!
When you are drilling ,please make sure
you wear glasses and dust masks to
prevent the dust fly into the nose and throat
causing unnecessary trouble
fig.6
fig.5
base holes
fig.1 fig.2 fig.3
fig.4
4、Put the power wire and load wire through the base holes (see fig.5);
5、
Cover cover into buckle
(see fig.6);
1、Through the buckle under cover(see fig.1)(fig2)
2、Hold base against the Ceiling and mark drill holes,
paying attention to any existing wiring in the Ceiling(fig.3);
3、Drill the holes, insert wall plugs (6mm dia.);(see fig.4);
Knob setting
Installation
LUX
SENS TIME
AC Power
L
L’
N
If you want LX-MV-360S2-A-Z to detect small zone, you can just adjust the sense knob SENS to the range that
you need (You may need to adjust some times untill you think it is suitable).If you want that the light can be
turned on when the circumstance luminance is under some value, you can just adjust the knob LUX (The
working luminance knob) to select the luminance value (You may need to adjust some times untill you think it
is suitable).
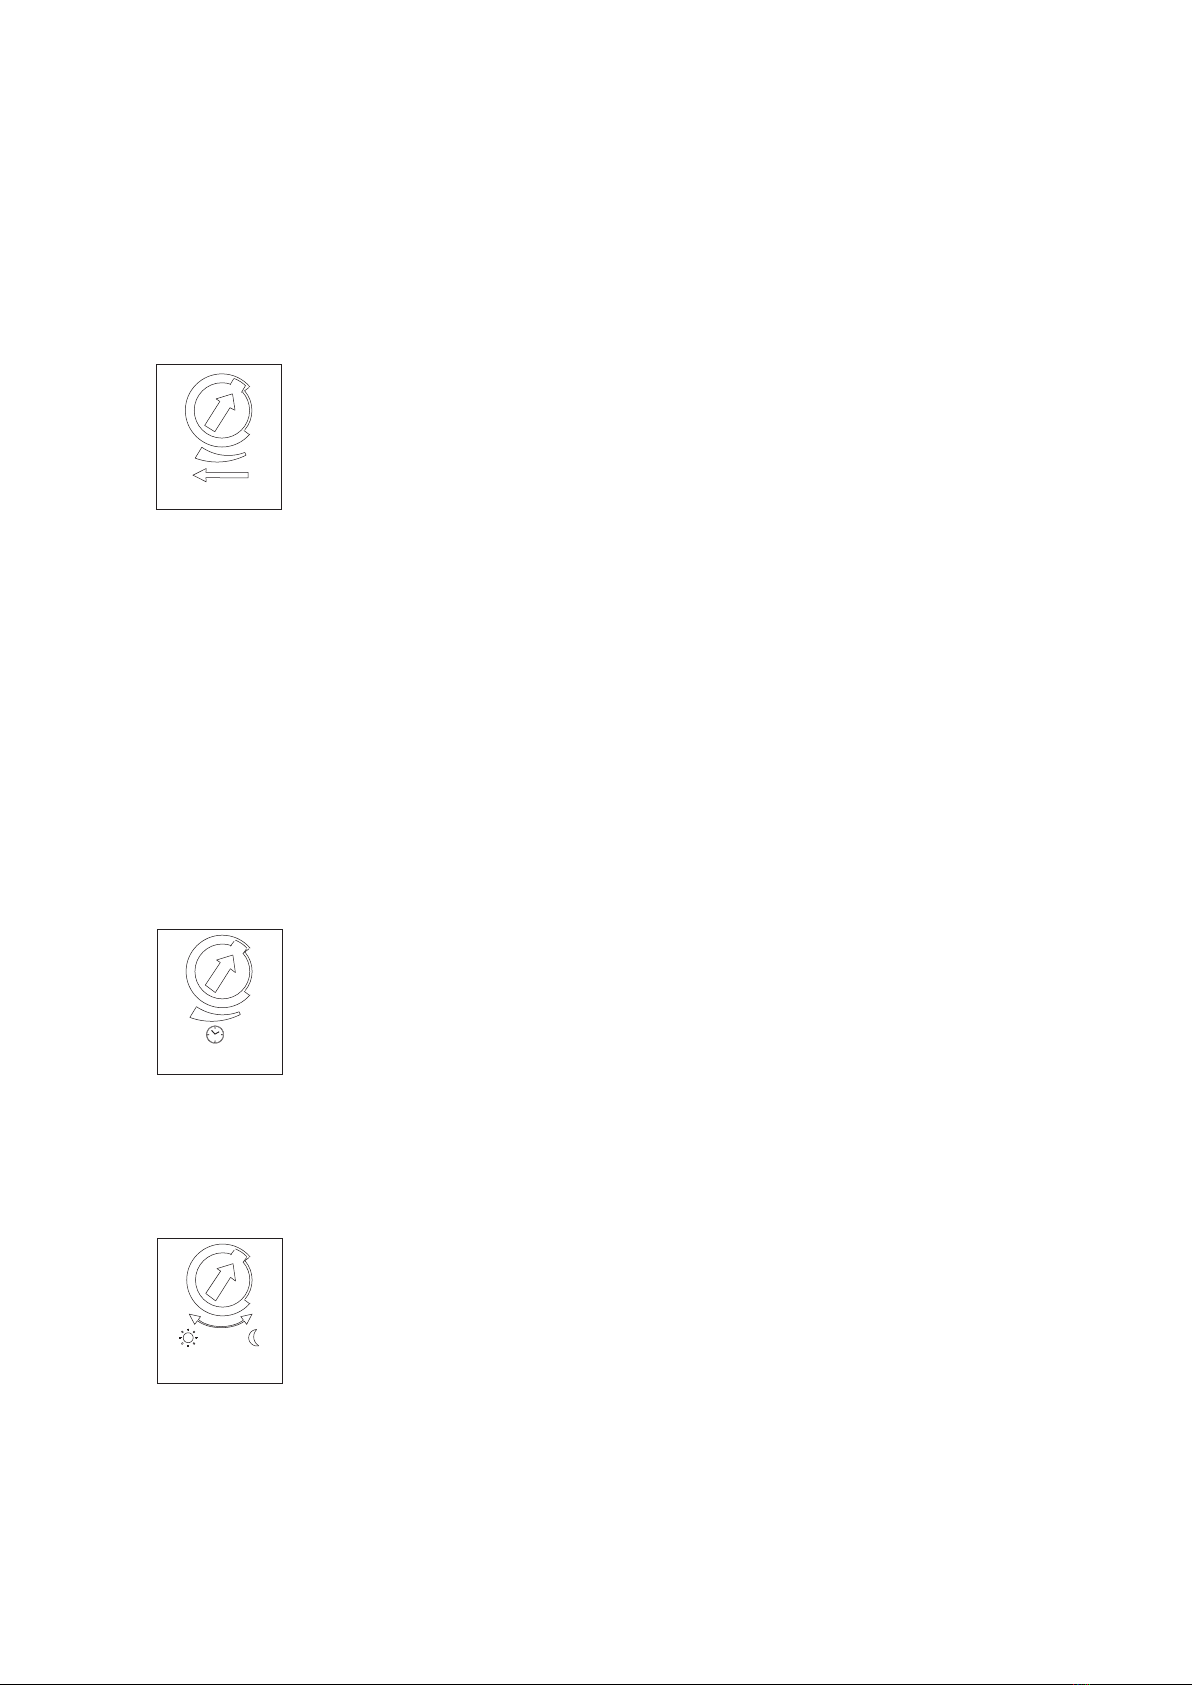
Detection range setting(sensitivity)
Time setting
Detection range is the term used to describe the radii of the roughly circle casting on
the ground when installed at the height of 2.5 m. To turn the knob fully anti-clockwise
is the minimum range (2m), fully clockwise is the maximum (10m).
The light can be set to stay ON for any period of time between approx. 8sec(turn fully
anticlockwise) and a maximum of 12min(turn fully clockwise). Any movement
detected before this time elapse will re-start the timer. It is recommended to select
the shortest time for adjusting the detection zone and for performing the walk test.
NOTE: the above detection distance is gained in the case of a person who is between
1.6m~1.7m tall with middle figure and moves at a speed of 1.0~1.5m/sec. If person’s stature,
figure and moving speed change, the detection distance will also change.
NOTE: When the light be auto off, it will take 1 second before the sensor is ready to detect
another movement, that is, only signal detected 1 seconds later can the light be auto-on.
Light-control setting
It can be defined in the range of 2~2000 LUX. To turn the knob fully anti-clockwise is
about 2 lux, fully clockwise is about 2000 lux. When adjusting the detection zone and
performing the walk test in daylight, you should turn the knob fully clockwise.
NOTE: please don’t adjust the three functional buttons to excess. That is because the three
functional buttons were connected to the components directly, there is a small stopper in
each of the three components, when you adjust the buttons from start to end, the excessive
turn will damage the stopper,and lead to the 360°non-stop turn around. Theadjust range
limit is 270°, please do pay attention to this.
2-10m
8sec-12min
2-2000LUX
ATTENTION:When use this product, please adjust the sensitivity to an appropriate position
you need, please do not adjust the sensitivity to maximum, to avoid the product does not
work normally caused by wrong motion.Because the sensitivity is too high easily detect the
wrong motion by wind blowing leaves & curtains, small animals, and the wrong motion by
interference of power grid & electrical equipment. All those lead the product does not work
normally !
When the product does not work normally, please try to lower the sensitivity appropriately,
and then test it.
Warning!
1、Being installed on the rocking object will lead to error reaction.
2、The shaking curtain blown by wind will lead to error reaction. Please select the suitable place to install.
3、Being installed where the traffic is busy will lead to error reaction.
4、The sparks produced by some equipment nearby will lead to error reaction.
The following situations will lead to error reaction.
Fault and the solution
The load fails to work.
Light-illumination is set incorrectly.Adjust the setting of the load.
Change the load.
Turn the power on.
Check the settings of the
detection area.
Re-adjust the installation place.
Check the settings of the
detection area.
Check the settings of the
detection area.
The load is broken.
The power is off.
There is a continuous signal in the region of the detection.
Moving signal is detected by the sensor (movement
behind the wall, the movement of small objects, etc.)
The lamp isn't installed well so that sensor fails to
detect reliable signals.
The motion speed is too fast or the defined detection
area is too small.
Fault Failure cause Solution
The load works all the time.
The load works when there is
no motion signal detected.
The load fails to work when
there is motion signal detected.
● Please confirm with prefessional installation.
● For safety purposes, please cut off power before installation and removal operations.
● Any losses caused by improper operation,the manufacturer does not undertake any
responsibility.
Warning!
We are committed to promoting the product quality and reliability, however, all the electronic
components have certain probabilities to become ineffective, which will cause some
troubles.When designing, we have paid attention to redundant designs and adopted safety
quota to avoid any troubles.
This instruction, without our permission, should not be copied for any other purposes.

Other Lexing Accessories manuals

Lexing LX-PR-M18Z User manual

Lexing

Lexing LX-PR-M18Z User manual

Lexing LX-MV-360S13A User manual

Lexing

Lexing LX-MV-360S13A User manual

Lexing LX-SLL136L User manual

Lexing

Lexing LX-SLL136L User manual

Lexing LX-AL9 User manual

Lexing

Lexing LX-AL9 User manual

Lexing LX-MV-360S15A-Z User manual

Lexing

Lexing LX-MV-360S15A-Z User manual

Lexing LX-180GS12 User manual

Lexing

Lexing LX-180GS12 User manual

Lexing LX-MV-360S15B-Z User manual

Lexing

Lexing LX-MV-360S15B-Z User manual

Lexing LX-MV360S2-IR Series User manual

Lexing

Lexing LX-MV360S2-IR Series User manual

Lexing LX-PR-28F User manual

Lexing

Lexing LX-PR-28F User manual

Lexing LX-PR136A User manual

Lexing

Lexing LX-PR136A User manual

Lexing LX-MV-360S1 User manual

Lexing

Lexing LX-MV-360S1 User manual

Lexing -MV-128LED-D User manual

Lexing

Lexing -MV-128LED-D User manual

Lexing LX-PR-65S User manual

Lexing

Lexing LX-PR-65S User manual

Lexing LX-MV-360S2-Z User manual

Lexing

Lexing LX-MV-360S2-Z User manual

Lexing LX-MV-360S13B User manual

Lexing

Lexing LX-MV-360S13B User manual

Lexing LX-PR-29A User manual

Lexing

Lexing LX-PR-29A User manual

Lexing LX16C-Z User manual

Lexing

Lexing LX16C-Z User manual

Lexing LX16C User manual

Lexing

Lexing LX16C User manual

Lexing LX-MV-360S18 User manual

Lexing

Lexing LX-MV-360S18 User manual

Lexing LX-PR-S15-Z User manual

Lexing

Lexing LX-PR-S15-Z User manual

Lexing LX-PR-29B User manual

Lexing

Lexing LX-PR-29B User manual

Popular Accessories manuals by other brands

netvox R718UBB Series user manual

netvox

netvox R718UBB Series user manual

Katranji SE03 user manual

Katranji

Katranji SE03 user manual

TOPPOINT LT95094 quick start guide

TOPPOINT

TOPPOINT LT95094 quick start guide

IFM Efector500 PY7102 operating instructions

IFM

IFM Efector500 PY7102 operating instructions

Robic M367 operating instructions

Robic

Robic M367 operating instructions

poolstar X-TRAMP PREMIUM Installation and user manual

poolstar

poolstar X-TRAMP PREMIUM Installation and user manual

SOMFY Oximo WireFree Battery Stick instructions

SOMFY

SOMFY Oximo WireFree Battery Stick instructions

Eufficio Innera Piatto installation instructions

Eufficio

Eufficio Innera Piatto installation instructions

Rice Lake 880 Performance Series Operation manual

Rice Lake

Rice Lake 880 Performance Series Operation manual

iKAMPER ExoShell 270 user manual

iKAMPER

iKAMPER ExoShell 270 user manual

Snapper 6117 parts manual

Snapper

Snapper 6117 parts manual

COMITRONIC-BTI LKS 485 user manual

COMITRONIC-BTI

COMITRONIC-BTI LKS 485 user manual

Hobo S-RGx-M002 quick start

Hobo

Hobo S-RGx-M002 quick start

Parker PJC Series instruction manual

Parker

Parker PJC Series instruction manual

Xylem WTW CellOx 325 operating manual

Xylem

Xylem WTW CellOx 325 operating manual

Emos P0068 manual

Emos

Emos P0068 manual

GE Reuter-Stokes FLAME TRACKER Operation & maintenance manual

GE Reuter-Stokes

GE Reuter-Stokes FLAME TRACKER Operation & maintenance manual

Persona Medical Earasers quick start guide

Persona Medical

Persona Medical Earasers quick start guide

manuals.online logo
manuals.online logoBrands
  • About & Mission
  • Contact us
  • Privacy Policy
  • Terms and Conditions

Copyright 2025 Manuals.Online. All Rights Reserved.