manuals.online logo
Brands
  1. Home
  2. •
  3. Brands
  4. •
  5. Lexing
  6. •
  7. Accessories
  8. •
  9. Lexing LX-PR-28F User manual

Lexing LX-PR-28F User manual

Sensor information
Function
Specifications
LX-PR-28F infrared motion sensor instruction
Summary
LX-PR-28F has 3 high-sensitivity detectors, it adopts IC, numeric LED display and SMT technology; the 3
detectors compose wide detecting range; it use infrared energy form human body as its control source, when
one enter its sense range, it can start controlled load (for example: lamp); after leaving the range, the load will
go out automatically within set time.
LX-PR-28F has remote controller, the controller can remote control the unit 30m away from controller.
We can add new function for you and produce it according to your requirement. Hope our product will take you
convenience.
Power source: 100-130V/AC
220-240V/AC
Power frequency: 50/60Hz
Power source(emitter): DC12V
Emit frequency: 433MHz
Detection range: 4m~10m(adjustable)
Remote control range:15m(wide place)
Light-control: <15LUX~>1000 LUX (adjustable)
Rated load: 1200W Max.tungsten(220-240V/AC)
300W Max.fluorescent(220-240V/AC)
800W Max.tungsten(100-130V/AC)
150W Max.fluorescent(100-130V/AC)
Time delay(normal mode):0sec~999sec(adjustable),
default:999sec
Detection angle:360°
Working temperature: -10°C~+40°C
Working humidity: <93%RH
Installation height: 1.5m~3.5m
Power consumption: Working 0.45W(static 0.1W)
Remote control sense motion speed: 0.6~1.5m/s
Sense time interval( impulse mode):0sec~999sec(adjustable),
default: 50sec
> Accurate numeric LED display time-delay function: it can be accurate to second, 1sec~999sec for your
choice,operation simple and using convenient;
>Impulse mode is another new function, when one enters its sense range, it will start load to turn on 0.5sec,
that give effect of alert signal. in this mode, the sense time interval is adjustable, default is 50sec;
>SET TIME button: used to set time, the details is in SET TIME WAY.
>Switch: convert NORMAL mode and IMPULSE mode;
0
(Height of installation2~4M)
(Height of installation1.5~3.5M)
1.5~3.5
m
Sensing angle adjustment rangeSensing distance adjustment range
Max:10m
Min:4mMin:4m
Max:10m
360°
> SENSE LED;
> Sensitivity(SENS) is adjustable;
> Light control(LUX) is adjustable;
> 2 remote controls are for your choice at will:
On:
The load work always.
Off:
1) Make the load stop working.
2) In normal mode, after convert to impulse mode,press it
to return normal mode.
Impulse:
In normal mode press this key to convert to impulse
mode;
Set time:
Set needed time, the details is in SET TIME WAY.
Note:
1. During sensing, the emitter is ineffective.
2. Loosen the off key, after 2sec, pressing other key is
effective.
Set time way
In normal mode set time delay and in impulse mode set sense time-interval.
1. 50sec later after switching on power, the sensor enter working state; now you can start to set time;
2. Press and hold set-time button, numeric LED display number adding from the right bit; like following figure;
3. Loose set-time button and then within 2sec immediately press and hold button again, numeric LED display
number diminishing from the right bit(like following figure);
4. Like above, you can repeat pressing button to make the adding and diminishing exchange, until the number
is needed.
1. To avoid false pressing, 2sec later after pressing and hold set time button, it start to set time.
2. After switch off power, the time you set previously will not be saved, it will resume default
time(normal mode:999sec, impulse mode:50sec)
3. During setting time, to make number adding and diminishing exchange, the interval between loosing
button and pressing it again should not exceed 2sec, otherwise the numeric LED will display OFF, you
must reset time from 0.
Example:set time 25sec and then set to 10sec:
Step1: after sensor enter working state, press and hold set time button until numeric LED display 29, loosen
button (the number adding, numeric LED display
Step2: within 2sec immediately press and hold button again until numeric LED display 25sec, loosen button
(the number diminishing, numeric LED display , numeric LED display OFF and setting finish.
LUX and SENS adjustment
1. Use flat-head screwdriver to turn the knob, note: to avoiding destroy the knob, you should turn it lightly but
not overexert.
2.SENS adjustment: by turning the SENS knob to adjust the detection range; turn clockwise to increase
sensitivity and anti-clockwise turn to decrease it.
)
).
Note:
3.LUX adjustment: turn clockwise to increase working light and when turn to the end(☼)the unit can work all
day and all night; anti-clockwise turn to decrease it, when turn to the end( ), it only can work in the
circumstance <15LUX; you can turn the knob to other position according to your required working light.
1. Slide switch to normal mode and the unit be in normal mode;
2. Turn light control(LUX) knob to ☼(max)and sensitivity knob(SENS) to certain position;
3. Switch on power, the load doesn’t work and numeric LED counts down [50~00]. When numeric LED display
OFF, the sensor enter working state;
4. Moving in the sensing range, the numeric LED display “-“ moving to left, that indicate the sense signal is
detected;
5. After receiving sense signal, the sense LED lights and the load works, keep human body hold still
absolutely, under no continual sensing condition, the numeric LED count down time delay (example: default
999sec, and it display counting-down like 999,998…000) until the numeric LED display OFF, the load stops
working;
6. Like that, sense once, the load works for 999sec(you can set other time delay);
Note: after sense it for the first time, it receive sense signal again, the time delay will recompute time
from the second sense,so when human body always move in the sense range, the load will work
always.
7. Using remote controller:
press on key: make the load work always;
press off key: 1)make the load stop working;
2)after convert to impulse mode, press the key to return normal mode;
press impulse key: convert to impulse mode, note: after switching off, the unit return normal mode;
press Set time key: set needed time delay, the details is in SET TIME WAY.
Normal mode:numeric LED display OFF. Sense, the load work for some time, time delay is adjustable,
default is 999sec.
height
maxsense distance
2.13m
4m(SENS-)10m(SENS+)
LUX
LUX
Impulse mode: numeric LED display OFF moving to left. Sense, the load work for 0.5sec, the sense
time interval is adjustable, default is 50sec.
1.Slide switch to impulse mode, the unit be in impulse mode;
2.Turn light-control(LUX) knob to ☼(max), and sensitivity knob(SENS) to certain position;
3.Switch on power, the load doesn’t work and numeric LED count down 50~00, when numeric LED display
OFF moving to left, the sensor enter working state;
4.Moving in the sensing range, after receiving sense signal, the sense LED lights and the load works for
0.5sec, then the numeric LED count down time interval(example: default 50sec and it display reversing like
050…00), when the numeric LED resume displaying OFF moving to left and you can sense again.
5.Like that, sense once every at least 50sec(you can set other time interval) , the load works for 0.5sec.
6.Using remote controller:
press on key: make the load work always;
press off key: make the load stop working;
press Set time key: set needed sense time interval, the details is in SET TIME WAY.
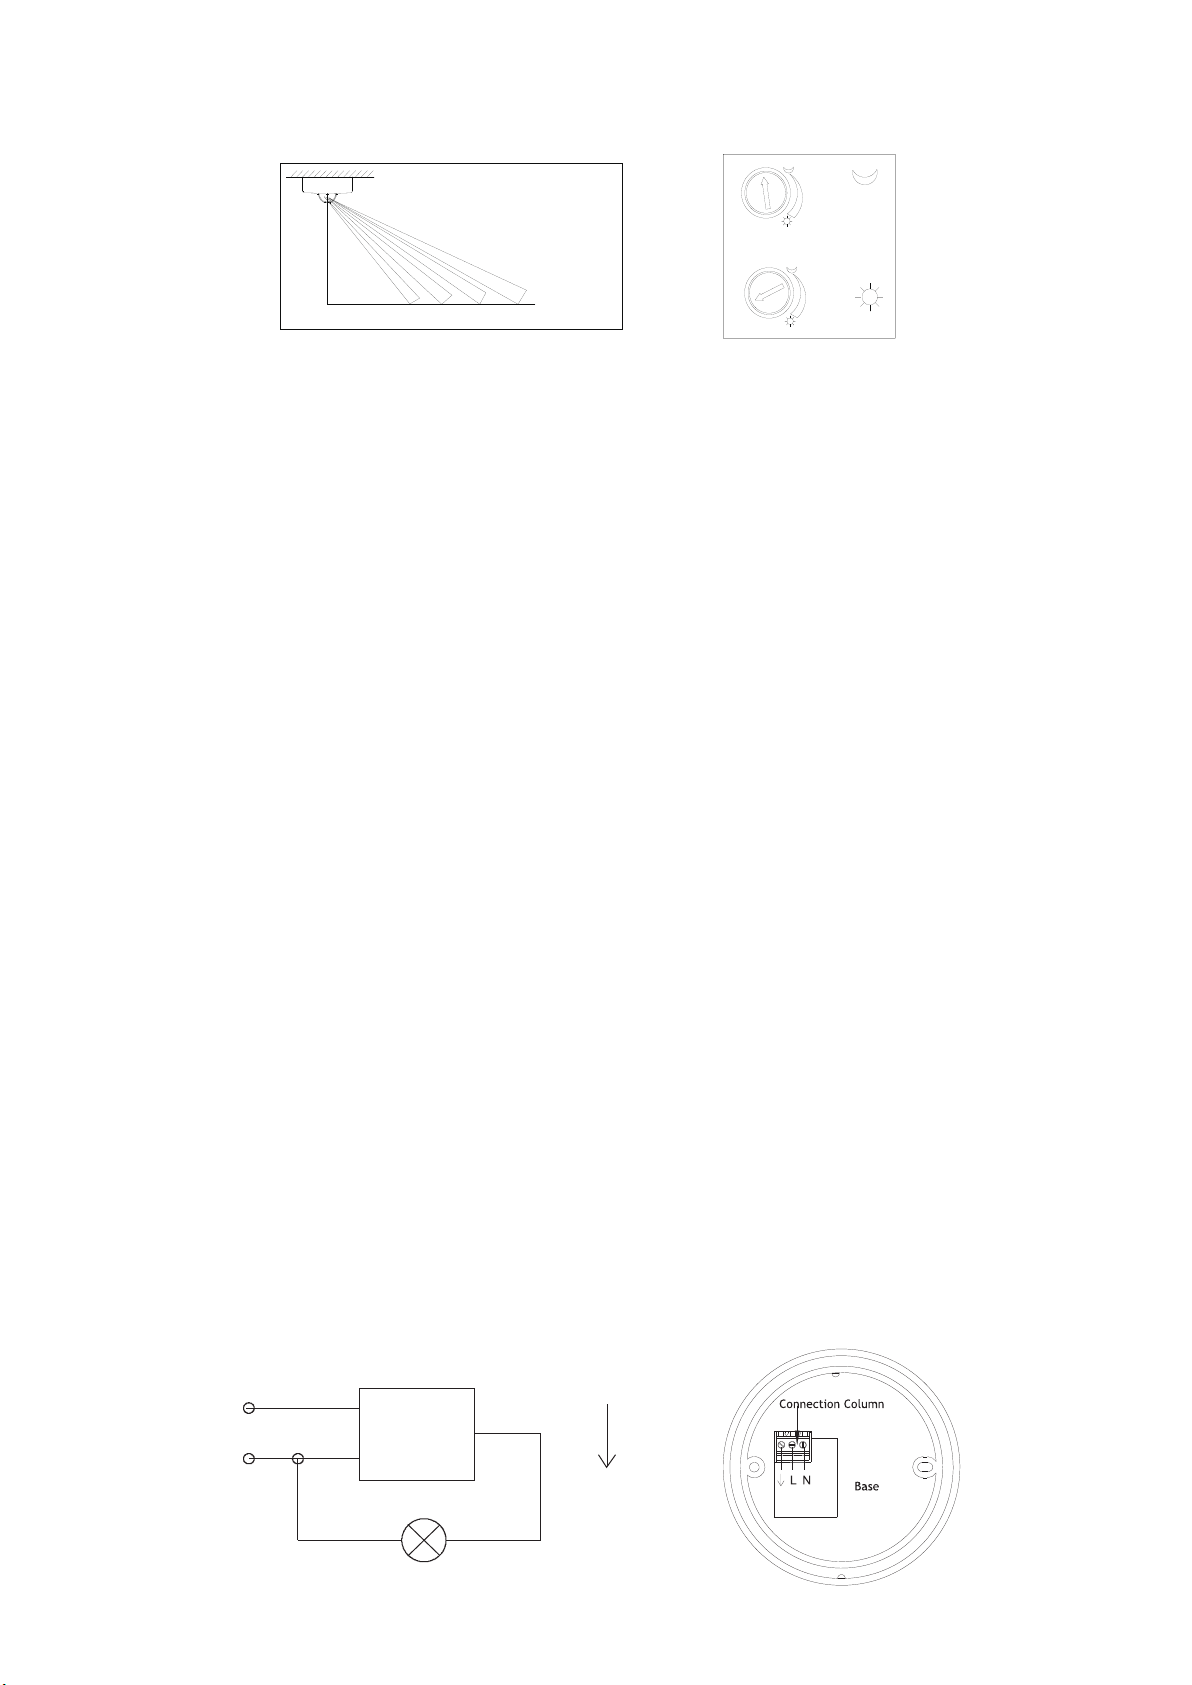
Connection-wire diagram
L
N
Sensor
Load
~input output
Install attention
> In sense range there should not be obstruction;
> You should not install the unit facing window and where temperature change quickly (like air conditioning,
stove) to avoid false working;
> In front of sense window there should not be moving object, like hanging fan. etc.
Troubleshooting
①Load doesn’t work:
- check whether the connection of power and load is correct or not;
- check whether the load is good or not;
- check whether the working light you set accord with ambient light or not.
②Sensitivity is low:
- Check whether in front of sense window there is isolation to affect sensor receiving signal;
- Check whether ambient temperature is too high;
- Check whether sense signal source is in sense range;
③Sensor can not shut off load automatically:
- Check whether there is continual sensing signal in sense range or not;
- Whether power accord with specification required or not;
- Whether temperature near sensor changes quickly, for example: air conditioning, heater, etc.
Install procession
·Before installing switch off power;
·Press the lock-button of bottom cover with finger, and pull off the top cover(like 1);
·Connect power the load with sensor according to connection-wire method;
·Install the sensor body on selected position with screw and dilatants(like 2);
·Make top cover aim at the body and button the cover(like 3), install finish;
·If you want to open the top cover, you should press the lock-button on both side with screwdriver and
simultaneously pull off the top over(like 4).

Other Lexing Accessories manuals

Lexing LX-MV-360S1 User manual

Lexing

Lexing LX-MV-360S1 User manual

Lexing LX-MV-360S2-Z User manual

Lexing

Lexing LX-MV-360S2-Z User manual

Lexing LX-MV360S2-IR Series User manual

Lexing

Lexing LX-MV360S2-IR Series User manual

Lexing LX-MV-360S13B User manual

Lexing

Lexing LX-MV-360S13B User manual

Lexing LX-180GS12 User manual

Lexing

Lexing LX-180GS12 User manual

Lexing LX-PR-29B User manual

Lexing

Lexing LX-PR-29B User manual

Lexing LX-PR-M18Z User manual

Lexing

Lexing LX-PR-M18Z User manual

Lexing LX16C User manual

Lexing

Lexing LX16C User manual

Lexing LX-MV-360S15B-Z User manual

Lexing

Lexing LX-MV-360S15B-Z User manual

Lexing LX-AL9 User manual

Lexing

Lexing LX-AL9 User manual

Lexing -MV-128LED-D User manual

Lexing

Lexing -MV-128LED-D User manual

Lexing LX-MV-360S13A User manual

Lexing

Lexing LX-MV-360S13A User manual

Lexing LX-PR-65S User manual

Lexing

Lexing LX-PR-65S User manual

Lexing LX-PR-S15-Z User manual

Lexing

Lexing LX-PR-S15-Z User manual

Lexing LX-MV-360S2-A-Z User manual

Lexing

Lexing LX-MV-360S2-A-Z User manual

Lexing LX-MV-360S18 User manual

Lexing

Lexing LX-MV-360S18 User manual

Lexing LX-MV-360S15A-Z User manual

Lexing

Lexing LX-MV-360S15A-Z User manual

Lexing LX-PR136A User manual

Lexing

Lexing LX-PR136A User manual

Lexing LX16C-Z User manual

Lexing

Lexing LX16C-Z User manual

Lexing LX-PR-29A User manual

Lexing

Lexing LX-PR-29A User manual

Lexing LX-SLL136L User manual

Lexing

Lexing LX-SLL136L User manual

Popular Accessories manuals by other brands

MEFE CAT 139 8101 operating manual

MEFE

MEFE CAT 139 8101 operating manual

AEG BK 6 Instructions for use

AEG

AEG BK 6 Instructions for use

Panasonic EX-F61 instruction manual

Panasonic

Panasonic EX-F61 instruction manual

Stahl SolConeX 8571/11 Series operating instructions

Stahl

Stahl SolConeX 8571/11 Series operating instructions

Sam SAMX DRAINER manual

Sam

Sam SAMX DRAINER manual

Kompernass KAA 31 A1 operating instructions

Kompernass

Kompernass KAA 31 A1 operating instructions

D'Addario HUMIDITRAK quick start guide

D'Addario

D'Addario HUMIDITRAK quick start guide

Fern-Howard FHL414 Setup instructions

Fern-Howard

Fern-Howard FHL414 Setup instructions

Mutsy Spider instruction manual

Mutsy

Mutsy Spider instruction manual

Rinstrum R320 Reference manual

Rinstrum

Rinstrum R320 Reference manual

elero Lumo-868 operating instructions

elero

elero Lumo-868 operating instructions

Decagon 10HS Operator's manual

Decagon

Decagon 10HS Operator's manual

McAfee IIP-S14C-NA-100I - IntruShield 1400 Sensor... Product guide

McAfee

McAfee IIP-S14C-NA-100I - IntruShield 1400 Sensor... Product guide

Pyxis ST-735 Operation manual

Pyxis

Pyxis ST-735 Operation manual

Sonero X-IMS070 user manual

Sonero

Sonero X-IMS070 user manual

Eshine ES960S user manual

Eshine

Eshine ES960S user manual

Focusrite Scarlett Solo user guide

Focusrite

Focusrite Scarlett Solo user guide

ADVANSEA Speed s400 Multilingual installation manual

ADVANSEA

ADVANSEA Speed s400 Multilingual installation manual

manuals.online logo
manuals.online logoBrands
  • About & Mission
  • Contact us
  • Privacy Policy
  • Terms and Conditions

Copyright 2025 Manuals.Online. All Rights Reserved.