03/12/13
900-173C/174C/175C Instructions Continued…
How to Attach Side Rails to Headboard (A) / Footboard (B)
* All needed hardware is located in a hardware bag which should be taped to inside of side rail.
1. Insert threaded rod (D) into metal dowel in post thru open hole. Twist clockwise until tight.
2. With both threaded rods in place, and side rail positioned with T-slots to inside, slide side rail (C) over threaded rods.
3. Add curved washer (E) to threaded rod.
4. Tighten nut on curved washer with wrench (F) until tight. Repeat process for other three corners.
How to Attach Slats (G) to Side Rails (C)
1. Insert bolted end of adjustable leveler (H) into bottom of support leg (I) and twist until tight. Insert bolted end of support leg into bottom of slats
(G). There is a T-nut in the center of the board. Rotate clockwise until tight. [5/ 0 Queen bed has (4) levelers/support legs and 6/6 King and 6/0
California King beds have (8) levelers/support legs.]
2. Adjust leveler so that support leg and leveler sit ½” above floor.
3. Place a slat 3” to 5” inward from each end of wood cleats. Place two slats between two end slats so that there is an equal amount of space between
all four slats.
4. Secure slats with wood screws (J) provided. Note that top side of slat has larger hole.
How
900-173C/174C/175C
Low FB Post Option w/ Ball Finial
For additional consumer assistance please contact your Lexington dealer or call our
Consumer Services Department at 1-336-474-5300, Monday-Friday, 8-5 Eastern. Page 2 of 2
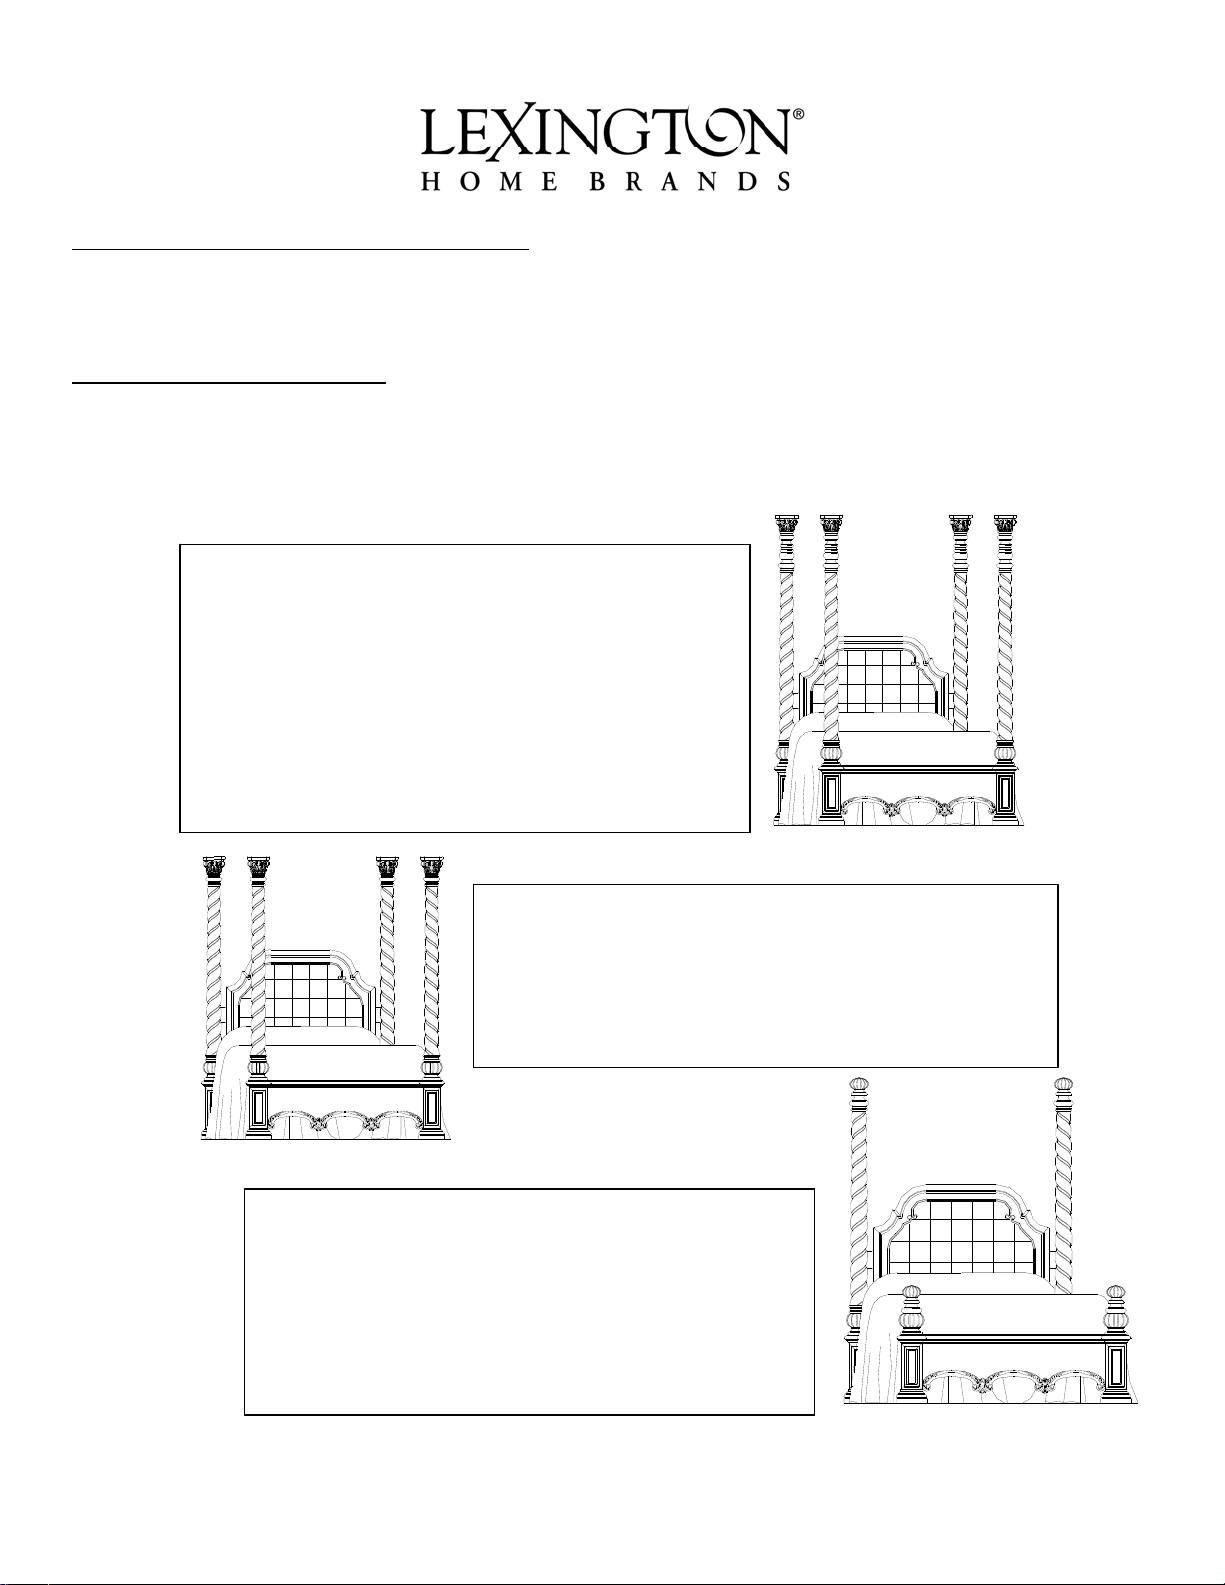
Figure 1 - How to Set Up Bed as High Post Option
with 9” Filler Post Sections:
Determine which post is left-side-facing footboard post and which post is
right-side-facing footboard post. Spirals on left footboard post should be
in same direction as spirals on left headboard post. Spirals on right
footboard post should be in same direction as spirals on right headboard
post. Insert bolted end of each footboard post (L) into top corners of
footboard panel (B). Twist posts clockwise until tight. Insert bolted end of
9” filler post section (M) into top of each headboard post (K) and each
footboard post (L). Twist filler post sections clockwise until tight. Insert
bolted end of each “capital” finial (N) into top of each filler post section
(M). Twist finials clockwise until tight, making sure that straight edge of
finial is in line with headboard panel (A) and footboard panel (B).
Figure 2 - How to Set Up Bed as High Post Option
without 9” Filler Post Sections:
Remove “capital” finials (N) from headboard posts (K) and footboard posts
(L). Remove 9” filler post sections (M) from all (4) posts. Insert bolted end
of “capital” finial (N) into top of each headboard post (K) and each
footboard post (L). Twist finials clockwise until tight, making sure that
straight edge of finial is in line with headboard panel (A) and footboard
panel (B).
Figure 3 - How to Set Up Bed as Low Footboard Post Option:
Remove “capital” finials (N) from all (4) posts and remove footboard
posts (L) from footboard panel (B). Insert bolted end of 6-5/16” headboard
“ball” finials (P) into top of headboard posts (K). Twist headboard finials
clockwise until tight. Insert bolted end of 7-5/8” footboard “ball” finials
(R) into top corners of footboard panel (B). Twist footboard finials
clockwise until tight. [9” filler post section (M) may be used on headboard
low footboard post option. Before adding headboard “ball” finials (P),
insert bolted end of filler post sections (M) into headboard posts (K) and
twist clockwise until tight. Then add headboard “ball” finials (P).]
900-173C/174C/175C
High Post Option w/ Capital Finial and
w/ 900-174PS (9" Filler Post Section)
900-173C/174C/175C
High Post Option w/ Capital Finial


