REFRIGERANT (FOR R32 ONLY)
10 INSTALLATION
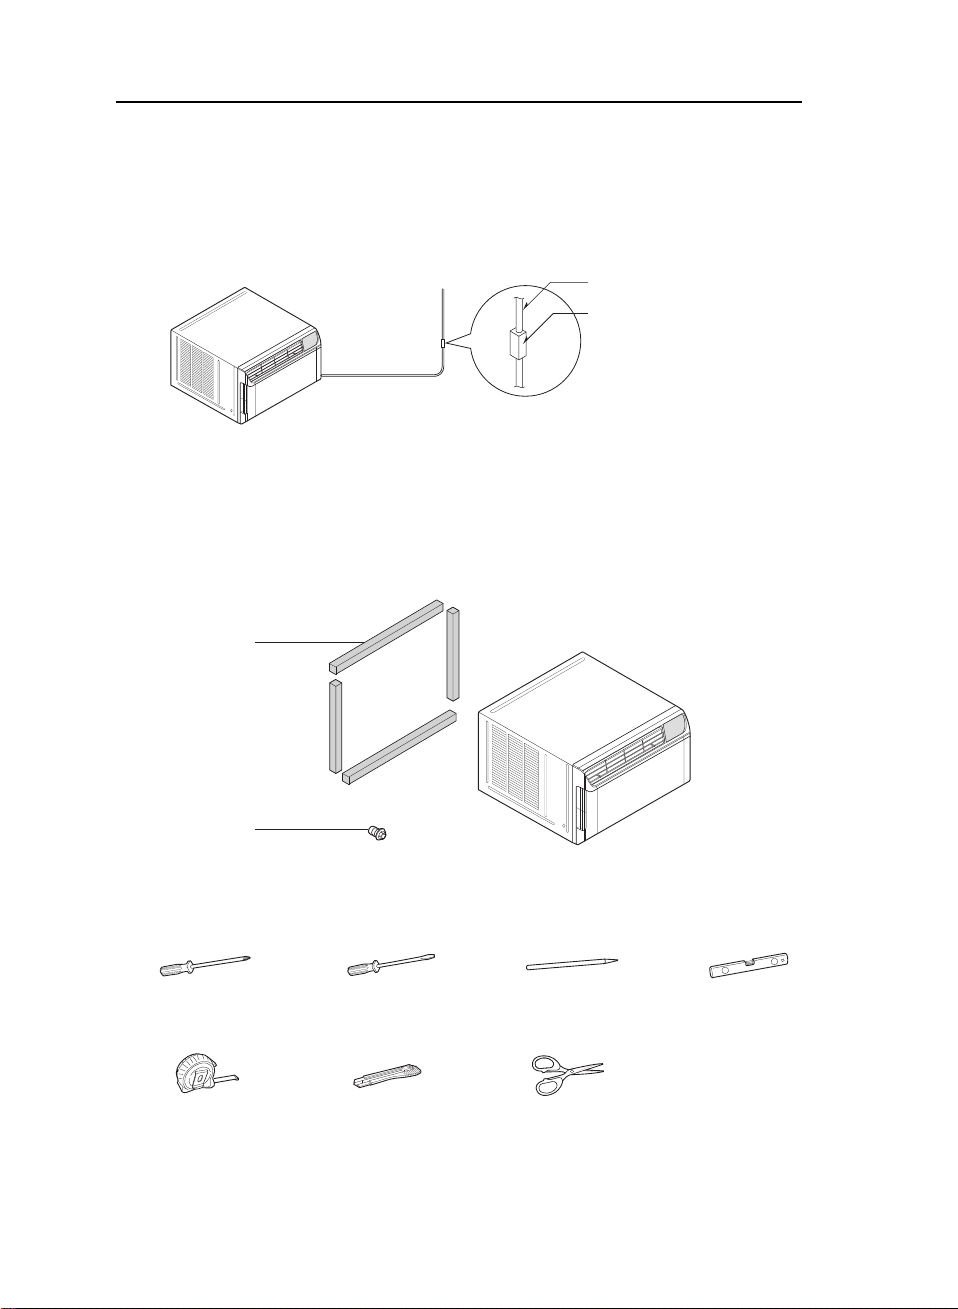
Drainage (Optional)
The base-pan may overflow due to high humidity.
To drain the excess water, remove the drain cap
from the base pan of the unit and secure the
drain pipe.
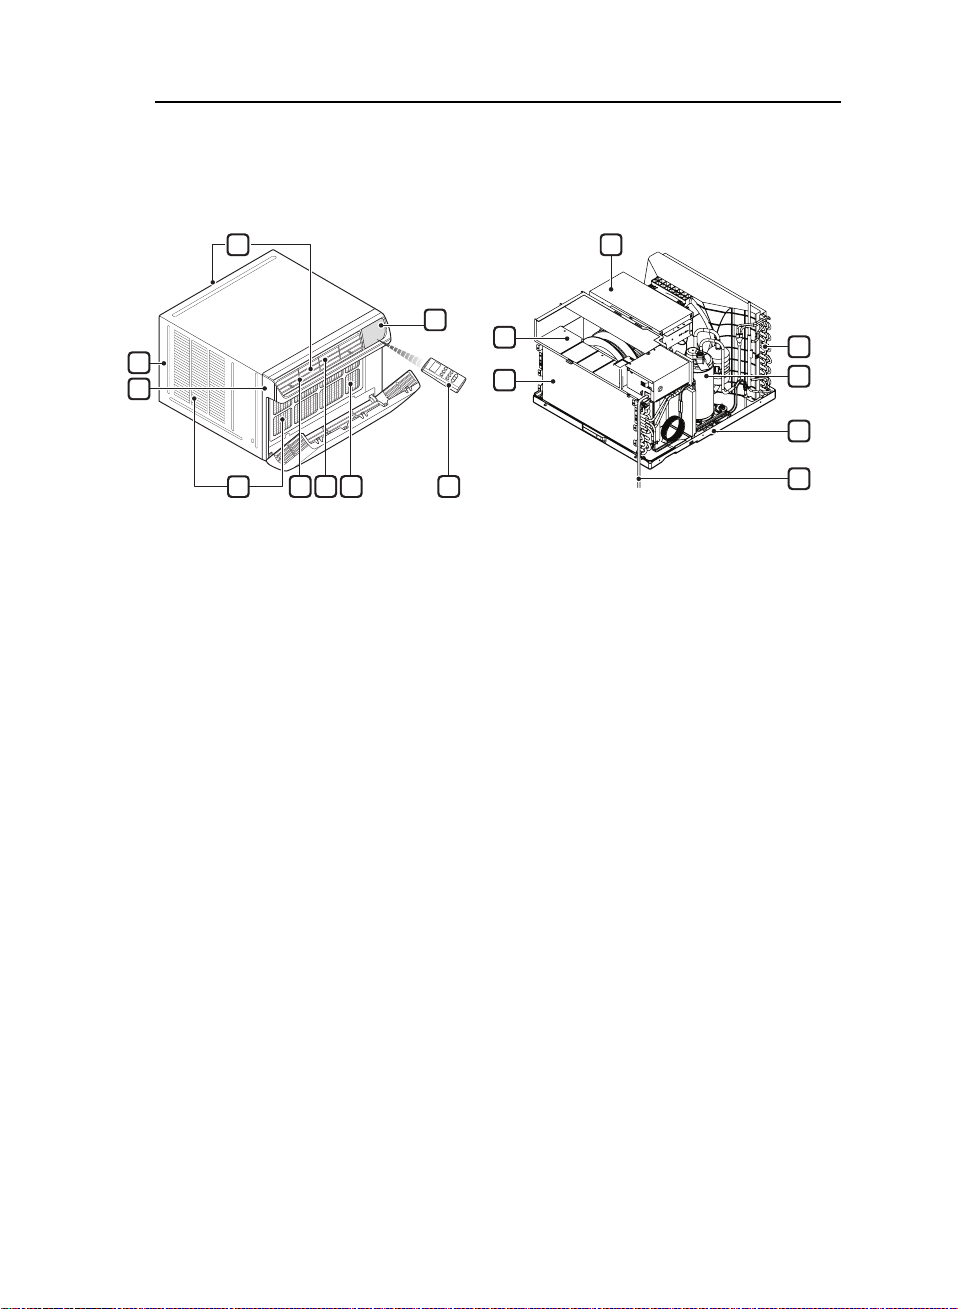
1Measure the space for installation to
assure a good fit. The air conditioner must
be installed firmly into place to prevent
vibration and noise.
2Avoid exposure to direct sunlight.
3Remove all obstacles from the rear of the
unit. There must be at least 50 cm (20 in.)
of cleared space around the rear of the
unit. Obstacles restricting the airflow may
reduce the cooling efficiency of the unit.
4The unit should be installed with a slight tilt
towards the outside to allow condensed
water to drain. (About 10~15 mm or 1/4
bubble with Level)
1Remove the rubber cap from the hole
under the base-pan.
3Connect the drain hose to the outlet
located on the bottom of the drain pipe.
(You can purchase the drain hose or tubing
locally to satisfy your particular needs.
Drain hose is not supplied)
CAUTION
•Take care when inserting the drain pipe.
Push away from the sharp edge to avoid
slipping and injuring yourself.
!
2
1
2Press the drain pipe into the hole by
hanging and pushing.
Foam Awning
Heat
radiation
Fence
Over 50 cm
Cooled air
10~15 mm
1/4 Bubble
Level
How to Install the Unit
CAUTION
•The external grille must be exposed outside for
air discharge.
•As the minimum installation height is 70cm.
Please be aware of some old buildings may not
meet this requirement of installation height.
!
(Minimum
70-150cm
height is 70cm)
installation
5
SAFETY INSTRUCTIONS
EN
OPERATION
• Use this appliance only for its intended purpose.
• Never attempt to operate this appliance if it is damaged, malfunctioning, partially disassembled, or has
missing or broken parts, including a damaged cord or plug.
• Repair or immediately replace all power cords that have become frayed or otherwise damaged.
Do not use a cord that shows cracks or abrasion damage along its length or at either end.
• Do not run cord under carpets or mats where it could be stepped on and damaged.
• Keep the cord out from under heavy objects like tables or chairs.
• Do not place the power cord near a heat source.
• Do not use an adaptor or plug the product into a shared outlet.
• Do not tamper with controls.
• If you detect a strange sound, a chemical or burning smell, or smoke coming from the appliance, unplug it
immediately, and contact an LG Electronics Customer Information Center.
• Never unplug the appliance by pulling on the power cord. Always grip the plug firmly and pull straight out from
the outlet.
• Do not grasp the power cord or touch the appliance controls with wet hands.
• If water enters the product, turn off the power at the main circuit, then unplug the product and call for service.
• If the product has been submerged, contact the LG Electronics Customer Information Center for instructions
before resuming use.
• Unplug the product when unused for long periods.
• Unplug the product before cleaning.
• In the event of a gas leak (propane gas, etc.) do not operate this or any other appliance. Open a window or
door to ventilate the area immediately.
• This appliance is not intended for use by persons (including children) with reduced physical, sensory or mental
capabilities, or lack of experience and knowledge, unless they have been given supervision or instruction
concerning the use of the appliance by a person responsible for their safety. Children should be supervised to
ensure that they do not play with the appliance.
• The interior of the product must only be cleaned by a LG Electronics Customer Information Center or a dealer.
• Do not use solvent-based detergent on the product. Doing so can cause corrosion or damage, product failure,
electrical shock, or fire.
GROUNDING INSTRUCTIONS
• The power cord of this appliance is equipped with a three-prong (grounding) plug. Use this with a
standard three-slot (grounding) wall power outlet to minimize the hazard of electric shock. The customer
should have the wall receptacle and circuit checked by a qualified electrician to make sure the
receptacle is properly grounded. DO NOT CUT OR REMOVE THE THIRD (GROUND) PRONG FROM
THE POWER PLUG.
- Situations when the appliance will be disconnected occasionally; Because of potential safety hazards,
we strongly discourage the use of an adapter plug.
• Attaching the adapter ground terminal to the wall receptacle cover screw does not ground the appliance
unless the cover screw is metal, and not insulated, and the wall receptacle is grounded through the
house wiring. The customer should have the circuit checked by a qualified electrician to make sure the
receptacle is properly grounded.
• Disconnect the power cord from the adapter, using one hand on each. Otherwise, the adapter ground
terminal might break. Do not use the appliance with a broken adapter plug.
- Situations when the appliance will be disconnected often; Do not use an adapter plug in these
situations. Unplugging the power cord frequently can lead to an eventual breakage of the ground
terminal. The wall power outlet should be replaced by a three-slot (grounding) outlet instead.


 null")