LG 450 Guide

MBM64698801 (1.0) Printed in China
Start Guide
Guia de inicio
Welcome
Bienvenido

By selecting a rate plan and activating your
phone, you agree to the MetroPCS Terms
and Conditions of Service available at
metropcs.com.
This Start Guide is to get you up and
running. For the complete User Guide,
please visit www.lg.com/us. After searching
for the model name, click on
PRODUCT SUPPORT on the model page.
Al seleccionar un plan y activar su teléfono,
usted acuerda a los términos y condiciones
de servicio de MetroPCS disponible en
metropcs.com.
Esta Guía de inicio le ayuda a iniciar el
uso del teléfono. Para la guía de usuario
completa, por favor visite www.lg.com/us.
Después de buscar el nombre del modelo,
haga clic en PRODUCT SUPPORT en la
página.
Copyright ©2014 LG Electronics, Inc. All rights
reserved. LG and the LG logo are registered
trademarks of LG Group and its related
entities. All other trademarks are the property
of their respective owners.
Copyright ©2014 LG Electronics, Inc. Todos
los derechos reservados. LG y el logotipo
de LG son marcas registradas de LG
Group y sus entidades relacionadas. Todas
las demás marcas son propiedad de sus
respectivos titulares.

1
TABLE OF CONTENTS
Introduction ................................................2
Your Phone.................................................3
Getting Started...........................................5
Calls and Voicemail.....................................8
Contacts ....................................................9
Text and Picture Messaging......................10
Camera and Video....................................11
Useful Tools..............................................12
Browser....................................................13
Email ........................................................14
Settings....................................................15
MetroPCS Terms and
Conditions of Service................................16

2
Introduction
Service
You will need the following information when
activating service:
•
Your name, address and an eight-digit
number that you will use to access your
account (your personal identification
number “PIN”).
•
Your serial number (IMEI) and SIM card
number. To locate the serial number,
remove the phone from the box and
remove the battery cover from the phone.
The serial number is located near the bar
code. It will be either 14 or 18 digits. The
SIM card number can be located below the
bottom bar code on the back of the SIM
card holder.
•
Your choice of MetroPCS plan and services
including unlimited data, talk and text plans.
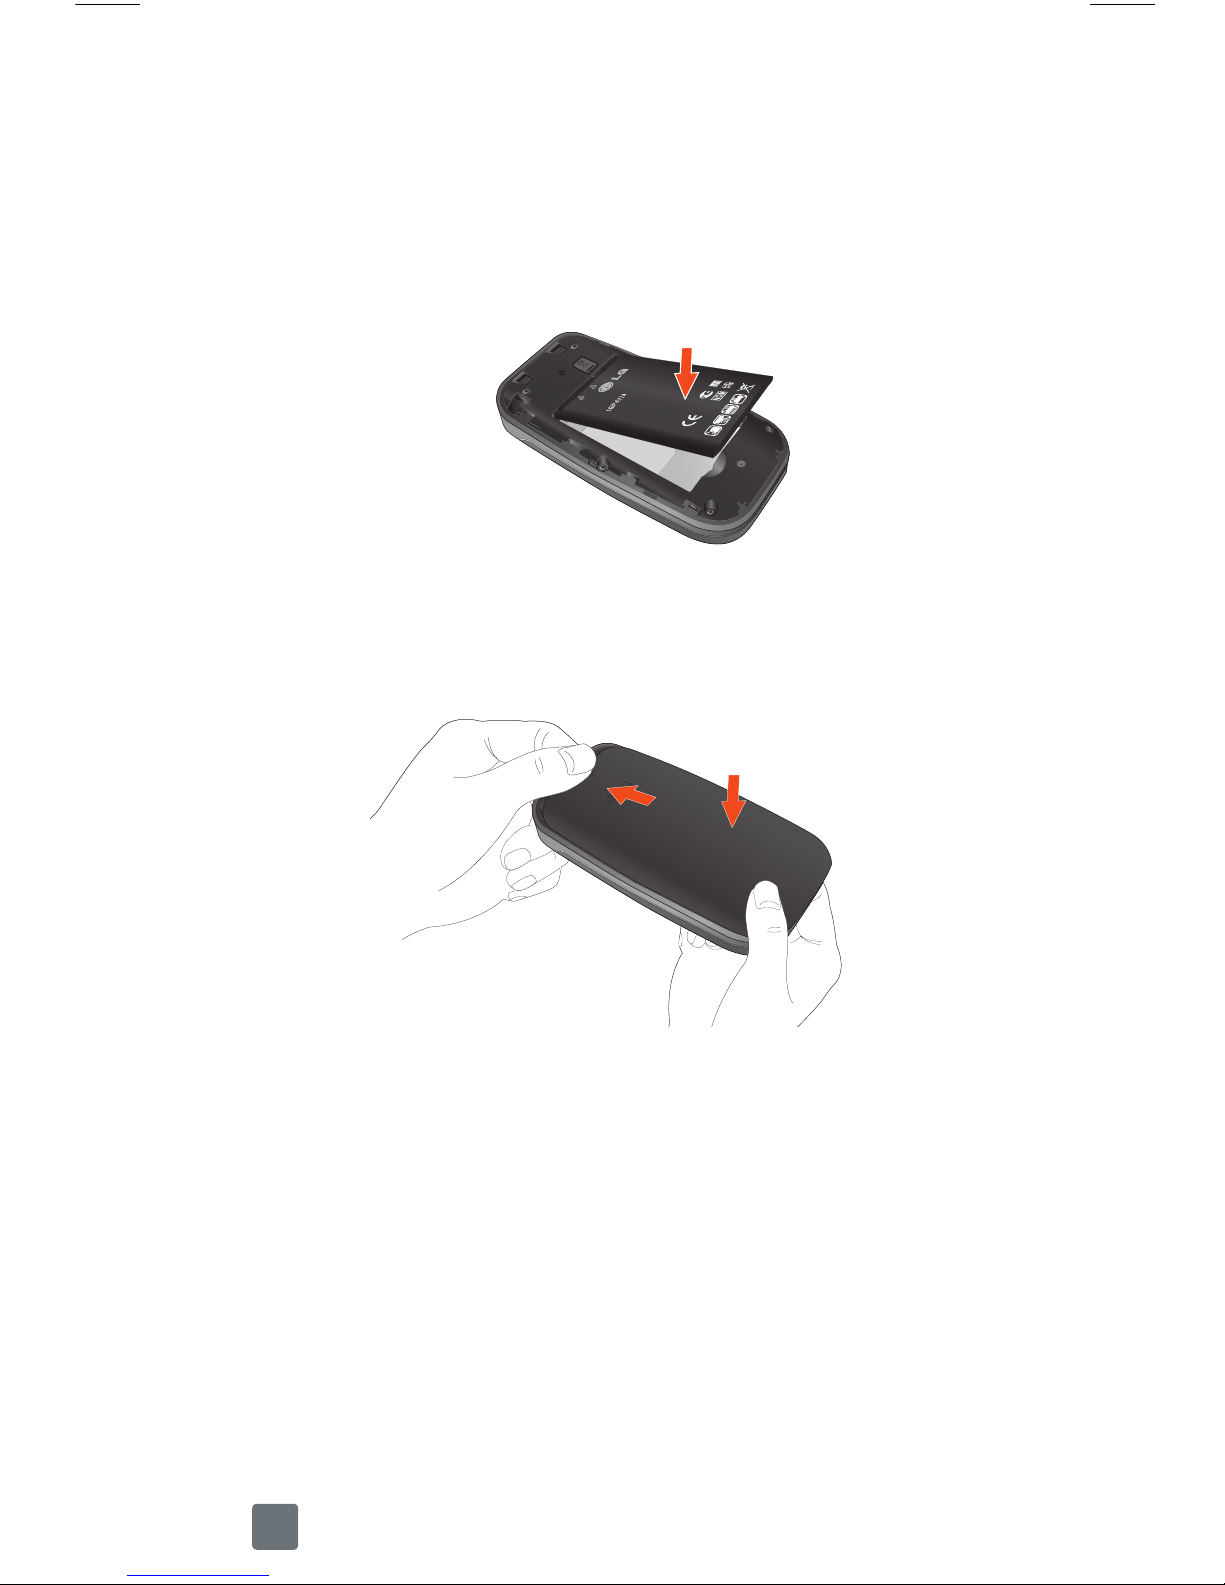
•
Install the battery and SIM card in your
new phone by following the step by step
instructions in this phone’s User Guide.
•
Once your phone is powered up, dial
1.888.8metro8 (1.888.863.8768) to connect
with an activation representative who will
assist you in activating your phone. You can
also activate your phone online by visiting
metropcs.com. (As soon as your service
is activated, be sure to fully charge the
phone’s battery before using it again.)
Don’t hesitate to ask your MetroPCS
representative for more information on
additional features and services or visit
metropcs.com.

3
Your Phone
Front view
Main LCD
Camera Key
Message Key
Navigation Keys
Send Key
Earpiece
Left Soft Key/Right
Soft Key
Clear/Back Key
TTS Mode Key
OK Key
End/Power Key

4
Side view
Volume Keys
Charger/USB Port
Rear view
SIM Card Slot
Back Cover
Battery

5
Getting Started
Before you start using the phone, you may
need to insert the SIM card.
Installing the SIM card and battery
1To remove the back cover, place your thumb
at the top part of the back cover and slide it
downwards.
2Slide the SIM card into the SIM card slot
(as shown below). Make sure that the gold
contact area on the card is facing downwards.

6
3Insert the top of the battery first into the top
edge of the battery compartment. Ensure that
the battery contacts align with the terminals
on the phone. Press the bottom of the battery
down until it snaps into place.
4Align the back cover on the battery
compartment and slide it upwards until it locks
into place. Then charge your phone.

7
Charging your phone
Locate the Charger/USB Port on the left side
of your phone. Insert the charger connector
to the phone (the ‘B’ side of the connector
has to be facing up when connecting to
the phone) and then plug the other end into
the wall socket. Your phone will need to
be charged until the Full Battery message
appears on the screen.
NOTE
• You must insert the battery before
charging.
• The battery must be fully charged initially to
improve battery lifetime.
Warning!
Use of unauthorized accessories could
damage your phone and void your warranty.

8
Calls and Voicemail
It’s easy to make calls and access voicemail
and your call logs with your phone.
Make a Call
1From the Home screen, enter the number
you want to call.
2Press the OKKey Call or the SendKey
to place the call.
Answer a call
1From the Home screen, press the
LeftSoft
Key
Accept
or the
SendKey
. Or,
simply flip open the phone.
• To reject the call, press the
EndKey
.
• To change your answer options, press the
LeftSoftKey Menu
>
Settings
>
Call
>
AnswerMode
.
View recent calls
From the Home screen, press the
LeftSoft
Key Menu
>
RecentCalls
.
Check voicemail
1From the Home screen, press and hold the
key
.
2Follow the voice prompts to listen to
messages.
3Enter a passcode, if applicable.

9
Contacts
You can save and manage contact address
information.
Adding new contact
1From the Home screen, enter the number
you want to save.
2Press the RightSoftKey Save > As
NewContact.
3Enter the display name, first name, last name
and more.
4Press the RightSoftKey Save.
Viewing your contact list
1From the Home screen, press the
LeftSoft
Key Menu>Contacts .
2Select the ContactList.

10
Text and Picture
Messaging
Send a message
1From the Home screen, press the
Message
Key
.
2Select a recipient or enter a phone number,
then press the RightSoftKey Compose.
3In the text field, enter your text.
4Press the OKKey Send to send the
message.
Insert a picture or video
1While composing a message, press
the
RightSoftKey Insert
to add an
attachment.
2Select attachment type and follow prompts to
add to message.
3When message is complete, press the OK
Key Send to send the message.

11
Camera and Video
Take a picture
1From the Home screen, press the Camera
Key .
2To access camera settings, press the Left
SoftKey Settings.
3Press the OKKey or the CameraKey
to take a picture.
Recording a video
1From the Home screen, press and hold the
CameraKey
.
2To access video settings, press the LeftSoft
Key Settings.
3Press the OKKey or the CameraKey
to begin recording a video. Press either
key again to stop recording.
View pictures and videos
1From the Home screen, press the
LeftSoft
Key Menu
>
Album
.
2When a file is highlighted, press the LeftSoft
Key Options to access other functions.

12
Useful Tools
Text to Speech
When Text to Speech is enabled, your phone
will read aloud menu items, new messages,
and other phone features.
Press the
TTSKey
to turn Text to Speech
mode on or off.
Voice Commands
Call contacts, check messages and voicemail,
find the date and time, and more.
1From the Home screen, press the
Left
SoftKey Menu
>
Tools
>
Voice
Command
.
2Speak a command, such as “messages”,
“missed calls”, or another option from the
menu.
Senior Mode
Senior mode is a function that amplifies
a sound for seniors to hear the voice well
by emphasizing a low voice. It is used for
enhancing the speech quality while you are on
the phone.
From the Home screen, press the
LeftSoft
Key Menu
>
Settings
>
Accessibility
>
SeniorMode
.

13
Browser
Use the Web browser to surf the Web with
ease.
Browsing the Web
1From the Home screen, press the
LeftSoft
Key Menu>MetroWEB
.
2Press the LeftSoftKey Options and
select the EnterURL.
3Enter a web address and press the OKKey
Connect.
4To add a bookmark, press the LeftSoftKey
Options and select the Bookmarks.
5Select the ThisPage, and press the Right
SoftKey Save.
6To exit the browser, press the
End/Power
Key
>
Yes
.

14
Email
You can access your email account on your
phone.
Setting up an email account
1From the Home screen, press the
LeftSoft
Key Menu
>
Email
.
2Enter your email address and password and
then press the RightSoftKey Done to
log in.
3Select the mailbox type, then press OKKey
, if necessary.
4Enter the incoming server and outgoing server,
then press OKKey , if necessary.
Sending an email
1From the Home screen, press the
LeftSoft
Key Menu
>
Email
.
2Press the LeftSoftKey Options and
choose WriteEmail to write an email.
3Enter an address or press the OKKey
Contacts to access your contact list.
4Enter the subject and your message, then
press the OKKey to send the email.

15
Settings
Change Ringtone
1From the Home screen, press the
LeftSoft
Key Menu
>
Settings
.
2Select the Audio&Ringtones > Ringtone >
Sounds.
3Highlight a ringtone and press the RightSoft
Key Play to play it.
4Press the OKKey to set the highlighted
ringtone as your ringtone.
Change Language
1From the Home screen, press the
LeftSoft
Key Menu
>
Settings
.
2Select the PhoneSettings > Languages.
3Highlight a language and press the OKKey
.

16
MetroPCS Terms and
Conditions of Service
Account Detail
•
Text Message Reminder. MetroPCS
provides a text message reminder on your
phone before payment is due.
•
E-statement. View your statement
summary online. (Only available in select
states.)
•
Call Detail. View your call detail online
for a listing of all local calls made during the
service cycle. (Additional charge applies.)
Payment Options
There are several ways to pay for your
MetroPCS service.
•
Auto Pay. Your credit or debit card is
automatically debited five days before
payment is due.
•
Express Pay. Pay by credit or debit card
online at metropcs.com.
•
Drop Box.* Drop a check made
payable to MetroPCS or money order in a
MetroPCS store drop box.
•
By Mail. Include your account number
and phone number on your check or
money order and mail to: MetroPCS, P.O.
Box 5119, Carol Stream, IL 60197-5119.
•
By Phone via Automated System.
Pay by credit or debit card from your
MetroPCS phone by dialing 1.888.8metro8.
(Convenience fee applies.)

17
•
Store Payment Machine.* Accepts
cash, debit or credit card (with PIN).
(Convenience fee applies.)
•
Over the Counter.* Pay at an
Authorized Payment Location with cash,
check, credit or debit card. (Fees vary
based on location.)
•
eWallet. Sign up for MyAccount through
metropcs.com and create your own secure
eWallet where you can safely store cards for
quick payment and set up auto pay.
•
Text to Pay. The secure and easy way
to pay your monthly MetroPCS service.
Register your credit or debit card with
the MetroPCS eWallet service and simply
respond to a text from PAYNOW (729699)
to pay.
* Not available at all locations.
MyMetro®
•
Manage your MetroPCS account right on
your phone.
By dialing any of the customer service
numbers you can change your rate plan,
change your features and pay your bill. Just
follow the instructions on your phone.
For Assistance
Please visit your local MetroPCS store or refer
to the following options if you need additional
assistance.
•
Sign up for MyAccount to view account
details, check your balance, make a
payment, manage eWallet and more.

18
•
MetroPCS automated customer service
from any phone...............1.888.8metro8
and follow the prompts (1.888.863.8768)
•
Online information..............metropcs.com
Please follow us at:
#WirelessForAll
facebook.com/metropcs
Coverage: Coverage and services not
available everywhere. Nationwide long
distance only available to the continental U.S.
and Puerto Rico. Coverage, rates, services
and features subject to change.
Text Messages: Unlimited international
texts are limited to selected countries,
destinations, technologies and carriers and
are subject to change without notice, as are
Terms and Conditions of International Service.
See metropcs.com/world for further details.
Text messages can only be sent while in a
MetroPCS coverage area or in a compatible
roaming area. No guarantee of text message
delivery.
General: Family Plan is limited to five lines
attached to one account and use of qualifying
phones. Limited time offer. Certain restrictions
apply. Phone selection and availability may
vary by store. Compatible MetroPCS 4G or
4G LTE device required; not all features or
plans available with all devices. MetroPCS
features and services for personal use only.
Not all services are available in all covered
areas.
Other manuals for 450
1
Table of contents
Languages:
Other LG Cell Phone manuals