LG G4 Stylus User manual

LG G4 Camera
User Guide

It is true that many believe that you can't beat the quality of
a professional camera no matter how good the quality of photo being
taken by a smartphone is. I was one of those who had doubts about a
smartphone camera's performance. However, while on this project, I had
to reverse my stereotype after experiencing the amazing functions of the
G4 camera. The G4 camera guideline was written in simple terms for new
users. Our goal was to show that our normal, everyday life is the best
material for works of art through our daily surroundings and landscapes.
I hope that the joy and warmth I felt when taking pictures can be
transferred to the readers of this guideline and I wish for you to discover
your potential as a photographer.
●
Photographer of MBC's Infinite Challenge (Calendar episode)
●
OnStyle Korea's Next Top Model Season4 Challenge, Photo shoots GUYS & GIRLS
●
Other photo shoots including VOGUE, BAZAAR, ESQUIRE
PROFILE
Photographer Joong Suk Oh
Is it possible to take a good
quality photo using
a smartphone camera?

Manual Mode
with ISO, WB, Shutter Speed
01
The world class brightness of
LaserCam F1.8
OIS 2.0 that captures
critical moments without shake
The Color Spectrum Sensor
that detects and reproduces natural color
The rst 8.0 megapixel front camera
for your stylish sele
Instant quick shot by pressing the
lower volume button twice on the
back of the phone
02 03 04 05 06
Special features of G4 Camera
★Above pictures were taken by G4

1. Touch Mode ( ), Select Simple Mode ( )
2. Touch the subject you want to shoot
Wonder how you don't miss the various
expressions of an adorable baby changing
rapidly with every moment! How about the
pose of a cute cat! Love and technique is what's
needed in order to contain various short, quick
changes. G4's simple mode allows you to never
miss a moment by simultaneously focusing and
shooting when you touch the screen.
Focus and shoot simultaneously
with a single touch!
Quick shot
[Cool feature]
tok! tok!
Simple Mode (Touch & Shot)
LESSON 1
Don't miss your favorite moments but capture them as much as you want. You can record your moments with
two clicks of the lower volume button on the back of the phone even when the screen is turned off.
Select Mode (Simple / Auto / Manual)
With simple mode, you can take
pictures quickly and adjust the
focus on the areas you want.
Take a picture by adjusting
the focus on the movement
of the baby.
1. Compose the screen so that various items are well-placed
2. Touch the subject you want to focus on in the display
3. Try to touch another subject
If the background of a picture is not as you wish. Let the subject
ll the frame to produce the best possible photo.

1. Touch Mode ( ), select Auto Mode ( )
2. Select Panorama, Dual Recording function
Auto Mode
LESSON 2
You can shoot vast and cool background pictures and capture
the expression of your face by just setting up Panorama / Dual /
Automatic Mode within Auto Mode. You can also record your SNS
prole picture in an easy and convenient way by setting the aspect ratio.
Quickly and easily capture memories with G4's unique Auto Mode.
Easily select the recording method with quick set up!
Panorama Shot
Contain the vividness of the
scenery surrounding you.
Dual Camera
Record fun pictures with the
dual recording mode and contain
the smiles of a child and a father
simultaneously.
1
1
Setting up 1:1 ratio
Instantly change your prole
picture by shooting with G4.
1. Touch Setting ( )
2. Select 16:9 ( )
3. Select 1:1( )
★ Images used on the bottom are staged images.
LG G4 has a built-in color spectrum sensor that analyzes the surroundings of visible light and infrared ray wavelengths automatically.
It allows the user to take photos that produce the most authentic color compared to what humans see.
genius Oh's Tip

Mode
(Simple / Auto /
Manual)
Flash
(Off / On / Automatic)
Video
Camera
Level
Settings
Histogram
Shutter
Speed
Exposure
Adjustment
White Balance
Exposure Adjustment Holding
Shutter Speed
Dial
Front / Back Camera
Storage Method
(JPG / RAW JPG)
Aperture F1.8
ISO
Exposure Adjustment Dial
Manual Focus (MF)/
Automatic Focus (AF)dial
White Balance
dial
ISO Dial
Moving Backward
Gallery
Manual Focus (MF)/
Automatic Focus (AF)
Peek into the G4 Camera
in detail
LESSON 3
★Exposure adjustment :The camera by default represents white to gray, and black to less black.
Because the actual color can be represented differently you can take photographs that are similar to
what we see in real life by correcting the exposure to either darker (-) or brighter (+).
★Histogram :A type of a graph indicating the picture brightness. The shape of the graph will tilt to
the right if excessive light enters the sensor causing pictures to be brighter thanks to overexposure.
The shape of the graph will tilt to the left if to little light enters the sensor leading to underexposure.
The shape of the graph will be convex in the center if the exposure is equal.
★Level :A function that helps pictures to align horizontally when shooting and to prevent tilting
to the one side.
★Automatic Focus (AF):The camera automatically sets focus to recognize the subject without any
additional settings. With the automatic focus adjustment, even rst timers can vividly capture a fast
moving subject.
★Manual Focus (MF):There are cases when the camera will focus on the wrong subject.
When having various subjects, MF function allows users to stage a photo as they wish by letting them
adjust the focus manually.
G4 Camera features
What it means to have an F1.8 Lens for G4?
F1.8 lenses of DSLR lenses, receive the most attention even among professional
photographers because of their excellent expression when shooting portraits.
F value (=aperture) is a numerical value indicating the brightness of camera lenses.
When having a lower value, it will increase the amount of light passing through;
therefore, you can get a clear and bright picture even at night, or indoors with less
light. The G4 smartphone is equipped with an F1.8 Lens for the rst time which
means you can take a picture of shining stars and the beautiful night sky, instantly
capture the blowing out of birthday candles and other beautiful moments with
exceptional quality. With G4’s brightest F1.8Lens, create your own world you wish
to see in brighter way. LG G4General Smartphone
(Actual comparison using a picture from LG G4)

Manual Mode
LESSON 4
Are you familiar with the position of each button and its use? Master the most important functions of ISO / Shutter
Speed / WB / Exposure Adjustment before taking a photo! You will take amazing photos without realizing it!
Master ISO / Shutter Speed / WB / Exposure Adjustment
Sensitivity (ISO)is the extent to which the sensors respond to light represented by a number. It is indicated as 50, 100, 200, 400,
and 800. Each number represents light sensitivity. This means each value is twice as sensitive as the previous value. Raising the
sensitivity in the dark will increase the chance of taking a picture without blur (recommend raising the sensitivity even in broad
daylight.)The higher the ISO, the brighter the picture will be because of the quantity of light let in. However, there is a drawback of
decreased clarity because of more noise in the picture. Conversely, with lower ISO, the picture becomes darker but clarity increases.
Set about 100~200 ISO when taking a photo at night or when it's dark indoors and 400 ISO would be good with general scenery.
ISO
With lower ISO (ISO 100)–Smooth and clean without noise With Higher ISO (ISO 12800)– No blurring of subject but has rough and indenite colors
When taking a photograph 1. You can produce a smooth photograph without the noise by setting the ISO to a lower level
2. You can produce a clear photograph without shake by setting the shutter speed as a priority.
genius Oh's Tip

Shutter Speed means adjusting the amount of light let in when the shutter opens and closes. With a faster shutter speed,
less light is let in and sharper photos are produced but at times they can be dark. Conversely, with a slower shutter speed,
more light is let in, leaving an afterimage of the subject. You can also shoot different styles of long exposure.
Shutter Speed
Slow shutter speed |1/60s Fast shutter speed |1/6500s
White Balance is the technology that allows the camera to recognize natural color as we see it. Our eyes recognize the same
white paper under uorescent lighting or incandescent lamps; however, a camera is different to our eyes. In order to properly
represent true white colors, it needs to set the color temperature. However, if you apply it conversely you can produce a variety of
colors without using specialized programs like Photoshop.
White Balance
WB 2800K WB 5500K
2300K
[indoor shooting] [outdoor shooting]
Incandescent lamp (3000K)light of the sun (5000K)
3000K 4000K 5000K 6000K 7500K
Taking photos with lower WB values under incandescent lamps It is possible to produce a different atmosphere of color,
almost as if it were taken under sunlight with an increase in WB.
Manual Mode
LESSON 4

You can save pictures in RAW format to be corrected later.
If you touch , DNG will be generated with JPG when shooting.
Big storage space could be needed if you save in RAW format.
icon will be displayed once the picture is taken in RAW
format. DNG also will be deleted once you erase the picture
from the gallery and you can only erase DNG from the File
Manager or PC.
Exposure Adjustment
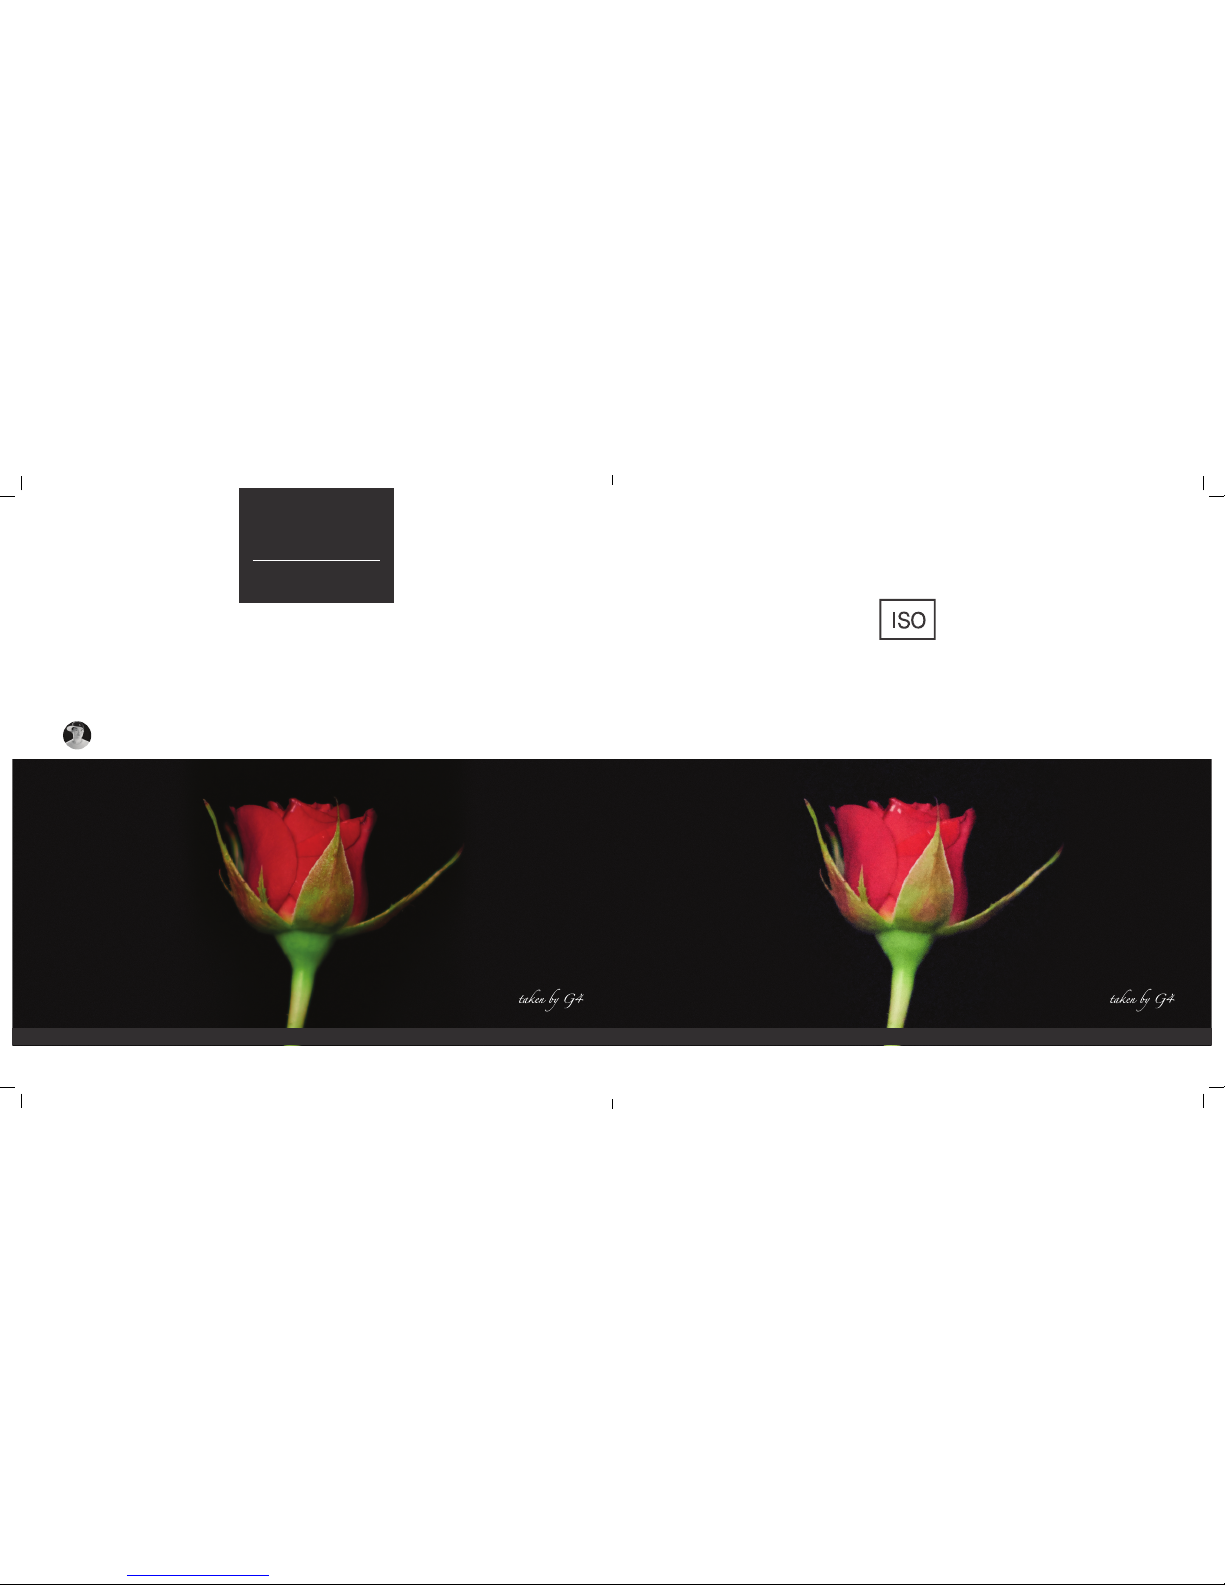
Exposure is a function to adjust the amount of light exposed to the image sensor. Exposure is affected by both the shutter speed
and the aperture. Aperture controls the amount of light received at once and the shutter speed controls the amount of light overall
by adjusting the time of exposure. Besides this, exposure is also affected by ISO (sensitivity). In other words, you have to utilize the
aperture, shutter speed, and ISO in order to adjust the exposure. In the case of over exposure, the sensor receives too much light
resulting in the brightening of pictures. Conversely, in the case of under exposure, the sensor receives too little light resulting in the
darkening of pictures. By using G4’s exposure adjustment function, you can take a picture as you intend to, with true-to-life quality.
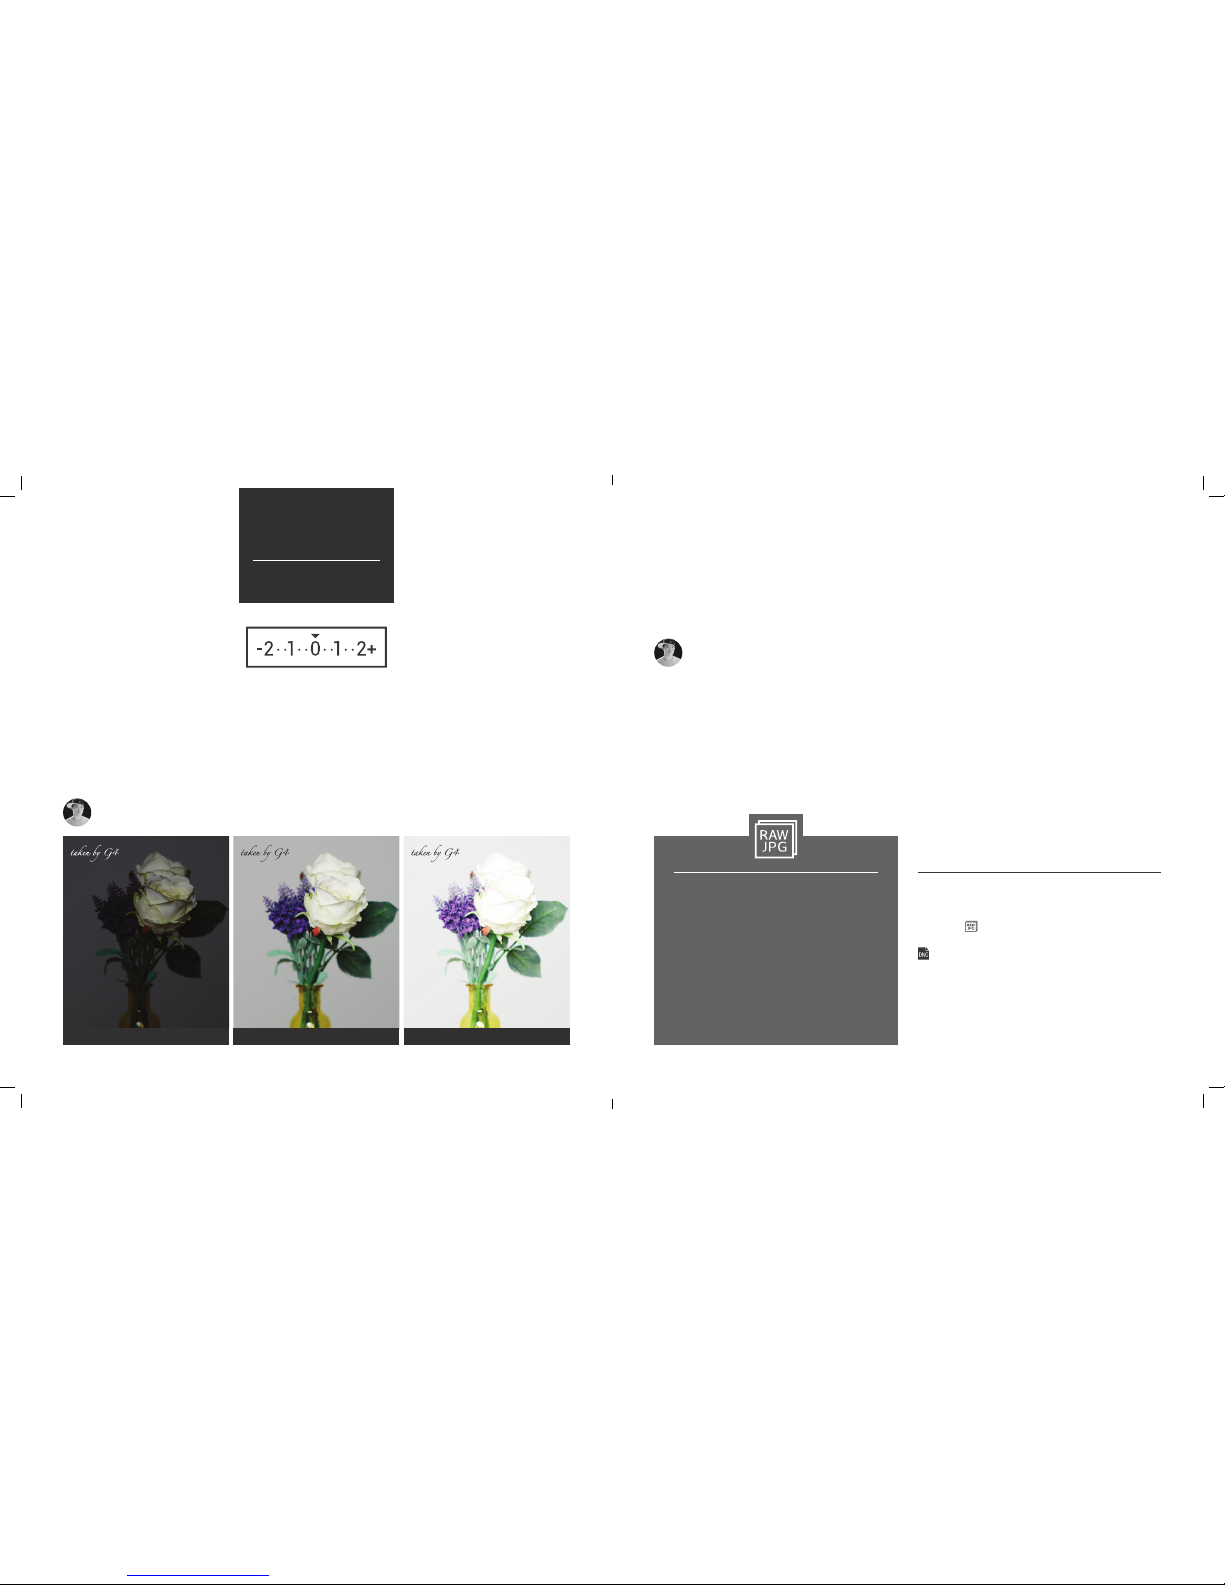
Under exposure (-2)Optimum level (0)Over exposure (+2)
It has more light and color information compared to
JPG les it can be changed to JPG through
exposure, white balance, and various modications.
The most popularly used image le format that can
be shared quickly on PCs or printers because of its
compatibility and small size compared to picture quality.
JPG
RAW
★
Save as RAW format
The word "RAW", as you can already induce from the word itself; is a le format that is stored without
processing. If you compare it to cooking, a JPG would be processed food that has been rened to suit the
needs of the public which limits the taste that can be produced by a chef. On the other side, a RAW would be
fresh ingredients that have the advantage to allow for the creation of taste without restrictions.
RAW & JPG Picture le format
genius Oh's Tip
In the case of having to take a picture with low light, set the exposure value to +, when there is excessive brightness, set the exposure value to -.
genius Oh's Tip
Manual Mode
LESSON 4

genius Oh's Comment
In order to capture the longer trail of the plain, I decreased the ISO and set the shutter speed to 30 seconds. With a low shutter speed,
the long exposure of 30 seconds captures the trail of the plane. F1.8 |ISO 50 |Shutter Speed 30s |WB 2800K
★ A part of pictures were set as a Manual Mode and
were taken by ISO 50 to produce a clear quality with less noise
Shoot your daily life with Manual Mode using features such as ISO / White Balance / Shutter Speed / Focus
and set them as you desire. Get started by shooting with each function and along each step. Once you fully
understand the various settings try manipulating them in various ways.
Create memorable moments with Manual Mode!
genius Oh's Comment
The exquisite tones and color of this
landscape were achieved through the
use of a brighter exposure and by setting
the white balance to 5500K since it is in
direct sunlight.
F1.8 |ISO 50 |Shutter Speed 1/1000s |WB 5500K
1. Select Mode ( ), Manual Mode ( )
2. Detail Settings ISO, WB, Shutter Speed
Manual Mode
LESSON 4

STEP 1 Technique to take portrait shots
1. Raise a little lighter than it looks to ISO
2. A light or light of the window is to be focused on the face
3. Turn your face towards the light or the sun at an angle of 45 degrees
genius Oh's Comment
Since the amount of light was sufcient,
I have taken a photograph raising the
ISO to 100. In order to obtain a picture
without blur, I chose the best shutter
speed based on the value of the ISO (100)
and WB (2800K). The value of WB (2800K)
was set due to an incandescent light.
1. For the effective looks of brighter skin,
select a background which is darker
than the person.
2. Align the tiptoe to the bottom of the
frame and leave space for the face
at the top of the frame, and set the
focus on the center.
A technique to take a
full body shot
that makes legs look
longer
When shots the face in full frame, due to the
distortion of the lens head and feet are taken
larger than the actual gure and the body is
taken smaller than the actual gure.
genius Oh's Tip
genius Oh's Comment
By highlighting the model, a colorful stage for a full body shot was created.
F1.8 |ISO 50 |Shutter Speed 1/60s |WB 2800K
F1.8 |ISO 100 |Shutter Speed 1/60s |WB 2800K
Techniques to take close up shots of
bright and compelling skin
Manual Mode
LESSON 4

STEP 2 Food photograph tips
Techniques to make food photographs
look more appetizing
genius Oh's Comment You can produce great food photography using a high angle.
●
It is not necessary to apply white balance on food photographs because the whole atmosphere could become colder.
If there is not an excessive use of yellow or red colors, these warm colors give a delicious effect to food.
●
Be sure to shoot the food and hands with chopsticks and a spoon using close-up.
It is important to show the cross-section of food that has been lifted up.
●
With food that is soft try to focus in on the delicious part.
genius Oh's Tip
genius Oh's Comment I set the WB to auto and shot the picture because with the G4's color spectrum sensor I can capture the authentic
color of the food. When photographing bowls and other items. Fill the frame of the photograph with the food to give a fresh feel.
1. To reect the luster of the food, set the shooting direction to side or backlight.
2. Focus on the food in close-up. It is effective to take a close-up shot to deliver
the sense of avor and aroma, and of the food's texture and unique color.
F1.8 |ISO 50 |Shutter Speed 1/30s |AWB 5000KF1.8 |ISO 50 |Shutter Speed 1/60s |AWB 5000K
Manual Mode
LESSON 4

STEP 3 Scenery photo tips
1. When the picture is correct, set up RAW le as the saving format for easy
correction of tone, saturation, and brightness.
2. For a stable screen conguration, rst align a composition of horizontal and vertical
aspects of the landscape and divide the screen into three equal parts to place
subject on one-third or two-thirds of the screen.
3. To maintain a three-dimensional sense, place distant, intermediate,
and far scenery in the frame.
4. For the wide-angle, set the aspect ratio to 16:9.
Beautiful scenery photography tips
genius Oh's Comment
I was photographing a panoramic view
of the sea and some gorgeous clouds.
Because the photograph takes place in
direct sunlight, I have set the white balance
to 5500K. I captured moving clouds and
a shing man and raised the shutter speed
to give a visual accent to the photo which
could have looked lackluster.
F1.8 |ISO 50 |Shutter Speed 1/2000s |WB 5500K
●
Landscape photos with buildings in a city can be given a majestic feeling
by applying a low angle to the vertical approach.
●
Shoot in monotone by reducing the saturation. Stunning images can be
produced directing the painterly atmosphere.
●
When shooting a blue sky, shoot against the sun. When shooting a sunset
in the opposite direction, shoot toward the sun.
genius Oh's Tip
F1.8 |ISO 50 |Shutter Speed 1/500s |WB 6000K
F1.8 |ISO 50 |Shutter Speed 1/6000s |WB 5500K
F1.8 |ISO 50 |Shutter Speed 1/1000s |WB 5500K
Manual Mode
LESSON 4

STEP 4 Night scene photography tips
1. For a steady shot, prepare a tripod. If you do not have a tripod,
nd somewhere you can stand and lean.
2. You can discover the difference in brightness by scrolling the shutter speed.
Set the exposure for a bright tone and the ISO to the lowest value in order to
decrease the noise.
3. Turn off the ash and set the shutter speed to the slowest mode.
Tips for long exposure photography at night
genius Oh's Tip There is a great difference between having a light or not when shooting a night scene, pay careful attention as to not set
a higher ISO value which can lead to brighter parts being blown away.
genius Oh's Comment By setting the shutter speed to 30seconds, the lights of the city reected in the river and the sky
were beautifully expressed by the long exposure. F1.8 |ISO 50 |Shutter Speed 30s |WB 2800K
●
Do not miss the magic hour of 30 minutes after a sunset. When shooting at that magic hour,
light will turn more yellow and softer and have a dramatic expression and effect on the gradient.
●
Be ready to prepare a tripod to avoid shakiness in night scenes!
genius Oh's Tip
genius Oh's Comment By setting the white balance to 6000k, the reddish sky is expressed in a more dramatic way.
F1.8 | ISO 50 | Shutter Speed 1/500s | WB 6000K
Manual Mode
LESSON 4

8.0 megapixel sele camera
Tips for Gesture interval shot
1. Raise G4 to 45 degree angle
2. Looking at the screen, quickly open
and close hand twice
Once you open and close a hand twice,
in 2 seconds 4 pictures will be taken
continuously.
Tips for sele gesture shot
1. Remove skin blemish with Beauty Mode
2. Raise G4 to 45 degree angle
3. Open the palm looking at the screen
4. Close to make a st when palm is recognized
5. Check the picture by lowering the screen
(Gesture View)
Photo shooting initiates once a st is made.
LESSON 5
★
Images used on the bottom are staged images.
1
3
2
4
Video
LESSON 6
★
Images used on the bottom are staged images.
1. Touch settings ( )
2. Touch 16:9 of aspect ratio ( )
3. Touch UHD ( )
4. Start Video ( )
5. Finish Video ( )
Tips for taking
a clear and realistic video
1. Touch setting ( )
2. Touch 16:9 of aspect ratio ( )
3. Touch Slow-motion ( )
4. Start Video ( )
5. Finish Video ( )
Tips for taking slow-motion
like a movie scene

genius Oh's Comment By shooting owers in black and white under normal light, the gradients captured and
produced a rich photograph of a ower. F1.8 |ISO 50 |Shutter Speed 1/30s |WB 2800K
genius Oh's Comment I have set the ISO to 50 in order to produce a clear and smooth photograph. Using the ash in
macro photograph, I maximized the detail in the owers that is not visible to our eyes. F1.8 |ISO 50 |Shutter Speed 1/500s |WB 5500K

genius Oh's Comment I set the shutter speed to 1/6000 and found the optimal ISO value in order to capture a jumping model
without shake affecting the picture. F1.8 |ISO 400 |Shutter Speed 1/6000s |WB 2800K
genius Oh's Comment Without using a tripod, the trajectory of the stars was drawn on the photograph using 30 seconds of long
exposure. Feeling of watercolors was expressed to describe the sky, the stars, and the light softly. F1.8 |ISO 50 |Shutter Speed 30s |WB 2800K

genius Oh's Comment After the models were asked to move freely, I found the optimal shutter speed to obtain a photograph
without shake. They seem to pose in a stationary position even though they were moving in a continuous motion.
F1.8 |ISO 100 |Shutter Speed 1/125s |WB 2800K

Above pictures were taken by G4
Other manuals for G4 Stylus
17
Table of contents
Other LG Cell Phone manuals