LG LG-E400b User manual

Quick start guide
Guide de démarrage rapide
LG-E400b
P/N : MBM63641049 (1.0) www.lg.com/ca
E N G L I S H
FRANÇAIS
Printed in China


Quick start guide
LG-E400b
To download the latest full version of the user guide, go to
www.lg.com on your PC or laptop.
ENGLISH

Index
1.
2.
3.
4.
5.
6.
7.
8.
9.
10.
11.
12.
13.
14.
15.
16.
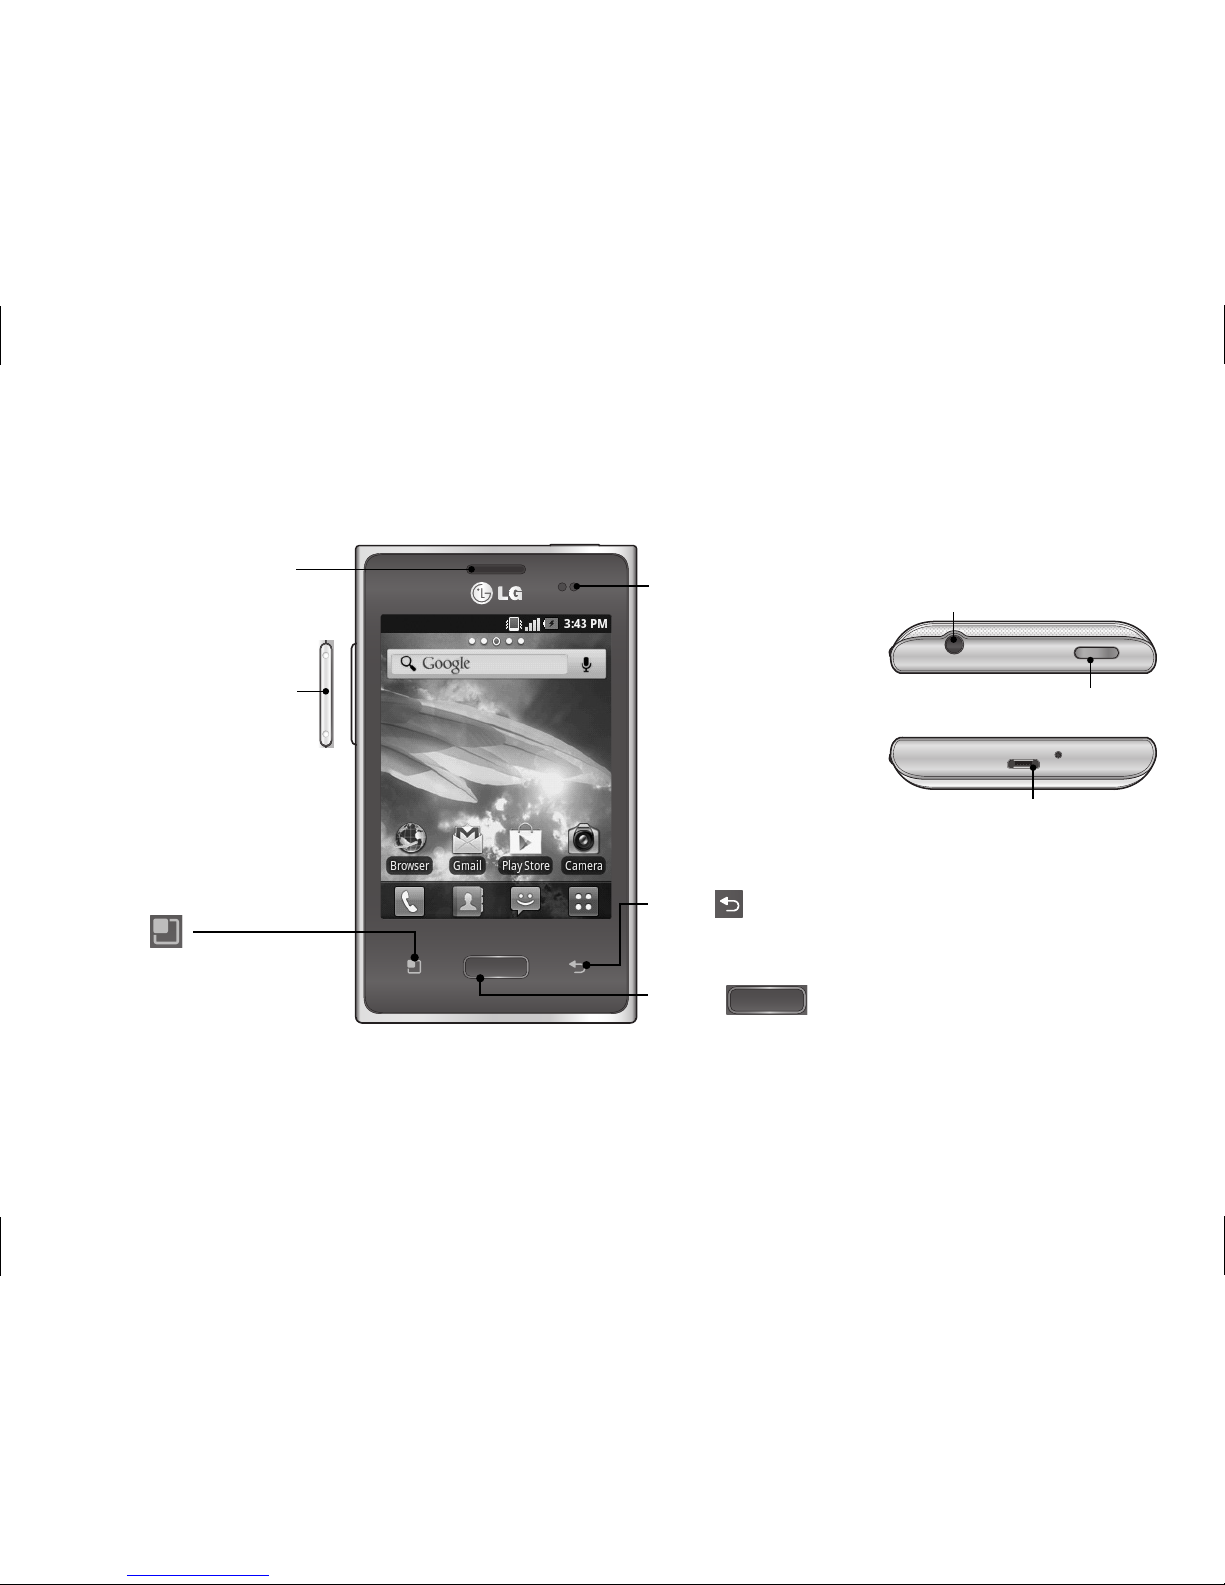
LG-E400b overview................................. 1
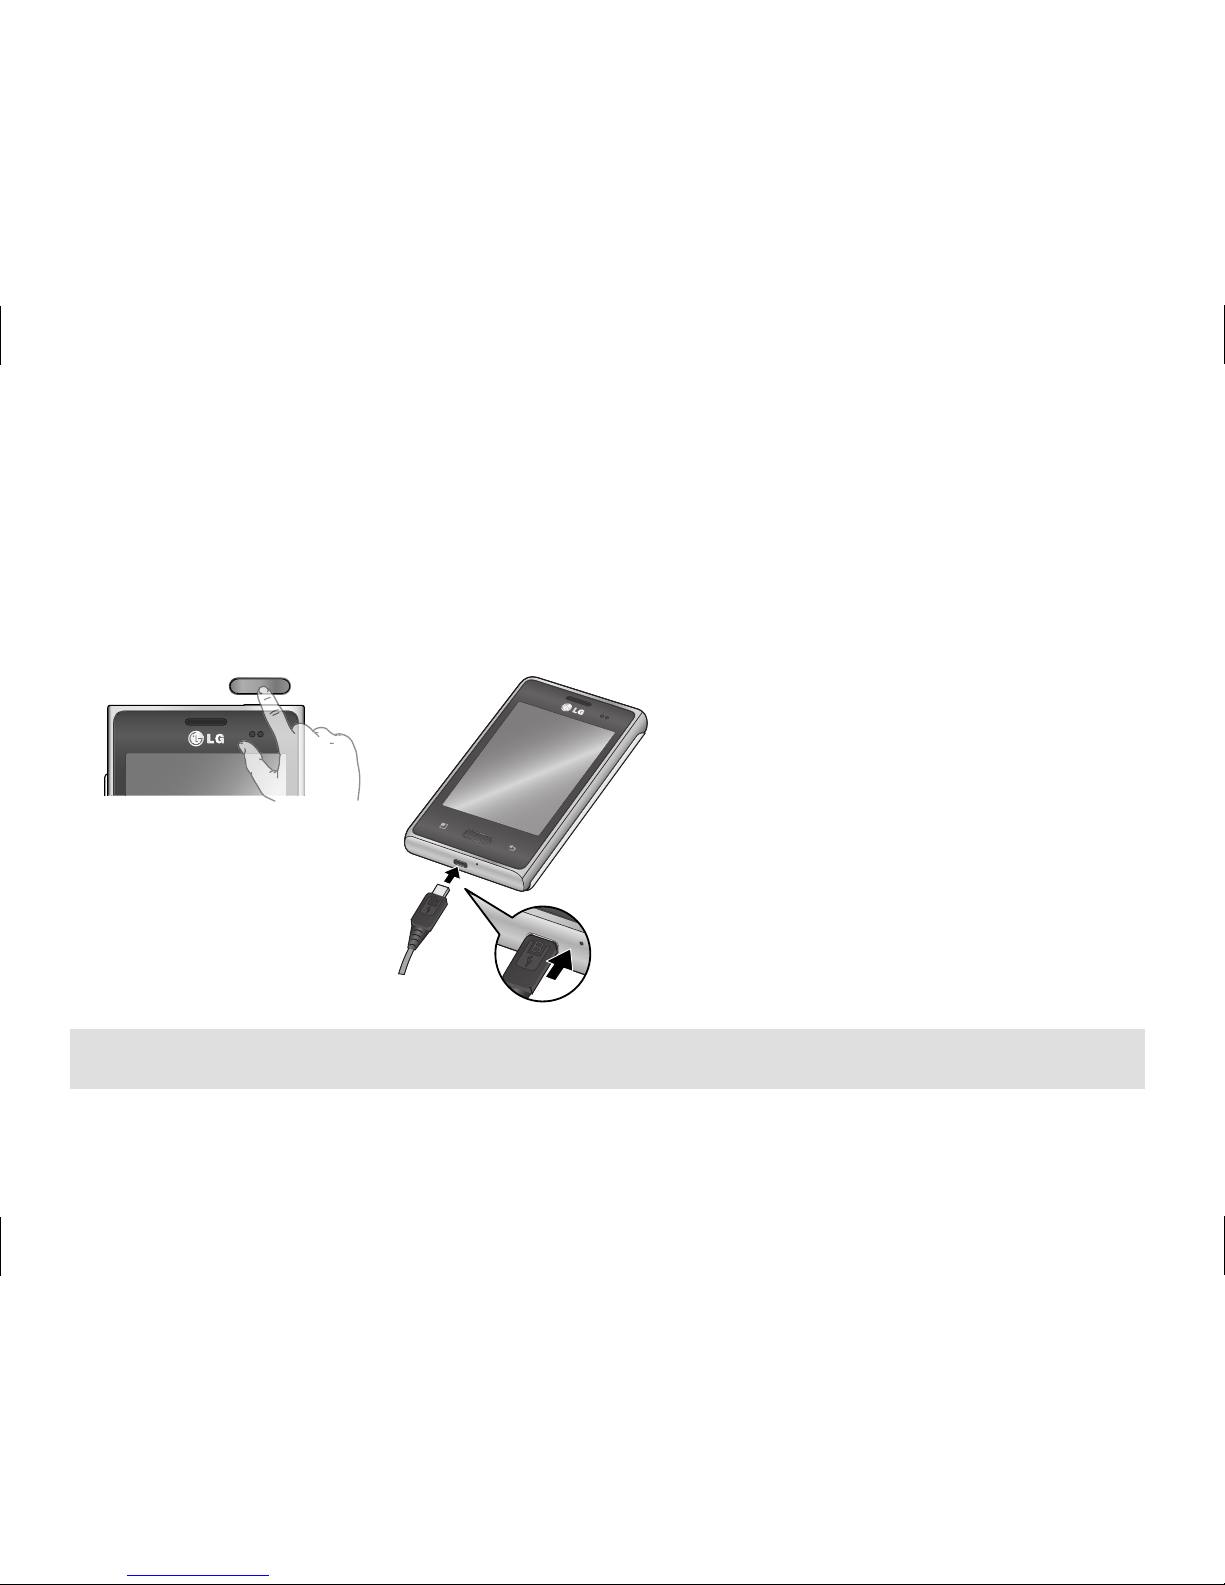
Setup ......................................................... 2
Home screen............................................. 5
Unlock screen ........................................... 6
Notification screen ................................... 7
Make a call/send a message ................... 8
Contacts .................................................... 9
Browser/Maps........................................... 10
Camera ...................................................... 11
Video camera............................................ 11
Google account......................................... 12
Downloading applications........................ 13
Email.......................................................... 14
Sync your phone with your computer..... 15
Troubleshooting ........................................ 17
Safety......................................................... 23
* Some of the contents of this manual may not
apply to your phone. This depends on your
phone’s software and your service provider.
NOTE: Always use genuine LG accessories.
Failure to do this may void your warranty.
Accessories may vary in different regions.

1
LG-E400b overview
Speaker/receiver
Home
Return to home from any screen.
Back
Return to the previous screen.
Volume keys
Menu
Check what options are
available.
Proximity sensor
Stereo headphone
connector
Power/Lock key
Charger, micro USB
cable connector

2
Setup
Before you start using the phone, you need to insert the SIM card and battery.
Installing the SIM card and battery
Remove the back
cover.
1
Make sure the gold
contact area on
the card is facing
downwards.
2
Insert the battery.
3
Replace the back
cover.
4

3
Setup (continued)
Installing the memory card
Turn the phone off
before inserting
or removing the
memory card.
Remove the back
cover.
1
Insert the memory
card into the slot.
Make sure the gold
contact area is
facing downwards.
2
WARNING! Do not insert or remove the memory card when the phone is turned on. Otherwise the
memory card, as well as your phone, may become damaged and the data stored on the memory card may
be corrupted. To remove the memory card safely on the Home screen, touch the Applications tab then select
Settings > Storage > Unmount SD card.

4
When you first turn on the phone, you will be guided through a series of essential steps to
configure the phone settings.
Turning on the phone Charging the phone
Press and hold the Power/
Lock key for a couple of
seconds.
The charging port is on the side of the
phone.
Insert one end of the charging cable into
the phone and plug the other end into an
electrical socket.
To maximize the battery lifetime, ensure
that the battery is fully charged before you
use it for the first time.
•
•
•
Setup (continued)
TIP! If the phone is locked and does not work, press and hold the Power/Lock key for 8 seconds to turn it off.

5
Home screen
You can customize each screen by adding widgets or shortcuts to your favourite applications.
Adding icons to the Home screen
Swipe your finger right or left to move through the screens. Stop
when you get to a screen that you want to add items to.
Touch and hold an empty area in the Home screen. Touch the
Shortcuts, Widgets, Folders or Wallpapers option then select the
item you want to add.
Shortcuts: Add direct links to applications
Widgets: Add applications that are updated dynamically
Folders: Create folders to organize your contacts/shortcuts
Wallpapers: Change the wallpaper on the current Home screen
TIP! Touch and hold the application you want to add to the Home screen, selecting it from . To delete an
application, touch and hold it, then drag it to the icon.

6
After a period of inactivity, to conserve the battery, the screen you are currently viewing will be
replaced by the lock screen.
Unlocking the screen
Press the key.
Slide the screen upwards.
Setting up the display
Touch > .
Select Display.
Touch Screen timeout.
Select the period of time
you want.
1
2
3
4
NOTE: To lock your
screen using the pattern
lock feature, touch
> > Location &
security > Set up screen
lock. A short tutorial
will guide you through
the process of setting a
pattern lock.
Unlock screen

7
Notification screen
On this screen, you can view and manage ringtones, Wi-Fi, Bluetooth, GPS, the music player etc.
The 'notification drawer' runs across the top of the screen.
TIP! To preserve battery life, turn off Wi-Fi, Bluetooth and GPS when you are not using them.
Turning features on/off
Touch and slide the notification
drawer bar downwards.
Touch the icons to turn the
corresponding features on/off.
1
2
To view further settings options
Touch > > Wireless &
networks.
<Notification drawer>
Data
connectivity
GPSBluetoothWi-Fi
Sound/
Vibrate/
Silent

8
Make a call/send a message
It only takes a few taps to make a call or send a message.
Making a call
Touch .
Dial the number you want to call or start typing the name of the contact.
Sending a message
Touch .
Touch New message.
Enter the number of the person you want to send the message to, or touch to select a
number from your contacts list.
Compose your message and touch Send.
1
2
1
2
3
4
NOTE: To answer an incoming call, drag the icon.

9
Contacts
You can automatically synchronize the contacts on the phone with any of your online address
books, or even import contacts from another SIM/SD card.
Importing/exporting contacts
Touch > More > Import/Export.
NOTE: To add a number from a recent call to your contacts, locate the
number in your call log, touch and hold the number, then select Add to
contacts. Touch Create new contact to create a new contact entry, or touch
Add to the existing to add a new number to existing contacts.

10
Browser/Maps
Use the Web browser to surf the Net with ease. Use Maps during a journey to pinpoint your
location and check for traffic updates en route.
Browsing the Web
Touch > .
Touch .
Enter text.
Scroll up/down or pinch to view the webpage.
Setting up Maps
Touch > .
Set up the connection to Wi-Fi or 3G/GPS.
1
2
3
1
2
Pinch-to-Zoom: Use your index finger and thumb in a pinching or spreading motion to zoom in or out when
using the Web browser, a map or pictures.

11
Camera
Video camera
Zoom
Brightness
Settings
Scene mode
Video mode
Taking a photo
Gallery
Image size
Zoom
Brightness
Settings
Audio recording
Camera mode
Start recording
Gallery
Video size

12
Google account
The first time you open the Google application, you need to sign in. If you do not have a Google
account, you will be prompted to create one.
Creating a Google account
Touch > .
Touch Next then Create to start the Gmail setup
wizard.
Touch to open the keyboard and
enter your name or username.
Touch Next.
1
2
3
4
You then need to follow
the setup instructions
and enter the necessary
information to activate the
account. Please wait while
the server creates your
account.
TIP! Once you have created your Gmail account, you can access Gmail and Google Apps, and use Google's
many services on the phone.

13
Downloading applications
Download fun games and useful apps from Play Store.
From Play Store
Touch > .
Sign in to your Google account.
Select an app from the list of featured apps or use the search
feature.
Managing applications
Touch > > Applications.
Note: You cannot delete the pre-installed applications.
1
2
3
TIP! Launch the downloaded application from the icon.

14
Email
You can stay connected with MS Exchange, Yahoo!, Hotmail and other popular email providers.
Setting up an account
Touch > .
Select a mailbox type.
Enter your email address and password,
then touch Next.
Follow the remaining instructions.
1
2
3
4
Sending an email
Touch > .
Touch and Compose.
Enter your text, touch > Add attachment
to attach a file (if needed) and then touch
Send.
1
2
3
TIP! You can set sound and vibration alerts to notify you when you receive a new email.

15
Sync your phone with your computer
To synchronize your phone with your PC using the USB cable, you need to install LG PC Suite
onto your PC. Download the program from the LG website (www.lg.com).
Installing “LG PC Suite” PC application
Go to www.lg.com and select a country of your choice.
Go to Support > Mobile Phone Support > Select the Model (LG-E400b).
Click PC Sync from Download, and click WINDOW PC Sync Download to download “LG PC
Suite” PC software.
NOTE: LG Integrated USB Driver
LG integrated USB driver is required to connect an LG device and PC and installed automatically
when you install “LG PC Suite” PC software.
1
2
3

16
Transferring music, photos and videos
You can see USB
connection mode
popup. Tap USB
storage and OK
to confirm. (From
the Home screen,
tap the Menu Key
and tap Settings
> Connectivity >
Default connection
mode > USB
storage)
2
Connect the
phone to your PC
using the USB
cable.
1
Open the
removable
memory folder on
your PC. Copy the
files from your PC
to the drive folder.
3
Touch the Turn
off USB storage
button and
disconnect the
phone.
4
Sync your phone with your computer
Table of contents
Languages:
Other LG Cell Phone manuals