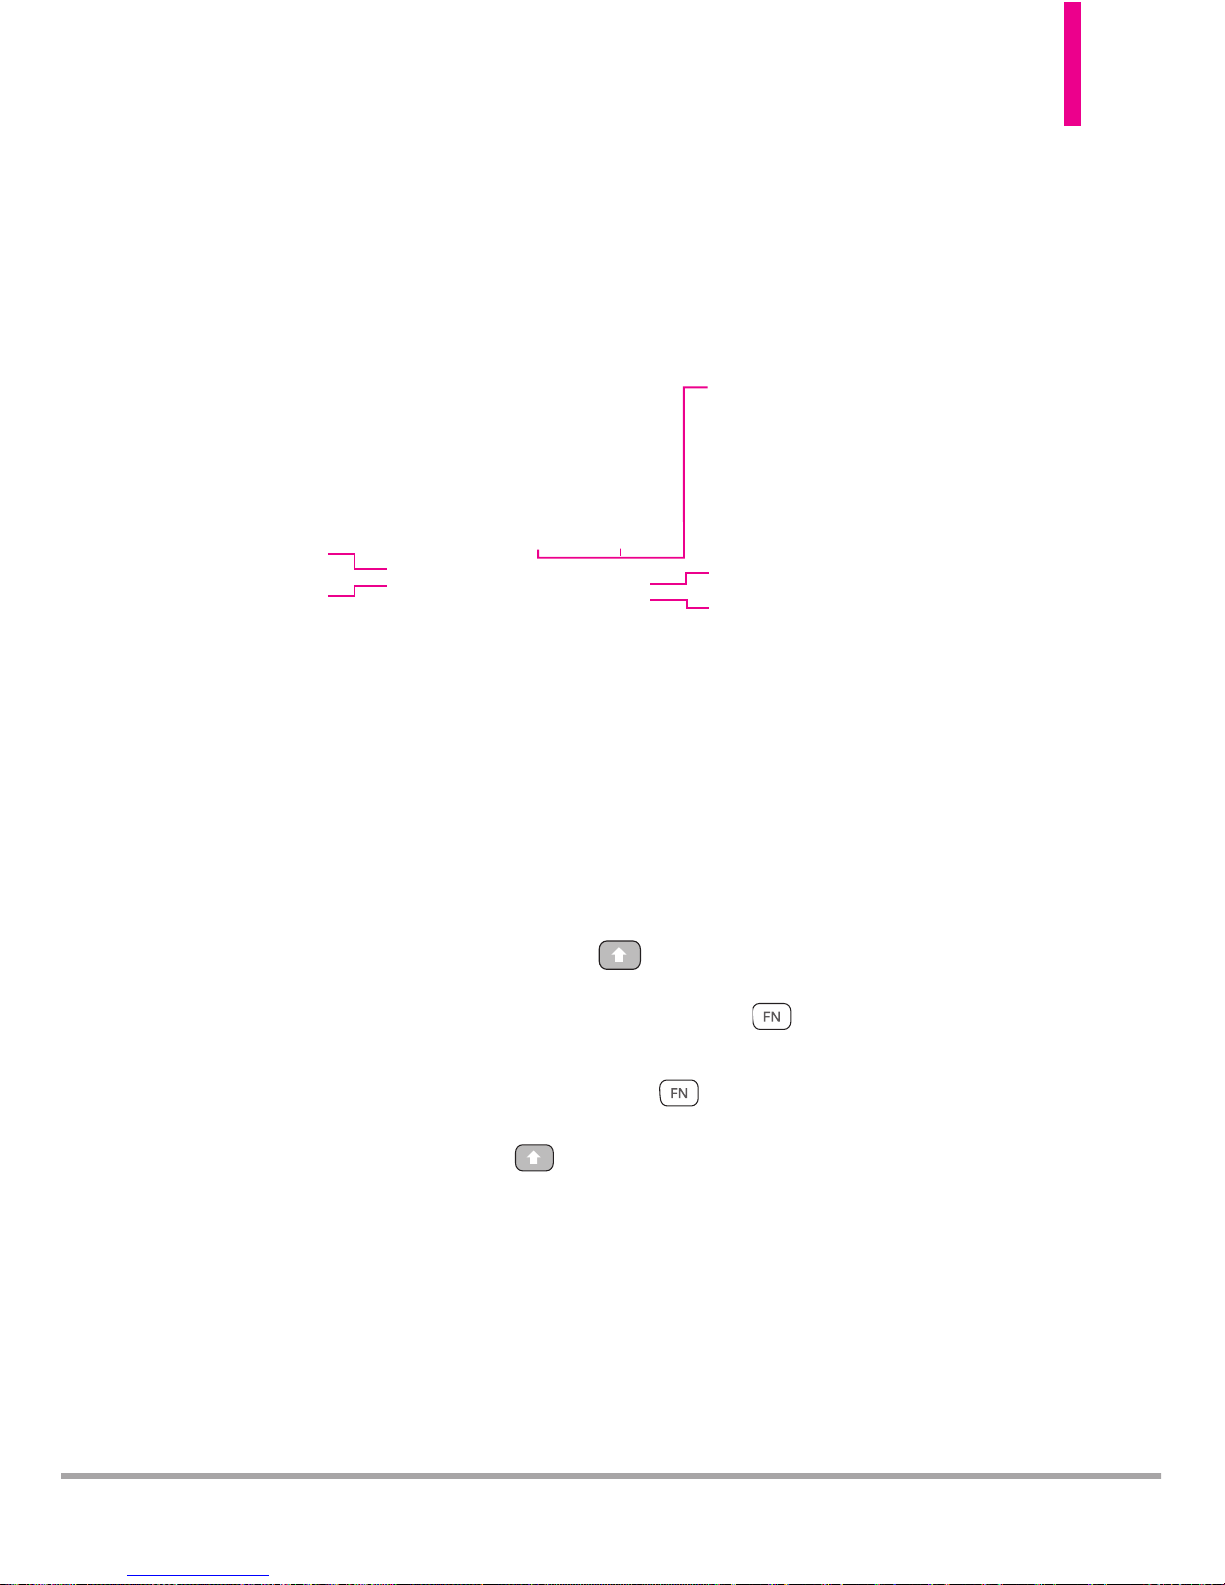
LG VN250 User manual

Part 15.21 statement
" Change or Modifications that are not expressly approved by the manufacturer could void
the user's authority to operate the equipment. “
Part 15.105 statement
This equipment has been tested and found to comply with the limits for a class B digital
device, pursuant to Part 15 of the FCC Rules.
These limits are designed to provide reasonable protection against harmful interference in
a residential installation. This equipment generates uses and can radiate radio frequency
energy and, if not installed and used in accordance with the instructions, may cause harmful
interference to radio communications. However, there is no guarantee that interference will
not occur in a particular installation. If this equipment does cause harmful interference or
television reception, which can be determined by turning the equipment off and on, the user
is encouraged to try to correct the interference by one or more of the following measures:
- Reorient or relocate the receiving antenna.
- Increase the separation between the equipment and receiver.
- Connect the equipment into an outlet on a circuit different from that to
which the receiver is connected.
- Consult the dealer or an experienced radio/TV technician for help.

Part 15 Class B Compliance
This device and its accessories comply with part15 of FCC rules.
Operation is subject to the following two conditions:
(1) This device & its accessories may not cause harmful interference.
(2) This device & its accessories must accept any interference received,
including interference that may cause undesired operation.
Body-worn Operation
This device has been tested for typical body-worn operations
with the distance of 0.79inches (2.0cm) from the user’s body.
To comply with FCC RF exposure requirements, a minimum separation distance
of 0.79inches(2.0cm) must be maintained from the user's body.
Additionally, Belt clips, holsters & other body-worn accessories may not contain
metallic components.

VN250
13
Phone Overview
1. Earpiece Lets you hear the caller and automated
prompts.
2. Front LCD Screen Displays digital clock and phone
status.
3. Volume Keys Use to adjust the Master Volume in
standby mode* and the Earpiece Volume during a
call. Volume keys can also use for adjusting the
scalable font size while viewing a message, dialing a
number or in the Main menu.
4. OK Key / Directional Key Use toselect the
function displayed at the bottom of the LCD
between the Left and Right Soft Key functions. Use
the Directional Key to scroll through the menu
items and highlight a specific field or object by
moving up, down, left or right.
5. Left Soft Key Perform functions shown on the
bottom-left of the display.
6. Speakerphone Key Use to change to
speakerphone mode. Also use it uses to answer call
with flip closed.
7. SEND Key Use to make and answer calls.
8. Camera Key Use for quick access to Camera
function. Press and hold the CameraKey to record
Video.
9.
Accessory Charger Port Connectsthe phone to the
battery charger, or other compatible accessories.
10. Camera Lens Use to take a photo or video. Keep
it clean for optimal photo/ video quality.
11.
2.5 mm Headset Jack Allows you to plug in an optional
headsetfor convenient, hands-free conversations.
12.
Right Soft Key Perform functions shown on the
bottom-right of the display.
13. BACK Key Deletes single spaces or characters with
aquick press, but press and hold to the entire
word. Also backs out of menus, one level at a time.
*Standbymode is when the phone is waiting for
input from you. No menu is displayed and the
phone isn’t performing any action. It’s the starting
point for all of the instruction steps.
NOTE
:This User Manual givesnavigation instructions
according tothe default "List" MenuLayout in the
Display Settings menu. If other themes or menus are
set, navigating the phone's menus may be different.
1. Earpiece
2. Front LCD Screen
10. Camera
Lens
11. 2.5 mm
Headset Jack
13. BACK Key
12. Right Soft Key
14. PWR/END Key
15. microSD™Slot
16. Alphanumeric Keypad
3. Side Keys /
Volume Keys Up/Down
5. Left Soft Key
4. OK Key / Directional Key
6. Speakerphone Key
7. SEND Key
8. Camera Key
9. Accessory Charger Port

14
VN250
Phone Overview
14. PWR / END Key Use to turn the power on/off
and to end a call. Also returns to standby mode.
15. microSD™Slot Accommodates optional microSD
cards up to 16GB.
16. Alphanumeric Keypad Use to enter numbers and
characters and select menu items.
24.
Vibrate Mode Key Use to set Vibrate mode (from
standby mode press and hold for about 3 seconds).
25. Microphone Allows other callers to hear you
clearly when you are speaking to them.
TIP
If you hold the phone enclosing
the lower edge, you may
interfere with the antenna's
ability to receive a clear signal
which affects call qualityfor
voice or data transfer.
NOTE
Antenna equipped
inside your phone.
Battery
Battery Cover
Rear view
NOTES
•It’simportant to fully charge
the battery before using the
phone for the first time.
•Battery life and signal
strength aresignificant
factors(among others) that
affect your phone’sability to
send/receivecalls or data
transfer.

VN250
15
Entering Text With the QWERTY Keyboard
Your phone features a slide-out QWERTY keyboard, specifically designed for
easy and comfortable text entry. The QWERTY keyboard uses the same
layout and works just like the keyboard on your computer. The easiest way
to enter text is using your thumbs to type on the QWERTY keyboard.
To enter text with the QWERTY keyboard:
1. In a text entry screen, slide open the QWERTY keyboard.
(The display automatically adjusts to landscape mode.)
2. Use your thumbs to enter text.
●To change capitalization, press .
●Toenter alternate characters on a key, press and then press the
key. To lock the function key (as when
entering a series of numbers), press twice.
●To enter symbols, press and select a symbol.
●For additional text entry options, including Symbols and 123, press
Left Soft Key and select an option.
SHIFT Key BACK Key
Soft Keys
●
In Standby Mode
Left Soft Key Use to access Message.
Right Soft Key Use to access the
Contacts menu.
ENTER Key
Function Key

16
VN250
Menu Tree on the Internal Screen
MEDIA CENTER
MEDIA CENTER
1. Search
2. Tunes & Tones
1. Get New
Ringtones
2. My Ringtones
3. My Sounds
3. Pictures
1. Get New
Pictures
2. My Pictures
3. Take Picture
4. Online Album
4. Games
1. Get New
Applications
5. Mobile Web
6. Browse &
Download
1. Get New
Applications
Bing
Backup Assistant
Mobile Email
VZ Navigator
7. Extras
1. Get New
Applications
MESS
MESSA
AGING
GING
1. New Message
1. TXT Message
2. Picture
Message
3. Voice Message
2. Inbox
3. Sent
4. Drafts
5. Voicemail
6. Mobile IM
7. Email
8. Chat
9. Social Networks
To Online Album
Facebook
MySpace
Twitter
CONT
CONTA
ACTS
CTS
1. New Contact
2. Contact List
3. Backup Assistant
4. Favorites
5. Groups
6. Speed Dials
7. In Case of
Emergency
8. My Name Card
R
Recent Calls
ecent Calls
1. Missed
2. Received
3. Dialed
4. All
5. View Timers

VN250
17
SETTINGS & T
SETTINGS & TOOLS
OOLS
1. My Verizon
2. Master Volume
3. Tools
1. Voice
Commands
2. Calculator
3. Ez Tip
Calculator
4. Calendar
5. To Do List
6. Alarm Clock
7. Info Search
8. Stopwatch
9. World Clock
0. Notepad
*. USB Mass
Storage
4. Bluetooth Menu
1. Add New
Device
5. Keyguard
Settings
1. Auto Lock
2. Unlock
Options
6. Sounds Settings
1. Easy Set-up
2. Call Sounds
1. Call
Ringtone
2. Call Vibrate
3. Caller ID
Readout
3. Alert Sounds
1. TXT
Message
2. Multimedia
Message
3. Voicemail
4. Emergency
Tone
5. Missed Call
4. Keypad Volume
5. Digit Dial
Readout
6. Service Alerts
1. ERI
2. Minute Beep
3. Call
Connect
4. Charge
Complete
5. Software
Update
7. Power On/Off
1. Power On
2. Power Off
8. Voice Clarity
7. Display Settings
1. Easy Set-up
2. Banner
1. Personal
Banner
2. ERI Banner
3. Backlight
1. Display
Backlight
2. Keypad
Backlight
4. Brightness
5. Wallpaper
1. My Pictures
2. Fun
Animations
3. Slide Show
6. Display
Themes
7. Main Menu
Settings
1. Menu
Layout
2. Replace
MenuItems

18
VN250
Menu Tree on the Internal Screen
3. Position
Menu Items
4. Reset Menu
Settings
8. Font Type
9. Font Size
1. Dial Digits
2. Menu &
Lists
3. Message
4. Volume Key
Resize
0. Clock Format
8. Phone Settings
1. Airplane Mode
2. SetShortcuts
1. Set My
Shortcuts
2. Set
Directional
Keys
3. Voice
Commands
1. Confirm
Choices
2. Sensitivity
3. Adapt Voice
4. Prompts
5. CLR Key
Activation
4. Language
5. Location
6. Current
Country
7. Security
1. Edit Codes
2. Restrictions
3. Phone Lock
Setting
4. Lock Phone
Now
5. Reset
Default
6. Restore
Phone
8. System Select
9. NAM Select
9. Call Settings
1. Answer
Options
2. End Call
Options
3. AutoRetry
4. TTY Mode
5. One Touch Dial
6. Voice Privacy
7. DTMF Tones
8. Assisted Dialing
9. Dial Search
0. Memory
1. Save Options
2. Phone Memory
3. Card Memory
*. Phone Info
1. My Number
2. SW/HW
Version
3. Icon Glossary
4. Software
Update
#.Set-up Wizard

VN250
19
Installing the Battery
1. Insert the bottom of the battery
into the opening on the back of
the phone making sure to align
the battery contacts.
2. Push the battery down until it
clicks into place.
3. Place the battery cover over the
opening on the back of the
phone, then slide it upwarduntil
it clicks into place.
Removing the Battery
1. Turn the phone off,then slide the
battery cover downward to
remove it.
2. Remove the battery from the
battery compartment by lifting
the top of the battery using the
fingertip cutout.
Removing & Installing the
battery cover
You need to remove the back cover
before you can install the battery
and micro SD card on your phone.
Also, makesureto always turn off
the power beforeinstalling or
replacing a battery.
Getting Started with Your Phone

20
VN250
Getting Started with Your Phone
To remove the back cover
1. Hold the phone securely with
both hands (as demonstrated).
2. Push the back cover up with
your thumb until it disengages
from the phone and then slide it
up to remove.
Toinstall the back cover
1. Hold the phone securely with
both hands (asdemonstrated).
2. Slide the battery cover upward
with your thumbs until it clicks
into place.
Charging the Battery
Your device comes with a cableless
wall adapter and a USB data cable
which connect together to charge
your phone. To charge your phone:
NOTICE
Please use only an approved charging
accessory to charge your LG phone.
Improper handling of the charging port, as
well as the use of an incompatible charger,
may cause damage to your phone and
void the warranty.
1. Connect the USB data cable into
the cableless wall adapter. When
connecting asshown below,the
LGlogo on the USB cable
should face toward you.
2. Gently uncover the accessory
charging port, then plug the USB
data cable (as shown below) into
the phone’s charger port and the
other end into an electrical
outlet.
Cableless Wall Adapter

VN250
21
3. The charge time varies
depending upon the battery
level.
Charging with USB
You can use your computer to
charge your phone. To be able to
charge with the USB cable, you
need tohave the necessary USB
Driver installed on your PC first.
Connect one end of the USB cable
tothe charging accessory port on
your phone and the other end to a
highpower USB port on your PC
(commonlylocated on the front
panel of the computer).
NOTE
Low-powered USB ports are not
supported, such asthe USB port on
your keyboard or buspowered USB
hub. LG USB Driver is downloadable
from the www.lge.com.
Battery Temperature
Protection
If the battery gets overheated, the
phone will automatically turn off.
When you turn the phone back on,
amessage pops up alerting you
that the phone was powered off for
your safety.
How to Install Your microSDTM
Card
1. Locate the microSD
TM
slot on the
right side of the phone and
gently uncover the slot opening.
(microSD
™
slot cover stays
attached to the phone so you
don't lose it).
2. Insert the microSDTM card in the
correct direction until it clicks
into the slot. If you insert the
card in the wrong direction, it may
damage your phone or your card.
NOTE
Memory card is
sold separately.
NOTICE
Please make sure that the 'B' side faces up
before inserting a charger or data cable into
the charger port of your phone.

22
VN250
Getting Started with Your Phone
How to Remove Your
microSDTM Card
Gently press and release the
exposed edge of the microSD
TM
card, then remove it from the slot
and replace the cover.
NOTES
●
Do not attempt to remove the
microSDTMcard while reading or writing
to the card.
●
Users wishing to transfer or download
music onto a MicroSD™card inserted
into this phone (through either MTP
Sync or Over the Air) should format
the MicroSD™cardon this handset
beforeusing it (through Menu ->
Settings & Tools -> Memory -> Card
Memory -> Options -> Format).
Warning: Formatting the MicroSD™
card will erase all contents on the card.
In the event the MicroSD™card is
used on this phone without first
formatting it,the phone will display a
“License acquisition failed” during OTA
downloading or MTP Sync. Song files
downloaded or otherwise purchased
from third party providers and stored
on a MicroSD™card inserted into this
device may be protected or encrypted
by such provider and cannot be played
on this device.
Battery Charge Level
You can find the battery charge level
at the top right of the LCD screen.
When the charge level becomes low,
the battery sensor sounds a warning
tone, blinks the battery icon, and
displays a warning message. As the
charge level approaches empty, the
phone automatically switches off
without saving.
Signal Strength
Call quality depends on the signal
strength in your area. You can tell
howmuch signal strength you have
by the number of bars next to the
signal strength icon: the
more bars, the stronger the signal.
If you’re having problems with
signal quality,move to an open area
or, when inside a building, try
moving near a window.
Turning the Phone On and
Off
Turning the Phone On
1. Insert the battery and connect
the phone to an external power
source.
2. With the flip open, press
until the LCD screen lights up.
Turning the Phone Off
With the flip open, press and hold
until the display turns off.

VN250
23
Making Calls
1.
Make sure the phone is turned on.
If not, open the flip and press
for about three seconds.
If necessary, enter the lock code.
2. Enter the phone number.
3. Press .
4. Press to end the call.
NOTE
Your phone has a Voice
Commands feature that also lets
you make calls by saying a phone
number, name, or location.
Correcting Dialing Mistakes
With the flip open, press once
to erase the last digit entered, or
hold it down for atleast two
seconds to delete all the digits.
Redialing Calls
With the flip open, press
twice to redial the last number
dialed.
Receiving Calls
1. When the phone rings or
vibrates, you can answer the call
by simply opening the flip. Or
pressing the speakerphone key
located to the right side
with the flip closed.
NOTE
If the Answer Options setting is
set to Any Key, you can:
●
Open the flip and press the
Left Soft Key [Quiet] to
mutethe ringing or vibration
for that call, then press any key
toanswer the call.
●
Open the flip and press the
Right Soft Key[Ignore]
toend the call or send it
directlyto Voicemail.
2. Press to end the call, or
simplyclose the flip.
Screen Icons
When the phone is on, the top line
of the LCD screen displays phone
status icons.
Tosee the icon glossary,with the
flip open, go to
MENU
->
Settings
&Tools
->
Phone Info
->
Icon
Glossary
on your phone.

24
VN250
Quick Access to Convenient Features
Vibrate Mode
Sets the phone to vibrate instead of
ring ( is displayed). To set
Vibrate Mode, with the flip open,
press and hold .
To return to
Normal Mode, press and hold .
Sounds Off
Quickly deactivate your phone's
sounds when you're in a place
where phone sounds would be
disruptive.
From standby mode with the flip
open, press and hold the lower side
volume keyfor 3 seconds. To
return to normal sounds mode,
press and hold the upper side key.
Mute Function
The Mute Function prevents the
transmission of your voice tothe
caller. To quickly activate Mute
while in a call, press the Left Soft
Key[
Mute
], then tounmute
press the Left Soft Key
[
Unmute
].
Quick Volume Adjustment
Quickly adjust ringer and earpiece
volumes by pressing the upper side
volume key on the left side of
the phone to increase and lower
volume side key to decrease.
NOTE
The earpiece volume can only be
adjusted during a call and
Keypad Volume can only be
adjusted through the Menu.
NOTE
Scalable Font:
Users can directly control font
size instead of accessing font size
settings bypressing the side
volume keys.
e.g. using volume keys to adjust 3
font sizesin 3 scenarios:
-Message Viewing
- List/Tab/Grid* Menu
-Dial Up
*Not support Grid menu layout
screen.
Call Waiting
During a call, one beep indicates
another incoming call.
Press to answer it and put the
first call on hold. Press again
to return to the first call.

VN250
25
Caller ID
Caller ID displays the number
and/or name and/or picture if
applicable of the person calling
when your phone rings.
Voice Commands
Voice Commands allow you to do
things by verbal command (e.g.,
make calls, confirm Voicemail, etc.).
The Voice Commands feature is
accessed by pressing the Voice
Commands Key(on the left
side of the phone) whether the flip
is open or closed.
●With the flip open, press the
Voice Commands Key and
followthe prompts.
●With the flip closed,
-If External Keyguard setting is
On, unlock the screen by
pressing the Play/Pause Key
and press the Voice
Command Key (on the left
side of the phone).
-If External Keyguardsetting is
Off, press and hold the Voice
Command Key (on the left
side of the phone).
NOTE
Voice Commands can also be
started with the designated key
on your Bluetooth®device.
Please check the manual of the
Bluetooth®device for further
instructions.
Dial Search
Set the Dial Search setting on (see
page 106) to easily find entries in
your Contacts. From Standby
mode with the flip open, press the
keypad key(s) with the first
letter(s) of the entry you aretrying
tofind. A list will be displayed for
you to select to call, message, or
view.
Speakerphone with Flip
Closed
Quickly and easily make and
answer calls with the flip closed.
The speakerphone feature
automatically activates for calls
made using the Voice Commands
feature and calls answered using
the Speakerphone Key.
●With the front LCD unlocked,
press the Voice Commands Key
,then say the call command
you want (for example, "Call
858 555-1212").

26
VN250
Quick Access to Convenient Features
●When the phone rings or
vibrates, press and hold the
Speakerphone Key to
answer a call with the flip closed.
Speakerphone With a Missed Call
There's no need to open the flip to
call back a missed call. When you
see a missed call on the front LCD,
press the Play/Pause Key to
View, then press and hold the
Speakerphone Key on the right
side of the phone to call it.
Volume Optimizer
Volume Optimizer feature consists
of “Volume Optimizer” and
“Earpiece Optimizer” providing
enhanced listening user experience
for both speakerphone and earpiece
audio.
●
Speakerphone Optimizer
Operation:
-Adaptive Volume Control:
Speakerphone optimizer will
detect thatthe incoming audio
is very low and will increase the
audio level of speakerphone
automatically.
-Automatic Clipping
Management: On the other
hand, the audio could become
distorted / clipped when audio
is too high. Speakerphone
optimizer will detect that the
incoming audio is too high and
will adjust audio signal to reduce
distortion / clipping.
●
Earpiece Optimizer
Audio loudness is relative to
surrounding noise level, and
volume level setting optimal for
office/home environment may
suddenly become poor in
crowded street or restaurant.
When user moves to noisy
environment, Earpiece Optimizer
feature will automatically increase
the earpiece audio level to
improve speech intelligibility.
NOTE Default setting of Earpiece
Optimizer feature is “Off” on
VN250.To turn it “On”, go to
Menu > Settings & Tools >
Sounds Settings >
Voice Clarity >Select “On”.

VN250
27
Favorites Key
Quickly and easily call, message,
and/or view ten of your Contacts
you set as your Favorites.
1. With the flip open, press the
Favorites Key .
2. Use the Directional Key to
highlight the Favorite you want.
●
Press to call it.
NOTE
Default Number is dialed if the Contact
has more than one phone number.
●Press
[MSG]
toviewthe
Favorites message history or send
amessage.
●
Press the Left Soft Key
[View]
to view the Favorites entry.
●
Press the Right Soft Key
[Options]
to access other options.
Messaging Key
Quicklyand easily send a TXT
message using the dedicated
Messaging Key.Simplyopen the
flip, press the Messaging Key ,
enter the address and message, then
press
[SEND]
.
Voice Recorder Using the
Front LCD
To quickly make a voice recording
with the flip closed:
1.
Unlock the front LCD screen by
pressing the Play/Pause Key ,
then press the Voice Command Key
(on the left side of the phone).
NOTE
If the External Keyguard setting is
Off, there's no need to unlock the
front LCD. Simply press and hold
the Voice Command Key .
2.
Press and hold the Voice
Commands Keyon the left
side of the phone again to activate
the Voice Recording feature.
3. Press the Play/Pause Keyto
start recording, then press the
Play/Pause Key to end the
recording.
4. To manage your recording(s), go
to My Sounds menu.
NOTE
Users can record voice message up
to1hour subject tomemory
capacity. Default setting is 1
minute. To change recording time
setting, users need to open the flip
and press Right Soft Key
[Options] during recording screen
on front displayis activated , then
press for recording time and
make selection.

28
VN250
Entering and Editing Information
Text Input
The following key functions are
available to help with text entry:
Left Soft Key: Press to
change text input mode.
Shift: Press to change
capitalization (initial cap,
caps lock, lowercase).
Next: Press to display other
matching words in the
database in word mode.
Space: Press tocomplete a
word and insert a space.
Clear: Press todelete a
single space or character.
Hold todelete words.
Punctuation: Press to insert
punctuation.
Text Input Modes
In a text field, press the Left Soft
Key to display text modes.
T9 Word/ Abc/ ABC/ 123 / T9
Palabra/ Symbols/ Quick Text
NOTE
T9 Palabra is the Spanish
counterpart of T9 Word which
utilizes accents, tildas, etc. for
correct Spanish word spelling.

VN250
29
Contacts in Your Phone’s Memory
Storing Basics
1.
With the flip open, enter a
number (max. 48 digits), then
press the Left Soft Key
[Save].
2.
Use the Directional Key to
highlight
Add New Contact/
Update Existing
,then press
.
3. Use the Directional Key to
highlight
Mobile 1/ Home/
Business/ Mobile 2/ Fax
,then
press .
4. Enter a name (max. 32
characters), then press .
5.
Press to exit, to call,
or the Right Soft Key
[Options].
Customizing Individual Entries
1. With the flip open, press the
Right Soft Key [
Contacts
],
then use the Directional Key
to highlight an entry.
2.
Press the Left Soft Key
[Edit].
3. Use the Directional Key to
highlight the information to
customize.
4. Change the entry as you want,
then press to save your
changes.
Speed Dial
Allows you to set up your Speed
Dials.
1. With the flip open, press the
Right Soft Key [
Contacts
],
then use the Directional Key
to highlight an entry.
2. Press the Left Soft Key
[
Edit
].

3. Use the Directional Key to
highlight a phone number, then
press the Right Soft Key
[
Options
].
4. Use the Directional Key to
highlight
Set Speed Dial
,then
press .
5. Enter a Speed Dial digit.
●
Use the keypad, then press
.
●
Use the Directional Key to
highlight the Speed Dial digit,
then press .
6. Press
Yes
to confirm, then
press to save.
Storing a Number with
Pauses
Pauses allow you to enter
additional series of numbers to
access automated systems such as
Voicemail or credit billing numbers.
Pause types are:
Wait
(W) The
phone stops dialing until you press
the Left Soft Key [
Release
]to
advance tothe next number.
2-Sec
Pause
(P) The phone waits two
seconds before sending the next
string of digits.
1. With the flip open, enter the
number, then press the Right
Soft Key [
Options
].
2. Use the Directional Key to
highlight
2-Sec Pause
or
Wait
,
then press .
3. Enter additional number(s) (e.g.,
pin number, credit card number,
etc.).
4.
Press the Left Soft Key
[Save].
5. Choose Add
New
Contact/Update Existing
.
6. Continue entering information
for the Contact entry as
necessary.
Adding Another Phone
Number
From standby mode
1. With the flip open, enter a
phone number, then press the
Left Soft Key[
Save
].
2. Use the Directional Key to
highlight
UpdateExisting
,then
press .
30
VN250
Contacts in Your Phone’s Memory
Table of contents
Other LG Cell Phone manuals