manuals.online logo
Brands
  1. Home
  2. •
  3. Brands
  4. •
  5. Light Emotion
  6. •
  7. Lighting Equipment
  8. •
  9. Light Emotion VIVID0312 Operator's manual

Light Emotion VIVID0312 Operator's manual

www.lightemotion.com.au
VIVID0312
Compact LED Wash Light with IR Remote
User’s instruction manual
This manual contains important information about the safe installation and use of this product
Please read this instruction manual carefully before installing or operating
Please keep these instructions in a safe place for future reference
V1.02
1
Introduction
Thank you for the purchase of your VIVID0312 compact LED par can by Light Emotion. We are confident you will
be satisfied with your purchase and enjoy many years of use from this Light Emotion Party Range product. Please
read these instructions carefully to ensure the product is well look after and used correctly to avoid any potential
problems.
Please note that as part of our ongoing commitment to continuous improvement and product development, the
specifications in this manual are subject to change without notice. Whilst every care has been taken in the
preparation of this manual we reserve the right to change specifications in the course of product improvement.
What is in the box:
- 1 x VIVID0312 Compact LED Wash
- 1 set bracket and knobs
- This user manual
1. Safety Instructions:
Please read these instructions carefully. It includes important information about the installation usage and
maintenance of this product.
- Please keep this User Manual for future consultation. If you sell the unit to another user, be sure that they also
receive this instruction booklet.
- Always make sure that you are connecting to the proper voltage and that the line voltage you are connecting to is
not higher than that stated on the sticker of the fixture.
- This product is intended for indoor use only. To prevent risk of fire or shock, do not expose fixture to rain or
moisture.
- Make sure there are no flammable materials close to the unit while operating.
- The unit must be installed in a location with adequate ventilation, at least 50cm from adjacent surface. Be sure that
no ventilation slots are blocked.
- Always disconnect from power source before servicing.
- Secure fixture to stands, trussing and the like using a safety chain.
- Maximum ambient temperature is 40˚C. Do not operate fixture at temperatures higher than this.
- In the event of serious operating problem, stop using the unit immediately. Never try to repair the unit by yourself.
Repairs carried out by unskilled people can lead to damage or malfunction. Please contact the nearest authorized
technical assistance center.
- Make sure power cord is never crimped or damaged.
- Never disconnect power cord by pulling or tugging on the cord.
- Never carry the fixture directly from the cord. Carry by holding the base of the unit, and only move when unit is
upright.
- Avoid direct eye exposure to the light source while it is on.
2
2. Installation:
Caution: For safe mounting of this product, please read the following carefully.
- Use suitable hook clamp to attach to lighting stand, trussing or bar. Clamp should be securely fixed to the bracket
of the product via the hole in the bracket. The product can also be mounted via screw using the same hole direct to
walls or ceilings provided it is safe or suitable to use a screw to do so. Some stands include screws and holes to
mount products directly to them. Light Emotion offers various clamps and safety chains as part of its product range.
- When mounting the product, do not stand directly underneath the product
- Always use a safety chain when mounting the product on stands, trussing or bars. Make sure the breaking strain
rating of the chain is at least 10 times the weight of the product.
- Make sure there is adequate ventilation around the product.
- Never look directly into the LED light sources of the product.
- For indoor use only – do not use outdoors.
- To avoid electrical shock, keep away from rain and moisture.
- Keep out of reach of children.
3. Features
This product is designed as an LED lighting effect and is only intended to be used as an LED lighting effect for
entertainment and display applications. Due to our ongoing commitment to constantly reviewing and improving
products, features and specifications are subject to change without prior notice.
- LEDs: 12 x 3W RGB 3-in-1 LEDs with average 50000 hours lifespan
- Control: DMX, Sound Activation, Stand Alone, Master/Slave
- DMX Channels: 7
- Beam angle 25
0
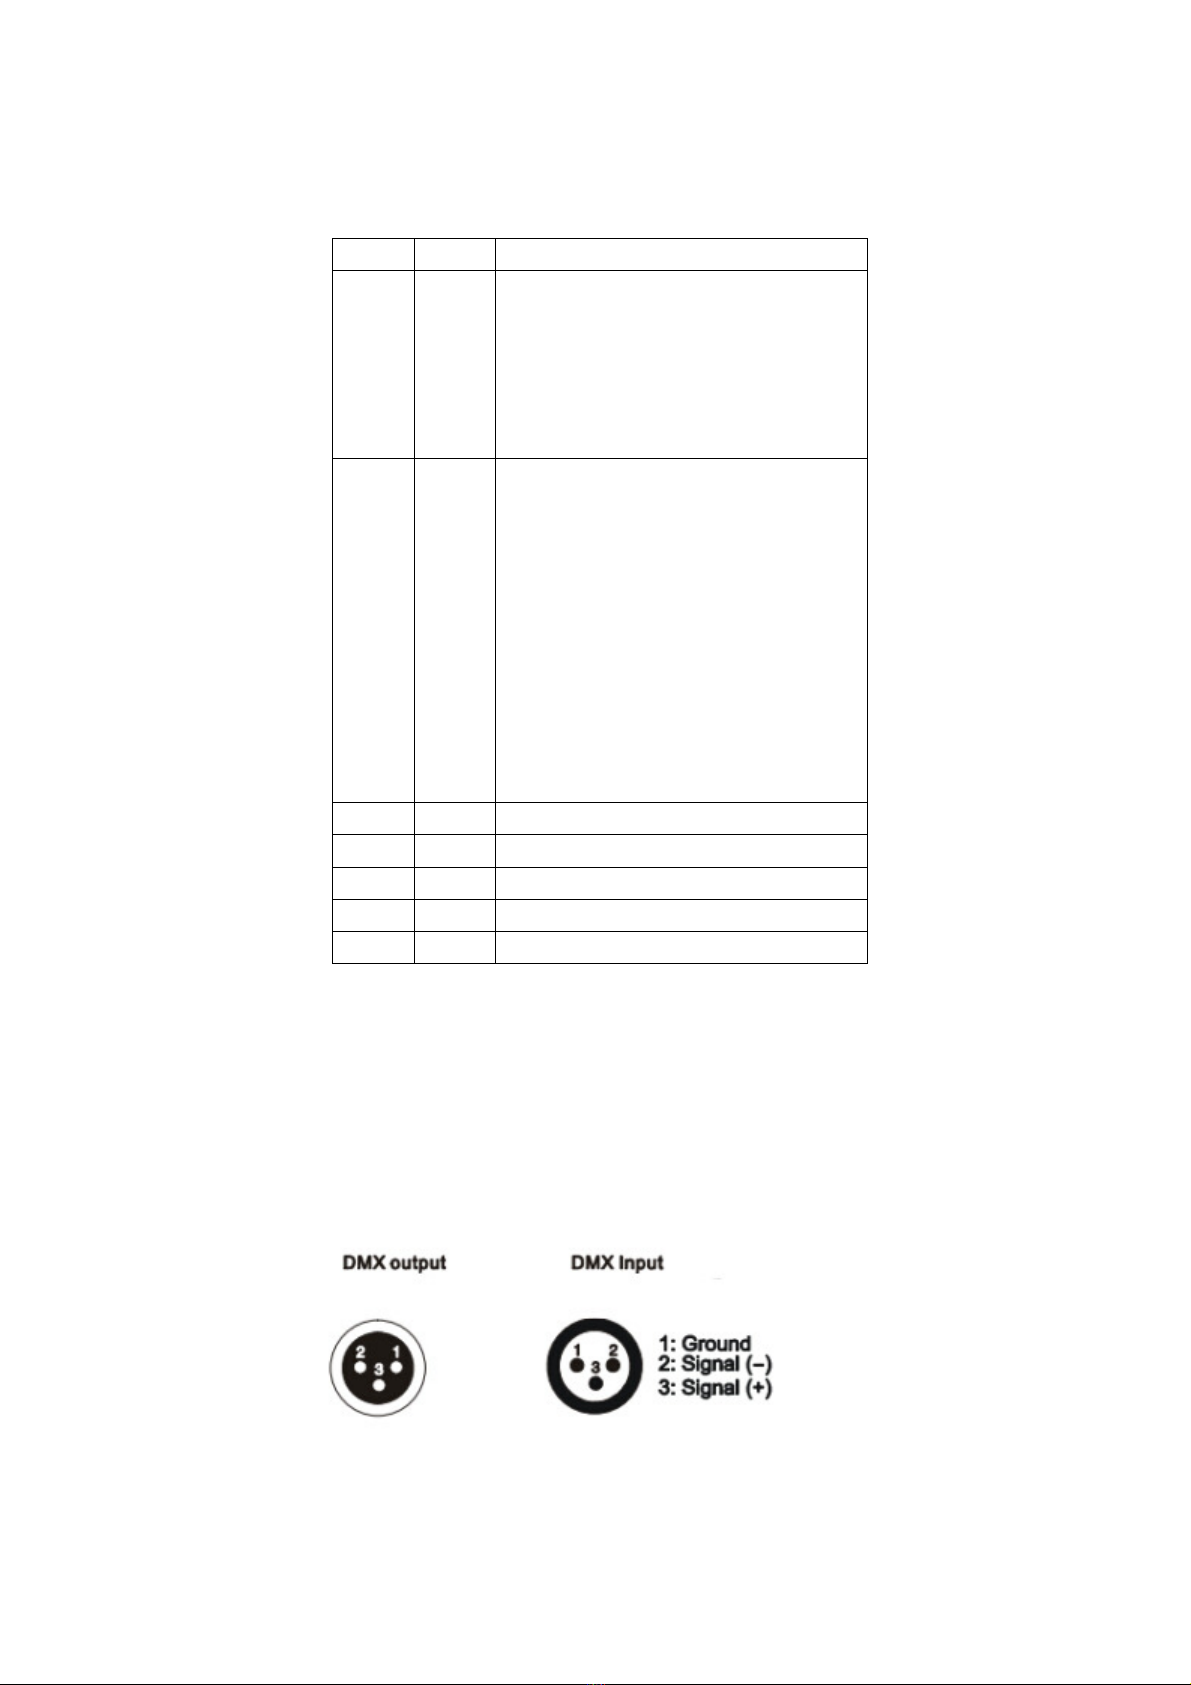
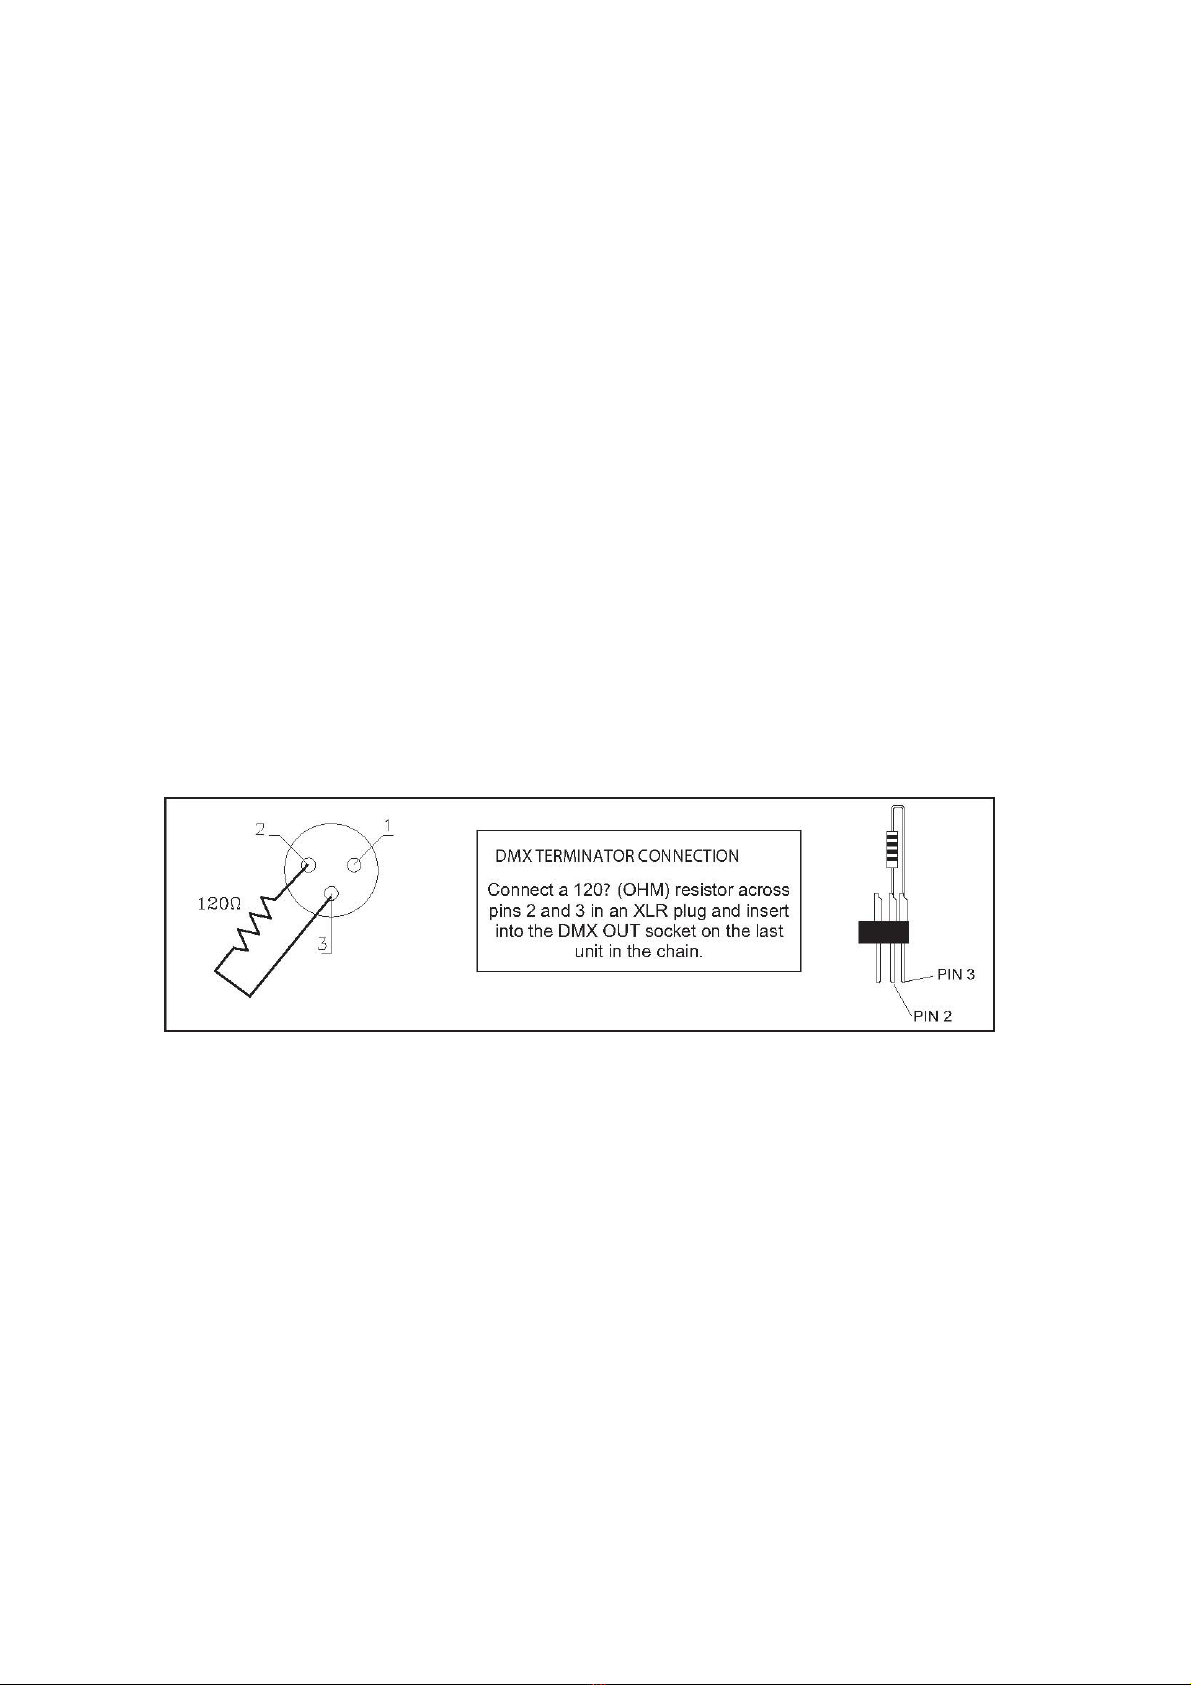
- 3 pin XLR male and female DMX sockets
- Functions: Single colours, Changing colours, Fading, Strobing.
- Built in programs for single and multiple fixtures
- Weight: 600g
- Packed Dimensions 128x128x128mm
4. Product Operation
The VIVID0312 is a compact LED wash light that can produce a multitude of colours using the mixing of red, green
and blue colours built into each 3-in-1 LED. You can set the product to output a single static colour or use the
included series of built in running patterns and sequences that utilize the 12 LEDs to produce different colours,
chasing effects, strobing effects and fading effects.
The mixing of red, green and blue can create any colour you like – for example, red, green and blue on at the same
intensity will create white while red and green together create yellow. Blue and red together create magenta while
blue and green together create cyan. Varying intensities of the red, green or blue will create other colours as well.
3
The VIVID0312 can be controlled via the onboard 4 button LED display control or via DMX control using a DMX
controller (not included) and the DMX inputs connections.
This section of the manual details accessing the features of the products by those various means.
4a Built in Programs common to all control modes:
Program Description Functions
A1 Static Colour Select 1 White 2 Red 3 Green 4 Blue
5 Yellow 6 Cyan 7 Magenta
A2 Colour Changing instantly between
colours
1 Slow – 32 Fast
A3 Colour Changing fading between
colours
1-12 Colour fade sequences
A4 Audio Activation 1 Change Colour to Sound
2-10 Flash single colour
A5 Strobing 1-32 Various combinations of Strobing and colour patterns,
variable speed
4b Onboard Menu control
To navigate through the onboard LED menu display (on the
rear of the product), press the MENU button until the desired
display function is reached. Each press of the MENU button
will advance to the next function. You then use the +/- button
to vary the feature or program. In some functions, pressing
enter will result in the last two digits flashing – which allows
you to set the speed or the response of the program using the same +/- buttons. Pressing enter again when the last
two digits are flashing will cause them not to flash and allow you to go back to changing the program being selected.
Note the display will black out while not in use after 15 seconds. A red dot indicates the fixture is on and receiving
power.
Display Function Detail Pressing Enter Detail
d DMX Selects DMX Channel No function
IP No Function No function
A1 Static Colour Selection +/- 1-10 to choose colour No function
A2 Colour Changing (instant) +/- 1-32 to choose speed No function
A3 Colour Changing (fading) +/- 1-11 to choose program Speed +/- 1-32
A4 Sound Activation +/- 1-11 to choose program Sensitivity +/- 1-4
A5 Strobing +/- 1-11 to choose program Flash speed +/- 1-32
r Red fixed colour +/- to choose red intensity 0-255 No function
G Green fixed colour +/- to choose green intensity 0-255 No function
b Blue fixed colour +/- to choose blue intensity 0-255 No function
4
4d DMX Table
Channel Value Function
Ch 1 0-10
11-50
51-100
101-150
151-200
201-255
Ch4 – Ch7 Manual Control
A1 Colour Function
A2 Colour change
A3 Colour Fade
A4 Sound Activation
A5 Strobing patterns
Ch 2 0-39
40-59
60-79
80-99
100-119
120-139
140-159
160-179
180-199
200-219
220-255
7 Colour Recycle
Red
Green
Blue
Yellow
Cyan
Magenta
Yellow
Cyan
Magenta
White
Ch 3 0-255 Speed slow to fast for programs chosen on Ch 1.
Ch 4 0-255 Master dimmer for Ch 5, 6 & 7
Ch 5 0-255 0-100% Red dimmer
Ch 6 0-255 0-100% Green dimmer
Ch 7 0-255 0-100% Blue dimmer
5. DMX-512 Control Connection
Using a 3 pin XLR cable, you can connect the product to a DMX controller and then to other fixtures with 3 pin
XLR inputs and outputs. When not using DMX, multiple fixtures can be connected together and operate under
master/slave control. The signal cable should have two core with shielded cable, the signal connectors are XLR
input and output connectors. Please refer to the below diagram:
5
6. DMX Address Setting
When being used in conjunction with a DMX controller, each fixture must be set a specific starting address. When
receiving signal, fixture will receive channel control signals of this address from the DMX controller.
For simplicity, the user can use the same address for multiple fixtures but this will result in each fixture providing
exactly the same output and fixtures with the same DMX address cannot be individually controlled.
To control each fixture individually via DMX, each fixture must have its own unique DMX address. As this fixture
uses 7 DMX channels, each address must be at least 7 apart.
So for example – assuming the first fixture is DMX channel 1, the second fixture would need to be on channel 8,
then the 3
rd
channel 15 and so on. Some DMX controllers may group fixtures in lots of 16 channels – so in that case,
fixture 1 on channel 1, fixture 2 on channel 17, 3 on 33, and so on. Refer to your DMX controllers’ instruction
manual on how best to manage your DMX channel allocation.
7. DMX-512 connection with DMX terminator
A DMX terminator helps to reduce ‘noise’ on the DMX chain, and makes the light respond to control more
accurately. It should be plugged in to the last fixture in any chain. For Terminator connections please see below:
8. Cleaning and maintenance
From time to time it is recommended the product is cleaned to ensure maximum light output and performance. Use
a wet cloth to clean the housing as well as the lenses. Do not use alcohol based cleaners and solvents as they will
cause damage to the product.
When used in a fixed long term installation such as a venue or club, the unit should be periodically taken down from
the installation and professionally cleaned. Dust build-up within the unit can cause damage and ultimately failure of
components.
9. Warranty
This product is warranted for 12 months from your purchase date. We are confident that this product will give many
years of trouble-free operation but should an unlikely problem arise, warranty claims must be via the original place
of purchase, together with the original purchase receipt. Please keep both your original purchase receipt and this
6
instruction manual together and in a safe place for future reference. Should the product be sold within the warranty
period, be sure to pass on both to the new purchaser so they are able to claim warranty should they need to. We
recommend you register your warranty online at www.industrygear.com.au.
Purchased from:_________________________________________
Contact Details:_________________________________________
Date Purchased:_________________________________________
Invoice/Receipt Number:__________________________________
Copyright Light Emotion 2016. E&OE
Exclusively imported by LSW Imports and Distribution
PO Box 887, Kingsgrove, NSW, 2208
[email protected]
www.lightemotion.com.au
1800 643 111 (within Australia)
+612 9718 4900 (outside of Australia)

Other Light Emotion Lighting Equipment manuals

Light Emotion QUARK2RBP User manual

Light Emotion

Light Emotion QUARK2RBP User manual

Light Emotion STROBA Operator's manual

Light Emotion

Light Emotion STROBA Operator's manual

Light Emotion PARBAR Operator's manual

Light Emotion

Light Emotion PARBAR Operator's manual

Light Emotion PARBAR4 QUAD User manual

Light Emotion

Light Emotion PARBAR4 QUAD User manual

Light Emotion QUARK2GBC User manual

Light Emotion

Light Emotion QUARK2GBC User manual

Light Emotion LEDBAR1803 Operator's manual

Light Emotion

Light Emotion LEDBAR1803 Operator's manual

Light Emotion DERBY2 Guide

Light Emotion

Light Emotion DERBY2 Guide

Light Emotion Phantomrgb1700 User manual

Light Emotion

Light Emotion Phantomrgb1700 User manual

Light Emotion DERBY3 Operator's manual

Light Emotion

Light Emotion DERBY3 Operator's manual

Light Emotion LX90SPOT User manual

Light Emotion

Light Emotion LX90SPOT User manual

Light Emotion MILKYWAY3 Operator's manual

Light Emotion

Light Emotion MILKYWAY3 Operator's manual

Light Emotion DMXDIM4LED Operator's manual

Light Emotion

Light Emotion DMXDIM4LED Operator's manual

Light Emotion UVLED User manual

Light Emotion

Light Emotion UVLED User manual

Light Emotion FLAT1012 Operator's manual

Light Emotion

Light Emotion FLAT1012 Operator's manual

Light Emotion thunderboltg2 Operator's manual

Light Emotion

Light Emotion thunderboltg2 Operator's manual

Popular Lighting Equipment manuals by other brands

Chauvet Abyss Led user manual

Chauvet

Chauvet Abyss Led user manual

Clevertronics L10 CleverFit Exit LCFLED Series ASSEMBLY, INSTALLATION & MAINTENANCE INSTRUCTIONS

Clevertronics

Clevertronics L10 CleverFit Exit LCFLED Series ASSEMBLY, INSTALLATION & MAINTENANCE INSTRUCTIONS

Scanic Astute 575 PRO II instruction manual

Scanic

Scanic Astute 575 PRO II instruction manual

Eaton Crouse-hinds series instruction manual

Eaton

Eaton Crouse-hinds series instruction manual

Original BTC Hatton 3 instruction manual

Original BTC

Original BTC Hatton 3 instruction manual

LITAGRO Gold Series user manual

LITAGRO

LITAGRO Gold Series user manual

BARRON CP-EMW  Series installation instructions

BARRON

BARRON CP-EMW Series installation instructions

STEINEL AC PRO Signal UP manual

STEINEL

STEINEL AC PRO Signal UP manual

STL G-TZ6 instruction manual

STL

STL G-TZ6 instruction manual

Conrad 2377931 operating instructions

Conrad

Conrad 2377931 operating instructions

SyncroLaser SyncroLaser-R user guide

SyncroLaser

SyncroLaser SyncroLaser-R user guide

Miboxer Mi-Light CL3-P60V12 manual

Miboxer

Miboxer Mi-Light CL3-P60V12 manual

Stage Lighting HC-930A user manual

Stage Lighting

Stage Lighting HC-930A user manual

Hayward Sense and Dispense Installation and operation manual

Hayward

Hayward Sense and Dispense Installation and operation manual

Nexxus Lighting LUMificient HYPERION R-LITE accent installation manual

Nexxus Lighting

Nexxus Lighting LUMificient HYPERION R-LITE accent installation manual

Cooper Lighting LZR102 Specification sheet

Cooper Lighting

Cooper Lighting LZR102 Specification sheet

Lightolier 240 datasheet

Lightolier

Lightolier 240 datasheet

JB Systems LED Marvel Operation manual

JB Systems

JB Systems LED Marvel Operation manual

manuals.online logo
manuals.online logoBrands
  • About & Mission
  • Contact us
  • Privacy Policy
  • Terms and Conditions

Copyright 2025 Manuals.Online. All Rights Reserved.