Lindy 42624 User manual

© LINDY ELECTRONICS LIMITED & LINDY-ELEKTRONIK GMBH - FIRST EDITION (July 2014)
USB 3.0 KVM & Data Transfer Cable
User Manual English
Benutzerhandbuch Deutsch
Manuel Utilisateur Français
Manuale Italiano
No. 42624
www.lindy.com
Tested to Comply with
FCC Standards
For Home and Office Use!


User Manual English
Introduction
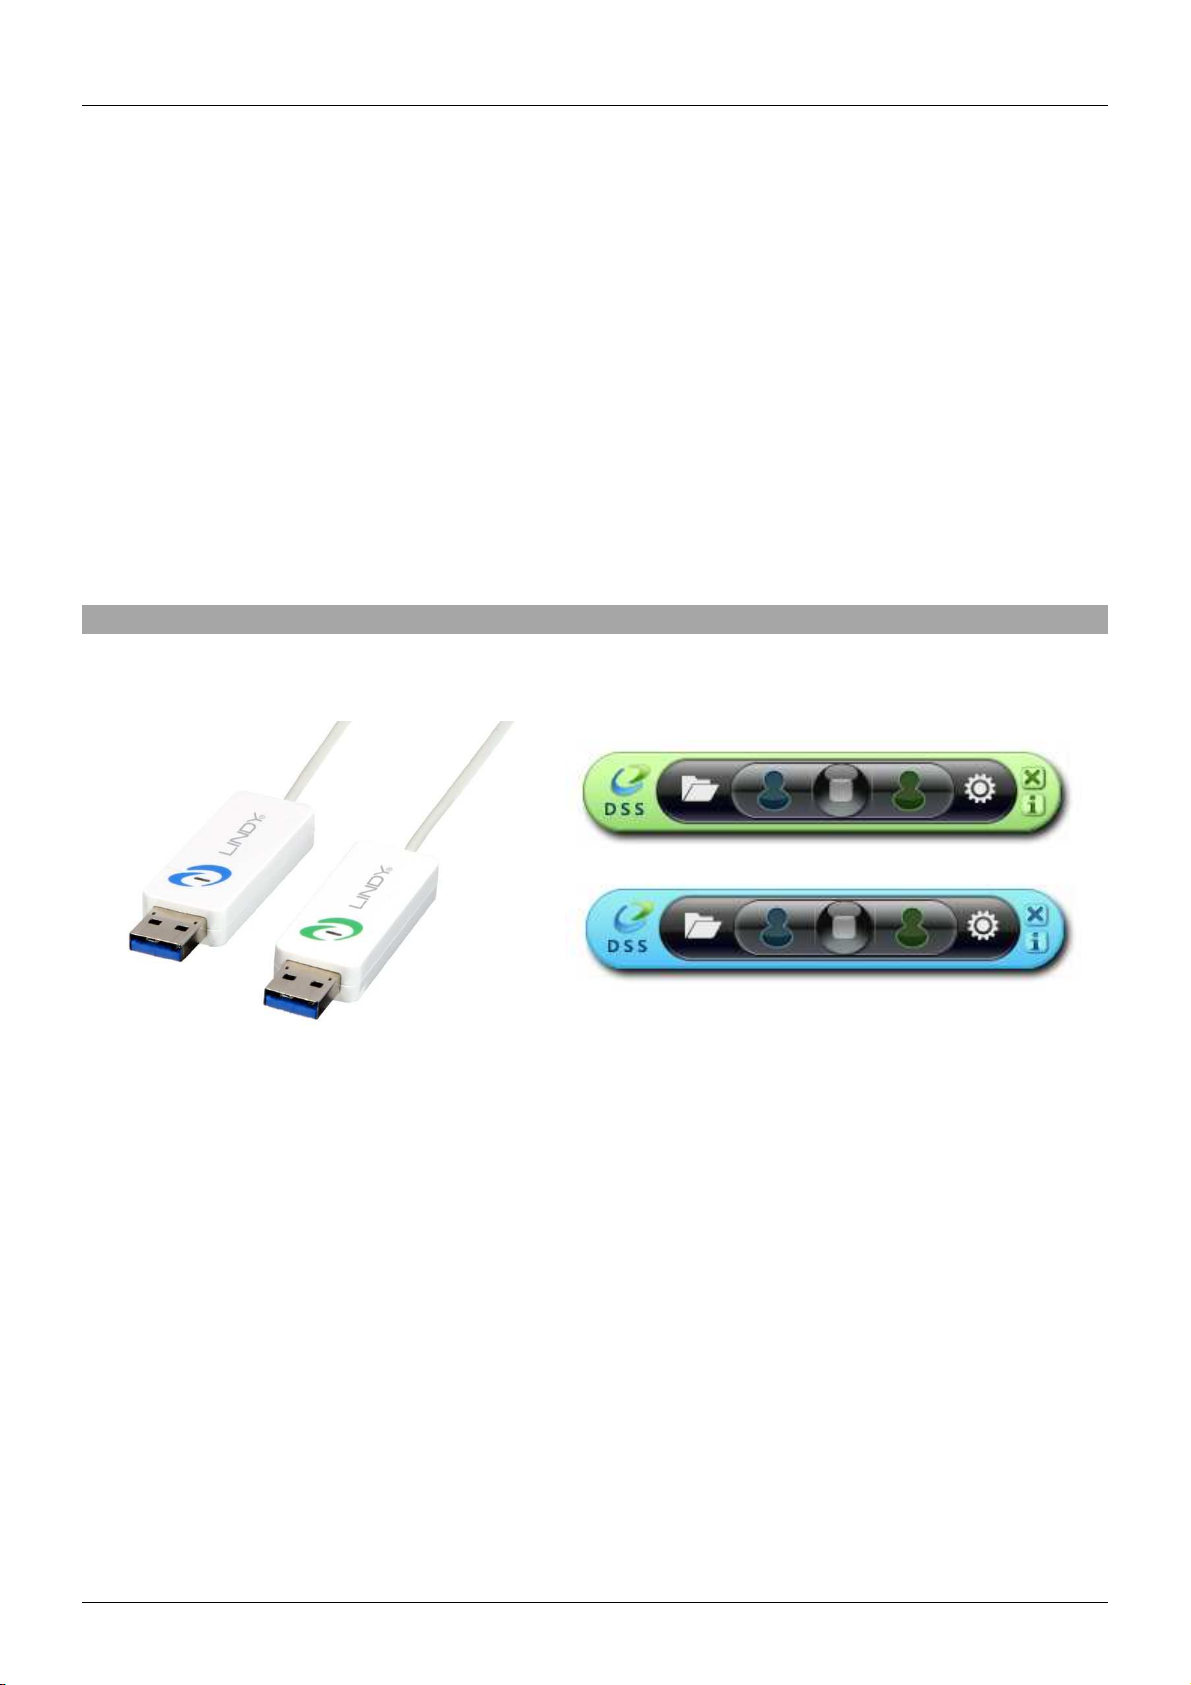
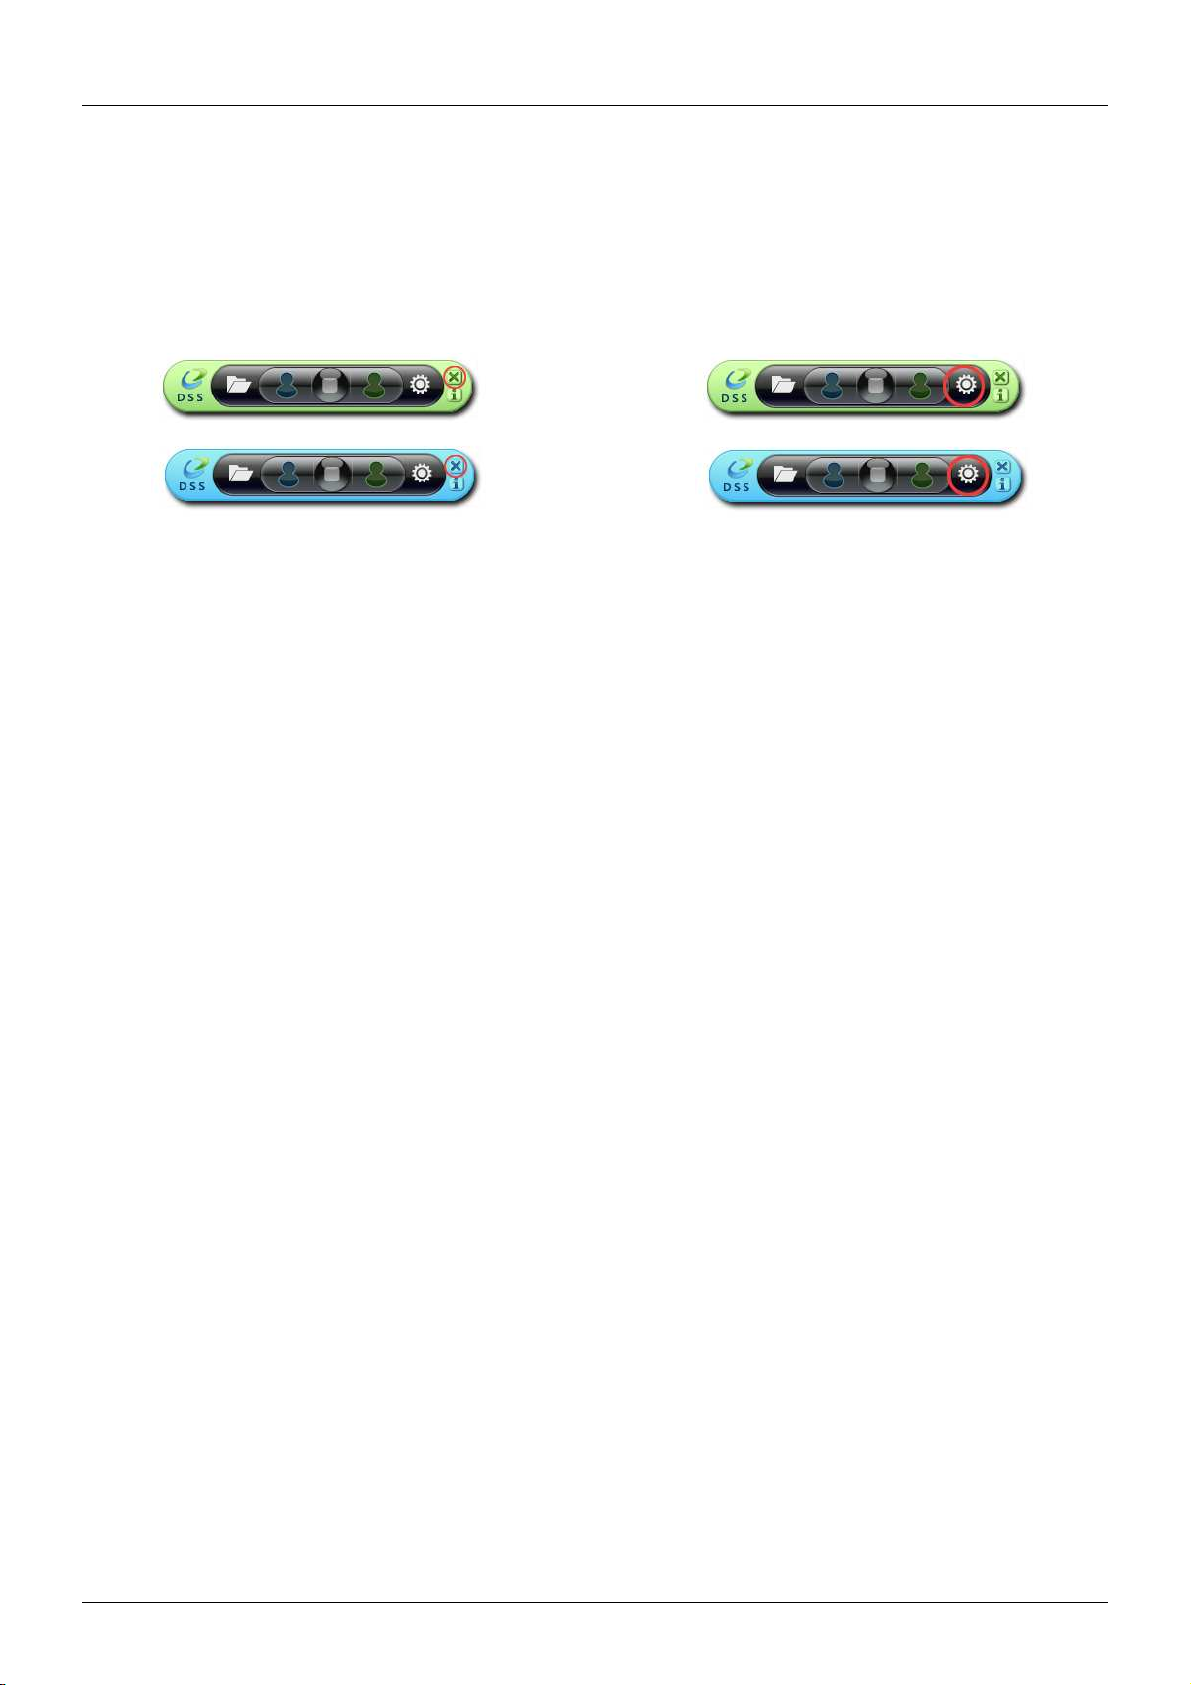
Thank you for purchasing the LINDY USB 3.0 KVM & Data Transfer Cable. This cable gives you the
ability to share Video, Keyboards & Mouse resources and transfer files between two Windows®
computers, via USB 3.0. Use Drag & Drop or Copy & Paste functionality via an easy to use GUI to
quickly move pictures, music, video and other files between computers at speeds of up to 5Gbps.
Control one computer from the other by simply moving your cursor from one screen to the other.
Touchscreen support means you can use touch enabled tablets, screens or monitors to switch between
compatible computers as you would use a mouse, while also maintaining the full resource and clipboard
sharing features of the cable.
Note – The cable has a limited performance when used with USB 2.0 host ports.
Package Contents
USB 3.0 KVM & Data Transfer Cable
Software CD
LINDY Manual
Features
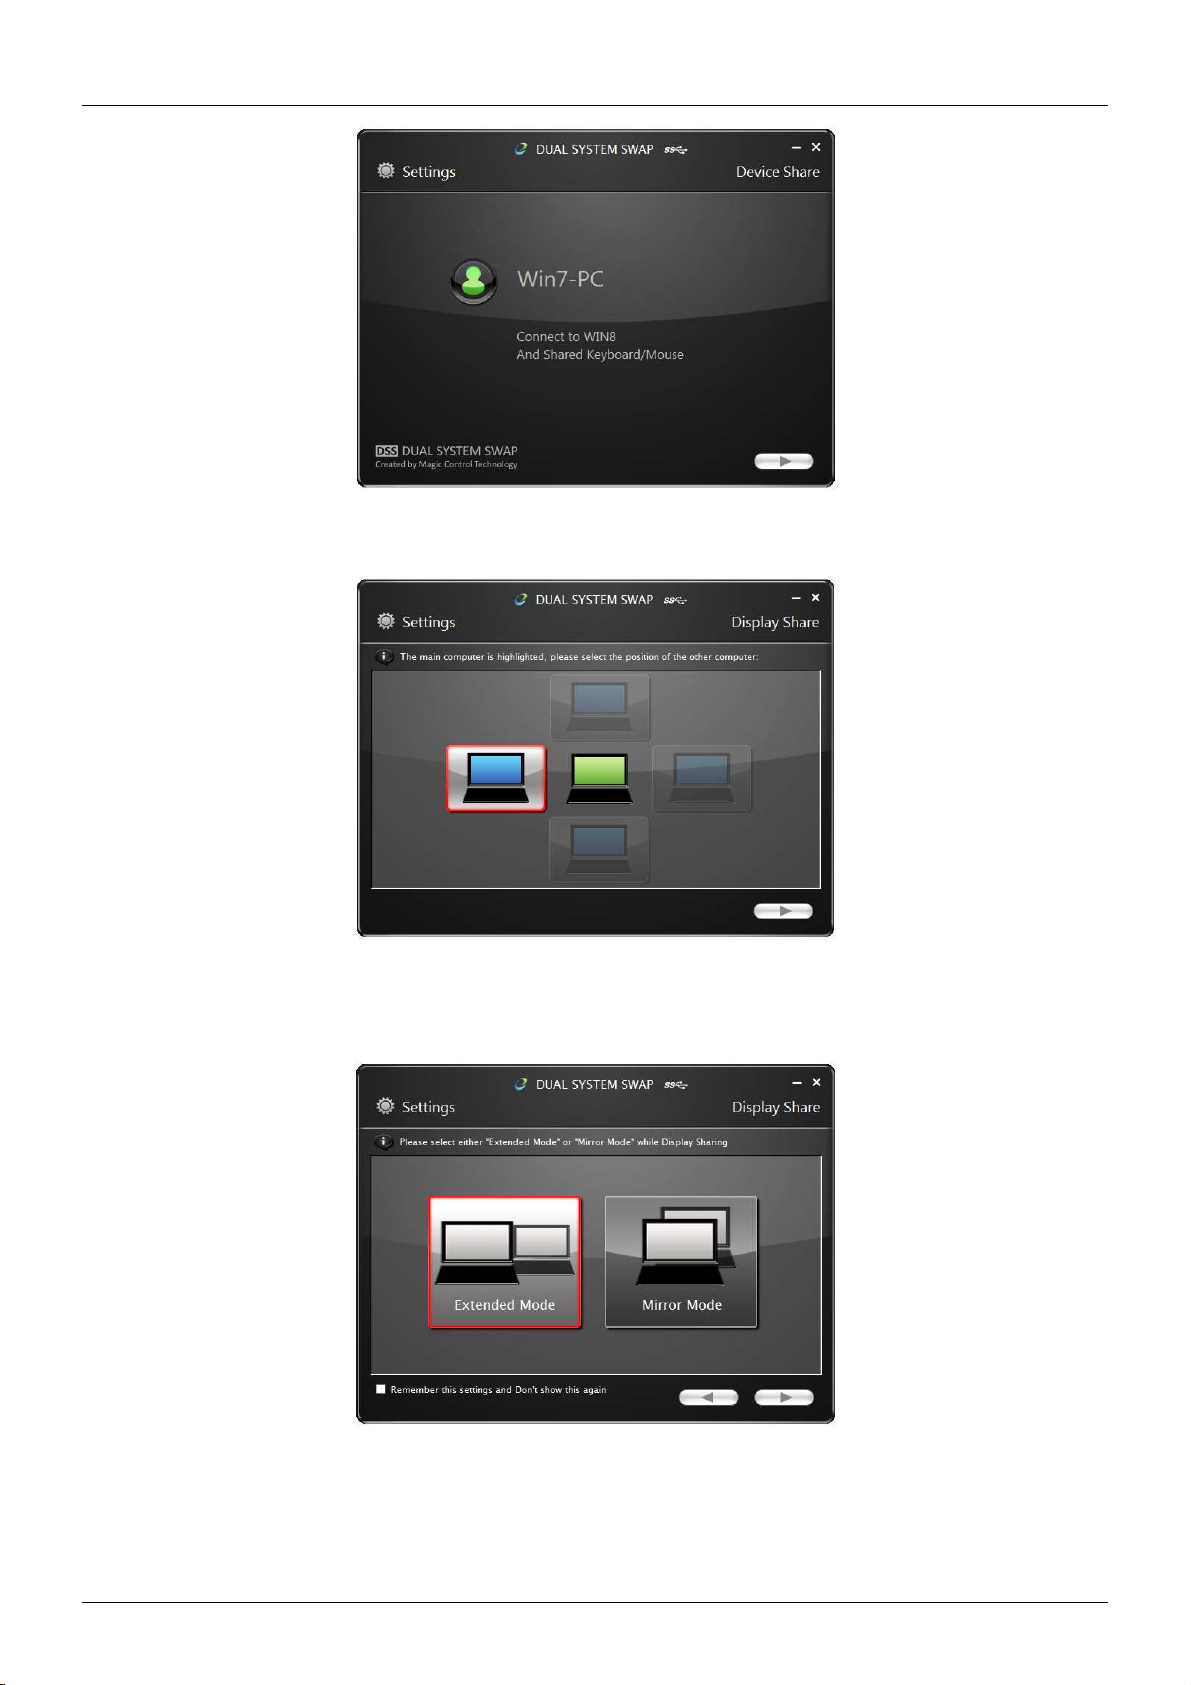
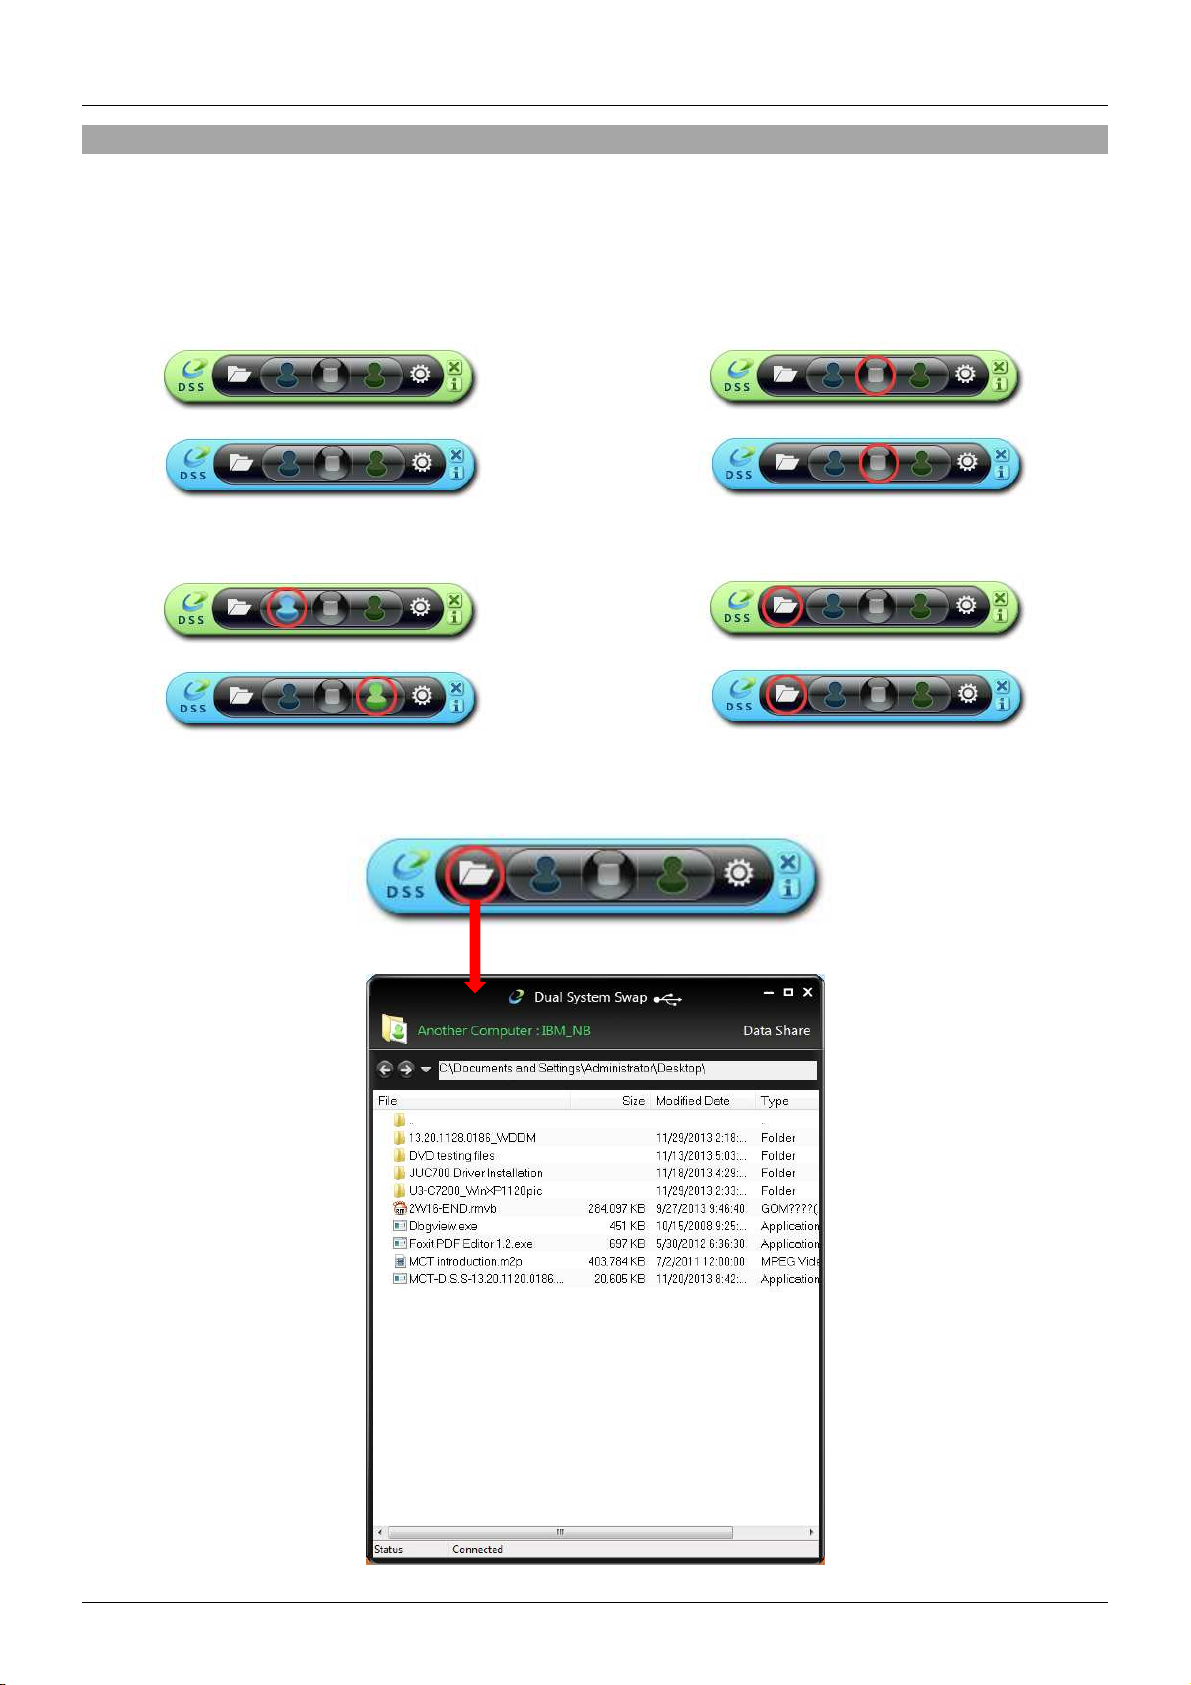
Share Keyboards, Mice and Monitors between computers
Turn a Notebook / Desktop / Tablet PC into a 2nd display via Mirror & Extended display modes
Share Video Card & Hard Disk resources between two Windows computers
Easily transfer data, photos, music, and video between two computers
Conforms to SuperSpeed USB 3.0 (5Gbps) transfer rate
Support touch screen (Windows 8 or above)
Specification
Max Resolution 2048 x 1152 / 32bit
USB 3.0 Type-A Male connectors
USB 3.0 cable length 1.4m
Bus Powered
Operating Temperature: 0~50°C
Storage Temperature: -10~75°C
Humidity: <85% non-condensing
System Requirements
Available USB 2.0 / USB 3.0 port (USB 3.0 port is recommended)
CPU: Dual Core 2.0GHz or higher
RAM: 2GB memory or higher
Windows 8.1 / 8 / 7 / XP (32bit or 64bit)

User Manual English
Installation
!!! IMPORTANT!!!
DO NOT connect the LINDY USB 3.0 KVM & Data Transfer Cable to either computer until after
installing the included software and restarting both machines.
Installing the device driver from the Software Disc allows your computers to recognize the
LINDY USB 3.0 KVM & Data Transfer Cable. Please check your OS and refer to the appropriate
installation procedure below to begin installing the device drivers.
Windows 8.1 / 8 / 7 / XP
This section describes the driver installation procedure for a computer running Windows 7 OS.
Please ensure the USB 3.0 KVM & Data Transfer Cable is unplugged from your PC or Notebook before
continuing with the setup procedure.
•Insert the Software CD; the setup program should launch automatically, if it doesn’t launch, open
the Disc Drive folder via Windows Explorer and double click the Setup Application Icon.
•When the Windows User Account Control appears, click “Yes” to allow the program to install and
follow the Installation Wizard, click “Next” to continue.
•Once the installation is complete, close the Installer and Restart your computer.
•Repeat the driver installation on the second computer that you are going to use.
Note: You may notice your computer screens flashing or turning on & off during the installation; this is
normal and part of the installation process.
After finishing the driver installation on both computers and restarting, connect the USB 3.0 KVM & Data
Transfer Cable.
Windows 8.1 / 8 / 7
The device driver will be configured automatically. A Pop Up will appear on both computers. When this
completes the USB 3.0 KVM & Data Transfer Cable is ready to be used.
Windows XP
The Hardware Installation Wizard dialogue will show, select “No, not this time” and click “Next” to
continue.

User Manual English
Click “Continue Anyway” when the Microsoft Software warning dialogue box appears, then, click “Finish”
to complete the Hardware Wizard. A Pop Up will appear on both computers. When this completes the
LINDY USB 3.0 KVM & Data Transfer Cable is ready for use.
Uninstalling the Drivers
To uninstall the drivers, go to the Windows Control Panel and use the ‘Uninstall a Program’ feature.
•Locate the “MCT Dual System Swap (D.S.S.) 13.xx. Xxxx. 0186” (driver version may vary).
•Click the “Uninstall” button.
•Unplug the USB 3.0 KVM & Data Transfer Cable and click “OK” to continue.
•Select “Yes, I want to restart my computer now” and click “Finish” to reboot. After rebooting, you
will have completed the driver un-installation.
Connection Setup
The connectors of the USB 3.0 KVM & Data Transfer Cable are two different colours: Blue & Green.
These correspond to the colour of the User Interface (UI) icon that appear in your computer's toolbar and
help you identify the connected computer as you configure your system.
The following Settings are available and can be accessed on both Blue & Green computers. When you
first attach the cable the following dialogue will appear. The colour of the avatar icon will correspond to
end of the cable you have attached, Blue or Green.

User Manual English
Selecting the next icon on the first dialogue screen will open the ‘Display Share’ dialogue.
Here you can set the position of the second computer display; Left, Right, Above or Below. Selecting the
next icon will open the next ‘Display Share’ dialogue.
Here you can select the display mode (Extended or Mirror Mode)
Extended Mode - This feature allows you to use the connected computer's screen as an extended
display.

User Manual English
Mirror Mode - This feature allows the same contents to be displayed (mirrored) on both displays.
The screen resolution setting on the attached computer will follow the lead computer’s screen resolution.
For example, if this is 1024x768 at 32bit, then the mirrored computer will retain the same resolution.
Use your computers ‘Display Setting’s to change the resolution of the two screens as desired. The
Maximum Resolution the Cable supports is 2048 x 1152 / 32bit
Touch Screen Control (for Windows 8 or above)
If the computer has a touch screen, you can use that to directly control the computer being Mirrored or
Extended via the touch screen. This also applies to Tablets.
Save your settings by selecting the tick box in the bottom left of the screen. This will ensure you skip this
process the next time you connect the cable.
Selecting the next icon will open a final Information dialogue. You can choose not to see this Information
dialogue again by selecting the tick box in the bottom left of the screen.
Note – if you disconnect the cable at any time you should reconnect the appropriate Blue or Green end
to the computer it was attached to during setup. Swapping ends initialises a second install of the device
drivers and can cause malfunctions in the cables operation.

User Manual English
Operation
After finishing the Connection Setup, a new icon will appear in the System Tray of both machines.
Selecting this launches the Control Bar, which appears at the bottom right corner of both screens.
With the Control Bar you can control Display & Data Sharing Settings between the two computers.
Default Control Bar
Display Share - Select the Blue / Green icon to
view and control that computer.
Stop sharing displays – Select the Stop Icon.
Data Sharing - View and transfer data between
computers via GUI.
Clicking the “Folder” icon opens a file transfer GUI (Graphical User Interface) allowing you to transfer
files from one computer to the other.

User Manual English
The GUI supports File/Folder and Data transfer through the generic Drag & Drop or Copy & Paste
actions from the opposite computer at 5Gbps. Clipboard Sharing allows selected texts from the first
computer to be simply and easily pasted on the second, and vice versa.
Close Control Bar – Select the ‘X’ in the top right
corner of the Control Bar.
Reset Positions & Display Mode – Reset screen
positions and re-run the ‘Display Share’
dialogue.
Restart Control Bar - Double click the Control Bar icon on the task bar to restart the Control Bar.
Keyboard & Mouse Sharing - Move your Mouse cursor between the two computers to switch the
Keyboard usage to the other computer. I.e. Use the Keyboard of the first computer to type on the second
computer.

User Manual English
Troubleshooting
Known Issues
•Direct 3D is not supported under XP/Vista
•Some display utility and drivers that shipped with certain AGP and built-in display adapters may
prevent you setting the 2nd display as the main screen when display sharing
General Recommendation if you have a problem
•Check your USB port it active the device is plugged in correctly to the host system
•Unplug the USB 3.0 KVM & Data Transfer Cable and re-insert it
•Check to see that the monitor is correctly connected to your computer and it is powered ON
•Ensure to restart your computer after the driver installation
•Unplug all other USB devices from the system
•Try connecting the USB 3.0 KVM & Data Transfer Cable directly to the computer instead of
through a hub
Media Playback
•Ensure that the USB port you are using is a USB 3.0 port.
•During video playback on all platforms, do not change the display mode, position or arrangement
of video player window (such as dragging the video player window between main display and
attached display). This usually causes the video player to lag and the video may stop playing. We
suggest stopping the video playback, moving the window to the attached display and then playing
the video.
•You may experience poor video performance on some low-spec PC system.
•Some DVD playback software packages do not support playing on a second display adapter of
any kind. You may try to open the media player in the secondary display first before playing the
DVD.
•Your PC may be a lack of the correct codec to support playback of certain video format.
•Video/Media players have different decoding capability under different display modes. For better
performance it is recommended you use Windows Media Player 10 or above.

Benutzerhandbuch Deutsch
Einführung
Vielen Dank für den Kauf des LINDY USB 3.0 Datentransfer- & KVM-Kabels. Dieses Kabel ermöglicht es
Ihnen, mit einem Monitor, einer Tastatur und einer Maus an zwei Windows® Computern zu arbeiten und
Daten via USB 3.0 auszutauschen. Die anwenderfreundliche, grafische Benutzeroberfläche erlaubt per
Drag-and-Drop oder Copy-and-Paste ein schnelles Verschieben/Kopieren von Bildern, Musik, Videos
oder anderen Dateien zwischen den Computern mit Geschwindigkeiten bis zu 5 Gbit/s. Dabei wird
einfach der Mauscursor von einem Bildschirm zum anderen bewegt.
Durch die Touchscreen-Unterstützung können auch Tablets, Bildschirme oder Monitore mit Touch-
Funktion zum Umschalten zwischen kompatiblen Computern verwendet werden. Hierbei bleibt die
Funktion der gemeinsamen Ressourcennutzung und Zwischenablage erhalten.
Beachten Sie bitte, dass die Performance bei Gebrauch eines USB 2.0 Ports eingeschränkt ist.
Lieferumfang
USB 3.0 Datentransfer- und KVM-Kabel
Software CD
LINDY Handbuch
Eigenschaften
Mit einer Maus, Tastatur und einem Monitor an 2 Computern arbeiten
Macht aus einem Notebook, Desktop oder Tablet ein zweites Display über gespiegeltem oder
erweitertem Displaymodus
Zwei Computer teilen sich eine Grafikkarte und Festplatte
Einfacher Austausch von Daten, Bildern, Musik und Videos zwischen zwei Computern
USB 3.0 SuperSpeed Standard mit Datentransferraten bis zu 5Gbit/s
Touchscreen-Unterstützung (ab Windows 8)
Spezifikationen
Maximale Auflösung: 2048 x 1152 / 32Bit
USB 3.0 Typ A Stecker
USB 3.0 Kabel, ca. 1,4m
Bus Powered – keine externe Stromversorgung erforderlich
Betriebstemperatur: 0~50 °C
Lagertemperatur: -10~75 °C
Luftfeuchtigkeit: <85% nicht-kondensierend
Systemanforderungen:
USB 2.0 / USB 3.0 Port (USB 3.0 empfohlen)
CPU: Dual Core 2.0GHz oder höher
RAM: 2GB oder mehr
Windows 8.1 / 8 / 7 / XP (32Bit oder 64Bit)

Benutzerhandbuch Deutsch
Installation
! ACHTUNG !
Verbinden Sie das LINDY USB 3.0 Datentransfer- & KVM-Kabel erst mit einem
Computer, nachdem Sie die beiliegende Software installiert haben und beide
Computer neu gestartet wurden.
Durch die Installation der Gerätetreiber von der Software-CD können die Computer das
LINDY USB 3.0 Datentransfer- & KVM-Kabel erkennen. Unten finden Sie das korrekte
Installationsprozedere für Ihr Betriebssystem.
Windows 7
Vergewissern Sie sich, dass das LINDY USB 3.0 Datentransfer- & KVM-Kabel nicht an einem Computer
angeschlossen ist.
•Legen Sie die Software-CD ein, das Setup-Programm sollte dann automatisch starten. Sollte das
nicht der Fall sein, dann öffnen Sie den Ordner des CD-Laufwerks über den Windows Explorer
und starten Sie das Installation mit einem Doppelklick das Setup Icon.
•Wenn die Windows Benutzerkontensteuerung erscheint, klicken Sie auf “Ja” um die Installation
des Programms zu erlauben. Dann folgen Sie dem Installationsassistenten und klicken auf
“Weiter”.
•Nach erfolgter Installation schließen Sie den Assistenten und starten den Computer neu.
•Wiederholen Sie den Installationsvorgang dann auf Ihrem zweiten Computer.
Es ist möglich, dass der Bildschirm bei der Installation kurz an- und wieder ausgeht; das ist normal und
Teil des Installationsprozesses.
Nach erfolgter Treiberinstallation und einem Neustart beider Computer schließen Sie bitte das USB 3.0
Datentransfer- & KVM-Kabel an.
Windows 8.1 / 8
Der Gerätetreiber wird automatisch installiert; ein Popup-Fenster erscheint auf beiden Computern. Wenn
dieses schließt, können Sie das USB 3.0 Datentransfer- & KVM-Kabel verwenden.

Benutzerhandbuch Deutsch
Windows XP
Wenn der Hardwareassistent erscheint und eine Auswahl anbietet, klicken Sie auf “Nein, diesmal nicht”
und “Weiter”.
Klicken Sie auf “Installation fortsetzen” wenn die Microsoft Softwarewarnung erscheint und danach auf
“Fertigstellen” zum Beenden des Hardwareassistenten. Dann erscheint ein Popup-Fenster auf beiden
Computern. Wenn dieses schließt, kann das LINDY USB 3.0 Datentransfer- & KVM-Kabel verwendet
werden.
Deinstallation der Treiber
Die Deinstallation der Treiber erfolgt in der Windows Systemsteuerung.
•Suchen Sie zunächst den Treiber “MCT Dual System Swap (D.S.S.) 13.xx. Xxxx. 0186” (die
Treiberversion kann variieren).
•Klicken Sie dann auf “Deinstallieren”.
•Entfernen Sie das USB 3.0 Datentransfer- & KVM-Kabel vom Computer und klicken “OK” um
fortzufahren.
•Wählen Sie dann “Ja, ich möchte meinen Computer jetzt neu starten” und dann “Fertigstellen”,
um neu zu starten. Nach dem Neustart ist der Treiber deinstalliert.
Verbindungsaufbau
Die Anschlüsse des USB 3.0 Datentransfer- & KVM-Kabels haben zwei verschiedene Farben: blau und
grün.
Diese korrespondieren mit der Farbe des Icons, das in der Symbolleiste erscheint und erleichtert die
Identifikation des angeschlossenen Computers bei der Konfiguration.
Es sind mehrere Einstellungen möglich, die im Folgenden aufgeführt werden. Sie sind auf beiden
Computern möglich, jeweils mit blau oder grün gekennzeichnet.
Beim ersten Anschluss des Kabels erscheint untenstehender Dialog.

Benutzerhandbuch Deutsch
Wenn Sie das folgende Icon im ersten Dialog auswählen wird der Dialog „Display Share“ geöffnet.
Hier können Sie die Position des zweiten Computerdisplays einstellen: links, rechts, oben oder unten.
Wenn sie das nächste Icon auswählen öffnet sich das nächste „Display Share“ Dialogfenster.
Hier können Sie den Displaymodus auswählen (erweitert oder gespiegelt).
Erweiterter Modus: Erlaubt die Nutzung des angeschlossenen Bildschirms als erweitertes Display.

Benutzerhandbuch Deutsch
Gespiegelter Modus: Erlaubt es, dieselben Inhalte auf beiden Displays anzuzeigen (Spiegelung).
Die Bildschirmauflösung auf dem gespiegelten Display wird vom ersten Computer übernommen. Sind es
z.B. 1024x768 bei 32Bit, so wird diese Einstellung beim gespiegelten Display beibehalten.
In den Anzeigeeinstellungen können Sie die Auflösung beider Bildschirme nach Belieben ändern. Die
maximal unterstützte Auflösung beträgt 2048 x 1152 / 32Bit.
Touchscreen-Steuerung (ab Windows 8)
Wenn der Computer über einen Touchscreen verfügt, können Sie diesen zur direkten Steuerung des
erweiterten oder gespiegelten Modus verwenden. Dies ist auch mit Tablets möglich.
Sichern Sie Ihre Einstellungen, indem Sie das Kästchen links unten auf am Fenster auswählen. Wenn
Sie das Kabel das nächste Mal anschließen wird dieser Vorgang dann übersprungen.
Wenn Sie das nächste Icon auswählen, öffnet sich ein Dialog “Information”. Sie können die Anzeige
dieses Dialogs für die Zukunft unterbinden, indem Sie wieder das Kästchen links unten anklicken.
Beachten Sie bitte, dass Sie immer, wenn Sie das Kabel entfernen, bei erneutem Anschluss wieder das
richtige grüne oder blaue Ende am Computer anschließen (wie bei der Inbetriebnahme). Wenn Sie die
Enden vertauschen, wird eine zweite Installation der Treiber durchgeführt, was zu Fehlfunktionen führen
kann.

Benutzerhandbuch Deutsch
Betrieb
Nach dem Verbindungsaufbau sehen Sie ein neues Icon in der Taskleiste beider Computer. Wenn Sie
darauf klicken, erscheint die Steuerungsleiste rechts unten auf beiden Bildschirmen. Mit dieser können
Sie die Einstellungen des Displays und des Datenaustauschs beider Computer steuern.
Steuerungsleiste – Standardeinstellung: Auswahl des Icons „Stop“ um die Nutzung zweier
Bildschirme zu beenden:
Teilen des Displays: Wählen Sie das grüne Datenaustausch über grafische Benutzeroberfläche:
bzw. blaue Icon, um den entsprechenden
Computer zu sehen bzw. zu steuern:
Wenn Sie auf das “Ordner”-Icon klicken, öffnet eine grafische Benutzeroberfläche zum Datenaustausch,
womit Sie nun Daten von einem zum anderen Computer übertragen können.

Benutzerhandbuch Deutsch
Die grafische Benutzeroberfläche unterstützt den Austausch von Dateien/Ordnern und Daten von einem
zum anderen Computer durch Drag-and-Drop oder Copy & Paste mit Geschwindigkeiten bis zu 5Gbit/s.
Die gemeinsame Nutzung der Zwischenablage erlaubt es, ausgewählte Texte von einem zum anderen
Computer zu kopieren.
Schließen der Steuerungsleiste durch Klicken auf das “X“ in der Steuerungsleiste rechts oben
Zurücksetzen von Bildschirmdarstellung & Displaymodus:
Durch einen Doppelklick auf das Icon der Steuerungsleiste in der Taskleiste führen Sie einen Neustart
der Steuerungsleiste durch
Gemeinsame Nutzung von Tastatur & Maus:
Bewegen Sie den Mauszeiger zwischen den zwei Computern hin und her, um die Tastaturnutzung
zwischen den Computern zu steuern und die Tastatur des ersten Computers auf dem zweiten Computer
zu verwenden.

Benutzerhandbuch Deutsch
Fehlersuche
Bekannte Probleme
•Unter Windows XP/Vista wird “Direct 3D” nicht unterstützt
•Grafikkartentreiber und Dienstprogramme einzelner AGPs und eingebauter Displayadapter
können die Einrichtung eines zweiten Displays als Hauptbildschirm verhindern
Allgemeine Empfehlungen bei Problemen
•Prüfen Sie, ob Ihr USB Port aktiv ist und ob das USB 3.0 Datentransfer- & KVM-Kabel korrekt an
den USB Host angeschlossen ist
•Entfernen Sie das USB 3.0 Datentransfer- & KVM-Kabel vom Computer und schließen Sie es
erneut an
•Prüfen Sie ob Ihr Monitor korrekt am Computer angeschlossen und eingeschaltet ist
•Führen Sie nach der Treiberinstallation einen Neustart durch
•Entfernen Sie alle anderen USB-Geräte von Ihrem System
•Schließen Sie das USB 3.0 Datentransfer- & KVM-Kabel direkt an den Computer an (nicht an
einen Hub)
Medienwiedergabe
•Vergewissern Sie sich, dass Sie einen USB 3.0 Anschluss benutzen.
•Während der Videowiedergabe auf beiden Displays sollten Sie weder den Displaymodus noch
die Position oder Einstellung des Videoplayers ändern (z.B. das Videoplayer-Fenster von einem
zum anderen Bildschirm ziehen). Dies führt nämlich oft dazu, dass der Videoplayer langsamer
wird oder gar stoppt. Wir empfehlen in diesem Fall die Videowiedergabe anzuhalten, das Fenster
zum angeschlossenen Bildschirm zu ziehen und dann das Video zu spielen.
•Ein PC mit geringer Leistung kann die Ursache für schlechte Videowiedergabe sein.
•Es gibt DVD-Wiedergabesoftware, die das Abspielen auf einem zweiten Monitor generell nicht
unterstützt. Versuchen Sie zuerst den Mediaplayer auf einem zweiten Bildschirm zu öffnen bevor
Sie die DVD abspielen.
•Ihr PC verfügt möglicherweise nicht über den korrekten Codec zum Abspielen von Videos in
einem bestimmten Format.
•Video/Mediaplayer haben in verschiedenen Displaymodi unterschiedliche
Dekodierungsfunktionen. Um eine gute Performance zu gewährleisten, sollten Sie den Windows
Media Player 10 (oder höher) verwenden.

Manuel Utilisateur Français
Introduction
Merci d’avoir choisi le câble KVM & Data Transfer USB 3.0 LINDY. Ce câble vous donne la possibilité de
partager la vidéo, claviers & souris et de transférer des fichiers entre deux ordinateurs Windows®, via
USB 3.0. Utilise les fonctionnalités Glisser & Déposer ou Copier & Coller via une interface utilisateur
GUI simple d’utilisation, pour rapidement transférer images, musique, vidéo et autres fichiers entre
ordinateurs à une vitesse de transfert allant jusqu’à 5 Gbit/s. Contrôlez un ordinateur à partir d’un autre
en déplaçant simplement le curseur d’un écran à l’autre.
La prise en charge des écrans tactiles permet l’utilisation de tablettes, écrans ou moniteurs tactiles pour
commuter entre les ordinateurs compatibles comme si vous utilisiez une souris, tout en maintenant les
fonctions presse papier et caractéristiques du câble.
Remarque – le câble a des performances limitées lorsqu’il est utilisé sur des ports hôtes USB 2.0.
Continue
Câble KVM & Data Transfer USB 3.0
CD de logiciels
Manuel LINDY
Caractéristiques
Partage claviers, souris et moniteurs entre ordinateurs
Transforme un Notebook / Ordinateur de bureau / Tablette PC en un second affichage via modes
d’affichages clone & étendu
Partage les ressources vidéo & disque dur entre deux ordinateurs sous Windows
Transfert facile de données, photos, musique et vidéo entre deux ordinateurs
Conforme aux taux de transfert USB 3.0 SuperSpeed (5Gbit/s)
Prise en charge des écrans tactiles (Windows 8 ou supérieur)
Spécification
Résolution maximale 2048 x 1152 / 32bit
Connectiques USB 3.0 Type A male
Câble USB 3.0 longueur 1.4m
Alimenté par le Bus USB
Températures de fonctionnement: 0~50°C
Températures de stockage: -10~75°C
Humidité relative: <85% non condensée
Configuration requise
Port USB 2.0 / USB 3.0 disponible (port USB 3.0 recommandé)
CPU: Dual Core 2.0GHz ou supérieur
RAM: 2Go ou plus de mémoire
Windows 8.1 / 8 / 7 / XP (32bit or 64bit)

Manuel Utilisateur Français
Installation
!!! IMPORTANT!!!
NE PAS connecter le câble KVM & Data Transfer USB 3.0 LINDY à l’un des ordinateurs avant
d’avoir installé le logiciel fourni et redémarrer les deux machines.
L’installation du pilote à partir du CD-ROM fourni permet aux ordinateurs de reconnaître le câble
KVM & Data Transfer USB 3.0 LINDY. Merci de vérifier votre version d’OS et de vous référez à la
procédure d’installation appropriée ci-dessous pour démarrer l’installation des pilotes.
Windows 8.1 / 8 / 7 / XP
Cette section décrit la procédure d’installation de pilotes pour un ordinateur fonctionnant sous Windows
7.
Merci de vous assurer que le câble KVM & Data Transfer USB 3.0 LINDY n’est pas connecté à votre PC
ou Notebook avant de continuer la procédure d’installation.
•Insérez le CD-ROM de logiciels; le programme d’installation devrait se lancer automatiquement,
dans le cas contraire, ouvrez le dossier du lecteur de disque via l’explorateur Windows et double-
cliquez sur l’icône de Setup.
•Lorsque la fenêtre de contrôle d’utilisateur Windows apparait, cliquez sur “Yes” pour permettre au
programme de s’installer et de continuer l’assistant d’installation, cliquez sur “Next” pour
continuer.
•Une fois l’installation finalisée, fermez le programme et redémarrer votre ordinateur.
•Répétez l’installation des pilotes sur le second ordinateur que vous allez utiliser.
Remarque: vous remarquerez peut-être que vos écrans d’ordinateurs pourront clignoter ou
s’allumer/s’éteindre durant l’installation; ceci est normal et fait partie du processus d’installation.
Après avoir finalisé l’installation des pilotes sur les deux ordinateurs et les avoir redémarrés, vous
pourrez connecter le câble KVM & Data Transfer USB 3.0.
Windows 8.1 / 8 / 7
Le pilote de périphérique se configurera automatiquement. Une fenêtre Pop-Up apparaitra sur les deux
ordinateurs. Une fois cette étape terminée le câble KVM & Data Transfer USB 3.0 est prêt à être utilisé.
Table of contents
Languages:
Other Lindy Cables And Connectors manuals
Popular Cables And Connectors manuals by other brands

Voltech
Voltech 250-030 installation guide

Wieland
Wieland gesis RST20i2 Mounting instructions

SIIG
SIIG CE-H22K12-S1 user manual

Glenair
Glenair IRT Series Wiring instructions

Madison Electric Products
Madison Electric Products WireSmart MH8120 instruction manual

Metra Electronics
Metra Electronics CS-1X4HDMSPL user manual

Philips
Philips SWA2520 Specifications

Digi
Digi 76000774 user guide

Heico
Heico Quell EESeal quick start guide

Philips
Philips Sonicare 300 SerieS Information

Lattice Semiconductor
Lattice Semiconductor HW-USBN-2B user guide

PCE Health and Fitness
PCE Health and Fitness TOPTAURUS2 057 Series Assembly instructions