Lindy 32818 User manual

© LINDY ELECTRONICS LIMITED & LINDY-ELEKTRONIK GMBH - FIRST EDITION (DECEMBER 2009)
For Home and Office Use
Tested to Comply with
FCC Standards
KVM Switch Micro – USB & VGA
User Manual English
Benutzerhandbuch Deutsch
Manuel d’utilisateur Français
Manuale d’uso Italiano
LINDY No. 32818
www.LINDY.com
User Manual English
- 2 -
Introduction
Thank you for purchasing the LINDY KVM Switch Micro. Please read this short
manual to fully understand the functions and features supported. The switch
allows two computers to be connected and controlled from a single keyboard,
monitor and mouse. In addition the switch also supports USB 1.1 hubs and
allows you to share and switch additional USB devices. Always use a USB hub
with an external supply. Computer selection may be made either by the remote
push button switch, keyboard hotkey, task bar/dock icon (Windows & Mac) or
software application (Windows). This USB KVM Switch registers in the system
as a USB device and supports OSD functions for displaying and switching the
active port/computer. The software from the CD must be installed to support
channel display and icon and software switching.
Package contents
LINDY KVM Switch Micro
Remote control push button switch
This manual and a CD containing the drivers and software
Installation
•Please install the appropriate software from the CD before connecting the
KVM switch to a Windows or Mac computer for the first time.
•Attach the two KVM Switch modules to
your computers VGA ports. Connect the
short USB cable to an available port as
shown in the diagram.
•Connect your keyboard, mouse, monitor
and the remote control push button to
the USB and VGA ports on the KVM
switch modules.
•Switch on the first computer and allow it
to boot up completely, do not switch
away from this port until the drivers have
been completely installed and the LED
on the remote control push button has
stopped flashing.
•Switch on the second PC and follow the
same procedure as above.

User Manual English
- 3 -
Driver & Software Installation
Insert the supplied CD into your CD drive and start the Setup program on a
Windows computer or open UKB KVM.pkg on a Mac. Follow the USB KVM
Setup installation step by step.
When finished a grey, red or green ball icon will appear in the task bar
(Windows) or dock (Mac) and display the selected port (green=port 1 or
red=port 2). A grey icon indicates that the KVM Switch is not connected.
Windows computers will also display a desktop icon for port switching.
WINDOWS
Desktop Icon: Task bar icons: red/green
Mac
Dock Icon:
red or green
KVM operation
Four different methods are available for switching between computers:
Via “Port”-button on the remote control push button
When PC1 is selected the LED illuminates green.
When PC2 is selected the LED illuminates orange.
Via keyboard hotkeys
+
Via Task Bar / System Tray Icon: Right click the red or green icon and
switch the channels. If the Task Bar /System Tray icon is grey no KVM
Switch is connected to the computer and console.
Via the Desktop Icon (only available on Windows computers)
Troubleshooting:
If the keyboard or mouse does not work correctly then check the cables and
connections. Ensure you have installed the drivers correctly and confirm that
USB Legacy support is enabled in your computer’s BIOS. Disconnect and
reconnect the USB cables to different ports on your computer. Finally power
down your computers and restart to see if this corrects the problem.
Should you still encounter any problems please contact your dealer or LINDY
technical support at www.lindy.com
Scroll
Lock
Scroll
Lock
(Pressing the Scroll Lock hotkey twice
within a second switches the ports)
Benutzerhandbuch Deutsch
- 4 -
EINFÜHRUNG
Wir gratulieren Ihnen zum Erwerb dieses LINDY KVM Switches und wünschen
Ihnen allzeit angenehmes Arbeiten mit diesem Umschalter. Bitte lesen Sie
diese kurze Anleitung um alle Möglichkeiten kennen zu lernen.
Der KVM Switch erlaubt zwei Rechner von nur einer Tastatur/Maus/Monitor-
Kombination aus zu steuern. Er unterstützt ebenfalls USB Hubs (mit Netzteil)
zum Umschalten / wechselweisen Nutzen weiterer USB Geräte mit USB 1.1
Geschwindigkeit. Das Umschalten kann auf verschiedene Arten erfolgen:
Taste am Remote Switch, Tastatur-Hotkey, Dock- (Mac) / Taskleisten- und
Desktop (Windows) Icon. Dieser USB KVM Switch registriert sich am Rechner
als USB Device. Zum Umschalten per Applikation unter Windows ab XP und
Mac OS ab 10.3 installieren Sie bitte die Software von der beiliegenden CD.
LIEFERUMFANG
Die beiden per Kabel verbundenen KVM Switch Micro Einheiten
Remote Switch mit Kabel
Dies Handbuch und eine CD mit Treibern & Software
INBETRIEBNAHME
•Sie müssen die Computer zur Installation nicht ausschalten, USB unter-
stützt die Hot Plug Funktion. Installieren Sie auf Windows und Mac Syste-
men die Software von der beiliegenden CD vor Anschluss des KVM Switch.
•Schließen Sie die beiden KVM Switch
Einheiten an die VGA Ausgänge Ihrerer
Grafikkarten an und die USB Kabelenden
an USB Buchsen an.
•Schließen Sie ihre Tastatur, Maus, Monitor
und den Remote Switch an die
entsprechenden Ports der KVM Switch
Einheiten an.
•Schalten Sie PC 1 ein und warten Sie bis er
vollständig hochgefahren ist, schalten Sie
nicht zu früh um und warten Sie bis die
LED am Remote Switch nicht mehr blinkt
und die USB Treiber komplett geladen sind.
•Schalten Sie PC2 auf die gleiche Weise
ein.

Benutzerhandbuch Deutsch
- 5 -
Treiber- & Software-Installation
Legen Sie die CD in Ihr Laufwerk und starten Sie das Setup Programm unter
Windows bzw. Öffnen Sie UKB KVM.pkg auf Ihrem Mac. Folgen Sie den
Installationsanweisungen Schritt für Schritt.
Nach Abschluss der Installation erscheint auf Windows Rechnern ein Desktop-
und ein Taskleisten-Icon, auf Macs ein Icon im Dock. Es zeigt den gerade
ausgewählten Port/Computer an: Grün = Port 1, Rot = Port2, Grau = KVM
Switch nicht angeschlossen)
WINDOWS
Desktop Icon: Taskleisten-Icon: Rot/Grün
Mac
Dock Icon:
Rot oder Grün
Betrieb
Sie können zwischen 4 Arten des Umschaltens wählen:
Per “Port”-Taste am Remote Switch
Die LED leuchtet grün bei Wahl des PC1
Die LED leuchtet orange bei Wahl des PC2
Per Tastatur-Hotkey
+
Per “Taskleisten-/Dock-Icon”:-Ein Rechts- oder Linksklick auf das rote
oder grüne Icon schaltet die Ports um
Per Desktop-Icon (Nur auf Windows Rechnern verfügbar)
Störungsbehebung:
Wenn Tastatur und/oder Maus nicht erkannt werden oder nicht funktionieren
prüfen Sie zuerst bitte alle Kabelverbindungen, ob Sie die Software von der
CD installiert haben und ob der USB Legacy Support in Ihrem BIOS
eingeschaltet ist. Ziehen Sie die USB Kabel ab und schließen Sie sie an
andere USB-Ports wieder an. Booten Sie Ihren Rechner zum Abschluss neu.
Sollten die Probleme weiter auftreten so wenden Sie sich bitte vertrauensvoll
an Ihren Händler oder an unseren Support. Sie finden alle Kontaktdaten
weltweit auf unserer Website. Vielen Dank! Ihr LINDY-Team
Rollen
Rollen
Zweimaliges Drücken der Rollen-Taste
innerhalb einer Sekunde schaltet um
Manuel Utilisateur Français
- 6 -
Introduction
Merci d’avoir choisi le switch KVM LINDY. Merci de lire ce manuel pour bien
comprendre toutes les fonctions offertes par ce switch.
Le switch KVM permet de contrôler 2 ordinateurs depuis un seul
clavier/écran/souris. Il supporte également les hubs USB (avec alimentation)
pour pouvoir contrôler davantage de périphériques USB en USB 1.1. La
commutation se fait de différentes manières: touche sur le switch, séquence
clavier hotkey, icône dans la barre des tâches (Mac et Windows). Ce switch
KVM USB est reconnu comme périphérique USB par l’ordinateur. Pour la
commutation par le logiciel sous Windows dès XP et Mac OS dès 10.3, merci
d’installer le logiciel du CD fourni.
Contenu du package
2 switchs KVM micro, connectés ensemble par un câble
Télécommande filaire du switch KVM
Ce manuel
Installation
•Vous n’avez pas à éteindre les ordinateurs car l’USB supporte la fonction
“hot plug” (connexion/déconnexion “à chaud”). Avant de connecter le switch
KVM à un ordinateur sous Windows ou Mac, merci d’installer le logiciel
depuis le CD.
•Connectez les 2 switchs KVM à la sortie
des 2 cartes graphiques VGA et le câble
USB sur les PCs, comme illustré ci-
contre.
•Connectez votre clavier, souris, écran et
la télécommande filaire sur le switch.
Commutez sur le 1er ordinateur et autorisez
le à redémarrer complètement, ne
commutez pas tant que les pilotes n’ont pas
été complètement installés et que la LED
de la télécommande cesse de clignoter
•Commutez sur le second PC et attendez
l’installation des pilotes.

Manuel Utilisateur Français
- 7 -
Installation des pilotes & du logiciel
Insérez le CD fourni dans le lecteur CD et démarrez le programme Setup depuis un
PC sous Windows et ouvrez UKB KVM.pkg sur un Mac. Suivez la procédure
d’installation USB KVM Setup, pas à pas.
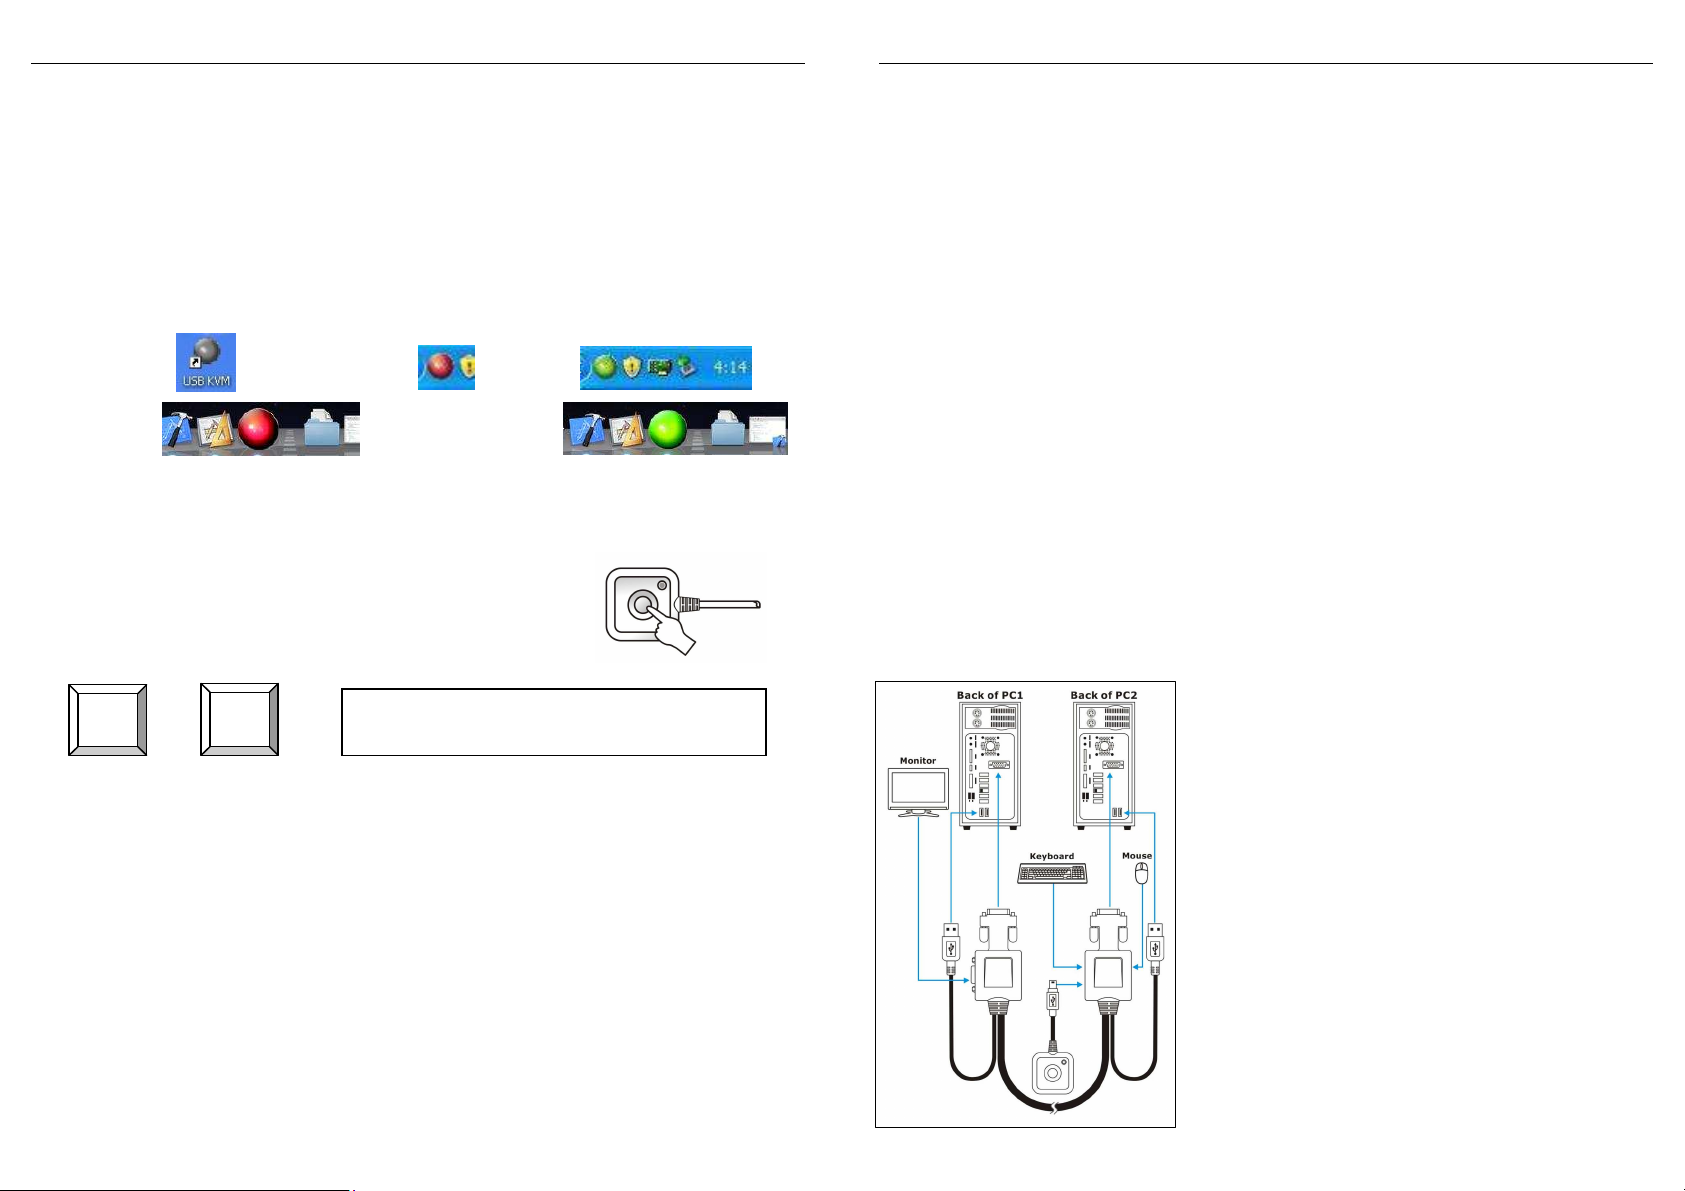
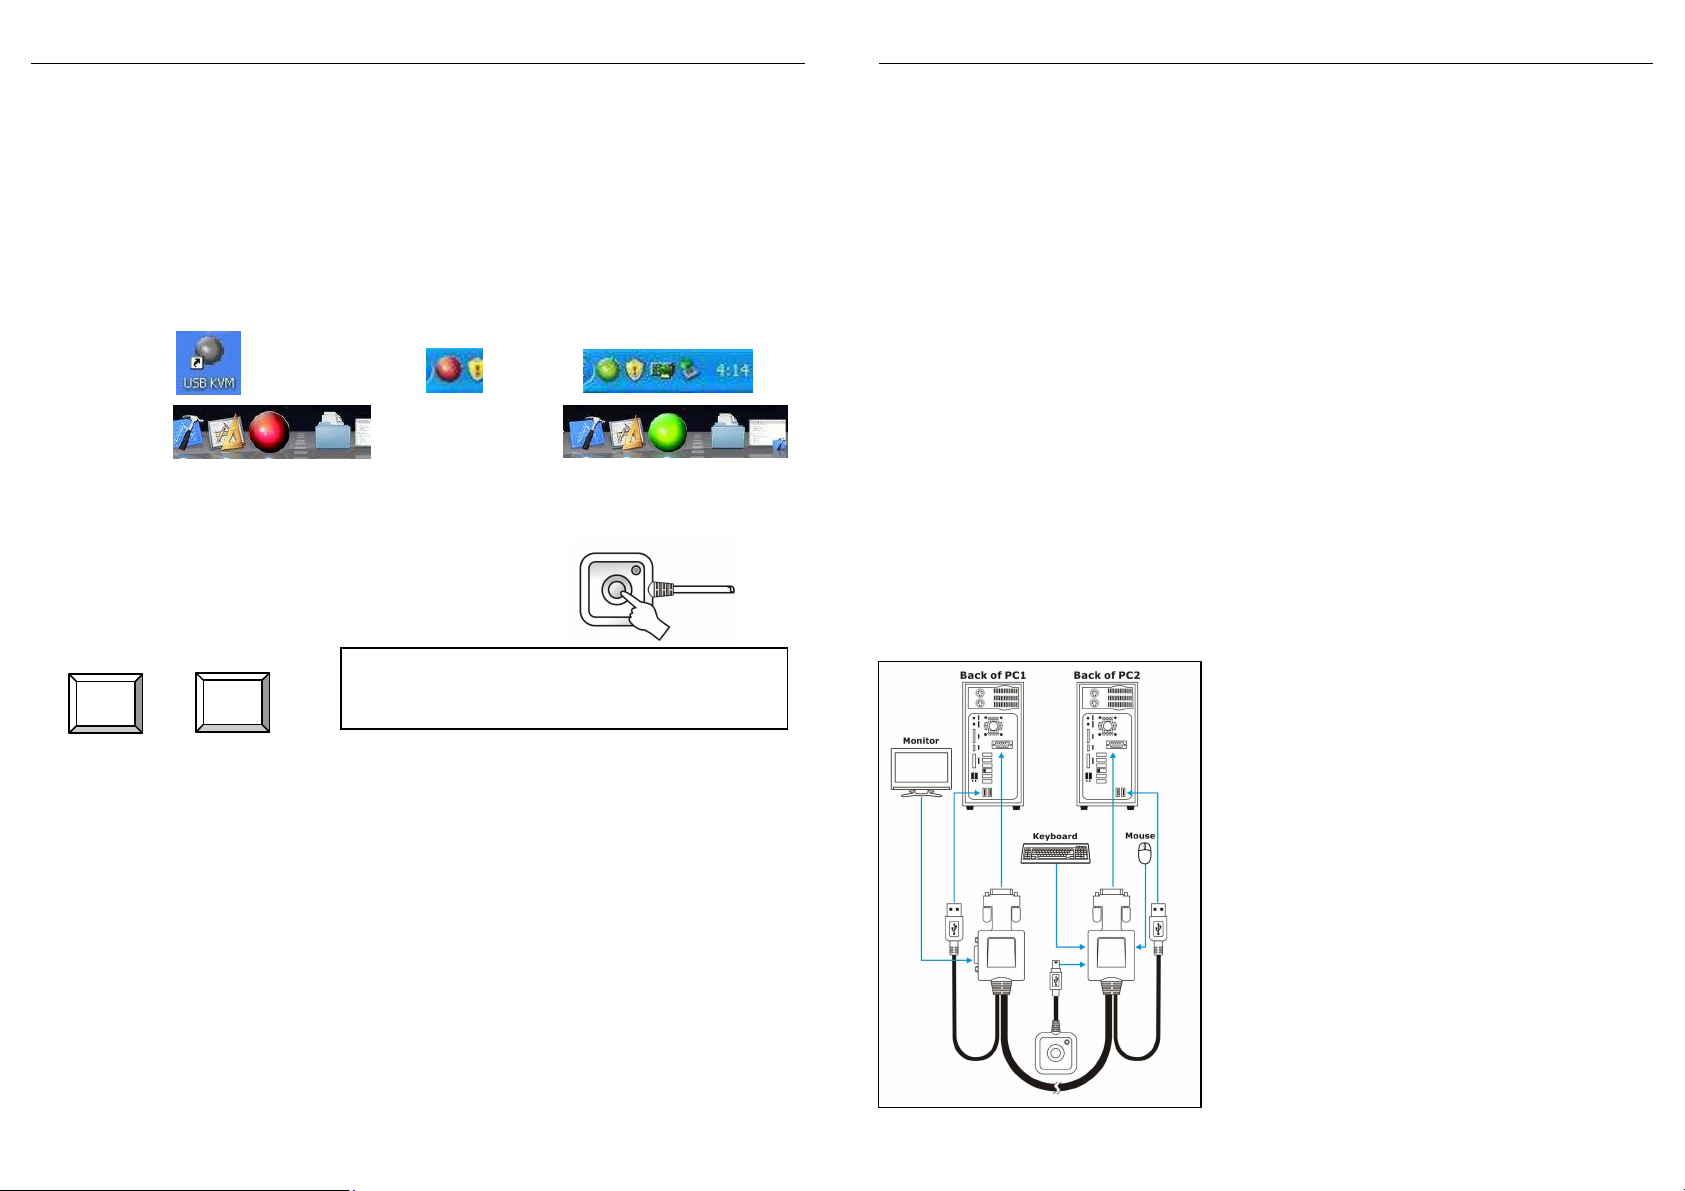
Une fois terminé, un icône en forme de balle grise, rouge ou verte apparaîtra dans la
barre des tâches (Windows ou Mac) et affichera le port sélectionné (vert=port 1 ou
rouge=port 2). Un icône gris indique que le switch KVM n’est pas connecté. Sur les
ordinateurs Windows, un icône est affiché.
WINDOWS
Raccourci: Icône de la barre des tâches: rouge/verte
Mac
Icône:
rouge ou vert
Utilisation du KVM
Vous pouvez choisir 4 méthodes différentes pour la commutation:
Via le bouton “Port”- de la télécommande filaire
Si le PC1 est sélectionné, la LED est verte.
Si le PC1 est sélectionné, la LED est orange.
Via la séquence clavier hotkey
+
Via l’icône de la barre des tâches: clic droit sur l’icône rouge ou vert, et
commutez. Si l’icône est vert, aucun switch KVM n’est connecté à
l’ordinateur et à la console.
Via le raccourci du bureau (uniquement sous Windows)
Dépannages:
Si le clavier et la souris ne sont pas détectés ou ne fonctionnent pas
correctement, merci de vérifier la connexion des câbles, si vous avez installé
les pilotes depuis le CD et que le support USB est activé dans le BIOS du PC.
Déconnectez et reconnectez les câbles USB à d’autres ports USB de votre
ordinateur. Essayez ensuite de redémarrer le PC et vérifiez que le problème
soit réglé.
Sinon appelez le support technique LINDY.
Arrêt
défil
Arrêt
défil
(en pressant la touche “Arrêt défil”
en moins de deux secondes)
Manuale d'uso Italiano
- 8 -
Introduzione
Grazie per aver scelto il LINDY KVM Switch Micro. In questo manuale
troverete le caratteristiche e le funzioni di questo KVM Switch. Questo KVM
Switch consente di controllare due computer da un unica tastiera, mouse e
monitor. Lo Switch supporta la connessione di Hub USB (velocità 1.1) per
condividere ulteriori dispositivi USB. In questo caso consigliamo di utilizzare un
Hub USB alimentato. La commutazione tra i Computer può avvenire tramite il
tasto di commutazione remoto, hotkey tastiera, icona task bar/dock (Windows
& Mac) o via software (Windows). Questo KVM Switch viene registrato dal
sistema come periferica USB e supporta funzioni OSD per visualizzare le porte
attive e commutare tra i Computer. Occorre installare il software incluso nel
CD per effettuare la commutazione tramite icone, software e per visualizzare il
canale.
Contenuto della confezione
Due KVM Switch Micro dongle con cavi di connessione
Tasto di commutazione remoto
Questo manuale e CD con driver e software
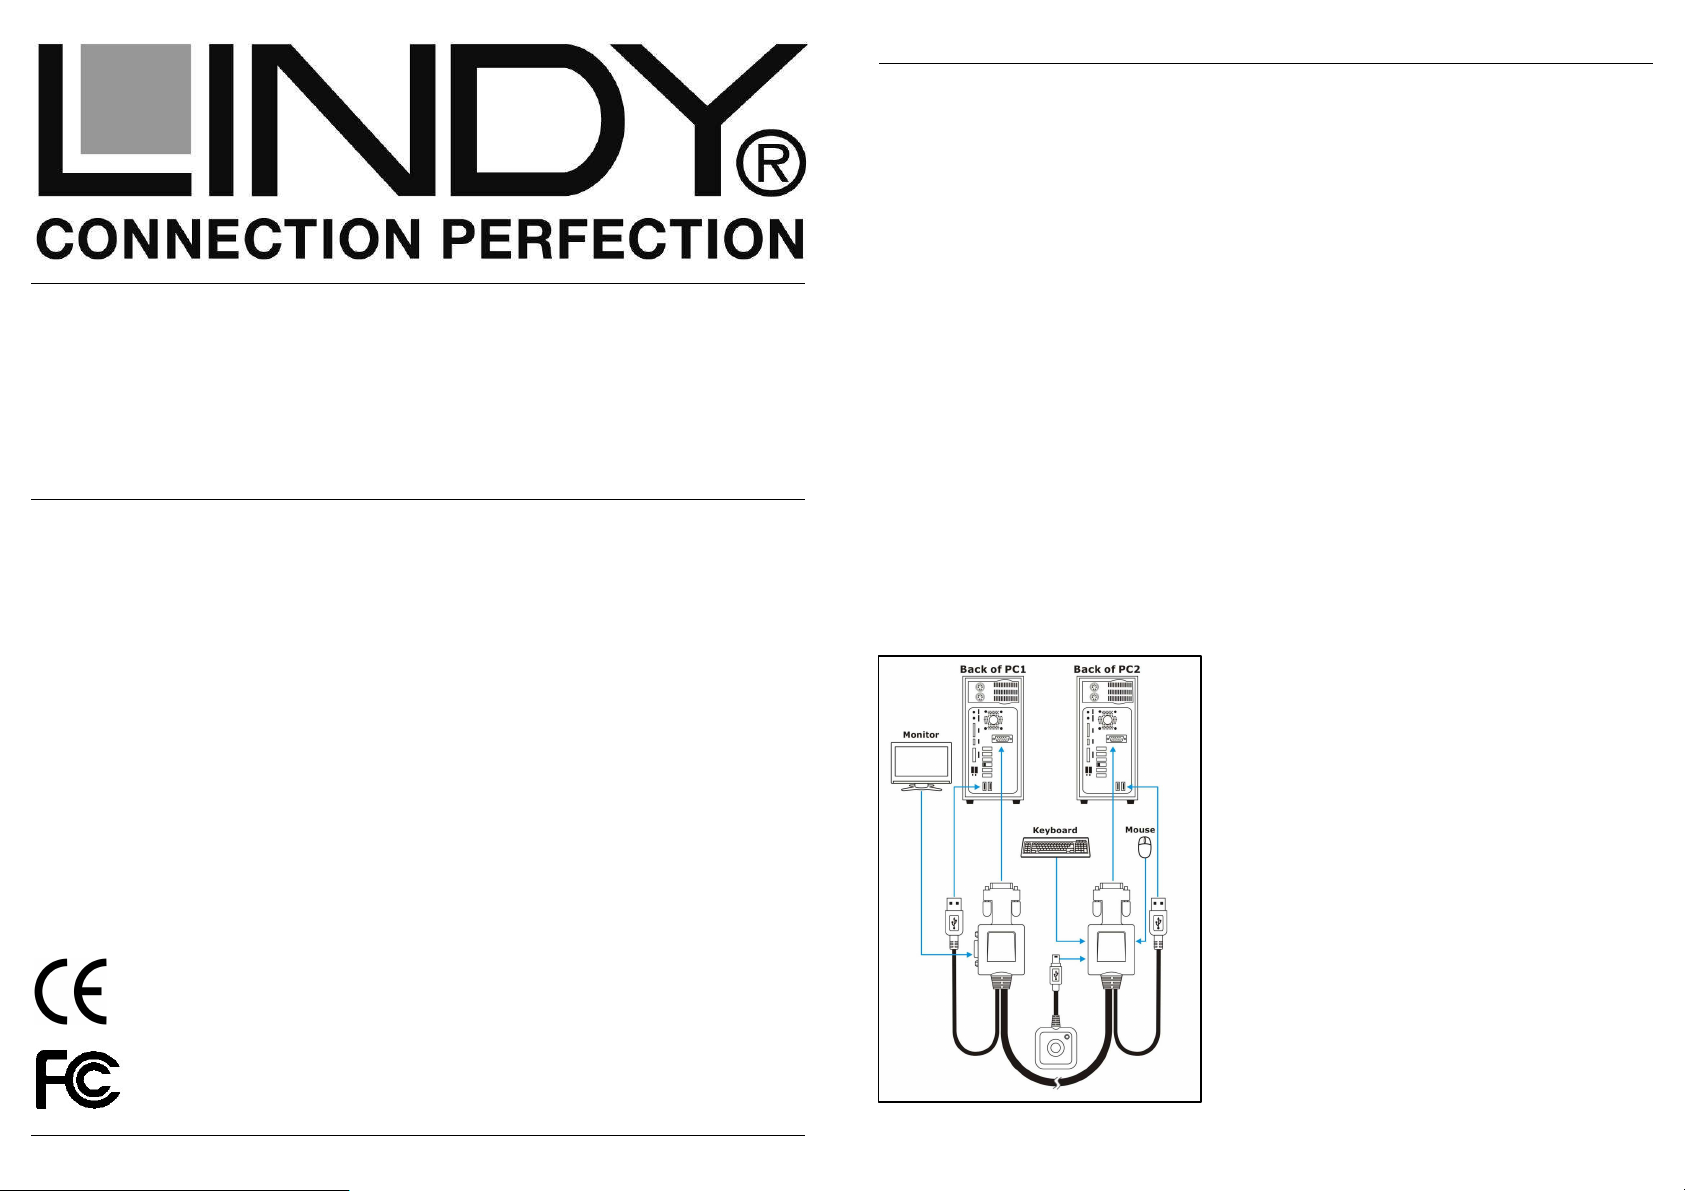
Installazione
•Non è necessario spegnere i Computer dato che lo standard USB supporta
la funzione hot plug. Prima di collegare il KVM switch ad un Computer con
Windows o Mac per la prima volta,
installate il software nel CD.
•Collegare i due dongle all’uscita VGA
della scheda grafica e collegare il cavo
USB alla relativa porta sul PC.
•Collegare tastiera, mouse, monitor e tasto
di commutazione remoto alle porte USB e
VGA presenti sui KVM switch dongle.
•Commutare sul primo Computer e
aspettare che si sia avviato, è possibile
commutare sull’altra porta quando il LED
della porta sul tasto di commutazione ha
smesso di lampeggiare e il Computer ha
terminato la procedura di installazione.
•Commutare sul secondo PC nello stesso
modo.

Manuale d'uso Italiano
- 9 -
Installazione Driver & Software
Inserire il CD ed avviare il programma Setup su un PC con Windows o aprire il
file UKB KVM.pkg su un Mac. Seguire la procedura di installazione.
Al termine della procedura guidata apparirà sulla Task Bar o Dock un’icona
grigia, rossa o verde (Windows o Mac) che mostra la porta selezionata
(verde=porta 1 o rosso=porta 2). L’icona grigia indica che il KVM Switch non è
connesso. Su computer con Windows compare anche un’icona sul desktop.
WINDOWS
Icona Desktop: Icona Task bar: rossa/verde
Mac
Icona Dock:
rossa o verde
Funzioni KVM
E’ possibile effettuare la commutazione tra i computer in 4 modi differenti:
Tramite tasto “Port” sul tasto di commutazione remoto:
Quando è selezionato PC1, il LED sarà verde.
Quando è selezionato PC2, il LED sarà arancione.
Hotkey Tastiera
+
Icone Task Bar / System Tray: cliccare col tasto destro del mouse
sull’icona rossa o verde e commutare tra i canali. Se l’icona è di colore
grigio nessun KVM Switch è collegato al Computer.
Icona Desktop (solo su Computer con Windows)
Risoluzione problemi:
Se mouse e tastiera non vengono riconosciuti controllare che le connessioni
siano corrette, che i driver siano stati installati correttamente e che dal BIOS
sia abilitata la funzione USB Legacy. Scollegare e ricollegare i cavi USB dai
Computer e infine provare a riavviare i Computer.
Se il problema dovesse persistere contattate il vostro rivenditore o il supporto
tecnico LIDNY.
Bloc
Scorr
Bloc
Scorr
Premere due volte entro un secondo il
tasto Bloc Scorr
Certifications and Statements
- 10 -
FCC Warning
This device complies with part 15 of the FCC Rules.
Operation is subject to the following two conditions:
1. This device may not cause harmful interference, and
2. This device must accept any interference received, including interference that may cause undesired
operation.
CE Statement, EMC Compatibility
This device complies with EN Standards EN55022 and EN55024 according to the relevant EC EMC
Directive. It must be used with shielded cables only to maintain EMC compatibility.
Dieses Produkt entspricht den einschlägigen EMV Richtlinien der EU und darf nur zusammen mit
abgeschirmten Kabeln verwendet werden.
LINDY Herstellergarantie
LINDY gewährt für dieses Produkt über die gesetzliche Regelung hinaus eine zweijährige Herstellergarantie
ab Kaufdatum. Die detaillierten Bedingungen dieser Garantie finden Sie auf der LINDY Website aufgelistet
bei den AGBs.
WEEE (Waste of Electrical and Electronic Equipment),
Recycling of Electronic Products
In 2006 the European Union introduced regulations (WEEE) for the collection and recycling of all waste
electrical and electronic equipment. The wheelie bin symbol shown indicates that this product must not be
disposed of with household waste. Instead the product must be recycled in a manner that is environmentally
friendly. For more information on how to dispose of this product, please contact your local recycling centre or
your household waste disposal service. Each individual EU member state has implemented the WEEE
regulations into national law in slightly different ways. Please follow your national law when you want to
dispose of any electrical or electronic products.
More details can be obtained from your national WEEE recycling agency.
Germany / Deutschland
Die Europäische Union hat mit der WEEE Direktive umfassende Regelungen für die Verschrottung und das
Recycling von Elektro- und Elektronikprodukten geschaffen. Diese wurden im Elektro- und
Elektronikgerätegesetz – ElektroG in deutsches Recht umgesetzt. Dieses Gesetz verbietet das Entsorgen
von Elektro- und Elektronikgeräten über die Hausmülltonne! Diese Geräte müssen den lokalen
Sammelsystemen bzw. örtlichen Sammelstellen zugeführt werden! Dort werden sie kostenlos entgegen
genommen. Die Kosten für den weiteren Recyclingprozess übernimmt die Gesamtheit der Gerätehersteller.
LINDY No.32818
1st Edition, December 2009
www.lindy.com
Table of contents
Other Lindy Switch manuals

Lindy
Lindy 25007 User manual

Lindy
Lindy 32165 User manual

Lindy
Lindy 43275 User manual

Lindy
Lindy U8 User manual

Lindy
Lindy IPower Switch Classic 8 User manual

Lindy
Lindy 43309 Instruction Manual

Lindy
Lindy 39322 Installation and operating instructions

Lindy
Lindy 32165 User manual

Lindy
Lindy 38273 User manual

Lindy
Lindy 32882 Quick start guide