manuals.online logo
Brands
  1. Home
  2. •
  3. Brands
  4. •
  5. Little Tikes
  6. •
  7. Toy
  8. •
  9. Little Tikes RESCUE TALES WALK 'N WIGGLE DAISY User manual

Little Tikes RESCUE TALES WALK 'N WIGGLE DAISY User manual

AGES 4+
ADULT SUPERVISION REQUIRED
ADULT BATTERY INSTALLATION REQUIRED
SKU: 657719
Walk ‘n wiggle
Daisy™
CONTENTS
t
Ales
t
Ales
RescueRescue
t
Ales
t
Ales
RescueRescue
TM
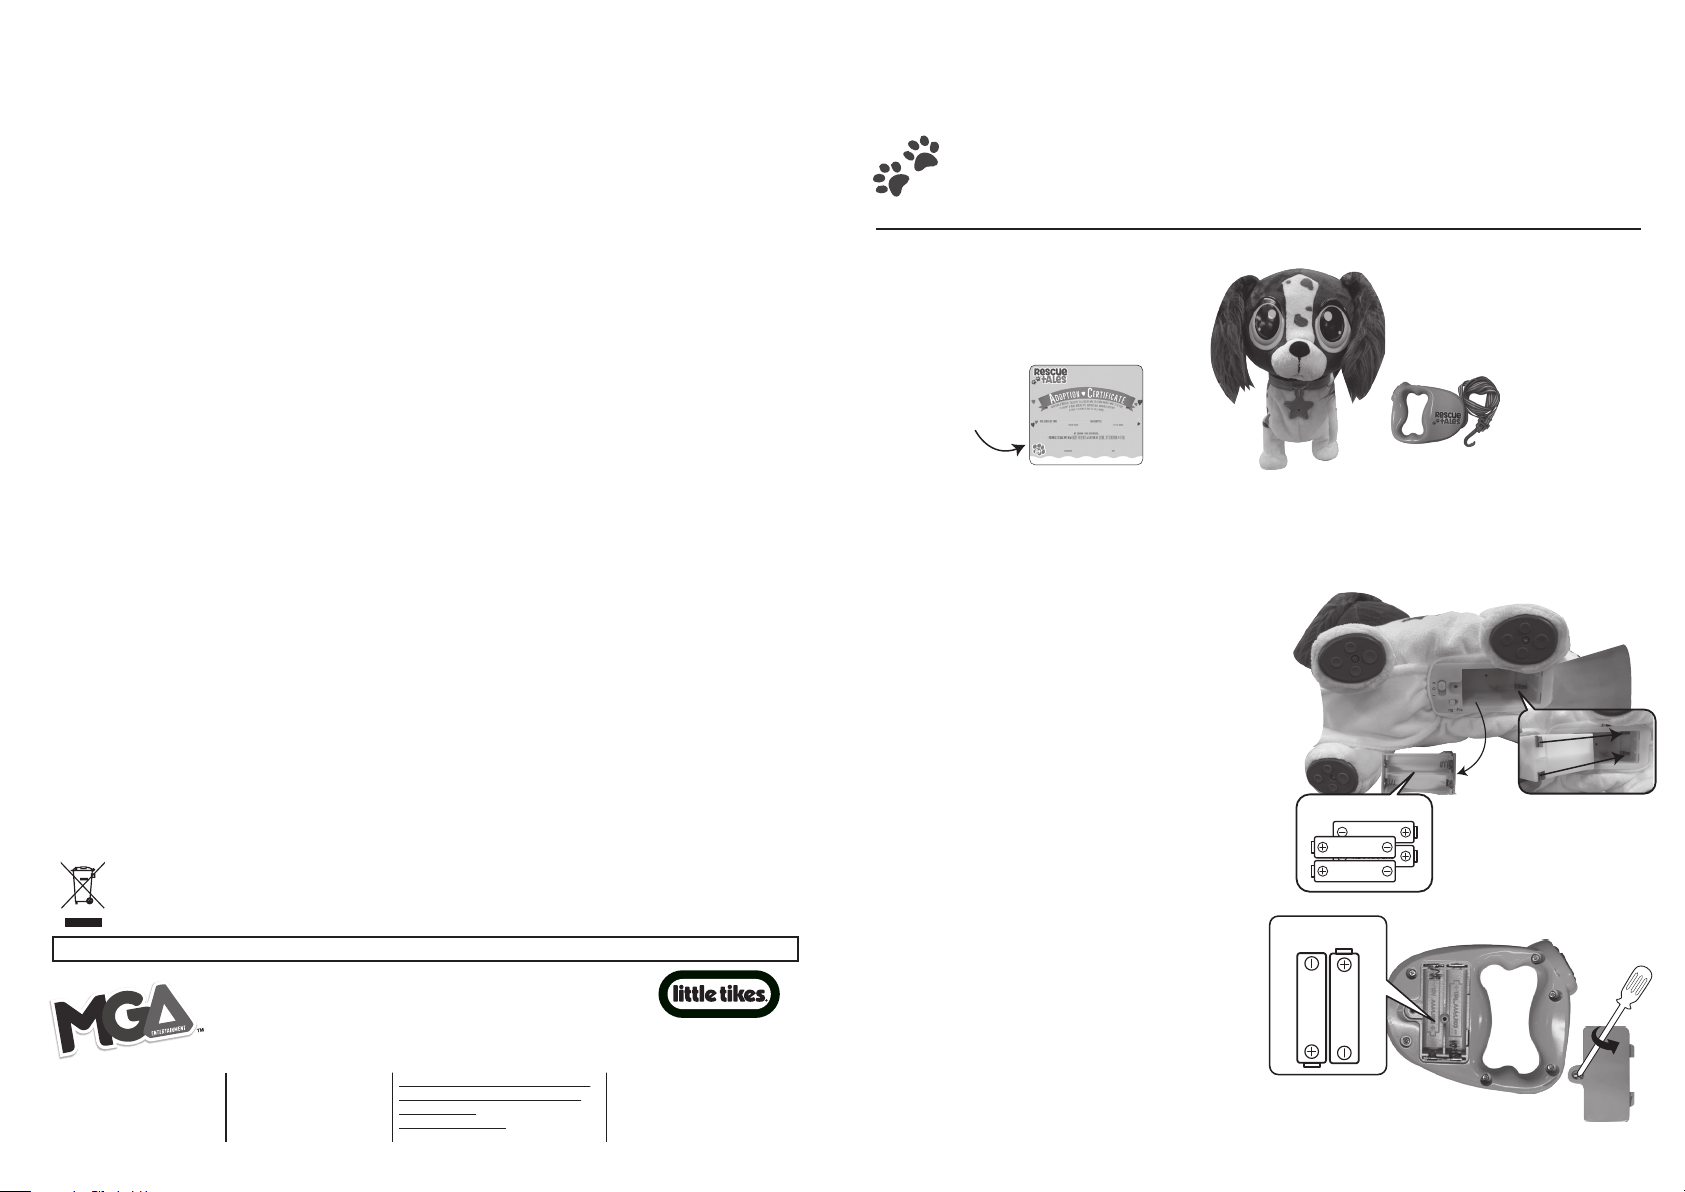
A. Walk ‘n Wiggle Daisy™
B. Remote Control with Detachable Leash
Please keep this manual as it contains important information.
© The Little Tikes Company, an MGA Entertainment company.
LITTLE TIKES® and RESCUE TALES™ are trademarks of Little Tikes in the U.S.
and other countries. All logos, names, characters, likenesses, images,
slogans, and packaging appearance are the property of Little Tikes.
Printed in China • 0421-1-E/INT www.littletikes.com
www.littletikes.co.uk
www.littletikes.com.au
MGA Entertainment (Netherlands) B.V.
Baronie 68-70, 2404 XG Alphen a/d Rijn
The Netherlands
Tel: +31 (0) 172 758038
Little Tikes Consumer Service
2180 Barlow Road
Hudson, Ohio 44236 U.S.A.
1-800-321-0183
MGA Entertainment UK Ltd.
50 Presley Way, Crownhill, Milton
Keynes, MK8 0ES, Bucks, UK
support@LittleTikesStore.co.uk
Tel: +0 800 521 558
Imported by MGA Entertainment
Australia Pty Ltd
Suite 2.02, 32 Delhi Road
Macquarie Park NSW 2113
1300 059 676
The Little Tikes Company makes fun, high quality toys. We warrant to the original purchaser that this product is free of
defects in materials or workmanship for one year * from the date of purchase (dated sales receipt is required for proof of
purchase). At the sole election of The Little Tikes Company, the only remedies available under this warranty will be the
replacement of the defective part or replacement of the product. This warranty is valid only if the product has been
assembled and maintained per the instructions. This warranty does not cover abuse, accident, cosmetic issues such as
fading or scratches from normal wear, or any other cause not arising from defects in material and workmanship. *The
warranty period is three (3) months for daycare or commercial purchasers.
U.S.A and Canada: For warranty service or replacement part information, please visit our website at www.littletikes.com,
call 1-800-321-0183 or write to: Consumer Service, The Little Tikes Company, 2180 Barlow Road, Hudson OH 44236, U.S.A.
Some replacement parts may be available for purchase after warranty expires—contact us for details.
Outside U.S.A and Canada: Contact place of purchase for warranty service. This warranty gives you specic legal rights, and
you may also have other rights, which vary from country/state to country/state. Some countries/states do not allow the
exclusion or limitation of incidental or consequential damages, so the above limitation or exclusion may not apply to you.
LIMITED WARRANTY
FCC COMPLIANCE
BATTERY SAFETY INFORMATION
• Use only 4 size“AA”(LR6) and 2 size“AAA”(LR03) alkaline batteries (6 required).
• Charging of rechargeable batteries should only be done under adult supervision.
• Remove rechargeable batteries from the product before recharging.
• Do not mix old and new batteries.
• Do not mix alkaline, standard (carbon-zinc), or rechargeable batteries.
• Be sure to insert the batteries correctly and follow the toy and battery manufacturer’s instruction.
• Always remove exhausted or dead batteries from the product.
• Dispose of dead batteries properly: do not burn or bury them.
• Do not attempt to recharge non-rechargeable batteries.
• Avoid short-circuiting battery terminals.
• Remove batteries before placing the unit into storage for a prolonged period of time.
‘Let’s care for the environment!’
The wheelie bin symbol indicates that the product must not be disposed of with other household waste.
Please use designated collection points or recycling facilities when disposing of the item.
Do not treat old batteries as household waste. Take them to a designated recycling facility.
NOTE: This equipment has been tested and found to comply with the limits for a Class B digital device, pursuant to Part 15 of the
FCC Rules. These limits are designed to provide reasonable protection against harmful interference in a residential installation. This
equipment generates, uses and can radiate radio frequency energy and, if not installed and used in accordance with the
instructions, may cause harmful interference to radio communications. However, there is no guarantee that interference will not
occur in a particular installation. If this equipment does cause harmful interference to radio or television reception, which can be
determined by turning the equipment o and on, the user is encouraged to try to correct the interference by one or more of the
following measures:
• Reorient or relocate the receiving antenna.
• Increase the separation between the equipment and receiver.
• Connect the equipment into an outlet on a circuit dierent from that to which the receiver is connected.
• Consult the dealer or an experienced radio/TV technician for help.
This device complies with Part 15 of the FCC Rules. Operation is subject to the following two conditions: (1) This device may not
cause harmful interference, and (2) this device must accept any interference received, including interference that may cause
undesired operation.
Caution: Modications not authorized by the manufacturer may void users authority to operate this device.
This device contains licence-exempt transmitter(s)/receiver(s) that comply with Innovation, Science and Economic
Development Canada’s licence-exempt RSS(s). Operation is subject to the following two conditions: (1) This device may not cause
interference. (2) This device must accept any interference, including interference that may cause undesired operation of the device.
CAN ICES-3 (B)/NMB-3(B).
Illustrations are for reference only. Styles may vary from actual contents.
Please remove all packaging including tags, ties & tacking stitches before giving this product to a child.
BATTERY INSTALLATION
The batteries included in your pup are for in-store demonstration. It is recommended that, prior to playing, an
adult install fresh alkaline batteries. Here’s how:
1. Open the ap located under the pup.
2. Using a Phillips screwdriver (not included) remove the
screw and battery compartment cover under the pup.
3. Remove the battery pack from inside the battery
compartment. NOTE: The battery pack is double-sided.
4. Install four (4) 1.5V AA (LR6) alkaline batteries (not
included) making sure the (+) and (-) ends face the proper
direction as indicated inside the battery compartment.
5. Replace the battery pack, making sure the metal plates on
the battery pack and the metal plates inside the battery
compartment touch.
6. Replace the compartment cover and tighten the screw.
Then, close the ap.
4 1
PUP BATTERY REPLACEMENT
A.
B.
Remote control BATTERY installation
1. Using a Phillips screwdriver (not included) remove the
screw and battery compartment cover on the back of
the remote control.
2. Install two (2) 1.5V AAA (LR03) alkaline batteries (not
included) making sure the (+) and (-) ends face the
proper direction as indicated inside the battery
compartment.
3. Replace the compartment cover and tighten the screw.
1.5V AAA/LR03
1.5V AAA/LR03
2 x AAA Batteries
1.5V AA/LR6
1.5V AA/LR6
4 x AA Batteries
1.5V AA/LR6
1.5V AA/LR6
Sign your pet’s
adoption certicate.
BEFORE BEGINNING
1
Move the switch under the remote control
to the ON ( I ) position. The light on top of
the remote control will begin to ash.
Open the ap under the pup and move the
switch from Motion Detection mode (X) to the
ON position (I). The light on the remote control
will stop ashing.
To change the language, move the language
switch from ENG ( I I ) to FRE ( I ) or vice versa.
IMPORTANT INFORMATION
• Play is limited in MOTION DETECTION mode. Move the switch to the ON (I) position for full play experience.
• After a minute of no activity, your pup will go into sleep mode. Pet Daisy to wake her up.
• Turn off the pup after use to conserve battery power by moving the switch to the OFF position (O).
• Surface wash the pup only. Keep moisture away from the battery compartment.
• Do not play in the street, where there is vehicular traffic or in heavily traveled areas with pedestrians.
• Do not use leash on live animals.
• Frequency band range is 2.407GHz - 2.475GHz.
• Maximum radio-frequency power is 11dBm.
2 3
WALKING DAISY
TRAINING DAISY
I O
2
1. Hook the leash onto the back of the pup’s collar. (Fig. 1)
2. To walk your pup, press the left, right or up buttons once. Daisy can also dance! Press the middle button once
to see your pup dance. (Fig. 2) To stop Daisy, press the stop button.
3. Your pup will continue to respond to the remote control commands even if detached from the leas .
Fig. 1 Fig. 2
I O X
I I I
Dance
Left Right
Forward
Stop
Daisy understands commands! Say “Daisy” and then the command to see her reactions. Make sure to speak
clearly and that you say“Daisy”before any command. See Phrases You Can Say for all the different
commands. Make sure to speak clearly in front of Daisy and in a quiet room.
IMPORTANT NOTES:
· Before giving Daisy a command, make sure to clearly say“Daisy” and then wait for her response.
· When you tell Daisy “time for bed,” Daisy will go into sleep mode. Pet her head front to back to wake her up.
· While in sleep mode, Daisy can sense motion and make sounds. Pet her to wake her up.
Phrases you can say!
• Dance party!
• Who’s a good girl?
• Let’s go! (Daisy will walk away from the
direction the command came from.)
• Wanna go for a walk?
• Snack time!
• Come here! (Daisy will walk towards the
direction the command came from.)
• Get your tail!
• What’s that?
• I love you.
• Time for bed!
Daisy will react differently to each command.
ENG FR
• Danse !
• Qui est gentille ?
• Allons-y ! (Daisy s'éloignera de la direction
d'où vient l'ordre.)
• Tu veux faire une promenade ?
• Tu veux une friandise ?
• Viens ici ! (Daisy se dirigera vers la direction
d'où vient l'ordre.)
• Cours après ta queue !
• Qu’est-ce que c’est, là-bas ?
• Je t’aime bien.
• C’est l’heure du coucher !
EXPRESSIONS QUE VOUS POUVEZ DIRE !
Daisy réagira différemment à chaque commande.
Interacting with daisy
Move the switch under Daisy from the ON (I) or OFF (O) position to the Motion Detection mode (X) position.
While in this mode, Daisy can sense motion. Walk by your pup to hear puppy sounds.
Motion Sensor

This manual suits for next models

1

Other Little Tikes Toy manuals

Little Tikes Endless adventures 620270 User manual

Little Tikes

Little Tikes Endless adventures 620270 User manual

Little Tikes FOAMO User manual

Little Tikes

Little Tikes FOAMO User manual

Little Tikes 651328MX1 User manual

Little Tikes

Little Tikes 651328MX1 User manual

Little Tikes Pogo-IT! User manual

Little Tikes

Little Tikes Pogo-IT! User manual

Little Tikes 70911E5 User manual

Little Tikes

Little Tikes 70911E5 User manual

Little Tikes CAPE COTTAGE PLAYHOUSE 637902M User manual

Little Tikes

Little Tikes CAPE COTTAGE PLAYHOUSE 637902M User manual

Little Tikes Girl Scout Cookie Booth User manual

Little Tikes

Little Tikes Girl Scout Cookie Booth User manual

Little Tikes 654053M User manual

Little Tikes

Little Tikes 654053M User manual

Little Tikes Cook 'N Grow BBQ Grill User manual

Little Tikes

Little Tikes Cook 'N Grow BBQ Grill User manual

Little Tikes Slammin' Racers Runaway Railroad User manual

Little Tikes

Little Tikes Slammin' Racers Runaway Railroad User manual

Little Tikes 637735M User manual

Little Tikes

Little Tikes 637735M User manual

Little Tikes First OVEN User manual

Little Tikes

Little Tikes First OVEN User manual

Little Tikes Learn & Play Roll Arounds User manual

Little Tikes

Little Tikes Learn & Play Roll Arounds User manual

Little Tikes LITTLE BABY BUM TWINKLE'S SINGING SOOTHER User manual

Little Tikes

Little Tikes LITTLE BABY BUM TWINKLE'S SINGING SOOTHER User manual

Little Tikes 4533 User manual

Little Tikes

Little Tikes 4533 User manual

Little Tikes BIG ADVENTURES MINING TRUCK User manual

Little Tikes

Little Tikes BIG ADVENTURES MINING TRUCK User manual

Little Tikes Hot Hoops User manual

Little Tikes

Little Tikes Hot Hoops User manual

Little Tikes Splish Splash Sink and Stove 635557M User manual

Little Tikes

Little Tikes Splish Splash Sink and Stove 635557M User manual

Little Tikes 641428 User manual

Little Tikes

Little Tikes 641428 User manual

Little Tikes My Real Jam Active Play Music User manual

Little Tikes

Little Tikes My Real Jam Active Play Music User manual

Little Tikes lil' ocean explorers User manual

Little Tikes

Little Tikes lil' ocean explorers User manual

Little Tikes Dual Twister User manual

Little Tikes

Little Tikes Dual Twister User manual

Little Tikes Handle Haulers Carey Cargo User manual

Little Tikes

Little Tikes Handle Haulers Carey Cargo User manual

Little Tikes Go & GrowLil’ Rollin’ Girae User manual

Little Tikes

Little Tikes Go & GrowLil’ Rollin’ Girae User manual

Popular Toy manuals by other brands

FUTABA GY470 instruction manual

FUTABA

FUTABA GY470 instruction manual

LEGO 41116 manual

LEGO

LEGO 41116 manual

Fisher-Price ColorMe Flowerz Bouquet Maker P9692 instruction sheet

Fisher-Price

Fisher-Price ColorMe Flowerz Bouquet Maker P9692 instruction sheet

Eduard EF-2000 Two-seater exterior Assembly instructions

Eduard

Eduard EF-2000 Two-seater exterior Assembly instructions

USA Trains EXTENDED VISION CABOOSE instructions

USA Trains

USA Trains EXTENDED VISION CABOOSE instructions

Modellbau Laffont Z1601 Assembly instructions

Modellbau Laffont

Modellbau Laffont Z1601 Assembly instructions

NOCH 12905 instruction manual

NOCH

NOCH 12905 instruction manual

Eduard Ki-61-Id quick start guide

Eduard

Eduard Ki-61-Id quick start guide

Viessmann Vollmer 45616 Mounting instruction

Viessmann

Viessmann Vollmer 45616 Mounting instruction

Vollmer 42004 Mounting instruction

Vollmer

Vollmer 42004 Mounting instruction

Phoenix Model CLASSIC-EP instruction manual

Phoenix Model

Phoenix Model CLASSIC-EP instruction manual

H-KING Sopwith Camel British WW1 Fighter instruction manual

H-KING

H-KING Sopwith Camel British WW1 Fighter instruction manual

MODSTER Predator 4x4 Crawler user manual

MODSTER

MODSTER Predator 4x4 Crawler user manual

DHK Hobby 8136 User instruction manual

DHK Hobby

DHK Hobby 8136 User instruction manual

THUNDER TIGER Raptor 50 V2 kit manual

THUNDER TIGER

THUNDER TIGER Raptor 50 V2 kit manual

Timberkits Skateboarder instructions

Timberkits

Timberkits Skateboarder instructions

Hangar 9 Funtana 125 Assembly manual

Hangar 9

Hangar 9 Funtana 125 Assembly manual

QModeling XP Series instruction manual

QModeling

QModeling XP Series instruction manual

manuals.online logo
manuals.online logoBrands
  • About & Mission
  • Contact us
  • Privacy Policy
  • Terms and Conditions

Copyright 2025 Manuals.Online. All Rights Reserved.