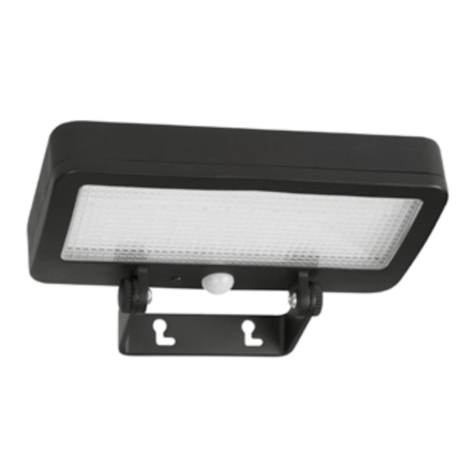
LIVARNO home 387731 2101 Quick guide

SOLAR LED SPOTLIGHT WITH
MOTION SENSOR
REFLECTOR LED SOLAR CON SENSOR
DE MOVIMIENTO
IAN 387731_2101
US-EN US-ES
US-EN US-ES
SOLAR LED SPOTLIGHT
WITH MOTION SENSOR
Operating and Safety Instructions
REFLECTOR LED SOLAR CON
SENSOR DE MOVIMIENTO
Instrucciones de uso y seguridad

US - EN
Before you start reading, please fold out the illustrations page and familiarise
yourself with all of the item’s functions.
US - ES
Antes de leer las instrucciones, despliegue la página con las ilustraciones y,
a continuación, familiarícese con todas las funciones del artículo.
US-EN Operating and Safety Instructions Page 6
US-ES Instrucciones de uso y seguridad Página 13

A
C D
B
1
6
2
3456
7 8
6

E F
H
G
1 2
9
10
5
11
4
12
7 8
13
10
9

5
Introduction ������������������������������������������ 6
Explanation of symbols���������������������� 6
Intended use����������������������������������������� 7
Specications supplied������������������������ 7
Description of parts����������������������������� 7
Technical specications ����������������������� 7
Safety instructions ������������������������������� 8
Risk of batteries/rechargeable
batteries leaking���������������������������������� 8
Assembly and installation������������������ 9
Mounting the Spotlight������������������������ 9
Positioning the Spotlight/
solar panel������������������������������������������ 10
Charging the rechargeable
battery ������������������������������������������������ 10
Operation ������������������������������������������� 10
Troubleshooting��������������������������������� 11
Cleaning and storage������������������������ 11
Disposal����������������������������������������������� 11
3 year limited warranty ������������������� 11
Service������������������������������������������������� 12
US-EN US-ES
Introducción���������������������������������������� 13
Explicación de los signos������������������ 13
Uso previsto ��������������������������������������� 14
Volumen de suministro ��������������������� 14
Descripción de partes������������������������ 14
Datos técnicos ������������������������������������ 14
Instrucciones de seguridad��������������� 15
Riesgo de fuga de pilas / baterías � 16
Ensamble��������������������������������������������� 16
Instalación del reector��������������������� 16
Orientación del reector /
celda solar������������������������������������������� 17
Carga de la batería��������������������������� 17
Manejo ������������������������������������������������ 18
Resolución de problemas ����������������� 18
Limpieza y almacenaje��������������������� 18
Eliminación������������������������������������������ 18
Garantía limitada de 3 años������������ 19
Servicio postventa����������������������������� 20

6US-EN
Solar LED Spotlight with
Motion Sensor
Changes or modications to this product not
expressly approved by the party responsible
for compliance could void the user‘s authority
to operate the product.
Note: This product has been tested and
complies with the limits for a Class B digital
device, pursuant to Part 15 of the FCC Rules.
These limits are designed to provide
reasonable protection against harmful
interference in a residential installation. This
product generates, uses and can radiate
radio frequency energy and, if not installed
and used in accordance with the instructions,
may cause harmful interference to radio
communications. However, there is no
guarantee that interference will not occur in
a particular installation. If this product causes
harmful interference to radio or television
reception, which can be determined by
turning the product off and on, the user is
encouraged to try and correct the
interference by one or more of the following
measures:
• Reorient or relocate the receiving antenna.
• Increase the separation between the
equipment and receiver.
• Connect the product into an outlet on a
circuit different from that to which the
receiver is connected.
• Consult the dealer or an experienced
radio / TV technician for help.
zIntroduction
Congratulations on the purchase of
your new product. You have
purchased a high quality product.
Please read this instruction manual carefully
and completely. These instructions are an
essential part of the product and contain
important information on rst-time use and
handling. Always comply with any safety
instructions. If you have any questions or are
unsure how to handle the product, please
contact your retailer or customer service
center. Please keep this manual for reference,
and pass it on to third parties, if applicable.
Name of product as referred to below:
“Spotlight”
zExplanation of symbols
Read the instruction manual!
Issue date of instruction manual
(month/year)
Date of manufacture (month/
year)
DC voltage
Risk of fatal injury and accident
risk for toddlers and children!
Please note warning and safety
instructions!
Explosion hazard!
Wear protective gloves!
This symbol means that the
product operates with safety
extra-low voltage (SELV/PELV)
(protection class III).
Protected against ingress of
dust (dust-proof, fully contact-
proof) and protected against
sprayed water from any
direction
Any split or cracked protective
cover must be replaced. If the
product is damaged in any
way, stop using it immediately
and contact your service center
at the address specied.
Motion sensor detection range

7
US-EN
Motion sensor eld of view
Luminous power
b
a
Please dispose of packaging
and product in an
environmentally friendly
manner!
MIX
Packaging
Packaging made of FSC-
certied wood mix
zIntended use
The product is intended for automatic
illumination in outdoor areas (e.g. garden,
patio, etc.). The product must not be installed
indoors since the rechargeable battery will
then not be recharged. The product is not
suitable for household room lighting. This
product is only intended for use in private
households. The product must not be used in
any way other than that described above or
modied in any way, as doing so may result
in damage to property or even personal
injury. The manufacturer and/or retailer
accepts no liability whatsoever for damage
arising from use other than intended or
incorrect use.
zSpecications supplied
1 LED solar Spotlight with motion sensor
1 wall bracket (model 1020-S)
1 set xings (2 wall plugs and 2 screws)
1 instruction manual
zDescription of parts
1LED module
2Solar panel
3Guide holes (1020-B)
4Motion sensor
5Switch
6Spotlight star knob (1020-B)
7Screw
8Wall plug
9Spotlight star knob (1020-S)
10
Wall bracket star knob (1020-S)
11
Wall bracket (1020-S)
12
Spotlight star knob screw (1020-S)
13
Guide holes (1020-S)
zTechnical specications
Model number: 1020-B / 1020-S
Input voltage
(spotlight): 3.7 V , 5 W
Solar panel: 300 mA, max. 1,5 W
Lithium Ion
Rechargeable
Battery:
3.7 V ,
1500 mAh
(non-replaceable)
Illuminants: 56 LEDs (non-
replaceable)
Motion Sensor: Detection range:
max� 10m
Field of view:
approx. 120°
Luminous period: 15 s
Luminous power: max. 450lm
Charging time: approx. 7-8h at
50,000lux
LED life: approx. 50,000 h
Color temperature: 6500K (cold white)
Recommended
height of installation: approx. 2-4m
Dimensions of
spotlight (excluding
wall bracket):
approx. 20 x 11 x
3 cm (model 1020-B)
approx. 17.5 x 11 x
3.5 cm (model 1020-S)
Maximum projection
area: approx. 119cm²
(model 1020-B)
approx. 118cm²
(model 1020-S)

8US-EN
Weight: approx. 310 g
(Model 1020-B)
approx. 300 g
(Model 1020-S)
zSafety instructions
Safety instructions
WARNING!
RISK OF FATAL INJURY AND
ACCIDENT RISK FOR TODDLERS
AND CHILDREN!
Never leave children
unattended with packaging material. Risk of
suffocation. Children often underestimate
dangers. Please keep children away from the
product at all times.
This product may be used by children of 8
years and older, and persons with reduced
physical, sensory or mental abilities, or
persons without relevant experience and
knowledge if they are supervised, or after
they have been properly instructed as to
how to use the product safely, and if they
have understood any resulting hazards.
Children must not play with the product.
Cleaning and maintenance work must not
be carried out by children without proper
supervision.
Do not use the product if you notice any
defects or damage.
The manufacturer/distributor of this product
accepts no responsibility whatsoever for
injury or damage arising as a consequence
of in correct installation or use.
Do not immerse the product in water or any
other liquids.
Keep the product away from naked ames
and hot surfaces.
The LED module 1 is not replaceable.
LEDs are not replaceable. Once the light
source has reached the end of its service
life, the entire product must be replaced.
Never manipulate or change the product.
Do not open the housing, but leave the
repair to specialists. Contact a specialist
workshop for this purpose. Liability and
warranty claims are excluded in the event
of repairs carried out independently,
improper connection or incorrect operation.
DANGER TO LIFE!
Keep children away
from the work area during installation. The
product specications supplied include a
large number of screws and other small
parts. These can be fatal if they are
swallowed or inhaled.
Safety instructions for
batteries/rechargeable
batteries
RISK OF FATAL INJURY!
Keep batteries/
rechargeable batteries out of the reach of
children. If swallowed, seek medical advice
immediately
NOTE!
The rechargeable battery is not
replaceable. When it has reached the end
of its life, the entire product must be
replaced.
EXPLOSION HAZARD!
Never
try to recharge non-rechargeable
batteries. Do not short-circuit
batteries/rechargeable batteries or open
them up. This may result in overheating, risk
of re, or explosion.
Never throw batteries/rechargeable
batteries into a re or water.
Do not subject batteries/rechargeable
batteries to mechanical stress.
zRisk of batteries/
rechargeable batteries
leaking
Avoid exposing batteries/rechargeable
batteries to extreme conditions or
temperatures, e.g. on radiators/in direct
sunlight.
Prevent any contact with skin, eyes and
mucous membranes! After any contact with
battery acid, rinse affected part of body

9
US-EN
with plenty of clean water and immediately
seek medical advice!
WEAR PROTECTIVE GLOVES!
Leaking or damaged batteries/
rechargeable batteries can cause
burns if they come into contact with the
skin. Therefore wear suitable protective
gloves in such cases.
In the event of leaking batteries, remove
them immediately from the product in order
to prevent damage.
zAssembly and installation
Note:
remove all packing materials from the
product. Decide prior to mounting where the
product is to be mounted. Before drilling the
xing holes, make sure that there are no gas
or water pipes or power cables that could
be drilled into or damaged in the area
where you are drilling. Use a drill to drill
holes in the wall. Please note the safety
instructions in the instruction manual of your
drill. Otherwise there is a risk of serious or
fatal injury from electric shock.
Note:
the xings included are intended for
standard solid masonry walls. You should
check independently what type of xings are
most suitable for the surface on which you
intend to mount the product. If necessary,
you should seek the advice of an expert.
When deciding where to mount the
light, pay attention to the following
Make sure the product illuminates the
selected area properly. Make sure that the
motion sensor 4 is facing the desired
detection area.
The motion sensor has a maximum
detection range of 10m with a eld of view
of approx. 120°.
Make sure the motion sensor 4 is not in a
position where street lights will shine on it
at night. This may result in diminished
functionality.
The recommended installation height is 2 to
4m. If possible, mount the Spotlight in a
position not exposed to dust and dirt where
it is protected from rain (e.g. under a roof
projection) and other weathering effects.
Note:
the solar panel 2 requires as much
direct sunlight as possible. Even if the solar
panel is only partially in the shade during
the day, it can signicantly impair the
charging process.
Orientation:
The optimum alignment is facing south.
Choose an orientation facing slightly to the
west rather than slightly to the east.
z
Mounting the Spotlight
Transfer the positions of the guide holes 3
/
13
to the mounting point on the wall.
Drill two holes (dia. 6mm) and insert the
matching wall plugs 8 (see Figs. C and
G).
Mounting model 1020-B
Screw the screws 7 into the wall plugs 8,
leaving a gap of approx. 3mm between the
screw head and the wall (see Fig. C).
Slot the guide holes 3 over the screws and
then slide the Spotlight along the guides to
x it in place (see Fig. C).
If necessary, adjust the gap between the
screw heads and the mounting surface to
provide a rm seating for the Spotlight.
Mounting model 1020-S
Screw the wall bracket
11
rmly in place
by inserting the screws 8 through the
guide holes
13
into the wall plugs 8and
rmly tightening them (see Fig. G).
Fix the Spotlight to the wall bracket
11
by
loosening the Spotlight star knob 9and
removing the screw
12
�
Align the holes in the Spotlight with the
holes in the wall bracket and slot the screw
12
through the holes (see Fig. F).

10 US-EN
Screw the Spotlight star knob 6 onto the
screw and tighten it hand-tight. Check that
the product is xed rmly in place.
z
Positioning the Spotlight/
solar panel
Positioning model 1020-B
The Spotlight can be adjusted horizontally
(top/bottom) to an angle of up to 180° (see
Fig. D).
Loosen the two Spotlight star knobs 6 to
adjust the Spotlight (see Fig. B).
When the desired position is obtained,
tighten the star knobs again. If necessary,
use a screwdriver to hold the screw while
tightening the star knob.
Positioning model 1020-S
The Spotlight can be adjusted horizontally
(top/bottom) to an angle of up to 180° (see
Fig. H).
Loosen the wall bracket star knob
10
to
adjust the height of the Spotlight (see Fig.
H).
When the desired position is obtained,
tighten the star knob again.
Loosen the two Spotlight star knobs 9 to
adjust the angle (see Fig. H).
When the desired position is obtained,
tighten the star knob again. If necessary,
use a screwdriver to hold the screw while
tightening the star knob.
Note:
the motion sensor has a eld of view
of up to 120°. Make sure that the motion
sensor faces directly towards the desired
detection zone.
Note:
to ensure the solar panel functions as
effectively as possible, make sure that the
surface of the solar panel 2 is not dirty.
Orientation:
The optimum alignment is facing south.
Choose an orientation facing slightly to the
west rather than slightly to the east.
zCharging the rechargeable
battery
The battery is charged in all operating
modes. To optimize initial charging, charge
the product while it is turned off.
Note:
the battery is fully charged after it has
been well exposed to sunlight for 7 to 8
hours. The duration of the charging process
depends on the battery‘s charge level and
the quality of the sunlight.
zOperation
The product can be operated in three
different modes. The operating mode is set
by means of the switch 5�
Note:
the solar panel will turn on the
product in twilight or darkness in the mode
you have set.
Note:
battery charging via the solar panel
does not depend on which mode is selected.
The battery is charged continuously at all
times.
Mode 1
Press and hold the switch 5 for 3 seconds
to switch to “Mode 1”.
The Spotlight will light up once and then
switch to guide-light function (reduced
brightness).
If the motion sensor detects movement
within its range, the Spotlight will light up
at maximum brightness.
After approx. 15 seconds, it switches back
to guide-light function.
Mode 2
Press the switch 5 again to switch to
“Mode 2”.
The light will icker twice and then switch off.
If the motion sensor detects movement
within its range, the Spotlight will light up
at maximum brightness.
After approx. 15 seconds, it will switch off
again�

11
US-EN
Mode 3
Press the switch 5 again to switch to
“Mode 3”.
The light will icker three times. The
guide-light function (reduced brightness) is
then permanently active. The motion sensor
is inactive in this mode.
Switching o the Spotlight
To switch off the Spotlight, press the switch
5 for a fourth time.
zTroubleshooting
= Fault
=Cause
= Solution
= The product fails to switch on.
=The product is switched off.
= Press the switch 5 to turn on the
product (see section “Operation”).
= Light is ashing.
= Rechargeable battery is almost fully
discharged.
= Recharge the rechargeable battery
(please see chapter ”Charging the
rechargeable battery“).
zCleaning and storage
Switch the product off if you want to stop
using it, store it away and/or clean it.
Regularly inspect the motion sensor 4and
solar cell 2 to make sure they are not
dirty. Remove any dirt to ensure proper
functioning of product.
Keep the product and especially the solar
panel free of snow and ice in winter.
Use only a dry, lint-free cloth for cleaning. If
the product is very dirty, dampen the cloth
slightly.
zDisposal
Please inquire about disposal
options of your old product at your
municipality or town administration.
If your product is old and obsolete,
in the interest of environment, do
not dispose of it via your household
waste system, but through specialist
waste disposal systems. Information
on collecting points and opening
hours is available at your competent
administrative bodies.
Risk of environmental damage from
incorrect disposal of rechargeable
batteries!
Batteries must not be disposed of
as general household waste. They may
contain toxic heavy metals and are subject
to special waste treatment. The chemical
symbols of the heavy metals are as follows:
Cd = cadmium, Hg = mercury,
Pb = lead.
z3 year limited warranty
What does this warranty cover?
The warranty covers:
· Damage, breakage or inoperability due to
defect.
· Damage not caused by normal wear and
tear or failure to follow the safety and
maintenance instructions provided in the
user manual.
What is not covered by the warranty?
The warranty does not cover damage
caused by:
· Normal wear and tear of the product,
including fragile parts (such as switches,
glass, etc.);
· Improper use or transport;
· Disregarding safety and maintenance
instructions;
· Accidents or acts of nature (e.g. lightning,

12 US-EN
re, water, etc.);
· Tampering with the product (such as
removing cover, unscrewing screws etc.)
Consequential and incidental damages are
also not covered under this warranty.
However, some states do not allow the
exclusion or limitation of incidental or
consequential damages, so this limitation or
exclusion may not apply to you.
What is the period of coverage and
warranty resolution?
The warranty is for 3 years from the date of
purchase. At our discretion, product will
either be refunded or replaced.
What will we not do?
We will not:
· Start a new warranty period upon product
exchange;
· Repair product.
How to process the warranty?
To initiate, please:
· Call customer service at 1 (844) 543-5872
· Visit the Website Customer Service Platform
at www.lidl.com/contact-us
or
· Visit a LIDL store for further assistance
To ensure the quickest warranty return
process, please have the following available:
· The original sales receipt that includes the
date purchased;
· The product and manual in the original
package;
· A statement of the problem.
What must you do to keep the
warranty in eect?
· Retain the original receipt;
· Follow all product instructions;
· Do not repair or modify the product.
How does state law relate to this
warranty?
This warranty gives you specic legal rights,
and you may also have other rights which
vary from state to state. All implied
warranties are limited by the duration and
terms of this warranty. Some states do not
allow limitations on how long an implied
warranty lasts, so the above limitation may
not apply to you.
zService
US-EN
Hotline: 1 (844) 543-5872
(www.lidl.com/contact-us)
IAN 387731_2101
Please have the receipt and the article
number (e.g. IAN 123456) ready as proof
of purchase for all enquiries.
You can nd an up-to-date version of the
operating instructions at: www.citygate24.de

13
US-ES
Reector LED solar con
sensor de movimiento
Los cambios o modicaciones no
expresamente aprobados por el encargado
de Compliance podrían anular la
autorización del usuario para utilizar el
equipo.
Nota: Este equipo ha sido probado y
cumple con los límites para un dispositivo
digital Clase B de acuerdo con la Parte 15
de la normativa de la FCC. Estos límites han
sido concebidos para proporcionar una
protección razonable frente a interferencias
perjudiciales en una instalación residencial.
Este equipo genera, usa y puede irradiar
energía de radiofrecuencia, y si no se
instala y utiliza de acuerdo con las
instrucciones, podría causar una
interferencia perjudicial en las
radiocomunicaciones. Sin embargo, no se
puede garantizar que dicha interferencia no
ocurra en una instalación determinada. Si
este equipo causara una interferencia
perjudicial para la recepción de radio o
televisión, lo cual se puede determinar
apagando y encendiendo el equipo, se
insta al usuario a intentar corregir la
interferencia aplicando una o varias de las
siguientes medidas:
• Reorientar o reubicar la antena de
recepción.
• Aumentar la separación entre el equipo y
el receptor.
• Conectar el equipo a una toma en un
circuito diferente al que está conectado el
receptor.
• Consultar al vendedor o a un técnico de
radio/TV con experiencia para obtener
ayuda.
zIntroducción
Enhorabuena por la compra de su
nuevo producto. Ha elegido un
producto de alta calidad. Lea este
instructivo de uso completa y detenidamente.
Este instructivo es parte de este producto y
contiene instrucciones importantes para la
puesta en marcha y el uso. Observe siempre
todas las instrucciones de seguridad. En
caso de que tenga preguntas o dudas
relacionadas con el manejo del producto,
póngase en contacto con su distribuidor o el
centro de servicio de atención al cliente.
Conserve este instructivo con cuidado y
transmítalo a terceros si es necesario. En lo
sucesivo, el producto se denominará como:
”Reector“
zExplicación de los signos
¡Lea el instructivo de uso!
Fecha de publicación del
instructivo de uso (mes/año)
Fecha de fabricación
(mes/año).
Voltaje DC
¡Peligro de muerte y de
accidente para bebés y niños!
¡Observe las instrucciones de
advertencia y de seguridad!
¡Peligro de explosión!
¡Lleve guantes protectores!
Este símbolo indica que el
producto funciona con una
tensión de protección muy
baja (SELV / PELV) (clase de
protección III).

14 US-ES
Rango de detección del sensor
de movimiento.
Ángulo de detección del
sensor de movimiento.
Flujo luminoso.
Protección contra la
penetración de polvo (estanco
al polvo, protección completa
contra el contacto) y protección
contra los chorros de agua
procedentes de todas las
direcciones.
Cualquier cubierta protectora
agrietada debe ser
reemplazada. En caso de
daños, deje de utilizar
inmediatamente el producto y
póngase en contacto con la
dirección de servicio posventa
indicada más abajo.
b
a
Elimine el embalaje y el
producto de manera
respetuosa con el
medioambiente.
MIX
Packaging
Embalaje de madera
controlada con la etiqueta FSC
Mixto.
zUso previsto
El producto ha sido diseñado para iluminar
de manera automática espacios en el
exterior (p. ej., jardín, patio, etc.). No instale
el producto en interiores, ya que esto
impedirá que la batería se cargue. El
producto no es adecuado para iluminar
interiores. Este producto está destinado
exclusivamente a su uso en el ámbito
doméstico. No está permitido ningún uso
distinto al descrito ni efectuar ninguna
modicación del producto, ya que puede
provocar daños materiales o incluso lesiones
corporales. El fabricante o el distribuidor no
asumen ninguna responsabilidad por los
daños causados por un uso inadecuado o
incorrecto.
zVolumen de suministro
1x reector LED solar con sensor de
movimiento
1x soporte de pared (modelo 1020-S)
1x material para el ensamble
(2 taquetes y 2 tornillos)
1x instructivo de uso
zDescripción de partes
1Módulo LED
2Celda solar
3Oricios guía (1020-B)
4Sensor de movimiento
5Interruptor
6Pomo rosca (1020-B)
7Tornillo
8Taquete
9Pomo rosca del reector (1020-S)
10
Pomo rosca del soporte de pared
(1020-S)
11
Soporte de pared (1020-S)
12
Tornillo para el pomo rosca del reector
(1020-S)
13
Oricios guía (1020-S)
zDatos técnicos
Número de modelo: 1020-B / 1020-S
Tensión de entrada
(reector): 3,7 V , 5 W
Celda solar: 300 mA,
máx. 1,5 W
Batería de ion de
litio: 3,7 V ,
1500 mAh
(no sustituible)
Fuente de luz: 56x LED (no sustituible)

15
US-ES
Sensor de
movimiento: Rango de detección:
máx. 10 m
Ángulo de detección:
aprox. 120°
Duración de la luz: 15 s
Flujo luminoso: máx. 450 lm
Tiempo de carga: aprox. 7-8 h con
50.000 Lux
Vida útil del LED: aprox. 50 000 h
Temperatura de
color: 6500 K
(luz blanca fría)
Altura recomendable
de ensamble: aprox. 2-4 m
Dimensiones del
reector (sin soporte
de pared):
aprox. 20 x 11 x 3 cm
(modelo 1020-B)
aprox. 17,5 x 11 x
3,5 cm (modelo
1020-S)
Área de proyección
máxima: aprox. 119 cm²
(modelo 1020-B)
aprox. 118 cm²
(modelo 1020-S)
Peso: aprox. 310 g
(modelo 1020-B)
aprox. 300 g
(modelo 1020-S)
zInstrucciones de seguridad
Instrucciones
de seguridad
¡ADVERTENCIA!
¡PELIGRO DE MUERTE Y DE
ACCIDENTE PARA BEBÉS Y
NIÑOS!
Nunca deje a los niños
desatendidos con el material de empaque.
Existe peligro de atragantamiento debido al
material de empaque. Los niños a menudo
subestiman los peligros. Mantenga el
producto alejado de los niños.
Este aparato puede ser utilizado por niños
de 8 años y mayores y personas con
capacidades físicas, sensoriales o mentales
reducidas, o con falta de experiencia y
conocimiento, si se les ha dado
instrucciones referidas al uso del aparato
de una manera segura y comprendan los
peligros involucrados. Los niños no deben
jugar con este producto. La limpieza y el
mantenimiento no deberán hacerlo los
niños sin supervisión.
No utilice el aparato si detecta algún
daño.
El fabricante/distribuidor de este producto
no se responsabilizará de lesiones o daños
resultantes de una instalación o uso
inadecuado.
No sumerja nunca el producto en agua o
en otros líquidos.
Mantenga el producto alejado del fuego y
de supercies calientes.
El módulo LED 1 no es reemplazable.
Los LEDs no son reemplazables. Cuando la
fuente de luz alcance el nal de su vida
útil, deberá sustituirse todo el producto.
No manipule ni altere nunca el producto.
No abra la carcasa, sino que encomiende
la reparación a los especialistas. Póngase
en contacto con un establecimiento
especializado para ello. La responsabilidad
y los derechos de garantía quedan
excluidos en caso de reparaciones
realizadas de forma independiente,
conexión inadecuada o funcionamiento
incorrecto).
¡PELIGRO DE MUERTE!
Mantenga a los
niños alejados de la zona de trabajo
durante el ensamble. El volumen de
suministro contiene varios tornillos y otras
partes pequeñas, que pueden ser
peligrosas ya que podrían provocar
atragantamiento en caso de ser ingeridas o
inhaladas.
Indicaciones de seguridad
para pilas / baterías
¡PELIGRO DE MUERTE!
Mantenga las
pilas / baterías fuera del alcance de los
niños. ¡En caso de ingestión, consulte

16 US-ES
inmediatamente a un médico!
¡NOTA!
La batería no es reemplazable.
Cuando se agote, deberá eliminarse todo
el producto.
¡PELIGRO DE EXPLOSIÓN!
No
recargue nunca pilas no
recargables. No cortocircuite ni
abra las pilas / baterías. Podrían
calentarse, encenderse o explotar.
No arroje nunca las pilas / baterías al
fuego o al agua.
No exponga las pilas / baterías a
esfuerzos mecánicos.
zRiesgo de fuga de pilas /
baterías
Evite condiciones y temperaturas extremas
que puedan afectar a las pilas / baterías,
p. ej. calefacción / radiación solar directa.
Evite el contacto con la piel, los ojos y las
membranas mucosas. En caso de contacto
con el ácido de la batería, lave la zona
inmediatamente con agua limpia y busque
ayuda médica de inmediato.
¡LLEVE GUANTES
PROTECTORES!
Las pilas /
baterías con fugas o dañadas
pueden ocasionar quemaduras al entrar en
contacto con la piel. En ese caso, lleve
guantes protectores adecuados.
Si las pilas presentan fugas, retírelas
inmediatamente del producto para evitar
daños.
zEnsamble
Nota:
Retire todo el material de embalaje
del producto. Antes de ensamblarlo, decida
dónde ensamblar el producto. Antes de
taladrar los agujeros de montaje, cerciórese
de que no hay líneas de gas, agua o
electricidad que puedan ser taladradas o
dañadas en el lugar de la instalación.
Utilice un taladro para realizar las
perforaciones en la mampostería. Observe
las instrucciones de seguridad del instructivo
de uso y de seguridad del taladro. De lo
contrario, existe riesgo de muerte o lesiones
por descarga eléctrica.
Nota:
El material de ensamble que se
adjunta es adecuado para mamposterías
sólidas estándar. Infórmese también del
material de ensamble adecuado para la
supercie de instalación que ha elegido. Si
es necesario, solicite información a un
profesional.
Al seleccionar el lugar de ensamble,
preste atención a lo siguiente:
Cerciórese de que el producto ilumine el
área deseada. Cerciórese de que el sensor
de movimiento 4 detecte el área deseada.
El sensor de movimiento tiene un rango de
detección de 10 m con un ángulo de
detección de aprox. 120°.
Cerciórese de que el sensor de movimiento
4 no reciba luz por la noche del
alumbrado público, ya que puede afectar
al funcionamiento.
La altura de instalación recomendada es
de 2 a 4 metros. Si es posible, ensamble el
reector en un lugar protegido de la
suciedad y el polvo, protegido de la lluvia
(por ejemplo, bajo un alero) y de otras
inuencias climatológicas.
Nota:
La celda solar 2 necesita recibir la
mayor cantidad posible de luz solar directa.
Incluso un sombreado parcial de la celda
solar durante el día puede afectar
signicativamente a la carga.
Punto cardinal:
La orientación óptima es hacia el sur. Más
bien, elija una orientación desviada
ligeramente hacia el oeste en lugar de hacia
el este.
z
Instalación del reector
Marque las posiciones de los oricios guía
3/
13
en el lugar de instalación de la

17
US-ES
pared.
Taladre dos agujeros (ø 6 mm) e inserte los
taquetes adecuados
8
(ver las gs. C y G).
Instalar el modelo 1020-B
Atornille los tornillos 7 en los taquetes 8,
dejando un espacio de unos 3 mm entre la
cabeza del tornillo y la pared de montaje
(ver la g. C).
Coloque los oricios guía 3 sobre los
tornillos y empuje el reector a lo largo de
la guía para jarlo (ver la g. C).
Si es necesario, corrija la distancia de los
tornillos a la supercie de instalación para
lograr un ajuste rme del reector.
Instalar el modelo 1020-S
Atornille el soporte de pared
11
introduciendo los tornillos 8 a través de
los oricios guía
13
en los taquetes 8 y
apriételos rmemente (ver la g. G).
Fije el reector al soporte de pared
11
aojando el pomo rosca 9 y retirando el
tornillo
12
�
Superponga los agujeros del reector y del
soporte de pared e introduzca el tornillo
12
a través de los agujeros (ver la g. F).
Atornille el pomo rosca del reector 6a
los tornillos y apriételos con la mano.
Compruebe que el producto haya quedado
bien sujeto.
z
Orientación del reector /
celda solar
Orientar el modelo 1020-B
El reector puede orientarse horizontalmente
(arriba/abajo) en un ángulo de hasta 180°
(ver la g. D).
Aoje los dos pomos rosca del reector 6
para ajustar la posición del reector (ver la
g. B).
Cuando oriente el reector a la posición
deseada, apriete de nuevo los pomos
rosca. Si es necesario, utilice un
destornillador para evitar que se mueva el
tornillo en el pomo rosca.
Orientar el modelo 1020-S
El reector puede orientarse horizontalmente
(arriba/abajo) en un ángulo de hasta 180°
(ver la g. H).
Aoje el pomo rosca del soporte de pared
10
para ajustar la altura del reector (ver
la g. H).
Cuando oriente el reector a la posición
deseada, apriete de nuevo el pomo rosca.
Aoje el pomo rosca del reector 9 para
ajustar el ángulo de inclinación del
reector (ver la g. H).
Cuando oriente el reector a la posición
deseada, apriete de nuevo el pomo rosca.
Si es necesario, utilice un destornillador
para evitar que se mueva el tornillo en el
pomo rosca.
Nota:
El sensor de movimiento ofrece un
ángulo de detección de hasta 120°.
Cerciórese de que el sensor de movimiento
se encuentre orientado en línea recta hacia
el área de detección que desee.
Nota:
Cerciórese de que la supercie de la
celda solar 2 no esté sucia para garantizar
un funcionamiento óptimo.
Punto cardinal:
La orientación óptima es hacia el sur. Más
bien, elija una orientación desviada
ligeramente hacia el oeste en lugar de hacia
el este.
zCarga de la batería
La batería se carga en cualquiera de los
modos. Conseguirá una carga óptima al
principio, cuando el producto esté
apagado.
Nota:
Después de 7 a 8 horas con buena
luz solar la batería estará cargada. La
duración del proceso de carga depende del
estado de carga de la batería y de la
calidad de la luz solar.

18 US-ES
zManejo
El producto puede funcionar en tres modos
diferentes. Los modos de funcionamiento se
pueden ajustar con el interruptor 5�
Nota:
La celda solar enciende el producto
al anochecer o en la oscuridad, en el modo
que haya establecido.
Nota:
La carga de la batería a través de la
celda solar no depende del modo
seleccionado. Siempre se produce la carga
independientemente del modo seleccionado.
Modo 1
Pulse el interruptor 5 durante 3 segundos
para cambiar al ”Modo 1“.
El reector se enciende 1 vez y cambia a
la luz de orientación (luminosidad
reducida).
En el momento en que el sensor de
movimiento detecta un movimiento dentro
de su radio de acción, el reector se
enciende con toda su luminosidad.
Al cabo de unos 15 segundos se vuelve a
encender la luz de orientación.
Modo 2
Vuelva a pulsar el interruptor 5 para
cambiar al ”Modo 2“.
La luz parpadea 2 veces y luego se
apaga.
En el momento en que el sensor de
movimiento detecta un movimiento dentro
de su radio de acción, el reector se
enciende con toda su luminosidad.
Al cabo de unos 15 segundos se vuelve a
apagar la luz.
Modo 3
Vuelva a pulsar el interruptor 5 para
cambiar al ”Modo 3“.
La luz parpadea 3 veces. La luz de
orientación (luminosidad reducida) se
queda encendida de forma permanente.
En este modo el sensor de movimiento está
desactivado.
Apagar del reector
Pulse el interruptor 5 una cuarta vez para
apagar el reector.
zResolución de problemas
= Problema
=Causa
= Solución
= El producto no se enciende.
=El producto está apagado.
= Pulse el interruptor 5 para encender
el producto (véase el capítulo
"Manejo").
= La luz parpadea.
= La batería está casi descargada.
= Cargue la batería (consulte el
capítulo "Carga de la batería").
zLimpieza y almacenaje
Apague el producto si no desea utilizarlo,
va a guardarlo o limpiarlo.
Compruebe periódicamente si el sensor de
movimiento 4 y la celda solar 2
presentan suciedad. Retírelas para
garantizar que el producto funcione
correctamente.
En invierno, mantenga el producto,
especialmente la celda solar, libre de nieve
y hielo.
Utilice sólo un paño seco y sin pelusas
para la limpieza. Para una suciedad más
intensa, humedezca ligeramente el paño.
zEliminación
Puede ponerse en contacto con su
administración municipal o
ayuntamiento para informarse sobre
las opciones de disposición de
residuos.

19
US-ES
¡Daños ambientales debido a la
disposición incorrecta de las baterías!
Las baterías no deben desecharse con la
basura doméstica. Pueden contener metales
pesados tóxicos y deben tratarse como
residuos peligrosos. Los símbolos químicos
de los metales pesados son los siguientes:
Cd = cadmio, Hg = mercurio,
Pb = plomo.
zGarantía limitada de 3
años
Lo que cubre la presente garantía
· Daños, quebraduras o incapacidad para
funcionar debido a defectos.
· Daños que no hayan sido causados por el
desgaste propio del uso o por no seguir las
instrucciones de seguridad y mantención
incluidas en el manual para el usuario.
Lo que no cubre esta garantía
La garantía no cubre daños causados por:
· El desgaste propio del uso del producto,
incluidas las partes frágiles (como
interruptores, piezas de vidrio, etc.).
· Uso o transporte no indicado del producto.
· Desatención a las instrucciones de
seguridad y mantención.
· Accidentes o causas de fuerza mayor (e.g.
relámpagos, incendio, inundación, etc.).
· Manipulación mal intencionada del
producto (retirar la cubierta, tornillos, etc.).
La presente garantía tampoco cubre daños
indirectos o emergentes. Sin embargo
algunos estados no permiten la exclusión o
limitación de daños indirectos o emergentes,
por lo que dicha exclusión o limitación
pudiera no aplicarse en su caso.
Período de cobertura y resolución de
la garantía
La garantía es válida por 3 años a partir de
la fecha de compra. La empresa, según
lo estime conveniente, devolverá el dinero o
repondrá el producto.
La empresa no:
· Dará inicio a un nuevo período de
garantía al hacerse el cambio del
producto.
· Reparará el producto.
¿Cómo se tramita la garantía?
Recomendamos que primero usted:
· Llame al Servicio de atención al cliente al 1
(844) 543-5872.
· Visite el Portal de atención al cliente en
www.lidl.com/contact-us
· Visite una de nuestras tiendas LIDL en caso
de cualquier inquietud.
A n de acelerar el trámite de la garantía,
tenga a bien contar con lo siguiente:
· Recibo de venta original que incluya la
fecha de compra.
· Producto y manual en su empaque original.
· Descripción del problema.
¿Qué debe hacer usted para mantener
la garantía vigente?
· Guardar el recibo original.
· Seguir todas las instrucciones para el uso
del producto.
· No realizar ninguna reparación ni
alteración al producto.
¿De qué manera inuyen las leyes
estatales con esta garantía?
La presente garantía le otorga derechos
legales especí cos, y pudiera usted contar
con otros derechos los cuales varían de un
estado a otro. Todas las garantías implícitas
se encuentran limitadas a la duración y
términos de la presente garantía. Algunos
estados no permiten limitaciones al período
de tiempo y términos de la garantía
implícita, por lo que dichas limitaciones
pudieran no aplicarse en su caso.

20
zServicio postventa
US-ES
Hotline: 1 (844) 543-5872
(www.lidl.com/contact-us)
IAN 387731_2101
Por favor, al realizar cualquier consulta
tenga a mano el recibo y el número de
artículo (p. ej. IAN 123456) como
comprobante de compra.
Puede consultar una versión actual del
manual de instrucciones en:
www.citygate24.de
Table of contents
Languages:
Other LIVARNO Spotlight manuals

LIVARNO
LIVARNO 375304 2101 Original instructions

LIVARNO
LIVARNO 1002-W Original instructions

LIVARNO
LIVARNO 314812 Technical specifications

LIVARNO
LIVARNO home 353560_2010 Technical specifications

LIVARNO
LIVARNO 88651 User manual

LIVARNO
LIVARNO Z31171 Technical specifications

LIVARNO
LIVARNO 1020-B User manual
Popular Spotlight manuals by other brands

LIVARNO LUX
LIVARNO LUX 300304 Assembly, operating and safety instructions

LIVARNO LUX
LIVARNO LUX 288404 Assembly, operating and safety instructions

LIVARNO LUX
LIVARNO LUX 898-S manual

Factory Method
Factory Method ZING manual

Perel
Perel EHS120D user manual

PROMAT
PROMAT 4000873348 Original instruction manual