Livestrong LS7.9E User manual

Read the ELLIPTICAL GUIDE before using this OWNER’S MANUAL.
LS12.9ELS9.9ELS7.9E
ELLIPTICAL OWNER’S MANUAL

23
ASSEMBLY
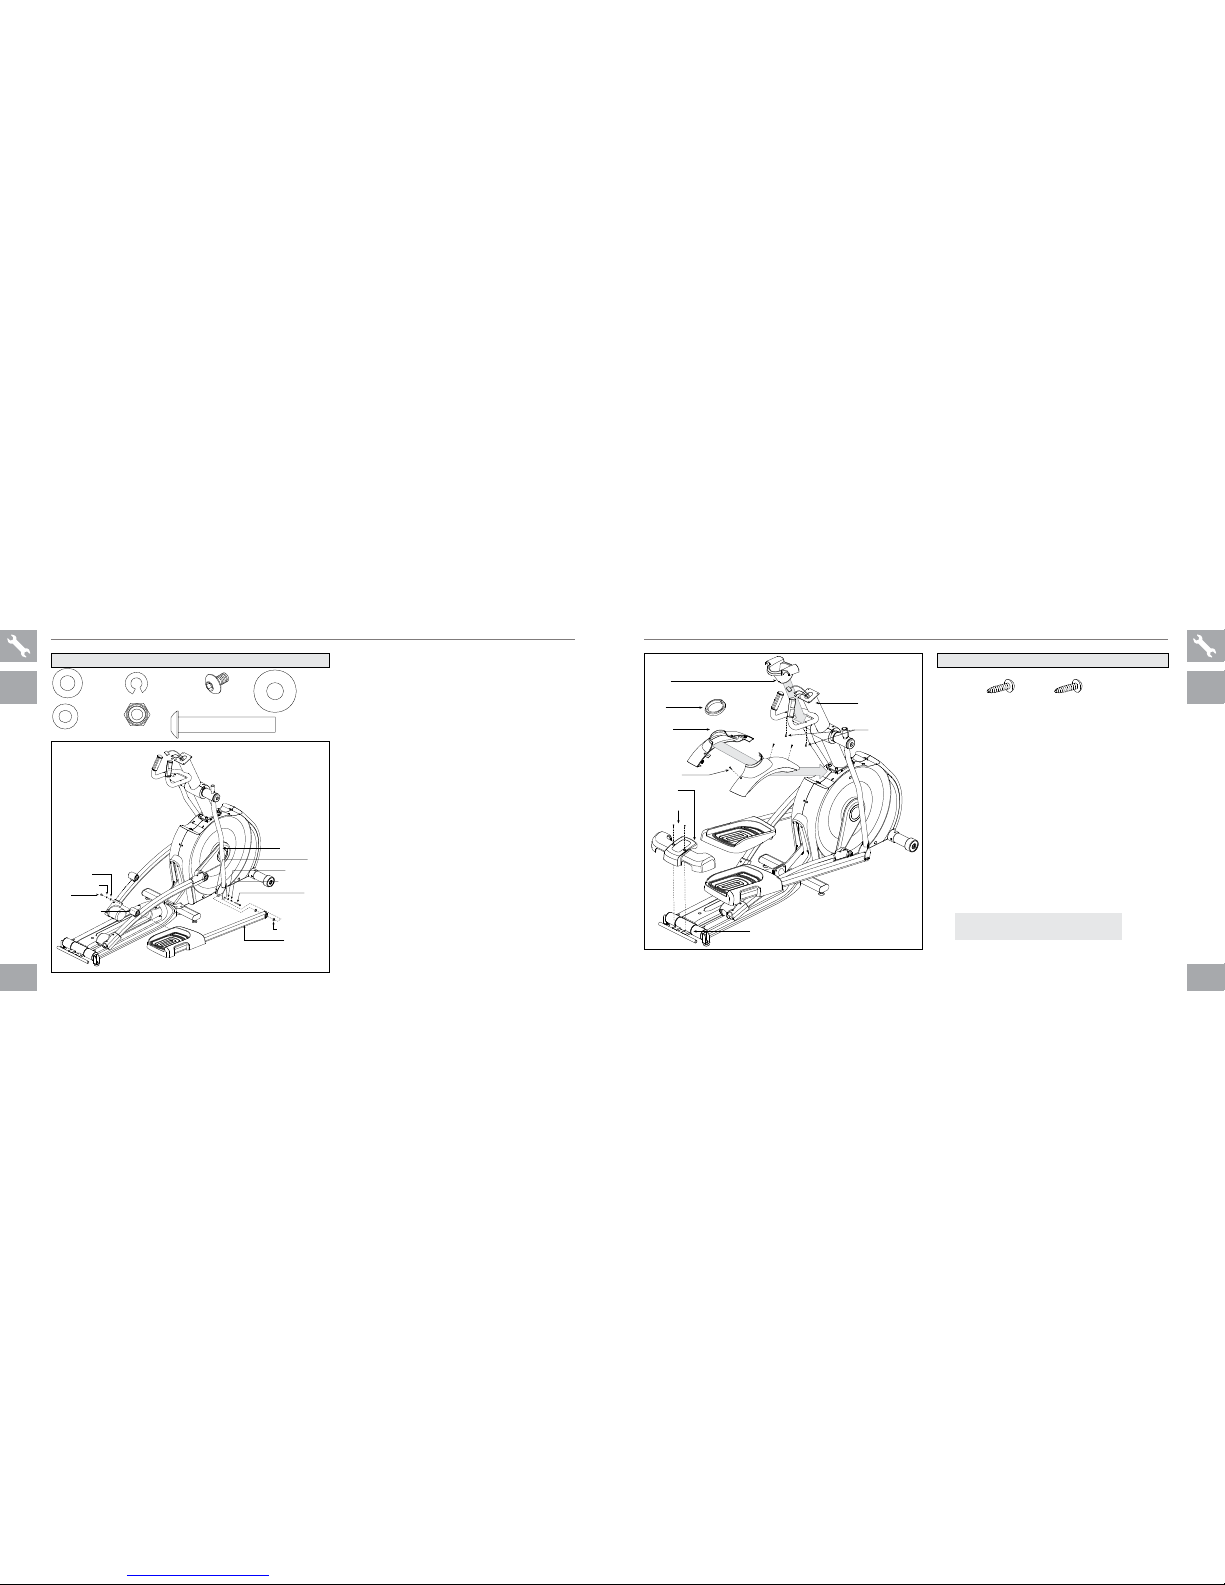
There are several areas during the assembly process that special attention must be paid. It is very important to follow the assembly
instructions correctly and to make sure all parts are firmly tightened. If the assembly instructions are not followed correctly, the
elliptical could have parts that are not tightened and will seem loose and may cause irritating noises. To prevent damage to the
elliptical, the assembly instructions must be reviewed and corrective actions should be taken.
Before proceeding, find your elliptical’s serial number located on the front stabilizer tube and enter it in the space provided
below. Also locate the model name which is next to the serial number.
ENTER YOUR SERIAL NUMBER AND MODEL NAME IN THE BOXES BELOW:
WARNING
LIVESTRONG™is a registered trademark of the Lance Armstrong Foundation.
The Lance Armstrong Foundation fights for the more than 25 million people around the world living with cancer today. There can be – and should be – life after cancer for more people. They
kick in at the moment of diagnosis, giving people the resources and support they need to fight cancer head-on. They find innovative ways to raise awareness, fund research and end the stigma
about cancer that many survivors face. They connect people and communities to drive social change, and call for state, national and world leaders to help fight this disease. Anyone, anywhere
can join the fight against cancer. Join them at LIVESTRONG.org.
INTRODUCTION
Congratulations and thank you for your purchase of this LIVESTRONG™elliptical!
Purchases of this product ensure that a minimum of $4M will go to the Lance Armstrong Foundation and the fight against cancer.
Whether your goal is to win races or simply enjoy a fuller, healthier lifestyle, a LIVESTRONG™elliptical can help you
attain it – adding club-quality performance to your at-home workouts, with the ergonomics and innovative features you
need to get stronger and healthier, faster. Because we’re committed to designing fitness equipment from the inside
out, we use only the highest quality components. It’s a commitment we back with one of the strongest frame-to-motor
warranty packages in the industry.
You want exercise equipment that offers the most comfort, the best reliability and the highest quality in its class.
LIVESTRONG™ellipticals deliver. SERIAL NUMBER:
MODEL NAME: LIVESTRONG ELLIpTIcAL

4 5
PIVOTING FOOT PADS
CR AN K
TOP CAP
GUIDE RAIL SET
SPEAKE RS
WATE R BOTTLE HOLDER
UPPER HANDLEBAR
PULSE GRIPS
CONSOLE
RE AR COVER
STABILIZ ER TUB E
POWER CORD SOCKET
MAIN FRAME
PEDAL ARM
IPOD/MP3 PLAYER POCKE T
CONSOLE MAS T
TOUCH PAD PANEL AND DISPLAY WINDOWS
LOWER HANDLEBAR
LOWER LINK ARM
PIVOTING FOOT PADS
CR AN K
INCLINE BRACKET
TOP CAP
GUIDE RAIL SET
SPEAKE RS
WATE R BOTTLE HOLDER
UPPER HANDLEBAR
PULSE GRIPS
RE AR COVER
STABILIZ ER TUB E
POWER CORD SOCKET
MAIN FRAME
PEDAL ARM
IPOD/MP3 PLAYER POCKE T
CONSOLE MAS T
CONSOLE
BUTTONS AND D ISPL AY WINDOWS
LOWER HANDLEBAR
LOWER LINK ARM
LS7.9E LS9.9E

6 7
PIVOTING FOOT PADS
CR AN K
INCLINE BRACKET
TOP CAP
GUIDE RAIL SET
SPEAKE RS
WATE R BOTTLE HOLDER
UPPER HANDLEBAR
PULSE GRIPS
RE AR COVER
STABILIZ ER TUB E
POWER CORD SOCKET
MAIN FRAME
PEDAL ARM
IPOD/MP3 PLAYER POCKE T
INCLINE LEVEL TOGGLES
RE SISTANCE LEVEL TOGGLES
CONSOLE MAS T
CONSOLE
BUTTONS AND D ISPL AY WINDOWS
LOWER HANDLEBAR
LOWER LINK ARM
LS12.9E
TOOLS INcLUDED:
FScrewdriver
F8 mm L-Wrench
F6 mm L-Wrench
F5 mm L-Wrench
F13/15 mm Flat Wrench
pARTS INcLUDED:
F1 Stabilizer Tube
F1 Guide Rail Set
F2 Pedal Arms
F2 Lower Handlebars
F2 Upper Handlebars
F2 Lower Link Arms With Footpads
F1 Top Cap (2 pieces)
F1 Console Mast
F1 Console Mast Boot
F1 Console
F2 Handlebar Caps
F1 Water Bottle Holder
F1 Rear Cover (LS9.9E, LS12.9E only)
F2 Sets Handlebar Covers (LS12.9E only)
F2 Aero Hand Grips (LS12.9E only)
F1 Audio Adapter Cable
F1 Power Cord
F9 Hardware Bags (LS12.9E) or...
F7 Hardware Bags (LS7.9E, LS9.9E)
UNpAcKING
Unpack the product where you will be using it. Place the elliptical carton on a level
flat surface. It is recommended that you place a protective covering on your floor.
Never open box when it is on its side.
NOTE: During each assembly step, ensure that ALL nuts and bolts are in place
and partially threaded in before completely tightening any ONE bolt.
NOTE: A light application of grease may aid in the installation of hardware. Any
grease, such as lithium bike grease is recommended.
pRE ASSEMBLY
ALL
MODELS

8 9
ASSEMBLY STEp 1
A Open HARDWARE BAG 1.
B Attach the STABILIZER TUBE to the MAIN
FRAME using 4 BOLTS (A), 4 SPRING
WASHERS (B) and 4 ARC WASHERS (C).
BOLT (A)
30 mm
Qty: 4
SPRI NG WASHER (B)
15 mm
Qty: 4
ARC WASHER (C)
17 mm
Qty: 4
HARDWARE BAG 1 CONTENTS :
BOLTS (A)
SPRI NG WASHERS (B)
ARC WASHER S (C)
STABILIZER TU BE
MAIN FRAME
BOLTS (A)
SPRI NG WASHERS (B)
ARC WASHER S (C)
STABILIZER TU BE
MAIN FRAME
LS7.9E ASSEMBLY STEp 2
* This step is for LS7.9E only.
A Open HARDWARE BAG 2.
B Align GUIDE RAIL SET with MAIN FRAME as
shown.
C Attach the GUIDE RAIL SET to the MAIN FRAME
using 4 BOLTS (D), 4 FLAT WASHERS (E) and 4
TOOTH WASHERS (G).
TOOTH WASHER (G)
15 mm
Qty: 4
FLAT WASHE R (E)
17 mm
Qty: 4
BOLT (D)
55 mm
Qty: 4
HARDWARE BAG 2 CONTENTS :
TOOTH WASHERS (G)
FLAT WASHERS (E)
GUIDE RAIL SET
BOLTS (D)
MAIN FRAME
LS7.9E SHOWN
LS7.9E
ALL
MODELS
LS7.9E SHOWN
LS9.9E , LS12.9E
SHOWN

10 11
LS9.9E, LS12.9E ASSEMBLY STEp 2
* This step is for LS9.9E, LS12.9E models only.
* LS7.9E models skip to STEP 3.
A Open HARDWARE BAG 2.
B Attach the GUIDE RAIL SET to the MAIN FRAME
using 4 BOLTS (D), 4 FLAT WASHERS (E) and 4
TOOTH WASHERS (G).
TOOTH WASHER (G)
15 mm
Qty: 4
FLAT WASHE R (E)
17 mm
Qty: 4
BOLT (D)
55 mm
Qty: 4
HARDWARE BAG 2 CONTENTS (For Steps A–B):
TOOTH WASHERS (G)
FLAT WAS HERS (E)
GUI DE RAIL SET
BOLTS (D)
MAIN FRAME
LS9.9E , LS12.9E ONLY
LS9.9E
LS12.9E
LS9.9E, LS12.9E ASSEMBLY STEp 2
C Attach the GUIDE RAILS to the MAIN FRAME
using 4 BOLTS (H), 4 FLAT WASHERS (I), 4
SPRING WASHERS (B) and 4 NUTS (J).
SPRI NG WASHER (B)
15 mm
Qty: 4
FLAT WASHE R (I)
16 mm
Qty: 4
BOLT (H)
35 mm
Qty: 4
NUT (J)
Qty: 4
HARDWARE BAG 2 CONTENTS (For Step C) :
GUI DE RAILS
MAIN FRAME
BOLTS (H)
SPRI NG WASHER S (B)
FLAT WASHE RS (I)
NUTS (J)
LS9.9E , LS12.9E ONLY
LS9.9E
LS12.9E

12 13
BOLT (M)
SPRI NG WASHER (B)
FLAT WASHE R (K)
WAVY WASHE R (L)
PEDAL ARM
CRANK
PEDAL ARM WHE EL
GUI DE RAIL
CONSOLE MAST
PRE-IN STALLE D BOLTS
CONSOLE CABLE
MAIN FRAME
ASSEMBLY STEp 3
ALL
MODELS
A Open HARDWARE BAG 3.
B Carefully pull the CONSOLE CABLE through
the CONSOLE MAST using the twist tie located
inside the CONSOLE MAST.
C Gently slide the CONSOLE MAST onto the
MAIN FRAME and attach CONSOLE MAST to
MAIN FRAME using PRE-INSTALLED BOLTS.
D Slide WAVY WASHER (L) over CRANK
followed by PEDAL ARM as shown. Rest
PEDAL ARM WHEEL on GUIDE RAIL.
E Attach the PEDAL ARM to the CRANK using 1
FLAT WASHER (K), 1 SPRING WASHER (B)
and 1 BOLT (M).
F Repeat steps D–E on the opposite side of the
elliptical.
BOLT (M)
20 mm
Qty: 2
SPRIN G WASHER (B)
15 mm
Qty: 2
FLAT WASHER (K)
20 mm
Qty: 2
WAVY WASHER (L)
22.5 mm
Qty: 2
HARDWARE BAG 3 CONTENTS :LS9.9E , LS12.9E SHOWN
ASSEMBLY STEp 4
A Open HARDWARE BAG 4.
B Slide 1 FLAT WASHER (N), 1 WAVY WASHER
(L) and another FLAT WASHER (N) onto the
CONSOLE MAST.
C Slide LOWER HANDLEBAR onto CONSOLE
MAST and attach using 1 FLAT WASHER (N),
1 FLAT WASHER (K), 1 HANDLEBAR CAP, 1
FLAT WASHER (K), 1SPRING WASHER (B)
and 1 BOLT (M).
D Repeat steps B–C on the opposite side of the
elliptical.
BOLT (M)
20 mm
Qty: 2
SPRI NG WASHER (B)
15 mm
Qty: 2
FLAT WASHE R (K)
20 mm
Qty: 4
WAVY WASHE R (L)
22.5 mm
Qty: 2
FLAT WASHE R (N)
25 mm
Qty: 6
HARDWARE BAG 4 CONTENTS :LS12.9E SHOWN
BOLT (M)
SPRI NG
WASHER (B)
FLAT WASHE RS (K)
FLAT WASHE RS (N)
CONSOLE MAST
HANDLE BAR
CAP
LOWER HANDLE BAR
WAVY WASHER (L)
ALL
MODELS
NOTE: Be
careful not
to pinch any
wires while
attaching the
console mast.

14 15
WATER
BOTTLE
HOLDER
CONSOLE MAST
SCREWS (Q)
SCREWS (Q)
REAR CAP
SCREWS (R)
REAR STABILIZER
CONSOLE
MAST
BOOT
TOP CAP
(LEFT & RIGHT)
BOLT (O)
SPRI NG WASHER (B)
FLAT WASHE R (E)
FLAT WASHE R (K)
BOLT (M)
NUT (J)
LOWER HANDLE BAR
SPRI NG WASHER (B)
TEFLON WASHER S (P)
LOWER LINK AR M
PEDAL ARM BRACKET
ASSEMBLY STEp 5
ALL
MODELS
A Open HARDWARE BAG 5.
B Slide LOWER LINK ARM onto PEDAL ARM
BRACKET.
C Attach LOWER LINK ARM to PEDAL ARM
using 1 FLAT WASHER (K), 1 SPRING
WASHER (B) and 1 BOLT (M).
D Align opposite end of LOWER LINK ARM with
bracket on bottom of LOWER HANDLEBAR.
NOTE: Be sure to remove the zip tie on the
LINK ARM.
E Place TEFLON WASHERS (P) on both sides of
the LOWER LINK ARM. While holding TEFLON
WASHERS (P) slide LOWER LINK ARM into
bottom end of LOWER HANDLEBAR.
F Secure the joint with 1 FLAT WASHER (E), 1
SPRING WASHER (B),1 BOLT (O) and secure
with 1 NUT (J).
G Repeat steps B–F on the opposite side of the
elliptical.
BOLT (M)
20 mm
Qty: 2
SPRI NG WASHER (B)
15 mm
Qty: 4
FLAT WASHE R (K)
20 mm
Qty: 2 TEFLON
WASHER (P)
28.4 mm
Qty: 4
FLAT WASHE R (E)
17 mm
Qty: 2
NUT (J)
Qty: 2
BOLT (O)
70 mm
Qty: 2
HARDWARE BAG 5 CONTENTS :
LS12.9E SHOWN
LS9.9E
LS12.9E
LS9.9E, LS12.9E ASSEMBLY STEp 6
* This step is for LS9.9E, LS12.9E models only.
* LS7.9E skip to next page.
A Open HARDWARE BAG 6.
B Slide RIGHT TOP CAP over CONSOLE
MAST and attach using 3 SCREWS (Q).
C Slide CONSOLE MAST BOOT around
CONSOLE MAST and insert into TOP CAP.
D Slide WATER BOTTLE HOLDER over
CONSOLE MAST and attach using 2
SCREWS (R).
E Slide REAR CAP over REAR STABILIZER
and attach using 2 SCREWS (Q).
SCREW (Q)
15 mm
Qty: 5
SCREW (R)
15 mm
Qty: 2
HARDWARE BAG 6 CONTENTS :LS12.9E SHOWN
NOTE: Be careful not to pinch any
wires while tightening screws.

16 17
CONSOLE
BOLTS (T)
UPPER HAN DLEBAR
(LS12.9E SHOWN)
CONSOLE CABLES
LOWER HANDLE BAR
HANDLE BAR WIRES
(LS12.9E ONLY)
PRE-IN STALLE D
SET SCREWS
NOTCH
TAB
CONSOLE MAST
CONSOLE
MAST BOOT
TOP CAP
WATER
BOTTLE
HOLDER
CONSOLE MAST
SCREWS (S)
TOP CAP
REAR
COVER
LS7.9E
LS7.9E ASSEMBLY STEp 7
* This step is for LS7.9E only.
* LS9.9E, LS12.9E models skip to next page.
A Open HARDWARE BAG 7.
B Slide TOP CAP and TOP CAP REAR COVER
over CONSOLE MAST and snap into place.
C Insert CONSOLE MAST BOOT over TOP CAP
and snap into place.
D Slide WATER BOTTLE HOLDER over
CONSOLE MAST and attach using 2
SCREWS (S).
HARDWARE BAG 7 CONTENTS :
ALL
MODELS
SCREW (S)
12 mm
Qty: 2
A Open HARDWARE BAG 8.
B Attach the CONSOLE CABLES to the CONSOLE.
C Carefully tuck the CONSOLE CABLES into the
CONSOLE MAST before attaching the CONSOLE.
Attach CONSOLE to CONSOLE MAST using 4
BOLTS (T).
D Slide UPPER HANDLEBARS onto LOWER
HANDLEBARS and align NOTCH with TAB making
sure handlebars are joined together completely.
Secure UPPER HANDLEBARS to LOWER
HANDLEBARS using PRE-ATTACHED SET
SCREWS.
E LS12.9E ONLY: Connect the HANDLEBAR WIRES
from the UPPER HANDLEBAR to the wires from the
CONSOLE MAST.
F Repeat step D–E on other side.
ASSEMBLY STEp 8
BOLT (T)
12 mm
Qty: 4
HARDWARE BAG 8 CONTENTS :LS12.9E SHOWN
NOTE: Be careful not to pinch
any wires while attaching the
console or handlebars. LS7.9E, LS9.9E ASSEMBLY COMPLETE!
LS7.9E SHOWN
NOTE: Be careful not to pinch any
wires while tightening screws.

18 19
BOLTS (T)
UPPER HAN DLEBAR
HANDLE BAR
WIRES
AERO HAND GRIPS
HANDLE BAR COVERS
SCREWS (Q)
ELLIPTICAL OPERATION
This section explains how to use your elliptical’s console and programming.
The BASIC OPERATION section in the ELLIPTICAL GUIDE has instructions for the following:
• LOcATION OF THE ELLIpTIcAL
• pOWER/GROUNDING INSTRUcTIONS
• FOOT pOSITIONING
• MOVING THE ELLIpTIcAL
• LEVELING THE ELLIpTIcAL
• pOWER/MANUAL INcLINE OpERATION
• USING THE HEART RATE FUNcTION
* This step is for LS12.9E only.
A Open HARDWARE BAG 9.
B Connect the HANDLEBAR WIRES from the
right AERO HAND GRIP to the wires from the
UPPER HANDLEBAR. Attach AERO HAND
GRIP to the UPPER HANDLEBAR using 2
BOLTS (T).
NOTE: Be careful not to pinch any wires.
C Repeat on other side.
D Snap right HANDLEBAR COVERS over
handlebars and attach using 4 SCREWS (Q).
E Repeat on other side.
LS12.9E ASSEMBLY STEp 9
BOLT (T)
15 mm
Qty: 4
SCREW (Q)
15 mm
Qty: 8
HARDWARE BAG 9 CONTENTS :LS12.9E ONLY
NOTE: Be careful not
to pinch any wires while
attaching parts.
LS9.9E
LS12.9E
LS12.9E ASSEMBLY COMPLETE!

20 21
LS7.9E cONSOLE OpERATION
Note: There is a thin protective sheet of clear plastic on the overlay of the console that should be removed before use.
A) LED DISpLAY WINDOWS: time, distance, speed, calories, watts and heart rate.
Resistance level is displayed when level is changed.
B) pROGRAM LED INDIcATORS: indicates what program is selected.
c) START: press to begin exercising, starts your workout, or resume exercising after pause.
D) STOp: press to pause/end your workout. Hold for 3 seconds to reset the console.
E) LEVEL / : used to adjust resistance level.
F) QUIcK KEYS: used to reach desired resistance level more quickly.
G) SELEcT pROGRAM: press to select your desired program.
H) cUSTOM 1 & 2: press to select your custom 1 or 2 program. LED will illuminate.
I) ENTER & / : used to confirm and adjust program settings.
J) cHANGE DISpLAY: press to change display feedback during workout.
K) SpEAKERS: music plays through speakers when your CD / MP3 player is connected to the console.
L) AUDIO IN JAcK: plug your CD / MP3 player into the console using the included audio adaptor cable.
M) AUDIO OUT / HEADpHONE JAcK: plug your headphones into this jack to listen to your music through the headphones.
Note: when headphones are plugged into the headphone jack the sound will no longer come out through the speakers.
N) Mp3 pLAYER pOcKET: used to store your MP3 player.
O) READING RAcK: holds reading material.
* Maximum user’s body weight = 135 kg / 300 lbs
DI STA NC E
TI ME
SP EE D
WAT TS
CA LOR IE S
HE AR T RAT E
MAN UAL RE VERS E TRAI N
INT ERVA LS MO UNTA IN
WEI GHT LOS S CONS TANT WAT TS
1
2
3
5
6
7
4
8
9
10
11
13
14
15
12
16
L S 7.9E
CUSTO M
PROGR AM
1
CUSTO M
PROGR AM
2
SELE CT
PROGR AM ENT ER
CH A N G E D I S P L AY
P R O G R A M M I N G C O N T R O L S
S T OP
HOL D TO RES ET
S TA R T
QUI CK STAR T
L E V E L
LA
BB
G
H
F
E
C
J
I
F
M
D
N
O
K K
LS7.9E LS7.9E

22 23
LS9.9E cONSOLE OpERATION
Note: There is a thin protective sheet of clear plastic on the overlay of the console that should be removed before use.
A) LED DISpLAY WINDOWS: time, distance, watts, RPM, calories, heart rate and speed.
Incline and resistance levels are displayed when their levels are changed.
B) LED DOT MATRIx WINDOW: displays workout profile.
c) START: press to begin exercising, starts your workout, or resume exercising after pause.
D) STOp: press to pause/end your workout. Hold for 3 seconds to reset the console.
E) INcLINE / : used to adjust incline level.
F) RESISTANcE + / – : used to adjust resistance level.
G) QUIcK KEYS: used to reach desired incline or resistance level more quickly. Press quick key number then SET INCLINE or
SET LEVEL.
H) SET INcLINE: press to set incline after pressing a QUICK KEY number. (0%–100%, increments of 5%)
I) SET RESISTANcE: press to set resistance level after pressing a QUICK KEY number. (20 levels, increments of 1)
J) pROGRAMMING BUTTON: used to select program, level and time, and other options. Press to change display feedback
during workout. ENTER is used to confirm a selection. BACK is used to move back in program setup.
K) SpEAKERS: music plays through speakers when your CD / MP3 player is connected to the console.
L) AUDIO IN JAcK: plug your CD / MP3 player into the console using the included audio adaptor cable.
M) AUDIO OUT / HEADpHONE JAcK: plug your headphones into this jack to listen to your music through the headphones.
Note: when headphones are plugged into the headphone jack the sound will no longer come out through the speakers.
N) Mp3 pLAYER pOcKET: used to store your MP3 player.
O) READING RAcK: holds reading material.
*Maximum user’s body weight = 147 kg / 325 lbs
LS9.9E LS9.9E
CA LOR IE S HE AR T RAT E SP EE D
WAT TS R PM
ENTERBACK
PR OG R A M M IN G
CO NT R O L S
CH AN G E DIS PL A Y
LS9.9E
S TA R T
QUI CK START
S T O P
HOL D TO RESE T
DI STA NCE
TI ME
L
A B
G
H
F
C D
E
I
F
M
F
N
O
K K
J

24 25
LS12.9E LS12.9E
LS12.9E cONSOLE OpERATION
Note: There is a thin protective sheet of clear plastic on the overlay of the console that should be removed before use.
A) LED DISpLAY WINDOWS: time, distance, watts, RPM, calories, heart rate and speed.
Incline and resistance levels are displayed when their levels are changed.
B) LED DOT MATRIx WINDOW: displays workout profile.
c) START: press to begin exercising, starts your workout, or resume exercising after pause.
D) STOp: press to pause/end your workout. Hold for 3 seconds to reset the console.
E) INcLINE / : used to adjust incline level.
F) RESISTANcE + / – : used to adjust resistance level.
G) QUIcK KEYS: used to reach desired incline or resistance level more quickly. Press quick key number then SET INCLINE or
SET LEVEL.
H) SET INcLINE: press to set incline after pressing a QUICK KEY number. (0%–100%, increments of 5%)
I) SET RESISTANcE: press to set resistance level after pressing a QUICK KEY number. (20 levels, increments of 1)
J) pROGRAMMING BUTTON: used to select program, level and time, and other options. Press to change display feedback
during workout. ENTER is used to confirm a selection. BACK is used to move back in program setup.
K) LIVETRAcK™BUTTON: press to activate/deactivate LIVETRACK™Fitness Journal System.
L) cHANGE DISpLAY: press to change display feedback during workout.
M) SpEAKERS: music plays through speakers when your CD / MP3 player is connected to the console.
N) AUDIO IN JAcK: plug your CD / MP3 player into the console using the included audio adaptor cable.
O) AUDIO OUT / HEADpHONE JAcK: plug your headphones into this jack to listen to your music through the headphones.
Note: when headphones are plugged into the headphone jack the sound will no longer come out through the speakers.
p) Mp3 pLAYER pOcKET: used to store your MP3 player.
Q) READING RAcK: holds reading material.
*Maximum user’s body weight = 160 kg / 350 lbs
CA LOR IE S HE AR T RAT E SP EE D
WAT TS R PM
ENTERBACK
PR OG R A M M IN G
CO NT R O L S
LS12.9 E
S TA R T
QUI CK START
S T O P
HOL D TO RESE T
CH A N G E D I S P L A Y
F I T N E S S J O U R N A L S Y S T E M
PR E S S TO SC R O L L
DI STA NCE
TI ME
CLOCK
DAT E
A B
K L
G
H
C D
E
I
O
F
P
Q
M M
J
N

26 27
DISpLAY WINDOWS
• TIME: Shown as minutes : seconds. View the time remaining
or the time elapsed in your workout.
• DISTANcE: Shown as miles. Indicates distance traveled or
distance remaining during your workout.
• SpEED: Shown as MPH. Indicates how fast the foot pads are
moving.
• cALORIES: Total calories burned or calories remaining left to
burn during your workout.
• HEART RATE: Shown as BPM (beats per minute). Used to
monitor your heart rate (displayed when contact is made with
both pulse grips).
DI STAN CE
TI ME
SP EED
WAT TS
CA LO RIE S
HE A RT R ATE
MA NUA L RE VE RSE T RA IN
IN TER VAL S MO UN TAIN
WE IG HT LO SS C ONS TAN T WAT TS
CA LO RIE S HE A RT R AT E SPE ED
WAT TS RP M
DI STAN CE
TI ME
CLOCK
DAT E
LS7.9E DISPLAYS LS9.9E , LS12.9E DISPLAYS
• LEVEL: Shows the current level of resistance. Will be
displayed in the alphanumeric window.
• INcLINE (LS9.9E, LS12.9E ONLY): Shown as percent.
Indicates the incline level of the power ramp. Will be
displayed in the alphanumeric window.
• WATTS: Displays current user power output.
• RpM: Displays current Rotations Per Minute.
• DATE/cLOcK: LS12.9E only.
ALL
MODELS
LS7.9E
TO cLEAR SELEcTION/RESET THE cONSOLE
Hold STOP key for 3 seconds.
FINISHING YOUR WORKOUT
When your workout is complete, the monitor display will flash “FINISHED” and beep. Your
workout information will stay displayed on the console for 30-45 seconds and then reset.
A) QUIcK START Up
Simply press START to begin working out. The time will count up from 0:00, the
resistance level will default to level 1.
B) SELEcT A pROGRAM
1) Select a program using the SELECT PROGRAM key. Press ENTER to confirm.
2) Adjust the time using the / keys.
3) Press START or ENTER to begin workout.
LS7.9E GETTING STARTED
1) Check to make sure no objects are nearby that will hinder the movement of the elliptical.
2) Plug in the power cord and turn the elliptical ON. (Switch is located at the bottom-front of the elliptical.)
3) You have the following options to start your workout:

28 29
LS9.9E
TO cLEAR SELEcTION/RESET THE cONSOLE
Hold STOP key for 3 seconds.
FINISHING YOUR WORKOUT
When your workout is complete, the monitor display will flash “FINISHED” and beep. Your
workout information will stay displayed on the console for 30-45 seconds and then reset.
LS12.9E
A) QUIcK START Up
Simply press START to begin working out. Time will count up from 0:00. The resistance
level will default to level 1. Incline will default to 0%.
B) SELEcT A pROGRAM
1) Select a program using / and press ENTER on the PROGRAMMING BUTTON.
2) Select a level using / and press ENTER.
3) Set time using / and press ENTER.
4) Press START or ENTER to begin the program. NOTE: if you press START before
pressing ENTER, the program will begin and counts up from 0:00 for the Manual
(P1) and Constant Watts (P4) programs, and count down from 30:00 for all other
programs. The level defaults to 1.
LS9.9E GETTING STARTED
1) Check to make sure no objects are nearby that will hinder the movement of the elliptical.
2) Plug in the power cord and turn the elliptical ON. (Switch is located at the bottom-front of the elliptical.)
3) You have the following options to start your workout:
Programming
Button
TO cLEAR SELEcTION/RESET THE cONSOLE
Hold STOP key for 3 seconds.
FINISHING YOUR WORKOUT
When your workout is complete, the monitor display will flash “FINISHED” and beep. Your
workout information will stay displayed on the console for 30-45 seconds and then reset.
A) QUIcK START Up
Simply press START to begin working out. Time will count up from 0:00. The resistance
level will default to level 1. Incline will default to 0%.
B) SELEcT A USER
Use the PROGRAMMING BUTTON to select USER 1, USER 2 or GUEST and press
ENTER.
c) SELEcT A pROGRAM
1) Select a program using / and press ENTER on the PROGRAMMING BUTTON.
2) Select a level using / and press ENTER.
3) Set time using / and press ENTER.
4) Press START or ENTER to begin the program. NOTE: if you press START before
pressing ENTER, the program will begin and counts up from 0:00 for the Manual
(P1) and Constant Watts (P4) programs, and count down from 30:00 for all other
programs. The level defaults to 1.
LS12.9E GETTING STARTED
1) Check to make sure no objects are nearby that will hinder the movement of the elliptical.
2) Plug in the power cord and turn the elliptical ON. (Switch is located at the bottom-front of the elliptical.)
3) You have the following options to start your workout:
Programming
Button

30 31
LS9.9E
LS12.9E
5) LS12.9E ONLY: THR zONE:
• Select THR Zone
program using /
and press ENTER on the
PROGRAMMING BUTTON.
• Select time using / and
press ENTER.
• The heart rate window will flash
showing the default target heart
rate of 80 beats per minute.
• Select your target heart rate
from the chart above using
/ and press START. The
target heart rate is selected in
multiples of 5 beats.
In this program, the large LED dot matrix window displays your heart rate during
exercise. The middle row represents your target heart rate (THR) and the other rows
equal +/-2 heart beats. If you are working out beneath your THR, the LEDs below
the middle row will illuminate. If you are over, the LEDs above the middle row will
illuminate. Your current heart rate is represented by the flashing column and the
window will refresh every 5 seconds.
NOTES: There is a 4-minute warm-up built into this program at level 1 resistance.
After 4 minutes the resistance will automatically adjust to bring your heart rate within
5 beats of the target number you selected at the beginning of the program. If there is
no heart rate detected, the unit will not change resistance levels up or down. If your
heart rate is 25 beats over your target zone the program will shut down.
LS9.9E, LS12.9E pROGRAM INFORMATION
100%
75 %
60 %
BEATS PER MINUTE
20 2 5 30 35 40 45 5 0 55 60 65
AGE
T A R G E T Z O N E
120 117 114 111 108 105 102 99 97 93
150 146 14 3 139 135 131 128 124 120 116
1) MANUAL: Allows ‘on the fly’ manual
resistance changes. Time-based goal.
2) INTERVALS: Walk or run a series of
alternating resistance levels. Time-
based goals with 10 difficulty levels
to choose from.
3) WEIGHT LOSS: Challenges with
various combinations of hills and
valleys (resistance). Time-based goal
with 12 difficulty levels to choose
from.
4) cONSTANT WATTS:
• Select Constant Watts program
using / and press ENTER
on the PROGRAMMING
BUTTON.
• Set time using / and press
ENTER.
• Select desired watts using /
and press ENTER.
• Press START or ENTER to being
the program.
5) LS9.9E ONLY: RANDOM: Provides
even more workout variety by
mixing up your resistance intervals
(resistance levels). Time-based goal
with 7 difficulty levels to choose from.
LS7.9E pROGRAM INFORMATION
1) MANUAL: Allows ‘on the fly’ manual resistance changes. Time-based goal.
2) INTERVALS: Walk or run a series of alternating resistance levels. Time-based goals with 16 difficulty levels to choose from.
3) WEIGHT LOSS: Challenges with various combinations of hills and valleys (resistance). Time-based goal with 12 difficulty
levels to choose from.
4) REVERSE TRAIN: Program cues you to pedal forward (F) and backwards (R) for an exciting and challenging workout
(resistance levels). Time-based goal with 14 difficulty levels to choose from.
5) MOUNTAIN: Simulates climbing mountains by increasing and decreasing the resistance. Time-based goal with 15 difficulty
levels to choose from.
6) cONSTANT WATTS:
1) Select Constant Watts program using / and press ENTER on the PROGRAMMING BUTTON.
2) Set time using / and press ENTER.
3) Select desired watts using / and press ENTER.
4) Press START or ENTER to being the program.
7-8) cUSTOM 1 & 2:
1) Press the CUSTOM PROGRAM 1 or 2 key to select a custom program. Press ENTER to confirm.
2) Use the / keys to select time. Press ENTER to confirm.
3) Set each resistance profile by using the / keys and press ENTER. Repeat for all 15 resistance profiles.
4) Press START or ENTER to begin.
LS7.9E

32 33
LS9.9E
LS12.9E
LIVETRAcK™ FITNESS JOURNAL SYSTEM (LS12.9E ONLY)
Congratulations! Research shows that those who journal their fitness routines or workouts, on average, achieve greater
success than those who do not. Because your new elliptical is equipped with the exclusive LIVETRACK™Fitness Journal
System, you’ve taken an important step towards achieving your fitness goals.
LIVETRACK™is an innovative new software program, integrated into your elliptical console, that will allow you to track your
fitness progress over time, without the need for paper journals or logs. LIVETRACK™allows you to easily compare your
current workout to your personal bests or your last five workouts. With quick access to feedback like duration of workout,
distance traveled, calories burned or your overall pace, you’ll be able to quickly and easily see the progress you’ve made.
You can also track your workout totals. By following your total number of workouts, distance, and calories, you’ll be able to
see just how far you have come. Read further to see how LIVETRACK™can help motivate you to enhance your performance.
SETUp
To activate LIVETRACK™fitness journal system a user MUST be chosen before the program begins. To select a USER 1 or
2, use the PROGRAMMING BUTTON and press ENTER to confirm. All accumulated data specifically relates to the user
that is chosen.
NOTE: If no user is selected and clock and date are not set, no data will be tracked.
RESET
Reset all recorded information for USER 1 or USER 2 by selecting the user and then holding down the LIVETRACK™button
for 10 seconds. NOTE: This step is permanent and will delete ALL previously accumulated data for the chosen user.
LS12.9E
6) REVERSE TRAIN: Program cues you to pedal forward (F) and backwards (R) for an exciting and challenging workout
(resistance levels). Time-based goal with 14 difficulty levels to choose from.
7-8) INcLINE 1 & 2: Takes your strength and endurance to the next level of fitness with intense combinations of resistance
and incline. Time based goal with 10 difficulty levels to choose from. NOTE: All elevations are listed as a percent of total
elevation.
9-10) cUSTOM 1 & 2:
1) Select CUSTOM 1 or 2 using / and press ENTER on the PROGRAMMING BUTTON.
2) Use the / keys to select time. Press ENTER to confirm.
3) Set each resistance/incline profile by using / and press ENTER. Repeat for all 15 resistance/incline profiles.
NOTE: You may go back to the previous segment by pressing BACK on the PROGRAMMING BUTTON.
4) Press START to begin.
LS9.9E, LS12.9E pROGRAM INFORMATION

34 35
5) WEEKLY TOTAL: View your accumulated data from the last Sunday to the present day.
NOTE: this data is based on week to date not the previous seven days. For instance, if you have not used the
machine since Sunday, the console will read zeros. The following information will be shown in each display window:
•Time–totaltimeofworkout
•Calories–averagecaloriesburned
•Watts–averagewattsofweeklyworkout
•Distance–totaldistanceofworkout
•Speed–averagespeedofweeklyworkout
•RPM–averageRPMofweeklyworkout
NOTE: if the date and clock are not set, weekly total will default to the last workout data.
6) LIFETIME TOTAL: This option allows you to view the total accumulated data. The following information will be
shown in each display window:
•Time–totalaccumulatedtime.
NOTE: if time is greater than 59:59, the time will no longer display minutes and will display hours only.
•Calories–averagecaloriesburned
•Watts–averagewatts
•Distance–totalaccumulateddistance
•Speed–averagespeed
•RPM–averageRPM
WEEKLY GOAL SETUp
1) Select USER 1 or USER 2.
2) Press the LIVETRACK™button and scroll to WEEKLY GOAL.
3) To enter the setup mode, press ENTER. Use +/- keys to set a TIME GOAL (leave time at 00:00 if you want to
set a DISTANCE GOAL).
4) Press ENTER again and use the +/- keys to set a DISTANCE GOAL. If the distance is changed from 0.00, the
distance will be the goal. You may only set a time or distance goal, not both.
5) Press ENTER again to confirm weekly goal setup.
6) Press the LIVETRACK™button until you return to program setup.
LS12.9E LS12.9E
LIVETRAcK™ FITNESS JOURNAL SYSTEM (LS12.9E ONLY)
AccUMULATED DATA
Once LIVETRACK™is activated, you can scroll through your accumulated data in multiple formats by pressing the
LIVETRACK™button. A workout is saved when: the program ends, the console is paused and not resumed within 10
minutes, or the stop button is held to reset the console.
1) cURRENT WORKOUT: the console automatically defaults to current workout, displaying your progress in real time.
2) AVERAGE WORKOUT: this option allows you to see your average accumulated data for the last 30 workouts. The
following information will be shown in each display window:
•Time–averageworkouttime
•Calories–averagecaloriesburned
•Watts–averagewattsofworkout
•Distance–averageworkoutdistance
•Speed–averagespeedofworkout
•RPM–averagerpmofworkout
3) LAST WORKOUT: This option allows you to view your accumulated data from your last workout. The current
workout becomes the last workout once a program has ended or the console has been reset. The following
information will be shown in each display window:
•Time–totaltimeoflastworkout
•Calories–totalcaloriesburnedoflastworkout
•Watts–averagewattsoflastworkout
•Distance–totaldistanceoflastworkout
•Speed–averagespeedoflastworkout
•RPM–averageRPMoflastworkout
4) WEEKLY GOAL: Indicates the weekly goal you set. “LEFT”: indicates the time or distance you have left to complete
to meet your weekly goal. TIME or DISTANCE: the total time or distance goal you selected and the time or distance
you have left to complete to meet your weekly goal.
•The“GOAL” and “LEFT” will display alternately every 3 seconds.
•“GOAL DONE” message will appear when goal is completed.
•Ifthedateandclockarenotsetand/oraweeklygoalisnotset,weeklygoalwilldisplayzeros.
•Thetimeordistanceleftfortheweeklygoalwillresetattheendofeachweek.

36 37
USING YOUR cD / Mp3 pLAYER
1) Connect the included AUDIO ADAPTOR CABLE to the AUDIO IN JACK
on the top of the console and the headphone jack on your CD / MP3
player.
2) Use your CD / MP3 player buttons to adjust song settings.
3) Remove the AUDIO ADAPTOR CABLE when not in use.
4) If you don’t want to use the SPEAKERS, you can plug your headphones
into the AUDIO OUT JACK at the bottom of the console.

Other manuals for LS7.9E
1
This manual suits for next models
2
Table of contents
Other Livestrong Elliptical Trainer manuals
Popular Elliptical Trainer manuals by other brands

Precor
Precor Discovery DSL 621 Getting started guide

Fitness Quest
Fitness Quest Eclipse 1000HR owner's manual

Exerpeutic
Exerpeutic 710ST owner's manual

Keys Fitness
Keys Fitness Magnetic Elliptical Exercise Trainer ET4000 owner's manual

Fortis
Fortis FSTNRELTPLA quick start guide

Spirit
Spirit 16117680US Owners manual and setup instructions