Locinox SlimStone User manual

SlimStone 1
SlimStone
MANUAL • HANDLEIDING • MANUEL
ANLEITUNG • INSTRUCCIONES
INSTRUKCJA •ИНСТРУКЦИИ

2SlimStone
COPYRIGHT
Copyright©2018 Locinox. All rights reserved. This product incorporates copyright protected technology
that is protected by a number of EU patent method claims and other intellectual property rights owned by
the Locinox Corporation and other rightholders.
Use of this copyright protected technology must be authorized by the Locinox Corporation. Reverse
engineering or disassembly is prohibited.
No part of this publication can either be reproduced, communicated, transcribed, stored in a retrieval
system or be translated into any language in any form or by any means, whether electronic, mechanical,
magnetic, optical, chemical, manual or otherwise, unless explicit written consent has been given by the
copyright holder.
NOTICE
The contents of this publication are subject to change. The Locinox Corporation reserves the right to
alter the contents of this publication at any time and without notice. The contents of this publication may
contain inaccuracies or typographical errors and is supplied for informational use only.
TECHNICAL SUPPORT
If you require any additional information or assistance during the installation, please contact your dealer,
who will be able to provide the latest information. Alternatively, you can visit the Locinox website for more
technical information or e-mail us on [email protected]. Please keep the serial number at hand of your
product for future support.

SlimStone 3
SlimStone
MANUAL • HANDLEIDING
MANUEL • ANLEITUNG
INSTRUCCIONES • INSTRUKCJA
ИНСТРУКЦИИ

4SlimStone
IP 68
Extreme
weather
proof
Freeze-free
by heating
element
Easily
readable
digits by
LED lighting
Ultimate
durable
components
Up to 100
entry codes
SlimStone
Override
contact
included

SlimStone 5
BOX CONTENT
115 mm
4-1/2”
50 mm
2”
1400 mm
55-1/8”
27 mm
1-1/16”
Ø 15 mm
Ø 9/16”
Ø 15 mm
Ø 9/16”
SLIMSTONE
UP
*TEMP-000049*
50 mm
2”
27 mm
1-1/16”
Ø 15 mm
Ø 9/16”
Ø 15 mm
Ø 9/16”
SlimStone_templates_v3.indd 1 17/10/17 09:41
50 mm
2”
115 mm
4-1/2”
137 mm
5-3/8”
54 mm
2-1/8” 23,8 mm
15/16”
1
5
2
3
4
1SlimStone
2Allen key 6 mm
3Allen key 2,5 mm
4Wall mounting set
5Drilling template

6SlimStone
CONTENTS
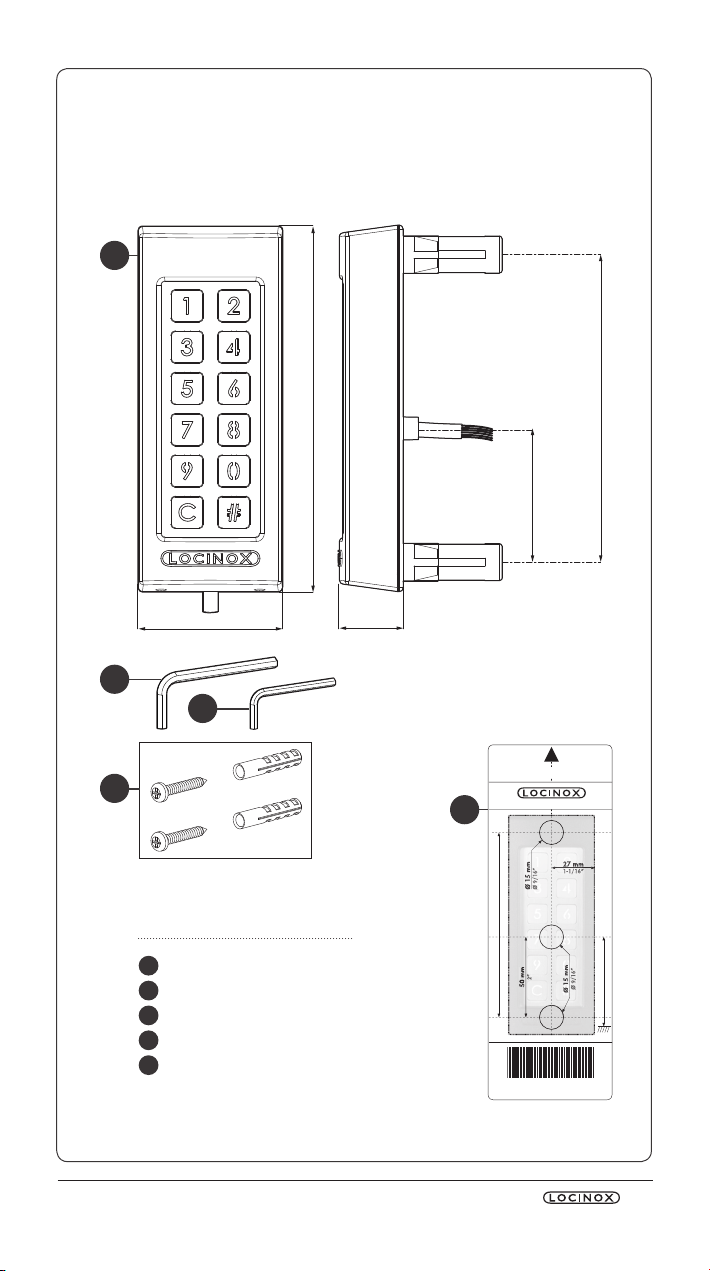
EN 1. PRODUCT DESCRIPTION ................................................................. 8
2. TECHNICAL SPECIFICATIONS .......................................................... 8
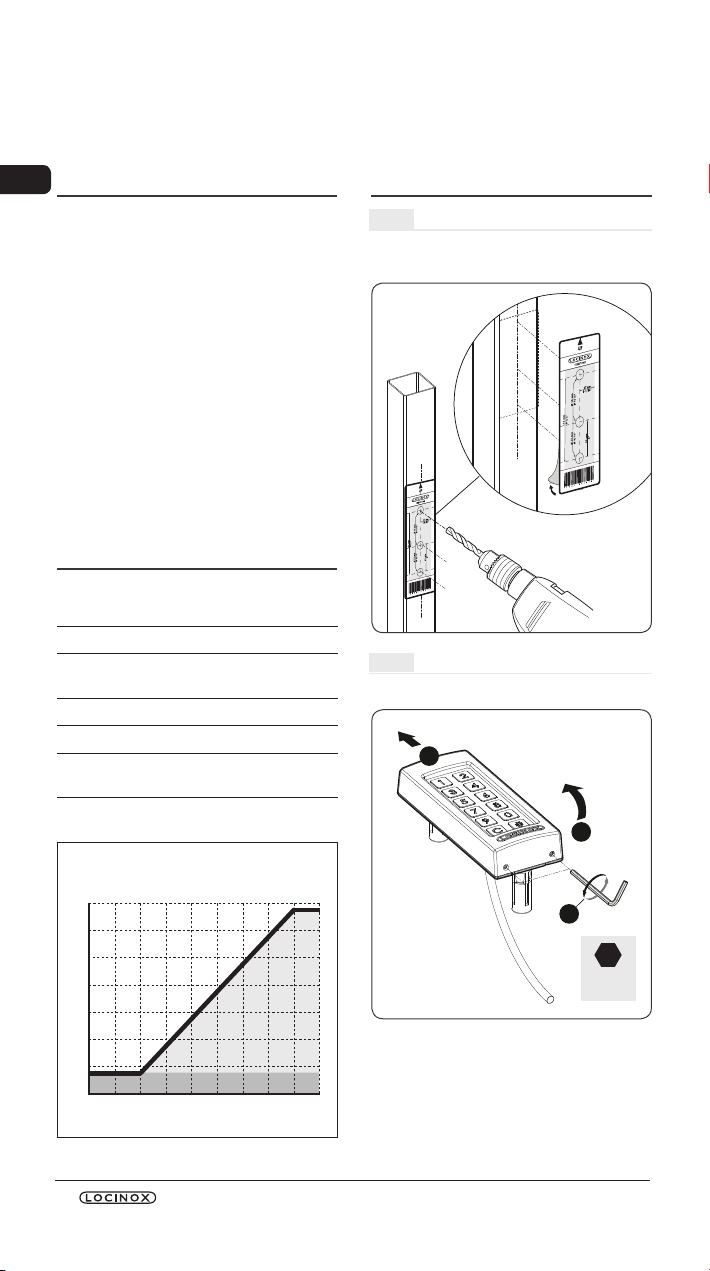
3. MOUNTING ....................................................................................... 8
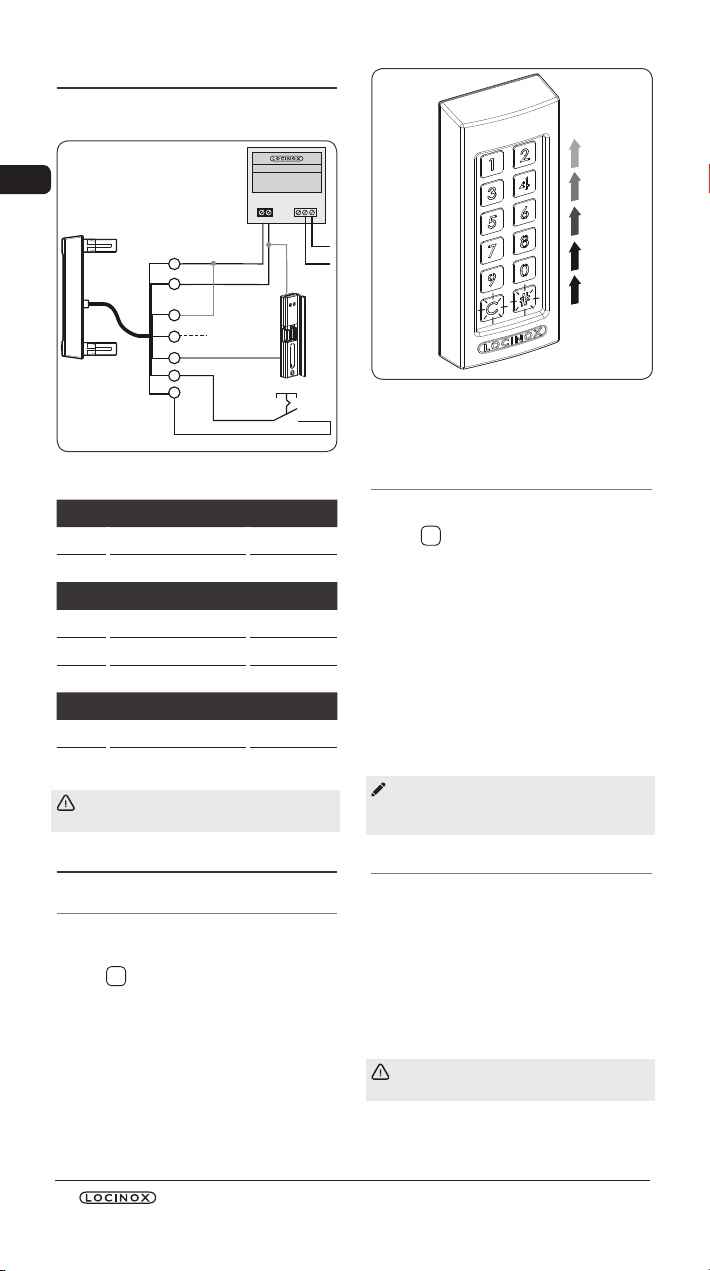
4. CABLING........................................................................................... 10
5. FUNCTIONING OF SLIMSTONE ........................................................ 10
6. PROGRAMMING ............................................................................... 11
7. MAINTENANCE ................................................................................. 12
8. GENERAL INFORMATION.................................................................. 12
9. WARRANTY....................................................................................... 12
10. TROUBLESHOOTING ........................................................................ 13
11. FREQUENTLY ASKED QUESTIONS................................................... 13
12. USER CODES.................................................................................... 52
13. CONNECTION SCHEME.................................................................... 55
NL 1. PRODUCTOMSCHRIJVING ............................................................... 14
2. TECHNISCHE FICHE......................................................................... 14
3. MONTAGE ......................................................................................... 14
4. BEDRADING...................................................................................... 16
5. WERKING.......................................................................................... 16
6. PROGRAMMATIE .............................................................................. 17
7. ONDERHOUD.................................................................................... 18
8. ALGEMENE INFORMATIE.................................................................. 18
9. GARANTIE......................................................................................... 19
10. PROBLEEMOPLOSSING ................................................................... 19
11. VEELGESTELDE VRAGEN ................................................................. 19
12. GEBRUIKERSCODES........................................................................ 52
13. AANSLUITSCHEMA .......................................................................... 55
FR 1. DESCRIPTION DU PRODUIT............................................................. 20
2. SPÉCIFICATIONS TECHNIQUES ....................................................... 20
3. MONTAGE ......................................................................................... 20
4. CÂBLAGE.......................................................................................... 22
5. FONCTIONNEMENT DU SLIMSTONE................................................ 22
6. PROGRAMMATION ........................................................................... 23
7. ENTRETIEN ....................................................................................... 24
8. INFORMATIONS GÉNÉRALES........................................................... 24
9. GARANTIE......................................................................................... 25
10. AIDE AU DÉPANNAGE....................................................................... 25
11. QUESTIONS SOUVENT POSÉES ...................................................... 25
12. CODES D’UTILISATEUR .................................................................... 52
13. SCHÉMA DE CONNEXION ............................................................... 55
DE 1. PRODUKTBESCHREIBUNG .............................................................. 26
2. TECHNISCHE SPEZIFIKATIONEN ..................................................... 26
3. MONTAGE ......................................................................................... 26
4. VERKABELUNG................................................................................. 28
5. FUNKTIONSWEISE DER SLIMSTONE ............................................... 28
6. PROGRAMMIERUNG ........................................................................ 29
7. WARTUNG......................................................................................... 31
8. ALLGEMEINE INFORMATIONEN ....................................................... 31
9. GARANTIE......................................................................................... 31
10. FEHLERBEHEBUNG.......................................................................... 31
11. HÄUFIG GESTELLTE FRAGEN........................................................... 32
12. BENUTZERCODES............................................................................ 52
13. VERBINDUNGSSCHEMA .................................................................. 55

SlimStone 7
ES 1. DESCRIPCIÓN DEL PRODUCTO....................................................... 33
2. ESPECIFICACIONES TÉCNICAS ....................................................... 33
3. MONTAJE.......................................................................................... 33
4. CABLEADO ....................................................................................... 35
5. FUNCIONAMIENTO DEL SLIMSTONE ............................................... 35
6. PROGRAMACIÓN.............................................................................. 36
7. MANTENIMIENTO.............................................................................. 38
8. INFORMACIÓN GENERAL................................................................. 38
9. GARANTÍA......................................................................................... 38
10. LOCALIZACIÓN DE AVERÍAS ............................................................ 38
11. PREGUNTAS FRECUENTES.............................................................. 38
12. CÓDIGOS DE USUARIO.................................................................... 52
13. ESQUEMA DE CONEXIÓN ................................................................ 55
PL 1. OPIS PRODUKTU.............................................................................. 40
2. DANE TECHNICZNE.......................................................................... 40
3. INSTALACJA...................................................................................... 40
4. PRZEWODY PODŁĄCZENIOWE ........................................................ 42
5. OBSŁUGA URZĄDZENIA SLIMSTONE .............................................. 42
6. PROGRAMOWANIE........................................................................... 43
7. KONSERWACJA................................................................................ 45
8. INFORMACJE OGÓLNE .................................................................... 45
9. GWARANCJA .................................................................................... 45
10. ROZWIĄZYWANIE PROBLEMÓW...................................................... 45
11. CZĘSTO ZADAWANE PYTANIA ......................................................... 45
12. KODY UŻYTKOWNIKÓW ................................................................... 52
13. SCHEMAT PODŁĄCZENIA ................................................................ 55
RU 1. ОПИСАНИЕ ПРОДУКТА ................................................................... 46
2. ТЕХНИЧЕСКИЕ ДАННЫЕ................................................................. 46
3. МОНТАЖ .......................................................................................... 46
4. ПРОВОЛОЧНАЯ АРМАТУРА ............................................................ 48
5. РАБОТА SLIMSTONE ........................................................................ 48
6. ПРОГРАММИРОВАНИЕ ................................................................... 49
7. ОБСЛУЖИВАНИЕ ............................................................................ 50
8. ОБЩАЯ ИНФОРМАЦИЯ................................................................... 50
9. ГАРАНТИЯ......................................................................................... 50
10. ВЫЯВЛЕНИЕ НЕИСПРАВНОСТЕЙ .................................................. 51
11. ЧАСТО ЗАДАВАЕМЫЕ ВОПРОСЫ .................................................. 51
12. КОДЫ ПОЛЬЗОВАТЕЛЕЙ................................................................. 52
13. СХЕМА ПОДКЛЮЧЕНИЯ ................................................................. 55

EN EN
8SlimStone
Congratulations with the purchase
of your SlimStone
1. PRODUCT DESCRIPTION
The SlimStone is a sturdy, weather resistant
keypad with integrated LED lighting. This
keypad is unique in its kind thanks to its
durability. Developed and tested for use in the
most extreme weather conditions, SlimStone
guarantees access control in all circumstances.
Thanks to the integrated relay, with a normally
open and normally closed contact, both the
coupling to Locinox and other automation
products and the programming of the
SlimStone are very easy. Equipped with
innovative Quick-Fix, alternative xings for
wood and stone are also supplied.
The SlimStone is made of an aluminium
powder-coated housing with a brushed
stainless steel key panel and ditto push buttons.
Up to 100 codes can be programmed.
2. TECHNICAL SPECIFICATIONS
Operational
temperature -22°F up to 185°F
-30°C up to 85°C
Power supply 12-24 V AC/DC
Switching
contact 0-26 V AC/DC, 2A
(60W)
Cable length 2m (6-1/2ft.)
IP value IP68
Input 2-wire low voltage (5V)
priority contact
Consumption 1,5W (> 5°C) + 12W at
max heating (< -25°C)
TEMPERATURE °C
-22-13-451423
32
415059
-30-25-20-15-10-5
0
51015
0
2
4
6
8
10
12
14
CONSUMPTION W
TEMPERATURE °F
HEATING
3. MOUNTING
STEP 1
Stick the template and drill into the wall or post
(see p.5).
STEP 2
Remove the cover of the SlimStone.
1
3
2
HEX
2,5mm

EN EN
SlimStone 9
STEP 3A
Run the cable through the middle hole in the
post.
STEP 3B
Run the cable through the middle hole in the
wall.
STEP 4
Position the SlimStone and tighten both
Quick-Fix.
HEX
6 mm
STEP 5
Position the cover and tighten thanks to the
2 screws underneath.
1
2
3
HEX
2,5 mm

EN EN
10 SlimStone
4. CABLING
The SlimStone is equipped with a 7 conductor
cable which is 2m long.
SlimStone
AC-TRANS12V/25W
FAIL-CLOSE
ELECTRIC STRIKE
220V
220V
12V
+12V
N
L1
0
A
B
C
E
F
G
D
See p. 55 for a detailed connection scheme.
Power supply
AAC1 Blue
BAC2 Brown
Relay
CRelais COM Black
DRelais NC Red
ERelais NO Orange
Override button
FNO button White
GCOM button Green
Unused cable ends must be insulated to
ensure a proper functioning of the keypad.
5. FUNCTIONING OF SLIMSTONE
5.1 ENTER A CORRECT CODE
• Enter a personal code (min. 4 - max. 8
digits).
• Press #to conrm the code.
• A light sequence runs from the bottom to the
top during the time the relay is energised
(default time = 8 seconds).
• If the sequence light stops, the relay is no
longer energised. The SlimStone is ready for
a new code.
5.2 ENTER A WRONG CODE
• Enter a wrong code.
• Press #to conrm the code
• All lights ash for 2 seconds, indicating a
wrong code has been entered.
• If 5 or more wrong codes are entered
consecutively, you won’t be able to use the
SlimStone for a certain period due to safety
reasons. The time out period is specied as
follows :
2[number of failed attempts] seconds.
For example : 6 failed attempts result in a
time out period of 64 seconds (26seconds).
The time out period is reset when a correct
code is entered, or if no new code was
entered during 2 hours.
5.3 PRIORITY CONTACT
• An external button or actuator can be
connected to overrule the SlimStone. For
example an intercom, free exit, ...
• Connect the wires F & G according to the
connection scheme on p55.
• The NO-contact of an external push-button
should be connected between the “NO
Button” (F) and the “COM button” (G).
Attention! This must be a dry contact with
NO function.
• The light sequence is running from bottom to
top during the time the relay is energized.

EN EN
SlimStone 11
6. PROGRAMMING
6.1 ACCESS PROGRAMMING MODE
• Press #for 5 sec, after the LEDs will ash.
• Enter the Master PIN (see 6.3) and press
#. If correct, #will remain lit as long as
the programming mode is activated. When a
wrong code is entered, all keys will ash.
If only #is lit, you are in the main menu
of the programming mode.
• Select a menu number (see 6.2) and conrm
with #.
The programming mode ends
automatically when there is no activity
for 60 seconds.
• Press Cto move up one menu.
• If a wrong Master PIN is entered, the
programming mode ends and the time out
procedure as described in 5.2 applies.
• Press Cfor 5 seconds to exit the
programming mode.
6.2 OVERVIEW
9 set a Master PIN
1 add a PIN code
2 delete a PIN code
3 set hold time
4 set lighting mode
0 factory reset
6.3 SET MASTER PIN
• Access programming mode (see 6.1).
For safety reasons we strongly recommend
to change the Master PIN upon first use.
• Press 9and conrm with #.
• 9and #are both lit.
The default Master PIN is 12345. It always
has to be a 5-digit code.
• Enter a new 5-digit Master PIN and press
#. Repeat this step.
• If both codes are equal, all LEDs will light
briey and you will return to the main menu
of the programming mode.
When two different codes or a wrong code
length is entered, all LEDs will flash three
times, indicating the code hasn’t been
saved. Try again. 9will remain lit.
• For safety reasons, the Master PIN can
only be entered to access the programming
mode. It cannot be used as an entry code.
6.4 ADD A PIN CODE
• Access programming mode (see 6.1).
A maximum of 100 different PIN codes
can be programmed (min. 4 - max. 8
digits).
• Press 1and conrm with #.
• 1and #are both lit.
• Enter a new PIN code and conrm with #.
Repeat this step.
• If both codes are equal, the new PIN code is
saved. All LEDs will light briey.
• You will return to the main menu of the
programming mode.
When two different codes or a wrong code
length is entered, all keys will flash three
times, indicating the code setting hasn’t
been saved. Try again. 1will remain lit.
6.5 REMOVE PIN CODE
• Access programming mode (see 6.1).
• Press 2and conrm with #.
• 2and #are both lit.
• Press the PIN code you wish to delete and
press C. Repeat this step.
• All LEDs are briey lit, indicating the code is
deleted.
• You will return to the main menu of the
programming mode.
When two different codes or a wrong code
length is entered, all keys will flash three
times, indicating the code wasn’t deleted.
Try again. 2will remain lit.

EN EN
12 SlimStone
6.6 SET HOLD TIME
• Access programming mode (see 6.1).
• Press 3and conrm with #.
• 3and #are both lit.
• Enter the time (between 1 and 99 seconds)
and conrm with #.
• A valid time is conrmed with a brief lighting
of all LEDS.
• You will return to the main menu.
Pulse mode : if the SlimStone is used to
control automated systems, a pulse is
required. This mode can be activated by
setting a time of 0 seconds. The pulse
duration is 150ms.
In case an invalid time is entered, all keys
will flash three times. Menu 3remains
activated.
The default time is set at 8 seconds.
6.7 SET LIGHTING MODE
• Access programming mode (see 6.1).
• Press 4and conrm with #.
• 4and #are both lit.
• Choose the mode in which you want the
lighting to work:
1Always on
2Off after 45 seconds
The lighting is switched off after 45
seconds inactivity. As soon as a key is
pressed, the lighting is back on for a
minimum time of 45 seconds.
• Press 1or 2and conrm with #.
When all LEDs ash, your choice is saved.
• You are back in the main menu of the
programming mode.
If an invalid number is entered, all lights
flash three times. Start over. Menu 4
remains activated.
6.8 FACTORY RESET
• Access programming mode (see 6.1).
• Press 0and conrm with #.
• 0will ash rapidly to indicate an
irreversible action can be taken.
• Enter the Master PIN and conrm with #for
2 seconds.
• When all LEDs ash, the factory reset is
complete. All settings are restored to default
values except for the Master PIN.
6.9 FACTORY RESET UPON LOSS OF
MASTER PIN
Perform a factory reset without a Master PIN:
• Switch the power supply off and on, enter
the standard Master PIN ‘12345’ and
conrm with #within 20 seconds.
• The factory reset is complete.
• In case of a factory reset as described
above, the Master PIN is reset to ‘12345’.
7. MAINTENANCE
• Clean the housing and display using a soft
cloth, moistened with a neutral cleaning
agent.
• Never use fuel or other chemical means on
the device since they might harm the housing.
8. GENERAL INFORMATION
• Please observe the local regulations on
the deposit of packaging material and of
appliances no longer in use.
• Our packaging material is eco-friendly. It can
be divided into 2 materials: cardboard (box)
and expandable polyester (buffer).
• Your device is made of recyclable materials.
9. WARRANTY
A 2 year warranty covers all electronics.

EN EN
SlimStone 13
10. TROUBLESHOOTING
PROBLEM SOLUTION
• All lights are ashing. • When wrong codes have been entered
repeatedly, the SlimStone is blocked.
See 5.2.
• The SlimStone lighting is off after pushing a
button.
• Verify the power supply connection.
• The SlimStone does not react after entering
the code.
• Entering a code must always be conrmed
with #.
• The sequence light remains lit. • Check if the cables of the override button are
insulated.
• Possibly you set a time of 99 seconds.
• The lights ash after entering the PIN code
and conrmation by pressing #.
• The entered code does not match any of the
registered codes. See 5.2.
11. FREQUENTLY ASKED QUESTIONS
QUESTION ANSWER
• Is the keypad heated? • Yes, SlimStone has a regulated heating
system which keeps the keys frost-free.
• How weatherproof is the SlimStone? • SlimStone is designed to comply with the
IP68 standard.
• Can I use the SlimStone with sectional doors? • Yes, by setting the relay hold time to 0, a
pulse is given with which sectional doors can
be controlled.
A discarded device can either be returned to your dealer or be sent back to Locinox.
This product’s recycling fee is € 0,2.
The WEE marking on the product indicates that it may not be thrown away together with
normal household waste and must be handed over to a designated collection point for
the recycling of electrical and electronic rejects.
As manufacturer of this product, we guarantee that we have taken all the necessary steps
in order to comply with the current safety requirements for this product.

14 SlimStone
NL NL
Prociat met de aankoop van uw SlimStone
1. PRODUCTOMSCHRIJVING
SlimStone is een robuust en weersbestendig
codeklavier met geïntegreerde ledverlichting.
Het codeklavier is uniek door zijn
duurzaamheid. Slimstone werd ontwikkeld
en getest voor gebruik in de meest extreme
weersomstandigheden, en staat daarom garant
voor een permanente toegangscontrole in alle
omstandigheden.
Dankzij het ingebouwde relais, met 1
normaal open contact en 1 normaal gesloten
contact, zijn de aansluiting op Locinox- en
andere automatiseringsproducten én de
programmering van SlimStone zeer eenvoudig.
Naast onze innovatieve Quick-Fix zijn andere
bevestigingssystemen voor hout en steen ook
beschikbaar.
SlimStone bestaat uit een aluminium
gepoederlakte behuizing met een klavier en
drukknoppen van geborstelde inox.
Maximaal 100 codes kunnen ingesteld worden.
2. TECHNISCHE FICHE
Werkings-
temperatuur -30°C tot 85°C
Voeding 12-24 V AC/DC
Schakelen 0-26 V AC/DC, 2A (60W)
Kabellengte 2m (6-1/2ft.)
IP-waarde IP68
Ingangssignaal tweedraadslaagspannning
(5V) voorrangscontact
Verbruiks-
temperatuur 1,5W (> 5°C) +12W bij
maximale opwarming
(< -25°C)
-30-25-20-15-10-5
0
51015
0
2
4
6
8
10
12
14
VERBRUIK W
TEMPERATUUR °C
OPWARMING
3. MONTAGE
STAP 1
Kleef het sjabloon en boor in de muur of paal
(zie pag. 5).
STAP 2
Verwijder de behuizing van uw SlimStone.
1
3
2
HEX
2,5mm

SlimStone 15
NL NL
STAP 3A
Plaats de kabel door het middelste gat in de
paal.
STAP 3B
Plaats de kabel door het middelste gat in de
muur.
STAP 4
Positioneer SlimStone en span beide Quick-Fix-
bevestigingen aan.
HEX
6 mm
STAP 5
Plaats de behuizing terug en draai de 2
schroeven onderaan vast.
1
2
3
HEX
2,5 mm

16 SlimStone
NL NL
4. BEDRADING
SlimStone is uitgerust met een 7-aderige kabel
van 2 meter lang.
SlimStone
AC-TRANS12V/25W
FAIL-CLOSE
ELECTRIC STRIKE
220V
220V
12V
+12V
N
L1
0
A
B
C
E
F
G
D
Zie pag. 55 voor een gedetailleerd
verbindingsschema.
Stroom
AAC1 blauw
BAC2 bruin
Relais
CRelais COM zwart
DRelais NC rood
ERelais NO oranje
Overbruggingsknop
FNO-knop wit
GCOM-knop groen
Ongebruikte kabeluiteinden moeten
afgeschermd worden om een goede
werking van het klavier te garanderen.
5. WERKING
5.1 CORRECTE CODE
• Voer een persoonlijke code in (min. 4 en
max. 8 cijfers).
• Druk op #om de code te bevestigen.
• Er wordt een looplicht van onder naar
boven weergegeven gedurende de tijd dat
het relais geactiveerd is (standaardtijd = 8
seconden).
• Indien het looplicht stopt, is het bekrachtigen
van het relais ook gestopt en is het
codeklavier weer klaar voor een nieuwe
ingave.
5.2 FOUTE CODE
• Voer een foute code in.
• Druk op #om de code te bevestigen.
• Alle lichten knipperen gedurende 2 seconden
om aan te tonen dat een foute code
ingegeven werd.
• Indien 5 of meer keer na mekaar een foute
code ingevoerd wordt, zal u de SlimStone
omwille van veiligheidsredenen even niet
meer kunnen gebruiken. De pauzetijd wordt
als volgt berekend:
2[aantal mislukte pogingen] seconden.
Bijvoorbeeld: 6 mislukte pogingen =>
pauzetijd van 64 seconden (26seconden).
De pauzetijd wordt opnieuw ingesteld
wanneer een juiste code ingegeven wordt,
of indien twee uur lang geen nieuwe code
ingevoerd werd.
5.3 VOORRANGSCONTACT
• Een externe knop of signaalgever kan
aangesloten worden en is prioritair ten
opzichte van SlimStone. Bijvoorbeeld een
intercom, vrije uitgang, enz.
• Sluit kabels F en G aan volgens het
aansluitingsschema op pag. 55.
• Het NO-contact van een externe drukknop
moet verbonden worden tussen de NO-knop
(F) en de COM-knop (G.)
Opgelet: dit moet een droog contact zijn
met NO-werking.

SlimStone 17
NL NL
• Het looplicht gaat van onder naar boven
gedurende de tijd dat het relais geactiveerd
is.
6. PROGRAMMATIE
6.1 PROGRAMMATIEMODUS
• Druk gedurende 5 sec. op #. Daarna
knippert het lampje.
• Voer Master PIN in (zie 6.3) en druk op #.
Indien correct, zal #blijven oplichten
zolang de programmatiemodus geactiveerd
is. Indien een foute code ingegeven werd,
zullen alle toetsen knipperen.
Als enkel #oplicht, bevindt u zich in het
hoofdmenu van de programmatiemodus.
• Selecteer een menu (zie 6.2) en bevestig
met #.
De programmatiemodus eindigt
automatisch indien er gedurende 60
seconden geen activiteit is.
• Druk op Com naar het bovenliggende
menu te gaan.
• Als een foute Master PIN ingevoerd werd,
wordt de programmatiemodus beëindigd, en
start de pauzeprocedure zoals beschreven
in 5.2.
• Druk gedurende 5 seconden op Com de
programmatiemodus te verlaten.
6.2 OVERZICHT
9 Master PIN instellen
1 pincode toevoegen
2 pincode verwijderen
3 contacttijd instellen
4 verlichtingsmodus instellen
0 reset fabrieksinstellingen
6.3 MASTER PIN INSTELLEN
• Ga naar programmatiemodus (zie 6.1).
Omwille van veiligheidsredenen raden wij
u sterk aan de Master PIN bij het eerste
gebruik te wijzigen.
• Druk op 9en bevestig met #.
• 9en #lichten op.
De standaard Master PIN is 12345. Deze
code moet altijd uit 5 cijfers bestaan.
• Voer een nieuwe Master PIN (5 cijfers) in en
druk op #. Herhaal deze stap.
• Als beide ingevoerde codes overeenkomen,
zullen alle LEDs kort oplichten en keert
u terug naar het hoofdmenu van de
programmeringsmodus.
Indien twee verschillende codes ingevoerd
werden, of als te weinig of te veel cijfers
ingegeven werden, zullen alle LEDs drie
keer knipperen om aan te geven dat
de code niet bewaard werd. Probeer
opnieuw. 9blijft oplichten.
• Omwille van veiligheidsredenen kan de
Master PIN enkel ingevoerd worden om naar
de programmatiemodus te gaan. Deze code
kan niet gebruikt worden als toegangscode.
6.4 PINCODE TOEVOEGEN
• Ga naar programmatie (zie 6.1).
U kan maximaal 100 verschillende
pincodes programmeren (min. 4 en max. 8
cijfers).
• Druk op 1en bevestig met #.
• 1en #lichten allebei op.
• Voer een nieuwe pincode in en bevestig met
#. Herhaal deze stap.
• Als beide ingevoerde codes overeenkomen,
wordt de nieuwe pincode bewaard. Alle
LEDs zullen kort oplichten.
• U keert terug naar het hoofdmenu van de
programmatiemodus.
Indien twee verschillende codes ingevoerd
werden, of als te weinig of te veel cijfers
ingegeven werden, zullen alle toetsen
drie keer knipperen om aan te geven
dat de code niet bewaard werd. Probeer
opnieuw. 1blijft oplichten.
6.5 PINCODE VERWIJDEREN
• Ga naar programmatiemodus (zie 6.1).
• Druk op 2en bevestig met #.
• 2en #lichten allebei op.
• Selecteer de pincode die u wenst te
verwijderen en druk op C. Herhaal deze
stap.
• Alle LEDs lichten kort op om aan te geven dat
de code verwijderd werd.

18 SlimStone
NL NL
• U keert terug naar het hoofdmenu van de
programmatiemodus.
Indien twee verschillende codes ingevoerd
werden, of als te weinig of te veel cijfers
ingegeven werden, zullen alle toetsen
drie keer knipperen om aan te geven
dat de code niet bewaard werd. Probeer
opnieuw. 2blijft oplichten.
6.6 CONTACTTIJD INSTELLEN
• Ga naar programmatiemodus (zie 6.1).
• Druk op 3en bevestig met #.
• 3en #lichten allebei op.
• Voer de tijd in (tussen 1 en 99 seconden) en
bevestig met #.
• Een geldige tijd wordt bevestigd met een
korte oplichting van alle LEDs.
• U keert terug naar het hoofdmenu.
Pulsmodus: als SlimStone gebruikt wordt
om geautomatiseerde systemen te
bedienen, is een puls vereist. Deze modus
kan geactiveerd worden door een tijd van
0 seconden in te stellen. De pulsduur is
150 ms.
Indien een ongeldige duur ingevoerd
werd, knipperen alle toetsen drie keer.
Menu 3blijft geactiveerd.
De standaardtijd is ingesteld op 8
seconden.
6.7 VERLICHTINGSMODUS
INSTELLEN
• Ga naar programmatiemodus (zie 6.1).
• Druk op 4en bevestig met #.
• 4en #lichten allebei op.
• Kies de verlichtingsmodus:
1Altijd aan.
2Na 45 seconden
De verlichting wordt na 45 seconden
inactiviteit gedoofd. Zodra een toets
ingedrukt wordt, gaat de verlichting
weer aan voor een minimumduur van
45 seconden.
• Druk op 1of 2en bevestig met #.
Als alle LEDs knipperen, betekent het dat uw
keuze bewaard werd.
• U bent terug in het hoofdmenu van de
programmeringsmodus.
Indien een ongeldig getal ingevoerd werd,
knipperen alle lichten drie keer. Begin
opnieuw. Menu 4blijft geactiveerd.
6.8 RESET FABRIEKSINSTELLINGEN
• Ga naar programmatiemodus (zie 6.1).
• Druk op 0en bevestig met #.
• 0knippert snel om aan te geven dat een
onomkeerbare handeling uitgevoerd kan
worden.
• Voer de Master PIN in en bevestig door 2
seconden op #te drukken.
Als alle LEDs knipperen, is de reset
naar fabrieksinstellingen voltooid.
Alle instellingen zijn terug op de
standaardwaarden ingesteld, behalve de
Master PIN.
6.9 RESET NAAR
FABRIEKSINSTELLINGEN BIJ
VERLIES VAN MASTER PIN
Voer een reset naar fabrieksinstellingen uit
zonder Master PIN:
• Schakel de stroom uit en terug aan, voer de
Master PIN 12345 in en bevestig binnen de
20 seconden door op #te drukken. De
reset naar fabrieksinstellingen is dan voltooid.
• Bij een reset naar fabrieksinstellingen zoals
hierboven beschreven, wordt de Master PIN
terug ingesteld als 12345.
7. ONDERHOUD
• Reinig de behuizing en het scherm met
behulp van een zacht doekje bevochtigd met
een neutraal schoonmaakmiddel.
• Gebruik nooit brandstof of een ander
chemisch middel op het product omdat die
de behuizing kan aantasten.
8. ALGEMENE INFORMATIE
• Gelieve rekening te houden met de
plaatselijke reglementen inzake het afvoeren
van verpakkingsmateriaal en van producten
die niet meer gebruikt worden.
• Ons verpakkingsmateriaal is milieuvriendelijk.
Het kan opgesplitst worden in 2 materialen:
karton (doos) en rekbare polyester (buffers).
• Het door u gekochte product is gemaakt van
recycleerbare materialen.

SlimStone 19
NL NL
9. GARANTIE
De garantie van 2 jaar dekt alle elektronische
onderdelen van het product.
10. PROBLEEMOPLOSSING
PROBLEEM OPLOSSING
• Alle lichten knipperen. • Als herhaaldelijk een foute code ingegeven
wordt, wordt SlimStone geblokkeerd.
Zie 5.2.
• De SlimStone-verlichting is uit na het
indrukken van een knop.
• Controleer de stroomaansluiting.
• SlimStone reageert niet na het invoeren van
de code.
• Het invoeren van een code moet altijd
bevestigd worden met #.
• Het looplicht blijft oplichten. • Controleer of de kabels van de
voorrangscontact afgeschermd zijn.
• Mogelijks werd een duur van 99 seconden
ingesteld.
• De lichten knipperen na het invoeren van de
pincode en het bevestigen door een druk
op #.
• De ingevoerde code komt niet overeen met
een van de geregistreerde codes. Zie 5.2.
11. VEELGESTELDE VRAGEN
VRAAG ANTWOORD
• Is het klavier verwarmd? • Ja, SlimStone heeft een gereguleerd
verwarmingssysteem dat de toesten vorstvrij
houdt.
• Hoe weersbestendig is SlimStone? • SlimStone werd ontworpen om te voldoen
aan de norm IP68.
• Kan ik SlimStone gebruiken bij
sectionaalpoorten?
• Ja, door de contacttijd van het relais op 0 in
te stellen, wordt een puls gegeven waamee
de sectionaalpoort bediend kan worden.
Een afgedankt product kan ofwel teruggebracht worden naar uw verdeler, of
teruggestuurd worden naar Locinox. De recyclagebijdrage van dit product is 0,2 €.
De WEEE-markering op het product duidt aan dat het niet met het gewone huishoudelijk
afval weggegooid mag worden, en dat het product naar een speciek inzamelpunt voor
recyclage van elektrische en elektronische afgedankte producten gebracht moet worden.
Als producent van dit product kunnen we u garanderen dat we alle nodige stappen
ondernomen hebben om te voldoen aan de geldige veiligheidsvereisten van dit product.

20 SlimStone
FR FR
Félicitations avec l’achat de votre SlimStone
1. DESCRIPTION DU PRODUIT
Le SlimStone est un clavier à codes robuste et
résistant aux intempéries, équipé de lumières
LED. Le clavier à codes est unique en raison
de sa durabilité. Le SlimStone a été développé
et testé pour être utilisé dans des conditions
météorologiques les plus extrêmes et garantit
donc un contrôle d’accès permanent en toutes
circonstances. Grâce au relais intégré, avec
1 contact normalement ouvert et 1 contact
normalement fermé, tant la connexion aux
produits Locinox et à d’autres produits
d’automatisation que la programmation
du SlimStone est très simple. Il est doté des
xations innovantes Quick-Fix, mais d’autres
systèmes de xation pour le bois et béton sont
également disponibles.
Le SlimStone est conçu avec une boîtier en
aluminium thermolaqué structuré et avec un
clavier comprenant des touches en inox brossé.
Vous pouvez programmer jusqu’à 100 codes.
2. SPÉCIFICATIONS TECHNIQUES
Température de
fonctionnement -22°F jusq’à 185°F
-30°C jusq’à 85°C
Alimentation
électrique 12-24 V AC/DC
Commutation 0-26 V AC/DC, 2A
(60W)
Longueur du
câble 2m
Valeur IP IP68
Signal d’entrée basse tension (5V) à 2 ls
contact prioritaire
Température
d’utilisation 1,5W (> 5°C) + 12W
à chauffage max. (< 25°C)
-30-25-20-15-10-5
0
51015
0
2
4
6
8
10
12
14
CONSOMMATION W
TEMPÉRATURE °C
ECHAUFFEMENT
3. MONTAGE
ÉTAPE 1
Collez le gabarit et percez le mur ou le poteau
(voir page 5).
ÉTAPE 2
Enlevez le boîtier du SlimStone
1
3
2
HEX
2,5mm
This manual suits for next models
1
Table of contents
Languages:
Other Locinox Keypad manuals