Loewe LA2300DG User manual

LA2300DG
DEALER GUIDE

1OVERVIEW
LOEWE (pronounced “LOO-va”) televisions offer a new world of quality viewing. As a LOEWE dealer, you
have the opportunity to bring this unique and extraordinary world to your customers. Since LOEWE televi-
sions are digital televisions, there are special considerations that you need to keep in mind.
Please take the time to read this manual and familiarize yourself with the particular capabilities that go
along with this high tech product. You can better support your customers by gaining a thorough under-
standing of LOEWE products.
Some of the information contained in this manual goes beyond the User’s Guide. Remember, the customer is
expecting you to be the expert on the proper set up and operation of Loewe TVs.
The information contained in this reference guide is confidential and is intended for Dealer and Service
Center use only.
2SERVICE MODE
Scrolls through Service
Menu items.
Opens the Service Menu.
Changes Service Menu Items.
Selects and Saves
Service Menu Items.
Exits the Service Menu.
OK
favorite mute
infofreeze menu exit
ch+
vol+vol—
ch—
pip swap
window
format
ch edit
input
video power
audio
mode
vcr
cable
LR
S-Video
+
—
Audio
Function key
To enter Service Mode:
1. Press the Function Key ( ) on the
TV front panel as shown below.
Using the Remote Control:
2.Press the down arrow key
(“ch–”) until “Service” is
highlighted.
3.Press the menu button to enter
Service Mode.
4.To scroll through menu items,
press the up/down arrow keys
(“ch +/–”). To make selections,
press the OK key. To change
menu items, press the left/right
arrow keys (“vol +/–”). To save
a particular setting, press the
OK key.
Control at TV
Volume
Contrast
Color
Service
50
21
32
For trade
dealer only!

info
back
exit
SERVICE
OK
i
M
E
More...
Colour VCO
Adjustments
EAROM Transfer
Adjust
Color VCO
Store with OK info
back
exit
OK
i
M
E
Value: -0670
stop go
Store with OK info
back
exit
Option Byte 0
OK
i
M
E
Bit 0
Bit 1
Bit 2
Bit 3
Bit 4
More...
0 1
0 1
0 1
0 1
0 1
Store with OK info
back
exit
ADJUSTMENTS
OK
i
M
E
Y delay
Encoder Y Delay
Subbrightness
Subcontrast
OSD Contrast
More...
3
5
4
-21
7
Store with OK info
back
exit
ADJUSTMENTS
OK
i
M
E
More...
Rotation
Text Position V
Text Position H
PIP PositionV
PIP PositionH
32
16
48
5
2
Red
Green
Blue
CUTOFF
Store with OK info
back
exit
OK
i
M
E
20
20
20
Store with OK info
back
exit
Option Byte 0
OK
i
M
E
More...
Bit 5
Bit 6
Bit 7
0 1
0 1
0 1
Store with OK info
back
exit
Option Bytes
OK
i
M
E
Option byte 0
Option byte 1
Option byte 2
Option byte 3
Option byte 4
More...
Red
Green
Blue
WHITE DRIVE
Store with OK info
back
exit
OK
i
M
E
63
63
63
info
back
exit
SERVICE
OK
i
M
E
System data
Geometry
Cutoff
White drive
Option bytes
More...
SYSTEM DATA
Chassis A23
Software version V0.0
EPROM code 14 Sep 1998
EAROM code U00700
Operating Time 13h
info
back
exit
OK
i
M
E
V Amplitude
GEOMETRY
Store with OK info
back
exit
OK
i
M
E
36
3SERVICE MENU OVERVIEW

4ALIGNMENT FUNCTIONS
To prevent misalignment, before adjusting any service parameter, write down its current setting. This will
allow you to reset it if necessary. You can make adjustments without saving, but once a parameter is se-
lected again it will be restored to its original setting. To save a particular setting, press OK on the remote.
ALIGNMENT FUNCTION
0 Vertical Amplitude
1 Vertical Position
2 Vertical Symmetry
3 Vertical Linearity
4 Horizontal Amplitude
5 Horizontal Position
6 EW Amplitude
7 EW Upper
8 EW Lower
9 Trapezium Correction
10 Vertical Bow
11 Vertical Angle
12 Horizontal Offset
13 Cut-off
Reference
14 White Level
15 Option Bytes
16 Option Bytes
17 Option Bytes
18 Option Bytes
19 Option Bytes
20 Colour VCO
21 Y delay
22 Comp. Y Delay
23 Subrightness
24 Subcontrast
25 OSD Contrast
26 Rotation
27 Text Position V
28 Text Position H
29 PIP Position V
30 PIP Position H
EEROM DEFAULT
34
26
-43
-30
-30
-67
45
22
0
0
-1
82
R 20
G 20
B 20
R 63
G 63
B 63
6
5
4
-21
8
27
0
0
5
TYPICAL ADJUSTMENT
FOR 33"
36
29
-43
-6
-13
-58
16
17
4
0
-11
67
R 20
G 27
B 41
R 61
G 57
B 63
3
14
-6
-40
7
32
16
1
3
TYPICAL ADJUSTMENT
FOR 16:9
30
38
-43
-30
39
-64
45
31
0
0
-1
82
R 20
G 21
B 47
R 62
G 58
B 63
3
14
-3
-14
8
32
16
1
3
SETTINGS/
SPECIAL FEATURES
Optimum Setting
Standard crosshatch
Different for various screen settings
Optimum settings
In the grey area, raise the missing two
colors until black becomes standard.
One cutuff should be set to 20.
In the white area, reduce the dominant
two colors until black becomes
standard. One drive should be 63.
These adjustments are outlined in the
option byte table
Adjust zero beat
Optimum settings
Don't adjust!
Optimum settings

5OPTION BYTE TABLE
Alignment function Adjusted in the factory
Meaning
Bit-Nr.
N°.32" 33" 37"
16:9 4:3 4:3
Byte 0
"0"
000
000
000
000
000
000
000
000
000
000
000
000
000
000
000
000
000
000
000
000
000
000
000
000
000
000
100
111
000
000
000
000
111
111
111
111
111
111
111
111
"1"
0
1
2
3
4
5
6
7
0
1
2
3
4
5
6
7
0
1
2
3
4
5
6
7
0
1
2
3
4
5
6
7
0
1
2
3
4
5
6
7
Byte 4
Byte 3
Byte 2
Byte 1
free
free
free
free
free
free
free
free
free
free
free
free
free
CRT
Switch-off autom. (w/o Sync)
Virgin mode
Sound ident info OSD active
Automatic Volume Control (AVC)
AMD switch -over
Warm-up mode (Factory ONLY)
Besic Chroma Inverter
Vertical freeze in VCR mode
Default to 4:3 aspect ratio
AGC memory
Reaction time of remote orders
Lock Mode VPC
Blanking during channel or input
change
Auto PAL/NTSC
PIP mode
16:9 sets and PIP on
Auto color system for ext.
input admitted
Side panels with BESIC
Blue picture w/o signal
Inhibit VGA
Inhibit delayed switch to VGA
Timer controlled channel switch
Auto YC on AV mode
Vertical deflection (Do NOT Change)
Sync Slicer VPC
——
written not written
——
——
——
yes
yes
yes
yes
yes
yes
yes
yes
yes
yes
no
no
no
no
no
no
no
no
no
no
no
no
on
on
60 Hz progressive 120 Hz
——
PIP frame mode
PIP field mode display
PAN/CIN/ZOOM
possible PAN/CIN/ZOOM
impossible
always NTSC auto PAL
——
——
off on
fast slow
——
enabled disabled
4:3 16:9
——
——
ffoon
——
yes
yes (only for test!)
slow
slow
fast
——
——
fast
off
off
yes no
Caution: Only adjust option bits that are highlighted. Other option bits are for authorized service
personnel only. Some option bits, if incorrectly adjusted, can cause unrecoverable system failures.

6SETUP, CONNECTION AND INSTALLATION CONSIDERATIONS
There is a substantial amount of information within the User’s Guide regarding setup and installa-
tion. It is recommended that you read this information prior to installing a customer’s set. Below is
additional information that may help you custom install the set.
Antenna Connections
• TV Input from Antenna Input A is internally split to three destinations:
1.Tuner #1
2.Tuner #2 (switched between this signal and Ant B)
3.Loop Out
• Antenna Input B goes directly (via an antenna switch) to Tuner #2. Because of this, the RF signal
sensitivity of Antenna Input B will be slightly better than Antenna A.
• The built in LOOP OUT is useful for sending the incoming RF signal to a Cable Box or VCR from
the incoming main RF signal.
Video Auxiliary Connections
• The TV has three video inputs: Video 1 and 2 (both rear panel) and Video 3 (front panel).
• All Video Inputs (except Antenna A) are “closed” out of the box. That means they are unavail-
able until opened to suit the specific product you wish to connect to the TV, e.g. Cable Box, VCR,
Camcorder, etc. To do this, first select the TV Setup Menu, then select Connections, then follow
the steps for the particular device you wish to connect.
• Due to the digital design and digital progressive scan inherent in Loewe sets, it is important to
understand that the Video 1 and Video 2 inputs are optimized for different signal types:
1.Video 1 - Best for highest quality sources, such as DVD, Laserdisc, Satellite.
2.Video 2 - Best for lesser quality sources, such as VHS Tape.
3.Video 3 (Front) - For headphones and camcorders.
• If you connect a DVD Player to Video Input 2, the picture quality will be compromised.
• Although the TV has component video inputs, we strongly recommend the “S-Video” inputs
when connecting a DVD player to achieve the highest quality signal transfer as well as to take
advantage of the automatic formatting function.
• If you connect your DVD player to Video Input 1, the television automatically detects whether
the incoming signal is Composite or S-Video.
Letterbox and DVD Considerations
• The User’s Guide gives a comprehensive explanation of Video Sources vs. Television Format
Settings. Please refer to the User’s Guide regarding media type vs. TV settings.
• Don’t forget (especially with the Planus model): If you are watching a DVD in 16x9 mode, set the
DVD Player to 16x9 mode for the television to auto-format.
VGA/RGB Setup
The VGA/RGB Input is designed for a computer or other RGB device, such as a HDTV Set-top Box.
To turn on the VGA/RGB Input:
1. Press the menu button on the remote control.
2. Use the up/down arrow keys (“ch +/–”) to highlight “TV Setup,” then press OK.
3. Use the up/down arrow keys to highlight “Connections,” then press OK.
4. Use the up/down arrow keys to highlight “VGA/RGB,” then press OK. (If VGA/RGB does not
appear on your Connections menu, see “VGA Option Bit” below).
5. Follow the instructions to connect your VGA/RGB device to the television. After each step,
press OK to continue.
6. When you reach the Congratulations Screen, press exit to quit the menu system.
7. Continue below with “Using the VGA/RGB Connection.”

VGA/RGB Option Bit
If “VGA/RGB” does not appear under your TV Setup/Connections menu, follow these instructions to open
the Input:
1. Press the Function Key ( ) on the TV front panel
2. Use the up/down arrow keys (“ch +/–”) on the remote
control to highlight “Service” then press menu.
3. Use the up/down arrow keys to highlight “Option Bytes”
then press OK.
4. Use the up/down arrow keys to highlight “Option Byte 0” then press OK.
5. Use the up/down arrow keys to highlight “Option Bit 6.”
6. Use the left arrow (“vol –”) to change the bit setting from 1 to 0, then press OK.
7. Press exit to quit the Service Menu.
8. Complete the steps in VGA/RGB Setup above to enable the Input.
Using the VGA/RGB Connection
• Make sure your display settings are set as follows:
- Resolution is 640 x 480 Standard VGA
- Refresh rate is 60Hz
- Maximum scan rate is 31.5 KHz
- Once the VGA/RGB Input is selected on the television, you may adjust the VGA Geometry in the
Main menu.
- For laptop computers, the monitor type may need to be changed to Standard VGA as well.
• If the picture is not in sync, press the input key repeatedly to slowly cycle through the inputs. If the
picture is still not in sync, try powering off the television using the front panel On/Off button. Wait a
few seconds, and turn on the television. Then slowly cycle through the inputs again.
• If you are using a laptop computer with Windows 95 or above, you will need to turn off the LCD display
and enable the VGA Computer output. On some laptops, you can do this by holding down the function
key (Fn) and pressing F7 until the LCD is off and the television is on.
• If you have turned on the VGA Option Bit, we strongly recommend that you install a line filter choke.
Contact the Sensory Science Parts Department for more information. If your set has a 3-wire grounded
cord, this choke is installed internally in the television and is not necessary.
Rotation Coil Adjustment
• On larger screen sizes (16:9 and 36” models), an adjustment of the Rotation Coil may be necessary to
compensate for the earth’s magnetic field. Turning the television may cause the picture to tilt on the
horizontal axis, depending on which direction the television is facing. To compensate for this, a Rota-
tion Coil is installed in the television. To adjust the Rotation Coil:
- Version 1 Software: Enter the Service Menu, scroll to “Adjustments” using the down arrow key (“ch –”),
and press OK. Then scroll down to “Rotation.” Use the left/right arrow keys (“vol–/+”) to adjust the tilt of
the picture.
- Version 2 Software: the Rotation Coil adjustment is found in the Customer Setup menu.
• On smaller screen size televisions (Arcada/Calida), the Rotation Coil is not necessary.
LR
S-Video
+
—
Audio
Function key
7PARENTAL LOCK
In the event that customers forget their Parental Lock password, you
can access the Parental Lock menu by using the password “3001”.
Once the Parental Lock menu is accessed, the customer’s password
can be viewed, changed, or deleted as desired.
MAIN MENU
Use number keys
to enter your
password
info
back
exit
PARENTAL LOCK
OK
i
M
E
Password 3 0 0 1

When it comes to remote controls, we can meet most special requirements. While some solutions
will be implemented in the near future, under most circumstances we can help you today.
Direct Function “Extended” TV Remote Codes
We understand that when installers use third-party remote control systems (such as Crestron, Niles,
Philips, etc.), they may require special control functions, such as Direct Input or Power Select. These
functions are available—however, to do this, you must acquire the Loewe “Extended Remote
Control IR Command Set” (not available from the standard Loewe Remote), and the TV’s software
must be upgraded to version 2.0.
• In order for us to provide you with these “extended” remote codes, we can send you (via FedEx)
a special remote that is marked and preprogrammed with “extended” codes installed. Using this
remote, you can copy the IR code commands into your programmable remote or remote system,
then return the special remote to us.
• We use the remote’s number keys and provide the following 8 direct access function codes:
1. Antenna A 5. Video 2
2. Antenna B 6. Front *
3. Video 1 S-Video 7. VGA *
4. Video 1 C-Video 8. Power Off *
• Power On can be initiated by actuating a Power Off and then a normal Power command.
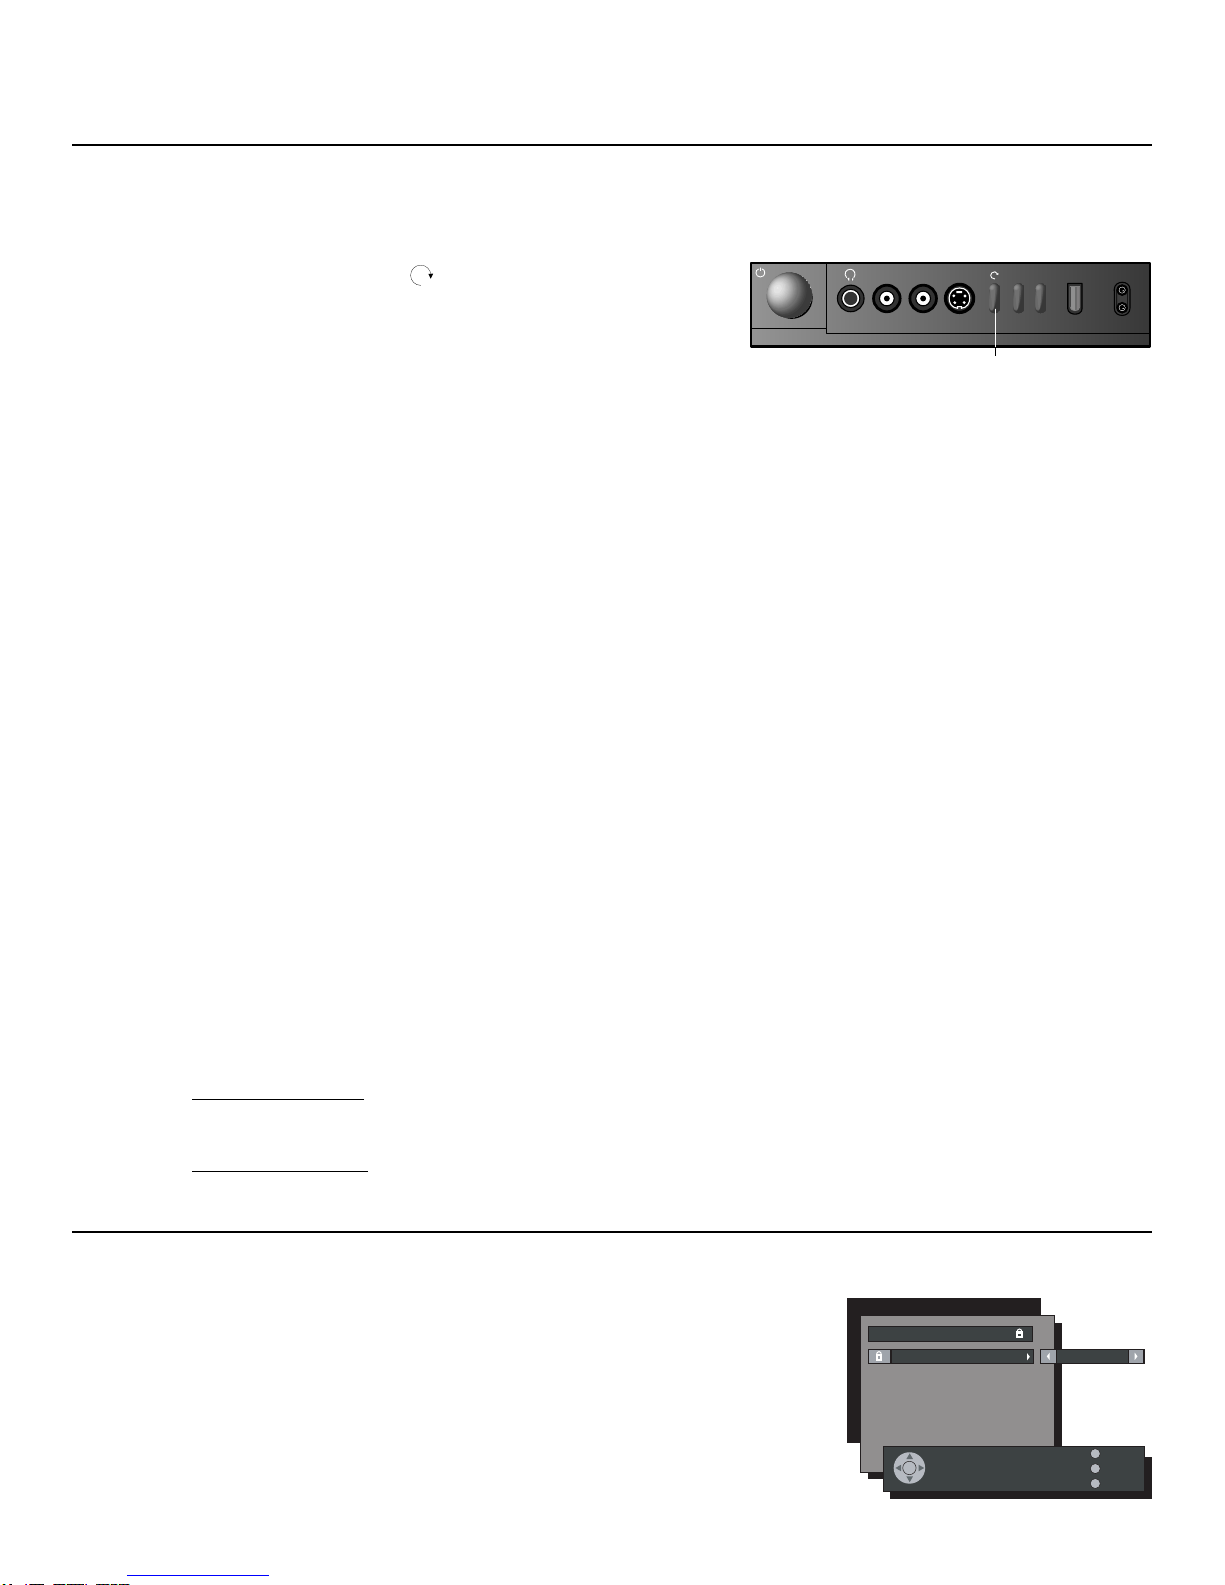
• Functions 1-5 will work with any Loewe model; however, functions 6, 7 and 8, require version 2.0
software. To ensure version 2.0 software is installed, press the front panel key, cursor down to
Service, then press the Menu key on the remote. Check System Data to see if the software is
version 1.4 or version 2.0. You can upgrade the software by replacing a socketed integrated
circuit available from Sensory Science.
• You may borrow this remote control by calling Stan Brown at (480) 998-3400, ext. 1026, or via e-
Programming Loewe Remotes With Additional Device Codes
In addition, some customers want the Loewe remote to control a specific device (such as a DVD
player, Satellite dish, VCR or Cable box), but the device’s codes are not included in the standard
universal Loewe remote control programming list.
• If you wish to program a Loewe remote with codes that are not in the standard library, the
short-term solution is to contact Sensory Science and arrange to send us the remote. We will
then program the codes into a standard Loewe remote control and return both remotes to you.
You would then return the owner’s original remote.
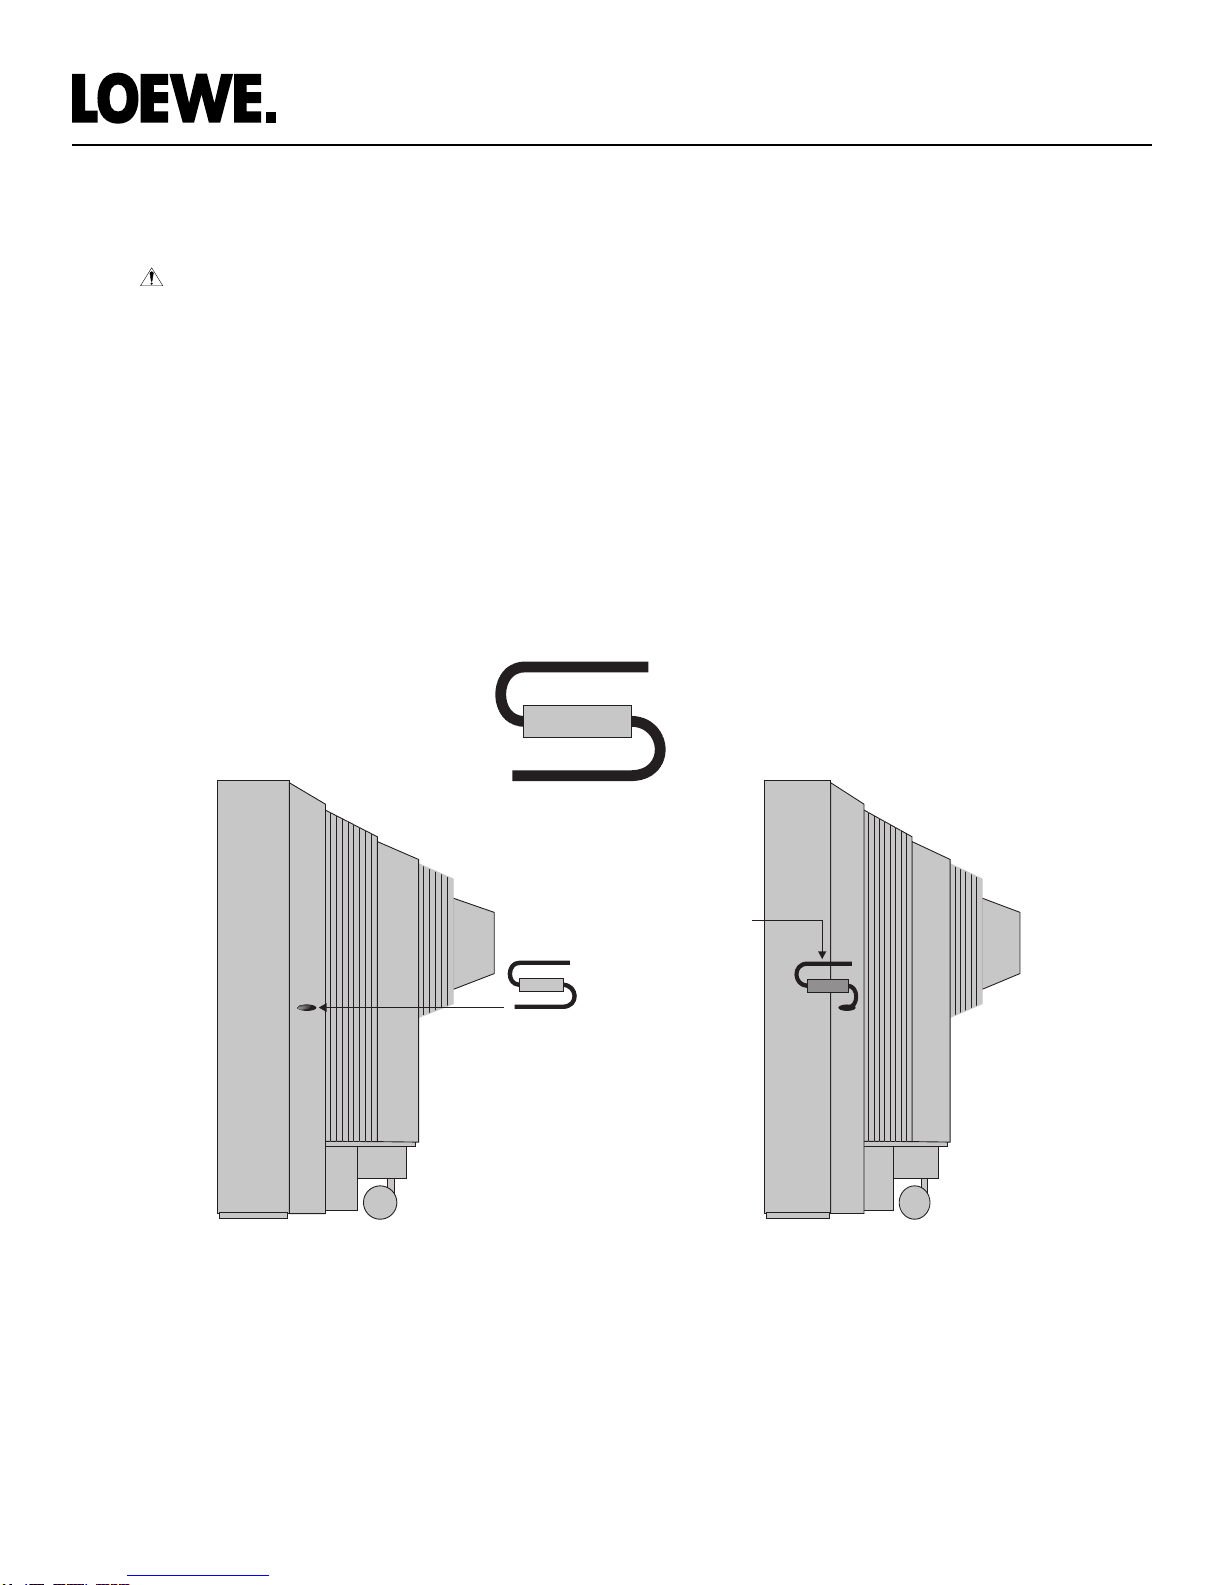
• Our long term plan is to supply all key dealers with a special “video box” and cable along with
our proprietary software. The video box connects between your Windows PC and your SVGA
monitor. Just follow the instructions provided with the box and install the supplied software. By
exposing the Loewe remote control’s built-in sensor to the supplied infrared emitter, you can
program the remote with any code from our extensive library of over 2000 units. If a product is
not in our library, simply send us the remote and we will update our code library. You will also be
able to acquire remote data codes via the Internet.
• One of the program codes available in our library will be the “Loewe Extended Remote Code”
set. As discussed above, a dealer with the “video box” will be able to program any Loewe re-
mote with the Extended Remote Code set so you can add new codes to the system as necessary.
• Should you have any further problems or questions regarding use of or programming Loewe
remotes , please do not hesitate to call or send e-mail (preferred) to Sensory Science at:
8REMOTE CONTROL ISSUES
* Only valid on version
2.0 or better software.

9READ ALL WARNINGS BEFORE INSTALLING GLASS!
• The filter glass is made of compound glass and
weighs approximately 20 pounds. It is breakable
if treated improperly.
• Always use the supplied nonslip gloves to
prevent damage when removing the glass from
the carton and during assembly.
• Make sure the glass is positioned securely so it
cannot slip or tip over during preparation for
assembly.
• Do not set the glass down on a hard or slick
surface.
• Keep children away from all packing material
and stickers.
• Once the glass is in place, treat it with care. Do
not tap the glass with a blunt or sharp object
(e.g. hammer, or sharp tool).
• Use only the supplied mounting screws, and
HAND-TIGHTEN them to prevent damage—DO
NOT OVERTIGHTEN!
• If the glass breaks, use extreme caution: Do not
touch the glass unless you are wearing protec-
tive gloves and special protective clothing.
Thoroughly remove and dispose of all glass
fragments and keep glass fragments away from
children.
• Remove the glass if: 1) it becomes scratched or
cracked, or 2) you plan to ship the television.
Use the original packaging if at all possible for
transportation of the television.
• To uninstall the filter glass, please follow the
instructions in reverse.
ART 636 FILTER GLASS INSTALLATION
TV
Glass
AB
Gently fasten the filter glass to the television cabinet using the four supplied thumb-tight mounting
screws and spacers. DO NOT OVERTIGHTEN!
How to Install Filter Glass
Installing the filter glass requires nonslip gloves
(supplied) and two people: one to hold the glass
and one to insert and hand-tighten the four
mounting screws.
1 Carefully remove the filter glass from the carton
and place it lengthwise on a soft, nonslip
surface.
2 Put on the supplied nonslip gloves before
removing the protective cover. If necessary,
clean the front and back of the glass with a soft
cloth before installing.
3 Insert each thumb-tight screw (A) into its white
plastic spacer (B) as shown in the diagram at
left.
4 Position the glass against the television so the
four screw holes are in alignment. The glass is
curved and follows the contour of the cabinet.
The front of the glass is indicated by the LOEWE
logo, model number, and attached sticker(s).
5 Insert and tighten all four mounting screws just
enough to hold the glass in place, then gently
snug each screw until the glass fits securely to
the cabinet.
WARNING: DO NOT OVERTIGHTEN, AS THIS
COULD BREAK OR PERMANENTLY DAMAGE
THE GLASS!!!
6 Remove the warning sticker(s) from the front of
the glass.
7 Installation is complete!
Support Tabs

Moving the Art television requires two people: one on each side to lift the set. Although the handles are
positioned to prevent tipping, a third person is recommended in the front as a precaution.
1 Insert one side of the S-shaped handle completely into the hole on the side of the Art television (see
figure 1. Note: You may need to move the handle up and down slightly during insertion.
2 Repeat for the other side of the television.
3 Rotate the handles up so that the foam is against the side of the television cabinet. Use the free side of
the handle to lift the set ( see figure 2).
4 After moving the television, remove the handles and store them for future use.
10 ART HANDLE USAGE
Grasp
handle
here
Figure 1. Insert handle. Figure 2. Grasp handle and lift.

FREQUENTLY ASKED QUESTIONS
Q. What is the Dot Pitch of the Picture Tube?
A. 1 mm (compared to 0.28mm on a standard 15-inch monitor). However, because the Picture Tube is 3
times larger, the relative Dot Pitch is the same.
Q. How many lines of resolution does the set have?
A. Over 400 lines (NTSC) to over 600 lines (RGB)
Q. Are there “burn in problems” with the Loewe TVs?
A. No. Loewe sets use standard phosphor picture tubes.
Q. How is the TV “HDTV ready”?
A. By using the RGB/VGA input with a set-top box equipped with a 480p VGA output.
Q. Why isn’t the picture centered vertically on 4:3 sets in the 16:9 mode?
A. To indicate that the set is in 16:9 anamorphic mode. This is normal.
Q. Why does Initial Setup run every time I turn on the television?
A. Units with Version 2 software include an Initial Set-up procedure that guides the customer through a
series of menus to set up the television. If the customer exits this procedure before it reaches the final
“Congratulations” screen, the television can be set up manually; however, the Initial Set-up will auto-
matically start again the next time the unit is turned on until the entire process is completed. To disable
this feature, open the Service Menu, select Option Bytes, then scroll to Option Byte 3 (press OK), then
scroll down to Bit 7 and change it from “0” to “1,” and press OK to save.
Q. Can I play PAL and SECAM sources?
A. Loewe sets are capable of displaying PAL sources, but not SECAM. This feature must be enabled in the
Service Menu. To enable this feature, open the Service Menu, select Option Bytes, then scroll to Option
Byte 2 (press OK), then change Bit 0 from “0” to “1,” and press OK to save. This will enable the televi-
sion to automatically detect and display PAL sources through the video inputs.
Main Operator
Phone: (480) 998-3400
Customer Service
Phone: (877) LOEWETV - (563-9388)
Parts Department
Phone: (480) 905-9649
Fax: (480) 998-0381
Loewe Television Technical Assistance
Loewe Field Service Engineer
Joel Johnson
Phone: (480) 905-9654
Fax: (480) 998-0381
E-mail: [email protected]
Senior Sales Administrator
Collin Kordas
Phone: (480) 905-9624
Fax: (480) 998-8312
E-mail: [email protected]
Director of Operations
Greg Todd
Phone: (480) 998-3400
Fax: (480) 905-9661
E-mail: [email protected]
Technical Applications Specialist
Stan Brown
Phone: (480) 998-3400 ext.1026
Fax: (480) 951-4404
E-mail: [email protected]
SENSORY SCIENCE CONTACTS
12
11

7835 East McClain Drive • Scottsdale, Arizona USA 85260
www.sensoryscience.com
www.loewetv.com
Printed in U.S.A.
Table of contents
Other Loewe Remote Control manuals

Loewe
Loewe Assist Media User manual

Loewe
Loewe Assist Multi-Control User manual

Loewe
Loewe 2100 User manual

Loewe
Loewe Assist Multi-Control User manual

Loewe
Loewe Assist Media User manual

Loewe
Loewe assist easy User manual

Loewe
Loewe Control 1 plus User manual

Loewe
Loewe Individual 26 Selection User manual

Loewe
Loewe Assist Media User manual

Loewe
Loewe Assist Media User manual
Popular Remote Control manuals by other brands

Firstech
Firstech 2WSHLCD -5P user guide

Lux Products
Lux Products 9000RF instructions

Velleman
Velleman High-Q Velleman-kit K8023 Illustrated assembly manual

Sunricher
Sunricher ZG9001K4-RGBW manual

Rasmussen
Rasmussen WT-2R Installation and operating insctructions

CheckMate V
CheckMate V RT-U50 Programming & operating instructions