Long range T4300A User manual

Introduction
The T4300A and T4300A-V are simple to use transmitters that can control 2 trap machines with the
push of a button. The T4300A-V has the added ability to launch targets using voice control. Both
transmitters require a 9-volt battery and an antennae.
Press any button to power on the transmitter. Be aware the this rst button press even though the
device is o will re the corresponding trap or traps. The Red Power LED will illuminate to let you know
that the device is on and ready to launch the second target.
The T4300A-V has a microphone included. or best results clip this microphone to the lapel of vest or
shirt about -9 inches from your mouth.
1
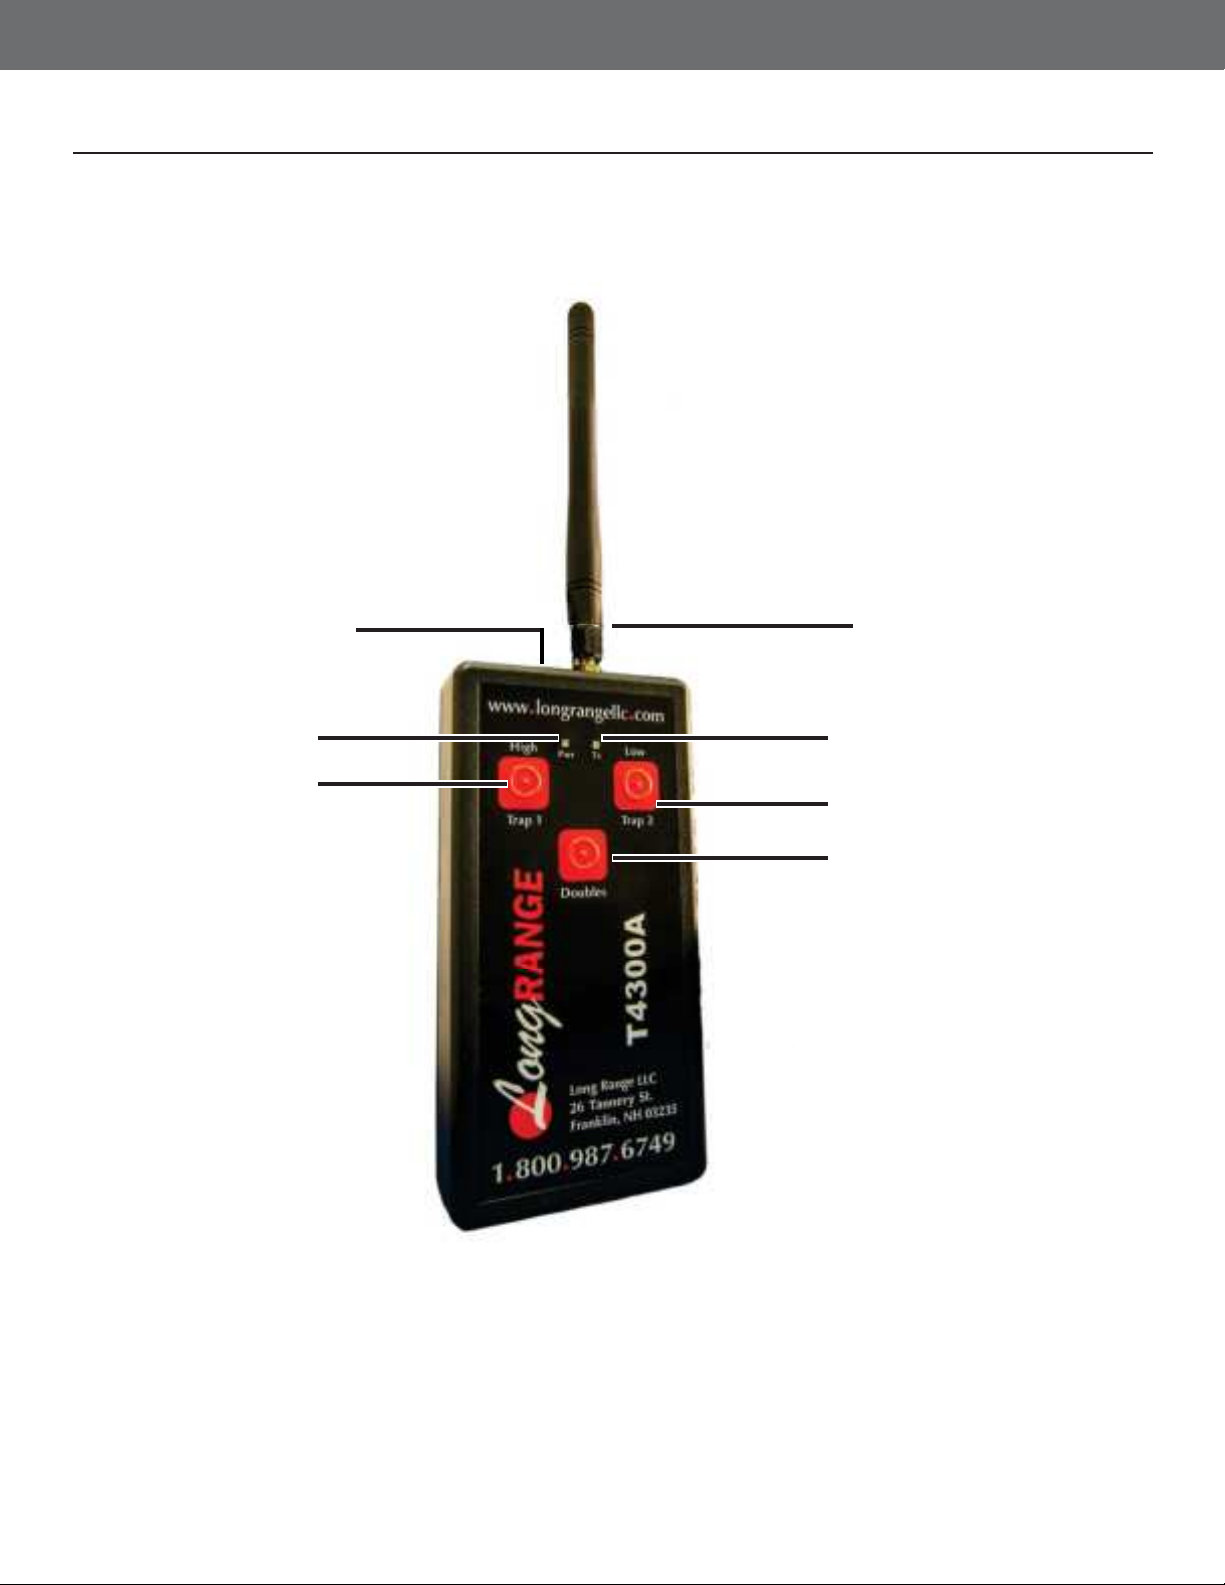
Antenna
Red Power LED
Trap 1 Button
Microphone Jack
Only on the T4300A-V
Green Tx Light
Indicates transmitter is armed
Trap 2 Button
Doubles Button
Throws a True Pair

Button Operation (T4300A & T4300A-V)
Voice Operation (T4300A-V Only)
Press Trap 1 or Trap 2 to re the corresponding trap. The Green TX LED will illuminate to indicate that
a signal is being transmitted and the corresponding trap will re. Press the Doubles Button to re a
True Pair which will re both traps simultaneously.
Be sure to have the supplied microphone plugged into the Microphone Jack on the top of the T4300A-V
and clipped to the lapel of vest or shirt about -9 inches from your mouth. The T4300A-V can be clipped
to a belt or put in a pocket of a shooting vest.
Once the microphone is plugged into the Microphone Jack the T4300A-V automatically enters voice
activation mode. To re a single target press either Trap 1 or Trap 2. This arms the device but does
not re the trap. The Green Tx Light will illuminate to indicate that the device is armed and is waiting
for the voice command. When ready call Pull in a normal tone of voice to re the designated trap. The
trap will re and the Green Tx Light will go out until another button is pressed.
To re both traps simultaneously press the Doubles button. This arms the device but does not re the
traps. The Green Tx Light will illuminate to indicate that the device is armed and is waiting for the voice
command. When ready call Pull in a normal tone of voice to re both trap 1 and trap 2. The traps will
re and the Green Tx Light will go out until another button is pressed.
Lock On Mode (T4300A-V Only)
Report Mode (T4300A-V Only)
The Lock On Mode is a feature of the T4300A-V and is used in conjunction with voice operation. Lock
On Mode allows Trap 1 Trap 2 or Doubles to be locked in and launched with a verbal command
without pressing a button each time.
To lock in a trap or a true pair press and hold either Trap 1 Trap 2 or Doubles until the Green Tx LED
ashes 4 seconds. The selected traps are now locked in. When ready call Pull in a normal tone
of voice to re the designated traps. The Traps will re and the Green Tx Light will go out. After 4
seconds the Green Tx Light will begin to ash again and the T4300A-V will be ready to re the same
traps. To eit Lock On Mode press any button.
Report Mode is a feature of the T4300A-V and is used in conjunction with voice operation. Report
Mode allows shooter to call for one trap and have the other trap re on the report of the gun.
To set up Report Mode press the rst trap that you would like to re Trap 1 or Trap 2. The Green
Tx LED will illuminate to indicate that the device is armed. Before calling for the target press the other
trap button. This will be the trap that res on the report of the gun. When you are ready call Pull in a
normal tone of voice to re the rst designated trap. On the sound of the gun the second trap will re.
2

Skeet Sequence Mode (T4300A-V Only)
The T4300A-V has the Skeet Sequence preloaded. This is designed for solo shooters to go out without
a trapper for practice.
To activate Skeet Sequence Mode press and hold the Doubles button for seconds until the Green
Tx LED blinks rapidly. Be aware that while holding the Doubles button the Green Tx LED will begin to
blink after 4 seconds when it enters Lock On Mode. Continue to hold down the Doubles button until
it blinks rapidly.
The T4300A-V is now in Skeet Sequence Mode. When you are ready call Pull in a normal tone of
voice to re a high house. The second call will release a low house and the third call will release a
double. The T4300A-V is now ready for stand 2. Continue through the stands and the T4300A-V will
launch the appropriate traps in the sequence.
At any time during the round you may press any of the 3 buttons to throw the option bird. After the
option bird is thrown the unit will resume the skeet sequence.
The T4300A-V will end the sequence after launching the low bird on Station 8. To throw a low 8 option
press the Low House button and call pull.
To e it Skeet Sequence Mode at any time press and hold the Doubles button until the Green Tx LED
turns o.
3
Link Mode (Alternative to Using Dip Switches)
1
2
3
4
Set desired Field ID Channel and Trap
Addresses on the transmitter.
Power on desired receiver with all dip switches
set to the openo position. The red Link LED
will blink for 15 Seconds. This indicates that
the receiver is in Link Mode. If a transmitter
has not been linked to the receiver during this
15 seconds the receiver will revert to the
previous settings.
The red Link Mode light on the receiver will
go solid. The transmitter and receiver are now
linked. Repeat this process to link another
receiver.
Press and hold the trap button that you would
like to assign to the receiver until the green Tx
Light on the transmitter ashes.
Link Mode allows users to wireless link receivers to specic trap buttons. Be sure that the receiver
you wish to link to is in Link Mode. If you are using the T4300A-V make sure that there is no
microphone attached to the device.
Link LED
Will blink for 15
seconds
Set to open/o
position
Indicates power
is on
Dip Switches
Power LED
T4300A Field ID Must
Be Set (Channel 1
Shown Here)
R-4300 Dip Switches
Set to Link Mode (All in
the openo position)

Trouble Shooting
Frequently Asked Questions
Contact
Please call us with any questions. Your satisfaction is our priority.
Call toll free:
1 00 9-49 onday-riday :30am-4:30pm ST
Website:
http://www.longrangellc.com
AI TO: Long Range LLC.
2 Tannery St.
ranklin 03235
Please carefully pack and ship prepaid and insured to ong Range C.
Questions Answers
What should I do if my T4300A isn’t working?
What should I do if my T4300A isn’t turning on?
irst ensure that your T4300A is set to the same
Channel as the trap that you are trying to re.
Second ensure that your T4300A is set to the
correct Message Length.
Please refer to the Dip Switches Manual
included with your device.
Be sure that the T4300A has a fresh 9-volt
battery.
4
FCC Compliance Statement
This device complies with part 15 of the CC Rules. Operation is subject to the following two conditions: 1 This device may not cause harmful
interference and 2 this device must accept any interference received including interference that may cause undesired operation.
CATIO: The grantee is not responsible for any changes or modications not epressly approved by the party responsible for compliance. Such
modications could void the user’s authority to operate the equipment.
OT: This equipment has been tested and found to comply with the limits for a Class B digital device pursuant to part 15 of the CC Rules.
These limits are designed to provide reasonable protection against harmful interference in a residential installation. This equipment generates uses
and can radiate radio frequency energy and if not installed and used in accordance with the instructions may cause harmful interference to radio
communications. owever there is no guarantee that interference will not occur in a particular installation. If this equipment does cause harmful
interference to radio or television reception which can be determined by turning the equipment o and on the user is encouraged to try to correct the
interference by one or more of the following measures:
– Reorient or relocate the receiving antenna.
– Increase the separation between the equipment and receiver.
– Connect the equipment into an outlet on a circuit dierent from that to which the receiver is connected.
– Consult the dealer or an eperienced radio/TV technician for help.
This equipment has been tested and meets applicable limits for radio frequency R eposure. This transmitter must not be co-located or operating in
conjunction with any other antenna or transmitter.
This manual suits for next models
2
Table of contents
Other Long range Transmitter manuals


Popular Transmitter manuals by other brands


Dejero
Dejero EnGo 3x manual

Rosemount
Rosemount 4600 Reference manual

Speaka Professional
Speaka Professional 2342740 operating instructions

trubomat
trubomat GAB 1000 instruction manual

Teledyne Analytical Instruments
Teledyne Analytical Instruments LXT-380 instructions

Rondish
Rondish UT-11 quick start guide


