Lumag KM800 User manual

Distribution Limited
Electric Road Brush
Operator’s Manual
KM800
FOR YOUR SAFETY
READ AND UNDERSTAND THE ENTIRE MANUAL
BEFORE OPERATING THIS MACHINE


Warranty Registration Form
For the warranty to be valid the Warranty Registration Form must be completed and
returned to Lumag Distribution Limited within 14 days of the purchase, together
with a copy of the purchase invoice.
We will use your email to confirm that we have received the completed Warranty
Registration Form and contact you about any errors or omissions on the form. We
may occasionally use this email address to make you aware of news, technical advice
and special offers. If you do not wish to receive such emails please tick this box.
Unit 10, Hatchmoor Industrial Estate, Hatherleigh, Okehampton, Devon EX20 3LP
www.lumag-gb.co.uk 01837 811741
Lumag Distribution Limited Company Number: 09267547 VAT Number: GB154566788 Hatherleigh
Plant and Tool Hire is a trading name of Lumag Distribution LTD
Model:
Serial Number:
Type of Use: Business / Domesc
Name:
Business Name:
Address:
Email Address:
Phone Number:
Date of Purchase:
Place of Purchase:
Proof of Purchase
enclosed:


Lumag Servicing and
Maintenance Schedules
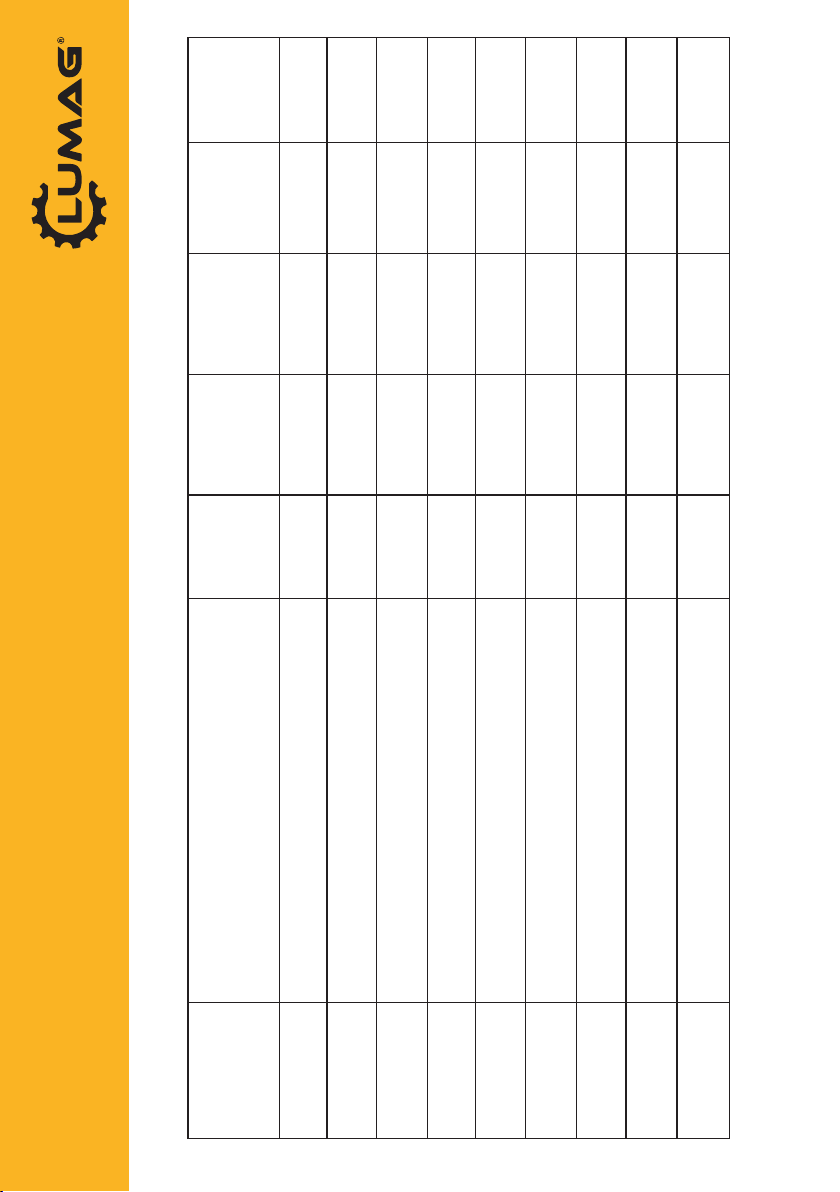
Engine Service & Maintenance Schedule
Machine Service & Maintenance Schedule
Item Checks/Work Each Use 20hrs
(1st Month)
50hrs
(2nd Month)
100hrs
(6th Month)
300hrs
(Yearly)
Engine Oil Check Level X
Change X (1) X
Air Filter Check X
Clean X (3)
Replace X (4)
Sediment Cup Clean X
Spark Plug Check/Clean X
Replace X
Idle Speed Check/Adjust X (2)
Valve Clearance Check/Adjust X (2)
Fuel Tank Strainer Check/Clean X (2)
Combuster Chamber Inspect/Clean X (2)
Fuel Lines Check X (2)
Item Checks/Work Each Use Weekly 20hrs
(1st Month)
50hrs
(2nd Month)
100hrs
(6th Month)
300hrs
(Yearly)
Fasteners Tension Check X
Clean Machine Clean X
Drive Belt Check/Adjust X
Replace X (2)
All Other Moving Parts &
Cables
Lubricate X X (2)
Engine Oil 600ml Lumag Engine 1
1 – First service only, 2 = Should be carried out by your Lumag Dealer, 3 = May need to be done more oen in dusty areas &
4 = Replace paper element only
To maximise the life of your Lumag machine it needs to be serviced and maintained at every indicated month or
operang hour interval, whichever comes rst, in accordance with the below Schedules. Please note that failure to
service your machine on schedule or use genuine Lumag parts and consumables will result in your warranty being void.

Distribution Limited
Service & Maintenance Record
Product Details: Model: __________________________________
Serial number: ____________________________
Purchase Date: ____________________________
Date: Description of checks/work carried out: Parts Used?
Y/N
Parts Invoice
Number:
Dealers
Name:
Engineers
Name:
Engineers
Signature:
Please note that failure to service your machine on schedule or use genuine
Lumag parts and consumables will result in your warranty being void

TABLE OF CONTENTS
INTRODUCTION ..........................................................................................................................................4
SAFETY STATEMENTS ...............................................................................................................................4
GENERAL SAFETY PRECAUTIONS........................................................................................................5-6
SAFETY SIGNS & LABELS .........................................................................................................................7
ENGINE OPERATION ..................................................................................................................................8
OPERATION............................................................................................................................................9-12
SERVICE & REPAIR - GENERAL ..............................................................................................................12
STORAGE ..................................................................................................................................................12
TECHNICAL SPECIFICATIONS.................................................................................................................13
TROUBLESHOOTING ...............................................................................................................................13
MAINTENANCE .........................................................................................................................................14
ACCESSORIES..........................................................................................................................................20
51-4144
3

INTRODUCTION
Purpose of Sweeper
This sweeper is designed solely for the use in
c
lean up, maintenance and similar operations.
Use in any other way is considered contrary to the
intended use. compli
ance with and strict adherence
to operation, service and repair conditions, as
specified by the manufacturer, are also essential
elements of the intended use.
SAFETY STATEMENTS
DANGER
THIS STATEMENT IS USED
WHERE SERIOUS INJURY OR
DEATH WILL RESULT IF THE
INSTRUCTIONS ARE NOT
FOLLOWED PROPERLY.
THIS STATEMENT IS USED
WHERE SERIOUS INJURY OR
DEATH COULD RESULT IF
THE INSTRUCTIONS ARE NOT
FOLLOWED PROPERLY.
THIS STATEMENT IS USED
WHERE MINOR INJURY COULD
RESULT IF THE INSTRUCTIONS
ARE NOT FOLLOWED PROPERLY.
THIS STATEMENT IS USED
WHERE EQUIPMENT OR
PROPERTY DAMAGE COULD
RESULT IF THE INSTRUCTIONS
ARE NOT FOLLOWED PROPERLY.
THIS SYMBOL BY ITSELF OR
USED WITH A SAFETY SIGNAL
WORD THROUGHOUT THIS
MANUAL IS USED TO CALL YOUR
ATTENTION TO INSTRUCTIONS
INVOLVING YOU
R PERSONAL
SAFETY OR THE SAFETY OF
OTHERS. FAILURE TO FOLLOW
THESE INSTRUCTIONS CAN
RESULT IN INJURY OR DEATH.
WARNING
CAUTION
Terms used in Manual
Right-hand, left-hand, front and rear are determined
from the operator’s perspective facing forward in the
normal operating position.
4
NOTICE
51-4144

GENERAL SAFETY PRECAUTIONS
WARNING
READ MANUAL PRIOR TO
INSTALL
Improper installation, operation,
or maintenance of this equipment
could result in serious injury or
death. operators and maintenance
personnel shou
ld read this
manual as well as all manuals
related to this equipment and the
prime mover thoroughly before
beginning installation, operation,
or maintenance.
Follow all
Safety instructions in
This manual and the prime
Movers manual.
READ AND UNDERSTAND ALL
SAFETY STATEMENTS
Read all safety decals and safety
statements in all manuals prior
to operating or working on this
equipment. know and obey all
oShA regulations, local laws
and other professional guidelines
for your operation. know and
follow good work p
ractices when
assembling, maintaining, repairing,
mounting, removing or operating this
equipment.
KNOW YOUR EQUIPMENT
know your equipment’s capabilities,
dimensions and operations before
operating. visually inspect your
equipment before you start, and
neve
r operate equipment that is not
in proper working order with all safety
devices intact. check all hardware to
assure it is tight. Make certain that all
locking pins, latches, and connection
devices are properly installed and
secured. Remove and replace any
damaged, fatigued or excessively
worn parts. Make certain all safety
decals are in place and are legible.
keep decals clean, and replace them
if they become worn and hard to
read.
GENERAL SAFETY PRECAUTIONS
WARNING
PROTECT AGAINST FLYING
DEBRIS
Always wea
r proper safety glasses,
goggles or a face shield when driving
pins in or out or when operation
causes dust, flying debris, or any other
hazardous material.
LOWER OR SUPPORT RAISED
EQUIPMENT
Do not work under raised booms
without supporting them. Do not us
e
support material made of concrete
blocks, logs, buckets, barrels or any
other material that could suddenly
collapse or shift positions. Make sure
support material is solid, not decayed,
warped, twisted, or tapered. Lower
booms to ground level or onto blo
cks.
Lower booms and attachments to
the ground before leaving the cab or
operator’s station.
WARNING
WARNING
51-4144
5

GENERAL SAFETY PRECAUTIONS
CONTINUED
• wear safety glasses, protective
clothing, and use a sound piece of
cardboard or wood when
searching for hydraulic leaks.
DO NOT USE YOUR HANDS!
SEE ILLUSTRATION.
GENERAL SAFETY PRECAUTIONS
CONTINUED
• Wear the protective clothing
equipment specified by the tool
manufacturer.
WARNING
SAFELY OPERATE EQUIPMENT
Do not
operate equipment until you
are completely trained by a qualified
operator in how to use the controls,
know its capabilities, dimensions,
and all safety requirements. See
your prime movers manual for these
instructions.
• keep all step plates, grab bars,
pedals, and controls free of dirt,
grease, debris, and oil.
• Never allow anyone to be around
the equipment when it is operating.
• Do not allow riders on the
attachment or the prime mover.
• Do not operate the equipment
from anywhere other than the
correct operators position.
• Never leave equipment unattended
with the engine running or with this
attachment in a raise position.
• Do not alter or remove any safety
feature from the prime mover or
this attachment.
• know your work site saf
ety rules as
well as traffic rules and flow. when
in doubt on any safety issue,
contact your supervisor or safety
coordinator for an explanation.
FALL HAZARD
DO NOT OPERATE NEAR
UNGUARDED EDGES.
• this sweeper is Not intended for
roof top use.
•
when operating sweeper, adhere
to all government rules, local laws
and other professional guidelines
for your sweeping application.
WARNING
DO NOT MODIFY MACHINE OR
ATTACHMENTS
Modifications may weaken the
integrity of the attachment and may
impair t
he function, safety, life and
performance of the attachment.
when making repairs, use only
the manufacturer’s genuine parts,
following authorized instructions.
other parts may be substandard
in fit and quality. Never modify
any RoPS (Roll over Protection
S
ystem) equipment or device. Any
modifications must be authorized in
writing by the manufacturer.
WARNING
SAFELY MAINTAIN AND REPAIR
EQUIPMENT
• Do not wear loose clothing, or any
accessories that can catch in
moving parts. If you have long hair,
cover or secure it so that it does
not become entangled in the
equipment.
• work on a level surface in a well
-lit
area.
• Use properly grounded electrical
outlets and tools.
• Use the correct tool for the job at
hand. Make sure they are in good
condition for the task required.
DANGER
6
51-4144

SAFETY SIGNS & LABELS
Serial Number
50-0722
warning: Misuse
Warning:flying objects&
ntanglement
SAFETY SIGNS & LABELS
there are several specific signs on this sweeper.
the exact location of the hazards and
description of
the hazards are reviewed.
Placement or replacement of Safety Signs
1. clean the area of application with nonflammable
solvent, and then wash the same area with soap
and water.
2. Allow the surface to fully dry.
3. Remove the backing from the safety sign,
exposing the adhesive surface.
4. Apply the safety sign to the position shown in
the diagram above and smooth out any bubbles.
51-4144
Instructions
1. keep all safety signs clean and legible.
2. Replace all missing, illegible, or damaged safety
signs.
3. Replacement parts, for parts with safety signs
attached, must also have safety signs attached.
7
Warning:flying objects&
entanglement
Warning:flying objects&
entanglement
Logo
Danger: fall hazard

ENGINE OPERATION
NOTICE -
THE MOTOR IS DELIVERED
WITHOUT OIL AND GASOLINE.
Oil Filling:
Place the motor in a h
orizontal position.
Remove the plug and fill with oil right to the edge.
(figure 1)
Fuel
Use lowest available octane unleaded fuel. when
filling, place the machine in a horizontal position.
always
replace old fuel. always stop the motor
when fueling. Never fill up with fuel on a hot motor.
Never use gasoline mixed with oil.
operation - Start and Stop
Cold Motor
Activate the motor choke.
Set the throttle control on full speed. (figure 2)
first, pull the starting rope a couple of times, shortly,
until if feel
s tight. Pull the starting rope slowly to the
point where it feels tight, place your left hand on
the motor in order to hold back, and pull the starting
rope hard once. when the motor runs, deactivate
the choke.
NOTICE -
NEVER LET THE STARTING ROPE
WIND AG
AIN BY ITSELF. FOLLOW
it all the way back with your hand.
If the motor will not run in spite of
several attempts this may be caused
by the fact that there is too much fuel
in the cylinder/carburator, and that
the spark plug has become moist.
Remove the plug and wipe it off.
figure 1
Stop the Motor:
Set the throttle control in position “Sto
p”. Set the
throttle lever to idle and let the motor run for 12
-20
seconds before the lever is moved to stop.
Never
leave the sweeper without stopping the motor.
NOTICE -
Do not turn off the motor by
switching on the choke, as this
may result in damage to the motor.
8
51-4144

OPERATION
CAUTION
A SWEEPER IS A DEMANDING
MACHINE.
Only fully trained
operators or trainee operators under
supervision of a fully trained person
should use this machine.
•before leaving the operator’s position for any
reason, StoP eNGINe.
NOTICE -
AVOID TRANSMISSION DAMAGE.
Do not shift while in motion.
before operating sweeper:
•Operate sweeper controls in an off-road location.
•be sure that you are in a safe area, away from
traffic or other hazards.
•check all hardware making sure it is tight.
•Replace any damaged or fatigued hardware
with properly rated fasteners.
•check tire pressure before sweeping.
•Remove from the sweeping area all property
that could be damaged by flying debris.
•be sure all persons not operating the sweeper
are clear of the sweeper discharge area.
•Always wear proper apparel such as a long
sleeved shirt buttoned at the cuffs; safety
glasses, goggles or a face shield; ear
protection; and a dust mask.
while operating sweeper:
DANGER
FALL HAZARD
DO NOT OPERATE NEAR
UNGUARDED EDGES.
WARNING -
OPERATION
leave the brush hood (shield)
and all other shields and safety
equipment in place when
operating the sweeper.
•when sweeping on rough terrain, reduce speed
to avoid “bouncing” the sweeper. Loss of
control can result.
•Never sweep toward people, buildings, vehicles
or other objects that can be damaged by flying
debris.
•only operate the controls while the engine is
running.
•while you operate the sweeper slowly in an
open area, check for proper operation of all
controls and all protective devices. Note any
repairs needed during operation of the sweeper.
Report any needed repairs.
Before each use
Perform daily maintenance as indicated in
Maintenance Schedule.
Run the sweeper at a low idle. check for proper
brush rotation and drive engagement.
WARNING
AVOID SERIOUS INJURY. check
for large objects that could harm the
operator or others if thrown by the
sweeper. Remove thes
e items before
operating.
•this sweeper is Not intended for roof top use.
•when operating sweeper, adhere to all
government rules, local laws and other
professional guidelines for your sweeping
application.
•Minimize flying debris - use the slowest rotating
speed that will do the job.
•keep hands, feet, hair and other loose clothing
away from all moving parts.
51-4144
9

OPERATION
Operating Tips
During use
Directing Debris
Avoid excessive downward pressure on the brush
sections to prevent excessive we
ar. A two to four
inch wide pattern is sufficient for most applications.
Direct debris by angling the brush head in that
Direction.
observe wind direction. Sweeping with the wind
makes sweeping more effective and helps keep
debris off the operator.
the terms swing and angle are used
Interchangeably.
brush head Angling
1. Push the locking handle down.
2. Position the brush head at the desired angle.
3. Release the locking handle.
NOTICE -
OPERATION
AVOID SWEEPER DAMAGE. Do not
ram into piles
Brush, engine & Travel Speeds
vary brush, engine and travel speeds to match
sweeping conditions.
large areas
when sweeping a large area, such as a parking lot,
make a path down the middle and sweep to both
sides. this reduces the amount of debris that the
sweeper must sweep to one side.
Snow
fast brush speeds and slow travel speeds are
needed to sweep effectively. for wet and/or deep
snow, increase to almost full throttle. this helps
keep snow from packing up inside the brush hood.
In deep snow you may need to make multiple
passes to get down to a clean surface.
to keep snow from blowing back onto a swept area,
always sweep so the wind is at your back.
Dirt & Gravel
to keep dust at a minimum, plan sweeping for days
when it is overcast and humid or after it has rained.
Also, sweep so the wind blows at your back.
Low brush speeds and moderate travel speeds work
best for cleaning debris from hard surfaces. brush
speeds that are too fast tend to raise dust because
of the aggressive sweeper action.
to sweep gravel, use just enough brush speed to
“roll” the gravel, not throw it.
Heavy Debris
travel slowly - 1-2 mph.
Sweep a path less than the full width of the
sweeper.
51-4144
Sweeping
to sweep:
1. Swing the brush head assembly the direction
that you want to direct debris. (See brush head
Angling)
2. Start the engine at idle.
3. engage the brush drive. (Left control lever)
4. Increase engine rpm to sweeping speed.
5. Engage the traction drive. (Right control lever)
NOTICE
AVOID SWEEPER DAMAGE.
Reduce travel speed to avoid hitt
ing
immovable objects.
10

OPERATION - CONTINUED
WARNING
SAFELY OPERATE EQUIPMENT
Do not operate equipment until you
are completely trained by a qualified
operator in how to use the controls,
know its capabilities, dimensions,
and all safety requirements.
See
your prime movers manual for these
instructions.
• keep all step plates, grab bars,
pedals, and controls free of dirt,
grease, debris, and oil.
• Never allow anyone to be around
the equipment when it is operating.
• Do not allow riders on the
attachment or the prime mover.
• Do not operate the equipment
from anywhere other than the
correct operators position.
• Never leave equipment unattended
with the engine running or with this
attachment in a raise position.
• Do not alter or remove
any safety
feature from the prime mover or
this attachment.
• know your work site safety rules as
well as traffic rules and flow. when
in doubt on any safety issue,
contact your supervisor or safety
coordinator for an explanation.
Height adjustment of Caster Wheels & Brushes
once the brushes get worn it is necessary to adjust
the height of the brushes, i.e. how close they are
to the surface to sweep. this adjustment takes
place by moving the plastic rings of the brush caster
wheels.
Remove the caster wheels and remove one plastic
ring from the bottom (figure 2). Mount the wheel
again (figure 3). this lifts up the caster wheel and
the brushes will come closer to the surface. finally,
mount the plastic ring, sleeve and locking ring
(figure 4).
·aa
c
b
figure 1
the sweeper moves forward by quickly pushing
down the top right lever. (figure 1a)
the bushes are activated by quickly pushing down
the left lever. (figure 1b)
the sweeper is equipped with an instant shutoff,
when you release the levers, the
brush and machine
stop.
WARNING -
IN AN EMERGENCY, RELEASE
LEVERS AS QUICKLY AS
POSSIBLE AND STOP THE
ENGINE.
figure 2
figure 3
51-4144
figure 4
11
a
b

OPERATION - CONTINUED
Swing the Brush
the brush can be swung 15° to either side. Press
the steering
knuckle arm for the brush, turn the
brush and let go of the handle, so that the catch will
fall correctly into place. (figure 1)
Steering Knuckle Arm
SERVICE & REPAIR - GENERAL
Repair or adjust the sweeper in a safe area, away
from traffic and other hazards.
before adjusting or servicing remove spark plug
wire from spark plug.
STORAGE
NOTICE
Do not store the sweeper with
weight on the brush
. weight will
deform the bristles, destroying the
sweeping effectiveness.
Do not store polypropylene
brushes in direct
sunlight. the
material can deteriorate and crumble
before the bristles are worn out.
figure 1
find information about the engine in the Motor
manual instruction.
Keep polypropylene brush
material away from intense heat or
flame.
WARNING!
EXPOSURE TO RESPIRABLE
CRYSTALLINE SILICA
DUST ALONG WITH OTHER
HAZARDOUS DUSTS MAY
CAUSE SERIOUS OR FATAL
RESPIRATORY DISEASE.
It is recommended to use dust
Suppression, dust collection and
If necessary personal protective
Equipment during the operation of
Any attachment th
at may cause high
Levels of dust.
Worn Section Standard
Section OD, Ring ID
New
24
26
32
36
36
46
6.38
8.00
10.00
10.00
10.63
19.38
Section
OD, Worn
17
18
22
24
25
34
Exposed
Bristle, Worn
3.8
4.0
5.0
6.0
6.0
6.0
Bristle
Length
8.50
9.00
11.00
13.0
0
12.69
13.31
Reference
Information
7.5
8.0
10.0
12.0
11.4
12.1
Exposed
Bristle, New
12
51-4144
Steering knuckle arm

KCB24
KCB24-F
KCB25
KCB25-F
Cleaning
width
61cm
61cm
80cm
80cm
Moving
speed
1.8-4.8km/h
1.8-4.8km/h
1.8-4.8km/h
1.8-4.8km/h
Max Output
6.5HP/4.8kw
6.5HP/4.8kw
6.5HP/4.8kw
6.5HP/4.8kw
Fuel Type
Gasoline
Gasoline
Gasoline
Gasoline
Start-up
mode
Electrical start
Manual
Electrical start
Manual
Size
145X61X110cm
145X61X110cm
145X80X110cm
145X80X110cm
NW
67KG
65KG
72KG
70KG
Vibration
4.85m/s2, K=1.5 m/s2
L
PA
87.8dB(A), K=3dB(A)
LWA(2000/14/EC)
104 dB(A)
TECHNICAL SPECIFICATIONS
Ensure that the spark plug is not
defective
Ensure
that the spark plug cap is fitted
correctly
Ensure
that the choke is deactivated
Ensure
that there are no impurities in
the fuel
Check
whether the belt coupling is
adjusted correctly
Check
whether the v-belt is defective
Make sure that the belt coupling is
adjusted correctly
Check
whether the v-belt is defective
Check
whether the brush distance to the
surface is set correctly
51-4144
13
TROUBLESHOOTING
The engine does not start
The engine runs irregularly
The brushes will not rotate
The machine will not run
The machine does not sweep effectively

MAINTENANCE
MAINTENANCE SCHEDULE
BEFORE
EACH
USE
25
HOURS
100
HOURS
AFTER
EACH
USE
PROCEDURES
Hardware - Inspect & tighten
Engine & Air filter - check & clean if
necessary
Oil, engine - check Level
Wash Unit - Remove Grease & Debris
14
51-4144
Table of contents
Other Lumag Cleaning Equipment manuals
Popular Cleaning Equipment manuals by other brands

Comet
Comet Lancia SC150 manual

Kärcher
Kärcher SB-Wash 50/10 manual

Tecno-gaz
Tecno-gaz CLEAN Original instructions for use

Alfalaval
Alfalaval Toftejorg SaniJet 20 instruction manual

Good Way
Good Way VAC-EX-120-9-SS Operation and maintenance manual

Silvercrest
Silvercrest SRB 4 A1 Operating instructions and safety instructions