manuals.online logo
Brands
  1. Home
  2. •
  3. Brands
  4. •
  5. Lumascape
  6. •
  7. Underwater Lighting
  8. •
  9. Lumascape LS333ANS-2COB User manual

Lumascape LS333ANS-2COB User manual

Warranty void if not installed as per installation instructions
INSTALLATION INSTRUCTIONS
Lumascape Lighting Industries Pty Ltd
38-44 Enterprise Street, Cleveland, QLD 4163, Australia
PO Box 1875, Cleveland D.C., QLD 4163, Australia
T07 3286 2299
F07 3286 6599
E[email protected]
Wwww.lumascape.com.au
IN0157 - 18 March 2016
Copyright ©2016 Lumascape Lighting Industries Pty. Ltd. ABN 21 010 572 773
www.lumascape.com.au
LS333ANS-2COB &LS333AS-2COB IP68
A.C.N. 0105 72 773
MODEL: LS333ANS-2COB & LS333AS-2COB
INSTRUCTIONS COVER: 30 V DC Ripple Free Power Supply
UNDERWATER
NOTE: These installation instructions are accepted in most areas. Some supply authorities may require alternative installation methods.
Should you experience any difficulty, please contact Lumascape directly: phone 07 3286 2299 or email [email protected]
IF IN DOUBT, PLEASE CALL
DANGER
ISOLATE LUMINAIRE FROM POWER
Failure to isolate power
supply before installation or
maintenance may result in
fire, serious injury, electric
shock, death and may
damage the luminaire.
WARNING
FINISHED
APPEARENCE
It is strongly recommended to use
Lumascape power supply or transformer
Use of electronic transformer will
permanently damage luminaire
All connections must be kept dry; failure to
do so may result in product reliability issues
Installation to be done by a qualified
electrician
1
2
3
4
5
6
7
A
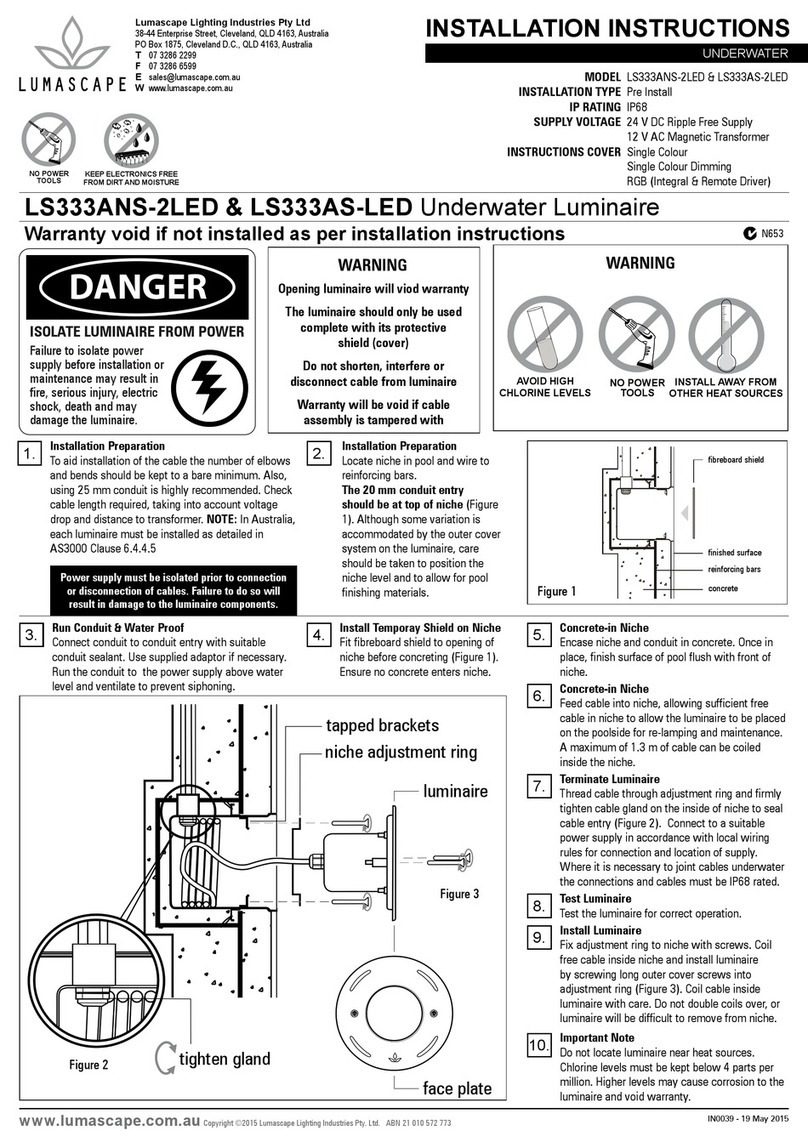
1Luminaire Cable
Connect to a suitable power supply in accordence
with local wiring rules.
2Suppluy Conduit
Attach to niche gland and use to run luminaire
cable back to power supply.
3Niche
Install at the time of construction. Use temporary
fibre board shield supplied to cover niche when
concrete is sprayed. About 1.3 m of cable can be
coiled inside the niche.
4Mounting Lugs
Use to hold niche in place during construction.
5Mounting Ring
Used slightly adjust luminaire position and rotation
within niche.
6Luminaire
If your luminaire was ordered with the factory
pre-set tilted optical system make sure to install it
in the correct orientation.
7Cover Plate
Place in front of luminaire before using screws to
mount luminaire and cover plate to mounting ring.
ADiffuser Installation
Open luminaire and insert diffuser between
reflector and accessory holder. Re-seal
luminaire.
Single Colour Dim
Wire Colour Designation
Black 30 V DC
-
Red 30 V DC +
Grey (1) PWM
(1) Do not connect if dimming
is not required
NOTE: Make sure to pull luminaire cable
through mounting ring before feeding
through conduit and terminating
IN0157 - 18 March 2016
Copyright ©2016 Lumascape Lighting Industries Pty. Ltd. ABN 21 010 572 773
www.lumascape.com.au
WARNING - To reduce the risk of FIRE or INJURY:
1. Luminaires and transformers to be installed by licensed electrical contractors.
2. Luminaires to be used for intended purpose only.
3. Do not operate the luminaires with a missing or damaged parts.
4. Use only genuine Lumascape parts to replace damaged or missing components.
5. Refer to instructions for installation and operating requirements.
6. Ensure installation complies with local regulations
Voltage insulation test (megger) will permanently damage product and will void warranty.
SAVE THESE INSTRUCTIONS.
SAFETY INSTRUCTIONS
Questions?
Call +61 7 3286 2299
Email [email protected]
www.lumascape.com.au
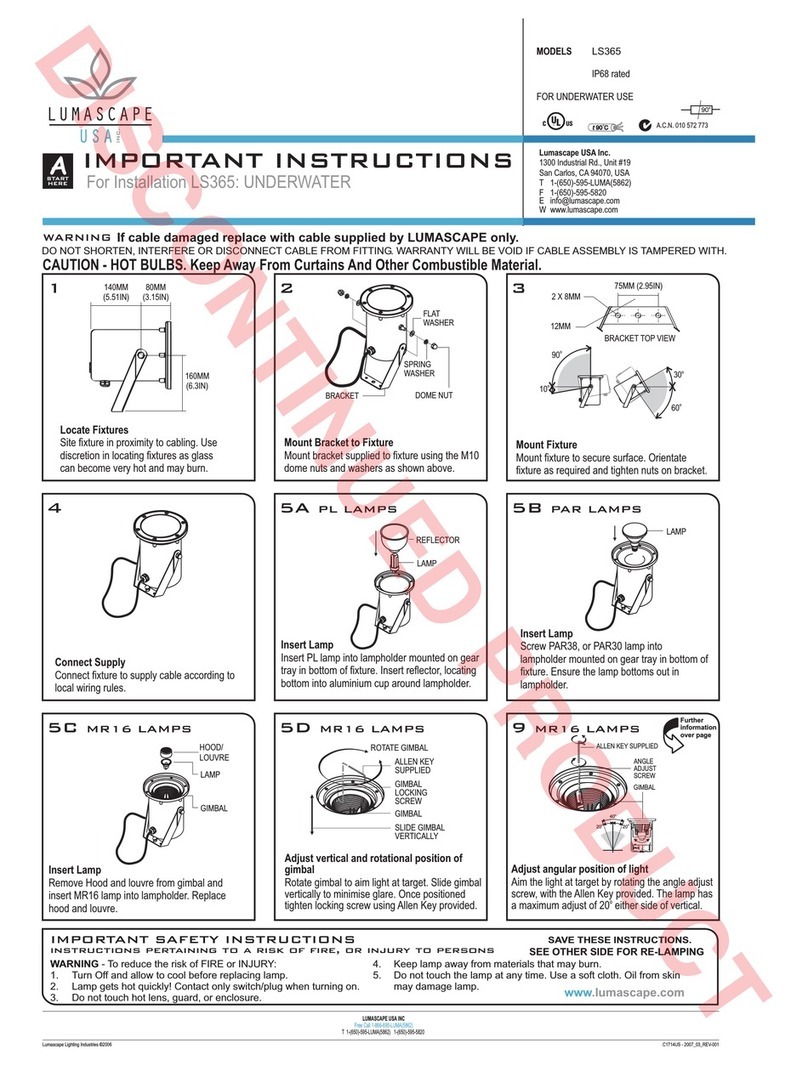
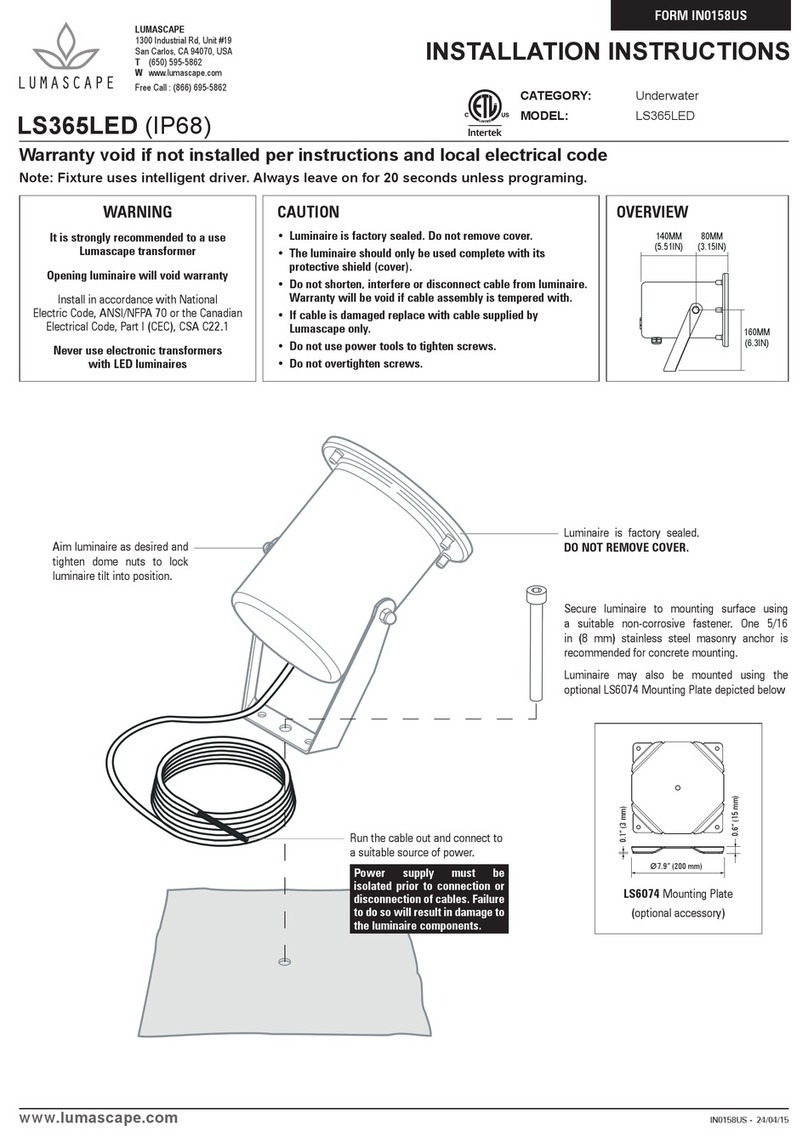
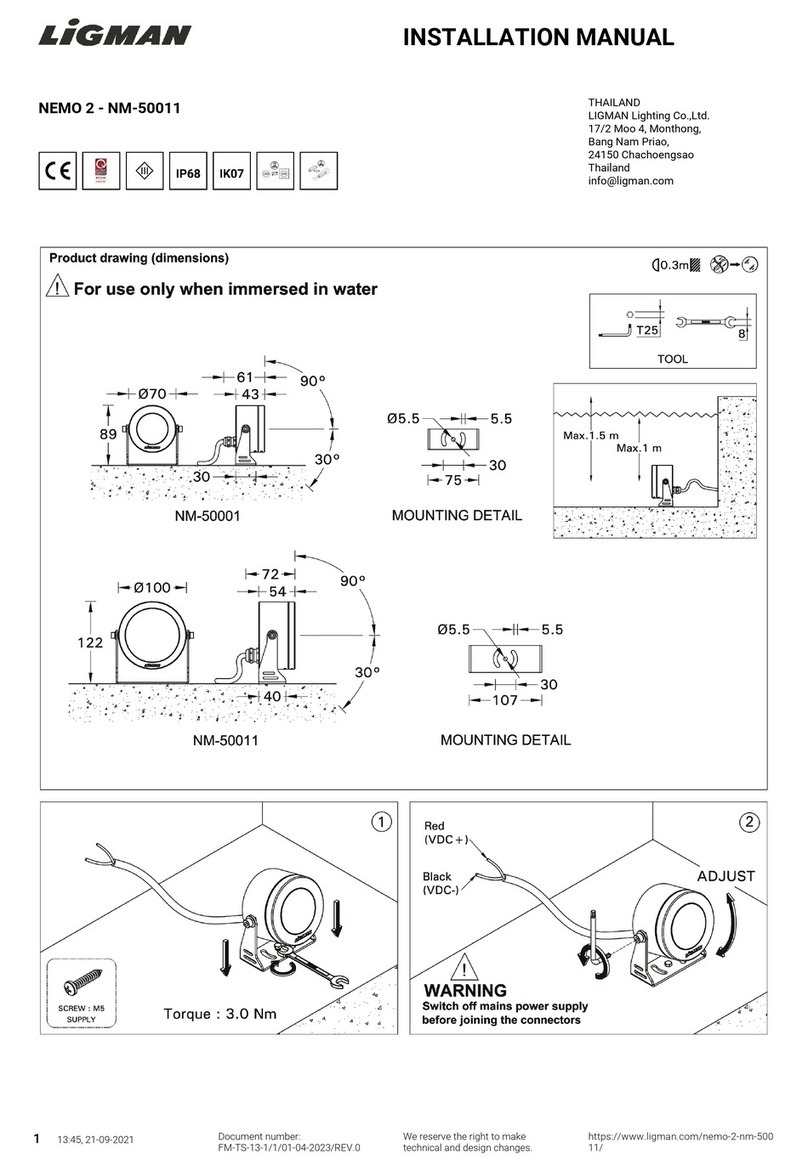
uTake the round 18/2 gauge cable end and feed first through conduit
from the transformer end. DO NOT feed from Niche end because the
factory cable join of the figure eight low voltage cable and the 18/2
cable will not go through the gland in the bottom of the Niche.
Feed cable into niche, allowing sufficient free cable in niche to allow
the fitting to be placed on the poolside for re-lamping. Figure 1
NB: A maximum of 1.3m of cable can be coiled
inside the niche.
Firmly tighten cable gland on the inside of niche to seal cable
entry. Figure 2
1FEED CABLE THROUGH
CONDUIT INTO NICHE
2Connect cable to fixture
1. Take the round 18/2 guage cable end and trim insulation back
according to Figure 3.
100mm
8mm
FIGURE 3
Strip cable as specified above before connecting to fixture.
FIGURE 4
Feed stripped cable
end through gland
and into fixture
2. Feed stripped end of cable through fixture cable gland.
3. Terminate stripped wires into terminal block as shown in Figure 5.
Ensure Thermal Cutout remains in correct position.
Figure 5
Tighten external cable gland nuts so that they are firmly touching.
As an extra precautionary measure to ensure no moisture
comes up through the cable into the fixture, please place a
suitable neutral cure silicone around the top of the gland totally
covering the end of the cable.
FIGURE 1
ROUND CABLE END
NICHE
CONDUIT
ANTI-LEACH
CONNECTION
FIGURE EIGHT
LOW VOLTAGE
CABLE
FIGURE 2
Gland
Tighten cable gland firmly
to ensure good seal on cable.
A
START
HERE
IMPORTANT INSTRUCTIONS
MODELS LS682-0310, LS682-0620,
LS682-0625, LS682-1030
12V 75watt max.
lamp IP68 rated
A.C.N. 010 572 773
Lumascape Lighting Industries 2006©
LUMASCAPE
HEAD OFFICE
T 07 3286 2299 F 07 3286 6599
LUMASCAPE
SYDNEY - NSW
T 02 9519 6860 F 02 9519 8834
LUMASCAPE
MELBOURNE - VIC
T 03 9686 1900 F 03 9686 1700
ECC LIGHTING
LUMASCAPE AGENT - NZ
T 09 379 9680 F 09 308 9328
H.I. LIGHTING
LUMASCAPE AGENT - WA
T 08 9321 5422 F 08 9321 5881
NQ LIGHTING
LUMASCAPE AGENT - NTH QLD
T 07 4031 4490 F 07 4031 5933
LIGHTING PARTNERS AUSTRALIA
LUMASCAPE AGENT - SA
T 08 8232 0074 F 08 8232 0076
Lumascape Lighting Industries Pty Ltd
38-44 Enterprise Street, Cleveland, QLD 4163, Australia
PO Box 1875, Cleveland D.C., QLD 4163, Australia
T 07 3286 2299
F 07 3286 6599
E [email protected]
W www.lumascape.com.au
Warning: The Luminaire should only be used complete with its protective shield (cover)
For Installation of fitting LS682 cable extensions
C1045 - 2006_11_REV-001
TERMINAL BLOCK
THERMAL CUTOUT
TERMINAL BLOCK
MOUNTING BRACKET
TO LAMPHOLDER
FIGURE 5
Inject here with Neutral cure
silicone.
Tighten cable gland so that both
nuts are touching.
TOP VIEW
T 1-(650)-595-LUMA(5862) 1-(650)-595-5820
LUMASCAPE USA INC
Free Call 1-866-695-LUMA(5862)
www.lumascape.com.au

Lumascape Lighting Industries Pty Ltd
38-44 Enterprise Street, Cleveland, QLD 4163, Australia
Tel (07) 3286 2299 Fax (07) 3286 6599 Email [email protected]
LUMASCAPE
HEAD OFFICE - QLD
Tel (07) 3286 2299
Fax (07) 3286 6599
LUMASCAPE
SYDNEY - NSW
Tel (02) 9519 6860
Fax (02) 9519 8834
LUMASCAPE
MELBOURNE - VIC
Tel (03) 9686 1900
Fax (03) 9686 1700
LUMASCAPE USA INC.
SAN FRANCISCO - CA
Tel 1-(650)-595-5862
Fax 1-(650) 595-5820
H.I. LIGHTING
LUMASCAPE AGENT - WA
Tel (08) 9321 5422
Fax (08) 9321 5881
LIGHTING PARTNERS AUSTRALIA
LUMASCAPE AGENT - SA
Tel (08) 8232 0074
Fax (08) 8232 0076
NQ LIGHTING
LUMASCAPE AGENT - NTH QLD
Tel (07) 4031 4490
Fax (07) 4031 5933
ECC LIGHTING
LUMASCAPE AGENT - NZ
Tel (09) 379 9680
Fax (09) 308 9328
Copyright ©2006 Lumascape Lighting Industries Pty. Ltd. ABN 21 010 572 773www.lumascape.com.au
IMPORTANT INFORMATION
WARNING - To reduce the risk of FIRE or INJURY:
Luminaires and transformers to be installed by qualified installers only.
Luminaires to be used for intended purpose only. e.g Wall Mount fittings must be wall mounted.
Luminaires can become very hot. Use discretion in placement.
Do not touch hot lens, guard, or enclosure.
CAUTION - HOT SURFACE. Keep away from curtains and other combustible material.
Turn Off/Unplug and allow to cool before replacing lamp.
Keep lamp away from materials that may burn.
Never touch lamp with bare fingers. Oil from skin may damage lamp. Hold lamp with soft cloth when installing or replacing.
Do not operate the luminaires with a missing or damaged parts.
Replace any cracked protective shield
Use only lamp type, voltage and wattage as specified by Lumascape on the product label.
Use only genuine Lumascape parts to replace damaged or missing components.
Luminaires supplied with Loctite Silver Grade Anti Seize lubricant on threads. Reapply if needed.
Refer to instructions for installation and operating requirements.
Ensure installation complies with local regulations
SAVE THESE INSTRUCTIONS.
1.
2.
3.
4.
5.
6.
7.
8.
9.
10.
11.
12.
13.
14.
15.
IMPORTANT SAFETY INSTRUCTIONS
C1721 - 2006_11_REV-002
A
232 0074
08) 8232 0076
NQ LIGHTING
LUMASCAPE AGENT - NTH QLD
GHTIN
LUMASCAPE AGENT - NZ
Tel (09) 379 9680
C
ax (09) 308 9328
right ©2006 Lumascape Lighting Industries Pty. Ltd. ABN
Lumascape Lighting Industries Pty Ltd
38-44 Enterprise Street, Cleveland, QLD 4163, Australia
Tel (07) 3286 2299 Fax (07) 3286 6599 Email [email protected]
LUMASCAPE
HEAD OFFICE - QLD
Tel (07) 3286 2299
Fax (07) 3286 6599
LUMASCAPE
SYDNEY - NSW
Tel (02) 9519 6860
Fax (02) 9519 8834
LUMASCAPE
MELBOURNE - VIC
Tel (03) 9686 1900
Fax (03) 9686 1700
LUMASCAPE USA INC.
SAN FRANCISCO - CA
Tel 1-(650)-595-5862
Fax 1-(650) 595-5820
H.I. LIGHTING
LUMASCAPE AGENT - WA
Tel (08) 9321 5422
Fax (08) 9321 5881
LIGHTING PARTNERS AUSTRALIA
LUMASCAPE AGENT - SA
Tel (08) 8232 0074
Fax (08) 8232 0076
NQ LIGHTING
LUMASCAPE AGENT - NTH QLD
Tel (07) 4031 4490
Fax (07) 4031 5933
ECC LIGHTING
LUMASCAPE AGENT - NZ
Tel (09) 379 9680
Fax (09) 308 9328
Copyright ©2006 Lumascape Lighting Industries Pty. Ltd. ABN 21 010 572 773www.lumascape.com.au
VOLTAGEDROP
LOAD
WATTAGE
DROP CABLE TRUNK CABLE
3.3mm2LS604 6mm2LS604-6 10mm2LS604-10
SINGLE DOUBLE SINGLE DOUBLE SINGLE DOUBLE
20 70m 140m 105m 210m 140m 280m
40 30m 60m 55m 110m 84m 168m
50 25m 50m 44m 88m 62m 124m
60 20m 40m 36m 72m 54m 108m
70 15m 30m 30m 60m 50m 100m
80 14m 28m 27m 54m 46m 92m
90 13m 26m 24m 48m 42m 84m
100 12m 24m 21m 41m 36m 72m
120 10m 20m 18m 36m 30m 60m
150 7m 14m 15m 30m 26m 52m
200 5m 10m 11m 22m 20m 40m
250 4m 8m 9m 18m 17m 34m
CAUTION The distances and wattages shown are maximum and should not be exceeded.
TRANSFORMER
20W
20m Circuit 1
60m Circuit 2
20W 20W 20W 20W
CABLE VOLTAGE DROP
Excessive voltage drop causes lamps to
have a low light output. The following
charts and illustrations apply only to
Lumascape supplied cable. The distance
and wattage shown are maximum and
should not be exceeded.
6mm2Figure 8 PVC Cable
LS604-6
9.5mm
4.2mm
3.3mm2Figure 8 PVC Cable
LS604
10mm2 Figure 8 PVC Cable
LS604-10
13.8mm
6.3mm
TABLE: VOLTAGE DROP
EXAMPLE 1
CABLES
EXAMPLE 2
20W
50m Circuit 3
168m Circuit 4
LS604-10 TRUNK CABLE
LS604 DROP CABLE
6m max
20W 20W 20W 20W
TRANSFORMER
12.5mm
5.4mm
EXAMPLE 2
Using trunk and drop cable only
This example shows the correct way to install
Lumascape luminaires using LS604-10
(10mm2) trunk cable. The total load on
Circuit 3 is 60W over 50 metres which is
shorter than the 54 metres allowed in the
Voltage Drop table. The load on Circuit 4 is
40W and using a doubled cable allows the
circuit to be up to 168 metres long.
EXAMPLE 1
Using drop cable only
This example shows the correct way to install
Lumascape light luminaires using LS604
(3.3mm2) drop cable. The total load on
Circuit 1 is 60W over 20 metres as allowed
in the Voltage Drop table. The load on Circuit
2 is 40W and by using a doubled cable this
circuit can be 60 metres.
A
232 0074
08) 8232 0076
NQ LIGHTING
LUMASCAPE AGENT - NTH QLD
GHTIN
LUMASCAPE AGENT - NZ
Tel (09) 379 9680
ax (09) 308 9328
right ©2006 Lumascape Lighting Industries Pty. Ltd. ABN
C
108m
0m
40m
34m

This manual suits for next models

1

Other Lumascape Underwater Lighting manuals

Lumascape LS365LED User manual

Lumascape

Lumascape LS365LED User manual

Lumascape LS365 Installation instructions manual

Lumascape

Lumascape LS365 Installation instructions manual

Lumascape LS5070 User manual

Lumascape

Lumascape LS5070 User manual

Lumascape LS333ANS-2LED User manual

Lumascape

Lumascape LS333ANS-2LED User manual

Popular Underwater Lighting manuals by other brands

Interline 38603595 Quick setup instructions

Interline

Interline 38603595 Quick setup instructions

Atlantic 73878 product manual

Atlantic

Atlantic 73878 product manual

Pontec PondoStar LED Set 1 operating instructions

Pontec

Pontec PondoStar LED Set 1 operating instructions

lumishore SMX21 Installation and operating guide

lumishore

lumishore SMX21 Installation and operating guide

emaux LED-P100 series Operating procedures

emaux

emaux LED-P100 series Operating procedures

EasyPro LED11WW Instructions for operation

EasyPro

EasyPro LED11WW Instructions for operation

ASTEL MARINE EQUATOR MSR36240 operating instructions

ASTEL MARINE

ASTEL MARINE EQUATOR MSR36240 operating instructions

Savi MINI MEL P user guide

Savi

Savi MINI MEL P user guide

Aqua STANDARD Series Installation and maintenance manual

Aqua

Aqua STANDARD Series Installation and maintenance manual

Sea & Sea YS-03 SOLIS instruction manual

Sea & Sea

Sea & Sea YS-03 SOLIS instruction manual

Astral Pool LumiPlus 2.0 Installation and maintenance manual

Astral Pool

Astral Pool LumiPlus 2.0 Installation and maintenance manual

Astral Pool 35954 Installation and maintenance manual

Astral Pool

Astral Pool 35954 Installation and maintenance manual

Astral Pool LumiPlus RAPID Installation and maintenance manual

Astral Pool

Astral Pool LumiPlus RAPID Installation and maintenance manual

LIGMAN FUN-50002 installation manual

LIGMAN

LIGMAN FUN-50002 installation manual

Backscatter Mini Flash MF-1 instruction manual

Backscatter

Backscatter Mini Flash MF-1 instruction manual

Oase Lunaqua 2 operating instructions

Oase

Oase Lunaqua 2 operating instructions

LIGMAN BORNHOLM 2 installation manual

LIGMAN

LIGMAN BORNHOLM 2 installation manual

Peraqua 74354 operating manual

Peraqua

Peraqua 74354 operating manual

manuals.online logo
manuals.online logoBrands
  • About & Mission
  • Contact us
  • Privacy Policy
  • Terms and Conditions

Copyright 2025 Manuals.Online. All Rights Reserved.