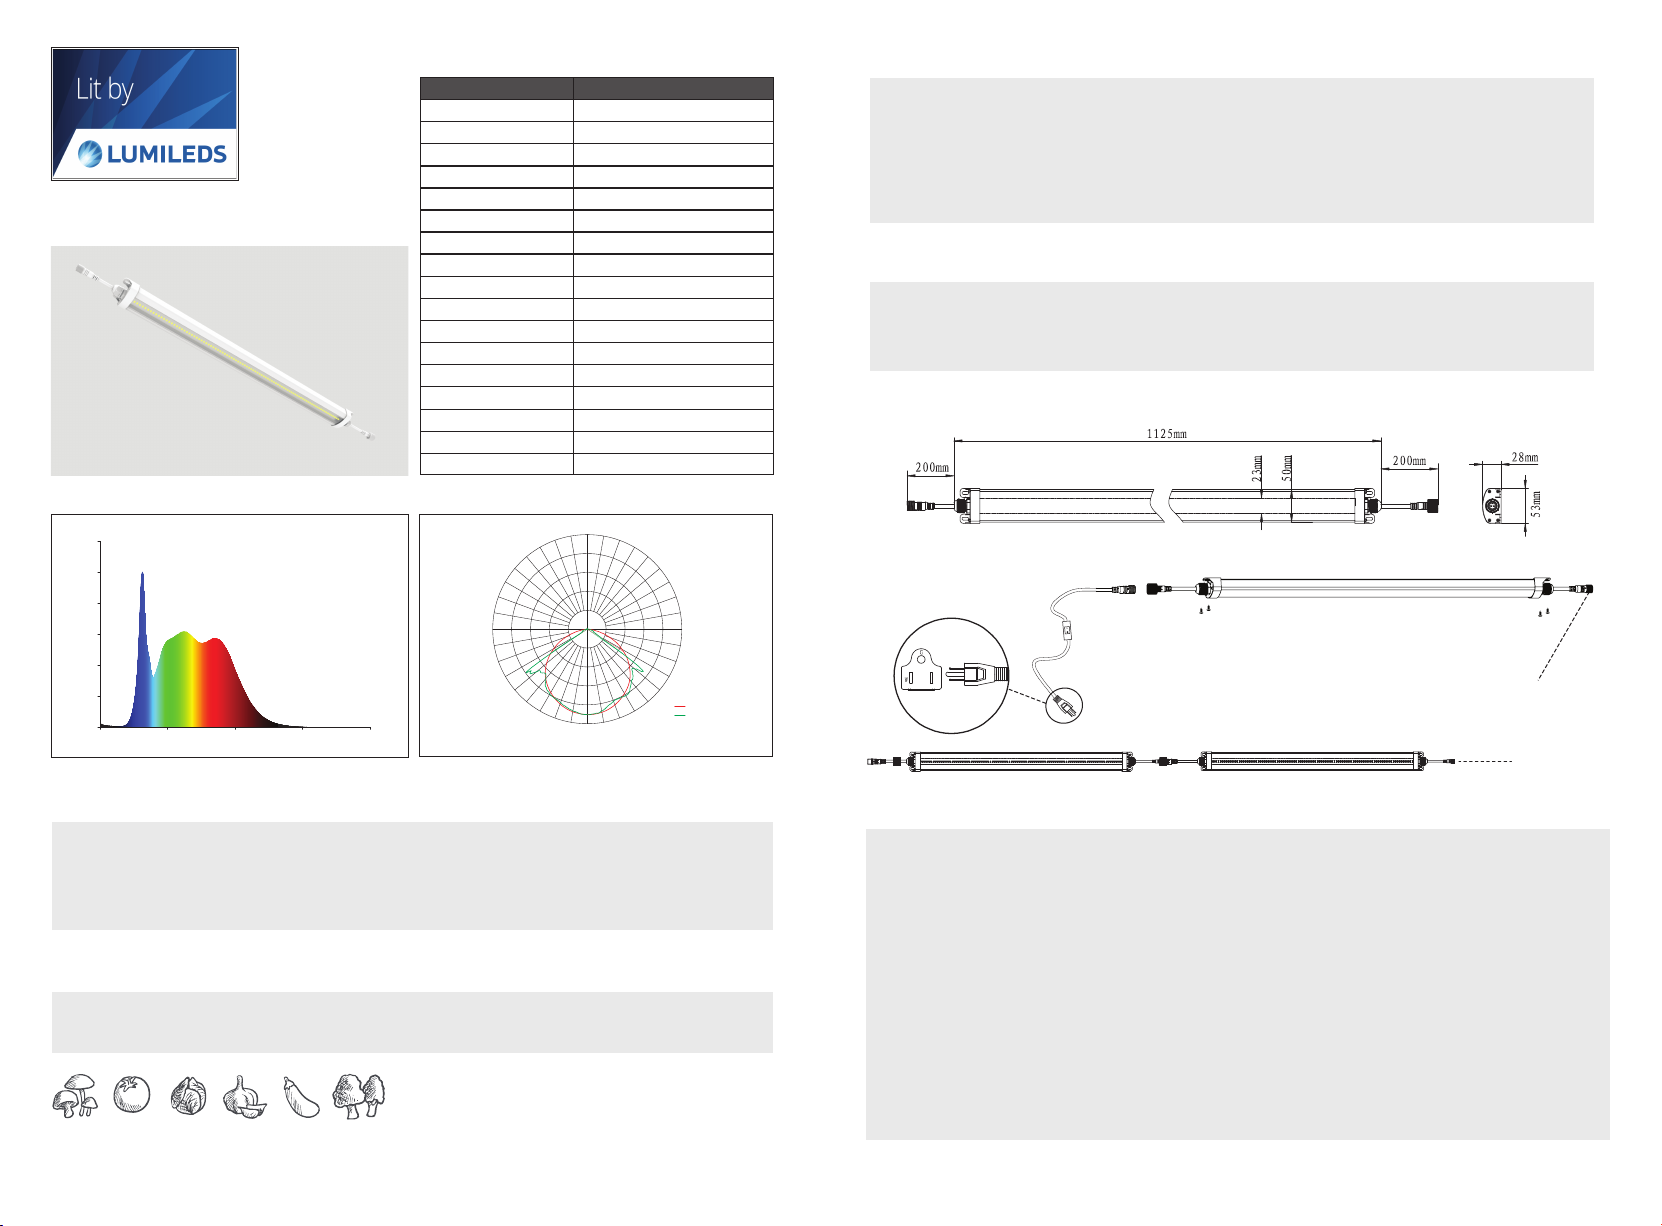
manuals.online logo
Brands
  1. Home
  2. •
  3. Brands
  4. •
  5. LUMILEDS
  6. •
  7. Lighting Equipment
  8. •
  9. LUMILEDS PGL050-TLA30 User manual

LUMILEDS PGL050-TLA30 User manual

Other LUMILEDS Lighting Equipment manuals

LUMILEDS LUXEON HR30 User manual

LUMILEDS

LUMILEDS LUXEON HR30 User manual

LUMILEDS LUXEON Neo User manual

LUMILEDS

LUMILEDS LUXEON Neo User manual

Popular Lighting Equipment manuals by other brands

Life 39.9F70020C quick start guide

Life

Life 39.9F70020C quick start guide

EuroLite LED ML-20 user manual

EuroLite

EuroLite LED ML-20 user manual

LIGMAN OD-50141 installation manual

LIGMAN

LIGMAN OD-50141 installation manual

Home Accents Holiday 1002461144 instructions

Home Accents Holiday

Home Accents Holiday 1002461144 instructions

Experia IRiS Ripple Light instruction manual

Experia

Experia IRiS Ripple Light instruction manual

Erco Gecko Mounting instructions

Erco

Erco Gecko Mounting instructions

Inter-lux ZTA.100.Surface Installation and maintenance instructions

Inter-lux

Inter-lux ZTA.100.Surface Installation and maintenance instructions

Whelen Engineering Company TN Series installation guide

Whelen Engineering Company

Whelen Engineering Company TN Series installation guide

IKEA BJÖRKSPIREA manual

IKEA

IKEA BJÖRKSPIREA manual

Toolland PM 6640 instruction manual

Toolland

Toolland PM 6640 instruction manual

GTD GTD-LP200 user manual

GTD

GTD GTD-LP200 user manual

LIVARNO home 1105-W-UK manual

LIVARNO home

LIVARNO home 1105-W-UK manual

ProLights EclPar IPMFC user manual

ProLights

ProLights EclPar IPMFC user manual

Velvet EVO Series user manual

Velvet

Velvet EVO Series user manual

IDTOLIGHT GENT installation instructions

IDTOLIGHT

IDTOLIGHT GENT installation instructions

MAYTONI S35 installation manual

MAYTONI

MAYTONI S35 installation manual

MaxLite MLFP14DP4535 user manual

MaxLite

MaxLite MLFP14DP4535 user manual

SLV Elektronik 550621 instruction manual

SLV Elektronik

SLV Elektronik 550621 instruction manual

manuals.online logo
manuals.online logoBrands
  • About & Mission
  • Contact us
  • Privacy Policy
  • Terms and Conditions

Copyright 2025 Manuals.Online. All Rights Reserved.

2
WIRING DIAGRAM
120VAC
AC plug (optional configuration)
Switching line The next plant growth lamp can be connected
Note: up to 10PCS
At Most:Max10PCS
AC
UL
1
TECHNICAL SPECIFICATIONS
PGL050-TLA30
SUGGEST HANGING DISTANCE
SUGGEST LIGHTING TIME
ASSEMBLY INSTRUCTIONS
Product Code
Power
Input Voltage
Input Current
Lumen (lm)
CRI
/CCT
Spectrum
Height
Beam Angle
IP Class
Operation Temp & Humidity
Speration Temp & Humidity
Product L* W * H (mm)
Carton L* W * H (mm)
NW (kg) ±0.1
GW (kg) ±0.1
50W
100-305VAC
0.42A/120Vac
6000 lm
Ra95 / 5000K
PPFD(
H
eight 60cm)
PPFD(H
eight
30cm)
80.448 μmol/(m²·s)
154.16 μmol/(m²·s)
330~880nm
12~24 inch
110°x115° Rectangular Beam
IP65
1125*53*28
1180*60*22 (1200*250*190,20pc
)
0.6Kg
0.8Kg
PGL050-TLA30
Grow tips
- The rate of photosynthesis and transpiration are directly affected by temperature, humidity and air flow;
- The perfect temperature and humidity for your plants are found between 75-85 °F and 50%-70% humidity;
- With plenty of airflow to replenish CO2;
- The suitable PH is 6-6.5;
- You may add more calcium and magnesium than normally needed.
Germination: 24-30 inch
Seeding: 24 inch
Veg : 18-24 inch
Flower: 12-18 inch
Veg: 18 hours ON
Flower: 12 hours ON
-Open the package and fix 4 screws on the bracket of the plant lamp, Let the light source faces the plant;
-Connect the power-line(optional configuration) to the lamp and tighten it;
-Insert the plug into the socket.
IMPORTANT SAFETY PRECAUCTIONS
Spectrum
1.2
1.0
0.8
0.6
0.4
0.2
0.0
350 513 675
Wavelength(nm)
838 1000
1.0=150.014mW/nm
0
30
60
90
120
150
-/+180
-150
-120
-90
-60
-30
UNIT:cd
C0/180,115.6
UNIT:cd
C90/270,111.8
AVERAGE BEAM ANGLE(50%):113.7 DEG
0
500
1000
1500
2000
2500
screw down
-20~45℃, 20~95%RH No condensation
-20~85℃, 10~95%RH No condensation
PGL050-TLA30 PLANT GROWTH LAMP SIZE:
screw down
Please read the manual thoroughly before attempting to install or operate LED Grow Light and keep it
for future reference.
Connect the light only to the power sources of the appropriate voltage using the plug received.
Protect power cables from being pinched or damaged, especially where the power cable enters the power
outlet and the unit.
If the provided plug does not fit your socket, please contact us for help by email immediately.
Please do not replace the power cord or plug by yourself, otherwise we are not responsible for man-made damages.
The system should only be cleaned as directed in the manual. You should seek service by qualified
service personnel if any of the following occur:
1.The power-supply cord or the plug has been damaged;
2.The unit has been exposed to rain;
3.The unit exhibits a marked change in performance;
4.The unit has been dropped, or its enclosure or chassis is damaged.
WARNING
CAUTION
- In summer or other hot environment, please use a cooling fan to keep a suitable temperature
for your plants.
GENERAL CARE
34
-This LED Grow light is passively cooled with zero moving components. It is designed for harsh
environments and years of maintenance-free performance. Some basic care will keep your lights
working at peak performance cycle-after-cycle.
-Natural convection removes heat away from the heat sink. In order to properly cool itself, at least
one inch of space is required between the fixture and the roof of your grow area. Failure to do so
may shorten the fixture’s lifespan.
-To achieve the optimal lifespan and performance of your fixtures, routinely check for and remove
excess dust, debris, and mineral build up from heat sink and LED array. Cleaning should always be
done with the fixture or using low-pressure compressed air with unplugged from its power source.
-Do NOT touch while in operation.
-To prevent eye damage, avoid looking directly at the LEDs.
-To reduce the risk of overheating or fire, always allow for adequate ventilation of fixtures and power
supplies.
- Read through this manual before installation.
- Handle the product with care.
- The product must be grounded.
- This product must be installed and maintained by certified electrician.
- Consult with the manufacturer before maintenance.
- Turn OFF the power before installation and maintenance.
- Make sure the products are securely installed.
- The housing might become hot after operation.
- Primary use:auxiliary lamp used to promote plant growth and maturity.
- Make sure the construction is strong enough to support the products.
- The external flexible cable or cord of this luminaire cannot be replaced; if the cord is damaged, the luminaire shall be destroyed.