Lumina TU-H3901 User manual

N13275
INSTRUCTION MANUAL
Model Number TU-H3901
Iron Steam Station
After Sales Support
Telephone: 1300 886 649

1After Sales Support
Telephone: 1300 886 649
Contents
02 Warranty
03 Welcome
04 General Safety Instructions
06 Parts List
07 Getting Started
08 Instructions
12 Other Useful Information

2
After Sales Support
Telephone: 1300 886 649
Iron Steam Station
Warranty Details
The product is guaranteed to be free from defects in workmanship and
parts for a period of 12 months from date of purchase. Defects that occur
within this warranty period, under normal use and care, will be repaired,
replaced or refunded at our discretion, solely at our option with no charge
for parts and labour. The benefits conferred by this warranty are in
addition to all rights and remedies in respect of the product that the
consumer has under the Competition and Consumer Act 2010 and
similar state and territory laws.

3After Sales Support
Telephone: 1300 886 649
Welcome
Congratulations on choosing to buy a Lumina®product.
All products brought to you by Lumina®are manufactured to the highest
standards of performance and safety and, as part of our philosophy of customer
service and satisfaction, are backed by our comprehensive 1Year Warranty. We
hope you will enjoy using your purchase for many years to come.

4
After Sales Support
Telephone: 1300 886 649
General Safety Instructions
Read this manual thoroughly before first use, even if you are familiar with this
type of product. The safety precautions enclosed herein reduce the risk of fire,
electric shock and injury when correctly adhered to.
Keep the manual in a safe place for future reference, along with the completed
warranty card, purchase receipt and carton. If applicable, pass these instructions
on to the next owner of the appliance.
Always follow basic safety precautions and accident prevention measures when
using an electrical appliance, including the following:
Electrical safety and cord handling
• Before turning on the iron steam station, make sure your outlet voltage and
circuit frequency correspond to the voltage indicated on the appliance.
• To reduce the risk of electrocution, never operate the iron steam station with
wet hands, never immerse the cords, plug, iron or steam station in water or
other liquid, and never spill liquids into the product.
• Do not use this iron steam station with an extension cord.
• Make sure to run the power cord in such a way that there will be no risk of
anyone pulling it inadvertently or tripping over it during use.
• Do not damage the power cord, do not kink or squash the cord and protect
it from sharp edges. Do not let the cord touch any hot surface, including the
ironing soleplate during use.
• Unwind and straighten the power cord before use.
• Do not pick up or operate the iron steam station if any part (including the
cords and plug) is damaged, if the appliance is leaking, after it malfunctions
or has been dropped. In case of damage, call the after sales support line (on
the number at the bottom of the page) for advice.
• If the power or supply cord is damaged, it must be replaced by the
manufacturer or its service agent or a similarly qualified person in order to
avoid a hazard.
• Turn off all controls and unplug the appliance from the power outlet after use.
• Make sure the appliance is unplugged before filling the water tank with water,
before cleaning, servicing, maintenance or moving the appliance.
• Make sure the iron has cooled down completely before storage.

5After Sales Support
Telephone: 1300 886 649
General Safety Instructions (Cont.)
Usage conditions and restrictions
• This appliance is designed and intended for domestic use only. It is neither
suitable for commercial nor for outdoor use.
• Do not use this appliance for anything other than its intended purpose, and
only use it as described in this manual.
• Improper installation may result in the risk of fire, electric shock and/or injury.
• We assume no responsibility for any eventual damages caused by improper
or faulty use.
• The appliance is not intended for use by persons (including children) with
reduced physical, sensory or mental capabilities, or lack of experience
and knowledge, unless they have been given supervision or instruction
concerning use of the appliance by a person responsible for their safety.
• Young children should be supervised to ensure they do not play with the
appliance. Close supervision is necessary when any appliance is used by or
near children.
• Do not let children touch the iron steam station while it is in use.
• Keep the 'anti-calc' cartridge and granules away from children at all times.
• Do not leave the appliance unattended when it is connected to a mains
power supply outlet.
• Do not insert any objects into the appliance.
• When using the iron steam station, make sure to place it on a firm, flat and
stable surface to avoid overturning.
• Only rest the iron on the steam station rest.
• Only fill water into the water tank. Do not add perfume, vinegar or any other
chemical additives as these can damage the appliance.
• Do not open the water tank during use.
• Empty the water tank after use.
• This iron steam station has no user-serviceable parts contained inside. Do
not attempt to repair, disassemble or modify the appliance.
• CAUTION!The iron generates high temperature steam. Always handle with
care and warn other users of potential danger.
• CAUTION!Do not touch the iron rest during or just after ironing. It is hot!

6
After Sales Support
Telephone: 1300 886 649
1
3
4
5
6
2
Parts List
1
2
3
4
6
5
12
10
9
7
8
13
14
Iron
1. Steam button
2. Steam lock
3. Temperature dial
4. Pilot light
5. Supply cord
6. Cork handle
Steam station
7. Power indicator
• Red: Off / Sleep mode
• Red Blinking: Preheat mode
• Green: Ready to use
8. Change cartridge indicator
9. Steam level indicators
10. Selection button
11. 'Anti-calc' cartridge
12. Water tank
13. Power cord
14. Anti-scale button
11

7After Sales Support
Telephone: 1300 886 649
Temperature Control Setting
.Acetate
. Elastsne
. Polyamide
. Polypropylene
. Polyester
. Silk
. Triacetate
. Viscose
. Cotton
. Linen
Acetate
Elastane
Polyamide
Polypropylene
Polyester
Silk
Triacetate
Viscose
Cotton
Linen
Getting Started
Before first use
• Remove all packaging materials from the appliance and dispose of them
responsibly. Plastic wrapping can be a suffocation hazard for babies and
young children, so ensure all packaging materials are out of their reach.
• Remove any protective films or stickers from the iron soleplate and the
appliance housing.
• Make sure the mains voltage stated on the rating plate corresponds to your
local electricity supply.
Hints for ironing
• Sort out the items to be ironed according to the type of fabric. This will
minimise the frequency of temperature adjustment for different garments.
• Test iron on a small area on the backside or inside of the garment if you are
unsure about the type of fabric. Start with a low temperature and increase
gradually.
• When ironing heat-sensitive fabrics, wait for about two minutes after turning
down the heat. Temperature adjustments need a certain time to reach the set
level, no matter whether you turn the heat up or down.
• Delicate fabrics such as silk, wool, velour, etc. are best ironed with an ironing
cloth to prevent shine marks.
• Read the garment labels and follow the garment manufacturer’s ironing
instructions. The symbols used stand for the following fabric types:
Temperature Control Setting
Cooliron:
Acrylic
Acetate
Elastane
Polyamide/
Nylon
Warmiron:
Polyester
Silk
Triacetate
Viscose
Wool
Hotiron:
Cotton
Linen
8
After Sales Support
Telephone: 1300 886 649
Instructions
Figure 1
Figure 2 Figure 3
6. You can refill the tank while the appliance is in operation, there is no need
to wait for the appliance to cool down. However, make sure to unplug the
steam station from the power outlet before filling and refilling the tank.
7. When the 'change cartridge' indicator light is blinking, it is time to replace the
'anti-calc' cartridge. See page 13 for instructions.
This iron steam station has a high technology low-pressure steam chamber
that can be heated up in a short time. The water in the water tank is converted
into steam in the steam chamber and then transported to the iron unit through
the supply cord. For best ironing results, follow the simple instructions below
and on the next few pages.
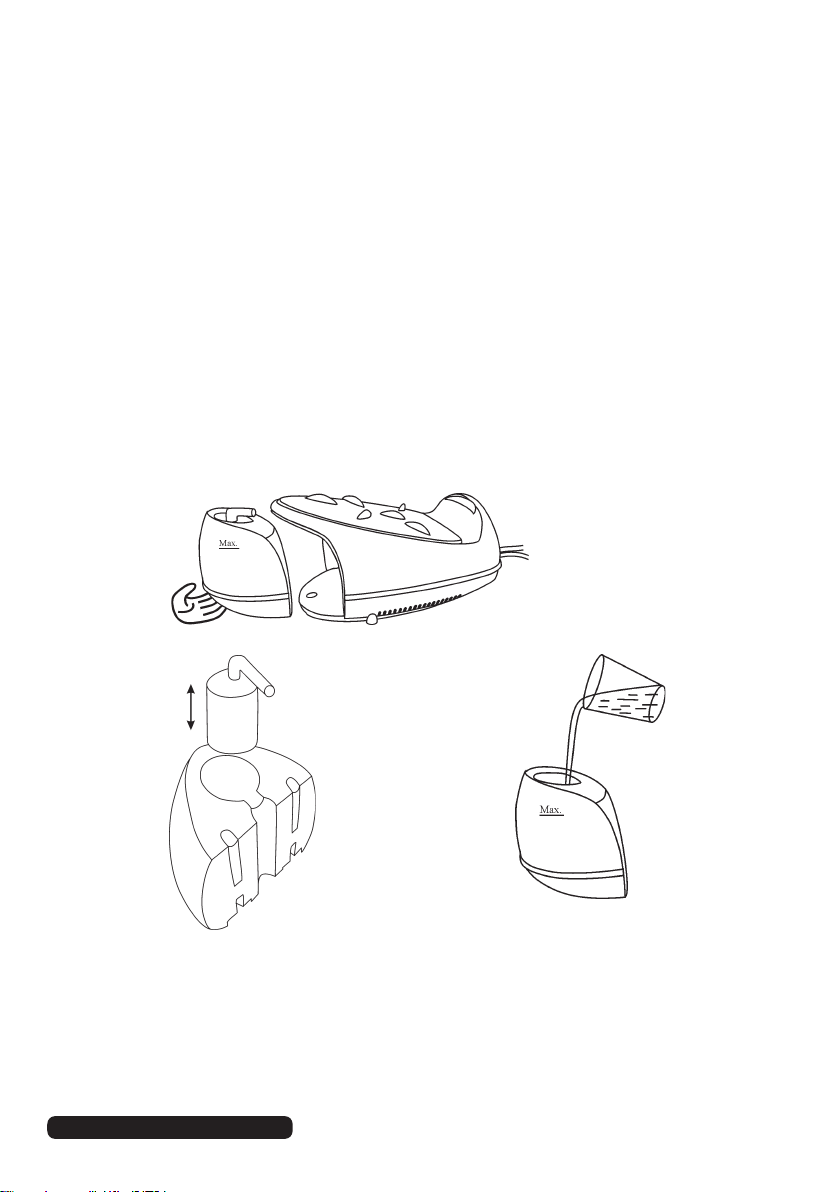
Filling the water tank
1. Slide out the water tank (Fig. 1).
2. Remove the 'anti-calc' cartridge (Fig. 2).
3. Fill the tank with water to the MAX level (Fig. 3).
4. Reinstall the 'anti-calc' cartridge (Fig. 2).
5. Replace the water tank in its place.

9After Sales Support
Telephone: 1300 886 649
Instructions (Cont.)
Using the steam button and the steam lock
1. Press the steam button underneath the handle for short bursts of steam.
2. Press and pull down the steam lock on top of the handle for continuous
steam (Fig. 4).
3. Press and push up to release the steam lock (Fig. 5).
Figure 4 Figure 5
2
1
2
First time ironing
1. Place the iron steam station on a flat, firm and stable surface.
2. Fill the water tank with tap water according to the instructions on page 8.
3. Unwind and straighten the power cord, then plug the steam station into a
suitable power point and switch on the power at the outlet. All LED lights
turn on for a second with an audible beep sound, then they turn off to
indicate the unit is turned on.
4. Press the selection button once, the MAX steam level indicator will glow red
and the power indicator will blink to indicate the appliance is preheating.
5. Turn the temperature dial on the iron to the desired temperature.
6. When the set temperature is reached, the red power indicator will stop
blinking and change to green, followed by a beep sound.
7. The pilot light goes off when the required temperature for the iron is reached.
The appliance is now ready for use.
8. Press down the steam button for 1 minute to clean the steam generating system.
9. Begin first time ironing with an old towel to avoid staining your garments, as
any oils left over from the manufacturing process may be expelled through
the steam holes on the soleplate.
NOTE: If you press the steam button when the steam generator has not yet
reached its required temperature, the unit will beep twice to indicate it is not
yet ready. It takes about 1½minutes to reach the required temperature.

10
After Sales Support
Telephone: 1300 886 649
Instructions (Cont.)
Steam ironing
1. Place the iron steam station on a flat, firm and stable surface.
2. Fill the water tank with tap water according to the instructions on page 8.
3. Unwind and straighten the power cord, then plug the steam station into a
suitable power point and switch on the power at the outlet. All LED lights
turn on for a second with an audible beep sound, then they turn off to
indicate the unit is turned on.
4. Press the selection button (repeatedly) to choose your required steam level:
maximum steam, medium steam, low steam, no steam. The relevant steam
level indicator will glow red and the power indicator will blink to indicate the
appliance is preheating.
5. Turn the temperature dial on the iron in a clockwise direction to your desired
temperature (see page 7 for an explanation of the dot symbols). The pilot
light will glow until the required iron temperature is reached.
6. When the iron has reached the set temperature, the pilot light on the iron
goes off and the red power indicator on the steam station will stop blinking
and change to green, followed by a beep sound. The appliance is now ready
for use.
7. Press the steam button/steam lock for steam ironing (see page 9 for details).
8. To switch off the iron, turn the temperature dial on the iron in a counter-
clockwise direction to the MIN position.
9. To switch off the steam station, press and hold the selection button for two
seconds, the steam station will beep and switch to standby mode and the
indicator light will change to red.
10. Unplug the unit from the power outlet.
11. When the appliance has cooled down completely, empty the water tank (see
page 12 for instructions) and store the unit in a safe place.

11 After Sales Support
Telephone: 1300 886 649
Instructions (Cont.)
Vertical steaming
This function provides steam for removing creases
and wrinkles on delicate garments in hanging position,
hanging curtains or other hanging fabrics (Fig. 6).
When using the vertical steam function on delicate
fabrics (synthetics, silk, velvet, etc.), make sure to
maintain a distance of a few centimetres to prevent
damaging the fabric. Figure 6
Dry ironing
1. Place the iron steam station on a flat, firm and stable surface.
2. Unwind and straighten the power cord, then plug the steam station into a
suitable power point and switch on the power at the outlet. All LED lights
turn on for a second with an audible beep sound, then they turn off to
indicate the unit is turned on.
3. Press the selection button four times, all three steam level indicators will go
off. The iron steam station is now in no steam mode. The red power indicator
will blink to indicate the appliance is preheating.
4. Turn the temperature dial on the iron in clockwise direction to your desired
temperature (see page 7 for an explanation of the dot symbols). The pilot
light will glow until the iron has reached the required temperature.
5. When the iron has reached the set temperature, the pilot light on the iron
goes off and the red power indicator on the steam station will stop blinking
and change to green, followed by a beep sound. The appliance is now ready
for use.
6. To switch off the iron, turn the temperature dial on the iron in a counter-
clockwise direction to the MIN position.
7. To switch off the steam station, press and hold the selection button for two
seconds, the steam station will beep and switch to standby mode and the
indicator light will change to red.
8. Unplug the unit from the power outlet and when it has cooled down
completely, store it in a safe place.
CAUTION:Takecarewhenusingtheverticalsteamfunction.
The steam temperature is very high and will burn or scald people and pets.
Do not apply steam to clothes or fabrics that are being worn at the time.
12
After Sales Support
Telephone: 1300 886 649
Other Useful Information
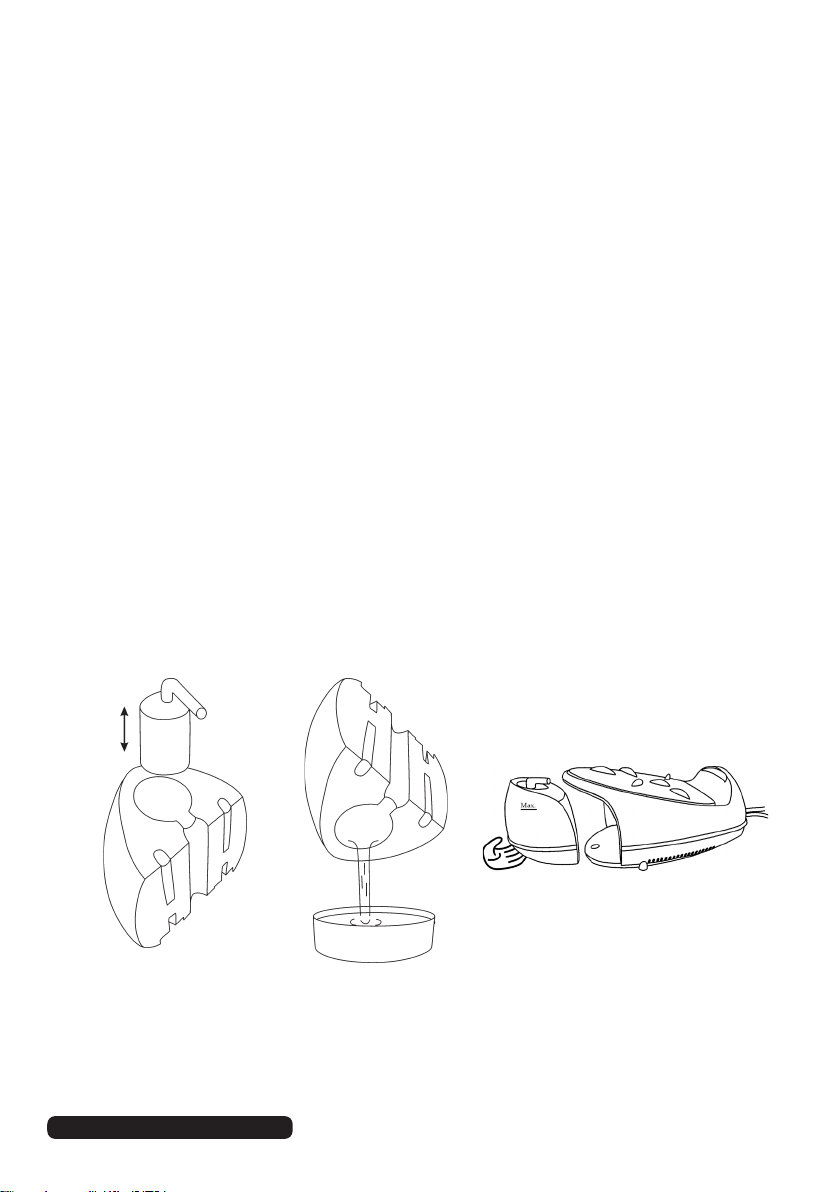
Draining the water
1. Disconnect the power cord from mains supply outlet.
2. Slide out the water tank and remove the 'anti-calc' cartridge (Fig.7).
3. Hold the tank upside down over a sink or bowl to empty all water out of the
tank (Fig. 8).
4. Replace the 'anti-calc' cartridge and reinstall the water tank (Fig. 9).
Figure 7 Figure 8 Figure 9
Cleaning and maintenance
1. Disconnect the power cord from the mains supply outlet.
2. Make sure the iron and steam station have completely cooled down before
cleaning or maintenance.
3. Use a damp cloth or non-scratching cleaner to remove any deposits off the
soleplate or off any other surfaces on the iron or steam station.
4. Never use sharp or rough objects to remove deposits off the soleplate.
5. Never use abrasive cleansers, vinegar or descaling agents to clean any part
of the iron.

13 After Sales Support
Telephone: 1300 886 649
Other Useful Information
'Anti-calc' monitoring and alert system
This iron steam station electronically monitors water hardness and prevents
calcium deposits clogging the steam generating system. An 'anti-calc' cartridge
inside the water tank removes mineral deposits and purifies the water.
From time to time the cartridge will need
replacing, its lifespan depends on the water
hardness in your area and the frequency of
usage.
The 'change cartridge' indicator light will blink to
alert you when it is time to replace the cartridge.
Call the after sales support line on the number at
the bottom of the page to arrange purchase of a
replacement cartridge.
If you cannot obtain a new cartridge straight away, you may continue using
the appliance with distilled water, instead of tap water, until a new cartridge is
available.
When changing the 'anti-calc' cartridge, press the anti-scale button once
(Fig. 10).
Responsible disposal
At the end of its working life, do not throw this appliance out with your household
rubbish. Electrical and electronic products contain substances that can have
a detrimental effect on the environment and human health if disposed of
inappropriately. Observe any local regulations regarding the disposal of electrical
consumer goods and dispose of it appropriately for recycling. Contact your local
authorities for advice on recycling facilities in your area.
Fig 5
Figure 10

14
After Sales Support
Telephone: 1300 886 649
(This page has been left blank intentionally.)

After Sales Support
Telephone: 1300 886 649
Table of contents
Other Lumina Iron manuals


