Lux Power Technology SNA3000 WPV User manual

USER MANUAL
Version: SNA-EN-UM-1.0-01
Off Grid Solar Inverter
SNA3000 WPV
SNA4000 WPV
SNA5000 WPV
www.luxpowertek.com info@luxpowertek.com LUX POWER TECHNOLOGY CO., LTD
Where sun shined
Power always on
Monitor APP Download
Android IOS

Table Of Contents
Information on this Manual
Validity
Scope
Target Group
Safety Instructions
1. Brief Introduction
1.1 Features of the inverter
1.2 Interface of the inverter
1.3 Packing list
2. Installation
2.1 Preparation
2.2 Mounting the Unit
2.3 Battery Connection
2.3.2 Lithium Battery Connection
2.4 AC Input/Output Connection
2.5 PV Connection
2.7 Dry Contact Signal control
2.9 Power ON/OFF
4. LCD Display and settings
2.8 Parallel function
5. Monitor System for Offgrid
3. Working Modes
7. Trouble Shooting & Error List
6. Specifications
01
2.3.1 Battery Power Cable Connection
2.6 Generator Connection
3.1 Offgrid modes introduction
3.2 Working modes related setting description
01
01
01
01
02
03
04
02
04
04
06
07
07
07
08
09
08
10
12
10
13
13
15
19
19
19
22
29
21
4.4 LCD Settings
4.3 Inverter Status Display
4.2 LCD Display
4.1 LED Display
30
33

Information on this Manual
Validity
This manual is valid for the following devices:SNA3000 WPV/SNA4000 WPV/SNA5000 WPV
Scope
This manual provides the installation, operation and troubleshooting of this unit, please read this manual
carefully before installations and operations.
Target Group
For qualified persons and end users. Qualified persons and end users must have the following skills:
Knowledge about this unit operation
Training in deal with the security issues associated with installations and electrical safety
Training in the installation and commissioning of electrical devices and installations
Knowledge of the applicable local standards and directives
Safety Instructions
WARNING: This chapter contains important safety and operating instructions. Read and keep this manual
for future reference.
All the operation and connection need to be operated by qualified persons.
Before using the unit, read all instructions and cautionary marking on the unit. Any damage caused by
inappropriate operation is not warranted by Luxpower .
All the electrical installation must comply with the local electrical safety standards.
Do not disassemble the unit. Take it to a qualified service center when service or repair is required,
incorrect re-assembly may result in a risk of electric shock or fire. Do not open inverter cover or change
any components without Luxpower's authorization, otherwise the warranty commitment for the inverter
will be invalid.
To reduce risk of electric shock, disconnect all wirings before attempting any maintenance or cleaning,
turning off the unit will not reduce this risk.
CAUTION-To reduce risk of injury, charge only deep-cycle lead-acid type rechargeable batteries and
lithium batteries, other types of batteries may burst, causing personal injury and damage.
NEVER charge a frozen battery.
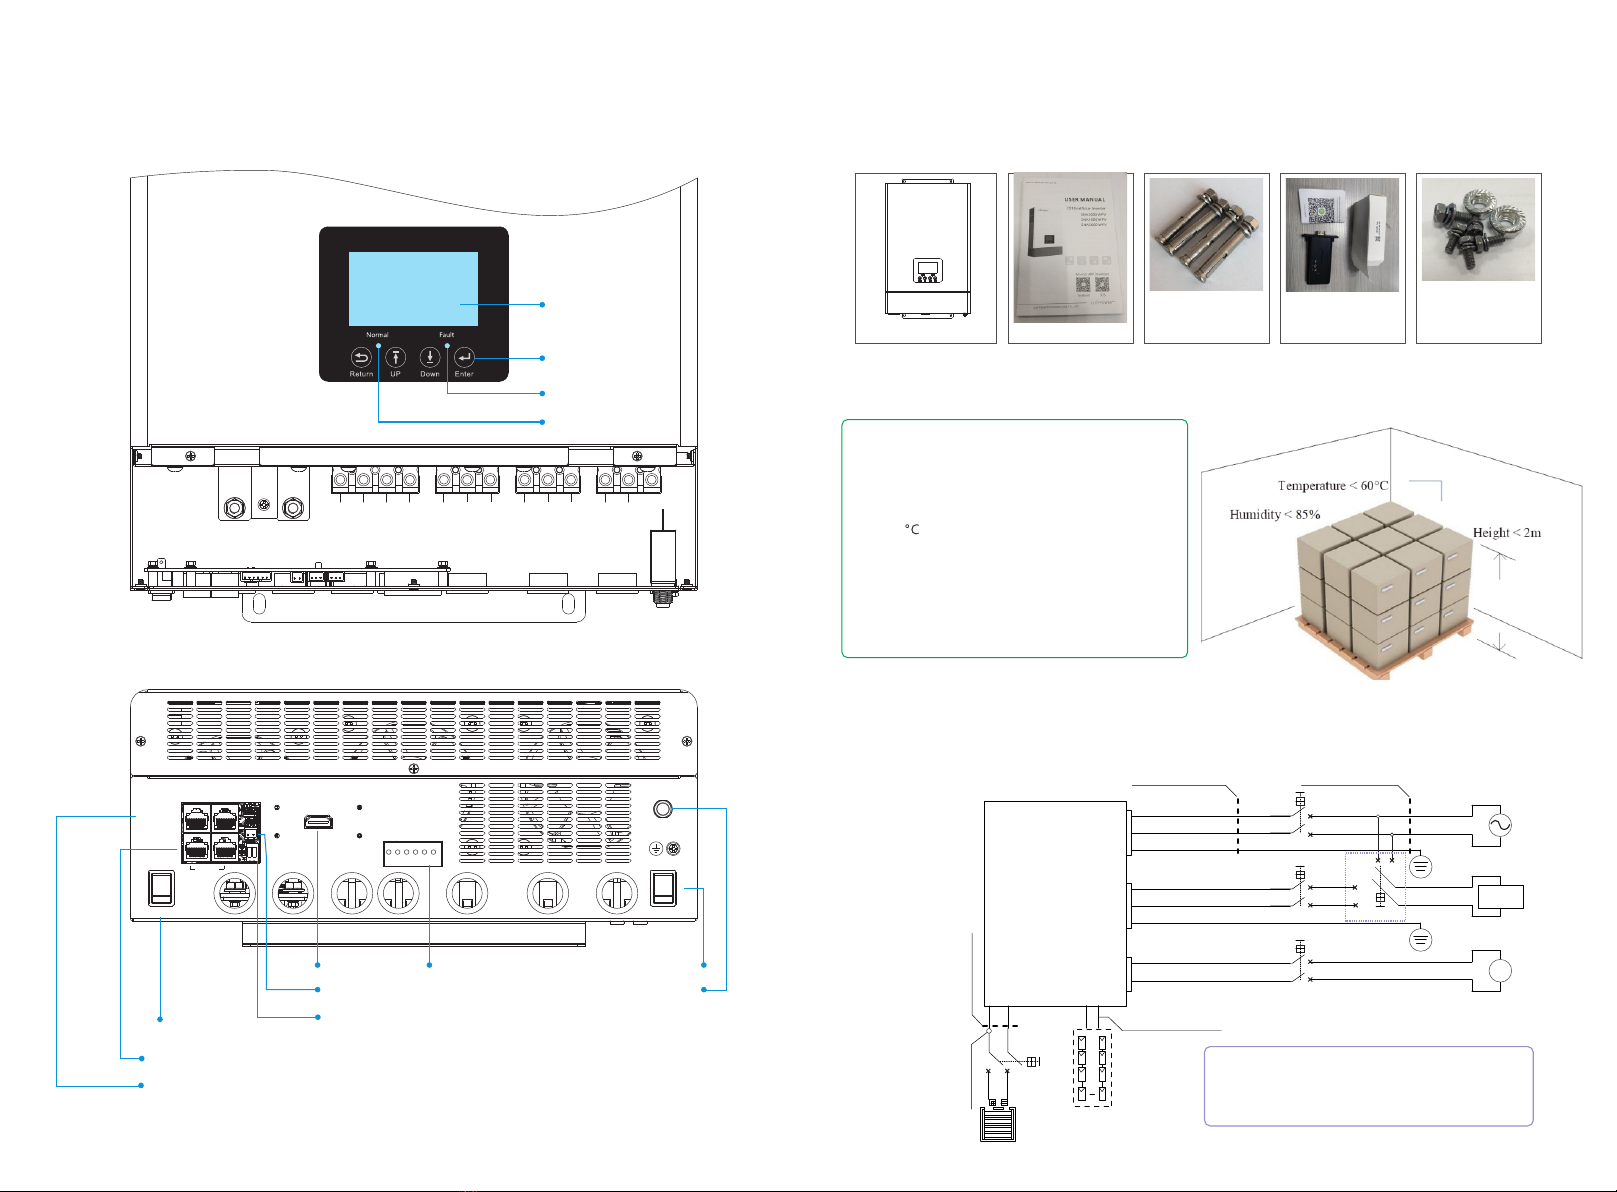
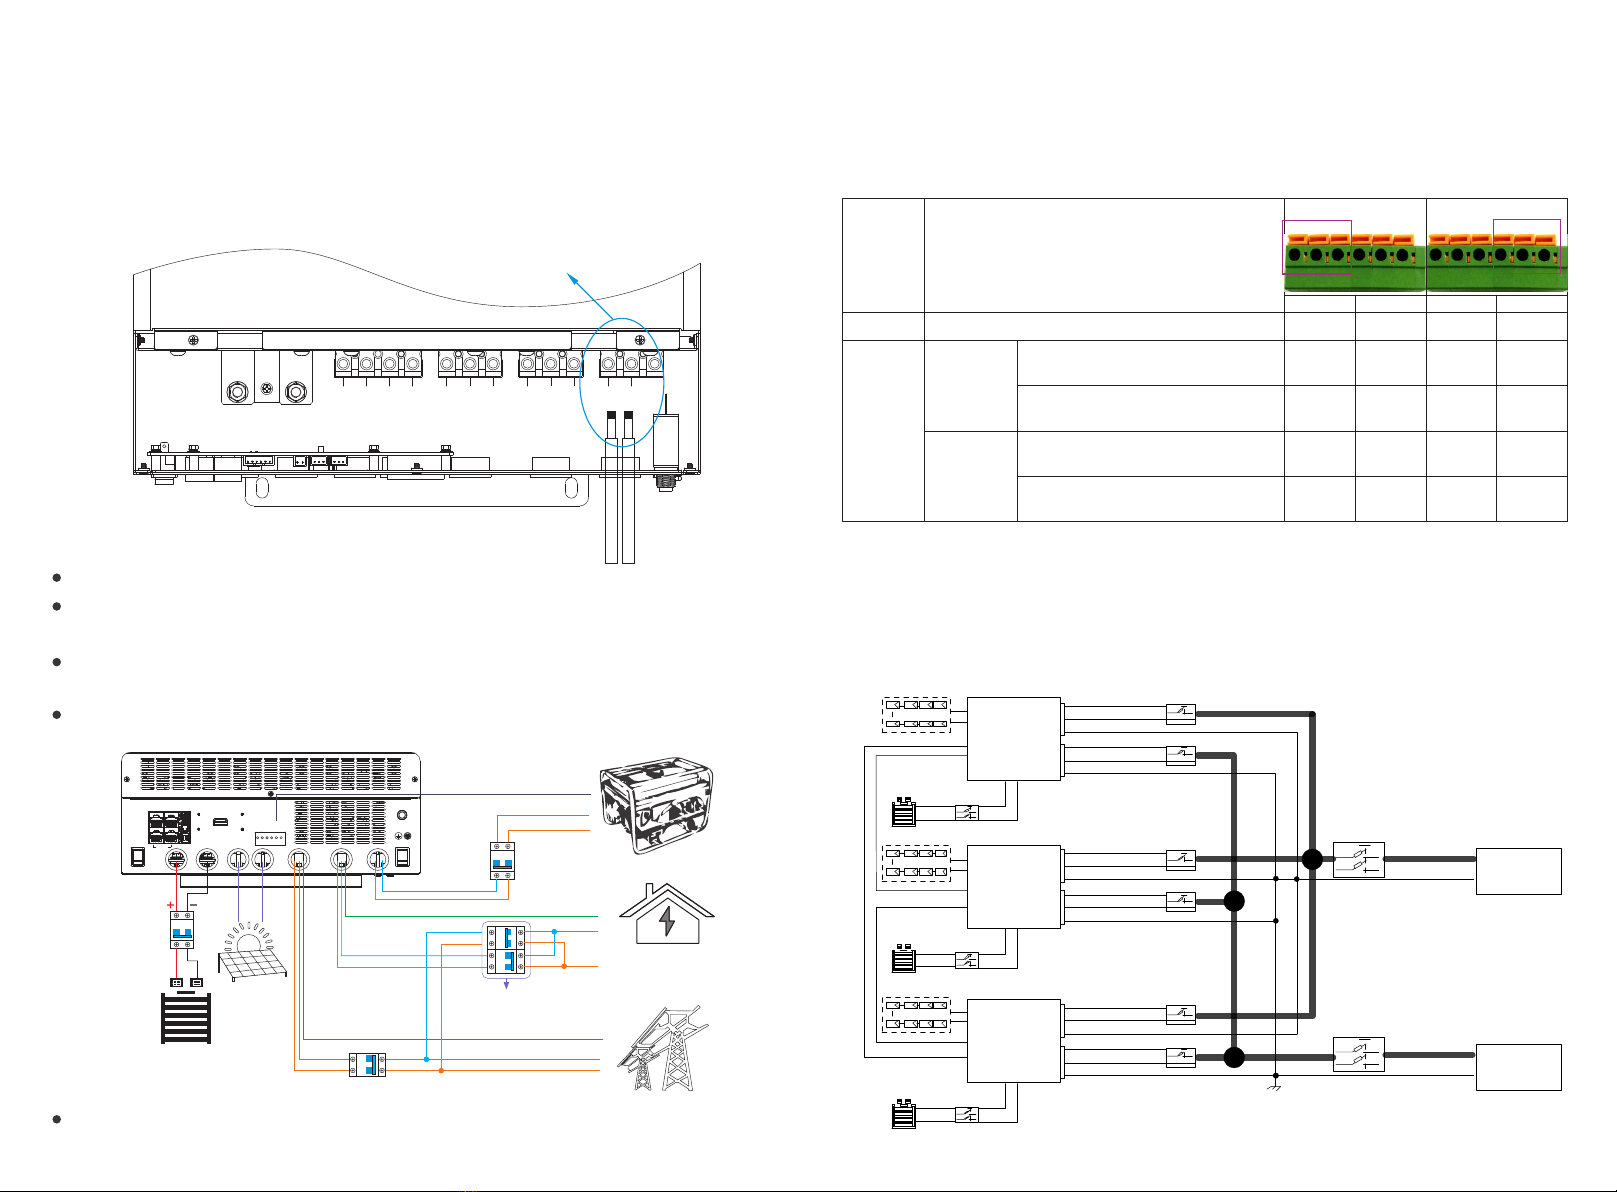
For optimum operation of this unit, please follow required spec to select appropriate cable size and breaker.
Please strictly follow installation procedure when you want to disconnect AC or DC terminals, please refer
to INSTALLATION section of this manual for the details.
GROUNDING INSTRUCTIONS -This unit should be connected to a permanent grounded wiring system,
be sure to comply with local requirements and regulation to install this inverter.
NEVER cause AC output and DC input short circuited. Do not connect to the mains when
DC input short circuits.
1. Brief Introduction
1.1 Features of the inverter
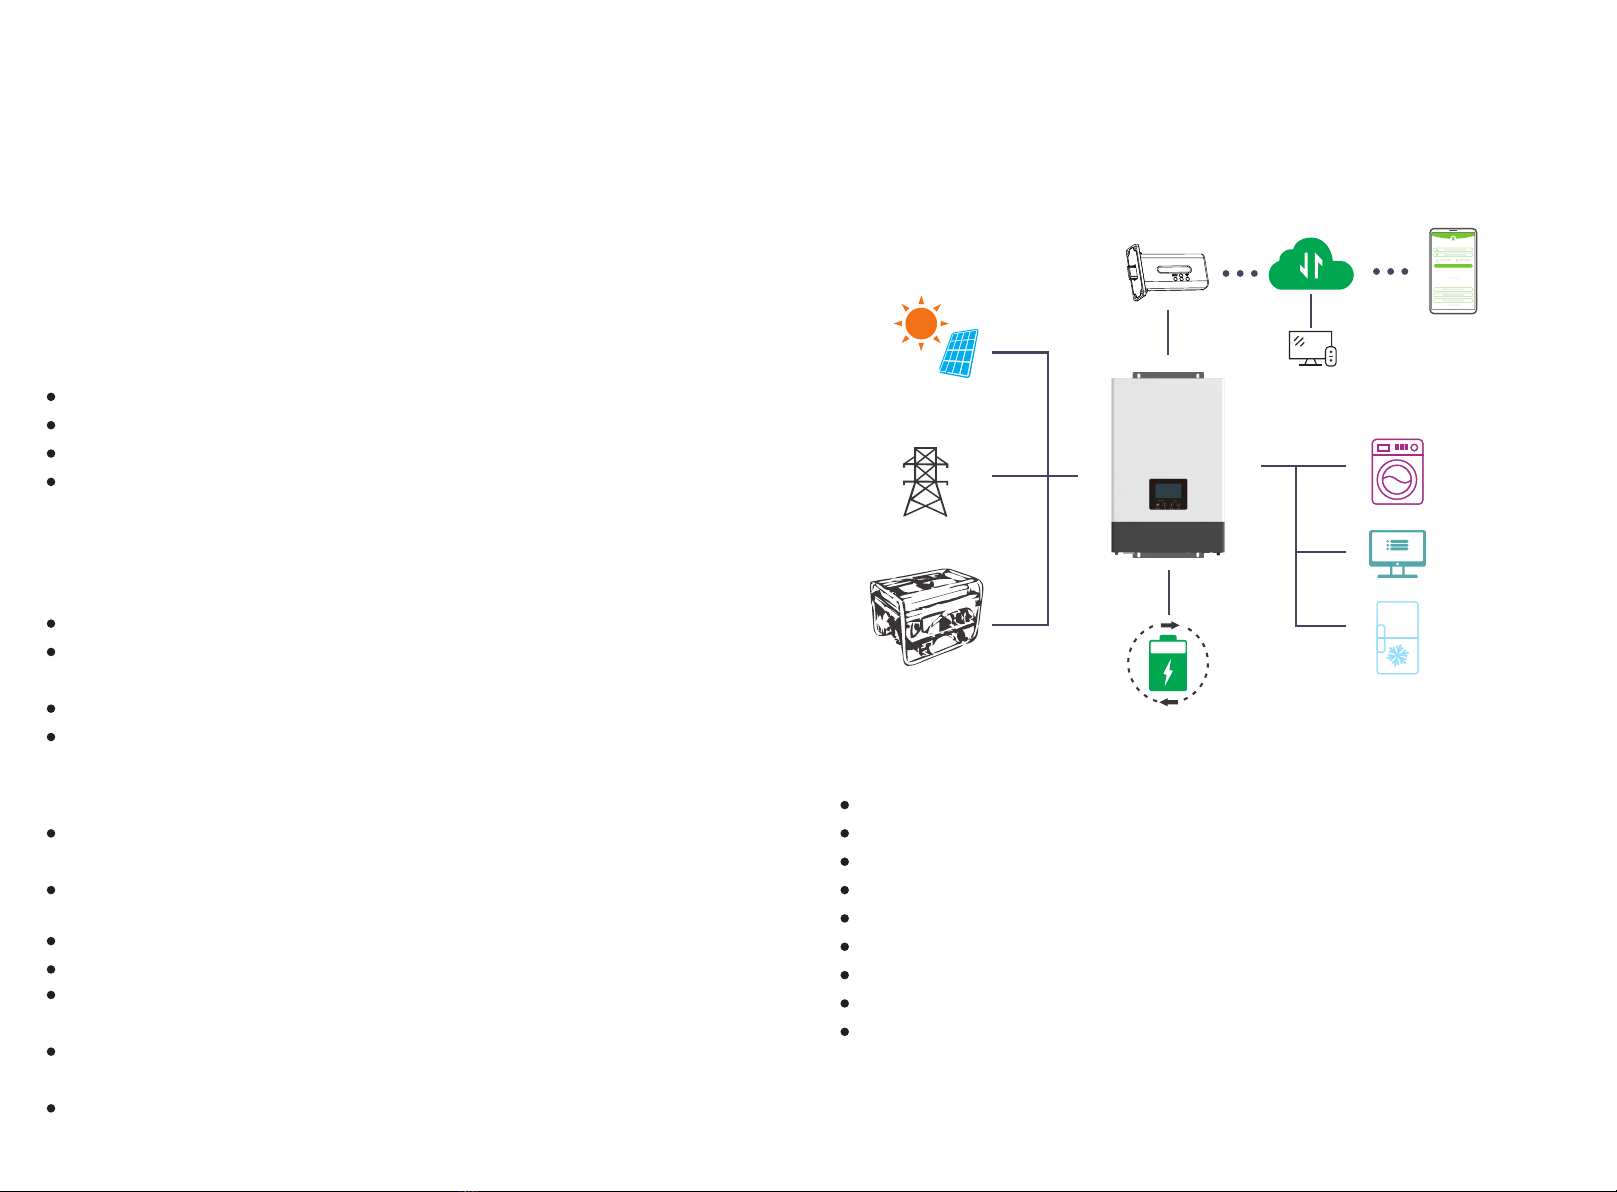
SONAR series is a multifunctional, high frequency pure sine wave off grid solar inverter, features:
Applicable for pure off grid/ backup power / self-consumption / on grid situation
Integrated with 2 MPPT solar charge controllers, MPPT ranges 120V~385V
Rated power 5KW, power factor 1
Be able to run with or without battery in ongrid and offgrid mode
With separated generator input interface, able to control generator remotely
Solar and utility grid can power loads at the same time
With integrated advanced parallel function, up to 10pcs max paralleling
Support CAN/RS485 for Li-ion battery BMS communication
WIFI/ GPRS remote monitoring , setting and firmware update, support website, free IOS/Android APP
LOGIN
Solar Panel
Utility Grid
Generator
Battery
Wifi / 4G Internet Luxpower View
Luxpower Server
Home
Loads
01 02

1.2 Interface of the inverter
LCD display
Normal Status indicator
Fault/Warning Status indicator
Function buttons
WiFi/GPRS
Parallel communication Resistor switch
Battery CAN /RS485
Acid NTC port
Dry contacts Power on/off switch
Parallel communication ports
EPS on/off switch
Circuit breaker
1.3 Packing List
Before installation, please inspect the unit. Be sure that nothing inside the package is damaged.
You should have received the following items in the package:
Storing the Inverter
The inverter must be stored appropriately if not installed immediately, refer to below figure.
a) The inverter and its components must be
stored in its original packaging.
b) The storage temperature should be within
-25~60 and humidity within 0~85%.
c) The packing should be upright and maximum
stacked layers is 6 .
d) Do not directly exposed the inverter and its
packaging to sunshine, raindrops and keep away
from corrosion.
User Manual X1 Wi-Fi Module X1
Off grid Inverter X1
Cross Head
ScrewX5 / NutX2
Expansion Screw
and Tube X4
PVA+ PVA- PVB+ PVB- L N PE
AC INPUT
L N PE
AC OUTPUT
L N
GEN
BAT+ BAT-
MPPT485
Li-ion
CAN/RS485
WIFI
NTC
OFF
ON
EPS Output
Parallel BAT+ BAT- PVA PVB AC OUTPUTAC INPUT GEN
Dry Port GEN
No2 C OM2 Nc 2 No1 COM1 Nc1
OFF
ON
Power
03 04
2. Installation
2.1 Preparation
The system connection is as below:
CAUTION !
Grid
EPS
LOAD
G
Generater
600V, 2*10AWG
600V, 2*10AWG
600V, 4*12AWG
100V, 2*4AWG
MAX:140A
PE
QF 1
QF 1
QF 1
L
N
PE
L
N
PE
L
N
QF 3
PVBAT
GEN
AC Output
AC Input
QF 2
QF 2 is Double interlock switch or Dual Power Switch In≥63A
QF 1 In≥63A
QF 2 In≥63A
QF 3 In≥140A

Please prepare the breakers and cables in advanced before installation.
1. Battery connection: For safety operation and regulation compliance, it's requested to install a separate
DC over-current protector or disconnect device between battery and inverter. The recommend battery
capacity is 150AH-200AH, the recommended spec of DC breaker is 150A/60V. Recommended battery cable
and terminal size:
Model Maximum
Amperage Cable
Battery
capacity Wire Size
Ring Terminal Torque value
Dimensions
2. AC connection: Please install a separate AC breaker between inverter and AC input power source,
inverter and AC output load. This will ensure the inverter can be securely disconnected during maintenance
and fully protected from over current of AC input. The recommended spec of AC breaker is 32A.
Recommended AC input/ AC output /GEN cable size for each inverter.
Model Gauge Cable (mm2) Torque Value
3. PV Connection: Please install separately a DC circuit breaker between inverter and PV modules.
The recommended of DC breaker is 600V/20A. It's very important for system safety and efficient
operation to use appropriate cable for PV module connection. To reduce risk of injury, please use the
proper recommended cable size as below:
4. Before connecting all wiring, please take off bottom cover by removing 3 screws as shown below.
SNA5000WPV 110A 200AH 1*2AWG
2*6AWG
38
28
6.4
6.4
39.2
33.2
D (mm) L (mm)
2~ 3 Nm
mm2
SNA5000WPV 10AWG 61.2 Nm
Model Gauge Cable (mm2) Torque Value
SNA5000WPV 1x12AWG 41.2 Nm
05 06
2.2 Mounting the Unit
Consider the following points before selecting where to install:
Mount on a solid surface
Do not mount the inverter on flammable construction materials.
For proper air circulation to dissipate heat, allow a clearance of approx. 20 cm to the side and approx.
50 cm above and below the unit.
The ambient temperature should be between 0°C and 55°C to ensure optimal operation.
The recommended installation position is to be adhered to the wall vertically.
180 mm
519 mm
Step1. Use the wall-mounting bracket as the template to mark the position of the 4 holes, then drill 8 mm
holes and make sure the depth of the holes is deeper than 50mm.
Step2. Install the expansion tubes into the holes and tight them, then use the expansion screws (packaged
together with the expansion tubes) to install and fix the wall-mounting bracket on the wall.
Step3. Install the inverter on the wall-mounting bracket and lock the inverter using the security screws.
200mm 200mm
500mm
500mm
Steps to mounting the unit
Notice:

2.3 Battery Connection
2.3.1 Battery Power Cable Connection
Note: for lead acid battery, the recommended charge current is 0.2C( C to battery capacity)
1. Please follow below steps to implement battery connection:
2. Assemble battery ring terminal based on recommended battery cable and terminal size.
3. Connect all battery packs as units requires. It's suggested to connect at least 200Ah capacity battery
for SNA5000 WPV.
4. Insert the ring terminal of battery cable flatly into battery connector of inverter and make sure the bolts
are tightened with torque of 2 ~3Nm. Make sure polarity of the battery is correctly connected and ring
terminals are tightly screwed to the battery terminals.
2.3.2 Lithium Battery Connection
If choosing lithium battery for SNA5000 WPV, please make sure the battery BMS is compatible with
Luxpower inverter. Please check the compatible list in the Luxpower website.
Please follow below steps to implement lithium battery connection:
1. Connect power cable between inverter and battery
2. Connect the CAN or RS485 communication cable between inverter and battery. If you do not get
the communication cable from inverter manufacturer or battery manufacturer, please make the cable
according to the PIN definition
3. Lithium battery configuration, in order to
communicate with battery BMS, you should
set the battery type to “Li-ion” in Program
“03” by LCD and choose the right battery
brand (for details, please check the LCD
setting chapter), users can also choose the
battery type and brand by monitor system.
Pin 1 2 3456 7 8
Pin
1
2
3
4
RS 485B
CANL
CANH
5/6
RS 485 port CAN port
RS 485A
7/8
- - -
- - -
- - -
- - -
- - -
- - -
- - -
- - -
07 08
123 4 56
MPPT485
NTC
Parallel
2.4 AC Input/Output Connection
CAUTION!!
- There are two terminal blocks with “IN” and “OUT” markings. Please do NOT mis-connect input and
output connectors.
Please follow below steps to implement AC input/output connection:
1. Before making AC input/output connection, be sure to open DC protector or disconnected first.
2. Remove insulation sleeve 10mm for six conductors. And shorten phase L and neutral conductor N 3 mm.
3. Insert AC input wires according to polarities indicated on terminal block and tighten the terminal screws.
Be sure to connect PE protective conductor first.
Ground (yellow-green)
N→Neutral (blue)
4. Insert AC output wires according to polarities indicated on terminal block and tighten terminal screws.
Be sure to connect PE protective conductor first.
5. Make sure the wires are securely connected.
- Be sure to connect AC wires with correct polarity. If L and N wires are connected reversely, it may
cause utility short-circuited when these inverters are worked in parallel operation.
2.5 PV Connection
Please follow below steps to implement PV module connection:
1. Remove insulation sleeve 10 mm for positive and negative conductors.
2. Check correct polarity of connection cable from PV modules and PV input connectors.
3. Connect positive pole (+) of connection cable to positive pole (+) of PV input connector. Connect negative
pole (-) of connection cable to negative pole (-) of PV input connector.
4. Make sure the wires are securely connected.
5. Finally, after connecting all wiring, please put bottom cover back by screwing two screws as shown below.
L→LINE (brown or black)
10
3
10
3
PVA+ PVA- PVB+ PVB- L N PE
AC INPUT
L N PE
AC OUTPUT
L N
GEN
BAT+ BAT-
Battery Pack
Inverter

2.6 Generator Connection
N→Neutral (blue)L→LINE (brown or black)
1. Before making Generator connection, be sure to open DC protector or disconnected first.
2. Remove insulation sleeve 10mm for 2 conductors.
3. Insert L and N wires according to polarities indicated on terminal block and tighten the terminal screws
PVA+ PVA- PVB+ PVB- L N PE
AC INPUT
L N PE
AC OUTPUT
L N
GEN
BAT+ BAT-
09 10
All lux units can work with generator.
Battery will get charged when the generator is turned on, and the generator is bypassed to AC output to
take all loads .
Users can connect the generator output to off grid inverters. GEN input terminal.
The generator will be automatically started when battery voltage is lower than the cut-off value or there is charge
request from BMS. When voltage is higher than AC charge setting value, it will stop the generator
Please purchase an external control box to remote turn on/off the generator (if needed the generator need to
support dry contact function).
MPP T485
Li- ion
CAN /RS4 85
WIF I
NTC
OFF
ON
EPS Ou tput
Para llel BAT + BAT- PVA PVB AC OUT PUTAC INP UT GEN
Dry Po rt GEN
No2 COM 2 Nc2 No1 C OM1 Nc1
OFF
ON
Powe r
PV
BATTERY
HOUSE Essential LOAD
L
N
PE
Generator
L
N
L
N
PE
The system will use AC first if there is both utility input and generator input.
2.7 Dry Contact Signal control
The Dry port(NO2,COM2,NC2) could be used to deliver signal to external device when battery voltage
reaches warning level. The GEN port(NO1,COM1,NC1) could be used to wake-up the Generator and
then the generator can charge the battery.
Unit Status Condition
Dry port GEN
Power Off Inverter is off and no output is powered. Close
Open
Power On
Without Grid
Battery voltage < Low DC
warning voltage
Battery voltage > Setting value or
battery charging reaches floating stage
Battery voltage < Low DC
warning voltage
Battery voltage > Setting value or
battery charging reaches floating stage
NO2 & COM2 NC2 & COM2
Close
Open
Close Open Close Open
Close
Open
NO2 COM2 NC2 NO1 COM1 NC1
Dry port GEN
NO1 & COM1 NC1 & COM1
NO2 COM2 NC2 NO1 COM1 NC1
Close
Open
Close Open Close
Open
Close
Open Close
Open
With Grid
2.8 Parallel function
SNA series inverter support up to 10 units to composed single phase parallel system or three phase
parallel system, for parallel system setup
Step1. Cable connection: the system connection is as below:
EPS Bus-Bar(L,N)
PV AC Input
AC Output
CAN 1
CAN 2
BAT
DC
DC
DC
AC
AC
AC
AC
L
N
PE
L
N
PE
L
N
PE
L
N
PE
L
N
PE
L
N
PE
AC
AC
PV
CAN 1
CAN 2
BAT
PV
CAN 1
CAN 2
BAT
AC Input
AC Output
Parallel line 1
Parallel line 2
Parallel line 3
Grid Bus-Bar(L,N)
Grid Bus-Bar(L,N)
EPS Bus-Bar(L,N)
PE
PE
Grid
EPS LOAD
Inverter 1
AC Input
AC Output
Inverter 2
AC Input
AC Output
Inverter 3
L
N
Notice: NO---Normal open NC---Normal close
Grid
L
N
Double interlock switch or
Dual Power Switch In≥63A
In≥63A
In≥63A
In≥140A

Step2. Please put the CAN communication PIN to on status for the first and the end inverter
Step3. Setup the monitor for the system, add all datalogs in one station. Users can login to the visit interface of
monitor system, Configuration->station->Plant Management->add datalog to add the datalogs.
No.1 No.2 No.n-1 No.n
1
03
1 1
1
03
0 0
1
03
0 0
1
03
1 1
Parallel
4444
Parallel line1 Parallel line2 Parallel line(n-1 to n)
Parallel line(n to 1)
The max parallel quantity is 10, so 2<n<10
Step4. Enable share battery for the system if the system share one battery bank, otherwise disable the
shared battery function
Step5. Set the system as a parallel group in the monitor system
For more detailed guidance for paralleling system, please visit https://www.luxpowertek.com/download/
And download the guidance
11 12
Monitor Data Overview Maintain
Stations
Datalogs
Inverters
Users
Add Station
+
Plant name Installer E nd User Country Timezone
Genesis
Butler Home
Office
Cronje Home
Elangeni
Broomhead cronje
South Africa
South Africa
South Africa
South Africa
Aspergo Ins tall
1
2
3
4
GMT+2
GMT+2
GMT+2
GMT+2
johnbutler
Aspergo User Cen ter
Daylight sa ving time
No
No
No
No
Create date
2019-03-1 4
2019-03-2 5
2019-06-0 3
2019-07-1 6
Action
Plant Manag ement
Plant Manag ement
Plant Manag ement
Plant Manag ement
Search by sta tion name
Monitor Data Overview Maintain
Stations Overview Station Name
Serial numb er Status Solar Power Charge Powe r Discharge P ow
0272011008
0272011011
0272011012
0272011017
Normal
1 kW
42 W
32 W
129 W
48 W
228 W
1
2
3
4
0 W
0 W
0 W
0 W
35 W
Aspergo User Cen ter
Load
182 W
0 W
1 kW
106 W
Solar Yieldi ng
215.3 kWh
158.7 kWh
170.3 kWh
99 kWh
Battery Dis char Feed Energy Consumption E Plant name Parallel
Search by inv erter SN
Device Overview
79 W
Action
39.6 kWh
21.1 kWh
49.9 kWh
85.6 kWh
0 kWh
0 kWh
0 kWh
0 kWh
551.2 kWh
160.5 kWh
434.5 kWh
257.1 kWh
Parallel
Parallel
Parallel
Parallel
A-1
A-2
A-3
A-4
Dragonview
Dragonview
Dragonview
Dragonview
2.9 Power and EPS ON/OFF
1.Power Switch: Control power supply for the unit
MPPT485
Li-ion
CAN/RS485
WIFI
NTC
OFF
ON
EPS Output
Parallel BAT+ BAT- PVA PVB AC OUTPUTAC INPUT GEN
Dry Port GEN
No2 C OM2 Nc2 No1 COM1 Nc1
OFF
ON
Power
2.EPS Output Switch: Use to control the AC output
After connection, please turn on both switch. Users can turn off the EPS output switch to turn off power
supply in some emergency case
PV AC Input
AC Output
CAN 1
CAN 2
BAT
DC
DC
DC
AC
AC
AC
AC
L
N
PE
L
N
PE
L
N
PE
L
N
PE
L
N
PE
L
N
PE
PV
CAN 1
CAN 2
BAT
PV
CAN 1
CAN 2
BAT
Parallel line 1
Parallel line 2
Parallel line 3
Grid or Generater
EPS
AC
AC
EPS Bus-Bar(L,N)
Grid or Generater
EPS
Grid or Generater
EPS
Phase L1
Phase L1
Phase L2
Phase L2
Phase L3
Phase L3
AC Input
AC Output
AC Input
AC Output
Inverter 1
Inverter 2
Inverter 3
Parallel Parallel Parallel
12
ON
12
ON
12
ON
12
ON

13 14
3. Working modes
3.1 Offgrid modes introduction:
Bypass Mode AC is used to take the load
PV Charge Bypass PV charge the battery while the
AC power the load
BAT Grid off Battery is used to take the load
PV+BAT Grid off PV+Battery power
the load together
PV+AC charge PV+AC charge the battery
AC is from AC Input or GEN Input
PV Grid off
When setting without battery,
the PV can power the load .
PV charge Gridon
PV charge battery and
power the load
*The rest power from PV
can feed in Grid
PV+BAT Gridon
PV+Battery power the load ,
and the AC can power the load
if PV+Battery power not enough
PV Gridon PV power the load, the rest
power feed in Grid
PV Charge
1.When the EPS key off, the
inverter charge the battery only
2.When the battery is power off,
the PV can wake up the battery
automatically
PV Charge+Grid off PV charge the battery and
power the load
AC Charge
1. AC charge the battery from
AC Input or GEN Input
2. When the battery is power off,
the AC can wake up the battery
automatically
NOTE: The output power depends
on the PV energy input, if the PV
energy is unstable, witch will
influence the output power

AC abnormal
AC normal
PV&AC Take Load
Jointly Enable
PV&AC Take Load
Jointly Disable
In the AC first time
Enable AC charge and in the AC charge time
1. Not in the AC first time and
2. Disable AC charge or not in the AC charge time
In the AC first time
Enable AC charge and in the AC charge time
1. Not in the AC first time and
2. Disable AC charge or not in the AC charge time
AC charge accroding to Time
AC charge accroding to
battery voltage or SOC
AC charge accroding to Time
AC charge accroding to
SOC/Battery voltage
Off grid mode
if P_Solar>=P_load, solar is used to take load and charge battery
if P_Solar<P_load, solar and battery take the load together, system
will discharge until battery lower than the Cut Off Voltage/SOC
Hybrid Mode 1(charge first)
Solar power will used to charge battery first,
1.The solar power will be used to charge the battery first. AC will take load.
2.if solar power is higher than power need to charge the battery, the
extra power will used to take load togther with grid
3.If there is still more energy after charge battery and take the load,
it will feed enegry into grid if export to grid function is enabled
Hybrid Mode 1(charge first)+AC charge battery if solar power is
not enough to charge battery
Hybrid Mode 1(charge first)+AC charge battery if solar power is not
enough to charge battery and the battery voltage/SOC is lower than AC
start charge voltage/SOC, the AC will stop charging when the battery
Voltage/SOC is higher than AC end charge battery voltage/SOC
Hybrid Mode 2(load first)
Solar power will used to take load first,
1.if solar power is lower than load, battery will discharge together to
take load until battery lower than EOD voltage/SOC
2.if solar power is higher than load, the extra power will used to charge
battery, if there is still more energy, it will feed into grid if enable export
Bypass Mode
AC will take the load and Solar is used to charge battery
Bypass Mode+AC charge battery
Solar is used to charge battery
AC will take load and also charge battery during AC charge time
if solar power is not enough
Bypass Mode+AC charge battery
Solar is used to charge battery
AC will take load and also charge battery when battery SOC/Volage is
lower than start SOC/Voltage, and the AC will stop charging when the
battery Voltage/SOC is higher than AC end charge battery voltage/SOC
Off grid mode
if P_Solar>=P_load, solar is used to take load and charge battery
if P_Solar<P_load, solar and battery take the load together, system will
discharge until battery lower than EOD Voltage/SOC
3.2 Working Modes related setting description
NA NA NA
Situation Setting 1 Setting 2 Setting 3 Working modes and Description
NA
NA
NA
NA
15 16

1. SONAR can work as traditional off grid inverter or as a hybrid inverter. When disable PV&AC
Take load Jointly, it will work as a traditional off grid inverter, otherwise it will work as a hybrid
2. Working as a traditional off grid inverter. In this situation, inverter either use (solar+battery) to take load
or use AC take load. Related settings
AC First: During the setting time, system will use AC to take load first, use solar power to charge the battery.
If the battery is full, solar power may be wasted. When out of the setting time, system will use battery and
solar to take load until battery voltage/SOC is lower than cut off voltage/SOC
3. Working as a hybrid inverter
Related settings
3.1 AC First: During this setting time, system will use AC to take load, use solar power to charge the battery
first. If there is extra solar power, extra solar power will take the load. When out of the setting time, system
will use solar and battery to take load first until the battery voltage/SOC is lower than On Grid EOD settings,
then it will use AC to take the load.
3.2 Export to Grid/Export Power percent: Users can also enable export function, it is allowed and set export
power percent
3.3 AC Charge function Disable: The system will not use AC to charge the battery(except Li ion BMS set
force charge flag )
According to Time: During the setting time, system will use AC to charge the battery until battery full and
battery will not discharge during the setting time.
According to Battery Voltage: During the setting time, system will use AC to charge the battery if battery
voltage is lower than AC Charge Start Battery Voltage and will stop when Voltage is higher than AC Charge
End Battery Voltage. And battery will not discharge during the setting time.
According to Battery SOC: During the setting time, system will use AC to charge the battery if battery SOC
is lower than AC Charge Start Battery SOC and will stop when Voltage is higher than AC Charge End Battery
SOC. And battery will not discharge during the setting time.
17 18
PV&AC Take Load Jointly
Export to Grid
Enable
Enable
Disable
Disable
Discharge Current Limit
Export Power Percent(%)
Set
Set
300
0
Hybrid Setting
Application Setting
EPS Voltage Set(V)
AC Input Range
Set
Set
230
0: APL(Utility Range90
EPS Frequency Set(Hz) Set50
AC First
AC first Start Time 1 00 00 Set
:
AC first End Time 1 12 00 Set
:
AC first Start Time 2 14 30 Set
:
AC first End Time 2 15 00 Set
:
AC first Start Time 3 16 30 Set
:
AC first End Time 3 16 40 Set
:
Discharge Setting
Battery Warning Voltage Set44 Battery Warning SOC Set20
Discharge Control SetAccording to SC
Battery Warning Recovery Voltage Set46 Battery Warning Recovery SOC Set60
Discharge Cut-off Voltage Set45 Discharge Cut-off SOC Set15
On Grid EOD Voltage(V) Set56 On Grid EOD SOC(%) Set30
AC Charge According to 8 Set AC Charge Battery Current(A) Set30
AC Charge
AC Charge Start Time 1 00 00 Set
:
AC Charge End Time 1 23 00 Set
:
AC Charge Start Time 2 00 00 Set
:
AC Charge End Time 2 00 00 Set
:
AC Charge Start Time 3 16 30 Set
:
AC Charge End Time 3 16 40 Set
:
Disable
According to Time
According to Battery SOC when no solar
According to Battery Voltage when no solar
AC Charge Start Battery Voltage(V) 46.4 Set
AC Charge Start Battery SOC(%) 20 Set
AC Charge End Battery Voltage(V) 48 Set
AC Charge End Battery SOC(%) 100 Set

4. LCD display and settings
LED Indicator Messages
Green
Solid On
Flashing
Working normal
Red Flashing
12
2
1fast: Warning
slow: Firmware update
Fault condition occurs
in the inverter
4.2 LCD Display
4.1 LED Display
19 20
Description Remarks
Generally Information
Display Area
No.
1
This area will display the currently time/date by default(year/
month/day/ hour/minute” switching automatically). When press
Up or Down buttons, this area will display the firmware version
information, serial number etc. Display the setting selection
information when entering settings
When make settings on the SNA5000 inverter through the
LCD, this area will display the AC Charge, Force Discharge,
Charge First option for setting on those working modes. It will
not display those information unless in the setting process.
On-grid solar inverter output
power and energy data
Battery information and data
This area shows the battery type, battery brand(lithium battery),
the lead-Acid battery setting of CV voltage, Floating charging
voltage, Cut off voltage, Discharge end voltage . And display the
voltage, SOC and power in turns of period of 1 seconds
System working status
/ setting code
There are three type of working status- normal, warning and
fault, in right side of this area, there are code display, it will
display different type of code -the system working mode code,
warning code, fault code and setting code
2
3
4
UPS/EPS output
information and data
When UPS function is enabled, this area will display UPS voltage,
frequency, power etc. in turns of periods of 1s
Programming & the percentage
of AC output power
When firmware updating in process, it will display relevant
information When in grid off, this area will display the
Percentage of the maximum AC output power
Loads consumption Display the power consumption by the loads in on grid model
Grid information and
Generator information
Display the grid(GRIDA) information of voltage, frequency,
input or output power, the Generator (GRIDB) information of
voltage, frequency, input power ,switch period of 1s
Working mode settings area
5
7
8
9
6
This area shows the data of PV voltage, power and the setting
of PV input connection information

21 22
4.3 Inverter Status Display
Normal status, running status 40 Warning Status, warning 29
Index Description Setting Option
Date& time
Setting Year/Month/day
Setting hour/minute/second
PV input mode
Default: S
S: two independent
Strings input
1
2P:Same string input
for 2 MPPTs
dc: DC source input
There are four buttons on the LCD. Step for settings by
the display:
Step1: After touch Enter button for about 2 seconds ,
the unit will enter setting mode. The setting
icon and index will flashing.
Step2:Touch UP or Down button to select setting index
from 1 to 19.
Step3: Then touch Enter button to set this item
Step4: Touch UP or Down button to change the settings
Step5: Touch Enter to confirm the setting or Return the setting list is as below
4.4 LCD Settings

23 24
Off grid Output
voltage and
frequency AC Output frequency
50Hz (Default)/60Hz
Buzzer enable
Buzzer enable(Default)
Ic: Maximum
charge current
(utility charge
current + solar
charge current)
Totoal charge current setting
Setting range :10A~140A
Default: 110A
AC Output voltage
208Vac/220Vac/
230Vac(Default)/240Vac
4
5
6
Buzzer Disable
Battery
For Lead Acid:
Step1:Choose battery type first, when Lead-Acid
flashing, select Enter to choose Lead-acid battery
Step2:Then choose battery capacity
For Lithium battery
Step1:Choose battery type first, when Li-ion
flashing, select Enter to choose Li-ion battery
Step2:Choose battery brand
0- > Standard Battery 2->Pylon Battery
6->Luxpower protocol Battery 8->Dyness Battery
3
Run with No Battery:
Step1:Choose battery type first, when no flashing,
select Enter to choose Run with No battery
FloChr:
Floating charging
voltage setting
(Only in Lead-acid
battery type)
Setting range:
50.0-56.0Vdc
Default: 54.0V
8
Id: Maximum
discharge current
Totoal discharge current setting
Setting range :10A~140A
Default: 110A
TEOd:
Discharge control
type: VOLT/SOC
Setting Range:
VOLT/SOC
9
10
ConChr:
CV voltage setting
(Only in Lead-acid
battery type)
Setting range:
50.0-59.0Vdc
Default: 56.4V
7

AcIn: AC voltage
range setting
Unity AC Input voltage range :
90Vac~280Vac
AC Output voltage range :
170Vac~280Vac
13
Eod:
Discharge end
voltage or soc with
grid, depend on
TEOd
Setting range:
VOLT: Cut off Volt-56V
Default: 42V
12
SOC: Cut off SOC -90
Default: 15%
CutOFF:
Cut off Voltage
or SOC, depend
on TEOd
Setting range:
VOLT: 40.0-OnGrid EOD Volt
Default: 42V
11 SOC: 0-OnGrid EOD SOC
Default: 15%
Eod:
Discharge end
voltage or soc with
grid, depend on
TEOd
Setting range:
VOLT: Cut off Volt-56V
Default: 42V
12
SOC: Cut off SOC -90
Default: 15%
25 26
Hybrid enable/
disable
Setting Range:
Hybrid Disable (default)
Hybrid Enable
16
Utility source
(AC Input) to take
Load time setting
Setting time of 1 start:
Range:00:00~23:59
Default:00:00~00:00
Setting time of 1 end:
Range:00:00~23:59
Default:00:00~00:00
Similar to set time 2 and time3
15
st art
end
st art
st art
AC charge setting
(The setting process
must enable the AC
charging function,
confirm the full
battery SOC value,
and set the
confirmation time
period 1, 2, 3 to
truly complete the
AC charging
function setting)
AC Charge function:
Disable(Default)
Enable
(Touch “Enter” button to
set ac charge parameter )
Setting AC Charge current:
30A(Default)
40A / 50A / 60A
Setting AC Charge to battery SOC:
Range:0%~100%
Default:100%
Setting AC Charge time of 1 start:
Range:00:00~23:59
Default:00:00~00:00
Setting AC Charge time of 1 end:
Range:00:00~23:59
Default:00:00~00:00
Similar to set time2 and time3
14
st art
en d
st art
st art

17
Battery Wakeup
Enable/disable
Enable wakeup battery
(Not for No
Battery type)
18 Max Generator
Input Power
Setting Range:0-7369W
7369W (default)
Power
Feed-In
Enable/disable
Only valid when
Hybrid is enabled
Setting Range:
Feed-In Disable (default)
Maximum Feed-In
percent Only valid
when Feed-In is
enabled Power
percent can be set
larger than 100%
in case of there is
other generating
device in the
system
Setting Range:0-100%
0% (default)
Feed-In Enable
16
19
20
PV Off Grid
enable/disable
Setting Range:
PV Off Grid Enable (default)
PV Off Grid Disable
Green Function
enable/disable
Setting Range:
Green Function Disable
(default)
Green Function Enable
21 Parallel setting
Parallel type setting
Setting Range: NoPL
(not Parallel)/1PH (Single
phase)/3PH (Three phase)
NoPL (default)
Parallel phase setting
Setting Range: P1 ( Rphase)/ P2(Sphase)
/P3(Tphase)
P1 (default)
Bat Share enable/disable
Setting Range:
Disable (default)
Enable
27 28

5. Monitor System for Off grid
Local Monitor
BA 19310175 9532004127
Solar Yielding
0.0 kWh
300.8 kWh
Battery Discharging
0.0 kWh
Today Discharging
Total Discharging
50.1 kWh
+
Feed-in Energy
0.0 kWh
Today Export
Total Export
77.1 kWh
Consumption
0.0 kWh
Today Usage
Total Usage
255.3 kWh
PV Power
0 W
Consumption
0 W
Backup Power(EPS)
Standby
Battery Power
0 W
Battery Level(SOC)
0 W
0 W
Notice
Overview Set
Users can use wifi dongle / WLAN dongle / 4G dongle
(Avaiblable from 2021 March for some countries) to
monitor the energy storage system,
The monitor website is: server.luxpowertek.com
1. Wifi Quick Guidance
Quick guidance for setting password for wifi module,
the paper is also available in the wifi box
2.Monitor system setup for Distributors and
Monitor system setup for endusers
Monitor system registration, wifi password setting,
and wifi local monitor and setting
3.Lux_Monitor_UI_Introduction
Introduction of monitor interface
4. WebsiteSettingGuidance
Introduction of website settings for offgrid inverter
Please download the introduction of guidance by
website: https://www.luxpowertek.com/download/
Document Reference:
The APP is also available in the google play and apple
APP store(Scan two code bar to download the APP).
INVERTER MODEL SNA5000WPV/SNA4000WPV/SNA3000WPV
Input Voltage Waveform Sinusoidal (utility or generator)
Nominal Input Voltage 230Vac
Low Loss Voltage 170Vac±7V (UPS); 90Vac±7V (Appliances)
Low Loss Return Voltage 180Vac±7V (UPS); 100Vac±7V (Appliances)
High Loss Voltage 280Vac±7V
High Loss Return Voltage 270Vac±7V
Max AC Input Voltage 280Vac
Nominal Input Frequency 50Hz / 60Hz (Auto detection)
Output Short Circuit Protection Circuit Breaker protect when GridOn Bypass
Transfer Time <20ms @ Single <30ms @ Parallel
Output power derating: When AC input voltage
drops to 170V, the output power will be derated.
Output Power Rated Power 20% Power
Table 1 Line Mode Specifications
6. Specifications
Software protect when GridOff discharge
29 30
Charge power derating:
When AC input voltage drops to 170V depending
on models, the charge power will be derated.
Output power derating: When AC input voltage
drops to 200V, the output power will be derated.
Max inv curren: 25A;
Max inv Power: 5kW;
Output Power
Rated Power
50% Power
90V 170V 280V
Input Voltage

Rated Output Power 5KVA/5KW
Output Voltage Waveform Pure Sine Wave
Output Voltage Regulation 208Vac/220Vac/230Vac/240Vac±5%
Output Frequency 50Hz / 60Hz
Peak Efficiency 93%
Overload Protection 5s@≥150% load; 10s@110%~150% load
Surge Capacity 2* rated power within 5 seconds
Battery Voltage Range 46.4V-60V(Li) 38.4V-60V(Lead_Acid)
High DC Cut-off Voltage
High DC Recovery Voltage
Table 2 Inverter Mode Specifications
59VDC(Li) 60VDC(Lead_Acid)
57.4VDC(Li) 58VDC(Lead_Acid)
4KVA/4KW 3KVA/3KW
Low DC Cut-off Voltage
Low DC Cut-off Return Voltage
20% SOC ( Settable )
Low DC Warning SOC
Low DC Cut-off Voltage
@load<20%+3V
Low DC Cut-off Return SOC
Low DC Warning SOC +10%
Low DC Cut-off SOC 15% SOC (Grid on) ( settable)
58.4Vdc
Charge Cut-off Voltage
No Load Power Consumption <60W
Lead_Acid Battery Charging Algorithm 3-Step
Max. AC Charging Current 60Amp(@VI/P=230Vac)
Bulk Charging Voltage
Flooded Battery
AGM / Gel Battery
Floating Charging Voltage 54Vdc
Utility Charging Mode
58.4Vdc
56.4Vdc
Table 3 Charge Mode Specifications
Low DC Warning Return Voltage
Low DC Warning Voltage
load < 20% 44.0Vdc(Settable)
20% ≤ load < 50% Warning Voltage @load < 20% -1.2V
load ≥ 50% Warning Voltage @load < 20% -3.6V
Low DC Warning Voltage@Different load +2V
load < 20%
20% ≤ load < 50%
load ≥ 50%
42.0Vdc(Settable)
Cut-off Voltage @load < 20% -1.2V
Cut-off Voltage @load < 20% -3.6V
Low DC Warning Return SOC
15% SOC (Grid off ) ( settable)
Low DC Cut-off SOC +10%
Cut-off Voltage@load<20%<45V
Cut-off Voltage@load<20%≥45V
48V
Charging Curve
480Vdc
MPPT Solar Charging Mode
Max. PV Array Open Circuit Voltage
Max. PV Array Power 6400W
Start-up Voltage 100Vdc±10Vdc
PV Array MPPT Voltage Range 120Vdc~385Vdc
110A
Max. Charging Current
(AC Charger Plus Solar Charger)
Max. PV Charging Current 110A
Battery Voltage, per cell Charging Current
2.43Vdc(2.35Vdc)
2.25Vdc
Voltage
100%
50%
Time
Current
T0 T1
Bulk
(Constant Current)
Absorption
(Constant Voltage)
Maintenance
(Floating)
T1=10*T0, minimun 10m ina, maxmum 8hour
Table 4 General Specifications
Safety Certification CE
Operating Temperature Range 0°C to 50°C
Storage temperature -15°C~ 60°C
Humidity 5% to 95% Relative Humidity
(Non-condensing)
INVERTER MODEL
Altitude <2000m
Dimension(D*W*H) 505*330*135mm
Net Weight 14.5Kg
SNA5000WPV/SNA4000WPV/SNA3000WPV
31 32

7. Trouble Shooting & Error List
Restart inverter, if the error still exist, contact us
The failures mainly divided into 5 categories, for each category, the behavior is different:
Check if PV input voltage is higher than 480V
UPS reserve current
Check if EPS and AC connection is in wrong terminal
Bus voltage high
Check PV input connection and if PV input voltage is
higher than 480V
EPS connection fault
Check PV connection
PV voltage high
The internal temperature of inverter is too high,
turn off the inverter for 10minutes, restart the inverter,
if the error still exist, contact us
PV short
Restart inverter, if the error still exist, contact us (Bus sample)
Temperature over range
Restart inverter, if the error still exist, contact us (DSP&M8)
Internal Fault
Check if you have choose the right battery brand and
communication cable is right, if the warning still exist,
contact us
Internal communication fault4
Check battery temperature sensor is right connected
and the battery temperature is not too high
Communication failure
with battery
Check battery temperature sensor is right connected
and the battery temperature is not too low
Battery temperature high
Inverter get battery fault info from battery BMS,
restart battery, if the warning still exist,
contact us or battery manufacture
Battery temperature low
Please contact Luxpower for firmware update
E000 Restart inverter, if the error still exist, contact us (DSP&M3)
Internal communication fault1
Restart inverter, if the error still exist, contact us (DSP&M3)
Battery failure
Multi master in parallel system
Bat On Mos Fail
Check CAN cable connection is connected to the right
COM port
Code Description
CT Fail
Check parallel setting for master/Slave part,
there should be one master in the system
CAN communication error
in Parallel System
Check parallel setting for master/Slave part,
there should be one master in the system
No master in parallel system
AC inconsistent in parallel system
Trouble shooting
W002
E002
E003
W004
W008
W009
W012
Restart inverter, if the error still exist, contact us (DSP&M3)
Internal communication fault3
Software mismatch
Phase Error in three phase
parallel system
Check if the AC connection is right for three phase system,
there should one at least one inverter in each phase
E008
E009
E010
E011
E012
W001
Off grid output short circuit
Check if AC Connection is same for all inverters in
parallel system
Check if the load is short circuit, try to turn off the load
and restart inverter
E013
E015
E019
E016
E017
E018
E020
E021
E024
E025
E026
E031
W000
Relay fault
Internal communication fault2
Restart inverter, if the error still exist, contact us
Restart inverter, if the error still exist, contact us (DSP&M8)
Restart inverter, if the error still exist, contact us (DSP&M3)
Fan Stuck
Bat On Mos
Over temperature
Check if the fan is OK
Restart inverter, if the error still exist, contact us
The temperature is a little bit high inside inverter
W013
W018
W025
W026
W027
AC Frequency out of range
Battery voltage high
Battery voltage low
Battery open
Check AC frequency is in range
Check if battery voltage is in normal range
Check if battery voltage is in normal range, need to
charge the battery if battery voltage is low
Check if there is output from the battery and battery
connection with inverter is OK
W028
W029
W031
EPS Over load
EPS voltage high
EPS DCV high
Check if EPS load is too high
Restart inverter, if the error still exist, contact us
Code Description Trouble shooting
33 34
This manual suits for next models
2
Table of contents
Other Lux Power Technology Inverter manuals

Lux Power Technology
Lux Power Technology SNA6000WPV User manual

Lux Power Technology
Lux Power Technology LXP 3K Hybrid User manual

Lux Power Technology
Lux Power Technology LXP8K SPEC User manual

Lux Power Technology
Lux Power Technology LXP 3600ACS User manual

Lux Power Technology
Lux Power Technology SNA5000WPV User manual

Lux Power Technology
Lux Power Technology 12K User manual

Lux Power Technology
Lux Power Technology LXP Series User manual