LUX MPPT 75 I 10 User manual

INSTALLATION
MANUAL
C A R A V A N & M A R I N E
S T E P B Y S T E P I N S T R U C T I O N S O N
I N S T A L L I N G Y O U R L U X S O L A R S Y S T E M
© L U X S O L A R L T D - N O T F O R D I S T R I B U T I O N
W W W . L U X S O L A R . C O . N Z | 6 - 8 D O M A I N R D , P A N M U R E , A U C K L A N D | + 6 4 0 2 7 4 5 8 9 6 7 4
© LUX SOLAR LTD
5% Discount Code:
giveme5
luxsolar.co.nz

BEFORE YOU
BEGIN...
Silicone Gun & Sikaflex 291 or similar for sealing mounts
Drill with drill bits (step drill & 3mm drill bit for pilot holes)
Screwdriver set for attaching controller connections
Adjustable wrench (medium) for tightening cable entry
gland
Spanner or socket suitable for the battery terminals (e.g. 10
mm or a 13 mm)
Side cutters or similar for chopping wire
Wire strippers for exposing wire (or craft knife)
Multimeter to measure voltage & resistance (ohms)
Recommended Tools:
© LUX SOLAR LTD

CABLE ENTRY
GLAND MOUNTING
Choose a location on the roof
Drill a hole for the cable in the roof.
Remove sharp edges so you don’t cut the cable.
Feed each solar cable through each gland and through the hole on your
roof
Silicone around the hole you have drilled to seal it
Silicone around the bottom of the entry gland and press the gland on to
the roof making sure it is sealed.
1.
2.
3.
4.
5.
6.
You will need to hold the gland down for some time. We recommend
placing a heavy object on the gland while the silicone sets.
Double Entry Gland
Single Entry Gland
© LUX SOLAR LTD
CUSTOMER INSTALLATION EXAMPLES

SOLAR PANEL
MOUNTING
We always recommend silicone and screwing for all mounts,
however some prefer to use just silicone. Please seek external
advice for a suitable silicone if you wish to do this.
Choose a location where you can safely mount and screw through
your roof.
Mark mounting locations on your roof, the mounting bracket and the
solar panel.
Remove solar panel and silicone and screw aluminum brackets to
panel in the previously marked locations
Aluminum brackets
Aluminium brackets are suitable for flat or slightly contoured roofs.
1.
2.
3.
© LUX SOLAR LTD
CUSTOMER INSTALLATION EXAMPLES

Find a suitable location on your roof and place all
brackets into position.
Mark the mounting location on the panel and the
brackets.
Silicon and screw the ABS brackets into the panel
Place the panel on the roof and silicone and screw the
brackets down. We recommend self drilling self
tapping TEK screws, available from Anzor Fasteners,
Bunnings etc
ABS Brackets
ABS mounts are only suitable for a flat roof.
1.
2.
3.
4.
SOLAR PANEL
MOUNTING
Example of ABS
Mounting brackets
© LUX SOLAR LTD

WIRING
© LUX SOLAR LTD
CUSTOMER INSTALLATION EXAMPLES

CONTROLLER &
CIRCUIT BREAKER
Place the circuit breaker box as close to the battery as possible
but not in the same enclosure as the battery.
Place the controller as close to the circuit breaker
box as possible and preferably directly above it.
© LUX SOLAR LTD
Circuit breakers are mounted with a din rail system like so. You
will need to break the cutouts on the sides of the cover to fit 2
breakers in.
To fit the wires in, drill holes in the tops of the cover and/or
break the cutout
CUSTOMER INSTALLATION EXAMPLES

WIRING THE
SYSTEM
Ensure circuit breaker is OFF [Green]
Wire controller to circuit breakers, two wires for the panel and
two for the battery
Connect your battery wires to the bottom of the battery circuit
breaker (the circuit breaker with the larger Amp rating / C value
- e.g. C20, C32, C50, C63).
Connect the solar panel wires to the solar panel circuit breaker
(the circuit breaker with the smaller Amp rating / C value - e.g.
C20, C32, C50, C63).
Always refer to the controller manual for correct
wiring as controllers vary.
ALWAYS start with the circuit breakers in the off position.
[GREEN means OFF, RED means ON].
If the manual doesn’t set the order of wiring:
1.
2.
3.
4.
© LUX SOLAR LTD

ADDING AN
INVERTER
Inverters are only necessary if you wish to run household (AC)
appliances. E.g. to run a laptop, household TV etc.
Inverter size is selected based on the MAXIMUM TOTAL load
you need to run at any time. For example, if you want to be
able to run a 1000 Watt blender at the same time as a 120
Watt TV, you would need at least an 1120 Watt Inverter.
Boats and caravans are generally equipped to run DC
appliances (e.g. boat/caravan fridges), which can be powered
off the solar system without any inverter.
Our kits with inverters will come with correctly sized
additional wires for the inverter - Contact us for a wiring
diagram including an inverter suitable for your selected kit.
© LUX SOLAR LTD
DOMETIC INVERTERS VICTRON INVERTERS

POWER UP THE
SYSTEM
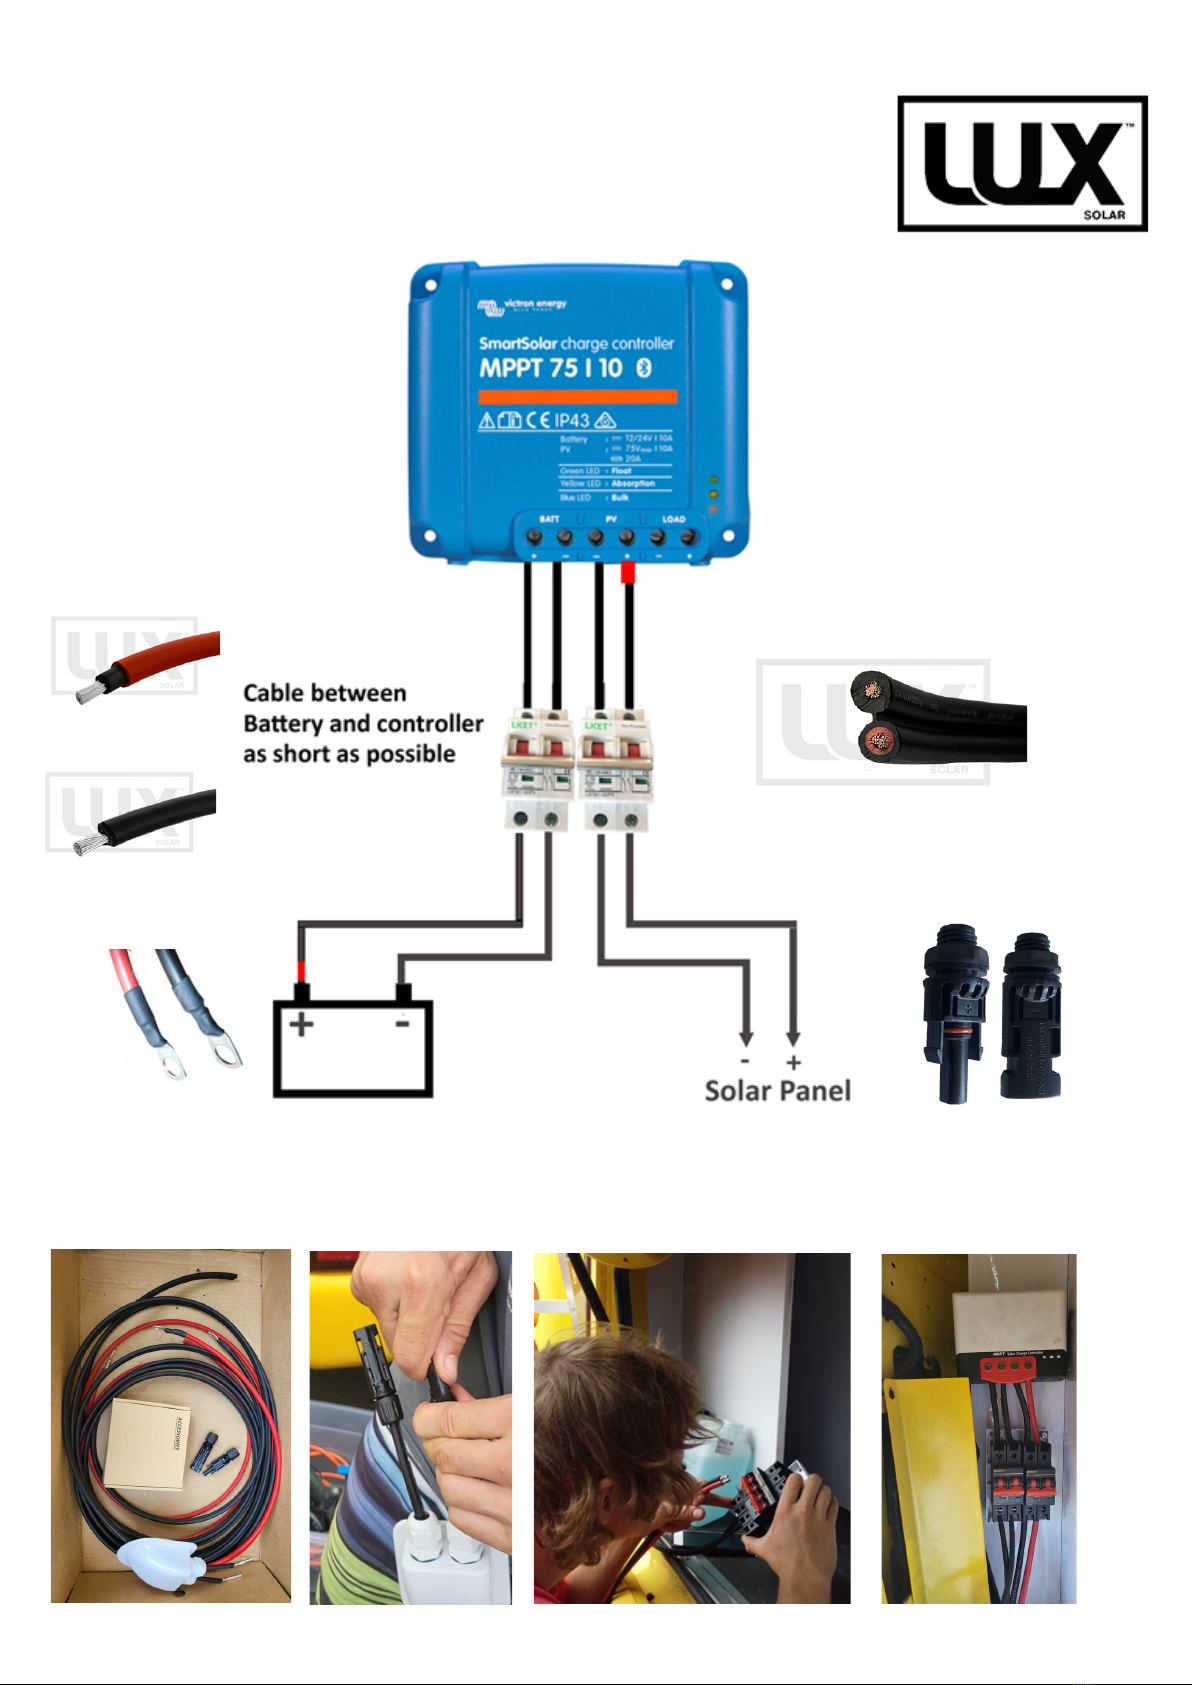
Your system is installed as per the diagram
All connections are tight
There are no short circuits
Turn on the battery circuit breaker
Turn on the PV circuit breaker.
Look at your battery type. If the controller can be
programmed read the manual and set the battery
type to charge the type of battery you have. For
example a GEL, lithium or flooded battery.
For MC series SRNE hold in the indented button
with a paperclip or similar for 8 seconds the LED
will flash. Select the correct battery type as written
on the side of the controller.
Verify
1.
2.
3.
Power Up
The power up sequence is determined by the
controller type. Please refer to the controller manual
for power on sequence.
For most controllers:
1.
2.
Configure the Controller
1.
2.
© LUX SOLAR LTD

Q U E S T I O N S O R F E E D B A C K T O
I N F O @ L U X S O L A R . C O . N Z
ENJOY!
© L U X S O L A R L T D - N O T F O R D I S T R I B U T I O N
W W W . L U X S O L A R . C O . N Z | 6 - 8 D O M A I N R D , P A N M U R E , A U C K L A N D | + 6 4 0 2 7 4 5 8 9 6 7 4
© LUX SOLAR LTD
5% Discount Code:
giveme5
luxsolar.co.nz
Table of contents
Popular Batteries Charger manuals by other brands

Digital Works
Digital Works ReZap Pro RBC889 Use & care guide

Fisher-Price
Fisher-Price POWER WHEELS P6828 Important safety instructions

Mastervolt
Mastervolt IVO Smart 12/35-3 user manual

Ikan
Ikan AC104 quick start guide

Philips
Philips MultiLife SCB5650NB Specifications

Overlander
Overlander RC6-Touch instruction manual