M2TECH Vaughan User manual

M2TECH
VAUGHAN
384KHZ/32BIT DIGITAL-TO-ANALOG CONVERTER
USER MANUAL
------- PRELIMINARY -------
REV. PrA – /2012

VAUGHAN
384kHz/32bit digital-TO-ANALOG CONVERTER
REVISION 1PrA – MAY 2012
Copyright © 2012, M2Tech Srl
2
M2Tech
www.m2tech.biz
Warning!
Changes or modifications not authorized by the manufacturer can invalidate the
compliance to CE regulations and cause the unit to be no more suitable to use. The
manufacturer refuses every responsibility regarding damages to people or things
due to the use of a unit which has been subject to unauthorized modifications or to
misuse or to malfunction of a unit which has been subject to unauthorized
modifications.
This unit is compliant with the following CE regulations when an USB ca le less than 3m is used: CEI EN
55022:2009 Class B (Radiated Emissions), CEI EN 55024:1999, CEI EN 55024:A2/2003, CEI EN
55024:IS1/2008 (Radio Frequency Electromagnetic Fields, 50Hz Magnetic Field Immunity Test and
Electrostatic Discharges – ESD).
For a proper operation of this unit, all connections to other equipment in the system must be done
when all equipment are off. Failing to comply to this advice may lead to damage to the unit.
Recycling
The la el a ove, printed on the product case, indicates that the product, when no more usa le, can’t e
treated as generic gar age, ut must e disposed of at a collection point for recycling of electrical and
electronic equipment, in compliance with the WEEE regulation (Waste of Electrical and Electronic
Equipment).
By making sure that this unit is correctly recycled, you will help preventing potential damages to environment
and human health, which could e caused y a wrong treatment of this product as generic gar age.
Materials recycling helps saving natural resources. For more in-depth information a out recycling this
product, please contact M2Tech Srl.
W RNING: the information contained in this manual are considered to be reliable and accurate.
M2Tech reserves the right to change or modify the information any time, without prior advice. It’s up
to the customer to ensure that the manual being consulted is the latest version.

VAUGHAN
384kHz/32bit digital-TO-ANALOG CONVERTER
REVISION 1PrA – MAY 2012
Copyright © 2012, M2Tech Srl
3
M2Tech
www.m2tech.biz
Dear customer,
thank you for purchasing VAUGHAN. What you have is a first-rate digital-to-analog converter
with many unique features conceived to o tain the est audio performance out of a music
file.
Even if getting music out of a PC or a Mac is nowadays quite simple, much harder is to
o tain the est sonic performance from it, due to intrinsic limits in USB 1.1 audio standard
and the implementation of digital audio interfaces in computers. Please visit M2Tech
we site (www.m2tech. iz) to find extensive literature a out this topic.
VAUGHAN overcomes all the limits of usual USB digital-to-analog converters y
implementing the latest generation hiFace technology, which uses proprietary drivers and
asynchronous data transfer, along with a sophisticated electronic design.
VAUGHAN features a comprehensive set of input connections which suit virtually all digital
sources around.
We feel that your expectations will e fulfilled y VAUGHAN: you’ll hear your CD’s, DVD’s
and music files in a way like never efore, prepare for a whole new experience!
Nadia Marino, CEO
Please annotate here your VAUGHAN serial num er for future reference:
S/N: ____________________________________
Date of purchase: _________________________

VAUGHAN
384kHz/32bit digital-TO-ANALOG CONVERTER
REVISION 1PrA – MAY 2012
Copyright © 2012, M2Tech Srl
4
M2Tech
www.m2tech.biz
INDEX
1. Unpacking and placing the unit........................................................................................5
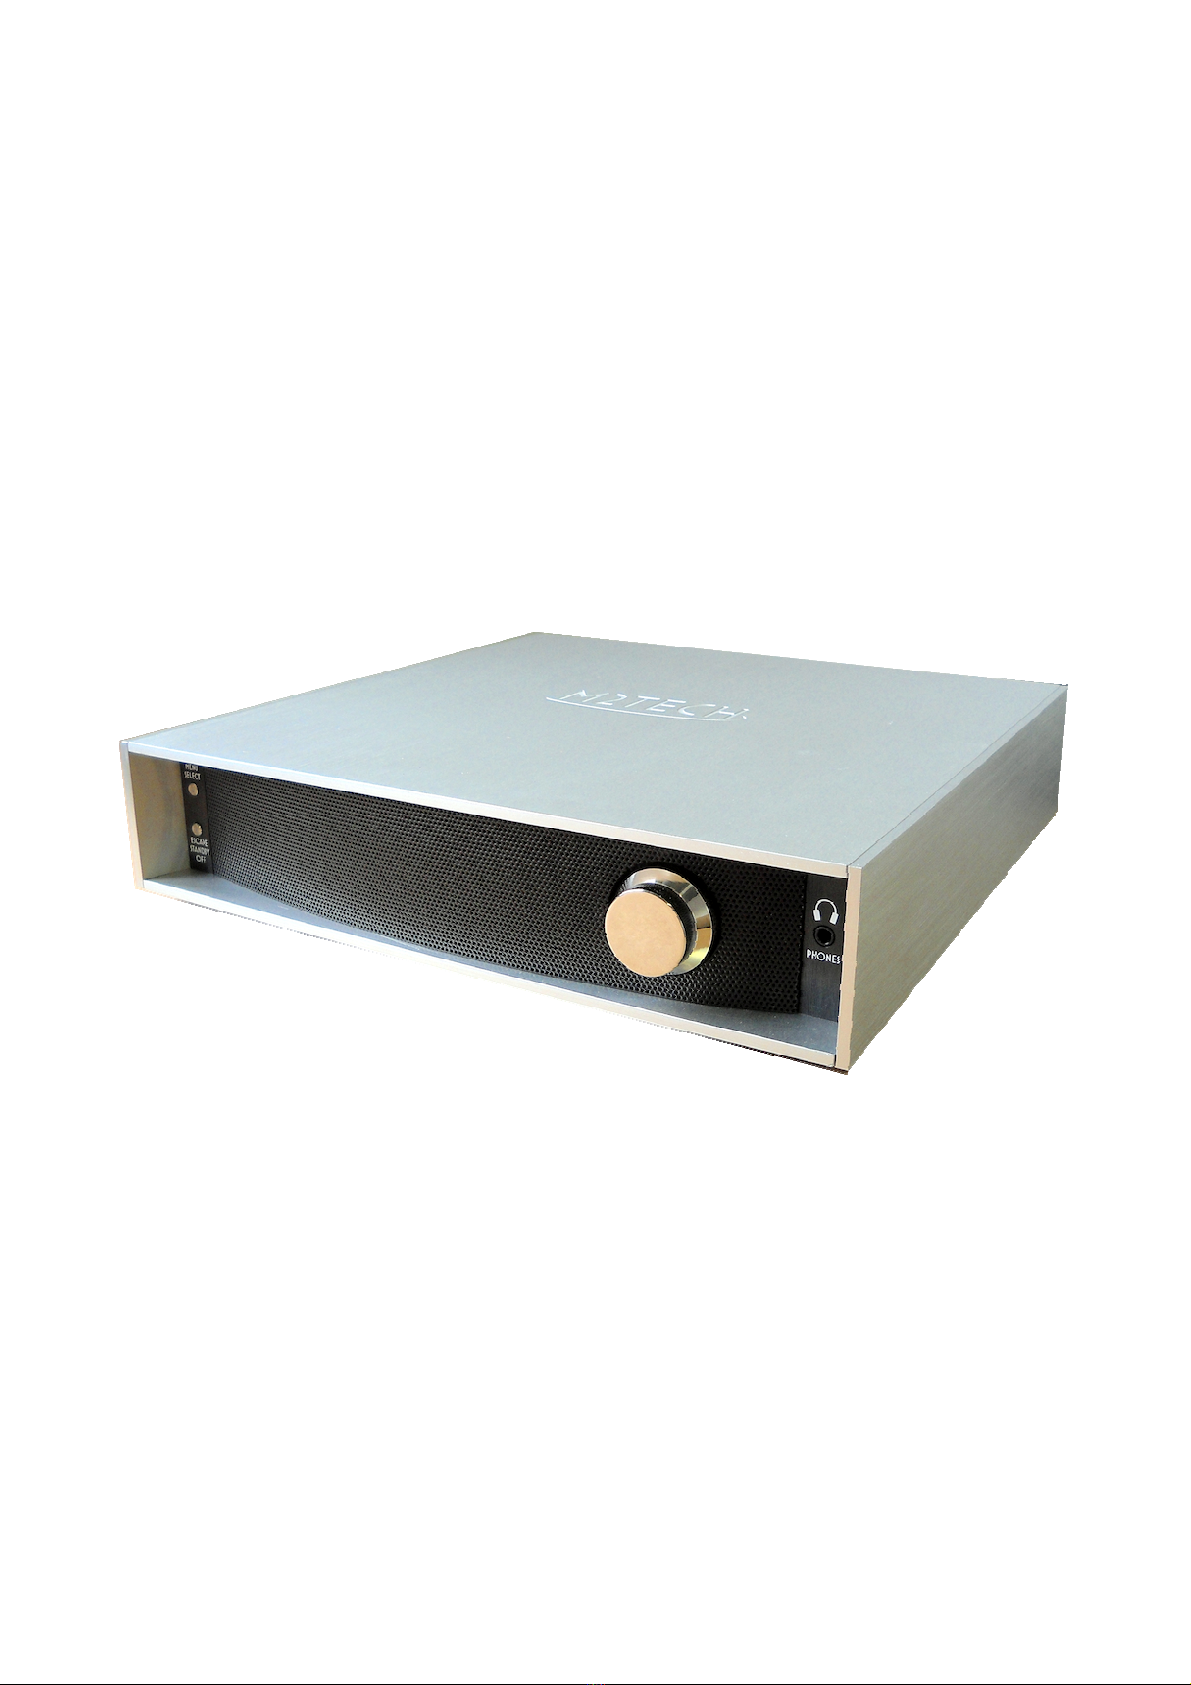
2. Front Panel ......................................................................................................................6
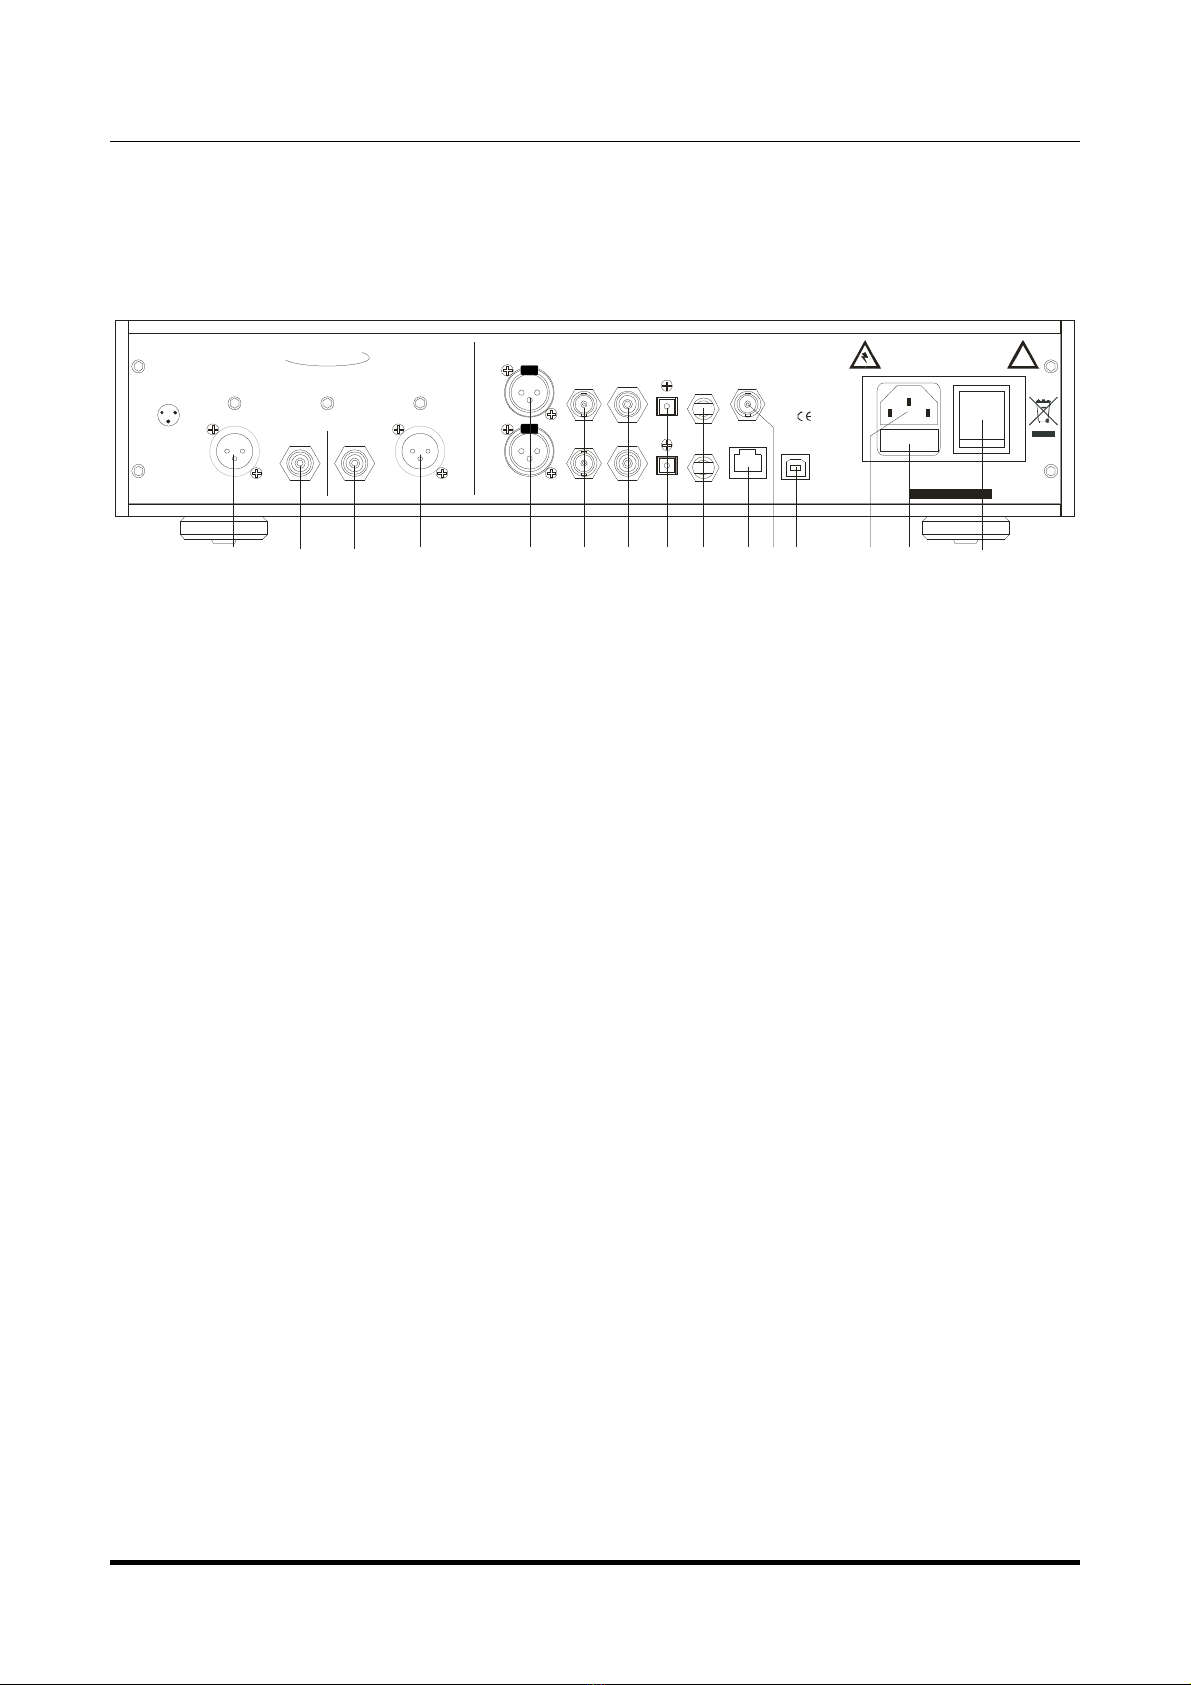
3. Back Panel.......................................................................................................................7
4. Remote Control................................................................................................................9
5. Connecting and powering the unit .................................................................................10
5.1. Stand y and power off ............................................................................................10
6. Driver installation ...........................................................................................................12
6.1. O taining the driver.................................................................................................12
6.2. Installing the driver on a Windows- ased PC..........................................................12
6.2.1. Automatic (guided) installation.........................................................................12
6.2.2. Manual installation ............................................................................................14
6.3. Installing the driver on a Mac ..................................................................................15
6.4. Unistalling the driver................................................................................................17
6.4.1. Uninstalling the driver on a Windows- ased PC after installation with
setup32.exe or setup64.exe .......................................................................................17
6.4.2. Manually uninstalling the driver on a Windows- ased PC ................................17
6.4.3. Uninstalling the driver on a Mac........................................................................18
7. Configuring the computer to use the VAUGHAN ..............................................................19
7.1. Configuring a PC with Windows XP ........................................................................19
7.1.1. Configuring for Direct Sound with Windows XP................................................19
7.1.2. Configuring for Kernel Streaming with Windows XP .........................................20
7.1.3. Using VAUGHAN in oth Kernel Streaming and Direct Sound mode. .................20
7.2. Configuring a PC with Windows Vista or Windows 7...............................................21
7.2.1. Configuring for Direct Sound with Windows Vista or Windows 7 ......................21
7.2.2. Configuring for Kernel Streaming with Windows Vista or Windows 7 ...............22
7.2.3. Configuring for WASAPI with Windows Vista or Windows 7.............................22
7.3. Configuring a Mac ...................................................................................................22
8. Configuring the player for Kernel Streaming: some examples.......................................23
8.1. FooBar ....................................................................................................................23
8.2. Winamp and MediaMonkey.....................................................................................23
9. Configuring the player for WASAPI: an example ...........................................................25
9.1. FooBar ....................................................................................................................25
10. Cleaning the unit..........................................................................................................26
11. Tips on using the USB input ........................................................................................26
12. Tips on using the I2S input ...........................................................................................26
13. External clock input......................................................................................................26
14. Stereo and dual mono modes......................................................................................27
15. Power supply, attery and attery charger ..................................................................27
16. Configuration ...............................................................................................................29
16.1. Navigating the menu y the front panel controls ...................................................29
16.2. Navigating the menu y the remote control...........................................................29
16.3. Configuration options and values ..........................................................................29
17. Tecnhical Specifications ..............................................................................................32

VAUGHAN
384kHz/32bit digital-TO-ANALOG CONVERTER
REVISION 1PrA – MAY 2012
Copyright © 2012, M2Tech Srl
5
M2Tech
www.m2tech.biz
1. Unpacking and placing the unit
Place the carton ox on a ta le and open it y removing or cutting the adhesive tape.
Extract the foam upper cover. You should find the following items:
• one VAUGHAN DAC;
• one mains cord;
• one A-B USB ca le;
• one remote control;
• this manual;
• one pair of gloves.
Should one or more items e missing, please contact your dealer or local distri utor.
Extract the VAUGHAN from the foam container and place it on a sta le ase, far from heat
sources. Avoid the direct sunlight on the unit. Allow for enough room around the unit for
venting. The VAUGHAN is a high efficiency design so little heat is produced during normal
operation; anyway, it’s etter allow for adequate venting. Avoid smoke, humidity, moisture
and water from reaching the unit.
Do not place the unit on thick carpets or inside a ox or piece of furniture, or in close
contact with curtains.

VAUGHAN
384kHz/32bit digital-TO-ANALOG CONVERTER
REVISION 1PrA – MAY 2012
Copyright © 2012, M2Tech Srl
6
M2Tech
www.m2tech.biz
2. Front Panel
Menu
select
ESCAPE
STANDBY
OFF
PHONES
1 2 3 4 5 6
Figure 1
1) Menu/select button. It is used to access the menu and to select a menu option.
2) Escape/standby/off button. It is used to a ort a choice in the menu, to put the unit in
stand y and to switch the unit off.
3) Left display. Displays the selected input or the menu item.
4) Right display. Displays sampling frequency or the value for the menu item.
5) Encoder. It is used to set the volume or to scan through menu items values.
6) Headphones output. Connect a headphone jack to this output. 6.35mm (1/4”) stereo
socket.

VAUGHAN
384kHz/32bit digital-TO-ANALOG CONVERTER
REVISION 1PrA – MAY 2012
Copyright © 2012, M2Tech Srl
7
M2Tech
www.m2tech.biz
3. Back Panel
WARNING!
ELECTRIC SHOCK HAZARD! DO NOT OPEN!
NO USER SERVICEABLE PARTS INSIDE
REFER ALL SERVICING TO QUALIFIED PERSONNEL
!
RATING: 100-240VAC - 0/60HZ
POWER CONSUMPTION: 7 VA
FUSE: 2. A Slow BLOW
M2TECH
VAUGHAN
384 H /32bit DAC
K Z
MADE IN ITALY
S/N:
OUTPUTS
RIGHT LEFT
INPUTS
A/L
B/R
AES/EBU
S/PDIF TOSLINK ST
EXT.
CLOCK
I S
2
USB 2.0
GND HOT (+)
COLD (-)
PUSH
PUSH
7 8 78 9 10 11 12 13 14 1516 17 18 19
Figure 2
7) Balanced analog outputs. Connect to a left-right pair of alanced inputs of the
amplifier or preamplifier. XLR male connectors.
8) Single-ended analog outputs. Connect to a left-right pair of single-ended inputs of the
amplifier or preamplifier. RCA female connector.
9) ES/EBU digital inputs. Accepts AES/EBU datastreams in either professional or
consumer format. Can e configured as two stereo inputs or one dual-mono input. XLR
female connector.
10) S/PDIF BNC digital inputs. Accept S/PDIF datastreams. Can e configured as two
stereo inputs or one dual-mono input. True 75 Ohms BNC female connectors
11) S/PDIF RC digital inputs. Accept S/PDIF datastreams. Can e configured as two
stereo inputs or one dual-mono input. RCA female connectors
12) ToslinkTM optical digital input. Optical input for ToslinkTM ca les. Can e configured
as two stereo inputs or one dual-mono input. ToslinkTM connector.
13) STTM optical digital input. Optical input for STTM ca les. Can e configured as two
stereo inputs or one dual-mono input. STTM connector.
14) I2S input. Accepts I2S audio signals. RJ45 8-pole female connector with M2Tech
proprietary pinout (see Section 12 on Page 26).
15) External clock input. Accepts oth master clocks and word clocks with automatic
detection (see Section 13 on Page 26). True 75 Ohm BNC female connector.
16) USB 2.0 input. Connect to a PC or MacIntosh with an USB 2.0 compliant A-B ca le.
USB 2.0 B female connector.

VAUGHAN
384kHz/32bit digital-TO-ANALOG CONVERTER
REVISION 1PrA – MAY 2012
Copyright © 2012, M2Tech Srl
8
M2Tech
www.m2tech.biz
17) IEC mains input. Connect the power cord provided with the unit or any other power
cord provided with IEC 3-prong female connector.
18) Fuse holder. Contains two 2A thermal 5x20mm fuses. One is in service while the
other is for spare.
19) Power Switch. It’s a temporary (monosta le) rocker switch. It automatically reverts to
the off position after the user release it. Operate it for a few seconds to switch the unit on.
(see Section 5 on Page 10).

VAUGHAN
384kHz/32bit digital-TO-ANALOG CONVERTER
REVISION 1PrA – MAY 2012
Copyright © 2012, M2Tech Srl
9
M2Tech
www.m2tech.biz
4. Remote Control
Stby/On. Activates the unit when it’s in
stand y and puts it in stand y when it’s on.
Dim. .Allows for choosing 6 different intensity
levels for the display, plus an “auto” mode in
which the display is always off, except for a
few seconds after a command is sent to the
unit.
Bat Lvl. Displays the attery status on the
display.
In+ and In-. Allow for sequentially choose the
input.
Mute. Toggles mute on and off. Mute is 20dB
attenuation over the set volume level.
Phase. Toggles output signal phase etween
0° and 180°. Useful to restore a solute
phase of certain recordings made with
inverted phase
Vol+ and Vol-. Allow for setting the volume,
except when the volume control is disa led.
rrows and Enter. Allow for navigating the
menu.
Esc. Exits the menu without changing the
displayed option.
Back. Recalls the active value of the
displayed option.
Note: the remote control is powered y two
AAA type atteries. To replace them,
unscrew the screw that holds the ottom
cover and open it y sliding it to the ack.
Please pay attention: when the ottom cover
is extracted, the front grill may fall down.
Figure 3

VAUGHAN
384kHz/32bit digital-TO-ANALOG CONVERTER
REVISION 1PrA – MAY 2012
Copyright © 2012, M2Tech Srl
10
M2Tech
www.m2tech.biz
5. Connecting and powering the unit
DVICE: all connections to other equipment in the system must be done when all
equipment are off. Failing to comply to this advice may expose the VAUGHAN to the
risk of damages.
Please refer to section 3, “Back Panel Description”.
Connect the “B” plug of a 2.0 USB A-B ca le to the USB connector (Figure 2, 16) of the
VAUGHAN.
Connect the “A” plug of the ca le to a 2.0 USB port of your computer.
Connect two interconnects to the alanced or single-ended analog outputs of the VAUGHAN
(Figure 2, 7/8) and to the input of your amplifier/preamplifier.
Connect digital ca les from your digital sources (CD player, DAT tape recorder,
DAB/DVB/sat tuner) to the VAUGHAN’s digital inputs (Figure 2, 9-14).
If needed, connect a clock generator to the external clock input (Figure 2, 15).
Connect the power cord to the supply connector (Figure 2, 17) of the VAUGHAN. Then,
connect the mains plug of the power cord to the wall outlet.
Now, operate the mains switch (Figure 2, 19) for a couple of seconds to activate the unit.
fter releasing it, it will revert to the off position: this is a normal and desired
behaviour. In fact, after the initial operation by the user, necessary to activate the
unit, The VAUGHAN will take control of the mains supply.
If the selected input is “USB” and a driver hasn’t een installed on your computer, an
automatic driver installation wizard may appear.
Note: If you want to avoid the automatic driver installation, please connect the
VAUGHAN to the computer after manually installing the driver (see Section 6.2.2).
5.1. Standby and power off
Once the VAUGHAN is active, it’s possi le to put it in stand y pressing the
“Escape/Stand y/off” utton on the front panel for two seconds or the “St y” utton on the
remote control. The unit enters a low consumption mode and eventually starts a attery
charge. The unit can e reactivated y pressing the “Escape/Stand y/off” utton again.
While entering the stand y, the unit stores its working configuration in its non-volatile
memory.
When a long idle period if planned, to avoid wasting attery charge cycles it’s wise to
completely switch the unit off. This is allowed y pressing the “Escape/Stand y/off” for at

VAUGHAN
384kHz/32bit digital-TO-ANALOG CONVERTER
REVISION 1PrA – MAY 2012
Copyright © 2012, M2Tech Srl
11
M2Tech
www.m2tech.biz
least four seconds. This way the attery is totally isolated. To switch the unit on again its is
necessary to operate the rear panel rocker switch (Figure 2, 19, Page 7).
For continuous or nearly continuous operation, it is recommended to set the power mode
in “Auto” (Section 16.3, page 31), to ensure the longest life possi le to the attery.

VAUGHAN
384kHz/32bit digital-TO-ANALOG CONVERTER
REVISION 1PrA – MAY 2012
Copyright © 2012, M2Tech Srl
12
M2Tech
www.m2tech.biz
6. Driver installation
6.1. Obtaining the driver
The drivers for the VAUGHAN are the same as the Young’s and are availa le on the M2Tech
we site, in the download page (www.m2tech. iz/download.asp). Download the driver you
need for your computer and operating system. Windows drivers are contained in zip files,
Mac drivers are contained in dmg files encapsulated in zip files.
6.2. Installing the driver on a Windows-based PC
Create a temporary folder in the hard disk of your computer (you can even create it on the
desktop). Then, dou le-click on the zip file to open it. Select and drag all files in the
temporary folder: this automatically unzips all files.
6.2.1. utomatic (guided) installation
Activate the VAUGHAN, select the USB input and connect it to the PC. Following the
negotiation process, the driver installation wizard is automatically launched. Select the
option “Not now”, as in Figure 4.
Figure 4

VAUGHAN
384kHz/32bit digital-TO-ANALOG CONVERTER
REVISION 1PrA – MAY 2012
Copyright © 2012, M2Tech Srl
13
M2Tech
www.m2tech.biz
Click on the utton to proceed. A window appears as shown in figure 5:
Figure 5
Choose automatic installation (as recommended) and proceed to next step. Indicate the
folder where you have previously unzipped the driver and proceed to installation. The
window shown in figure 6 will appear:
Figure 6

VAUGHAN
384kHz/32bit digital-TO-ANALOG CONVERTER
REVISION 1PrA – MAY 2012
Copyright © 2012, M2Tech Srl
14
M2Tech
www.m2tech.biz
Click on Continue. The installation will proceed to the end. The window shown in figure 7
will appear. Click on Finish to complete the driver installation.
Figure 7
Note: the wizard appearance and the guided installation procedure may slightly vary
from XP to Vista to Windows 7.
6.2.2. Manual installation
Sometimes it’s necessary or advisa le to install the driver manually. The installation
package offers two installation utilities, “setup32.exe” and “setup64.exe”. The former is for
32 its operating systems, while the latter is for 64 its operating systems. Without
connecting the VAUGHAN to the PC, dou le-click on either “setup64.exe” or “setup32.exe”,
depending on your operating system: the driver will e installed in your PC.

VAUGHAN
384kHz/32bit digital-TO-ANALOG CONVERTER
REVISION 1PrA – MAY 2012
Copyright © 2012, M2Tech Srl
15
M2Tech
www.m2tech.biz
6.3. Installing the driver on a Mac
Dou le-click on the zip file to open it. It contains a single dmg file. Extract it from the zip
and dou le-click on it to open it. It only contains a pkg file. Dou le click on it to start driver
installation. The window shown in figure 8 will appear.
Figure 8
Click on the Continue utton. The installation process will go on and the window in figure 9
will appear.
Figure 9

VAUGHAN
384kHz/32bit digital-TO-ANALOG CONVERTER
REVISION 1PrA – MAY 2012
Copyright © 2012, M2Tech Srl
16
M2Tech
www.m2tech.biz
Select “Install for all users”, then click on Continue utton. Another window will appear as
in figure 10 and you’ll e asked to type in the administrator password. After doing that, the
installation process will continue and you’ll e asked for a confirmation to continue the
process up to the computer restart. Click on Continue Installation utton.
The installation will continue until the final window will appear, announcing the successful
installation of the driver.
Figure 10
Click on Restart utton to complete the installation process as indicated in figure 11.
Figure 11

VAUGHAN
384kHz/32bit digital-TO-ANALOG CONVERTER
REVISION 1PrA – MAY 2012
Copyright © 2012, M2Tech Srl
17
M2Tech
www.m2tech.biz
6.4. Unistalling the driver
Sometimes it is necessary to uninstall the driver to roll ack to a previous version. Uninstall
is a quite simple procedure which depends on the operating system and the way the driver
was installed.
6.4.1. Uninstalling the driver on a Windows-based PC after installation with
setup32.exe or setup64.exe
Go to the control panel and launch the “Application Installation” utility.
Look for the VAUGHAN driver item in the list.
Dou le-click on it to launch uninstalling.
6.4.2. Manually uninstalling the driver on a Windows-based PC
Connect the VAUGHAN to the PC and select the USB input.
Go to the control panel and launch the “System” utility, then select Hardware ta . Open the
Peripehral Management window (see figure 12).
You’ll find Young listed under Audio, Video and Game controllers.
Figure 12

VAUGHAN
384kHz/32bit digital-TO-ANALOG CONVERTER
REVISION 1PrA – MAY 2012
Copyright © 2012, M2Tech Srl
18
M2Tech
www.m2tech.biz
Right-click to access the availa le actions.
Select “Uninstall”.
6.4.3. Uninstalling the driver on a Mac
Open a console, then type the following commands:
sudo mv /System/Library/Extensions/Young.kext /tmp
sudo touch /System/Library/Extensions
sudo pkgutil --forget com.m2tech.driver
Then, restart the Mac.

VAUGHAN
384kHz/32bit digital-TO-ANALOG CONVERTER
REVISION 1PrA – MAY 2012
Copyright © 2012, M2Tech Srl
19
M2Tech
www.m2tech.biz
7. Configuring the computer to use the VAUGHAN
VAUGHANVAUGHAN
VAUGHAN
7.1. Configuring a PC with Windows XP
A PC with Windows XP can use the VAUGHAN in two different ways: Direct Sound (DS) and
Kernel Streaming (KS). The former is suita le for players which can’t operate in Kernel
Streaming mode (such as Windows Media Player and iTunes) or for Internet streaming,
while the latter can e chosen (for etter performance) with players which can operate in
Kernel Streaming mode (such as FooBar, Winamp, Monkey Media, JRiver).
7.1.1. Configuring for Direct Sound with Windows XP
Connect the VAUGHAN to your PC and select the USB input. Then, go to the Control Panel
and launch the Sound and Audio Peripherals utility.
Select the Audio ta . In the Predefined Peripheral drop-down menu of the Play ack area,
select “KS M2Tech 384/32 DAC” (see figure 13).
Figure 13
Then, select the “Voice” Ta . Again, select “Young Kernel Streaming” in the drop-down
menu of the Play ack area. Click on OK utton. Please e adviced that even if the

VAUGHAN
384kHz/32bit digital-TO-ANALOG CONVERTER
REVISION 1PrA – MAY 2012
Copyright © 2012, M2Tech Srl
20
M2Tech
www.m2tech.biz
peripheral is listed as “kernel streaming”, it will operate in Direct Sound mode when listed
here.
From now on, unless the VAUGHAN is disconnected or settings are changed again,
VAUGHAN is the audio peripheral all audio programs will use when operating in direct sound
mode.
7.1.2. Configuring for Kernel Streaming with Windows XP
Kernel Streaming has no standard setting in Windows XP. KS must e selected in the
specific player you choose to use.
For example, when using FooBar, with VAUGHAN connected to the PC and USB input
selected, go to the File/Preferences/Play ack /Output ta and select “KS: M2Tech 384/32
DAC” as output device. Other players will require different settings (see section 8).
7.1.3. Using VAUGHAN
VAUGHANVAUGHAN
VAUGHAN in both Kernel Streaming and Direct Sound mode.
When VAUGHAN is selected as predefined audio peripheral, it’s possi le to use it in Kernel
Streaming mode, too, with a caveat. When using it in KS mode, it is necessary that no
other application accesses the VAUGHAN in DS mode. If this happens, Windows XP’s
Kernel Mixer takes control of VAUGHAN’s driver and from then on, no KS application can
access the VAUGHAN unless the PC is restarted or the VAUGHAN connection to the PC is
cycled or another input is selected on the VAUGHAN, then returning on the USB input.
Table of contents
Other M2TECH Media Converter manuals

M2TECH
M2TECH MANUNTA User manual

M2TECH
M2TECH JOPLIN MKIII User manual

M2TECH
M2TECH YOUNG User manual

M2TECH
M2TECH JOPLIN User manual

M2TECH
M2TECH JOPLIN MKII User manual

M2TECH
M2TECH YOUNG 384KHZ/32BIT User manual

M2TECH
M2TECH EVO DAC User manual

M2TECH
M2TECH HIFACE EVO TWO User manual

M2TECH
M2TECH HiFace DAC User manual

M2TECH
M2TECH JOPLIN User manual
Popular Media Converter manuals by other brands

MD
MD mXion maXiCap user manual

GoMax Electronics
GoMax Electronics CV-503MLR user manual

ICP DAS USA
ICP DAS USA I-7565 quick start guide

EMP-Centauri
EMP-Centauri MS13/13+6ECU-4 instruction manual

Pro-Ject Audio Systems
Pro-Ject Audio Systems DAC Box E Instructions for use

Danfoss
Danfoss VLT AQUA Drive FC 202 operating guide